1
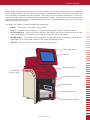
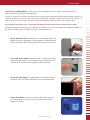
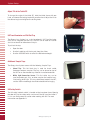
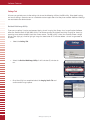
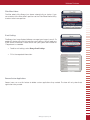
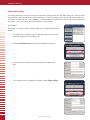
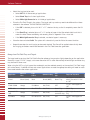
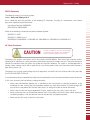
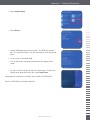
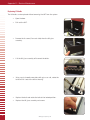
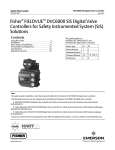
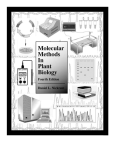
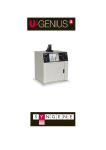
The OMEGA LUM™ Family Imaging Systems User Manual
by
Table of Contents
Section
Page
System Overview
3
Omega Lum System Specifications
4
Omega Lum G System Specifications
4
Omega Lum C System Specifications
4
Omega Lum W System Specifications
4
System Setup
5
Adjust Tilt of the Tablet PC
6
UV Transilluminator and Pull-Out Tray
6
Additional Sample Trays
6
UV Safety Switch
6
UV Override
7
Software
8
Introduction
8
8
Starting the Software
Page
Settings Tab 18
Residual Bulk Image Utility
18
Filter Wheel Home
19
E-mail Settings 19
Remove Custom Applications
19
20
Administrator Settings
User Profiles 20
Bias and Darkmaster Files
21
Flat Field Correction
21
Omega Lum Flat Field Trays
and Targets
22
Edit Emission Filters
23
Emission Filter Diagnostics
23
Omega Lum C & W Focus Calibration 23
Appendix A 25
Copyright and Trademark Information
25
Software License
8
Logging In
9
Omega Lum Image Capture Software
License Agreement 25
The Imaging Studio
9
Positioning Your Sample
9
Selecting Your Application
10
Capturing Your Image
10
Imaging with Default Applications
10
Manual Exposure Options
11
Exposure Options for Chemi
Applications
12
Exposure Settings for Multi-Channel
Fluorescent Westerns
13
Custom Applications
Creating Custom Applications
14
15
Software Features 17
Imaging Studio
Gallery
-2-
Section
17
17
Contact Information
26
Appendix B – Safety
27
CE/CSA Conformity
27
UV Safety Precautions
27
Electrical Safety Precautions
28
Hot Surface Warning
28
Waste Electrical and Electronic
Equipment (WEEE) 28
Appendix C – Tablet and Peripherals
29
Basic Tablet Operations
29
Mitsubishi Electric P-95D Printer
Drive Installation
29
Appendix D – Routine Maintenance
Adding or Replacing Filters
Replacing UV Bulbs
www.gelcompany.com
32
32
34
System Overview
Congratulations on purchasing your Omega Lum Imaging System, by Gel Company! The Omega Lum is a powerful
tool for gel documentation and chemiluminescent imaging. It generates publication quality 16 bit tiff images and
comes completely assembled for quick installation. The Omega Lum Image Capture Software has a clean user
interface for image capture and viewing. With the superior optical design, the Omega Lum captures high quality
images without the need for focus or aperture adjustment. Images generated by the Omega Lum are ideal for
downstream quantitative analysis.
The Omega Lum Systems include the following key components:
•Cabinet – The cabinet is a light tight imaging station.
•Camera – Integrated with the cabinet, it is a high resolution, cooled, scientific grade CCD camera.
•UV Transilluminator – The UV transilluminator offers both 302nm and 365nm transillumination. The UV
lights are controlled via the software, and switch off automatically with image capture.
•
Epi-LED lighting – The cabinet contains epi-white and blue LED panels for multiple imaging options.
The Omega Lum W also includes additional LED lighting for Multiplex analysis.
•Tablet PC – A touch screen PC for system control and image capture.
Tablet Power Switch
Tablet PC
UV Indicator Light
3 USB Ports
(1 Front, 2 Rear)
UV Safety/Override Switch
Epi-LED panel
UV Transilluminator
UV Wavelength Selector
www.gelcompany.com
-3-
Omega Lum System Specifications
Omega Lum G System Specifications
Camera resolution
6M pixels
Epi-illumination
White & Blue LED
Trans-Illumination
302 nm / 365 nm
Lens
18mm Fixed
Maximum Field of View
21.0 cm x 27.0 cm
Image output
16-bit Tiff, Jpeg
Power requirement
110V–240V
Dimensions (W x D x H)
33.0 cm x 48.0 cm x 74.0 cm
Weight
31.2 kg
Omega Lum C System Specifications
Camera resolution
8M pixels
Epi-illumination
White & Blue LED
Trans-Illumination
302 nm / 365 nm
Lens
25mm Motorized
Maximum Field of View
21.0 cm x 27.0 cm
Image output
16-bit Tiff, Jpeg
Power requirement
110V–240V
Dimensions (W x D x H)
33.0 cm x 48.0 cm x 74.0 cm
Weight
31.2 kg
Omega Lum W System Specifications
-4-
Camera resolution
8.4M pixels
Epi-illumination
Blue, Green, Red & White LED
Trans-Illumination
302 nm / 365 nm / 457 nm / 530 nm / 682 nm
Lens
25mm Motorized
Maximum Field of View
20.0 cm x 15.0 cm
Image output
16-bit Tiff, Jpeg
Power requirement
110V–240V
Dimensions (W x D x H)
32.0 cm x 46.0 cm x 61.0 cm
Weight
36.3 kg
www.gelcompany.com
System Setup
Warning! Excessive Weight Hazard – Please use two or more people to lift the system. Failure to do so may
result in personal injury and/or system damage.
As with all electrical instruments, the Omega Lum imaging system should be located away from water, solvents, or
corrosive materials. Place the unit on a flat, stable surface with adequate clearance, and at least 4 inches, on all
sides. Further, the system should be placed away from interfering electrical signals and magnetic fields.
Gel Company recommends using a surge protecting power strip to prevent electrical damage to the system.
Remove the system from the packaging and place on the work surface. The accessories are packaged separately in a
smaller box. Remove the accessories, packaging, and protective films.
•Plug in the Power Cords.The Omega Lum has two power cables; one
powers the system components, and one powers the onboard tablet.
Locate the power cables and plug them into the back of the system.
•Turn on the System Power.The power switch is located on the lower
right side of the cabinet. It will take the system approximately 2030 seconds to initialize once the power has been turned on.
•
Turn on the Tablet Power. The tablet power is located at the top of
the tablet. Press and hold the button to turn on the tablet power.
• L
aunch the Software. At the home screen, select the Omega Lum
tile. The software will launch and you are now ready to use the
Omega Lum system.
www.gelcompany.com
-5-
System Setup
Adjust Tilt of the Tablet PC
To change the angle of the tablet PC, hold the tablet frame with one
hand, and loosen the locking knob with you other hand. Adjust the tilt to
the desired angle and retighten the locking knob.
UV Transilluminator and Pull-Out Tray
The Omega Lum System has a dual wavelenght, UV Transilluminator
(UVT) on an integrated pull-out tray. The UVT can be used to visualize
and cut out bands for downstream analysis.
To pull out the tray:
•
Open the door.
•Use the handle to pull the tray out along the slides.
•Use the 302/365 switch to select the desired wavelenght.
Additional Sample Trays
The Omega Lum System comes with the following Sample Trays:
•
Chemi Tray. This flat black tray is used for chemi and/or
fluorescent western samples. The tray can be placed on top of
the UVT or on the elevated tray slides for increased resolution.
•
White Light Conversion Screen. This flat white tray can be
used for protein gels, film, or other samples that require transilluminating white light. This tray should be placed on the UVT,
and the 365nm wavelength should be selected while imaging.
UV Safety Switch
The UV safety interlock switch is located on the inner door frame. Opening
the door will trip the safety switch and turn off the UV transilluminator if
it is in use. Always exercise caution when working with UV. For more
information see Appendix A.
-6-
www.gelcompany.com
System Setup
UV Override
Remember to observe all standard UV safety precautions when overriding the
UV Safety Switch. These include, but are not limited to UV protective face
shield, gloves, lab coat, etc.
To visualize or excise bands you may override the UV safety switch with the
following steps:
•Open the door, pull out the UV tray, and position your sample.
• Select your desired UV wavelength.
• Pull out the UV switch.
• In the software, select the EtBr (UV-302nm) application.
•Select the Live button. The UV light will come on. When finished,
select Live again to turn off the UV light.
www.gelcompany.com
-7-
Software
Introduction
The Omega Lum Image Capture Software comes pre-installed on the system tablet. The capture software
controls the light sources and image capture. The separate UltraQuant analysis software is included for easy
image annotation and analysis on your laptop or PC. The Gel Company USB drive in the accessory package
contains a copy of the analysis software, three analysis software registration keys, copies of the user manuals
for both the image capture and analysis software, and the quick installation guide. Gel Company recommends
that the USB software drive be stored in a safe place for reference.
Starting the Software
Launch the Software. At the home screen, select the Omega Lum tile. The
software will launch and you are now ready to use the Omega Lum system.
The capture software will launch after the Omega Lum tile is selected from
the home window. If it does not launch, or if the software has been closed
to the desktop, it can be launched by double clicking on the desktop icon. It
can also be run from the program files folder.
Software License
The first time you run the software you will be asked to accept the terms and
conditions of the Omega Lum Image Capture Software License Agreement.
The complete software license is included in Appendix A. To accept the
terms and conditions select the Agree button.
To disable the software license popup, check the box at the bottom of the
window and then select Agree.
-8-
www.gelcompany.com
Software
Logging In
The software starts at the User Login Screen.
•Select a user, enter the password, and click the Login button.
•The default Admin password is: admin
•There is no default password for the Guest user. Leave the password
box blank and click Login.
•The default users are Admin and Guest. The Administrator can create
additional, individual logins. Please see Creating User Profiles on
page 20.
The Imaging Studio
Taking an image begins in the Imaging Studio Tab. The Imaging Studio is
your workspace for selecting and editing the image capture settings. The
Omega Lum has eliminated the need for focusing or aperture settings; simply
place your sample in appropriate gel tray, select the application, and click
acquire.
Basic imaging involves:
1. Positioning your sample
2. Selecting your application
3. Capturing your image
Positioning Your Sample
Place your gel either directly on the UV transilluminator or on one of the
optional sample trays available from Gel Company. Use the positioning
markers as a guide. The Omega Lum systems capture a large area so you
can place your sample on any part of the imaging surface. For ease of use,
Gel Company recommends that you place your sample centrally, towards the
front of the transilluminator.
In the Omega Lum C and W the chemi tray may be elevated. In the elevated
tray Gel Company recommends you place your sample in the center of the
tray.
www.gelcompany.com
-9-
Software
Selecting Your Application
The Omega Lum has a dual wavelength transilluminator, epi white lights, epi blue lights, as well as a white light
conversion screen, and chemi tray. Use the table below to select the correct combination for your application. If you
do not see your application listed, please check Creating Custom Applications, on page 15.
Sample Dye
Excitation
Conversion/Tray
Ethidium Bromide
UV Light
EtBr (UV-302nm)
®
SYBR Green
Epi Blue
SYBR® Safe
SYBR® Safe
Epi Blue
SYBR® Safe
Coomassie Blue
UV Light
White Light Conversion Screen*
Coomassie (UV-365nm)
Visible Light Gels
UV Light
White Light Conversion Screen*
Coomassie (UV-365nm)
Chemiluminescent Blots
None
Chemi Tray
Chemi / Chemi (Faint Bands)
High Resolution
Chemi Blots**
None
Chemi Tray Elevated
Chemi High Res
Fluorescent Westerns***
Epi Red/Green/Blue
Chemi Tray Elevated
Fluorescent Westerns
* The White Light Conversion Screen should be used with the 365nm UV wavelength.
** For Omega Lum C and W Only
*** For Omega Lum W Only
Capturing Your Image
Imaging with Default Applications
Once you have determined the correct application for your desired excitation
source, place your gel or blot on the appropriate tray and log into the software.
•Select your Application from the Application menu. Use the scroll
bar on the right to move through the entire list.
•Select Auto or Manual exposure.
-10-
www.gelcompany.com
Omega Lum Application
Software
•
Select Capture.
•
To stop capture for any reason, simply select the Capture button
again. It now reads Stop.
•
Your image will appear in the Gallery Tab. Here you can make visual
adjustments to the image and save or send the image to the desired
location.
Manual Exposure Options
Resolution and Binning – Binning is the combining of digital pixels when
taking an image. Binning pixels increases sensitivity, allowing fainter bands
to be captured. However, the trade off is lowered resolution. The Omega Lum
Image Capture software offers three sensitivity modes: Chemi Faint Bands,
Chemi, and Chemi Hi-Res. Chemi Faint Bands uses a high binning mode for
the greatest sensitivity. Chemi Hi-Res is un-binned for the highest resolution.
The total resolution of the image is displayed above the capture button.
Exposure Settings – The Omega Lum offers two exposure options on most gel
applications and four options on Chemi applications. For gel applications the
most common exposure option will be auto, and is the default setting. If you
select the manual option, the Manual Exposure options will appear.
• To make changes select Edit to open the Edit Exposure Settings
Window.
www.gelcompany.com
-11-
Software
• Highlight the box you wish to edit and type in the desired exposure
time.
• When done, select the enter arrow (far right), then select Capture.
Exposure Options for Chemi Applications
With Chemi applications there are two additional exposure options in addition
to the Auto and Manual Exposure. Each exposure options has its benefits.
-12-
• Auto – Ideal for bright light images such as gel images using visible
or fluorescent dyes. Auto expose can be used for chemi applications.
However, they are best used for very bright westerns whose substrate
is very stable and long acting (>12hrs).
• Manual – Ideal for know exposure times. For example, the exposure
is always going to be 2 minutes. Manual Exposure takes a single
image at the time input.
• Multiple – Multiple allows you to capture multiple images with
difference exposure time.
www.gelcompany.com
Software
• Example: you could take three frames, the first 10
seconds.
• The second 1 minute, and the third 3 minutes. Each
frame is an individual image.
• Cumulative – Cumulative allows stacking of multiple frames of
the same exposure time. This option is deals for samples with
an unknown exposure time and a substrate with a short halflife. Cumulative can capture multiple images before the signal
decays.
• Example: you capture three frames at 10 seconds. This
first image will have an exposure time of 10 seconds,
the second image will have an exposure time of 20
seconds, and the third image will have an exposure time
of 30 seconds.
• Please note that stacked images have a higher
background level because the background of these
image is also stacked.
www.gelcompany.com
-13-
Software
Exposure Settings for Multi-Channel Fluorescent Westerns
The Omega Lum W offers multi-channel fluorescent imaging for the Cye2,
Cye3, and Cye5 channels. This allows the detection of multiple proteins in
the same blot, as well as distinguishing between closely migrating bands,
without the need to strip and re-probe. To use this feature of the Omega Lum
W, select the Fluorescent Western Application.
The Fluorescent Western Application offers three channels, and each channel
has two exposure options: Auto and Manual. To select your exposure options,
first select the channel you wish to work with – Red, Green, or Blue. Then
select Auto or Manual exposure. If you select Manual exposure, select edit
to open the Edit Exposure Settings box to input your desired exposure time.
Repeat these steps for all three channels, then select Capture.
Custom Applications
The Omega Lum Image Capture Software has the option to create custom applications, allowing the user to tailor
the imaging parameters. While the parameters can always be modified prior to capturing your image, creating a
custom application saves these changes. To create a custom application:
• Select the default application you wish to modify.
•Select Custom from the Application menu.
Omega Lum G – You can customize your Light Source and Emission Filter.
Omega Lum C – You can customize your Light Source, Emission Filter, Tray
Type, and Aperture Type.
Omega Lum W – You can customize your Light Source, Emission Filter, Tray
Type, and Aperture Type.
General users can create and mange their own custom applications. Custom
applications created by the administrator will be available to all users, but
can only be modified by the administrator.
-14-
www.gelcompany.com
Software
Creating Custom Applications
Binning and Image Correction in Custom Applications
Example: on the Omega Lum C to create a custom UV gel application
using the Blue LED and Orange Filter.
•Select EtBr (UV-302).
•Select Custom.
•
Select Blue LED under Light Source, Orange Filter under
Emission Filter, Gel Tray under Tray Type, and Gel under
Aperture Type. Name the application and select Save.
The Custom Application option builds the application based on the original applications parameters, which have
defined sensitivity levels, darkmaster correction, and auto-exposure methods.
•
Gel Applications use standard sensitivity, simplified bias and darkmaster corrections, and normal
autoexposure methods.
•
Chemi Applications use enhanced sensitivity, full bias and darkmaster corrections, and normal autoexpose methods.
•
Chemi Faint Band Applications use high sensitivity, full bias and darkmaster corrections, and enhanced
autoexpose methods.
www.gelcompany.com
-15-
Software
•
The sensitivity mode is based on the original application, while bias file and darkmaster correction as
well as the auto-expose method are determined by the final application name. To use full bias file and
darkmaster correction ensure that “Chemi” is included in the application name. To ensure that enhanced
auto-expose is used, include “Faint Bands” in the application name. Please see the examples below for
illustration. They are demonstrated on the Omega Lum G.
Example 1: to create a custom application with standard
sensitivity and full bias file and darkmaster correction:
• Select a gel application such as: Coomassie.
• Select Custom.
• Adjust the lighting, exposure, and display options as
desired.
• Name the application “Chemi Example 1” and Save.
Example 2: to create a customer application with enhanced
sensitivity, and simplified bias file and darkmaster correction:
• Select Chemi.
• Select Custom.
• Adjust the lighting, exposure, and display options as
desired.
• Name the application “Example 2” and Save.
Example 3: to create a custom application with enhanced
sensitivity, simplified bias file and darkmaster correction, and
enhanced auto expose options:
• Select Chemi.
• Select Custom.
• Adjust the lighting, exposure, and display options as
desired.
• Name the application “Faint Bands Example 3” and
Save.
For the Omega Lum C you will need to also select the Tray Type and
Aperture Type.
-16-
www.gelcompany.com
Software Features
Imaging Studio
• Live Mode – A quick display of what is inside the cabinet, using the epi white lights for illumination.
This is not a preview of the image.
• Saturation – Oversaturated pixels appear in red.
• Invert – Inverts the black and white values of the image in the display.
• Auto Contrast – Calculates a balanced contrast ratio.
• Zoom in – Zooms in on the image.
• Zoom out – Zooms out on the image.
• Capture – Use this button to start the image capture process.
Gallery
The Gallery Tab in the Omega Lum Image Capture software allows modification of basic visual aspects such as
contrast and saturation. Previously captured images can also be opened and modified.
• •
Open – Open an image from a saved file location.
Print – Print the currently selected image.
• Save – Opens the Save or Save As dialogue boxes. The keyboard does not automatically pop up when
entering text into a text box. To open the keyboard look for the keyboard icon and touch it to select.
When saving you will need to open the keyboard prior to selecting Save.
• Save All – Allows the user to save multiple images at the same time.
• Crop – Opens the Crop Image tool. A box will appear with blue handles on the image. To crop, adjust
the handles to the desired size and select Crop Confirm. The cropped image will display in a new tab.
• Contrast – Use the slide bars to adjust the image contrast.
• E-mail – Use to send image files.
• Marker – Only available for use with chemi applications, creates a new image that overlays the marker
file and the chemi image.
• Image Info – Displayed Information: Image Width, Image Height, Bit Depth, Exposure Time (ms), Date
Taken, Taken By, Comment.
• Invert – Inverts the black and while values of the image in the display.
• Auto Contrast – Calculates a balanced contrast ratio.
• Zoom in – Zooms in on the image.
• Zoom out – Zooms out on the image.
www.gelcompany.com
-17-
Software Features
Settings Tab
All users are granted access to the settings tab to use the following utilities: the RBI utility, filter wheel homing,
and e-mail settings. General users can also delete custom applications that they have created. Additional Settings
are restricted to the Administrator.
Residual Bulk Image Utility
To ensure an optimal imaging environment during chemi imaging the Omega Lum Image Capture Software
offers the Residual Bulk Image (RBI) Utility. The feature ensures the highest sensitivity imaging for chemi by
removing trace residual photons from the camera sensor. The RBI utility is ideal for situations where a bright
UV gel, blue light gel, or white light gel image has been taken 0-10 minutes before a chemi image needs to
be taken.
• Select the Settings Tab.
•Select the Residual Bulk Image Utility. It will take two (2) minutes to
run.
-18-
•Once the utility has completed select the Imaging Studio Tab and
continue with image capture.
www.gelcompany.com
Software Features
Filter Wheel Home
The filter wheel of the Omega Lum homes automatically on startup. If you
are uncertain of the filter wheel’s position use the Filter Wheel Home Utility
to return to the home position.
E-mail Settings
The Omega Lum Image Capture Software can export your image via e-mail. To
enable this feature you must first enter the e-mail settings. You will need your
STMP service information. Please consult with your system administrator of
IT department as neededd.
• To edit e-mail settings select Change E-mail Settings.
• Fill in the requested information.
Remove Custom Applications
General users can use this feature to delete custom applications they created. The view will only show those
applications they created.
www.gelcompany.com
-19-
Software Features
Administrator Settings
The Administrator can create and manage user accounts, generate new bias and darkmaster files, create flat field
correction files, edit emission filters and run diagnostics, as well as change e-mail settings and calibrate the focus.
The default password for this user is admin. It is recommended that the administrator change the password once
the system is set up and keep the new password in a safe location.
User Profiles
he Omega Lum Image Capture Software allows you to create individual user
T
profiles.
•To create a new user profile, login as the Administrator, you will be
redirected to Administrator Settings tab.
•Select Create New Account and enter the requested information.
•If no password is entered, then no password will be required to
login.
•To change the admin password and settings, select Change Settings.
-20-
www.gelcompany.com
Software Features
Bias and Darkmaster Files
Bias and darkmaster files provide for automatic background correction during long exposures. They are unique for
each camera. Bias and darkmaster files have already been created for your system for 1, 3, and 9 minute exposure
times. If you anticipate taking longer exposures, we recommend you create a new set of darkmaster files.
•To create darkmaster files, login as Administrator, and navigate to
the Settings tab.
•Select Generate Darkmasters.
•Enter the desired exposure times in the popup window. The
exposure times would be comma separated with no spaces. You
must enter all the times you want such as 1,3,9,20.
•Click Generate. The total time remaining for the completion of the
darkmasters will show on the screen.
•The new set of bias and darkmaster files will overwrite any
previously generated files.
Flat Field Correction
Flat Field Corrections are digital image adjustments that correct for artifacts in the optical path and pixel variations
to improve image uniformity. Flat field files are created at the time of manufacture and applied automatically. If
these files need to be recreated the Flat Field Correction Utility will quickly create the necessary files. Events that
would require a new flat field correction include replacement of the UV bulbs, corruption of the original files, or
replacement of the camera and lens.
Flat Field Corrections are created for each imaging environment. Alterations in the emission filter, light source,
aperture setting, and working distance (ie height of tray used), all affect the final outcome. A flat field file must be
created for each imaging environment. To create a Flat Field Correction file:
•Select Build Flat Field from the Settings Tab.
• Select the desired emission filter position.
•Select the Light Source. Note, if using Transilluminating White
Light, the light source will be UV, as the white light conversion
screen converts the UV illumination source. The White Light
Conversion screen should only be used with 365nm UV. When
building UV flats, make sure to note the UV wavelength.
•Select the Aperture Type. For gel applications select Gel (F2.8), for
chemi applications select Chemi (F0.95).
www.gelcompany.com
-21-
Software Features
• Select the tray type to be used:
•
Select UVT for all flourescent gel applications
•
Select Chemi Tray for all chemi applications
•
Select White Light Conversion for all visible gel applications
•Place the Flat Field Target in the system. The target and tray used may need to be different than those
selected in the software. PLEASE CHECK CAREFULLY.
•
If the UVT is selected, place a full 8 ½” x 11” sheet on the tray so that it completely covers the UV
glass.
•
If the Chemi Tray is selected place a 3” x 3” section of paper in the filter wheel shield such that it
covers the hole. Please see Adding and removing filters in Appendix D for a visual aid.
•
If the White Light Conversion Tray is selected, no sheet of paper is necessary.
• Close the door and select Build. The system will automatically save the file to the correct location.
•Repeat these steps for each imaging environment desired. The files will be applied automatically when
the imaging parameters meet those selected in the Flat Field Correction generation.
Omega Lum Flat Field Trays and Targets
The target used to construct the Flat Field Calibration reference image varies slightly depending on the application.
Generally a large (11”x14”) target, cut to cover the entire UVT is used. Alternatively the white light conversion tray
may be used in some cases.
When using the UVT as a light source the wavelength must be selected correctly or the resultant Flat Field image
will not be correct. If additional filters and custom applications are used the appropriate setting will need to match
those used to define the custom application.
-22-
Application
Emission
Filter
Light
Source
Aperture Setting
Tray
Type
Target and Tray Used
Chemi
Chemi (none)
None
Chemi (0.95)
Chemi Tray
White paper inside filter
wheel cover with 11”x14”
on UVT
EthBr UV302
Orange
UV 302nm
Gel (F2.8)
UVT
11”x17” white paper on
UVT
SYBR Safe
Orange
Blue EPI LED
Gel (F2.8)
Chemi Tray
Chemi Tray
Coomassie UV
365
Orange
UV 365nm
Gel (F2.8)
White Light
conversion tray
White Light Conversion
Tray
Epi White
Orange
EPI White LED
Gel (F2.8)
UVT
11”x17” white paper on
UVT
www.gelcompany.com
Software Features
Edit Emission Filters
•Use this feature to name emission filters that are added later.
•Enter the name of the filter on the desired line.
•For information on adding and removing filters please see
Appendix D.
Emission Filter Diagnostics
The Emission Filter Diagnostics are performed if there is a suspected filter
wheel malfunction. It tests the filter sensor and timing.
•To run the diagnostic utility select Emission Filter Diagnostics.
•Select Start.
•When it is complete you will get a pass or fail notification.
If you receive a fail notification, contact Gel Company at
[email protected].
www.gelcompany.com
-23-
Software Features
Omega Lum C & W Focus Calibration
Not applicable to the Omega Lum G.
The Omega Lum C motoried lens focuses automatically and the calibration is
set at the time of manufacture. Over time and through use it is possible for
the calibration of this focus to change. In the event that the images no longer
appear to be in focus the Focus Calibration Utility can be run. The process
is automatic and can take up to twenty minutes to complete. Failure of the
utility to complete the calibration, or if images continue to appear out of
focus after the calibration may be an indication of a problem with the lens or
camera, please contact Gel Company at [email protected].
•To run the utility, select the Settings Tab.
•Select Calibrate.
•Select the Emission Filter, Tray Type, and Aperture Type of the
application you are trying to focus.
•Select Calibrate.
Focus is affected by the choice of emission filter, aperture setting and tray position. There are many possible
combinations of these three settings (~48) so a calibration method for all of these combinations is provided in the
SETTINGS tab.
After a calibration is complete, capture an image to confirm accurate focus. If the image is not in focus, switch to
a target with greater contrast. A business card is a good target for focusing. If the calibration fails again it may be
necessary to manually focus the lens. In this case please contact Gel Company at [email protected].
Commonly used configurations are calibrated at the factory and include the following:
-24-
Filter
Tray Type
Aperture
Typical Application
1. Orange
UVT
Gel (2.8)
EtBr (UV-302nm)
2. Orange
Chemi
Gel (2.8)
SYBR Safe
3. Orange
White
Gel (2.8)
Coomassie (UV-365nm)
4. Chemi
Chemi
Chemi (0.95)
Wide Angle Chemi
5. Chemi
Elevated
Chemi (0.95)
Chemi Hi-Res
www.gelcompany.com
Appendix A
Copyright and Trademark Information
All goods and services are sold subject to the terms and conditions of sale of the company within Gel Company which
supplies them. Gel Company reserves the right, subject to any regulatory and contractual approval, if required,
to make changes in specifications and features shown herein, or discontinue the product described at any time
without notice or obligation. Contact a Gel Company representative for the most current information. Omega Lum™,
UltraQuant™, and the Aplegen workmark are a trademark of Gel Company. All other trade names are the property
of their respective owners.
Gel Company
665 3rd St., Suite 240
San Fancisco, CA 94107
USA
Omega Lum Image Capture Software License Agreement
The terms “Gel Company”, “us”, “we” and “our” refers to Gel Company, a California corporation. Our contact details
are listed on our website at www.aplegen.com/contact.php or www.gelcompany.com. The term “you” refers to the
purchaser or user of the Omega Lum Image Capture software (“Software”).
As provided by the terms and conditions of sale incorporated into the quote and other sales documentation, you agree
to be bound by the terms of this software license agreement (“Agreement”). You acknowledge that all Software is
merely licensed to you and that title to the Software (or any copies thereof) is not transferred to you. As used in the
terms and conditions, quote, sales documentation, and this Agreement, the term “sale” or “sold” in connection
with the Software means sale of a license to use the Software.
1. License Grant. Subject to the terms and conditions of this Agreement, Gel Company grants you a non-exclusive,
nontransferable license, without the right to sublicense, to run the Software on the Omega Lum instrument onto
which it was pre-loaded at time of purchase. We reserve all other rights.
2. Restrictions. You acknowledge the Software constitutes valuable intellectual property protected by copyright, trade
secret and/or other laws. Except as expressly permitted in Section 1 above, you will not
a. Copy, perform, display, use, reproduce, modify, translate, enhance, decompile, disassemble, reverse engineer, or
create derivative works of the Software;
b. Rent, lease, or sublicense the Software;
c. Use the Software on a service bureau or application service provider basis;
d. Provide, divulge, disclose, or make available to, or permit the use of the Software by any third party;
e. Alter or remove any copyright notice or other proprietary rights notices that may appear on any part of the
Software;
f. Export the Software without first obtaining any licenses that may be required under any applicable export laws.
3. Warranty. We warrant to you that the Software will perform substantially as advertised under normal use for a period of
one year from purchase. We do not warrant that the Software will be error free or will run without interruption THE
FOREGOING WARRANTY IS EXCLUSIVE AND IN LIEU OF ALL OTHER WARRANTIES WHETHER EXPRESS,
IMPLIED, OR STATUTORY REGARDING OR RELATED TO THE SOFTWARE OR ANY MATERIALS OR SERVICES
PROVIDED TO YOU UNDER THIS AGREEMENT. WE SPECIFICALLY DISCLAIM ALL IMPLIED WARRANTIES
OF MERCHANTABILITY, NONINFRINGEMENT AND FITNESS FOR A PARTICULAR PURPOSE.
www.gelcompany.com
-25-
Appendix A
4. Limitation of Liability. IN NO EVENT WILL WE BE RESPONSIBLE OR LIABLE TO YOU OR ANY THIRD PARTY FOR
ANY LOST PROFITS, OR INCIDENTAL, CONSEQUENTIAL, INDIRECT, SPECIAL OR CONTINGENT DAMAGES
ARISING FROM OR RELATING TO THE SOFTWARE OR THIS AGREEMENT, EVEN IF WE HAVE BEEN ADVISED
OF THE POSSIBILITY OF SUCH DAMAGES. OUR TOTAL CUMULATIVE LIABILITY IN CONNECTION WITH
THIS SOFTWARE LICENSE, INCLUDING FOR ANY LIABILITY ON ACCOUNT OF A CLAIMED DEFECT IN ANY
SOFTWARE PRODUCT, WHETHER IN CONTRACT OR TORT OR OTHERWISE, SHALL IN NO EVENT EXCEED
THE PURCHASE PRICE OF THE SOFTWARE PRODUCT. ALL SALES ARE FINAL, NO RETURNS WILL BE
ACCEPTED OTHER THAN AS PROVIDED IN THESE WARRANTY PROVISIONS.
5. Interpretation. This Agreement shall be governed by and construed in accordance with the laws of the State of
California, U.S.A., without reference to its conflicts of law provisions. Any dispute shall be subject to the
exclusive jurisdiction of the state and federal courts located in Alameda County, California, U.S.A., and you
hereby irrevocably agree to submit to the personal and exclusive jurisdiction and venue of such courts. The
various section headings used herein are inserted for convenience of reference only and shall not affect the
meaning or interpretation of these Terms and Conditions or any section thereof. If any term, provision, covenant
or condition of these Terms and Conditions is held by a court or arbitral panel of competent jurisdiction to be
invalid, void or unenforceable, the remainder of the provisions hereof shall remain in full force and effect and
shall in no way be affected, impaired or invalidated.
6. The Software incorporates software called AvalonDock, copyright © Xceed Software Inc., pursuant to the terms of the New
BSD License. Additional terms, conditions, restrictions and warranty limitations regarding use of AvalonDock
software may be found at http://avalondock.codeplex.com/.
AVALONDOCK SOFTWARE IS PROVIDED BY THE COPYRIGHT HOLDERS AND CONTRIBUTORS “AS IS” AND ANY
EXPRESS OR IMPLIED WARRANTIES, INCLUDING, BUT NOT LIMITED TO, THE IMPLIED WARRANTIES OF
MERCHANTABILITY AND FITNESS FOR A PARTICULAR PURPOSE ARE DISCLAIMED. IN NO EVENT SHALL THE
COPYRIGHT HOLDER OR CONTRIBUTORS BE LIABLE FOR ANY DIRECT, INDIRECT, INCIDENTAL, SPECIAL,
EXEMPLARY, OR CONSEQUENTIAL DAMAGES (INCLUDING, BUT NOT LIMITED TO, PROCUREMENT OF
SUBSTITUTE GOODS OR SERVICES; LOSS OF USE, DATA, OR PROFITS; OR BUSINESS INTERRUPTION)
HOWEVER CAUSED AND ON ANY THEORY OF LIABILITY, WHETHER IN CONTRACT, STRICT LIABILITY,
OR TORT (INCLUDING NEGLIGENCE OR OTHERWISE) ARISING IN ANY WAY OUT OF THE USE OF THIS
SOFTWARE, EVEN IF ADVISED OF THE POSSIBILITY OF SUCH DAMAGE.
7. The Software uses the FreeImage open source image library. See http://freeimage.sourceforge.net for details. FreeImage
is used under the FreeImage Public License (“FIPL”) Version 1.0. You may obtain a copy of the FIPL at http://
freeimage.sourceforge.net/freeimage-license.txt. Software distributed under the FIPL is distributed on an “AS
IS” basis, WITHOUT WARRANTY OF ANY KIND, either express or implied. See the FIPL for the specific
language governing rights and limitations under the FIPL.
Aplegen, Inc. Omega Lum Image Capture Software License
Version 1.0
May 7th 2013
Contact Information
Gel Company
655 3rd St., Suite 240
San Francisco, CA 94107
USA
-26-
Phone: (415) 247-8760
Fax: (415) 247-8765
Email: [email protected]
www.gelcompany.com
Tech Support: (415) 247-8760
Tech Support Fax: (415) 247-8765
Email: [email protected]
Appendix B – Safety
CE/CSA Conformity
The following Omega Lum Imaging System,
Models: Omega Lum G/Omega Lum C
Are in conformity with the provisions of the following EC Directives, including all amendments, and national
legislation implementing these directive:
Low Voltage Directive 2006/95/EC
EMC Directive 2004/108/EC
And that the following harmonized standards have been applied:
EN61010-1: 2001
EN61326-1: 2006: Class A
EN61000-4-2,EN61000-4-3, EN61000-4-4, EN61000-4-5, EN61000-4-6, EN61000-4-11
UV Safety Precautions
CAUTION
Because U.V. radiation can cause serious damage
to unprotected eyes and skin, we recommend to
wear U.V. protection glasses or face shield.
The Omega Lum systems come with a built-in Ultra-Violet (UV 200-400nm) Trans-illuminator inside the system.
Exposure to UV radiation can cause permanent and/or serious damage to the eyes and skin. The system enclosure
confines the radiation within the system and shields the user from exposure. The system is also equipped with a
two-way safety interlock switch which automatically cuts off the power to the trans-illuminator when the door is
open during normal use.
The Omega Lum imaging system belong to Class A equipment, and fulfills the limit values of table 3 but not table
4 of EN 61326:1997+A1+A2+A3.
It may become necessary to override the safety switch or operate the transilluminator outside the system for service.
In this case, be sure to use the following safety precautions:
•Always wear UV-protected eyewear that is specified by the manufacturer as providing protection at the
wavelength(s) used, making sure that the eyewear protects any areas wear radiation may come through (UV
sunglasses may not prevent UV radiation from coming in through the sides or around the lenses).
• Always cover all skin that may be exposed to UV light, especially the face, neck, hands, and arms.
•Always make sure that any UV protection devices (such as the safety switch on the light cabinet apparatus)
are working properly. If not, discontinue use until the device(s) are properly repaired.
• Please use only UV lamps in the trans-illuminator.
www.gelcompany.com
-27-
Appendix B – Safety
Electrical Safety Precautions
Be sure to take proper precautions when handling any electrical equipment. NEVER work on any live circuit, fixture,
receptacle, or switch. Safety rules you should follow whenever working with any electrical appliance include:
• Always shut off power at the main disconnect before changing a fuse.
• Always shut off power to the circuit before repairing or replacing a switch, receptacle, or fixture.
• Always tape over the main switch, empty fuse socket, or circuit breaker you are working on.
•Always check that the circuit is dead before beginning work on it. Using a circuit tester or voltmeter can help
you determine this.
• Always unplug any appliance before repairing it.
The earth terminal, intended for connection to an external protective conductor for protection against electric shock
in case of a fault, is located on the inside of the back panel.
Hot Surface Warning
nder normal conditions, the temperature of glass surface of UV transilluminator is below 50 °C and safe
U
to touch. However, if the system malfunctions, it is possible for the glass surface temperature to exceed
80°C. Please exercise caution when working around the glass surface in this instance.
Waste Electrical and Electronic Equipment (WEEE)
ENG
This symbol indicates that the waste of electrical and electronic equipment must not be disposed as unsorted
municipal waste and must be collected separately. Please contact an authorized representative of the
manufacturer for information concerning the decommissioning of your equipment.
FRA
GER
ITA
SPA
SWE
Ce symbole indique que les déchets relatifs à l’équipement électrique et électronique ne doivent pas être jetés
comme les ordures ménagères non-triées et doivent être collectés séparément . Contactez un représentant agréé
du fabricant pour obtenir des informations sur la mise au rebut de votre équipement.
Dieses Symbol kennzeichnet elektrische und elektronische Geräte, die nicht mit dem gewöhnlichen, unsortierten
Hausmüll entsorgt werden dürfen, sondern separat behandelt werden müssen. Bitte nehmen Sie Kontakt mit
einem autorisierten Beauftragten des Herstellers auf, um Informationen hinsichtlich der Entsorgung Ihres
Gerätes zu erhalten.
Questo simbolo indica che i rifiuti derivanti da apparecchiature elettriche ed elettroniche non devono essere
smaltiti come rifiuti municipali indifferenziati e devono invece essere raccolti separatamente. Per informazioni
relative alle modalità di smantellamento delle apparecchiature fuori uso, contattare un rappresentante
autorizzato del fabbricante.
Este símbolo indica que el equipo eléctrico y electrónico no debe tirarse con los desechos domésticos y debe
tratarse por separado. Contacte con el representante local del fabricante para obtener más información sobre
la forma de desechar el equipo.
Denna symbol anger att elektriska och elektroniska utrustningar inte får avyttras som osorterat hushållsavfall
och måste samlas in separat . Var god kontakta en auktoriserad tillverkarrepresentant för information angående
avyttring av utrustningen.
-28-
www.gelcompany.com
Appendix C – Tablet and Peripherals
Basic Tablet Operations
The Omega Lum uses a touch screen tablet PC to run the imaging station. For in depth directions please refer to
the Dell Tablet User Manual. However, here are some basic navigation tips to help you get started.
• Use your finger as you would a mouse.
• One touch or tap to select.
• To Scroll tap once, then drag the scroll bar as desired.
• Double tap an icon to launch an application.
• To “right click” touch and hold your finger to the screen. A square will appear. When it completes, lift
your finger and the options menu will appear.
• To exit the menu, tap anywhere on the desktop.
• The keyboard does not automatically pop up when entering text into a text box. To open the keyboard
look for the keyboard icon and touch it to select. When saving you will need to open the keyboard prior to
selecting Save.
• The windows button on the center bottom of the tablet can be used to open the Windows Main Menu.
Mitsubishi Electric P-95D Printer Driver Installation
For a quick and easy installation, Gel Company has pre-installed the
Mitsubishi Electric P-95D Thermal Printer Driver. To use, simply plug the
USB printer cable into the USB port indicated by the red dot on the side rear
of the system. To re-install the driver, or to install a different driver that is
not Windows 8 compliant, please follow the directions below.
Windows 8 Driver Signature Enforcement is a new feature of Windows 8 that
has certain signature requirements not yet implemented in the Mitsubishi
Electric P-95D Printer. In order to install the printer driver you must
disable the Driver Signature Enforcement on startup, install the driver, and
then reboot the system. The Driver Signature Enforcement will reset upon
rebooting, but once the driver has been installed it will remain. You will need
a USB keyboard to complete the driver installation.
To install the Mitsubishi Electric P-95D Printer Driver please take the
following steps:
• Open the Charms Bar, swipe with your finger from the far right side
of the screen, to the left.
•Select Settings.
www.gelcompany.com
-29-
Appendix C – Tablet and Peripherals
•Select Change PC Settings.
•Select General.
•Scroll down the list, under Advanced Startup select Restart Now.
The system will restart.
•Select Troubleshoot.
•Select Advanced Options.
-30-
www.gelcompany.com
Appendix C – Tablet and Peripherals
•Select Startup Settings.
•Select Restart.
•Use the USB keyboard to select number 7 (hit F7 or the number 7
key). The system will restart. You are now ready to install the printer
driver.
• To start, plug in the printer USB.
•Turn on the printer and follow the directions that appear on the
screen.
•Or, you may install the printer from the control panel. To reach the
control panel, open the Charms bar, select Control Panel.
Detailed driver installation instructions are available in the Mitsubishi
Electric P-95D Printer Installation Materials.
www.gelcompany.com
-31-
Appendix D – Routine Maintenance
The Omega Lum System is robust and requires minimal routine maintenance. The system should be kept clean
and any spills cleaned up immediately. Simple green or ethanol can be used to remove dried spills. Use only a
soft cloth to clean the UV transilluminator glass, as harsh clothes can leave scratches. Replace UV bulbs and the
rubber camera gasket as needed. If condensation or frost appears in an image it may be necessary to replace the
desiccant plug in the camera.
Adding or Replacing Filters
To add or replace a filter it must be physically added to the system as well as
loaded into the software. Position 1 should be left empty for chemiluminescent
applications. To start login as Administrator.
-32-
• To add a filter:
•Create a custom application and select the filter position you
wish to add.
•Select Capture. This will rotate the filter wheel into the desired
location.
• Open the filter wheel shield.
• Screw in the new filter.
•
Close the filter shield.
www.gelcompany.com
Appendix D – Routine Maintenance
•Select the Settings Tab. Enter the name of the filter in the
correct location.
• To replace a filter:
•
Select an application with the filter in question.
•Select Capture to move the filter into place.
•
Open the filter wheel shield.
• Remove the old filter and screw in the new filter.
• Close the filter shield.
www.gelcompany.com
-33-
Appendix D – Routine Maintenance
Replacing UV bulbs
The UV bulbs can be replaced without removing the UVT from the system.
•
Open the door.
•
Pull out the UVT.
•Remove the 4 screws (2 on each side) from the UV glass
assembly.
•
Lift the UV glass assembly off to reveal the bulbs.
•Using a pair of needle nose pliers with grip as an aid, rotate the
bulb and lift it out of the ballast housing.
•Replace the bulb and rotate the bulb to the locked position.
•
Replace the UV glass assembly and screws.
-34-
www.gelcompany.com
www.gelcompany.com
-35-
by
Better Tools for Less
665 THIRD STREET, SUITE 240
SAN FRANCISCO, CA 94107
www.gelcompany.com
toll free (800) 256-8596
tel (415) 247-8760 | fax (415) 247-8765