1
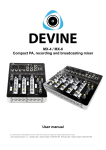
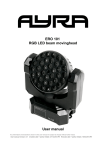
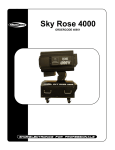
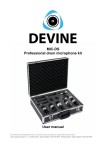
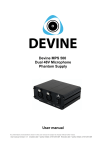
Nordo 12A
Battery powered PA speaker
User manual
Any information and illustrations shown in this user manual are subject to change without further notice.
User manual version: 2.0 Creation date + author initials: 10-07-2013 RV Revision date + author initials: 20-02-2014 RV
Safety instructions
WARNING!
Always keep this device away from moisture and rain! Hazardous electrical shocks may occur!
WARNING!
Only connect this device to a matching power outlet. This device is intended to work on a
specified AC currency. Connecting this device to power outlets with other voltages may result in
permanent damage and possible hazardous situations, such as fire or electrical shocks!
WARNING!
Be careful with every operation of this device. Touching live wires inside and outside the unit
may cause hazardous electrical shocks!
This unit must be operated by, or under the supervision of an adult. This device is not suitable for children.
Every person involved with the installation, operation and maintenance of this device has to:
- Be qualified
- Follow the instructions of this manual
- Make sure there is no damage caused by transport. If the device seems damaged from the outside, do not
use it and contact your dealer for more information and consultation.
- To make sure the device maintains in perfect condition and for safe operation, it is necessary for the user to
follow the instructions and warning notes of this user manual.
- Damage caused by improper use or modifications to the device are not covered by warranty.
- This device does not have any user-serviceable parts inside. Servicing of this device needs to be done by
qualified technicians.
Important notes regarding safety and health:
- Always keep the power cord away from other cables.
- Never remove any warning or informative labels from the unit
- Never leave cables lying around
- Do not open the device and do not modify any hard- or software of this unit.
- Do not insert this object into air vents.
- Do not connect this device to a dimmerpack.
- Do not switch the system on and off frequently as this will reduce the lifespan of the device.
- Do not drive the inputs of the fixture with a signal larger than required to work at full performance.
- This device is designed for indoor use, avoid contact with water, moist or other liquids. Do not place items
filled with liquids on top of the unit.
- Avoid nearby flames or heat sources, do not place this device near flammable liquids, gas or flammable
items.
- Always disconnect the device when it is not in use for a longer period of time, when servicing is needed or
Any information and illustrations shown in this user manual are subject to change without further notice.
User manual version: 2.0 Creation date + author initials: 10-07-2013 RV Revision date + author initials: 20-02-2014 RV
when the device needs cleaning.
- Only handle the power cord by its connectors. Never pull the cable to remove a connector from its socket,
as this could lead to damage and electrical shocks.
- Always operate this device with a stable AC current.
- Never use other types of cables than specified in the manual, do not use defective or bad functioning
cables. Contact your dealer when the included or required cables do not work properly with this device.
- When the device has been exposed to large temperature differences (for example, transport from outdoor
to indoor), do not connect the device immediately. Do not activate the unit until it has reached room
temperature, as moist might build up inside the unit, which may cause short circuits and/or electrical shocks.
Guidelines and types of use:
- This device is intended to be used by professionals on stage, in theaters, clubs and other equal venues.
- This device is not suitable for children and always needs to be operated by an adult.
- Only use the device when the environment is suitable and will not cause any damage. Do not use the
product in moist or dusty environments, or where long-term damage may occur such as:
- indoor swimming pools where chlorine is used.
- Beaches, where sand and salt are present.
- Temporarily outdoor setups, without roof protection
- Indoor areas where intense heat sources are present or where the temperature exceeds levels
which are comfortable for humans.
- Only use the included power adapter and only connect the device to a suitable power outlet with the correct
output voltage. Connecting the device to a power outlet with the wrong type of voltage or using the product
with a wrong type of power supply may cause permanent damage to the device.
- Avoid shocks and collision during use and transport. Do not transport the device while in use. Avoid brute
force during the installation and operation of this device.
- Familiarize yourself with the functions of the device before use. Do not allow operation of the device by
unskilled or unqualified people.
- Use of the device in other ways than described in this user manual may cause damage and injury. Devine
does not take responsibility for any damage or injury caused by improper use.
Storage and transport:
- This device is intended for mobile use. When transported, use the original packaging of the product, or a
fitting flightcase, preferably filled with foam.
- This device is not intended for permanent use. Operation breaks will ensure that the lifespan of the device
remains unchanged.
- If the device is not used for a longer period of time, disconnect it from its power source and store it in its
original packaging, or in a fitting flightcase.
- Store the device indoor, dry and do not expose the device to extreme temperature differences.
Housing:
- Inspect the housing of the device frequently. Severe dents, cracks and missing screws should be avoided
at all cost. Do not use the device when the housing is not in optimal condition. Contact your dealer or a
skilled technician when in doubt about the state of the device
- Check the fixture and screws for corrosion. Corrosion should not be present on the fixture. Contact your
dealer or a skilled technician when corrosion is found on the fixture
- Every power or signal chassis/connector should be mounted tightly. Do not use the device when connectors
are loose.
- Do not use the power cord when the cores are visible. Contact your dealer for a replacement if needed.
- Avoid the buildup of dust and dirt. Clean the exterior of the fixture every month with a dry or damp cloth.
When using the device intensively, the cleaning frequency needs to be increased.
Fuses:
- The main fuse of this device is to be found on the rear of the device. In most cases, directly next to the
power inlet.
- Only replace a fuse for a new one with the same type and rating! Do not use a fuse with a higher or lower
rating.
- Do not bridge the fuse with electrical wires, aluminum foil, as the fuse is used for protection against
electrical shocks and short circuit.
- Always mount the fuse cover back to the fuse compartment.
Any information and illustrations shown in this user manual are subject to change without further notice.
User manual version: 2.0 Creation date + author initials: 10-07-2013 RV Revision date + author initials: 20-02-2014 RV
Guidelines for battery powered speakers
WARNING!
This loudspeaker is capable of producing a sound pressure level which can be harmful for
humans and animals when used incorrectly and/or without protection. Possible permanent
hearing loss may occur when humans or animals are exposed to high sound pressure levels for
a longer period of time.
WARNING!
This device is equipped with an internal lead acid battery. This speaker needs to be handled with
care. Do not attempt to replace the internal battery yourself. Performing the wrong action on the
internal battery may cause serious damage and injury!
WARNING!
The +12V battery powered terminals on the rear of the speaker are for power consuming devices
only! Never connect anything else than a 12V DC current consuming device to these terminals.
The connected device may not require a power consumption of 3A or more! A total load of 6A
(speaker power consumption included) will blow the fuse, accessible from the rear of the
speaker. Always pay close attention to the polarity of the wiring! Connecting the wrong type of
device or incorrect polarity may cause hazardous electrical shocks!
Any information and illustrations shown in this user manual are subject to change without further notice.
User manual version: 2.0 Creation date + author initials: 10-07-2013 RV Revision date + author initials: 20-02-2014 RV
Introduction
Thank you for purchasing this Devine battery powered loudspeaker. Before you unpack all the received
items, carefully read this manual to become familiar with the functions of the system. Also check the contents
of the box to make sure all necessary parts are included.
If the loudspeaker fails to operate properly, or if you have any problems while using the system, turn off the
power and contact your selling point for more information and help.
Box contents:
1x battery powered loudspeaker
1x IR remote with internal battery
2x 9V battery
2x wireless microphone
1x user manual
1x power cable
Warning!
- To avoid electric shocks, do not open the system. There are no user serviceable parts inside.
- Before you connect the unit to a power supply, check if the voltage matches with the power requirements of
the system.
- In case the system will not be used for a longer period of time, remove the batteries from the handheld
microphones.
- For optimal performance of the system, do not place any heat sources on the surface of this product, do not
place the system on top of a heat source such as a microwave or fireplace.
- Keep the unit and microphones away from intense sunshine, humidity, dust and liquids
- Make sure the speaker is positioned on a stable horizontal platform during use, such as a solid floor or a
loudspeaker stand
- To avoid interference, keep the unit and microphones away from devices like large power supplies, power
transformators, radarstations and computers.
- do not place objects on top of the system
- Keep the unit and handheld microphones away from any sort of liquid, moist or fluids to avoid short circuits.
Features:
- battery powered, active loudspeaker
- built-in MP3-player/FM radio tuner, with USB, SD card, FM and Bluetooth audio streaming support
- included remote
- 2 wireless microphones included
- built-in wireless microphone receiver
- VHF frequency (199.6 MHz, 197.15 MHz)
- retractable antennas
- built-in trolley system with retractable handle and two wheels on the bottom
- 12 inch woofer, 1 inch tweeter
- 30W amplifier module
Any information and illustrations shown in this user manual are subject to change without further notice.
User manual version: 2.0 Creation date + author initials: 10-07-2013 RV Revision date + author initials: 20-02-2014 RV
Product overview
The rear of the unit contains lots of connections and settings for your convenience. This way you are able to
connect additional equipment, plus you have optimal control over volumes and the equalizer.
Please pay attention to the schedule below, as it contains valuable information for optimal performance.
1
3
4
2
5
6
7
8
11
9
12
10
13
14
16
15
15
19
17
18
20
1. USB/SD player display
2. USB/SD player control buttons
3. USB slot
4. SD card slot
5. Master volume
6. Master EQ with bass and treble control
7. Echo control for microphone signals
8. Microphone volume
9. MIC1/instrument input (6.35mm jack)
10. MIC2 input (6.35mm jack)
11. Line in (stereo RCA/cinch)
12. Mix Out (stereo RCA/cinch)
13. wireless microphone volume control
14. Wireless microphone on/off
15. Retractable antenna
16. DC 12V output for low-power devices
17. Charge/Power LEDs
18. On/off switch
19. 110V/220V switch
20. IEC power connector with main fuse
Any information and illustrations shown in this user manual are subject to change without further notice.
User manual version: 2.0 Creation date + author initials: 10-07-2013 RV Revision date + author initials: 20-02-2014 RV
Preparing the system
Inserting batteries
This system uses a 9V battery for the handheld microphones. Each handheld microphone uses one 9V
battery. Always use good quality batteries, as the battery life may vary. This may result in a working time
between 8 and 20 hours. Use the included batteries only for testing purposes as their lifespan may vary.
Devine recommends the use of Duracell Procell batteries or any comparable quality for optimal performance
results.
Insert the 9V battery by unscrewing the bottom of the microphone. Pay attention to the placement of the
connection terminals, there is only one way to insert the batteries properly. Screw the bottom cap back on
and make sure it is turned tightly. Do not apply too much force, as this might cause damage to the housing.
There is a on/mute/off switch provided on the body of the microphone. When you turn the switch to the ‘ON’
position, the microphone should show activity and the green LED should light up. When you put the switch in
the center position, the ‘MUTE’ function will become active. This means that the microphone is still active and
connected to the receiver, but it will mute all sound.
Remote control
The included remote control activates the built-in MP3/SD player with FM tuner. You have control over
Play/Pause, Stop, Next, Previous, Volume up, Volume Down, EQ, Repeat mode, USB/SD source, Mute,
On/Off and numerical buttons to access a certain track directly.
Using the built-in USB/SD/Bluetooth player with FM tuner
Use the USB/SD player to play music from any USB or SD card source. The unit supports .WAV and .MP3
source files.
When a USB or SD source is plugged in, the player will automatically switch to that source and start playing.
With the included remote or with the buttons underneath the display you have full control.
The FM tuner can be used to listen to radio stations. Use the buttons to scan for available frequencies, or
search for a specific frequency.
Any information and illustrations shown in this user manual are subject to change without further notice.
User manual version: 2.0 Creation date + author initials: 10-07-2013 RV Revision date + author initials: 20-02-2014 RV
The Bluetooth interface connects easily with any Bluetooth streaming device (such as a smartphone, tablet
or MP3-player). Use password 0000 to connect your streaming device with the speaker.
Volume, EQ, Echo and Mic
The volume knob of the unit is used to change the master volume of the unit. Turn it clockwise and the
volume will increase. Turn it counter-clockwise and the volume will decrease.
The built-in equalizer is used to change the sound characteristics of the speaker. The Treble knob is used to
increase or decrease high tones. The Bass knob is used to increase or decrease low tones.
This way you can adjust the sound for different venues. If you use the speaker for presentation or speech
purposes, you can boost the high frequencies. If you want to play music that contains lots of low frequencies,
you can turn up the bass indicator.
Please pay attention to the audio reproduction of the speaker. If you hear any crackling or distorted sounds,
the speaker is performing beyond its maximum capacity. Turn the volume down to avoid possible permanent
damage. Warranty is void when any defects are found, caused by improper use.
Use the Echo knob to add some echo to the microphone signals. This function is mostly used for karaoke
and speech purposes. Feel free to experiment with the amount of echo.
The Mic knob is used to increase or decrease the microphone level of all connected microphones.
Mic, instrument and line connections
It is possible to plug in extra audio-devices, such as MP3-player, wired microphones or even semi-acoustic
or electric guitars.
- MIC1/Guitar input
This input has a 6.35 mm jackplug connector and is suitable for most wired microphones and instruments.
- MIC2 input
This input has a 6.35 mm jackplug connector and is suitable for most wired microphones.
- Line in
This input is used for additional line audio sources, such as PA-mixers, MP3-players, tablets, smartphones or
laptops and is equipped with stereo cinch (RCA) connectors. Adapter cables to other stereo connectors
(XLR, 6.35 mm jack and 3.5 mm mini jack are available at your local Devine dealer.
- Mix Out
This output is suitable to link this unit with multiple NORDO 12 units, for compact PA-venues. The mixed
output of all signals will be transferred to another unit.
Wireless microphone section
This section is all about the wireless microphones. The green and yellow LED show if there is a connection
between the receiver and the transmitter. The volume of each microphone is adjustable, for optimal
performance. The wireless microphone section has an on/off switch to save energy while operating with the
internal battery.
Antenna section
These retractable antennas are used for the wireless microphones. They are retractable for your
convenience and they can be positioned freely. For the best reception Devine recommends to place the
antennas in a 90 degree angle V-shape, positioned as high as possible for optimal reception and signal
quality.
DC 12V
These connection terminals are suitable for cables with bare wire. This makes it possible to connect any lowpower 12V DC devices to your NORDO 12, such as small LED devices, small cooling fans, decoration
lasers, cigarette plug gadgets, etc.
Low voltage
When using the speaker in battery powered mode, it is possible that the MP3 display will flicker when the
battery voltage is too low. If this situation occurs, turn the device off and connect it to a suitable wall outlet
power source.
Any information and illustrations shown in this user manual are subject to change without further notice.
User manual version: 2.0 Creation date + author initials: 10-07-2013 RV Revision date + author initials: 20-02-2014 RV
Battery condition
To ensure proper battery functionality, the internal battery has to be charged at least once every three
months. When fully charged, disconnect the power mains.
WARNING: Do not connect a car battery, car audio amplifiers or high-powered devices as this might blow
the internal fuse and cause damage to the speaker.
WARNING: Do not connect a passive loudspeaker to this terminal output as this will blow up the speaker!
Devine is not responsible for any damage to this speaker or any connected devices, caused by improper
use.
Any information and illustrations shown in this user manual are subject to change without further notice.
User manual version: 2.0 Creation date + author initials: 10-07-2013 RV Revision date + author initials: 20-02-2014 RV
Troubleshooting
Problem
Possible Cause
Solution
Microphones do not turn on
Battery low or not inserted
(correctly)
Replace the batteries with new
ones. Check the polarity so the
battery can be inserted in the
correct way.
Microphone not turned on
Turn the microphone on
Microphones do not send any
signal
Check receiver for microphone
activity
Out of reach from the antennas
Extract the antennas on the rear
panel and position them in a 90
degree angle for opimal reach.
Microphones too far away from
antennas
Move closer to the antennas.
Microphone level set too high
Decrease microphone level
Receiver level set too high
Decrease receiver level
Signal receiving device set too
high
Decrease gain and/or volume on
your mixer / audio interface / etc.
Rattling and cracking sounds
Moist inside the microphone
Let the microphone dry on room
temperature and avoid use of the
microphone in humid or moist
environments. Do not let the
microphone come in contact with
water or liquids.
Loud high frequencies coming
from the speakers
Microphone positioned too close to Move the microphone further away
the speakers, which causes
from the speakers, or change the
feedback
position to prevent the microphone
to be aimed directly at the
speakers.
No sound from speaker
Input source not connected
properly
Check all connections with the
device to ensure that all signal
sources are connected properly
Volume set too low
Increase signal source volume
and/or master volume
Lack of bass
Bass knob set too low
Increase bass knob until it hits the
'0' position
Lack of high tones
Treble knob set too low
Increase treble knob until it hits the
'0' position
Too much bass
Bass knob set too high
Decrease bass knob until it hits the
'0' position
Too much high tones
Treble knob set too high
Decrease treble knob until it hits
the '0' position
Flickering display, volume low
Empty battery
Connect the speaker to a 120 –
No sound from microphone
Distorted sound or signal
Adjust antennas and position them
in a 90 degree angle opposed to
each other. Make sure the receiver
and antennas are free from
obstacles (flight cases, walls,
powered equipment).
Any information and illustrations shown in this user manual are subject to change without further notice.
User manual version: 2.0 Creation date + author initials: 10-07-2013 RV Revision date + author initials: 20-02-2014 RV
230V wall outlet.
Speaker only works on wall outlet
Battery dead
Let a specialized technician
replace the battery or contact your
local dealer for help
Speaker won't turn on
Empty battery
Connect the speaker to a 120 –
230V wall outlet to charge the
internal battery and turn the
speaker on.
Fuse blown
Disconnect the speaker from any
wall outlet, turn the speaker off
and check the fuse. If blown,
replace it with a fuse of the same
type and rating.
Battery dead
Replace the battery of the remote
control.
Out of reach
Move the remote closer to the
infrared receiver, situated on the
front and the rear of the speaker.
MP3 player does not respond to
any signal from the wireless
remote
Any information and illustrations shown in this user manual are subject to change without further notice.
User manual version: 2.0 Creation date + author initials: 10-07-2013 RV Revision date + author initials: 20-02-2014 RV
Technical specifications
-
Battery powered loudspeaker
Built-in, rechargeable battery
Can be used with a 230V power source
Up to 8 hours of use with a full battery
12 inch woofer with 1.5 inch voice coil
Tweeter with integrated horn
Built-in power amplifier: 30 Watt
Nominal system impedance: 4 Ohms
Trolley system with integrated wheels and retractable comfort handle
35 mm speaker stand adapter
-
MP3 player:
Supports USB, SD, Bluetooth audio streaming and FM radio
Remote control included
Display with control buttons
-
Bluetooth:
Password: 0000
Connects with every Bluetooth audio streaming device (such as a smartphone, tablet or MP3-player)
-
Microphones:
2x wireless microphone
VHF frequency (199.6 MHz, 197.15 MHz)
On/off/mute switch
Works on 9V battery (included)
Microphone holders on both sides of the speaker
Microphone volume adjustable
Optional microphone echo (variable)
-
in/output:
2x 6.35mm jack input (instrument/mic and mic)
Line in, stereo RCA
mix out, stereo RCA
-
Controls:
mic volume (VOL A, VOL B)
Main mic volume
Echo intensity
Master volume
VHF mic on/off switch
Power on/off switch
Any information and illustrations shown in this user manual are subject to change without further notice.
User manual version: 2.0 Creation date + author initials: 10-07-2013 RV Revision date + author initials: 20-02-2014 RV
Indicators:
- Charge LED indicator (green)
- Power LED indicator (red)
- RF A LED indicator (green)
- RF B LED indicator (yellow)
- VHF Power LED indicator (red)
-
Power supply:
110/230V AC, 50/60 Hz
12V DC power outlet for small devices, with wire terminals
-
Dimensions and weight:
Size: 340 x 310 x 575 mm
Net weight: 14.5 kg
Gross weight: 16.5 kg
-
Accessories:
2x wireless microphone
2x 9V test-battery
IR remote
Power cord (IEC – Schuko)
Any information and illustrations shown in this user manual are subject to change without further notice.
User manual version: 2.0 Creation date + author initials: 10-07-2013 RV Revision date + author initials: 20-02-2014 RV