1
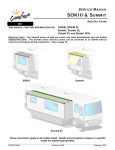
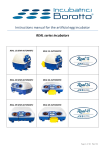
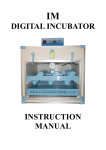
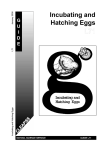
Maino Incubatrici MAINO ENRICO-ADRIANO di Roberto Maino & C. S.n.c. - Since 1945 Via Roma, 42 - 22070 OLTRONA SAN MAMETTE (CO) Italy Tel. +39-031-891478 ; Fax. +39-031-891457 ; Tlx. 380050 Como I Email: [email protected] - Internet http://www.maino.it CCIA Como 0198979 - C.F. + P.I: IT-01555980133 - C.M. CO-022855 INCUBATRICI; INCUBATORS; BRUTAPPARATE; BROEDMASCHINEN; INCUBATEURS; COUVEUSES; INCUBADORAS All our Incubators are manufactured in Italy, with the utmost care, taking into account all aspects of quality of materials and the environmental factors to produce a quality, effcient, “green” incubator. INCUBATOR USER'S MANUAL: SEE 24 – 50 – 77 How to use this manual. Text by this symbol MUST be adhered to, as there may be a risk to the user or the incubator, including its contents. Text by this symbol are operational instruction for best results. Packing: To open the carton using a knife or similar tool. Carefully cut the tape on the top of the box, and open. Inside the box - see the following pictures: Inside the box is the incubator with all the parts required for operation inside it. ** Take Care! The transparent door is located near the machine (indicated by arrow below) ** Packing List: no.1 Incubator no.1 Transparent Door no.1 Eggs tray Qty of aluminium alloy spacers no.1 Ground Mesh Qty Water trays Before switching on the incubator, read through this instruction booklet. Make sure the electrical voltage (tension) is the same as on the written technical information (the label placed near the thermostat). Make sure the incubator plug that is used to connect the incubator to the power socket is suitable to use, and if not, contact your local electrician. 1. Setting Up The Incubator prior to use: 1.1 Protective Plastic Film—Remove the protective film from all parts of the incubator for best vision into the incubator 1.2 Egg Tray - Set the space required inbetween turning bars on the egg turning tray so as to ensure the eggs sit horizontally through the bars touching the Ground Mesh underneath. Important! - Eggs should not sit on the egg bars, the eggs must contact with the Ground Mesh. Otherwise it could break the turning motor and also because, if the egg does not touch the Ground Mesh, egg turning will not happen and then, after the incubation period, nothing will hatch! Example of how set the turning bars for different egg sizes 1.3 Water Trays and Ground Mesh - Place the water trays on the base of the incubator. Do Not fill with water at this time. Place the Ground Mesh on top of the water trays with the edging angled up. 1.4 Place the Turning Tray on Top of the Ground Mesh. Once you have adjusted the position of turning bars, insert the tray inside the incubator, taking care to connect the hook lever of the egg tray with the turning screw that moves the turning tray in the top of the incubator (the screw on the hard plastic disk – see above). 1.5 Slide the front door into position. First, remove the protective transparent sheet from the door. Slide the door down the side guides - as shown in the picture below - to the end, to completely close the incubator. Ensure the water trays and ground mesh have been pushed to the back of the incubator, so the door closes completely. The top of the door should be level with the top of your incubator. REMEMBER! BEFORE OPENING THE INCUBATOR, ALWAYS STOP THE INCUBATOR BY SWITCHING OFF AND PULLING THE PLUG FROM THE ELECTRICAL SOCKET! 1.6 Plug in your incubator and switch on the electrical socket. The fan should start operating and the display panel will display a test sequence. E-18 : If the display shows E-18 after switching on, the temperature in the room is less than 18 degrees, indicating the room temperature is not ideal. Either move to a warmer room, or turn off the incubator after the temperature displays 18 degrees or more and switch back on to reset the control board. SEE MXPT ERROR CODES 2.0 ADJUSTING THE TEMPERATURE: In your incubator is installed a MXPT Control Card, version X, a highly precise temperature controller. The controller uses PID algorithms to calculate the power needed to maintain finely balanced operational temperature accuracy, essential for successful egg incubation. The MXPT controller is equipped with a high-visibility digital blue LED display, for displaying the current temperature, and setting parameters. Through the optional Daughter Card R1563 can you also read the relative humidity in the same digital LED display. Keeping the door closed, and without any eggs and water inside, wait until the incubator has the correct Temperature (see the Species Chart). To adjust the set temperature, i.e. for another species etc. In Temperature display mode (the only one mode available if the Daughter card R1563 is not installed), press for 3 seconds just one key "+" or "-", when upper and central segments blink, release the key then using again the + or – key, to select the new temperature. When you have finished, release all keys and wait 5 seconds. After that the new set point will be stored in the memory and the controller return to the Temperature display mode. The element is being heated when the LED Segment next to °C is lit 2.1 Settling In The Incubator The incubator should be run for 8 hours with a constant temperature before setting your eggs. 3.0 Humidity. Hatching Eggs, during Incubation, need to lose about 15% of their egg weight in water vapour, so that the Air Sac is the correct size for hatching. Loss of too much or too little water vapour can cause the chick embryos not to hatch. By reading the Relative Humidity (RH%) we know what percentage of the air is water vapour, and whether to add more water or take away some. Through experience you will get to know the best percentage Relative Humidity to run your incubator at for your eggs. Our advice to start you off is to use the settings in the Species Chart To read Relative Humidity you can either use the Optional Daughter Card R1563 or a Hygrometer Accessory. If you do not wish to use a hygrometer, fill one water tray through the setting period, then fill the rest of the trays for the hatch period. DO NOT add more water than in the water trays as this can increase the humidity level too high and cause damage to the incubator. IN ALL CASES DO NOT ALLOW YOUR INCUBATOR TO HAVE WATER CONDENSATION IN IT FOR LONG PERIODS OF TIME AS THIS CAN CAUSE IRREPAIRABLE DAMAGE TO COMPONENTS. Humidity Reading through Daughter Card R1563 The following instructions are for when the Daughter Card R1563 is installed. The small water pot with the wick in it should be kept full with water at all times. The wick will get contaminated by water deposits, chick down, and so should be changed when it is dirty, or at least every hatch. To Display Current Humidity Reading - Press the “F” key to switch from the Temperature Display to Relative Humidity Display Adjusting The Set Humidity with optional external humidifier. Ensure the humidifier is plugged into the socket on the top of your incubator. Press the “F” key to select humidity reading then press the “+” or “-” key and hold for 5 seconds to enter the program. When the LED Segments are flashing, release the “+” or “-” key and use those keys to increase or decrease the humidity level to the setting required. Release the button and the MXPT control will memorise the settings. NEVER SPRAY OR SPRINKLE WATER INSIDE THE INCUBATOR AS THIS CAN CAUSE THE ELEMENT TO FAIL, KILLING ALL YOUR EMBRYOS. If you must spray your eggs, take the tray of eggs out of the incubator and spray away from the incubator, then replace them. 3.2 Humidity Continued… When using a alternative hygrometer, by increasing or decreasing the surface area of water, you can increase or decrease the humidity in your incubator i.e. if the humidity level is too low, fill another tray in the bottom of the incubator with water. 4.0 Selection of Optimum Hatching Eggs. With most eggs, they should be no older than within 8 days from the date they were laid. Each with good weight, size and without defects or cracks. Eggs should be from healthy breeding flocks . Do not incubate eggs collected on the day they were laid. 4.1 Setting the Hatching Eggs. The eggs should be placed horizontally in the egg tray, inbetween the spacers that you've adjusted before to your size of eggs (See Instruction 1.2) The Turning Motor is always on from the time the electric socket is switched on. It is a slow continual movement, taking 4 hours. This also means when you are checking the turning mechanism, you must check a different time each day as the egg tray will be in the same position every 4 hours. Do Not Cover the Air Exchange Hole(s) over the fan on your incubator. All Embryos breathe in Oxygen and excrete Cardon Dioxide (like us), so by covering the air hole you can suffocate your chicks and they may die. 5.0 Egg Candling. Egg candling should be done after 8 or 18 days after insertion of the eggs in the incubator. When candling an egg, you are looking: at the embryo development, and with some candlers you may be able to see life; the air sac size, checking its growing, and that it is not floating; Identify Eggs that do not have an embryo in them; and to identify diseased eggs. Eggs that are imperfect or infertile should be discarded. Candling is a skill that will develop with experience. 6.0 The Hatch Period - The LAST 3 DAYS of the whole period of incubation (see Species Chart) the eggs should NOT BE TURNED. Remove the turning tray 3 days before hatching by lifting it out without having to handle the eggs. Fill up all your humdity trays to increase the humidity, close the door, and leave the incubator alone. Only open the door to refill humidity trays, then leave it again. Once the chicks start hatching, leave them in the incubator. The chicks can live 3 days after they are born, even without eating or drinking and without any kind of problem. The chicks should not drink because they have to absorb the yolk sac completely. If chicks drink, they may not absorb it completely & it may cause many deaths and deformities. Leave chicks alone until the last chick hatched is dry and fluffy. 7.0 Capacities Chart Kind of Eggs\Model SEE16 SEE24 SEE35 SEE50 SEE77 Hen | Duck | Black Turkey 16 24 35 50 77 Pheasant | Bantam 20 30 40 60 96 Quail | Grey Partridge 32 50 70 120 168 Red Partridge 28 45 68 112 152 Goose | Turkey | Peacock 6 12 17 21 36 8.0 General Requirements - Siting your Incubator Basic features of the room in the room where you install the device: The incubator must be placed in a clean, ventilated room, but away from draughts. It must be supported on a solid surface The room temperature must be between 18 – 23 °C. and 15 – 50 % Relative Humidity. Cold Air (Less than 18 °C will lead to uneven air temperature in the incubator, and could cause a reduce in element life. Do not use in greenhouses ( temperature too variable) or bedrooms for humans or animals. Oxygen is needed by chick embryos in the incubator, eggs that breathing then expel carbon dioxide thus reducing the oxygen levels in the air! This is very harmful to both human and animal health. The machine should be placed OUT of contact with any liquids, that could prejudice the incubators operation and/or also become a very dangerous in operation!. TECHNICAL SPECIFICATIONS: ELECTRIC INCUBATOR FOR ANY TYPE OF EGG ELECTRICAL FEATURES: 230 Volt AC + 10/-15% @ 50 Hz ± 0.5% Plugs: Schuko plug (CEE) or British plug (2 poles + E # 13A fuse – British Standard: BS 1363A/95) 9.0 MXPT Error Codes: From time to time, various codes will display on the LCD Display. Below is a list of those codes and the action required: Displayed Code Meaning Action E18 Generally seen at start up.The incubator has sensed that the room temperature is below the ideal 18 degrees Move to a warmer area, between 18 and 23 degrees Celsius. To cancel this warning, allow the incubator to heat to above 18 degrees, then switch it off and back on again. AL1 Internal Memory Corrupt Press “F” to continue with default parameters AL2 Temperature Sensor Failure or Disconnection Check Probe connection to control board, replace Temperature Probe AL3 Minimum Temperature Alarm Allow Incubator to increase in temperature. Check room temperature, Maybe element Failure AL4 Maximum Temperature Alarm Allow Incubator to settle in temperature. Check room temperature, AL5 Humidity Probe Failure or disconnection Check Probe connection to control board, replace Probe AL6 Minimum Humidity Alarm Check water reservoirs , and humidifier if fitted AL7 Maximum Humidity Alarm Allow incubator to settle. If high humidity persists, open incubator door slightly Incubator Servicing Incubators used for hatching build up a large amount of chick down, dust and general dirt!. After every hatch your incubator should be cleaned down. This prevents a build up of disease and prolongs the life of your incubator components. If you use your incubator as a setter only( i.e. do not hatch in the incubator), then a 3 monthly clean down is advised to prevent a build up of domestic dust on components. This section is broken down into component types. Some components may be different to those in your incubator. S1.0 General Cleaning Ensure the Incubator is switched off and unplugged. Remove and put somewhere safe, the screws around the top of the incubator. Lift of the roof of the incubator, along with all the incubator components inside. Turn upside down to clean. Remove heavy dirt and dust using a clean paint brush, and/or compressed air from a can or air-line from around the control card, and the element. Be careful with the element as it is fragile. Do not get the electrical components wet. Wash in water the incubator base, and Egg Grid, allowing to dry out thoroughly before reusing. Disinfect as required using an approved disinfectant. NEVER SPRAY or wipe Disinfectants into the top of the incubator. Disinfectants are corrosive and will destroy the coatings protecting the control board, drastically reducing its working life. It is not necessary to completely sterilise this area of the incubator. The base and Turning tray can be disinfected if required. S1.0 Servicing Fans S1.1 R000610 Square Black Fanx 1.11 Ensure the Incubator is 1.12 Remove the label on the fan 1.13 Using a screwdriver to unplugged. Undo the screws to expose rubber stopper / cover remove the rubber stopper holding the fan in the that protects the bearing brass incubator 1.14 With an oil can, put a few drops of oil on the brass bearing and then close with the rubber stopper. Reassemble into the incubator S1.2 R000613 Fan Motor Unit 1.21 Ensure the Incubator is unplugged. Undo the screws holding the fan in the incubator 1.22 Remove the Fan Blade 1.23 Unscrew the Brass Spacer 1.24 The fan should not come using a 7mm spanner, and extension pieces, using a 7mm apart into its components. Put holding the blade still. Spanner some spots of light oil onto the bearings. Reassemble in Reverse. S1.3R000800 Turning Motor 1.31Undo the screws holding 1.32 Using a flat blade the turning motor in place screwdriver, unclip the clip holding the motor onto the gearbox 1.33 Oiling point in the middle of the Gear Box 1.34 Put a few drops of light oil into the gearbox Spare Parts List MXPT Control Board R001562 Fan R000610 ( SEE24,35,50) MXPT Daughter CardWhere fitted R001563 Fan ( SEE 77) R000613 Thermometer RMPS0600 Element R00A710 Turning Motor R000800 Humidity Wick R001567 Optional Accessories R009010CC Fluorescent 240v Candler RHD300 LCD Hygrometer R001569 Humidifier for SEE77 R001569A Humidifier for SEE24,35,and50 GUARANTEE and Certificate Of Conformity Before using the incubator, you should read this instruction manual in full. All instructions, without exception, given in this manual are given in good faith, and we or our dealer / distributor, cannot be held responsible for any damage arising from these instructions, however caused. This includes, without restriction, damages, and hypothetical damage refered to in the use of this given instructions, such as: loss of goods, profits and income; loss of biological value; restoration and replacement cost or other similar costs; or any other special, casual or consequential damage. This information has been written very carefully. We have used best available knowledge in drawing it up, incorporating best technologies and best techniques. However its accuracy and its reliability are in no wise and in no case due to the dealer/ distributor. The authorization to make use of this information is strictly reserved for personal use. Every part of the appliance has been tested by the producer before the delivery and consignment date. Therefore the maker's guarantee does not include damages resulting from an incorrect transportation of the appliance. The guarantee does not include damages to the electric supply and electronic parts resulting from an incorrect connection to the electricity circuits or power surges. The guarantee includes any necessary spare parts and manpower to bring back into use in a functional way the appliance due to any breakdowns that might occur during the following 24 months after the initial testing. The guarantee work is done at the Producers company, or their agent, and will not include refunds of the appliance, or refunds of the damages suffered during the manufacture. The repairs will only have to be done by authorized staff. Not complying with this clause will cause the annulment of the guarantee. REFERENCE SET OF RULES: This product complies with the main requisitions of Electromagnetic and Safety Consistency provided by the Regulations: 89/33/CEE of May 3 1989 with subsequent changes (Regulation 92/31/CEE of April 28 1992 and Regulation 93/68/CEE of July 22 1993); 73/23/CEE of February 19 1973 with subsequent changes (Regulation 93/68/CEE of July 22 1993); Since it has been projected in compliance with the directions of the following Harmonized Rules: CEI EN61000-3-2 (1998) + A14 (2000) ref. Harmonic Current Emissions; EN61000-3-3 ref. Voltage Fluctuations; EN55014-1 ref. Conducted Radiodisturbance Emissions; EN55014-1 ref. Click; EN55014-1 ref. Power Disturbace (30/300 Mhz) & Immunity Tests EN55014-2 ref. ESD , CM , FSB , S, VDSI + EN60335 + EN60335-2-71. The compliance with the above-said main requisitions is attested by means of the affixing of the marking CE¹ on the product. The marking CE¹ was introduced in 1995. We attract your attention on the following actions that may compromise the compliance as well as, obviously, the features of the product: 1. Incorrect electric power; 2. Incorrect installation or incorrect or improper or in any case different use as to the directions written on the user's manual given with the product; 2. Change of parts or of original accessories with others not approved by the maker, or changed by non-authorized staff; DECLARATION OF CONFORMITY according to the attachment II, A of DPR 459/96 THE PRODUCER : IT01555980133 DISTRIBUTED IN THE UK BY : Maino UK , "Dovers Orchard Farm", Hoo Lane, Chipping Campden, Glos. GL55 6AZ VAT GB 275 2945 31 Sales:+44 (0)1386 841109 Web: www.maino.co.uk Email –[email protected] The Appliance INCUBATOR or HATCHING machine Matriculation Number: From 4512 - 07 - 2003 and so on , until new issue DECLARES THAT: Model: SEE16A and SEE16M IS PROJECTED AND REALIZED IN COMPLIANCE WITH THE MAIN REQUISITES OF SAFETY AND HEALTH OF THE D.P.R. 459/ of July 21 1996 - ATTACHMENT I - The adhesive plate with the mark CE¹ sticked on the appliance is integrant part of it; on the plate there is the specific information of the Appliance Directives. The following Harmonized Rules has been used to implement in a correct way the main requisites of Safety and Health of the ATTACHMENT I: CEI EN61000-3-2 (1998) + A14 (2000) ref. Harmonic Current Emissions; EN61000-3-3 ref. Voltage Fluctuations; EN55014-1 ref. Conducted Radiodisturbance Emissions; EN55014-1 ref. Click; EN55014-1 ref. Power Disturbace (30/300 Mhz) & Immunity Tests EN55014-2 ref. ESD , CM , FSB , S, VDSI + EN60335 + EN60335-2-71 Oltrona di San Mamette 01/07/2003, The declarant: Disposal of old special Equipment (Applicable throughout the European Union and other European countries with separate collection programs). The symbol, found on your product or on its packaging, indicates that this product should not be treated as household waste when you wish to dispose of it. Instead, it should be handed over to an applicable collection point for the recycling. By ensuring this product is disposed of correctly, you will help prevent potential negative consequences to the environment and human health, which could otherwise be caused by inappropriate disposal of this product. The recycling of materials will help to conserve natural resources. For more detailed information about the recycling of this product, please contact your local city office, household waste disposal service or the retail store where you purchased this product RAEE ITALY: IT08040000004688 – VALID ONLY IN ITALY Troubleshooting Incubation When a hatch is not what you would expect, use the guide below to help diagnose problems which may improve future hatchings. Infertile Eggs– No embryo present in the egg at all. Suggested Cause Suggested Resolution Cockerel Infertile Change the cockerel Cockerel not mating Birds too hot - heat stress reduced fertility Check for Disease Foot Problems Feed Problems - poor quality etc Male too old Early death of embryo - blood rings form, then they die Embryo dies prior to pipping Many Embryos stuck to shell Chicks pipped but fail to hatch Incorrect Male to Female Ratio Increase the Male to Female Ratio. Too many males can also lead to low fertility as they are fighting for dominance with each other. Excessive Inbreeding Do not Inbreed as much! Eggs stored at a too low temperature Store eggs at 12.5°C to 20°C Eggs stored too long Store eggs no more than 8 days (turkey and partridge 2 weeks) Eggs washed at too higher temperature Wash at hand hot temperature, or dry clean eggs. Try to produce only clean eggs for incubation Extreme rough handling Avoid excessive mis-handling Low Incubation Temperature Maintain incubator temperature at the correct temperature Too High Humidity Level Maintain humidity at correct level for species Check breeder diet Lack of essential minerals and/or vitamins Presence of lethal genes Avoid in-breeding, change cockerel Relative humidity too low at hatching Increase humidity to at least 55%RH Too much Albumen due to high relative humidity levels, and/or low incubator temperature Monitor temperature and humidity Levels Disease Check eggs are from a strong, healthy flock High Hatcher temperature Monitor Hatcher Temperature Low Hatcher Humidity Monitor Hatcher Humidity Chicks hatch early. Chicks weak Incubator Temperature too high Monitor Incubator Temperature. Check Calibration. 0.6°C will give a 24 early hatch Chicks hatch late. Chick lethargic Monitor Incubator Temperature. Check Calibration. 0.6°C will give a 24 early late hatch Incubator Temperature too low