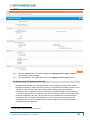
1
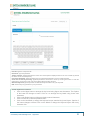
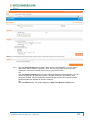
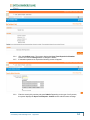
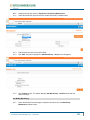
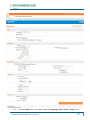
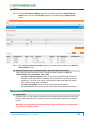
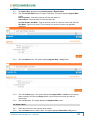
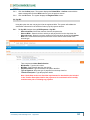
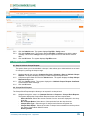
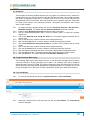
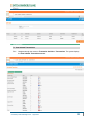
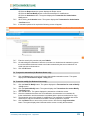
USER MANUAL FOR INTERNET BANKING (IB) SERVICE Content: Introduction and General questions. Accessing and using Internet Banking. 1. Log In, Log Out and Printing screen/transaction information 2. Inquiries 3. Term Deposits 4. Transfers and Payments 5. Bill Payments 6. Customer Services 7. Transactions User Manual for Internet Banking Service - August 2015 Introduction and General Questions Intesa Sanpaolo Bank Albania provides you the Internet Banking service, which allows you to effect transactions in real time, completely over the Internet, without needing to install any software on your computer. Internet Banking is available to both individual and corporate customers. This service gives you the ability to access your account(s) and banking information directly from your home or office computer, 24 hours a day, 7 days a week, thus, giving value to your time. Through Internet Banking customers can: check account(s) balance transfer funds (locally and abroad) make payments (e.g. phone bill, taxes, etc) review transaction details review information about loans, deposits, checks issued, exchange rates open an electronic deposit , e-deposit and much more… Customers may access the Internet Banking only after having applied for the service and after the Bank has provided them with a Username, Password and Security Key. The purpose of this document is to serve you as a guide on using the basic services in IB. For further information, please either visit your branch or contact us in the following numbers: CALL CENTER 08006000 (Free) +355 4 22 76 000/ 222 / 223 + 355 (0) 692080903 User Profiles? A User Profile consists in a number of "rights" that tell Internet Banking what functions the particular User is authorized to undertake, after logging in to Internet Banking. There are three User Profiles in Internet Banking. Administrator User – Bank Company user (valid only for companies) Individual user (valid only for individuals) Role of the Administrator User? The bank in the role of the Administrator, creates and maintains non-individual customer’s users of a company/organization/institution that uses the Internet Banking as well as the individual users of individual customers. Role of the Company and/or Individual User? - - The Company User is created by the Administrator User- Bank, according to the profile defined by the legal representative or authorized person in case of non-individual customer, in order to perform different functions in Internet Banking. The Individual User is created by the Administrator User- Bank, according to the profile defined by the account holder/s in case of individual customers. User Manual for Internet Banking Service - August 2015 2 Rights of Company Users and Individual Users in Internet Banking? The rights to operate in the different functions that Internet Banking Offers, are defined by the Administrator User-Bank, based on the instructions of the legal company representative or the authorized person in case of non-individual customers, or by the account holder/s in case of individual customers. Accessing and using the Internet Banking 1. Log in and out of Internet Banking 1.1 To log in to Internet Banking: 1.1.1 1.1.2 To access our Internet Banking service go to Intesa Sanpaolo Bank’s website and click login under the Internet Banking section or enter the URL https://internetbanking.intesasanpaolobank.al/ in the address bar. The system displays the main page. Click on the English, Italian or the Albanian link on the same main Login page Note: the default theme for the application is set to Contemporary. In case you want to switch to the classic view, select Classic from the drop down menu. 1.1.3 Then, enter your USER ID, PASSWORD, then press the button of the Security Key and enter the six digits displayed in the field Security Key. Be aware that the PASSWORD is casesensitive. Note: By default, the security keyboard option is checked. This enables the user to access the interface through a virtual keyboard appearing on the screen by either clicking or hovering on the keys. Alternatively, the user can clear the security keyboard option and can use the keyboard User Manual for Internet Banking Service - August 2015 3 User ID: Type the unique user ID. Password: Type the password. Theme selection: (Optional) Select the theme from the dropdown displayed inline to the user id field. By default the theme is set as Contemporary. Use Virtual Keyboard: (Optional) Select the Use Virtual Keyboard tab to use the virtual keyboard. Click here to enter by hovering: (Optional) Select the Click here to enter by hovering check box to enter the password by moving the mouse over the keyboard without clicking the keys Standart Keyboard: (Optional) Select the Standard Keyboard tab to use your keyboard. PIN: The Security Key provided to you by the Bank Virtual Keyboard Functions Click on the Upper button to arrange the key board using Upper case characters. The Caption of the button will change to Lower. Click on it to arrange the key board using Lower case characters Click on the Delete button to delete previously entered characters Click on Clear All to clear the password field. Click on the Not Mixed to arrange the keyboard as per standard key board layout. Caption of the button changes to Mixed. Click on the Mixed to change the keyboard layout after every character click. User Manual for Internet Banking Service - August 2015 4 1.1.4 Click the Sign In button to log in to the application. (During first time login, you will be required to Read the Terms and conditions and click on the accept button and to change the password, by following specifications on the page). In contemporary view for Individual users main menus are located on the top of the screen as shown below: For Business Users menus can be accessed by clicking on the main menu button located in the bottom left corner as shown below: User Manual for Internet Banking Service - August 2015 5 1.2 To log out of Internet Banking 1.2.1 Click the Logout option located in the right upper corner of the screen 1.3 Printing screens and transactions details On whichever screen you are working on, you are able to print the data appearing on the screen. 1.3.1 Select the Print button as indicated below to print the screen User Manual for Internet Banking Service - August 2015 6 1.3.2 To minimize the window select the Minimize button. 1.3.3 To reduce the size of the window select the Restore down button. 2. Inquiries The inquiries Module allows you view the consolidated details of the account like summary, details, account activity, etc. 2.1 Accounts – My Accounts - Account Summary This option allows you to view a summarized view of all your accounts and gives various details such as the account number, the description of the account, the base currency of the account, the current balance and the other currency equivalent of the current balance 2.1.1 2.1.2 2.1.3 2.1.4 For viewing the Equivalent Balance in any currency select the currency and Click on the Go button. The system will display all your current balances based on the selected currency and display the same under the <<Currency>> Equivalent column. Click the left side menu icons to view the account details, Account summary, Ad-hoc account statement and account activity in case of CASA Or Click the left side menu icons to view the Deposit details, Amend Term Deposit, Redeem Term Deposit, Term Deposit activity in case of Term Deposit Click on the edit icon next to the account number to edit or assign the nick name to the account. Click on the Set Favorite accounts link to set the Favorite accounts User Manual for Internet Banking Service - August 2015 7 2.2 Accounts – My Accounts - Consolidated Position This option provides you to view the consolidated position of the Assets and Liabilities with the Bank. CASA, deposit, loan accounts are few assets and liabilities held with the Bank. User Manual for Internet Banking Service - August 2015 8 2.3 Accounts – Savings and Current Account – Account Details This option provides the user to view important details of a selected Current or Savings account 2.3.1 2.3.2 2.3.3 Select the account number from the drop-down list for which the details are to be displayed Click the Submit button. The system displays the Account Details screen with the account details. Click the Account Activity button to view the account activity details (transaction history). The system displays the Account Activity for current period screen. User Manual for Internet Banking Service - August 2015 9 2.4 Accounts – Savings and Current Account – Account Statement This option allows you to view the account statements of any account under the customer IDs mapped to you. You can view the list of statements of individual accounts by clicking the account number link. You can also view the details of the individual statement numbers by clicking the statement number link 2.4.1 2.4.2 2.4.3 Click the required link in the Account Number column to view the corresponding account statements. The system displays the Account Statement screen. Click the required link in the Statement Number column to view the individual account statement details. The system displays the Account Statement screen. OR Click the Back button. The system displays the previous screen. Click the PDF Format button to download the statement in the PDF format (OR Click the HTML format button to download the statement in the HTML format OR Click the OK button. The system displays the initial Account Statement screen) User Manual for Internet Banking Service - August 2015 10 2.4.4 Click the Open button the system downloads the statement in the selected format OR Click the Save button. The system saves the file in the selected location OR Click the Cancel button to cancel the File Download. 2.5 Accounts – Savings and Current Account – Account Activity This option allows you to view and download the account activity for any CASA account under the customer IDs mapped. You can get the transaction details based on different transaction dates, by specifying the amount range and sorting on the transaction date, value date and the amount 2.5.1 2.5.2 2.5.3 2.5.4 Select the account and complete the search options and press the Submit button The system displays the Account Activity screen with the transaction details. Select the required download format, and click the Download button to download the file. The system displays the File Download dialog box Click the Save button to save the file. The system displays the Save As dialog box. OR Click the Open button to open the file. The system displays the file in the desired format User Manual for Internet Banking Service - August 2015 11 3. Term Deposits The term deposits module includes transactions which enable you to view term deposit account details, view term deposit account activity, open new term deposits and amend term deposits. 3.1 Term Deposit Details This option allows you to view the term deposit account details of the particular customer. It displays basic details of the deposit account like maturity date, maturity amount 3.1.1 3.1.2 3.1.3 Navigate to Accounts > Deposits > Term Deposit Details Click the Term Deposit Details link on the popup screen as shown encircled in the above screen. The system displays the Term Deposit Details screen Click the Back Button on the Term Deposit details screen to return to the previous screen. OR Click the Term Deposit Activity button. The system displays the Term Deposit Activity screen. 3.2 Term Deposit Activity This option allows you to view and download the account activity for any TD account under the customer IDs mapped to the user. The user can get the TD activity details for a given period, i.e., current period, previous period, or specified period 3.2.1 3.2.2 3.2.3 Navigate to Accounts > Deposits > Term Deposit Activity Enter/Select date for the search and click the Submit button. The system displays details in the Term Deposit Activity screen Click the Download button. The system displays File Download screen. Click the Open button to open and view the file. OR Click the Save button to save the file. OR Click the Cancel button to close this screen. 3.3 Open Term Deposit (for individuals only) This option allows you to open a new term e-deposit account with the Bank 3.3.1 3.3.2 Navigate to Accounts > Deposits > Open Term Deposit. The system displays Open Term Deposit screen Complete the required details: User Manual for Internet Banking Service - August 2015 12 3.3.3 Click the Save as Draft button to create a draft version of the transaction. You can use the draft version later to initiate the payment. Note: You can enter details in parts and save. Submission of the entered details can be done on any preferred date. OR Click the Save as Template button to create a payment template of the transaction. You can use the template later to initiate the payment. Template access type is mandatory while saving the template. Public templates are available to other users of the customer whereas Private templates are available to user who creates it. OR Click the Submit button. The system displays the Open Term Deposit –Verify screen. User Manual for Internet Banking Service - August 2015 13 3.3.4 3.3.5 3.3.6 Click the Confirm button. The system displays the Open Term Deposit Confirmation screen. OR Click the Change button to change the details. If transaction password is required the following screen will appear: Enter the security Key number and press Submit. Depending on the type of verify screen, the system displays the Open Term Deposit - Confirm screen with the status message User Manual for Internet Banking Service - August 2015 14 3.3.7 Click the OK button. 3.4 Amend Term Deposit (for individuals only) This option allows you to modify the maturity instructions of the selected TD. The maturity instructions include the principal and interest amount transfer details 3.4.1 3.4.2 Navigate to Accounts > Deposits > Amend Term Deposit. The system displays Amend Term Deposit screen Click the account number hyperlink to view the details of the term deposit under that account number. The system displays Amend Term Deposit - Initiate screen Note: You can only amend the payout details. Steps to be followed are the same as those detailed in Open Term Deposit section Payout Details. 3.4.3 3.4.4 3.4.5 Click the Initiate button. The system displays Amend Term Deposit - Verify screen. Click Confirm button. The system displays Amend Term Deposit - Confirm screen with the status message Click the Amend Another button to amend another term deposit account 4. Transfers and Payments 4.1 Maintain Beneficiary Users having access to Beneficiary Maintenance can maintain Beneficiary. Note for Business Users: You can also specify if the Beneficiary template created is available to other users of the same primary customer id by specifying the template access level as public. If the Template is created with template access level as Private, it is available only to the User who has created it. Beneficiary Maintenance is supported for both internal and outgoing transfers User Manual for Internet Banking Service - August 2015 15 4.1.1 4.1.2 Navigate through the menus to Payments > Beneficiary Maintenance Select the transaction type and click the Create Beneficiary Template button 4.1.3 4.1.4 Enter beneficiary data in the required fields Click Add. The system displays the Add Beneficiary - Verify screen will appear 4.1.5 Click Confirm button. The system displays Add Beneficiary - Confirm screen with the status message. 4.2 Modify Beneficiary 4.2.1 Select beneficiary ID by selecting the respective checkbox from the Beneficiary Maintenance search screen. User Manual for Internet Banking Service - August 2015 16 4.2.2 4.2.3 4.2.4 4.2.5 4.2.6 Click the Modify button to modify the selected beneficiary template. The system displays Modify Beneficiary screen. Enter the details to modify the beneficiary template. Click the Modify button to modify the selected beneficiary template. The system displays Modify Beneficiary - Verify screen. OR Click the Back button to navigate to the previous screen. Click the Confirm button. The system displays Modify Beneficiary - Confirm screen Click the OK button. The system displays initial Beneficiary Maintenance screen 4.3 Deleting a Beneficiary 4.3.1 4.3.2 4.3.3 Click the Delete button in the Beneficiary Maintenance screen with the search result. The system displays the Beneficiary Maintenance – Delete Beneficiary – Verify screen. Click the Confirm button. The system displays the Beneficiary Maintenance – Delete Beneficiary – Confirm screen. Click the OK button 4.4 Own Account Transfer Using the Own Account Transfer option, you can initiate funds transfer between any of your accounts, i.e. the accounts that are under the customer IDs mapped to you. Such transfer can be done either by making a new payment transaction or by using the existing beneficiary details User Manual for Internet Banking Service - August 2015 17 (i.e. templates) to make the payment. The payment can be processed immediately, or on a specific future date, or you can set recurring instructions with the bank. 4.4.1 4.4.2 Navigate through the menus to Payments > Within Bank > Own Account Transfer. The system displays the Own Account Transfer screen. Complete required information: - Existing Template [Mandatory] - Select Existing Template radio button to select the existing Payment template for funds transfer. - Make New Payment [Optional] - Select Make New Payment option button to make a new funds transfer entry. The transfer can be done either by using Existing Payment Template or Make New Payment. - User Reference [Optional] - Type the user reference number that you want to use to identify this transaction. - Source Account [Mandatory] - Select the source account number from the drop-down list. Click the button. The system will automatically fetch and display the available balance for the selected source account. - Destination Account [Mandatory] - Select the destination account number from the drop-down list. Click the button. The system will automatically fetch and display the available balance for the selected destination account. - Transfer Amount [Mandatory] - Type the amount to be transferred. - Pay now [Optional] - Select the Pay now radio button to process the funds transfer immediately. The transfer can be done in any of the three modes: Pay now, Pay later or Setup Standing Instruction. - Pay later [Optional] - Select the Pay later radio button to make the funds transfer on a future date. - Setup Standing Instruction [Optional] - Select Setup Standing Instruction to set standing instructions for funds transfer for a period. The system auto transfers the fund on the specified date and frequency. - SI Execution Frequency [Conditional] - Select the standing instruction execution frequency for the funds transfer from the drop-down list. The options are: · Daily · Weekly · Fortnightly · Monthly · Bi-Monthly · Quarterly · Half -Yearly · Yearly - This field is displayed if you select the Setup Standing Instruction option. - First Execution Date [Conditional] - Select the execution date for the first standing instruction from the Calendar pick list. This field is displayed if you select the Setup Standing Instruction option. - Expiry Date [Conditional] - Select the standing instruction Expiry date from the Calendar pick list. This field is displayed if you select the Setup Standing Instruction option. - Narrative [Optional] Type the narrative. - Template Access Type [Optional] - Select template access type from the drop-down list. (For Retail Users, template access type will be private). User Manual for Internet Banking Service - August 2015 18 4.4.3 Click the Initiate button. The system displays the Own Account Transfer - Verify screen. User Manual for Internet Banking Service - August 2015 19 4.4.4 4.4.5 4.4.6 Click the Confirm button. The system displays the Own Account Transfer - Confirm screen with the status message. Click the OK button 4.5 Internal Transfer Using the Internal Transfer option, you can transfer funds within the bank. You can also create and save payment templates to be used later for funds transfer. Such transfer can be done either by making a new payment transaction or using the existing beneficiary details (i.e. templates) to make the payment. The payment can be processed immediately or on a specific future date, or you can set recurring instructions with the bank. 4.5.1 Navigate through the menus to Payments > Within Bank > Internal Account Transfer. The system displays the Internal Account Transfer screen and complete required information: - Existing Template [Optional] - to select the existing Payment template for funds transfer. - Make New Payment [Optional] - Select the Make New Payment radio button to make a new funds transfer entry. The transfer can be done either by using Existing Payment Template or Make New Payment. - User Reference [Optional] -Type the user reference number that you want to use to identify this transaction. - Source Account [Mandatory] - Select the source account number for the internal transfer from the drop-down list. Click the button. The system will automatically fetch and display the available balance for the selected source account. - Beneficiary Account [Mandatory] - Click the Lookup button to select any beneficiary. Account of that selected beneficiary will get displayed here. - Beneficiary Branch [Display] - Beneficiary branch will get automatically populated here after the selection of Beneficiary Account. - Transfer Amount [Mandatory] - Type the transfer amount for the internal transfer. Transfer Currency [Mandatory] - Select the transfer currency for the internal transfer from the drop-down list. - Pay now [Optional] - Select Pay now to process the internal transfer immediately. - The transfer can be done in any of the three modes: Pay now, Pay later or Setup Standing Instruction. - Pay later [Optional] - Select Pay later to make the internal transfer on a future date. The transfer can be done in any of the three modes: Pay now, Pay later or Setup Standing Instruction. - Setup Standing Instruction [Optional] - Select Setup Standing Instruction to set standing instructions for the internal transfer for a period. The system auto transfers the fund on the specified date and frequency. The transfer can be done in any of the three modes: Pay now, Pay later or Setup Standing Instruction. - SI Execution Frequency [Conditional] - Select the standing instruction execution frequency for the internal transfer from the drop-down list. The options are: · Daily · Weekly · Fortnightly · Monthly · Bi-Monthly · Quarterly · Half -Yearly · Yearly This field is displayed if you select the Setup Standing Instruction option. - First Execution Date [Conditional] - Select the execution date for the first standing instruction from the Calendar pick list. This field is displayed if you select the Setup Standing Instruction option. - Expiry Date [Conditional] - Select the standing instruction Expiry Date from the Calendar pick list. This field is displayed if you select the Setup Standing Instruction option. - Narrative [Optional] - Type the narrative. - Template Access Type [Optional] - Select template access type from the drop-down list. Options are: · Public · Private. (For Retail Users, template access type will be private). User Manual for Internet Banking Service - August 2015 20 4.5.2 Click the Initiate button. The system displays the Internal Transfer - Verify screen. User Manual for Internet Banking Service - August 2015 21 4.5.3 4.5.4 Click the Confirm button. If transaction password is required the following screen will appear: 4.5.5 Enter the security Key number and press Submit. Depending on the type of verify screen, the system displays the Internal Transfer - Confirm screen with the status message. Click the OK button. 4.5.6 4.6 Multiple Internal Transfer This option allows you to initiate multiple internal transfers. You can transfer money from one account to as many as five different accounts. In addition you can transfer money from different accounts to a single or multiple accounts as per the instructions. 4.6.1 Navigate through the menus to Payments > Within Bank > Multiple Internal Transfer. The system displays the Multiple Internal Transfer screen and complete required information: - Debit Single Account [Optional] - Select Debit Single Account to debit a single account. - Debit Multiple Account [Optional] - Select Debit Multiple Account to debit more than one account. - User Reference [Optional] - Type the user reference number for the transaction. - Source Account [Mandatory] - Select the source account from the dropdown list. Payment Instruction - Destination Account [Mandatory] - Type the destination account which will act as a credit account for the transaction. - Destination Branch [Display] - This field displays the destination branch selected in the destination branch dropdown. - Transfer Amount [Mandatory] -Type the amount to be transferred. - Transfer Currency [Mandatory] - Select the currency from the drop-down list. - Payment Details - Pay Now [Optional] -Select Pay Now to process the transaction immediately. - Pay Later [Optional] - Select Pay Later to make the payment on future date. - Setup Standing Instruction [Optional] - Select Setup Standing Instruction to set the standing instruction for a period for multiple debits. Following fields are displayed if Setup Standing Instruction radio button is selected. User Manual for Internet Banking Service - August 2015 22 - - SI Details SI Execution Frequency [Conditional] - Select the standing instruction execution frequency from the drop-down list. The options are: · Daily · Weekly · Fortnightly · Monthly · Bi-Monthly · Quarterly · Half -Yearly · Yearly First Execution Date [Conditional] - Select the first standing instruction execution date from the pick list. Expiry Date [Conditional] - Select the standing instruction Expiry date from the Calendar pick list. This field is displayed if you select the Setup Standing Instruction option. Other Details Narrative [Mandatory] Type the brief description of the transaction. 4.6.2 4.6.3 To fill the details for Multiple Debit Account, select the Debit Multiple Account radio button. Click the Add More button to add multiple records. 4.6.4 4.6.5 Click the button to delete a record from the grid. Click the Initiate button. The system displays the Multiple Internal Transfer - Verification screen. User Manual for Internet Banking Service - August 2015 23 4.6.6 4.6.7 Click the Confirm button. If transaction password is required the following screen will appear: 4.6.8 Enter the security Key number and press Submit. The system displays the Multiple Internal Transfer - Confirmation screen with the status message User Manual for Internet Banking Service - August 2015 24 4.6.9 Click the OK button 4.7 Outgoing Account Transfer Using the Outgoing Transfer option, you can transfer funds domestically or globally (Domestic transfers are usually made through the local payments network). Outgoing transfers can be made either by using an existing template or as a new payment transaction. The payment can be processed immediately, or on a specific future date, or as per your standing instructions with the bank. 4.7.1 Navigate through the menus to Payments > Outgoing Transfers and complete required fields Payment To - Existing Template [Optional] - Select Existing Template option button to select the existing Payment template for funds transfer - Make New Payment [Optional] - Select Make New Payment option button to make a new funds transfer entry. The transfer can be done either by using Existing Payment Template or Make New Payment. User Reference Number [Optional] - Type the user reference number as per the your choice. - Source Account [Mandatory] - Select the source account from the drop-down list. Click the button. The system will automatically fetch and display the available balance for the selected source account. Beneficiary Details - Beneficiary Name [Mandatory] - Click the Lookup button to select any beneficiary. Name of that selected beneficiary will get displayed here. - Destination Account Type [Conditional] - Select · Enter Account No User Manual for Internet Banking Service - August 2015 25 - - - - - - - - Account Number / IBAN [Mandatory] - Type the beneficiary account number. Beneficiary Bank Details Enter Beneficiary Bank Details [Optional] - Select the option to enter the beneficiary bank details . The options are follows: · SWIFT · National Clearing Codes · Bank Details SWIFT Code [Conditional] - Click the lookup button to select the swift code. Bank Name [Display] - Beneficiary bank name will get automatically populated here after the selection of swift code. This field is enabled if the Bank Details option is selected from the Enter Beneficiary Bank Details. Bank Address [Conditional] - Type the bank address. This field is enabled if the Bank Details option is selected from the Enter Beneficiary Bank Details. If you select Swift Code then this field will get automatically populated. National Clearing Code [Search] - Click the search button to select the beneficiary bank code. This field is enabled if the National Clearing Codes option is selected from the Enter Beneficiary Bank Details. National Clearing Code Type [Mandatory] - Select the national clearing code type from drop-down list. Country [Conditional] - Type the country name. This field is enabled if the Bank Details option is selected from the Enter Beneficiary Bank Details. If you select Swift Code then this field will get automatically populated City [Conditional] - Type the city of the beneficiary. This field is enabled if the Bank Details option is selected from the Enter Beneficiary Bank Details. If you select Swift Code then this field will get automatically populated Intermediary Bank Details [Conditional] - Select from the radio button : · Swift Code · Bank Details. Note: If you select Swift Code radio button, then after selecting any swift code through search option at Swift Code field, remaining details will get auto populated. If you select Bank details radio button then you will have to enter remaining details. Swift Code [Conditional] - Select the swift code using search button provided. Bank Name [Conditional] - Type the bank name. Bank Address [Conditional] - Type the bank address. City [Conditional] - Type the city of the beneficiary. This field is enabled if the Bank Details option is selected from the Enter Beneficiary Bank Details. Country [Conditional] - Type the country name. This field is enabled if the Bank Details option is selected from the Enter Beneficiary Bank Details. Payment Details Transfer Amount [Mandatory] - Type the transfer amount. If a payment template is selected from the Payment Template drop-down list, this field displays the transfer amount of the selected payment template. Transfer Currency [Mandatory] - Select the transfer currency for the international transfer from the drop-down list. Pay Now [Optional] - Select Pay Now to process the transaction immediately. Pay Later [Optional] - Select Pay Later to make the payment on future date. Other Details Payment Details 1/2/3/4 [Mandatory] - Type the description for payment details. Other Details Correspondence Charges [Mandatory] - Select the correspondence charges from the drop-down list. Narrative [Optional] - Type the narrative. Template Access Type [Optional] - Select template access type from the drop-down list Options are: · Public · Private. User Manual for Internet Banking Service - August 2015 26 4.7.2 Click the Initiate button. The system displays the Outgoing Funds Transfer - Verify screen. User Manual for Internet Banking Service - August 2015 27 4.7.3 4.7.4 Click the Confirm button. The system displays the Outgoing Funds Transfer - Confirm screen with the status message. Click the OK button. The system returns you to the Outgoing Funds Transfer screen. 1 4.8 Bulk Payments (for Business Users Only) Bulk Management allows you to upload files which contain multiple transactions. Bulk module facilitates processing of multiple transactions through a single bulk file like Salary payments, Fund Transfer etc. This is a faster way of processing transactions than entering single screen transactions. The Transactions in the form of files will be uploaded through the internet banking. To be able to use this option the customer has to be a net banking customer and this option must have been configured to the user. The type of the file to be uploaded has to be defined before uploading the file, if the format of the uploaded file is not correct the file will be rejected. On uploading the file you can also view the status of the file using the upload reference number or through bulk file view transaction 1 This functionality is available only to selected customers User Manual for Internet Banking Service - August 2015 28 4.8.1 Bulk File Upload 4.8.1.1 Navigate through the menus to Bulk Transactions > Bulk File Upload. The system displays the File Upload screen - Bulk Identifier [Mandatory] - Select the bulk identifier created earlier in order to identify the file from the drop-down list. - Encoding type used for the upload file [Mandatory] - Select UTF-8 - Upload File [Mandatory] - Select the location from where the file will be uploaded using the Browse button. - Upload File Type [Mandatory] - Select CSV from the type of file to be uploaded from the dropdown. 4.8.1.2 Select the appropriate detail. 4.8.1.3 Click the Clear button to clear the data from the screen. OR Click the Initiate button. The system displays the File Upload screen User Manual for Internet Banking Service - August 2015 29 4.8.1.4 Click the File Reference Number hyperlink to view the status of the upload. The system displays the Bulk File View screen. OR Click the OK button to return to the File Upload screen. 4.8.2 Bulk File View Using this option you are allowed to view the bulk files uploaded by the customer. This function should provide customer to view result of bulk files uploaded. The search can be filtered on various parameters like status, transaction identifier. You can trace the status of the file and if there is an error in the file, you can also download the error file to arrive at the exact reason for error. You can also trace the history of the file. Individual record details can also be checked 4.8.2.1 Navigate through the menus to Bulk Transactions > Bulk File View. The system displays the Bulk File View screen. 4.8.2.2 Enter the relevant information. User Manual for Internet Banking Service - August 2015 30 4.8.2.3 Click the Search button. The system displays the Bulk File View screen with the search result. OR Click the Bulk Transaction Identifier hyperlink. The system displays the Bulk File view screen. OR Click the File status to view the Bulk File view with file status as selected shown in the Bulk File view screen. OR Click the Back button to return to the previous screen. User Manual for Internet Banking Service - August 2015 31 4.8.2.4 Click the File Reference Number hyperlink. The system displays the Bulk File Record Details screen. OR Click the File Name hyperlink. The system displays History Of File screen. 4.8.2.5 Click the Record reference number hyperlink. The system displays details in the Bulk File Record Details screen. 4.9 Additional Options (Save as Drafts\Template, Save and Submit, View Limits) While doing Payments transactions there are additional options available as Save as Drafts\Template, Save and Submit, View Limits. - Using Save as Drafts\Template option, you can save the entered details as drafts or templates. These saved drafts or templates can be used later for any of the payments transactions. You need not to enter any field details for those fields which are already filled in these existing drafts or templates. - Using Save and Submit you can save as well as initiate that transaction. - Using View Limits option, you can view the limits status for that particular transaction. 5. Bill Payments 5.1 Register Biller Using this option, you can register more than one account with the same service provider for bill payment. While paying bill, you can select any of the registered billers to whom bill is needed to be paid. Note: Bill can only be paid to the registered billers. This means that prior to paying a bill, you need to first register a biller. User Manual for Internet Banking Service - August 2015 32 5.1.1 5.1.2 - To register Biller: Navigate through Bill Payments > Register Biller Click the Add New Biller button to register a new biller. The system displays Register Biller screen Select Customer : Select the customer from the drop-down list. Select a Biller : Select the biller from the drop-down list. Account Number with Biller : Type the account number or consumer number with the biller. Nick Name Type the nick name. (This should be one word and contain only alphabetic characters). 5.1.3 Click the Submit button. The system displays Register Biller - Verify screen. 5.1.4 Click the Confirm button. The system displays the Register Biller - Confirm screen with the status message. OR Click the Change button to go to the previous screen and edit the entered data. Click the OK button. The system displays the Register Biller screen. 5.1.5 5.2 Delete a Biller 5.2.1 5.2.2 Select the check box of the customer to be deleted. Click the Delete button to delete a biller. The system displays Delete Biller verify screen User Manual for Internet Banking Service - August 2015 33 5.2.3 5.2.4 Click the Confirm button. The system displays the Delete Biller - Confirm screen with the status message OR Click the Back button to go to the previous screen. Click the OK button. The system displays the Register Biller screen. 5.3 Pay Bill Using this option the user can pay the bill to the registered biller. The system will validate the stored biller information for the sufficient funds to pay bill payment amount. 5.3.1 To Pay Bill: Navigate through Bill Payments > Pay Bill. - Select Customer :Select the customer from the drop-down list. - Select a Biller : Select the biller to which you will pay the bill from the drop-down list. - Select Account : Select the account number from the drop-down list and click Continue. Note: If the customer has setup an account nick name it can be used instead of the account type. - Then complete the Other Details Section Bill Number : Type the bill number. Bill Date : Select the bill date from the pick list. Payment Amount :Type the amount to be paid to the biller. Type of Payment: Select the type of payment from the drop down list Transfer Description: Type the payment details Note: Under Note section are listed the requirements for the details to be included in the Transfer Description field for the payment to be considered valid. Carefully read the notes prior to initiating any payment. User Manual for Internet Banking Service - August 2015 34 5.3.2 5.3.3 5.3.4 Click the Submit button. The system displays Pay Bills - Verify screen. Click the Confirm button. The system displays Pay Bills - Confirm screen with the status message. OR Click the Change button to go to the previous screen and edit the entered data. Click the OK button. The system displays Pay Bills screen. 6. Customer Services 6.1 Stop Or Unblock Cheque Request This option allows you to block/unblock a cheque. It also allows you to block/unblock set or batch of a cheque by entering the cheque range. 6.1.1 6.1.2 6.1.3 6.1.4 Navigate through the menus to Customer Services > Cheques > Stop or Unblock Cheque Request. The system displays the Stop or Unblock Cheque Request screen Complete required fields and Click the Submit button. The system displays the Stop Cheque Request Verify screen Click the Confirm button. The system displays the Unblock Cheque Request Confirmed screen with the status message. Click the OK button. 6.2 Cheque Book Request The Cheque Book Request option allows you to request for a cheque book 6.2.1 Navigate through the menus to Customer Serices > Cheques > Cheque Book Request. The system displays the Cheque Book Request screen and enter required data: - Select Account: Select the account number from the accounts displayed in the dropdown list. - No of Cheque Books: Select the no of cheque books from the drop down list. - Cheque Book Type : Select the type of cheque books from the drop down list. - Cheque Book Option : Select the number of cheque leaves needed from the drop-down list. Select: Cheque Book With 25 Leaves Delivery details User Manual for Internet Banking Service - August 2015 35 - 6.2.2 6.2.3 6.2.4 Mode of delivery: Select: Branch City: Select the City to which the branch belongs from the drop down list. Branch: Select the branch from where the cheque book will be collected from the drop down list. Other data will be automatically populated upon Branch selection. Click the Submit button. The system displays the Cheque Book Request - Verify screen. Click the Confirm button. The system displays the Cheque Book Request – Confirm screen with the status message. OR Click the Change button to change the cheque book details. Click the OK button. 6.3 Cheque Status Inquiry Specific reports can be generated for paid cheques, stopped cheques, paid cheques for a given period and for a given cheque range. Alternatively, a generic report can also be generated. Report can be generated for a single cheque also. A generic report without entering a cheque number can also be found out. 6.3.1 6.3.2 6.3.3 6.3.4 Navigate through the menus to Customer Services > Cheques > Cheque Status Inquiry. The system displays the Cheque Status Inquiry screen. Select the account number from the drop-down menu. Select the cheque status and date range. Click the Submit button. The system displays the status of the cheque and cheque amount. 6.4 Register Report 6.4.1 6.4.2 6.4.3 6.4.4 6.4.5 To Register a report Navigate through the menus to Reports > Register Report. The system displays the Register Report screen. Click the GO button. The system displays the Register Report screen. Select the report frequency and report download format. Enter the date range. Click the View / Register or Run Reports buttons. 6.5 Session Summary This option allows the user to track activity details of last five logins. The user can view the entire session summary of the previous five log sessions, and transactions carried out in each session along with the transactions’ status and time. 6.6 Mailbox The Mailbox option is an integrated communication system within the internet banking system for you to communicate with the bank and vice versa. It allows you to view all the notifications, alert messages and general messages sent by the bank; allows you to send messages to the bank and view the sent messages. Like popular e-mail clients that you may have used, the Mailbox offers an Inbox - where you can view messages and notifications sent to you, a Send Message facility using which you can send messages to the bank and a Sent folder, which allows you to view all the sent items. Mail Box functionality is subdivided into the following sub-sections: - Viewing received messages (Inbox) Viewing sent messages (Sent Messages) Sending messages(Compose) User Manual for Internet Banking Service - August 2015 36 6.7 Reminders The Reminder functionality enables business users to register for reminders. Once a reminder is registered the user can view the reminder under the Reminder schedule. The reminder schedule will display all registered reminders i.e. reminders that are due on the current date and also reminders that are due in the future. Once the reminder is due, it appears under the, ‘Reminders for Today’ screen section of the Reminder schedule. The system will enable the user to take action on the reminder. 6.7.1 To register reminder navigate through the menus to Customer Services > Self Services > Reminder Schedule. The system displays Reminder Schedule screen for reminder. 6.7.2 Initially it shows Reminders for today tab showing today’s reminders. 6.7.3 Click the Dismiss/Delete/Modify links in order to dismiss, delete of modify the reminder respectively. 6.7.4 Click on the Reminder Due during this week tab. The system displays reminders due for current week. 6.7.5 Click on the date link to view the reminder set for that particular day. 6.7.6 Click the Delete/Modify link on order to delete or modify that respective reminder. 6.7.7 Click the Reminders Due during this months tab in order to view reminders due for current month. 6.7.8 Click on the date link to view the reminder set for that particular day. 6.7.9 Click the Delete/Modify link on order to delete or modify that respective reminder 6.7.10 Click the Register New Reminder button. The system displays below Registration screen. 6.7.11 Click the Register button. The system displays Remindres Registration Confirm screen. 6.7.12 Click the OK button. The system displays initial Reminder Schedule screen 6.8 Foreign Exchange Rate Inquiry The Exchange Rate Inquiry option allows the user to view the latest exchange rates for various currencies offered for buying and selling by the bank. The exchange rates will be displayed against the base currency of FCDB. The option provides the buying and selling rates for cash as well as the buying and selling rates applicable for telegraphic transfers. If you wish to buy or sell foreign exchange, refer to this option to find the latest rates offered by the bank before doing so. 6.9 Line Limit Details 6.9.1 To view line limit through the menus to Customer Services > Line Limit Details 6.9.2 Select the customer ID from the drop down list and click View Details. The Limits Query screen is displayed. User Manual for Internet Banking Service - August 2015 37 7. Transactions 7.1 View Initiated Transactions 7.1.1 Navigate through the menus to Transaction Activities > Transactions. The system displays the View Initiated Transactions screen. User Manual for Internet Banking Service - August 2015 38 7.1.2 Click the hyperlink of the status. The system displays search initiated transactions screen. The transaction can be considered complete in case it’s status is “completed”. 7.2 Transaction Authorization (for Business Users only) An Authorizer can view the transactions pending for their authorization using this section. Authorizer can authorize, reject or Send the transaction back for modification. 7.2.1 Navigate through the menus to Transaction Activities > Transactions > Transactions to Authorize. The system displays the Transactions to Authorize screen. - 7.2.2 Transaction Type [Display] - Gives the list of transaction. Status [Display] - Displays the status of transactions. Click on the hyperlink to display the search results as per search criteria for the selected transaction. The transaction can be considered complete in case it’s status is “completed” - Count [Display] - Number of transaction for each transaction type with same status. - Graph [Display] - Displays the count as a graph. Click the status link of the transaction. The system displays the Search Authorization Transactions screen. User Manual for Internet Banking Service - August 2015 39 7.2.3 Click the E banking reference number link. The system displays the View Pending Authorization Transaction screen along with the audit details. OR Select the check box in front of the transaction. Click the Authorize or Reject button to Authorize or Reject the transaction. 7.2.4 Click the Back button to return to the previous screen. User Manual for Internet Banking Service - August 2015 40 7.2.5 7.2.6 7.2.7 7.2.8 7.2.9 OR Click the Reject button the system displays the Reject screen. OR Click the Send to Modify button to send the transaction for modifications. OR Click the Authorize button. The system displays the Transaction for Authorization Verify screen When clicking the Authorize button. The system displays the Transaction for Authorization - Confirm screen. If transaction password is required the following screen will appear: Enter the security Key number and press Submit. On authorizing the transaction if there are more than one Authorizers the transaction goes to the semi authorized state and needs to be further authorized by the second authorizer in a similar process as shown above. Click the OK button. 7.3 To reject the transaction (for Business Users only): 7.3.1 Click the Reject button on the View Pending Authorization transaction screen. The system displays the Transaction for Reject - Verify screen 7.4 To send to modify (for Business Users only): 7.4.1 7.4.2 7.4.3 7.4.4 7.4.5 7.4.6 Click the Send To Modify button. The system displays the Transactions for send to Modify - Verify screen. Click the Send to Modify button. The system displays the Transactions for send to Modify - Confirm Screen Click the Ok button. The system displays the transaction to Authorize screen. Once the transaction has been sent for modification, the transaction is not available for further authorization and the transaction is available with the previous authorizers for Copy. The transaction goes to the initiator for modification. The transaction is available with all the authorizers to copy the transaction and initiate a similar transaction if required. Click the Back button to return to the previous screen. OR Click the Copy transaction button. The system displays the initiate transaction screen to modify the transaction. User Manual for Internet Banking Service - August 2015 41