1
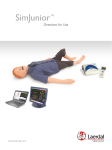
WISEWOMAN Program Clinical Screening Procedures
Procedure For Measurement Of Blood Pressure
1.
CHECK THE EQUIPMENT. Do not use if any problems are found.
A. Look to see that the gauge - mercury meniscus or aneroid needle - is at zero. (Preferably, do
not use an aneroid gauge with a stop-pin.)
B. Check the cuff for any breaks in stitching or tears in the fabric.
C. Check the rubber tubing for cracks or leaks, especially at connections.
D. Be sure three sizes of cuffs are accessible (small, regular, large).
E. Recommend 12-15 inch stethoscope tubing.
2.
PLACE THE MANOMETER so it can be viewed straight on and within 15 inches of the viewer.
3.
RIGHT ARM will be used when possible. Upper arm should be bare and unconstricted by clothing.
(You should be able to get at least one finger under a rolled-up sleeve.)
4.
SELECT THE APPROPRIATE SIZE CUFF. The bladder width should equal at least 40% of the
circumference of the upper arm, and the length of the bladder should be 80% of the circumference
of the arm, but no more than 100%.
5.
PALPATE the location of the brachial artery (on the upper arm's inner aspect.)
6.
POSITION the center of the cuff's bladder over the brachial artery.
7.
APPLY THE CUFF evenly and snugly one-inch (2.5cm) above the antecubital fossa (bend of arm).
CHECK SNUGNESS at both top and bottom of the cuff.
8.
POSITION THE ARM so the cuff is at heart level. The arm should rest firmly supported on a table,
slightly abducted and bent, with palm up.
9.
For the first reading only, OBTAIN PALPATORY SYSTOLIC PRESSURE.
A. Palpate the radial artery pulse.
B. Inflate the cuff to the point where the pulse can no longer be felt.
C. Slowly deflate the cuff, noting on the gauge the point where the pulse reappears/can again be
felt. This is the estimated systolic pressure.
Rapidly deflate the cuff. Wait at least 15-30 seconds before re-inflating the cuff to begin the first
auscultatory measurement. (This allows good circulation to be reestablished.)
10.
CALCULATE the maximum inflation level (MIL) by adding 30 mm Hg to the estimated systolic. (This
figure will be utilized in Step #14.)
11.
CHECK THE CLIENT'S POSITION. Legs should be uncrossed, feet resting firmly on the floor and the
back supported while blood pressure is being measured. (Clients may need to be reminded to
uncross their legs each time you are ready to take a blood pressure reading.)
12.
INSERT the stethoscope earpieces, angled forward to fit snugly.
13.
PLACE THE BELL OR THE DIAPHRAGM HEAD of the stethoscope lightly over brachial artery at the
bend of the elbow, but with good skin contact. Avoid too much pressure, which can close off the
vessel and distort the sounds, therefore altering the reading. (The bell head is preferred because it
permits more accurate auscultation of the Korotkoff sounds than the diaphragm, especially in the
10/2013
WISEWOMAN Clinical Procedures - Measurement of Blood Pressure
14.
interpretation of diastolic readings.)
INFLATE the cuff as rapidly as possible to maximum inflation level (MIL), calculated in Step #10 (30
mm Hg above estimated systolic pressure).
15.
DEFLATE THE CUFF SLOWLY and CONSISTENTLY at the rate of 2 mm per pulse beat. The rate of
deflation should be slow enough to accurately evaluate the exact millimeter marking of the
Korotkoff sounds. Once deflation has begun, never reinflate.
16.
NOTE where the first sharp rhythmic sound appears in relation to the gauge's calibrations. This is
the systolic pressure.
17.
CONTINUE DEFLATION at the established rate. NOTE on the gauge where the last sound is heard.
This is the diastolic pressure (5th Korotkoff phase) in adults.
18.
CONTINUE DEFLATION for 10 mm Hg past the last sound. (This assures that the absence of sound is
not a "skipped" beat but is the true end of the sound.) Then deflate the cuff rapidly and
completely.
19.
RECORD the readings to the nearest 2mm (round off upward). This means all readings taken with
non-electronic equipment will be stated and written in even numbers.
20.
MAKE NOTATIONS of cuff, arm and position only if there are variations from the standard
procedure of seated, regular cuff, right arm and fifth Korotkoff phase.
21.
Reporting for READINGS where examiner has questions:
A. When an auscultatory gap is heard (at least 2 initial beats, then absence of regular beats), do
not record the first disappearance of sound as the diastolic reading. The sound will soon return
as decompression of the vessel continues. The sound will finally disappear, indicating true
diastolic.
B. When sounds are too soft to be certain of either systolic or diastolic readings, "discard" this
reading. Institute augmentation procedures on the next attempt. Always inflate the cuff to the
MIL as rapidly as possible.
AUGMENTATION PROCEDURES
Have the client raise their arm prior to inflation to drain the blood from forearm. Inflate the cuff
rapidly and then have the client lower his/her arm to the standard position. Apply the stethoscope
immediately and begin deflation.
or
After inflation, keep the valve closed and have the client clench fist 5-6 times. Then apply the
stethoscope immediately and begin deflation.
REPEAT the measurement 30 seconds or more after the cuff is completely deflated. This allows for
circulation to adequately return and permits a true reading.
NOTE:
Mercury manometers are preferred because they are more accurate, easier to maintain and
less likely to become decalibrated.
Source: (1) Michigan Department of Public Health and the Michigan Association for Local Public Health. Promoting
Cardiovascular Health in Michigan: Recommendations for Action. pp 35-37, December 1991; (2) Perloff,
Dorothea; Grim, Carlene; et.al..... "Human Blood Pressure Determination by Sphygmomanometry." AHA
Medical/Scientific Statement: Special Report. Circulation. Vol. 88, No. 5, Part 1, November 1993. pp 2460-2470.
2
10/2013
WISEWOMAN Clinical Procedures - Measuring BP on Lower Arm
Procedure for Measuring Blood Pressure on Lower Arm
This procedure should only be used if the upper arm is too large for a large adult cuff and an
appropriate size cuff is not available. This procedure is recommended only as a last attempt to get the
best estimate of the blood pressure (BP) as possible.
The proportion of the bladder in the cuff to the lower arm should still meet the procedural guidelines
outlined: the bladder width should be 40% and the bladder length should be 80% of the circumference
of the lower arm.
Sometimes the diastolic reading may not be audible over the radial artery but the systolic at minimum
could be recorded. Be sure you note that the BP was taken on the lower arm.
The procedure below is the same as the one used in the upper arm except for the changes noted in
italics:
1. CHECK THE EQUIPMENT. Do not use if any problems are found.
A. Look to see the gauge - mercury meniscus or aneroid needle is at zero. (Preferably, do not use
an aneroid gauge with a stop-pin.)
B. Check the cuff for any breaks in stitching or tears in the fabric.
C. Check the rubber tubing for cracks or leaks, especially at connections
D. Be sure three sizes of cuffs are accessible (small, regular, and adult large).
E. Recommend 12-15 inch stethoscope tubing and bell/diaphragm stethoscope head.
2. PLACE THE MANOMETER so it can be viewed straight on and within 15 inches of the viewer.
3. RIGHT ARM will be used when possible. Lower arm should be bare and un-constricted by clothing.
(You should be able to get at least one finger under a rolled up sleeve.)
4. SELECT THE APPROPRIATE SIZE CUFF. The bladder width should equal at least 40% of the
circumference of the lower arm, and the length of the bladder should be 80% of the circumference
of the arm, but no more than 100%. Measure the circumference halfway between the wrist and
elbow.
5. PALPATE the location of the radial artery.
6. POSITION the center of the cuff’s bladder over the radial artery.
7. APPLY THE CUFF evenly and snugly one-inch (2.5 cm) above the radial artery at the wrist. CHECK
SNUGNESS at both the top and bottom of the cuff.
8. POSITION THE ARM so the cuff is at heart level. The forearm should be supported on a table, slightly
abducted and bent, with palm up.
9. For the first reading only, OBTAIN ESTIMATED SYSTOLIC PRESSURE.
A. Palpitate the radial artery pulse.
B. Inflate the cuff to the point where the pulse can no longer be felt.
C. Slowly deflate the cuff, noting on the gauge the point where the pulse reappears/can again be
felt. This is the estimated systolic pressure.
3
10/2013
WISEWOMAN Clinical Procedures - Measuring BP on Lower Arm
D. Rapidly deflate the cuff. Wait at least 15-30 seconds before re-inflating the cuff to begin the
first auscultatory measurement. (This allows good circulation to be reestablished.)
10. CALCULATE the maximum inflation level (MIL) by adding 30 mm Hg to the estimated systolic
pressure. (This figure will be utilized in step #14)
11. CHECK THE CLIENT’S POSITION. Legs should be uncrossed, feet resting firmly on the floor and the
back supported while blood pressure is being measured. (Clients may need to be reminded to
uncross their legs each time you are ready to take a blood pressure measurement.)
12. INSERT the stethoscope earpieces, angled forward to fit snugly.
13. PLACE THE BELL OR THE PEDIATRIC DIAPHRAGM HEAD of the stethoscope lightly over the radial
artery, but with good skin contact. Avoid to much pressure, which can close off the vessel and
distort the sounds, therefore altering the reading. (The bell head is preferred because it permits
more accurate auscultation of the Korotkoff sounds that the diaphragm, especially in the
interpretation of diastolic readings.)
14. INFLATE the cuff as rapidly as possible to maximum inflation level (MIL), calculated in Step #10 (30
mm Hg above estimated systolic pressure.)
15. DEFLATE THE CUFF SLOWLY and CONSISTENTLY at the rate of 2 mm per pulse beat. The rate of
deflation should be slow enough to accurately evaluate the exact millimeter marking of the
Korotkoff sounds. Once deflation has begun, never re-inflate.
16. NOTE where the first sharp rhythmic sound appears in relation to the number or markings on the
gauge. This is the systolic pressure.
17. CONTINUE DEFLATION at the established rate. NOTE on the gauge where the last sound is heard.
This is the diastolic pressure (5th Korotkoff phase) in adults.
18. CONTINUE DEFLATION for 10 mm Hg past the last sound. (This assures that the absence of sound is
not a skipped beat but is the true end of the sound.) Then deflate the cuff rapidly and completely.
19. RECORD the readings to the nearest 2mm (round to an even number). This means all readings take
with non-electronic equipment will be stated and written in even number.
20. MAKE NOTATIONS of cuff, arm and position only if there are variations from the standard procedure
of seated, regular cuff, right arm and fifth Korotkoff phase. Be sure to note lower arm used.
21. Reporting for READINGS where examiner has questions:
A. When an auscultatory gap is heard (at least 2 initial beats, then absence of regular beats), do
not record the first disappearance of sound as the diastolic reading. The sound will soon return
as record as decompression of the vessel continues. The sound will finally disappear, indicating
true diastolic.
B. When sounds are too soft to be certain of either systolic or diastolic readings, discard this
reading. Institute augmentation procedures on the next attempt. Always inflate the cuff to the
MIL as rapidly as possible.
4
10/2013
WISEWOMAN Clinical Procedures - Cholestech
®
AUGMENTATION PROCEDURES
Have the client raise the arm prior to inflation to drain the blood from forearm. Inflate the cuff
rapidly and then have the client lower his/her arm to the standard position. Apply the stethoscope
immediately and begin deflation.
or
After inflation, keep the valve closed and have the client open and close her/his fist 5-6 times. Then
apply the stethoscope immediately and begin deflation.
22. REPEAT the measurement 30 seconds or more after the cuff is completely deflated. This allows for
circulation to adequately return and permits a true reading.
Note: Use the same BP classification levels for high and normal cut off points.
Source (1) Michigan Department of Public Health and the Michigan Association for Local Public Health. Promoting Cardiovascular Health in
Michigan: Recommendation for Action. pp 35-37, December 191; (2) Perloff Dorothea; Grim, Carlene; et.al... AHuman Blood Pressure
Determination by Sphygmomanometry.@ AHA Medical/Scientific Statement: Special Report. Circulation. Vol. 88, No.5, Part 1, November 1993.
Pp 2460-2470; (3) The Sixth Report of the Joint Committee on Detection, Evaluation and Treatment of _High Blood Pressure (NIH Publication
No. 98-4080, November, 1997. (4) Consultation with Grim, Clarence and Carlene. December 22, 2000.
g:bplowerarm.12-00
5
10/2013
WISEWOMAN Clinical Procedures - Cholestech
®
CHOLESTECH® BLOOD COLLECTION BY FINGER PUNCTURE
FOR
CHOLESTEROL AND GLUCOSE
Purpose: To safely obtain a viable whole blood capillary specimen for processing in the Cholestech LDX
System® maintaining the standards required by Occupational Health and Safety Administration (OSHA),
Clinical Laboratories Improvement Amendments (CLIA’88), and clinical practices.
CLIA regulations are based on the test complexity, and are classified as waived, moderate complexity, or high
complexity. Facilities performing only waived tests have no routine oversight or personnel requirements and
are only required to obtain a Certificate of Waiver, pay fees and follow the manufacturer’s requirements.
Health Departments and other facilities must follow the requirements of the policies of their laboratory
director.
I.
Background and Exposure Control
a) Facilities providing services that could result in contact with human blood or other potentially
infectious material must have an “OSHA-Bloodborne Pathogen Exposure Control Plan” (BPECP)
outlining tasks, procedures, assigned job classifications according to exposure risk (Category A or
B), engineering controls, universal precautions, and personal protective equipment (PPE)
required to decrease the risk of their employees’ exposure to any bloodborne pathogen.
b) Category A employees perform procedures or tasks conducted in routine situations as a
condition of employment that could result in exposure to human blood or other infectious
material. Employers must offer the Hepatitis B vaccine series, boosters, and antibody testing to
Category A employees. If the employee initially declines, the employer must provide the vaccine
if an employee changes their mind and is still in Category A.
c) Category A employees must be provided OSHA-approved lancets* and specific training as
established in the Facility’s BPECP on OSHA’s standard “Occupation Exposure to Bloodborne
Pathogens ” before beginning to test and annually thereafter.
**OSHA Approved Lancets
Authority: The Department of Consumer and Industry Services: Occupational Health Standards—Bloodborne Infectious
Diseases by the authority conferred on the director of the department of consumer and industry services by: [ sections 14
and 24 of 1974, PA 154, MCL 408.1014 and 408.1024, and Executive Reorganization Order Nos. 1996-1 and 1996-2, MCL
330.3101 and 4454.2001]
* Category A, non-managerial, employees, annually, shall have direct input, documented in the “BBECP”, into
the identification, evaluation, and selection of effective engineering and work practice controls including
commercially available and effective safer medical devices designed to eliminate or minimize occupational
exposure, including improved technology (self-retracting lancets, needleless systems, etc. )
II.
Exposure Avoidance
a) Universal precautions (a method of infection control that treats all human blood and other
potentially infectious
b) material as capable of transmitting, HIV, HBV, and other bloodborne pathogens) must be
followed.
c) Place sharps container close to the collection site and place contaminated lancet into the
container immediately after use. Dispose of all blood collection materials and cassettes in a
biohazard waste container immediately after use following the facility’s BPECP. Wear intact
6
10/2013
WISEWOMAN Clinical Procedures - Cholestech
®
gloves at all times during the procedure, in addition to lab coat and other personal protective
equipment as indicated.
d) Any blood spill should be cleaned immediately with a 10% bleach solution or other approved
bloodborne pathogen disinfectant.
e) Materials for each client’s specimen should be placed on a clean, non-permeable and absorbent
surface such as a small waterproof towel.
III.
Machine and Work Area Preparation
Work surface should be clean and sanitary, without direct heat or bright light, and at room
temperature (68-86˚F)
Set-up machine according to the “Cholestech User Manual®. Page 9, Getting Started”. Available
online at: www.cholestech.com
IV.
a)
b)
c)
d)
e)
f)
g)
h)
i)
j)
k)
l)
m)
V.
Materials and Equipment:
10% bleach solution or other disinfectant approved for blood-borne pathogens
70% isopropyl alcohol or alcohol swab
Cotton balls, or gauze
Blood lancets and/or lancet device for skin punctures
Capillary tubes and Micropipettes
Cholestech® LDX Machine Analyzer, test cassettes, Optics check cassette
Water-proof towels/drapes
Power source
Quality control serum vials (high and low) and recording records
Personal protective equipment
Sharps containers and biohazardous waste containers
Hand gel or sink
Band-aids (Optional)
Client Specimen Collection and Testing
Read the procedures in the Cholestech LDX User Manual® and Product Insert Instructions for testing
patient samples.
a) Check signed consent for testing and HIPAA Privacy Statement if applicable. Identify the patient,
and explain the procedure to them.
b) Assess the warmth/circulation of the patient’s fingers and choose a site. The third or fourth
(middle or ring) finger on the non-dominant hand is preferred for finger sticks. Do not use a
finger with calluses and/or a wound. If improvement in circulation is needed, have the patient
rub their hands together or hold below the level of their heart for a few minutes.
c) Choose a site that is on the side of the fingertip midway between the edge and
midpoint of the fingertip. (see drawing)
d) Wash your hands before you put on your gloves. Hand disinfectant gels are
acceptable unless the facility policies state otherwise.
e) Cleanse the client’s finger with alcohol from a wipe or cotton ball for 15-30
seconds, rubbing vigorously. Wipe excess alcohol with sterile gauze let dry or it will sting and
potentially make the reading inaccurate.
7
10/2013
WISEWOMAN Clinical Procedures - Cholestech
f)
g)
h)
i)
j)
k)
l)
m)
n)
o)
p)
q)
®
Using a sterile, OSHA-approved* blood lancet, make a deep enough puncture (1.5mm) to form a
free-flowing drop of blood. A deep puncture will avoid needing to re-puncture.
To assure an accurate reading, squeeze the finger from the base moving to the top, DO NOT
MILK the finger or allow air bubbles to collect in the capillary tube.
Hold the capillary tube horizontally by the end with the plunger. Insert the capillary tube tip in
the drop of blood. The tube will fill by capillary action up to the black mark. Perform the filling of
the tube within 10 seconds of the puncture to assure a good specimen.
If another drop of blood is needed and the same puncture site is viable, wipe the finger with
gauze, and squeeze until a large drip of blood forms. If you can not obtain a large enough drop,
choose another site, disinfect and re-puncture. It is not necessary to re-glove at this point if the
gloves are intact.
Wipe off any excess blood and ask the patient to apply pressure to the puncture until the
bleeding stops. Apply a band-aid to the site to prevent contamination.
Using the plunger, dispense the entire blood sample from the micropipette, into the cassette as
soon as possible.
Once you have placed the sample into the cassette well, place the cassette in the drawer and
press RUN immediately.
Dispose of lancet and capillary tube into the sharps container and other materials and into a
biohazard waste container or as directed by the BPECP.
Remove gloves pulling one over the other, turning the contaminated side inside out.
Give the client the written result and counsel or send to the next station for counseling.
Put on a fresh pair of gloves for the next client.
At the end of the session, clean entire area and wipe down countertops with the 10% bleach
solution or other designated disinfectant. Clean machine according to the manufacturer’s
instruction. Dispose of biohazardous materials container and sharps according to the facility’s
BPECP.
Analysis of Blood Sample
Follow manufacturer’s instructions. Cholestech User Manual®. Page 15, Testing Procedure”. Available
online at: www.cholestech.com
Quality Control
Quality control practices assure that the system is working properly and giving dependable results.
Good laboratory practice principles suggest that in addition to routine testing, (a-c below), external
controls must be run if there is any question of the system integrity or operator technique, for
example, if reagent storage or handling or when the machine operators have not performed a test in
recent weeks.
a) Controls and Optics Check must be run on every day of testing before the first test is done.
b) Controls must be run each time a new lot of cassettes is opened.
c) Controls must be run anytime there is a question about the cassettes being stored properly.
d) The Cholestech LDX is a waived CLIA test so external proficiency tests are not required in the
law; however, they are recommended and may be required by the laboratory director.
e) See facility policies for all lab related recording forms, corrective action plans, and other facilityspecific requirements.
Refer to the Cholestech User Manual®. Page 23, Quality Control, Available online at:
www.cholestech.com
8
10/2013
WISEWOMAN Clinical Procedures - Cholestech
®
References:
•
•
•
•
•
•
•
Cholestech ® Technical Service 1-800-733-0404
Manufacturer‘s Website: www.cholestech.com
Web-based MDCH Laboratory Procedure #RL.04.01
http://www.michigan.gov/documents/RL_135815_7.04.01_Specimen_Collection_Blood_by_Fin
ger_Puncture.doc
OSHA-“Occupation Exposure to Bloodborne Pathogens” (29CFR 1910.1030)
CMS CLIA Resource: http://www.cms.hhs.gov/clia/
FDA CLIA Resource: http://www.fda.gov/cdrh/clia/
HIPAA: http://www.hhs.gov/ocr/hipaa/
MMWR-Recommendations and Reports Good Laboratory Practices for Waived Testing Sites
[11/11/2005/Vol.54/No., RR-13]
WISEWOMAN Program Procedure
MDCH, Cardiovascular Health, Nutrition and Physical Activity Section 7/2007
9
10/2013
WISEWOMAN Clinical Procedures – CLIA
Clinical Laboratory Improvement Amendments of 1988
General Program Description
Congress passed the Clinical Laboratory Improvement Amendments (CLIA) in 1988 establishing quality
standards for all laboratory testing to ensure the accuracy, reliability and timeliness of patient test
results regardless of where the test was performed. A laboratory is defined as any facility which
performs laboratory testing on specimens derived from humans for the purpose of providing
information for the diagnosis, prevention, treatment of disease, or impairment of, or assessment of
health. CLIA is user fee funded; therefore, all costs of administering the program must be covered by
the regulated facilities, including certificate and survey costs.
The final CLIA regulations were published on February 28, 1992 and are based on the complexity of the
test method; thus, the more complicated the test, the more stringent the requirements. Three
categories of tests have been established: waived complexity, moderate complexity and high
complexity. CLIA specifies quality standards for proficiency test (PT), patient test management, quality
control, personnel qualifications and quality assurance for laboratories performing moderate and/or
high complexity tests. Waived laboratories must enroll in CLIA, pay the applicable fee and follow
manufacturers’ instructions. Because problems in cytology laboratories were the impetus for CLIA,
there are also specific cytology requirements.
The Centers for Medicare & Medicaid Services (CMS) is charged with the implementation of CLIA,
including laboratory registration, fee collection, surveys, surveyor guidelines and training, enforcement,
approvals of PT providers, accrediting organizations and exempt states. The Centers for Disease Control
and Prevention (CDC) is responsible for the CLIA studies, convening the Clinical Laboratory Improvement
Amendments Committee (CLIAC) and providing scientific and technical support/consultation to
DHHS/CMS. The Food and Drug Administration is responsible for test categorization.
To enroll in the CLIA program, laboratories must first register by completing an application, paying fees,
being surveyed, if applicable, and becoming certified. CLIA fees are based on the certificate requested
by the laboratory (that is, waived, PPM, accreditation, or compliance) and, for moderate and high
complexity laboratories, the annual volume and types of testing performed. Waived and PPM
laboratories may apply directly for their certificate as they aren’t subject to routine inspections. Those
laboratories that must be surveyed routinely; i.e., those performing moderate and/or high complexity
testing, can choose whether they wish to be surveyed by CMS or by a private accrediting organization.
The CMS survey process is outcome oriented and utilizes a quality assurance focus and an educational
approach to assess compliance.
CLIA and the WISEWOMAN Program
The Cholestech LDX System is in the waived category. All users of waived tests are required to register
with CMS and obtain a CLIA Certificate of Waiver. Many local health departments in Michigan are part
of the Regional Lab System that the Michigan Department of Community Health oversees. If the
cholesterol and glucose screening are to take place at a health department that is part of the Regional
Lab System, it is important to confirm that a suitable CLIA certificate has been obtained. If the
cholesterol and glucose screening are to take place through an agency other than a local health
department, the application for the Certificate of waiver can be obtained through the CMS website,
http://www.cms.hhs.gov/clia/ .
10
10/2013