1
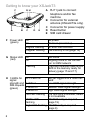
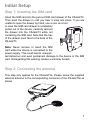
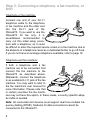
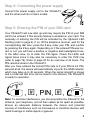
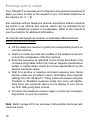
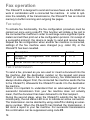
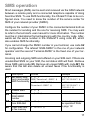
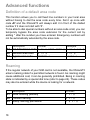
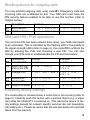
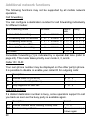
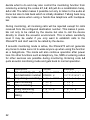
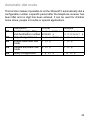
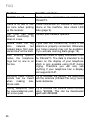
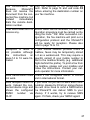
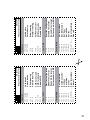
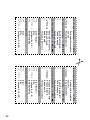
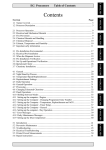
®
XSJack T3i
®
XSJack T3e
User Manual
2
Introduction
Thank you for choosing the XSJackT3e or XSJackT3i - henceforth
both referred to as XSJackT3. With the XSJackT3 a fax machine and a
telephone can be connected and used in a GSM mobile network.
Scope of delivery
■
■
■
■
XSJackT3e or XSJackT3i
Power supply
GSM antenna (XSJackT3e only)
User manual
Safety information
To protect yourself and the device from damage, please observe the
following when using and handling the XSJackT3:
■
■
■
■
■
■
■
■
■
The XSJackT3 is designed solely for use in dry heated rooms.
It must be kept away from fire and flames!
Do not use the XSJackT3 in areas with potentially explosive
atmospheres.
Prevent the device from exposure to direct sunlight or heat.
The slots and openings serve to ventilate the device and must
not be covered.
The device must not come into contact with liquid as this could
result in electric shock, short-circuiting or total destruction of the
device or worse.
Do not open the housing of the XSJackT3. This could cause a
hazard to the user or damage the device.
Dispose of the XSJackT3 in accordance with statutory requirements. The current disposal guidelines for electrical equipment
can be obtained from any recycling centre. Please also refer to
page 30.
Please use the original 4G Systems power supply only.
3
Table of contents
Introduction
Scope of delivery
Safety information
Table of contents
Getting to know your XSJackT3
Initial Setup
Step 1: Inserting the SIM card
Step 2: Connecting the antenna
Step 3: Connecting a telephone, a fax machine, or both
Step 4: Connecting the power supply
Step 5: Entering the PIN of your SIM card
Entering service codes
Telephone operation
Making telephone calls
Call waiting, call holding and conferences
Fax operation
Fax setup
Fax transmission
Fax reception
Resetting the fax memory
Fax and SIM card types
SMS operation
Advanced functions
Definition of a default area code
Roaming
Blocking device for outgoing calls
SIM card PIN / PUK operations
Resetting factory settings
Additional network functions
Acoustic Monitoring / Babyphone
Automatic dial mode
4
3
3
3
4
6
7
7
7
8
9
9
10
11
11
12
14
14
14
15
15
16
17
18
18
18
19
19
19
20
21
23
Appendix
Signal tones
FAQ
Technical data
Dimensions for wall mounting
Conformity
Disposal information
24
24
26
28
29
30
30
5
Getting to know your XSJackT3
F
A
GH
B
C
RJ11 jack to connect
telephone and/or fax
machine
B Connector for external
antenna (XSJackT3e only)
C Connector for power supply
D Reset button
E SIM card drawer
A
D
E
F Power LED
(green)
Off
On
Regular flashing
Irregular flashing
No power
Device is powered up
An error has occurred
Fax memory is full (page 15)
G Status LED
(red)
Off
On
Idle mode
Ongoing voice or fax connection to GSM network
There are received faxes and/or
SMS in the memory ready for
delivery (page 15 and 17)
Flashing
H 3 LEDs for All 3 LEDs off
signal
strength and 1 LED on
SIM requests
2 LEDs on
(green)
3 LEDs on
Left LED flashing
Not yet logged into a GSM network
Low GSM signal strength
Medium GSM signal strength
High GSM signal strength
The SIM card is blocked, defect
or not available
Middle LED
SIM PUK entry is required
flashing
(page 19)
Right LED flashing SIM PIN entry is required
(page 9)
6
Initial Setup
Step 1: Inserting the SIM card
Insert the SIM card into the pull-out SIM card drawer of the XSJackT3.
Then push the drawer in until you hear it snap into place. If you are
unable to open the drawer by hand, use a coin as a tool.
In case the SIM card drawer is completely
pulled out of the device, carefully reinsert
the drawer into the XSJackT3 while not
containing the SIM card. Note that the tray
of the drawer must face to the back of the
XSJackT3
Note: Never remove or insert the SIM
card while the device is connected to the
power supply. This could lead to unexpected behaviour and even permanent damage to the device or the SIM
card. Disregarding this warning causes a warranty breach.
Step 2: Connecting the antenna
This step only applies for the XSJackT3e. Please screw the supplied
external antenna to the corresponding connector of the XSJackT3e as
shown.
7
Step 3: Connecting a telephone, a fax machine, or
both
Telephone or fax machine:
Connect one end of your RJ-11
telephone cable to the telephone
or fax machine and the other end
into the RJ-11 jack of the
XSJackT3. If you want to use the
XSJackT3 for fax only, it is
nevertheless recommended to
carry out this initial setup procedure with a telephone, as it could
be difficult to enter the required service codes on a fax machine due to
the absence of a telephone receiver or dedicated button to go off hook.
If you do not have an analogue telephone available, refer to page 10.
Telephone and fax machine:
If both a telephone and a fax
machine are to be connected, first
connect the fax machine to the
XSJackT3 as described above.
Afterwards, connect the telephone
to an available RJ-11 jack of the fax
machine. You may want to refer to
the fax machine's user manual for
more information. Please note that
in certain countries the fax machines may not have this option. In these cases, a country specific adapter cable is needed.
Note: All connected end devices must support dual tone multiple frequency dialling (DTMF). Modems for data connections cannot be
connected to the XSJackT3.
8
Step 4: Connecting the power supply
Connect the power supply unit to the XSJackT3
and the other end into a mains socket.
Step 5: Entering the PIN of your SIM card
Your XSJackT3 will now start up and may require the PIN of your SIM
card to be entered, if this security feature is enabled on your card. The
necessity of entering the PIN will be indicated by the rightmost LED
flashing (refer to page 6). If so, lift the telephone receiver, wait for the
corresponding dial tone, press the # key, enter your PIN, and confirm
by pressing the # key again. Depending on if the entered PIN was correct or not, you will hear a positive or negative acknowledgment tone.
In the latter case, try to enter the PIN again. Check the LEDs and
signal tones since it may also be necessary to enter the PUK now
(refer to page 19). Refer to page 24 for an overview of all tones. The
PIN remains stored in the XSJackT3.
After you have entered the correct PIN code or if your SIM is not PINsecured at all, the device will automatically log onto the GSM network,
which may take up to 45 seconds. When the signal strength is shown
and a continued dial tone can be heard in the receiver, the XSJackT3
is ready for operation.
, , PIN, ,
Note: To minimize interference, you should position the XSJackT3, the
antenna, your telephone, and all their cables as far apart as possible.
Ensure an adequate distance between the device and potential
sources of interference such as microwaves or electrical devices with
metal housings or metal objects in general.
9
Entering service codes
Your XSJackT3 is operated and configured using special sequences of
digits you have to enter to the keypad of your connected telephone or
fax machine (0 - 9, *, #).
Fax machines without telephone receiver sometimes feature a dedicated button to go offhook and onhook, which may be indicated by an
icon like a telephone receiver or loudspeaker. Refer to the manual of
your fax machine for additional information.
On devices with telephone receiver or dedicated offhook/onhook
button, proceed as follows:
■
■
■
■
■
Lift the telephone receiver or press the corresponding button on
your fax machine.
Wait for a continuous dial tone audible in the telephone receiver
or from the loudspeaker of the fax machine.
Enter the sequence as specified by the format described in the
corresponding tables within this manual. Replace placeholders
written in capital letters inside the format specifications by the
desired numerical values.
Wait for a positive or negative command response tone. Some
service codes are provided to query information about specific
settings from the XSJackT3. These codes will answer using the
'Enabled' or 'Disabled' response codes and some will additionally show you numerical values on the display of your phone
via CLIP after going back onhook.
Put down the telephone receiver again or press the corresponding button on your fax machine.
Note: Refer to page 24 for an overview of all possible dial tones and
response tones.
10
If you have a fax machine connected without telephone receiver and
without dedicated offhook/onhook button, a trick may help:
Insert some sheet of paper in your fax machine as if you would like to
send a fax. Enter the service code as an imaginary destination number
and press 'Start' (or similar). The machine will now go offhook and will
dial the entered service code. After you can hear the response tone
from the XSJackT3 (loudspeaker on fax machine must be enabled!),
press 'Cancel' (or similar). As this is an exhausting method, it is highly
recommended to get a separate telephone for entering service codes.
Telephone operation
Making telephone calls
Making phone calls with the XSJackT3 is as easy as if it was a fixed
line. Just lift the telephone receiver, wait for the dial tone, and enter
your desired destination number including the area code. There are
several different dial tones which may indicate special conditions (refer
to page 24).
Actual dialling will take place after a specific time from the last entered
digit. By default this delay is set to 4 seconds. You may change this
period by using code D3. Furthermore you can skip this period and
immediately let the connection be established by entering # behind the
destination number (code D2).
Emergency calls to '112' can always be made - even without SIM card
or without being logged onto a network.
D1
D2
D3
Description
Dialling a number
Quick dialling
Change dial delay
Format
NUMBER
NUMBER #
* 02 * SECONDS #
Example
04091827364
04091827364 #
* 02 * 5 #
11
Call waiting, call holding and conferences
During active calls there are a number of possibilities to establish connections with multiple participants. To be able to receive a second call
during an ongoing one, call waiting must be generally allowed by activating it once using code W1.
W1
W2
W3
Description
Activate call waiting
Deactivate call waiting
Query call waiting setting
Format
* 43 #
# 43 #
* # 43 #
At different stages during active connections, there are different possibilities to manage multiple calls, which can be performed using the
hookflash button (R) on your telephone.
During an active call you can set up a second one:
H1
H2
Description
Format
Set active call on hold to establish second call R
Skip establishment of second call H1, get R or hang up
back to held one
If call waiting is activated, you will hear a signal when a new call
arrives. At this time you can choose between:
H3
H4
H5
Description
Reject waiting call
Take waiting call, end active call
Take waiting call, put active call on hold
Format
R 0
R 1
R 2
If you have one active call and one call on hold, the following actions
can be performed:
H6
H7
H8
H9
12
Description
End held call
End active call, switch to held one
Toggle between active call and held one
Establish three-party conference
Format
R 0
R 1 or hang up
R 2
R 3
This figure illustrates the relations between the different call stages.
R
Dial tone
1 call on hold
1 active call
New call
established
ve
ll,
call
ew hold
n
e
n
Tak all o
R2: ctive c
ut a
+p
ca
R0: Reject waiting call,
R1: Take new call + end active call,
Waiting caller hung up
ti
ll, ac
ca d
ld En
he p: up
u
d
En ang ung
:
h
R0 / H all
R1 ld c
He
call waiting signal
R / Hang up
1 active call
1 call on hold
R3
1 active call
1 new call
waiting
Three-party
conference
R2: Swap active
and held call
13
Fax operation
The XSJackT3 is designed to send and receive faxes via the GSM network in combination with a connected fax machine. In order to optimize the reliability of fax transmissions, the XSJackT3 has an internal
memory to buffer incoming and outgoing fax pages.
Fax setup
To activate fax functionality, the fax configuration procedure must be
carried out once using code F1. This function will initiate a fax call to
the connected fax machine in order to exchange some significant parameters and will then print out a fax configuration protocol. On receipt of
a successful protocol, the device is ready to send and receive faxes.
Repeat the fax configuration when another fax machine is connected,
settings of the fax machine were changed (e.g. caller ID), or the
XSJackT3 has been resetted.
F1
F2
Description
Format
Initiate fax configuration and enable fax * 10 #
reception
Recall current fax configuration protocol
* # 10 #
Fax transmission
To send a fax, proceed as you are used to: insert a document into the
fax machine, dial the destination number on the keypad and press
'Start' (or similar). Due to the internal memory, fax transmissions are
always double-staged. First, the connected fax machine sends the fax
to the XSJackT3, afterwards the XSJackT3 sends it to the destination
fax machine.
Hence it is important to understand that an acknowledgment of the
successful transmission from your fax machine does not actually
mean, that the document has been delivered to its final recipient.
During the second stage, when the XSJackT3 submits the fax to the
remote party, the red status LED is on to indicate an active connection.
The transmission can be aborted by using code F3 or dialling an emergency number. When the XSJackT3 has finished the transmission, it
will send a report to your fax machine. For successful transmissions
this confirmation can be suppressed using code F5.
14
Unsuccessful transmission confirmations will be printed in any case.
F3
F4
F5
F6
Description
Abort GSM fax transmission
Enable successful transmission confirmation (default)
Disable successful transmission confirmation
Manually declare fax mode for outgoing
transmission (normally not necessary)
Format
***
* 15 #
# 15 #
### NUMBER
Fax reception
In the first stage of fax reception the XSJackT3 receives the fax from
remote into the internal memory, which is indicated by the red status
LED. Afterwards the fax will be sent to your fax machine. Fax pages
will remain in memory until they have been successfully delivered.
Waiting pages in the memory are indicated by the status LED flashing
and can be retrieved by using code F9. If the fax memory is full, the
power LED flashes irregularly and new incoming fax calls will be rejected. Fax reception can be disabled or reenabled independent from the
fax configuration procedure:
F7
F8
F9
M1
Description
Format
Disable fax reception (rejects all incoming # 11 #
faxes)
Reenable fax reception
* 11 #
Get waiting faxes from memory
* 12 #
Clear fax and/or SMS memory
* 160016 #
Resetting the fax memory
The function M1 deletes all outgoing faxes which have not yet been
sent and incoming faxes which have not been printed from memory.
For this reason you should only use this function if you are absolutely
certain, that no important information will be lost. This also deletes all
waiting SMS on your SIM card if SMS functionality is enabled (please
refer to page 17).
15
Fax and SIM card types
Under some circumstances it is possible that faxes from analogue
fixed lines fail to be recognised as such by the receiving XSJackT3.
This may also happen when the sender uses a manual method to establish the connection like picking up the receiver of his fax machine,
dialling the destination number and pressing 'Start' when hearing fax
noises and so on.
These reasons will lead to voice indicated calls where fax transmissions will fail. In this case you will find your connected fax machine start
ringing immediately on an incoming fax without the XSJackT3 entering
the two-staged procedure as described on page 15. To avoid this problem, it is highly recommended to use a multi-numbering SIM card
whenever possible, which has a dedicated number for fax in addition to
its voice number. In contrast, a single numbering SIM only has one
number for both voice and fax. If only a single numbering SIM is available, try to use code N2 or N3 to increment the chance of correctly identified incoming calls.
The following table shows the possible scenarios related to the connected devices.
Phone
Single /
multi numbering
SIM
Fax
Single
numbering
SIM
Multi
numbering
SIM
Phone + Fax
Single
Multi
numbering
numbering
SIM
SIM
Use N2 or N3
N1
N2
N3
N4
16
Description
Identify next incoming call of unknown type as a fax
Identify all incoming calls of unknown type as faxes
Identify all incoming calls of unknown type as faxes
and reject all voice calls
Cancel N1, N2 and N3 - back to normal mode
Format
* 13 #
* 1313 #
* 14 #
# 13 #
SMS operation
Short messages (SMS) can be sent and received via the GSM network
between a remote party and a connected telephone capable of doing
fixed line SMS. To use SMS functionality, the XSJackT3 has to be configured once. You need to know the number of the service center for
SMS of your network provider (SMSC).
Configure the number of your SMSC in the connected terminal both as
the number for sending and the one for receiving SMS. You may want
to refer to the terminal's user manual for more information. The number
must be in international format beginning with the country code. Afterwards set the same number in the XSJackT3 using code S1, which
also enables SMS functionality.
If you cannot change the SMSC number in your terminal, use code S2
for configuration. The refered 'GSM-SMSC' is the one of your network
operator and the second 'Terminal-SMSC' is the fixed one of your terminal.
Incoming and outgoing SMS are buffered on your SIM card. If there are
unsubmitted SMS on your SIM, the red status LED will flash. Retrieve
those SMS using code S5. Remove all unread SMS with code M1. Be
aware that this will also delete all unread faxes if fax functionality is
used.
S1
S2
S3
S4
S5
M1
Description
Set SMSC number(s) and enable
SMS functionality
Format
* 17 *
GSM/Terminal-SMSC #
* 17 * GSM-SMSC *
Terminal-SMSC #
Disable SMS
# 17 #
Query
* # 17 #
GSM-SMSC
number
Get waiting SMS * 12 #
from SIM card
Clear SMS and / * 160016 #
or fax memory
Example
* 17 *
491701234567 #
* 17 *
491701234567 *
0193010 #
Codes also apply for
fax operation! Refer
to page 15!
17
Advanced functions
Definition of a default area code
This function allows you to call fixed line numbers in your local area
without having to dial the area code every time. Set it up once with
code A1 and the XSJackT3 will always add it in front of the dialled
number if it does not start with '0'.
To be able to dial special numbers without an area code at all, you can
temporary bypass the area code extension for the current call by
adding * after the number you have entered. Emergency numbers will
not be automatically extended by the area code.
A1
A2
A3
Description
Set default area code
Remove area code
Bypass area code
Format
Example
* 01 * AREA CODE # * 01 * 040 #
# 01 #
# 01 #
NUMBER *
11889 *
Roaming
If the regular network of your SIM card is not available, the XSJackT3
enters roaming state if a permitted network is found. As roaming might
cause additional cost, it can be generally prohibited. Being in roaming
state is indicated by a special dial tone (refer to page 24). These codes
may also be entered while the device is looking for a network.
R1
R2
R3
18
Description
Allow roaming (default)
Prohibit roaming
Query roaming permission
Format
* 07 #
# 07 #
* # 07 #
Blocking device for outgoing calls
You may prohibit outgoing calls using code B1. Emergency calls and
incoming calls are unaffected by this. Your SIM card must have the
PIN security feature enabled to be able to use this function (refer to
chapter below).
B1
B2
Description
Block device
Unblock device
Format
Example
* 00 * SIM PIN # * 00 * 1234 #
# 00 * SIM PIN # # 00 * 1234 #
SIM card PIN / PUK operations
If an incorrect PIN has been entered three times, your SIM card needs
to be unblocked. This is indicated by the flashing LED in the middle of
the signal strength LEDs (refer to page 6). Use code P2 to unblock the
SIM by entering the PUK and choosing a new PIN. You can also
change your PIN code or enable/disable the PIN security feature.
P3
Description
Enter the PIN
Enter the PUK
and a new PIN
Change PIN
P4
P5
P6
Enable PIN
*
Disable PIN
#
Query PIN state *
P1
P2
Format
# PIN #
# PUK * PIN #
*
Example
# 1234 #
# 87654321 *
1234 #
08 * OLD * NEW # * 08 * 1234 *
4321 #
09 * PIN #
* 09 * 1234 #
09 * PIN #
# 09 * 1234 #
# 09 #
* # 09 #
Resetting factory settings
The reset button is located inside a small hole in the housing (refer to
page 6). Carefully push this button with a pointed object (e.g. a paper
clip) while the XSJackT3 is powered up. This resets the device to factory settings (except for network specific services like call forwarding,
call waiting etc.). Please be aware that this will also delete all unprinted
faxes from the memory.
19
Additional network functions
The following functions may not be supported by all mobile network
operators.
Call forwarding
You can configure a destination number for call forwarding individually
for different modes:
Call forwarding mode
Activate
1. Immediate forwarding
2. Forwarding after 20 seconds
3. Forwarding when busy
4. Forwarding when offline
5. Immediate fax forwarding
All modes
*
*
*
*
*
21
61
67
62
51
*
*
*
*
*
NUMBER
NUMBER
NUMBER
NUMBER
NUMBER
#
#
#
#
#
Deactivate
# 21 #
# 61 #
# 67 #
# 62 #
# 51 #
# 22 #
Query
*
*
*
*
*
#
#
#
#
#
21
61
67
62
51
#
#
#
#
#
Immediate forwarding (1) is indicated by a special dial tone (refer to
page 24). This mode takes priority over mode 2, 3, and 4.
Caller ID / CLIR
Your own phone number may be displayed on the other party's phone.
It is possible to disable or enable your caller ID for outgoing calls:
I1
I2
I3
Description
Format
Activate caller ID (CLIR off)
# 31 #
Suppress caller ID (CLIR on)
* 3131 #
Only suppress for next call
* 31 #
Call back on busy
If a dialled destination number is busy, some operators support to call
you back as soon as the busy party is available again.
C1
C2
20
Description
Format
Activate callback while listening to busy tone
* 37 #
Abort incoming callback
Lift receiver and put
it down again
Acoustic Monitoring / Babyphone
Your XSJackT3 can monitor the audio level of its environment using a
connected telephone with a sensitive microphone or hands-free talking
function. If detected noises exceed a specific level, a configurable
number is dialled to be able to listen to the happenings at home when
being out. This function can be used as a baby phone, a burglary alarm
system or similar.
Before monitoring can be started, it must be configured using the code
L1. The sensitivity is a value between 0 and 5 where 1 means low sensitivity (alarm is triggered only on heavy continued noise) and 5 means
high sensitivity (alarm is already triggered on slight short noise). It is
recommended to start with high sensitivity and to go down step by step
if you feel that alarm is triggered too often. Sensitivity 0 is a special
case where no alarm is triggered and only calls from the configured
telephone number are answered (see below).
Place the telephone receiver or the hands-free telephone in an appropriate position where the microphone is uncovered and near the potiential source of noise. Monitoring can be started with code L3. After
acknowledgement, you must stay in off-hook state all the time and
must not put down the telephone receiver on-hook again. When being
on-hook for 10 seconds, an alarm is triggered and the configured number will be called to indicate that the telephone is not actively monitoring anymore.
After monitoring has been started, the system is calibrated, which is
indicated by the signal strength LEDs flashing. It is essential to be quiet
in this phase. 30 seconds after calibration, the system will be finally
armed.
In armed state, the XSJackT3 will trigger an alarm and call the destination number if, depending on the configured sensitivity level, a specific
amount of noise is detected using the microphone of the connected
telephone. The called party can then listen to the action at home,
21
decide what to do and may also control the monitoring function from
remote by entering the codes L1, L2, L3 (will do a recalibration here),
L4 or L6. The latter makes it possible not only to listen to the audio at
home but also to talk back which is initially disabled. Talking back may
only make sense when using a hands-free telephone with loudspeaker.
During monitoring, all incoming calls will be rejected except for calls
received from the configured destination number. This makes it possible not only to be called by the device but also to call the device
directly to check the acoustic environment. This is where sensitivity
level 0 may be useful if you only want to establish calls to the
XSJackT3 and don't want to be called by the device.
If acoustic monitoring mode is active, the XSJackT3 will not generate
any tones to make sure not to wake anyone up when using the function
as a babyphone. The mode will also continue operation after power
loss. No other functions such as telephony, fax, SMS or entering codes
for other services are possible during monitoring. Entering code L4
quits acoustic monitoring mode and gets back to normal operation.
L1
L2
L3
L4
L5
L6
22
Description
Set sensitivity (0 - 5)
and destination number
Only change sensitivity
Start monitoring
Stop monitoring
Query monitoring
Enable both-way
talking
Format
* 20 *
NUMBER
* 20 *
* 20 #
# 20 #
* # 20
**##
Example
SENS * * 20 * 3 *
#
01721234567 #
SENS # * 20 * 3 #
* 20 #
# 20 #
#
* # 20 #
**##
Automatic dial mode
This function makes it possible to let the XSJackT3 automatically dial a
configurable number a specific period after the telephone receiver has
been liftet and no digit has been entered. It can be used for children
home alone, people in trouble or special applications.
O1
O2
O3
O4
O5
Description
Set timeout (2 - 20s)
and destination number
Only change timeout
Enable automatic dial
mode
Disable automatic dial
mode
Query configuration
Format
Example
* 19 * TIME * * 19 * 5 *
NUMBER #
01721234567 #
* 19 * TIME # * 19 * 5 #
* 19 #
* 19 #
# 19 #
# 19 #
* # 19 #
* # 19 #
23
Appendix
Signal tones
Request tones on startup
Enter PIN: 660Hz [0.5s], 440Hz [2s], repeating (page 9):
…
Enter PUK: 2 x (660Hz [125ms], pause [125ms]), 440Hz [2s], repeating
(page 19):
…
No or invalid SIM card: 4 x (660Hz [62.5ms], pause [62.5ms]), 440Hz
[2s], repeating (page 6 and 9):
…
General offhook tones
Standard dial tone: 425Hz continuous (*);
Forwarding active dial tone: 425*50Hz continuous (*) (page 24);
Roaming active dial tone: 425+212.5Hz continuous (*) (page 18):
…
Device locked: 440*50Hz [0.5s], pause [0.5s], repeating (page 20);
Device busy: 440 [0.5s], pause [0.5s], repeating (page 14):
…
Not registered to network: 660Hz [31.25ms], pause [118.75ms], 660Hz
[31.25ms], pause [1.31875s], repeating (page 18):
…
24
Command response tones
Success / Positive response tone / Acknowledgment: 2 x (440Hz
[125ms], 660Hz [125ms], 880Hz [125ms], Pause [125ms]);
Enabled: 1 x (440Hz [125ms], 660Hz [125ms], 880Hz [125ms]):
Failed / Negative response tone / Non-Acknowledgment: 3 x (3 x
(800*880Hz [125ms], Pause [125ms]), Pause [0.5s]);
Disabled: 1 x (3 x (800*880Hz [125ms], Pause [125ms])):
Tones during connection
Busy tone: 425Hz [0.48s], pause [0.48s], repeating (*):
…
Congestion tone: 425Hz [250ms], pause [250ms], repeating (*):
…
Held call hung up: 3 x (440Hz [125ms], pause [25ms]):
Legend:
(*)
Tone may be country specific
X*Y Hz X Hz modulated by Y Hz
X+Y Hz X Hz mixed with Y Hz
25
FAQ
Problem
Possible solutions
All LEDs are off.
Check mains connection at socket and
XSJackT3.
There is no dial or sta- Check connection on XSJackT3 and teletus tone when picking phone or fax machine. Also check LED
up the receiver.
state (page 6).
The PUK has been Contact your network operator.
entered incorrectly 10
times in a row.
Device does not log
onto
network
but
instead plays 'Not registered tone' all the time.
If you use the XSJackT3e, check if the
antenna is properly connected. Otherwise
your home network may not be available.
Try to activate roaming state (page 18).
After entering specific
codes, the telephone
rings but no one is on
the line.
These are codes to query information from
the XSJackT3. The data is intended to be
shown on the display of your telephone
which is only possible using CLIP during
ringing. Therefore you will only see
anything if your telephone has a display
and supports CLIP.
Annoying radio interfe- Try to relocate the device, the telephone
rences can be heard and the antenna (XSJackT3e only). Avoid
when
making
tele- metal obstacles.
phone calls.
During telephone calls Try to activate the volume boost function
the conversational part- using *90309#. This can be deactivated
ner is too quiet.
again with #90309#.
26
Fax transmissions fail
because
XSJackT3
does not receive the
document from the connected fax machine but
instead
immediately
dials the remote destination number.
Your fax machine is not recognised as
such. Refer to page 14 and use code F6
before entering the destination number on
your fax machine.
I can send faxes but not Before faxes can be received, the fax conreceive any.
figuration procedure must be carried out by
using the code *10#. After successful configuration, the fax machine will print out a
configuration protocol and the XSJackT3
will be ready for reception. Please also
refer to page 14 to 16.
Reception of faxes is
not possible although
the
instructions
on
page 14 to 16 were followed.
If your mobile network provider offers a
mailbox, faxes may be temporarily stored
in it as a workaround. This may require a
specific variant of your mobile number to
dial to the mailbox directly (e.g. additional
digits behind the prefix). To print a fax from
the mailbox, please call your mailbox and
follow the instructions. Contact your network operator for more information.
SMS transmission does Check if the configured SMSC is correct
not work.
and in international format.
SMS reception does not
work. Instead the connected device rings and
shows the configured
SMSC
number
via
CLIP.
If you have not yet sent a SMS after configuration, please try it first (on some phones
you will once have to send a SMS before
the XSJackT3 can deliver SMS to your
phone). If it works, try to receive SMS
again. If it fails, check your SMSC again!
27
Technical data
Internal fax memory
1 MB (~ 10 to 50 pages)
Hookflash time
30ms to 400ms
Radio technology
GSM dual band 900/1800 MHz
Compatible with GSM Phase 2/2+
GSM engine
Triple rate codec for HR, FR, EFR
Echo cancellation
Noise reduction processor
Antenna
External dual band antenna (XSJackT3e)
Internal dual band antenna (XSJackT3i)
Operating environment Working temperature: 0°C to 40°C
Relative humidity: 10% to 70%
Housing
Measurements (WxDxH):
100 x 27 x 100 mm
Weight: 200g
Power consumption
Operating voltage 220-230V / 50Hz
Maximum power consumption: 6 W
Average power consumption: 1.8 W
Supported standards
Europe CE
28
13.0 mm
Dimensions for wall mounting
m
m
0
.
7
x.
3.5 mm
ma
87.0 mm
50.0 mm
100.0 mm
29
Conformity
4G Systems GmbH & Co. KG hereby declares that
the XSJackT3 meets the basic requirements of EN
301 511 (R&TTE Regulatory Radio Testing), EN 301
489 - 1, EN 301 489 - 7 (EMC Testing) and EN
60950 (Safety Testing) as well as the relevant provisions of Directive 1999/5/ EC.
Disposal information
Caution: Your product bears this symbol. It indicates
that electrical and electronic equipment should not be
disposed of with household waste, but rather be returned to a separate collection system.
Following the introduction of the directive in the EU
member states, private households can now deposit
their old electrical and electronic equipment at designated collection points free of charge.
For further details please contact your local council.
Copyright © 2008 4G Systems GmbH & Co. KG.
All rights reserved worldwide.
This document and the associated software are the property of 4G Systems GmbH & Co. KG or its
suppliers and are protected by copyright and other laws. They are distributed under a licence which
limits their use, reproduction, distribution and decompilation. Neither the receipt nor the ownership of
this document authorises you to reproduce, distribute or make available to third parties its contents in
whole or in part on paper, by electronic means or on any other medium. No part of this document
may be reproduced in any form by any means without the prior written consent of 4G Systems
GmbH & Co. KG. The terms and conditions of the software licence agreement shall also apply to this
documentation. All trademarks mentioned in this document are owned by their respective
companies.
www.4g-systems.com
30
31
Start fax configuration
Disable fax receipt
Re-enable fax receipt
Get faxes and/or SMS
Fax / SMS
*10#
#11#
*11#
*12#
Start fax configuration
Disable fax receipt
Re-enable fax receipt
Get faxes and/or SMS
Fax / SMS
*10#
#11#
*11#
*12#
Forwarding
*21*NO.#
Set ‘immediate’
*61*NO.#
Set ‘20 seconds’
*67*NO.#
Set ‘busy’
*62*NO.#
Set ‘offline’
*51*NO.#
Set ‘fax’
#21#,#61#,... Clear ‘immediate’ , ...
#22#
Clear all
Allow roaming
Prohibit roaming
CLIR for next call
CLIR for all calls
Disable CLIR
*07#
#07#
*31#
*3131#
#31#
Allow roaming
Prohibit roaming
CLIR for next call
CLIR for all calls
Disable CLIR
*07#
#07#
*31#
*3131#
#31#
Forwarding
*21*NO.#
Set ‘immediate’
*61*NO.#
Set ‘20 seconds’
*67*NO.#
Set ‘busy’
*62*NO.#
Set ‘offline’
*51*NO.#
Set ‘fax’
#21#,#61#,... Clear ‘immediate’ , ...
#22#
Clear all
Lock device
Unlock device
General
*00*PIN#
#00*PIN#
Lock device
Unlock device
General
XSJack®T3
Frequently used functions
*00*PIN#
#00*PIN#
XSJack®T3
Frequently used functions
R or hang up
In-Call: new call waiting
A
T3 B
R0
Reject B (waiting call)
R1
Take B, hang up A
R2
Take B, put A on hold
In-Call: one call on hold
A T3 B
R0
Hang up B (call on hold)
R1 or hang up Hang up A, take B
R2
Swap A and B
R3
Three-party conference
Acoustic monitoring / Babyphone
*20#
Start / Restart
#20#
Stop
*20*S*NO.# Configure (S = 0 - 5)
**##
Both-way talking
R or hang up
In-Call: single connection
A T3
R
Put A on hold to establish
new call
Skip establishment
In-Call: new call waiting
A
T3 B
R0
Reject B (waiting call)
R1
Take B, hang up A
R2
Take B, put A on hold
In-Call: one call on hold
A T3 B
R0
Hang up B (call on hold)
R1 or hang up Hang up A, take B
R2
Swap A and B
R3
Three-party conference
Acoustic monitoring / Babyphone
*20#
Start / Restart
#20#
Stop
*20*S*NO.# Configure (S = 0 - 5)
**##
Both-way talking
Automatic dial mode
*19#
Start
#19#
Stop
*19*T*NO.# Configure (T = 2 - 20)
In-Call: single connection
A T3
R
Put A on hold to establish
new call
Skip establishment
Automatic dial mode
*19#
Start
#19#
Stop
*19*T*NO.# Configure (T = 2 - 20)
32
4601.000018.04