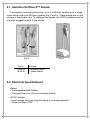
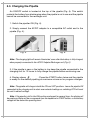
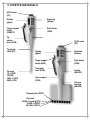
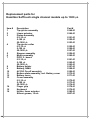
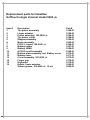
1
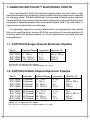
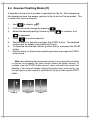
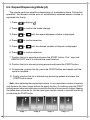
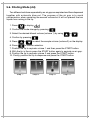
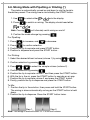
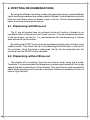
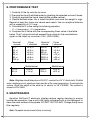
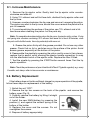
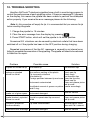
SofTouch™
Electronic
Precision Pipette
Instruction Manual
CONTENTS
1.HAMILTON SOFTOUCH™ ELECTRONIC PIPETTE ........... 2
1.1. SofTouch Single Channel Electronic Pipettes .......... 2
1.2. SofTouch Multi-Channel Electronic Pipettes ............. 2
1.3. Quality Testing .......................................................... 3
1.4. Hamilton AdvanTip™ Pipette Tips ............................ 3
2. UNPACKING & PREPARING THE PIPETTE FOR USE ...... 3
2.1. Hamilton SofTouch Stands ....................................... 4
2.2. Electrical Specifications ............................................ 4
2.3. Charging the Pipette ................................................. 5
3. PIPETTE MATERIALS .......................................................... 6
4. PIPETTE DESCRIPTION ..................................................... 7
4.1. Controls .................................................................... 7
4.2. START Button ........................................................... 7
4.3. Direction Symbols ..................................................... 7
4.4. Display ...................................................................... 7
4.5. Sealing and Ejecting tips .......................................... 8
4.6. Optional Filters .......................................................... 8
5. PROGRAMMING THE PIPETTE .......................................... 9
5.1. Mode Selection and Mode Recall ............................. 9
5.2. Setting Speeds ......................................................... 9
5.3. Pipetting Mode (P) .................................................. 10
5.4. Reverse Pipetting Mode (rP) ................................... 11
5.5. Repeat Dispensing Mode (d) .................................. 12
5.6. Diluting Mode (dd) .................................................. 13
5.7. Sequenced Dispensing Mode (Sd) ......................... 14
5.8. Mixing Mode with Pipetting or Diluting (*) ............... 15
6. PIPETTING RECOMMENDATIONS ................................... 16
6.1. Dispensing with Blow-out ........................................ 16
6.2. Dispensing without Blow-out ................................... 16
6.3. Other Recommendations ........................................ 17
7. STORAGE .......................................................................... 17
8. PERFORMANCE TEST ...................................................... 18
9. MAINTENANCE .................................................................. 18
9.1. In-house Maintenance ............................................ 19
9.2. Battery Replacement .............................................. 19
10. TROUBLE-SHOOTING ...................................................... 20
11. WARRANTY INFORMATION ............................................. 21
12. SPECIFICATIONS ......................................................... 22-23
13. REPLACEMENT PARTS
SofTouch single channel models up to 1000 µL ....... 24-25
SofTouch single channel model 5000 µL .................. 26-27
SofTouch multi-channel model 0.2-10 µL ................. 28-29
SofTouch multi-channel models 100 µL and 250 µL . 30-31
SofTouch multi-channel model 50-1200 µL .............. 32-33
1
1. HAMILTON SOFTOUCH™ ELECTRONIC PIPETTE
Your new Hamilton SofTouch electronic pipette offers the best value in high
performance electronic pipetting by using a direct charging system which requires
no charging stand. The self-calibrating, microprocessor-based system reduces
the possibility for human error and instrument contamination by controlling all piston
movements. Selected models offer replaceable Pipette Safe™ tip cone filters to
help prevent contamination and damage.
Its lightweight, ergonomic controls take the effort out of pipetting to help reduce
the risk of repetitive strain injuries (RSI) that are common in manual pipetting. All
Hamilton electronic pipettes operate on the air displacement principle and use
disposable tips.
1.1. SOFTOUCH Single Channel Electronic Pipettes
Part #
8707-01XX
8707-02XX
8707-03XX
8707-04XX
Volume Range
0.2 - 10 µl
5 - 100 µl
50 - 1000 µl
100 - 5000 µl
Increment
0.1 µl
1 µl
5 µl
50 µl
Hamilton Tip
10 µl
200 µl, 300 µl
1000 µl
5000 µl
Replace “XX” for regional AC/DC adapter:
US = U.S.A., EU = Europe, UK = United Kingdom, JP = Japan
1.2. SOFTOUCH Multi-Channel Electronic Pipettes
Part #
8707-05XX
8707-06XX
8707-07XX
8707-08XX
Channels
8-Channel
8-Channel
8-Channel
8-Channel
Volume Range
0.2 - 10 µl
5 - 100 µl
25 - 250 µl
50 - 1200 µl
Increment
0.1 µl
1 µl
5 µl
10 µl
Hamilton Tip
10 µl
200 µl, 300 µl
300 µl
1200 µl
8707-09XX
8707-10XX
8707-11XX
8707-12XX
12-Channel
12-Channel
12-Channel
12-Channel
0.2 - 10 µl
5 - 100 µl
25 - 250 µl
50 - 1200 µl
0.1 µl
1 µl
5 µl
10 µl
10 µl
200 µl, 300 µl
300 µl
1200 µl
Replace “XX” for regional AC/DC adapter:
US = U.S.A., EU = Europe, UK = United Kingdom, JP = Japan
2
1.3. Quality Testing
All SofTouch™ pipettes have been quality tested according to DIN 12650. The
quality control according to DIN 12650 involves gravimetric testing of each pipette
with distilled water (quality 3, DIN ISO 3696) at 22 °C using original manufacturer
tips.
1.4. Hamilton AdvanTip™ Pipette Tips
Hamilton AdvanTip Precision Pipette Tips are
recommended for use with Hamilton pipettes. These
detachable, disposable tips are made from chemically
resistant, virgin polypropylene. Hamilton pipette tips are
available with or without filters. Filter tips are presterilized.
Tips without filters packaged in bulk or racks are
autoclavable (121°C, 1ATM).
Note: Never pipette liquid without attaching a tip to the pipette.
2. UNPACKING & PREPARING THE PIPETTE FOR USE
The pipette package contains the following items:
• Pipette
• Grease
• Filters (selected models, see page 8)
• Instructions for use
• Performance certificate in accordance with DIN E-12650-7
• AC/DC adapter (functions as a recharging unit)
Make sure that all items are included and that no damage has occurred during
shipment.
Note: The pipette can only be charged with the original AC/DC adapter supplied with
the pipette.
3
2.1. Hamilton SoftTouch™ Stands
A convenient carousel stand holds up to 5 SofTouch pipettes and a singleplace stand holds one SofTouch pipette (Fig. 2 and 3). These stands are for the
storage of the pipette only. To recharge the pipette, the AC/DC adapter must be
manually plugged directly to the pipette.
Fig. 2.
Part #
8706-01
8705-01
Fig. 3.
Product
Carousel Stand
1-place Stand
2.2. Electrical Specifications
Battery
• Rechargeable NiMH battery
• Charging time max 12 hours for empty battery
AC/DC Adapter
• Input voltage and main plug according to local requirements
• Output voltage 9 VDC
4
2.3. Charging the Pipette
An ON/OFF switch is located at the top of the pipette (Fig. 4). This switch
protects the battery from discharging when the pipette is not in use and the pipette
cannot be connected to the recharger unit.
1. Switch the pipetter ON (Fig. 4).
2. Simply connect the AC/DC adapter to a compatible AC outlet and to the
pipette (Fig. 4).
Fig. 4.
Fig. 5.
Note: The charging light will remain illuminated, even after the battery is fully charged,
when properly connected to the AC/DC Adapter/Recharger unit (Fig. 5).
3. If the pipette is new or the battery is low keep the pipette connected to the
charging unit for 12 hours to fully charge the pipette before continuing use.
4. Display shows
. Press the START button twice and the pipette
is ready for the default pipetting at maximum volume or for program changes.
Note: The pipette will charge in both the ON and OFF positions. Leave the pipette ON
connected to the charging unit to retain user-selected settings as switching OFF will reset
the unit to default settings.
Note: If the pipette is left in the ON position uncharged for several days, the display will
be empty and there will be no response from the keyboard or START button, as the battery
voltage will be below the operating level.
5
3. PIPETTE MATERIALS
ACCU cover
(PC)
Display
(glass)
Keyboard
(silicon)
Finger support
(back)
(ASA/PC)
Start button
(POM)
Tip
ejector
lever (POM)
Tip ejector
collar (PP)
Tip cone
10 µl (PVC)
100 (SS)
1000 µl (PPS)
5000 µl (PE)
ACCU cover
(PC)
Display
(glass)
Keyboard
(silicon)
Finger support
(back) (ABS)
Start button
(POM)
Tip ejector
lever (POM)
Lever support
(POM)
Tip cone
housing
(ASA/PC)
Tip ejector bar (PETP)
Tip cones
10-250 µl (sealing:TPU)
10-250 µl (PVDF)
50-1200 µl (PPS)
6
Handle
(ASA/PC)
4. PIPETTE DESCRIPTION
The control and programming of the Hamilton electronic pipette are done using
the keyboard and display shown in detail below.
4.1. Controls
Power Switch
Recharger Connection
Battery Compartment
Changes speeds
Moves to next Mode
Increases volume or speed
Decreases volume or speed
Confirms setting changes
Switches Mixing on - off
START BUTTON Triggers all
mechanical operations
TIP EJECTOR LEVER Squeezed
to remove pipette tip(s)
4.2. START Button
The START button triggers the aspiration and dispensing operations according
to selected operating mode. Only a quick click is required to operate the button. If
the START button is kept down, the piston will stop in the lowest position until the
button is released. This feature is applicable to all modes of operation, except for
multiple dispensing (d).
4.3. Direction Symbols
These symbols indicate the direction in which the piston moves upon pressing
the START button. The small RIGHT ARROW in the display means that the next
function is to aspirate the liquid. The small LEFT ARROW in turn indicates the
dispensing function in accordance to the selected operating mode.
4.4. Display
The left display is the status indicator. It informs the user about parameters to
be programmed, functions to be performed and the number of dispensings
available.
The right display is used for programming and displaying the various volumes
needed in different operating modes.
7
4.5. Sealing and Ejecting Tips
Original Hamilton AdvanTip™ Precision Pipette Tips
are recommended for use with Hamilton SofTouch
pipettes. Before fitting a tip make sure that the pipette tip
cone is clean. Press the tip onto the cone of the pipette
firmly to ensure an airtight seal. The seal is tight when a
visible sealing ring forms between the tip and the tip cone
(Fig. 6).
Fig. 6
Hamilton SofTouch pipettes are designed for simple
and light attachment and ejection of the tips. To eject the
tip, simply place the pipette over the discard container
and squeeze the tip ejector lever (Fig. 7).
Fig. 7
4.6. Optional Filters
The tip cones of select Hamilton SofTouch electronic
pipettes allow the use of a removable Pipette Safe™ tip
cone filter as an option (Fig. 8). The filter prevents liquids
and liquid vapors from entering the pipette. Plus filters
will seal when wetted. The filter does not affect the
calibration of the pipette.
Cat.No.
8707-01XX
8707-02XX
8707-03XX
8707-04XX
8707-05XX
8707-06XX
8707-07XX
8707-08XX
8707-09XX
8707-10XX
8707-11XX
8707-12XX
Channels
Single Channel
Single Channel
Single Channel
Single Channel
8-Channel
8-Channel
8-Channel
8-Channel
12-Channel
12-Channel
12-Channel
12-Channel
Volume Range
0.2 - 10 µl
5 - 100 µl
50 - 1000 µl
100 - 5000µl
0.2 - 10 µl
5 - 100 µl
25 - 250 µl
50 - 1200 µl
0.2 - 10 µl
5 - 100 µl
25 - 250 µl
50 - 1200 µl
Replace “XX” for regional AC/DC Adapter:
US = U.S.A., EU = Europe, UK = United Kingdom, JP = Japan
8
Standard
Filter
N/A
N/A
9209-01
9209-01
N/A
9210-01
9210-01
9209-01
N/A
9210-01
9210-01
9209-01
Plus
Filter
N/A
N/A
9211-01
9211-01
N/A
N/A
N/A
9211-01
N/A
N/A
N/A
9211-01
Fig. 8
5. PROGRAMMING THE PIPETTE
Programming is done using the six-button keyboard and the LC-display. There are
seven operating modes including mixing offering special functions and varying speeds
for your selection.
To begin programming make sure that the pipette is in the ON position.
. Press the START button twice and the pipette is ready
Display shows
for the default pipetting at maximum volume or for program changes.
5.1. Mode Selection and Mode Recall
Available Modes:
Pipetting
Reverse Pipetting
Repeat Dispensing
Diluting
Sequenced Dispensing
*
Pipetting w/mixing
•
1. Press
Diluting w/Mixing
repeatedly to view the available modes of the pipette.
2. Press
when the desired mode is displayed. The pipette is
ready for use in the mode selected.
Note: Mode can only be activated when the piston is in its home position (arrow right
sign is lit), not in the middle of an aspiration or dispensing cycle.
5.2. Setting Speeds
1. Press
to display the current aspiration speed.
2. Press
or
until desired aspiration speed is displayed
(”5” Fast and ”1” Slow).
3. Press
to confirm speed selection. Display shows the current
dispense speed.
4. Press
or
until desired dispense speed is displayed
(”5” Fast and ”1” Slow).
5. Press
to confirm speed selection.
Note: The speed may not be changed in the middle of the aspiration or dispensing cycles.
Note: The default speed is 3 for all speed settings.
9
5.3. Pipetting Mode (P)
The pipette performs ordinary pipetting with blow-out.
1. Press
to display
.
2. Press
to confirm the mode change.
3. Select the desired pipetting volume by using
to increase, and
to decrease.
Note: When holding down
4. Press
or
, the volume display starts to scroll faster.
to confirm selection.
5. Position the tip to aspirate and press the START button.
6. Position the tip to dispense. Press the START button. The tip is emptied with
a blow-out and is ready for next pipetting.
Step 5.
10
Step 6.
5.4. Reverse Pipetting Mode (rP)
A selected volume plus an excess is aspirated into the tip. After dispensing
the selected volume, the excess remains in the tip and will be discarded. This
is useful with viscous samples.
1.
Use
to display
2.
Confirm the mode change by pressing
3.
Select the desired pipetting volume by using
.
to increase, and
to decrease.
4.
Press
5.
Position the tip to aspirate and press the START button. The selected
volume plus an excess is aspirated into the tip.
To dispense the selected volume, position the tip, and press the START
button.
Position the tip to discard any remaining excess and press the START
button twice.
6.
7.
to confirm selection.
Note: Upon delivering the programmed volume, it is also possible to continue
to aspirate and dispense the same volume without the empty function. To
continue, keep the START button pressed down and within one second the
direction of the arrow will change. Keeping the button down, place the tip into
the liquid again and the sample is aspirated into the tip by releasing the START
button.
Step 5.
Step 6.
Step 7.
11
5.5. Repeat Dispensing Mode (d)
The pipette performs repetitive dispensings of a selected volume. During this
operation, the desired volume plus an automatically selected excess volume is
aspirated into the tip.
1. Press
to display
.
2. Press
to confirm the mode change.
3. Press
or
4. Press
to confirm selection.
5. Press
or
6. Press
to confirm selection.
until the repeat dispense volume is displayed.
until the desired number of aliquots is displayed.
7. Position the tip to aspirate and press the START button. The * sign and
ARROW LEFT are lit to indicate the reset function.
8. Position the tip to discard priming excess and press the START button.
9. To dispense, position the tip, press the START button and repeat until the
cycle is complete.
10. Finally, position the tip to discard any remaining excess and press the
START button twice.
Note: Upon delivering the programmed volume, it is also possible to continue to aspirate
and dispense the same volume without the empty function. To continue, keep the START
button pressed down and within one second the direction of the arrow will change. Keeping
the button down, place the tip into the liquid again and the sample is aspirated into the tip
by releasing the START button.
Step 7.
12
Step 8.
Step 9.
Step 10.
5.6. Diluting Mode (dd)
Two different solutions separated by an air gap are aspirated and then dispensed
together with automatic blow-out. The purpose of the air gap is to avoid
contamination when aspirating the second volume but it will not prevent the two
liquids from mixing in the tip.
1. Press
to display
.
2. Confirm the mode change by pressing
.
3. Select the desired diluent volume (volume 1) by using
4. Confirm by pressing
5. Press
or
or
.
.
to select the sample volume (volume 2) on the display.
6. Press
to confirm selection.
7. Position the tip to aspirate volume 1 and then press the START button.
8. With the tip in the air press the START button again to aspirate an air gap.
9. Position the tip to aspirate volume 2 and press the START button.
10. Finally, position the tip to dispense and press the START button.
Step 7.
Step 8.
Step 9.
Step 10.
13
5.7. Sequenced Dispensing Mode (Sd)
Deliver a series of different volumes in any desired order.
1.
Press
to display
2.
Confirm the mode change by pressing
3.
Select the first desired dispense volume by using
4.
Press
5.
To select the following dispense volumes (up to 12) use
.
or
.
to confirm the dispense volume.
or
and always remembering to confirm each selection by pressing
.
To confirm your final selection press *
Position the tip to aspirate and press the START button.
Position the tip to discard priming excess and press the START button
again.
9. Position the tip to dispense and press the START button. Repeat the
action until the cycle is complete.
10. Position the tip to discard any remaining excess and press the START
button twice.
6.
7.
8.
Step 7.
14
Step 8.
Step 9.
Step 10.
5.8. Mixing Mode with Pipetting or Diluting (*)
The piston is automatically moved up and down to mix the liquid in
the delivery vessel. The mixing time is controlled by the START button.
1. Use
to select either
2. Press
or
onto the display.
to switch on mixing. The display should read either
or
.
Note: Pressing
will alternately switch mixing on and off.
3. Confirm the mode change by pressing
.
For Pipetting:
1. Press
to increase, and
2. Press
to confirm selection.
to decrease.
3. Position the tip to aspirate and press START button.
4. Position to dispense and press the START button .
For Diluting:
1. Select the desired diluent volume (volume 1) by using
2. Confirm selection by pressing
3. Press
or
or
.
.
to select the sample volume (volume 2) .
4. Confirm selection by pressing
.
5. Position the tip to aspirate volume 1 and then press the START button.
6. With the tip in the air, press the START button to aspirate an air gap.
7. Position the tip to aspirate volume 2 and press the START button.
8. Finally, position the tip to dispense and press the START button.
To Mix:
1. Position the tip in the solution, then press and hold the START button.
The mixing is done automatically as long as the START button is held
down.
2. Position the tip to dispense. Press the START button twice.
Step 1.
Step 2.
Note: The mixing is done with about 70 % of the total volume.
15
6. PIPETTING RECOMMENDATIONS
By using the different operating modes and special functions, several different
liquid handling procedures are made possible. Modes P and dd feature automatic
blow-out and others leave an excess liquid in the tip. Follow recommendations
below to ensure optimal performance.
6.1. Dispensing with Blow-out
The P and dd modes have an automatic blow-out function, followed by an
immediate return of the piston to the ”home” position. To avoid accidental aspiration
of the liquid back into the tip, it is recommended that the dispensing is always
done above the liquid surface.
By holding the START button down during dispensing the piston will stop in the
lowest position. This allows the tip to be placed against the bottom or the wall of
the container. Once the liquid is dispensed, the tip can be removed from the
container and the START button released.
6.2. Dispensing without Blow-out
The pipette will not perform the blow-out function when using the d mode.
Therefore, it is recommended that dispensing is always performed with the tip set
against the wall or the bottom of the container. The use of the d mode is especially
useful when pipetting small volumes or solutions that have a tendency to foam or
have a high viscosity.
16
6.3. Other Recommendations
• Hold the pipette vertically and place the tip a few millimeters into the liquid when
aspirating.
• Prerinse the tip by filling and emptying the tip five times. This is important when
dispensing liquids which have a viscosity and density different from water or a
temperature other than ambient.
• Check that the pipette, tip and liquid are at room temperature.
• Avoid contaminating the tip cone.
• Connect the pipette charging unit when the pipette is not in use. Switch the
pipettor OFF when not in use if it is not connected to the charging unit.
• Never strike the tip cone against a tip tray when mounting tips as this can damage
several internal components.
• Do not drop the pipette or AC/DC-adapter as this may cause excessive shock.
• Avoid exposing the unit to extreme temperature changes, humidity and dust.
• Avoid rough handling. Moderate pressure is all that is required when using the
keyboard or START-button.
• Avoid leaving the pipette on its side with liquid in the tip which might seep back
into the mechanism.
• Always pipette against the inside wall of the receiving vessel. Remove the tip by
drawing it up against the inside wall.
• Change the filter on the tip cone regularly (after 50 - 250 pipettings).
7. STORAGE
When not in use it is recommended that the pipette is stored on the stand in the
ON position connected to the charging unit. The green charging light should
illuminate.
17
8. PERFORMANCE TEST
1. Carefully fit the tip onto the tip cone.
2. Prerinse the tip with distilled water by pipetting the selected volume 5 times.
3. Carefully aspirate the liquid, keeping the pipette vertical.
4. Pipette distilled water into a tared container and read the weight in mgs.
Repeat at least ten times and record each result. Use an analytical balance
with a readability of 0.01 mgs.
5. Calculate the F-value using the following equation:
F = | inaccuracy | + 2 x imprecision
6. Compare the F-value with the corresponding Fmax value in the table
below. The F-value should not exceed Fmax value for the manufacturer
(given in the table) by more than 100% (DIN 12650).
Nominal
volume
Fmax
1-channel
Nominal
volume
5 µl
10 µl
20 µl
25 µl
50 µl
100 µl
±0.3 µl
±0.3 µl
±0.4 µl
±0.5 µl
±0.8 µl
±1.5 µl
200 µl
250 µl
500 µl
1000 µl
2000 µl
5000 µl
Multichannel
10 µl
50 µl
±0.6 µl
±1.6 µl
Fmax
1-channel
±2 µl
±2.5 µl
±5 µl
±10 µl
±20 µl
±50 µl
Multichannel
250 µl
300 µl
±5.0 µl
±6.0 µl
Note: Weighing should take place at 20-25°C, constant to ±0.5°C. Avoid drafts. Distilled
water, weighing vessel, pipette and tips must be at the same temperature. To calculate the
volume, divide the weight of the water by its density (at 20°C:0.9982). This method is
based on DIN 12650.
9. MAINTENANCE
Hamilton SofTouch™ electronic pipettes require regular cleaning to ensure
trouble-free operation. Use a soft cloth lightly moistened with a mild detergent to
clean the outer surface of the pipette. DO NOT AUTOCLAVE. Change the tip cone
filter regularly.
Note: The pipette must be turned off prior to servicing!
18
9.1. In-house Maintenance
1. Remove the tip ejector collar: Gently twist the tip ejector collar counterclockwise and slide off.
2. Using 70% ethanol and soft lint-free cloth, disinfect the tip ejector collar and
the tip cone.
3. Unscrew, counter-clockwise, the tip cone and remove it, exposing the piston.
The piston may stick to the tip cone, should this occur remove the piston with a
pair of tweezers.
4. To avoid scratching the surface of the piston use 70% ethanol and a lintfree tissue when cleaning the piston. Let the parts dry.
Note: For complete decontamination place the tip cone, tip ejector collar, piston, O-ring
and spring into a beaker containing 70% ethanol and leave for at least 30 minutes, rinse
the parts with distilled water, then dry preferably with warm air.
5. Grease the piston thinly with the grease provided. Do not use any other
grease. Check that no lint or particles are on the surface of the piston. Avoid
excess grease, especially at the bottom of the piston.
6. Reassemble the pipette by screwing the piston and tip cone in their places,
replace the tip ejector collar allowing the ejector handle connection to snap
into the attachment notch of the ejector collar. Replace the filter if fitted.
7. Test the pipette by pressing the START-button several times. Test the tip
ejector operation.
Note: Check the performance of your Hamilton SofTouch™ pipette regularly, e.g. every
3 months and always after in-house service or maintenance.
9.2. Battery Replacement
If the battery does not hold a sufficient charge for proper operation of the pipette,
follow these steps for replacement of the battery.
1. Switch the unit “OFF”.
2. Remove the top two screws on the back of the pipette and remove the
battery cover (Fig. 9).
3. Carefully remove the battery by lifting it straight
out of the holder.
4. Install the new NiMH-battery by pressing the
positive (+) end against the contact spring at the
bottom of the holder.
5. Replace the cover and the screws. Do not
overtighten the screws.
Fig. 9
6. Dispose of battery appropriately.
19
10. TROUBLE-SHOOTING
Hamilton SofTouch™ electronic pipettes have a built-in monitoring program to
control the performance of each pipetting action. If the error message Er1 appears
on the display, this means the pipette has been unable to perform the attempted
action properly. If you receive the error message please do the following:
Note: As this procedure will empty the tip, it is recommended that you remove the tip
before resetting the pipette.
1. Charge the pipette for 15 minutes.
2. Clear the error message from the display by pressing
.
3. Press START button, which will set the pipette to its home position.
Occasional Er1 situations can be caused by electrical outlets that have been
switched off or if the pipette has been in the OFF position during charging.
Repeated occurrence of the the Er1 message is caused by an internal error
failing to complete the execution of the pipetting. The pipette will need to be returned
to Hamilton for repair.
Problem
20
Possible cause
Solution
Use Hamilton tips
Droplets left inside the tip
Unsuitable tip
Leakage or pipetted
volume too small
Non-uniform wetting of the plastic
Tip incorrectly attached
Unsuitable tip
Foreign particles between tip and cone
Pipette out of given specs
Instrument damaged
Send for service
Pipette blocked, aspirated
volume too small
Liquid has penetrated tip cone and
dried
Clean and grease piston
and tip cone.
Tip ejector jammed or
moves erratically
Tip cone contaminated
Remove ejector collar,
clean with 70% ethanol
Continuous error message
Instrument damaged
Send for service
Attach new tip
Attach firmly
Use Hamilton tips
Clean the tip cone,
attach new tip
Clean and grease piston
Instrument contaminated
and tip cone
Insufficient amount of grease on piston Grease accordingly
and O-ring.
11. WARRANTY INFORMATION
Hamilton SofTouch™ electronic pipettes are warranted for one year (batteries/
three months) against defects in materials and workmanship. Should it fail to
function in any period of time, please contact Hamilton immediately. The warranty
will not cover defects caused by normal wear or by handling or using the pipette in
a manner contrary to the instructions given in this manual.
Each Hamilton SofTouch electronic pipette is tested before shipping by the
manufacturer. The Quality Assurance Procedure is your guarantee that the
Hamilton SofTouch electronic pipette you have purchased is ready for use.
All Hamilton electronic pipettes are CE-marked, fulfilling the requirements of
the EMC standards EN 55014, 1993 and EN 55104, 1995.
21
12. SPECIFICATIONS
Note: The manufacturer’s specifications below should be used as guidelines when establishing
your own performance specifications in accordance with DIN 12650.
Hamilton SofTouch™ Single Channel Pipettes:
Part #
22
Ch
Volume
Range
Test
Volume
Inaccuracy Imprecision
Number of
Dispensings
8707-01XX 1-ch
0.2 - 10 µl
10 µl
5 µl
1 µl
0.2 µl
0.90 %
1.00 %
2.50 %
6.00 %
0.50 %
0.70 %
1.50 %
6.00 %
2 - 50
8707-02XX 1-ch
5 - 100 µl
100 µl
50 µl
10 µl
5 µl
0.40 %
0.70 %
2.00 %
2.50 %
0.15%
0.30 %
1.00 %
1.80 %
2 - 20
8707-03XX 1-ch 50-1000 µl
1000 µl
500 µl
100 µl
50 µl
0.40 %
0.70 %
1.50 %
2.00 %
0.15 %
0.20 %
0.50 %
1.00 %
1 - 24
8707-04XX 1-ch 100 - 5000µl 5000 µl
2500 µl
500 µl
0.50 %
0.80 %
0.80 %
0.15 %
0.20 %
0.30 %
1 - 48
Hamilton SofTouch™ Multi-Channel Pipettes:
Part #
Ch
Volume
Range
Test
Volume
Inaccuracy Imprecision
Number of
Dispensings
8707-05XX 8-ch
0.2 - 10 µl
10 µl
5 µl
1 µl
0.90 %
1.50 %
4.00 %
0.50 %
0.80 %
4.00 %
2 - 50
8707-06XX 8-ch
5 - 100 µl
100 µl
50 µl
10 µl
5 µl
0.50 %
0.70 %
2.50 %
4.00 %
0.20 %
0.30 %
1.50 %
2.50 %
2 - 20
8707-07XX 8-ch
25 - 250 µl
250 µl
125 µl
25 µl
0.40 %
0.60 %
1.50 %
0.15 %
0.20 %
1.00 %
2 - 10
8707-08XX 8-ch
50 - 1200 µl 1200 µl
600 µl
100 µl
50 µl
0.50 %
1.00 %
4.00 %
8.00 %
0.15 %
0.20 %
0.80 %
1.50 %
1 - 24
8707-09XX 12-ch
0.2 - 10 µl
10 µl
5 µl
1 µl
0.90 %
1.50 %
4.00 %
0.50 %
0.80 %
4.00 %
2 - 50
8707-10XX 12-ch
5 - 100 µl
100 µl
50 µl
10 µl
5 µl
0.50 %
0.80 %
2.50 %
4.00 %
0.20 %
0.40 %
1.50 %
2.50 %
2 - 20
8707-11XX 12-ch 25 - 250 µl
250 µl
125 µl
25 µl
0.40 %
0.60 %
1.50 %
0.15 %
0.20 %
1.00 %
2 - 10
8707-12XX 12-ch 50 - 1200 µl 1200 µl
600 µl
100 µl
50 µl
0.80 %
1.00 %
4.00 %
8.00 %
0.15 %
0.20 %
0.80 %
1.50 %
1 - 24
23
Replacement parts for
Hamilton SofTouch single channel models up to 1000 µL
Item #
1
2
3
4
5
6
7
8
9
10
11
12
13
14
15
16
24
Description
Tip ejector assembly
Linear actuator
Piston Assembly
0.2-10 µL
5-100 µL
50-1000 µL
Tip ejector collar
0.2-10 µL
5-100 µL
50-1000 µL
Stopper assembly
Motor assembly
PICO 2 - board
0.2-10 µL
5-100 µL
50-1000 µL
Battery holder
Battery, NiMH
ACCU3 On-off assembly
Bottom plate assembly, incl. Battery cover
Battery cover
Cover assembly
0.2-10 µL
5-100 µL
50-1000 µL
Finger grip
Keyboard
Holder, linear actuator
Silicon grease, 15 mL
Part #
9148-01
9149-01
9151-01
9152-01
9153-01
9155-01
9156-01
9157-01
9159-01
9160-01
9161-01
9162-01
9163-01
9167-01
9168-01
9169-01
9170-01
9171-01
9172-01
9173-01
9174-01
9178-01
9179-01
9180-01
9207-01
25
Replacement parts for Hamilton
SofTouch single channel model 5000 µL
Item #
1
2
3
4
5
6
7
8
9
10
11
12
13
14
15
16
26
Description
Tip ejector assembly
Linear actuator
Piston assembly, 100-5000 µL
Tip ejector collar
Stopper assembly
Motor assembly
PICO 2 - board, 100-5000 µL
Battery holder
Battery, NiMH
ACCU3 on-off assembly
Bottom plate assembly, incl. Battery cover
Battery cover
Cover assembly, 100-5000 µL
Finger grip
Keyboard
Holder, linear actuator
Silicon grease, 100-5000 µL, 15 mL
Part #
9148-01
9150-01
9154-01
9158-01
9159-01
9160-01
9164-01
9167-01
9168-01
9169-01
9170-01
9171-01
9175-01
9178-01
9179-01
9180-01
9208-01
27
Replacement parts for
Hamilton SofTouch multi-channel model 0.2-10 µL
Item #
1
2
3
4
5
6
7
8
9
10
11
12
13
14
15
16
17
18
19
28
Description
Tip ejector assembly, mcp
Linear actuator and piston holder, 8-ch, 10/100/250 µL
Linear actuator and piston holder, 12-ch, 10/100/250 µL
Stopper assembly
Motor assembly
PICO 2 - board, 0.2-10 µL
Battery holder
Battery, NiMH
ACCU3 on-off assembly
Bottom plate assembly, incl. Battery cover
Battery cover
Tip cone housing, 8-ch, 0.2-10 µL, complete
Tip cone housing, 12-ch, 0.2-10 µL, complete
Tip ejector bar, 8-ch, 0.2-10 µL
Tip ejector bar, 12-ch, 0.2-10 µL
Piston assembly, 0.2-10 µL, mcp, complete
Tip cone cylinder, 0.2-10 µL
Tip cone sealing, 0.2-10 µL, 8 pcs.
Finger grip
Keyboard
Cover assembly, 0.2-10 µL
Holder, linear actuator
Silcon grease, 15 mL
Part #
9181-01
9182-01
9183-01
9159-01
9160-01
9161-01
9167-01
9168-01
9169-01
9170-01
9171-01
9186-01
9187-01
9192-01
9194-01
9198-01
9202-01
9206-01
9178-01
9179-01
9172-01
9180-01
9207-01
29
Replacement parts for
Hamilton SofTouch multi-channel models 100 µL and 250 µL
Item #
1
2
3
4
5
6
7
8
9
10
11
12
13
14
15
16
17
18
30
Description
Tip ejector assembly, mcp
Linear actuator and piston holder, 8-ch, 10/100/250 µL
Linear actuator and piston holder, 12-ch, 10/100/250 µL
Stopper assembly
Motor assembly
PICO 2 - board, 5-100 µL
Battery holder
Battery, NiMH
ACCU3 on-off assembly
Bottom plate assembly, incl. Battery cover
Battery cover
Tip cone housing, 8-ch, 100/250 µL, complete
Tip cone housing, 12-ch, 100/250 µL, complete
Tip ejector bar, 8-ch, 100/250 µL
Tip ejector bar, 12-ch, 100/250 µL
Piston assembly, 5-100 µL, mcp, complete
Piston assembly, 25-250 µL, mcp, complete
Tip cone cylinder, 5-100 µL
Tip cone cylinder, 25-250 µL
Finger grip
Keyboard
Cover assembly, 5-100 µL
Cover assembly, 25-250 µL
Holder, linear actuator
Silcon grease, 15 mL
Part #
9181-01
9182-01
9183-01
9159-01
9160-01
9162-01
9167-01
9168-01
9169-01
9170-01
9171-01
9188-01
9189-01
9193-01
9195-01
9199-01
9200-01
9203-01
9204-01
9178-01
9179-01
9173-01
9176-01
9180-01
9207-01
31
Replacement parts for
Hamilton SofTouch multi-channel model 50-1200 µL
Item #
1
2
3
4
5
6
7
8
9
10
11
12
13a
13b
14
15
16
17
32
Description
Tip ejector assembly, mcp
Linear actuator and piston holder, 8-ch, 50-1200 µL
Linear actuator and piston holder, 12-ch, 50-1200 µL
Stopper assembly
Motor assembly
PICO 2 - board, 50-1200 µL
Battery holder
Battery, NiMH
ACCU3 on-off assembly
Bottom plate assembly, incl. Battery cover
Battery cover
Tip cone housing, 8-ch, 50-1200 µL, complete
Tip cone housing, 12-ch, 50-1200 µL, complete
Tip ejector bar, 8-ch, 50-1200 µL
Tip ejector bar, 12-ch, 50-1200 µL
Piston assembly, 50-1200, complete
Tip cone cylinder, 50-1200 µL
Finger grip
Keyboard
Cover assembly, 50-1200 µL
Holder, linear actuator
Silcon grease, 15 mL
Part #
9181-01
9184-01
9185-01
9159-01
9160-01
9166-01
9167-01
9168-01
9169-01
9170-01
9171-01
9190-01
9191-01
9196-01
9197-01
9201-01
9205-01
9178-01
9179-01
9177-01
9180-01
9207-01
33
Notes
34
Hamilton Company
4970 Energy Way
Reno, Nevada 89520 USA
Toll-Free: 800-648-5950
Telephone: +1-775-858-3000
Fax: +1-775-856-7259
e-mail: [email protected]
Hamilton Bonaduz AG
Via Crusch 8
CH-7402
Bonaduz/Switzerland
Telephone: +41-(0)81-660-60-60
Fax: +41-(0)81-660-60-70
e-mail: [email protected]
TRADEMARKS:
The following are trademarks of Hamilton Company
AdvanTip™
Pipette Safe™
SofTouch™
Due to Hamilton’s continuing R&D efforts, specifications may change without prior notice.
Manufactured in Finland
9251-01, 6/03