1
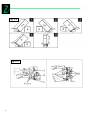
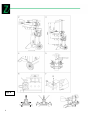
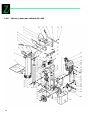
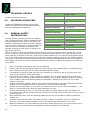
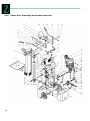
CZ Návod k použití Štípač EN Operation Manual Log splitter ZI-HS7 EAN : 912003923808 1 CZ Před použitím si přečtěte návod k použití a dodržujte bezpečnostní pokyny! EN Read the operation manual carefully before first use. 06/10/2011 – revize 01 - CZ/EN CZ 2 VÝZNAM BEZPEČNOSTNÍCH SYMBOLŮ EN SAFETY SIGNS DEFINITION OF SYMBOLS CZ POZOR! Dbejte na bezpečnostní symboly! Nedodržování pokynů a EN ATTENTION! Ignoring the safety signs and warnings applied on the CZ PŘEČTĚTE SI NÁVOD! Přečtěte si pozorně návod k použití a údržbě EN READ THE MANUAL! Read the user and maintenance manual care- CZ CE-SHODNÉ! – Tento výrobek odpovídá směrnicím EU. EN CE-Conformal! - This product complies with the EC-directives. CZ OCHRANNÉ PROSTŘEDKY! Používejte ochranu sluchu, ochranné EN PROTECTIVE CLOTHING! The operator is obligated to wear pro- CZ BEZPEČNÁ VZDÁLENOST! Osoby, které se strojem nepracují, se EN SAFE DISTANCE! Do not allow any persons to stay within your předpisů k použití štípač může vést ke škodám a zraněním nebo smrti! machine as well as ignoring the security and operating instructions can cause serious injuries and even lead to death. vašeho stroje a podrobně se s ním seznamte, abyste mohli stroj správně obsluhovat a předejít tak škodám na majetku a zdraví. fully and get familiar with the controls n order to use the machine correctly and to avoid injuries and machine defects. brýle a bezpečnostní obuv. per ear protection, safety goggles and safety shoes musí zdržovat ve vzdálenosti nejméně 5 m. Stejně i hospodářská zvířata. working area. Any persons or animals around must be at least 5 m away from this machine. Fig. 1 Fig. 1.1 3 Fig. 1.2 Fig. 1.3 4 Fig. 8 5 1 CZ NÁVOD K POUŽITÍ Vážený zákazníku! Děkujeme vám za zakoupení štípače ZIPPER ZI-HS7. Tento návod k použití obsahuje důležité pokyny k uvedení do provozu a údržbě štípače ZIPPER ZI-HS7. Návod k použití je nedílnou součástí stroje a nesmí od něj být odstraněn. Uchovejte tento návod pro další použití a vždy návod přiložte, pokud stroj předáváte někomu dalšímu! Dodržujte bezpečnostní pokyny! Vzhledem ke stálému vývoji našich strojů se mohou vyobrazení v tomto návodu lišit od skutečnosti. Pokud objevíte chybu, informujte nás prosím. Pozor! Technické změny vyhrazeny! Autorské právo © 2010 Tato dokumentace je chráněna autorským právem. Všechna práva vyhrazena! Zvláště nedovolený tisk, překlady, použití fotografií a vyobrazení budou trestně stíhány – soudním místem je Wels!. Adresa zákaznického servisu Z.I.P.P.E.R MASCHINEN GmbH Gewerbepark 8 A-4707 Schlüsslberg Tel 0043 (0) 7248 61116 - 700 Fax 0043 (0) 7248 61116 – 720 [email protected] 1.1 Přehled prvků stroje (Fig. 1) 8 Držák stolku 9 Zajišťovací háčky 10 Kola 11 Stojan 12 Olejová nádrž s vypouštěcím šroubem 13 Zarážka stolu 14 Ovládací páka 15 Ovládací páka 16 Nastavitelný držák špalku 17 Růřice 1 Transportní rukojeť 2 Nastavení výšky štípání 3 Štípací kříž 4 Sloupek A 1x Rám štípače 5 Vypínač B 2x ovládací páka s krytem 6 Ovládání ventilu 1x odnímatelný stůl 7 Motor 1x návod k použití 6 Obsah dodávky (Fig. 1.1) 1.2 Technická data Technické změny vyhrazeny 1.3 Obsah dodávky Vybalte štípač ZIPPER ZI-HS7 a zkontrolujte bezvadnost a úplnost stroje. 1.4 VŠEOBECNÉ BEZPEČNOSTNÍ POKYNY Provozní napětí: 230V / 50Hz Výkon motoru: 3,0 kW Jmenovitý proud: 10,0 A Štípací síla: 7T Max. štípací zdvih: 470 mm Průměr špalku: 70-400 mm Délka špalku: 580 – 770 – 1100 mm Objem olejové nádrže: 4 litry Hydraulický tlak: 19-22 MPa Tento štípač je výhradně určen ke štípání dřevě- Rychlost štípání: 4-5 cm/s ných špalků, jejichž parametry nepřevyšují technické parametry stroje. Jakékoliv jiné použi- Rychlost zpětného cho10-12,5 cm/s du: tí je bráno jako nebezpečné a výrobce neručí za škody a zranění, způsobená tímto nesprávným Rozměry 560 x460 x 1100 mm použitím. Příslušenství : Štípací kříž K ovládání stroje musí uživatel používat obě ruce. Během provozu musí ostatní osoby nebo zví- Hmotnost: 96 kg řata dodržovat minimální odstup 5 m. Zkontrolujte únosnost a stabilitu podkladu, na kterém pracujete. Štípač obsluhujte pouze ve vhodném pracovním oděvu. Nedodržování pokynů v této kapitole může vést ke škodám nebo zraněním. 1. 2. 3. 4. 5. 6. 7. 8. 9. 10. 11. 12. 13. 14. 15. 7 Stroj smí být obsluhován pouze jednou osobou Stroj smí obsluhovat pouze osoby, seznámené s tímto návodem k použití. Obsluha stroje musí být starší 18 let. Mladiství od 16 let smí na stroji pracovat pouze pod dohledem osoby starší 18 let. Nikdy nenoste šperky (prstýnky, náhrdelníky a hodinky atd.) a volný oděv. Používejte speciální pracovní oděv, bezpečnostní obuv, rukavice a ochranu sluchu. Pokud máte dlouhé vlasy, používejte síťku Vždy používejte ochranné brýle. Normální brýle vám neposkytnou dostatečnou ochranu. Těžké zranění může být způsobeno prasklým sklem brýlí. Štípač používejte vždy na suché, rovné a nepromrzlé ploše. Pokud používáte stroj na louce, dbejte na to, aby byla tráva řádně posekaná. Zajistěte si při štípání jistý postoj. Zajistěte, aby štípač měl pevný podklad a nehrozí jeho převrácení. To by mohlo vést k těžkým zraněním. Nedotýkejte se štípacího klínu, abyste zamezili zranění třískami. Zabezpečte, aby se nepřibližovali nepovolané osoby. Při práci se žádné nepovolané osoby nebo zvířata nesmí přiblížit ke stroji blíže než na 5 m. Ujistěte se, že štípané dřevo neobsahuje žádné cizí předměty. Ty by mohly způsobit zranění nebo poškození stroje. Nikdy neštípejte dřevo, obsahující hřebíky, dráty nebo jiné cizí předměty. Nikdy neštípejte dřevo, jehož rozměry přesahují "rozměry špalku" uvedené v technických datech stroje. Jinak může dojít k poškození stroje nebo zranění. Dřevo vždy štípejte „po letech“. Nikdy neštípejte dřevo napříč. To může vést ke zranění nebo poškození stroje. Nikdy nestavte dva špalky na sebe. Polena se mohou rozletět a zranit vás. Ovládací páky obsluhujte pouze rukama. Nepoužívejte nohy, kolena nebo jiné části těla k ovládání. Soustavně sledujte pohyb štípacího klínu. Nikdy nepřipravujte nový špalek, dokud se klín pohybuje. Ruce nepřibližujte k pohyblivým částem stroje. 16. 17. 18. 19. 20. 21. 22. 23. 24. 1.5 Chraňte svoje ruce. Nikdy ruce nedávejte do otvorů ve stroji. Nikdy neuvolňujte zaklíněné špalky nechráněnýma rukama. Při plném zatížení delším než 5 s dojde k přehřátí olejové náplně. To může způsobit poškození stroje. Pokud zjistíte, že se špalek nedá rozštípnout, přerušte štípání. Nikdy štípací klín proti dřevu nepřitlačujte. To by mohlo vést k poškození ostří. Nikdy nepoužívejte štípač pod vlivem alkoholu nebo drog. Stroj nesmí být nikdy používán ve vlhkém nebo výbušném prostředí. Nikdy stroj nepoužívejte v prostorách s agresivními výpary (plyn, benzín, zápalné výpary apod.) Při práci nikdy nekuřte. Nepřibližujte se s otevřeným ohněm k olejové nádrži. Zkontrolujte, že je elektrická zástrčka bezvadná a odpovídá jmenovitým údajům motoru stroje. Je nutné, aby výkon, napětí, frekvence a uzemnění odpovídaly údajům na typovém štítku. Zapnutý stroj nikdy nenechávejte bez dozoru. Stroj vždy kontrolujte, dokud se po vypnutí nezastaví. Pracoviště zabezpečte před dětmi. Stroj provozujte v prostorech, nepřístupných dětem. Také ostatní nepovolané osoby nesmí mít ke stroji přístup. Správné použití Stroj odpovídá platným směrnicím EU. Špalky se smí štípat pouze po letech. Je nutné dodržovat všechny pracovní a bezpečnostní předpisy. Je nutné dodržovat I všeobecné zásady předcházení úrazům. Jakékoliv změny na štípači mají za následek ztrátu záruky. Pro tento štípač se smí používat pouze originální náhradní díly a součástky. Jinak výrobce neručí za způsobené škody a zranění. 1.6 I při • • • • • žití. 1.7 POKYN Tento stroj byl zkonstruován a vyroben v souladu s tímto návodem k použití. Jakékoliv změny na stroji nebo nesprávné použití má za následek ztrátu záruky a může vést k ke škodám nebo zranění. Ostatní rizika správném použití zůstávají následující rizika: Zranění prstů a rukou odletujícími poleny Zranění nástroji nebo poleny Zranění elektrickým proudem při dotyku vodivých částí stroje. Poškození sluchu při nepoužití ochrany sluchu Ostatní rizika mohou být minimalizována při dodržení bezpečnostních pokynů a správného pou- Provozní podmínky Štípač se smí používat při teplotách +5 ° C až 40 ° C. Vlhkost vzduchu na pracovišti nesmí překročit 50% při 40 ° C. 8 1.8 Elektrická bezpečnost Před použitím zkontrolujte parametry elektrické sítě. Pokud napájení není v pořádku, kontaktujte místního elektromechanika. 1.9 Elektrická přípojka Stroj je napájen jednofázovým napětím 1 x 230 V/50 Hz + 10% / 50 Hz + 1 Hz. Napájecí kabel musí mít průřez 1P + N + PE (1/N/PE). Kromě toho musí mít jištění 16 A max. Elektrické vedení musí odpovídat EN 60245. 1.10 POKYN Ujistěte se, že je napájení jištěno, a že výkon, napětí a frekvence odpovídá vašemu motoru. Ujistěte se, že je zásuvka uzemněná. Vypínač nikdy neotvírejte. Pokud je to nutné, obraťte se na elektromechanika. Stroj ani napájecí kabel se nesmí ponořit do vody. Stroj nikdy netahejte nebo nezvedejte za přívodní kabel. Zástrčku nikdy ze zásuvky netrhejte a kabel nikdy nepřibližujte ke zdrojům tepla, oleji, nebo jiným prostředkům, které by ho mohly poškodit. Montáž a příprava Vybalení (Fig. 1.2). Štípač vybalujte ve dvou. Štípač umístěte na zem a postupujte krok za krokem podle obrázku. Ujistěte se, že je štípač (B) v krabici (A) přibližně ve středu podepřen. Konec krabice by měl být podepřen o pevnou překážku, aby nedošlo k podklouznutí. Montáž (Abb. 1.3) 1. Použijte pero (A) k zajištění a (B) k uvolnění. Naolejujte body podle obrázku a ujistěte se, že že páky dosáhnou na doraz (C). Zajistěte páku kolíkem (B) a závlačkou (A). To samé proveďte s druhou pákou. 2. Polohu stolu můžete nastavit do tří různých poloh. Vhodnou polohu zvolte podle délky štípaného dřeva. Transport štípače na pracoviště (Fig. 2) K jednoduchému pohybu je štípač vybaven párem kol. K transportu štípače použijte držadlo (A) a opatrně nakloňte. Ujistěte se, že je uzávěr olejové nádrže pevně dotažen. 1.11 Uvedení do provozu POZOR Jakékoliv neprofesionální použití prodlužovacího kabelu může vést k přehřátí stroje. Ujistěte se, že prodlužovací kabel není delší než 10 m a průřez vodičů není menší než 2,5 mm². Nikdy nepoužívejte neizolované kabely. Prodlužovací kabel musí být vhodný pro použití venku. POKYN Při použití jeřábu ke zvedání štípače se ujistěte, že je lano v pořádku. Lano nikdy nezavěšujte za transportní rukojeť Stroj musí být umístěn tak, aby nedošlo k jeho převrácení. Zabezpečte dostatek místa kolem stroje. Před zahájením práce musí být všechny kryty a bezpečnostní prvky namontovány. Zkontrolujte dotažení všech šroubů, čepů a hydraulických vedení. Dbejte na správnou hladinu hydraulického oleje. Před použitím se seznamte s bezpečnostními a ovládacími prvky stroje. Ujistěte se, že napájení odpovídá údajům na štítku troje. 9 Rozměry špalku(Fig. 3) Vyberte své pracoviště. Špalky skladujte v blízkosti. Maximální délka špalku nesmí překročit 104cm. Můžete použít tři různé polohy štípacího stolku. (Fig. 3): 52 cm, 78 cm a 104 cm. Zvolte odpovídající délku podle špalku. Stůl dobře zajistěte. Stroj nikdy nezatěžujte déle než 5 s. 1.12 Použití (Figs. 4 – 7) POKYN Nikdy neštípejte mokré dřevo. Suché dřevo se štípe mnohem snadněji. POKYN Na přední straně olejové nádrže se na1. Namažte kluzné destičky běžnou vazelínou, chází odvzdušňovací ventil (Fig. 4). abyste prodloužili jejich životnost. (Fig. 5). Před každým použitím tento ventil uvolněte, aby byla zajištěna cirkulace vzdu2. Prodlužovací kabel položte vždy tak, aby nechu v nádrži. Před transportem stroje mohlo dojít k jeho poškození. tento ventil uzavřete, abyste zamezili 3. Před použitím povolte odvzdušňovací šroub. Po úniku oleje. práci šroub opět dotáhněte. 4. Zkontrolujte správné otáčení motoru. Po startu motoru klín vyjede do horní polohy. Pokud je klín nahoře, stiskněte ovládací páky směrem dolů, abyste aktivovali pohyb dolů. Klín se tím dá do pohybu dolů. Pokud se klín nerozjede po zapnutí nahoru, ihned stroj vypněte. Pokud je vaše kvalifikace nedostatečná, kontaktujte POZOR oprávněného elektromechanika. Při štípání vždy nechte štípací klín do5. Pokud chcete stroj používat při nízkých jet až na konec štípací dráhy. Neměňteplotách, nechte stroj naprázdno po dobu te směr v průběhu pohybu – může do15 min. běžet naprázdno, aby se olej zajít ke změně otáčení motoru. Pokud hřál. má motor opačné otáčení, dojde k poškození čerpadla. Na toto poškození 6. Před začátkem práce proveďte následující se záruka nevztahuje! kontroly, abyste prověřili stav stroje: a. Stlačte obě ovládací páky dolů. To musí přivést štípací klín k pohybu směrem dolů. Štípací klín se musí asi 5 cm nad stolem zastavit. b. Pokud jednu páku uvolníte, štípací klin se zastaví c. Pokud uvolníte obě páky, klín se vrátí zpět do horní polohy d. Neuvolňujte štípací páky bezdůvodně v průběhu štípání. Může tím dojít ke změně otáčení motoru! 7. K nastavení výšky štípacího klínu postupujte následovně: (Fig. 7) a. Nastavte štípací klín do zvolené polohy 5 cm nad polenem. b. Uvolněte ovládací páky. Stroj vypněte. c. Uvolněte růžici (A). Nastavte výšku ovládací tyče tak, aby vedla k dosažení potřebné pozice. Potom růžici (A) opět dotáhněte. d. Uvolněte ovládací páku nebo stroj znovu zapněte. e. Zkontrolujte nově nastavenou polohu. 8. Nyní špalek svisle rozštípněte. Ujistěte se, že je špalek zajištěn a nemůže se zvrtnout. Nikdy neštípejte šikmo uříznuté špalky. 10 POKYN 9. Nastavte ovládací páky podle průměru špalku. 10. Špalek přidržujte oběma pákami, abyste zajistili stabilní polohu špalku. Potom stlačte obě páky směrem dolů, abyste špalek rozštípli. Uvolnění jedné páky má za následek zastavení štípacího klínu. Pokud uvolníte obě páky, štípací klín se vrátí do horní polohy. (viz Fig. 8) Dřevo vždy štípejte „po letech“ Nikdy dřevo neštípejte napříč, abyste zamezili poškození stroje. 11. Rozštípané špalky ihned ukliďte z pracovního prostoru. Tím snižujete riziko pracovních úrazů. 12. Po ukončení práce vyjeďte se štípacím klínem do horní polohy (parkovací pozice). K zastavení motoru vytáhněte zástrčku napájení ze zásuvky. Nechte stroj vychladnout. Potom stroj vyčistěte, a pokud je to nutné, namažte. Štípač skladujte ve svislé poloze, na suchém a čistém místě. Zkontrolujte, že je odvzdušňovací šroub dobře dotažen. POZOR 1.13 Údržba a péče Pečlivě stroj udržujte. Po každém použití stroj vyčistěte, abyste prodloužili jeho životnost. Mažte stroj podle návodu. Kontrolujte těsnění, hadice, spojky na únik oleje před začátkem práce. Udržujte ovládací páky a vypínač v čistotě a suchu, bez oleje a vazelíny. Rozštípané dřevo je zdrojem nebezpečí. Udržujte pracoviště v čistotě, abyste předešli úrazu. POZOR Před odstraněním rozštípaných špalků stroj vypněte Při uvolnění zaklíněných špalků ni1. Stroj odpojte od napájení kdy nepoužívejte cizí předměty pro 2. Použijte navlhčený hadr k čištění. Nepoodstranění. užívejte žádné čistící prostředky. Všechny bezpečnostní pokyny v 3. Použijte jemný kartáč na odstranění nekapitole "Všeobecné bezpečnostní čistot z větráku motoru. pokyny" je nutné dodržovat. Výrob4. Namažte běžným strojním olejem všechce neručí za škody a zranění, způny pohyblivé součástky. sobené nesprávným použitím nebo nedodržováním bezpečnostních poVýměny hydraulického oleje kynů. Olejová nádrž je z výroby naplněna kvalitním hydraulickým olejem třídy 20. Starý olej likvidujte v souladu s platnými předpisy. V žádném případě olej nevylévejte do kanalizace, půdy nebo vody. Čištění stroje: • Hydraulický systém je je uzavřený, složený z nádrže, čerpadla a regulačního ventilu. Nízký stav oleje může zapříčinit poškození čerpadla. Hladina oleje nesmí klesnout níže než 1-2 cm pod horní hranu olejové nádrže. Olej vyměňte nejméně jednou ročně. • zabezpečte, aby se do nádrže nedostalo žádné znečištění • po každé výměně olej správně zlikvidujte • po každé výměně oleje nechte štípač běžet několik minut naprázdno Následující oleje jsou vhodné pro váš štípač: SHELL Tellus 22 MOBIL DTE 11 ARAL Vitam GF 22 BP Energol HLP-HM 22 11 1.14 Zjišťování a odstraňování závad Závada Možná příčina Odstranění závady 1.1 Není napětí v zásuvce 1.1 Zkontrolujte pojistky 1.2 Vadný prodlužova- 1.2 Zkuste nový prodlužovací kabel cí kabel 1. Motor se netočí 1.3 Vada v napájení 3 1.3 5-pólová zástrčka 1,5 mm průměr. x 400 V 1.4 current. Vadný vypínač 1.4 Nechte zkontrolovat elektromechanikem. 2. 3. 4. 1.15 Opačné otáčení motoru Motor se točí, klín se nepohybuje Štípač pracuje, ale s netypickým zvukem a vibracemi. 2.1 Obrácené pořadí fází 2.1 Změňte pořadí fází šroubovákem v zástrčce. 2.2 Změňte pořadí fází šroubovákem v zástrčce 3.1 Ventil není dosta- 3.1 Dotáhněte ovládací páky tečně otevřen ovládacími pákami 3.2 Nízký stav oleje. 3.2 Doplňte olej 4.1 Nízký stav oleje. 4.1 Doplňte olej Likvidace Nelikvidujte váš stroj ZI-HS7 do komunálního odpadu. Kontaktujte vaše místní úřady pro informace o správné likvidaci. Pokud od vašeho obchodníka kupujete nový stroj, je tento povinen od vás starý stroj odebrat a recyklovat. 12 1.16 13 Výkres a seznam náhradních dílů Pos. Name Pcs 1 Arbeitstisch 1 2 Drehscheibe 3 4 Name Pcs 40 Oberes Rutschbrett 3 1 2 41 Dünne Mutter M16 1 Armschutz Abdeckung 4 42 Verstellbarer Hebel 1 Handgriff 2 43 Schalter 1 5 Rechte Spaltklemme 1 44 Schraube M4x60 2 6 Rechter Armschutz 1 45 Motor 1 7 Sternrad 2 46 Bolzen M10x30 10 8 Linke Spaltklemme 1 47 Ölzapfen für Pumpe 1 9 Linker Armschutz 1 48 Pumpe 1 10 Sicherungsmutter M8 2 49 Dichtring 4 11 Scheibe 8 50 Schlauch 1 12 Stift für Armschutz 2 51 Federscheibe 8 4 13 Dünne Mutter M8 2 52 Innere sechseckige Schraube M8x85 2 14 Bolzen M8x40 2 53 Öl-Rücklaufschlauch 1 15 Klammer 4 54 Öl-Rücklaufschlauchsventil 1 16 Einstellbare Planke 1 55 Dichtungsringset 20 7 17 Einstellbare Hebel-Anschluss 1 56 HohlschraubeM20x1.5 1 18 Handgriff 1 57 Innere sechseckige Schraube M8x35 2 19 4-Stern Griff 1 58 Hochdruckölpumpe 3 1 20 Führungsstange 1 59 Ventil 1 21 Mutter-Kopf M8 1 60 Leitungsanschluss für Ventil 1 22 Spannstab 1 61 Rohrstutzen für Pumpe 1 23 Kurze Welle 1 62 Hochdruckölpumpe 2 1 24 Schwungwelle 2 63 Hochdruckölpumpe 1 1 25 Obere Rutschplatte 1 64 3-Durchgangsmutterkappe M20 1 26 Rutschplattenausrichtung 1 65 Bolzen M6x30 1 27 Druckscheibe 12 66 Sicherungsmutter M6 1 28 Dichtung 10 67 Öl-Abdeckung 1 29 Innere sechseckige Schraube M6x12 4 68 O-Ring 25x3.55 1 30 Innere sechseckige Schraube M6x16 6 69 Scheibe 16 1 31 Wellenscheibe 2 70 Bolzen M16x1.5x25 1 32 Lange Achse 1 71 Ausrichtungsscheibe 16 4 33 Armschutz Halterungsplanke 2 72 Rad 2 34 Sicherungsmutter M4 1 73 Radwelle 1 35 Sicherungsmutter M10 10 74 Maschinenfach 1 36 Dichtungsring 10 44 75 Sperrgriff 6 37 Rutschbrett Fixierung 1 76 Ausrichtscheibe 20 2 38 Oberes Rutschbrett 2 1 77 Bolzen M10X35 6 1 78 Zylinder 1 79 Unteres Rutschbrett 4 80 Messerrohr 1 81 Pumpenabdeckung 1 39 14 Oberes Rutschbrett 1 Pos. 2 EN USER MANUAL Dear Customer! This manual contains important information and advice for the correct and safe use and maintenance of the ZIPPER log splitter ZI-HS7. The manual is part of the machine and may not be stored separately. Read it profoundly before first use of the machine and keep it for later reference. When the machine is handed to other persons always put the manual to the machine. Please follow the security instructions! Due to continuous development of our products illustrations, pictures might differ slightly. Attention! Technical changes reserved! Copyright © 2010 This manual is protected by copyright law – all rights reserved. Especially the reprinting as well as the translation and depiction of pictures will be prosecuted by law. Court of jurisdiction is WELS, Austria. Customer Support Z.I.P.P.E.R MASCHINEN GmbH Gewerbepark 8 A-4707 Schlüsslberg Tel 0043 (0) 7248 61116 - 700 Fax 0043 (0) 7248 61116 – 720 [email protected] 2.1 COMPONENTS (Fig. 1) 9 Table locking hook 10 Wheels 11 Stand 12 Oil tank plug/vent valve 13 Front table holding bracket 14 Operating lever guard 15 Operating lever 16 Adjustable log clamping claw 17 Log clamping claw star knob 1 Transport handle 2 Stroke adjusting rod 3 Splitting blade 4 Column A 1x log splitter frame 5 Switch B 2x operating levers with hand guard 6 Coupling brake 1x removable front table 7 Motor 1x User's Guide 8 Front table side bracket 15 Scope of Supplies (Fig. 1.1) 2.2 TECHNICAL DETAILS Technical changes reserved. 2.3 INCLUDED IN DELIVERY Unpack the ZIPPER log splitter ZI-HS7 and check the machine for any transport damage and for completeness of delivery. 2.4 GENERAL SAFETY INSTRUCTIONS Motor: 230V / 50Hz Motor power: 3,0 kW Rated current: 10,0 A Splitpower: 7t Max. splithub: 470 mm Splitpiece-diameter: 70-400 mm Split-length: 580 – 770 – 1100 mm Hydraulic oilcapacity: 4l Hydraulichub: 19-22 MPa Forward speed: 4-5 cm/s This log splitter exclusively serves for splitting Reverse speed: 10-12,5 cm/s logs, whose dimensions must correspond to the recommendations given herein. Any other use Dimensions: 560 x460 x 1100 mm shall be considered improper, and the manufacSpaltkreuz turer will not be liable to any consequential inju- peripheral equipment : ries of persons or animals as well as to any Weight: 96 kg damage to property as a result of improper usage of this machine. The user must be within the specified working area and must use both hands to actuate the control device. Under no circumstances must the user employ any other systems. Any other persons or animals, with the exception of the user, must keep a safety distance of 5 m around this log splitter while it is in use. Check the ground on which you intend to work for stability and firm hold. This log splitter may only be used with its protective facilities properly installed. Disregarding the instructions given in this chapter can result in severe consequential personal injuries or damage to property or to this machine itself. 1. 2. 3. 4. 5. 6. 7. 8. 9. 10. 16 Only one person is allowed to work on this machine. No one may use this log splitter without having read its User's Guide before, or without having been instructed on the rules for proper and safe machine usage. The operator must be at least 18 years old. Trainees at a minimum age of 16 years may only work on this machine under supervision. Never wear any jewellery (rings, necklaces, watches, etc.) or wide clothes such as oversized overalls, gloves or shoes as these could be caught by moving parts. Specific protective clothing such as safety shoes and special gloves are mandatory. Always wear a hair net if you have longer or long hair. Always wear safety goggles. Bear in mind that normal glasses do not offer sufficient protection as they can even cause more severe injuries as a result of glass breakage. Always use this log splitter on dry, level and unfrozen ground. If you use this log splitter out doors on a lawn make sure that the grass has been cut short. Ensure good footing so that you can keep your balance. Never stand on your log splitter. En sure that the log splitter is firmly placed on the ground so that it cannot fall over. This can avoid serious injuries. Stay sufficiently away from the splitting blade to avoid injuries caused by chips and splinters coming off. Keep any other persons away. Any other persons, children or animals, with the exception of the user, must keep a safety distance of 5 m around this log splitter while it is in use. Make sure whether you have removed any foreign bodies from the log you want to split to pre vent them from coming off during splitting and cause damage to this machine. 11. 12. 13. 14. 15. 16. 17. 18. 19. 20. 21. 22. 23. 24. 17 Never split any logs which contain nails, cables or dangerous foreign substances. Make sure that always both ends of the log you are just processing are split as square as possible. This is the only way to guarantee that the log will not be forced out of its vertical position, while branches must have been cut off flush. Never split any logs, whose dimensions are bigger than those specified under "Size of Logs". Otherwise, injuries or irreparable damage to the machine will be the result. Split the logs along the grain. Never place a log on this splitter crosswise to split it this way. This could result in injuries and damage to the machine. Never pile up the logs in order to process several logs at the same time. Parts of the wood could be flung off into the air and hit you. ONLY use your hands to operate the levers. Never use your feet, knees, a rope or similar means to operate the levers. Continuously concentrate on the movements of the splitting blade. Ne ver try to load the log splitter while its splitting blade is in motion. Do not put your hands in the vicinity of the moving parts of this machine. Protect your hands. Never bring your hands in the vicinity of any gaps opening in the log as these may close in a matter of seconds and crush or even cut off your hands. Do not remove any jammed parts of a log with your hands. When the splitting blade of the log splitter is return ing keep your hands off the machine, as this log splitter has been designed so that it will auto matically stop once the cylinder has fully retracted. Do not run this log splitter under full load for more than 5 seconds by keeping the cylinder pressed, for example, or if you want to split a hard log. This would result in quick overheating of the pressurized oil causing consequential damage to the machine. It is advisable to turn the log 90° and to try to split it at this position. If it is still impossible to split such log please dispose of it instead of subjecting it to any further splitting process to avoid damage to the machine. Do not press the splitting blade against the log. You could cause breakage of the blade or dam age to the column. Do not use the log splitter under any circumstances when you are under the influence of alco hol, drugs or medications, or if you are tired. This machine must never be used in damp or potentially explosive areas. Never use this ma chine in rooms containing aggressive vapours (natural gas, petrol vapours or inflammable va pours). Never smoke while you are working on this machine and make sure that there are no open fire sources or oil tanks in the vicinity of your working area. Check whether your power supply circuit is efficiently fused and conforms with the properties of the motor. Conformity with the power rating, the voltage and the frequency (refer to the values indicated on the type label), earthing and a standard voltage transformer connected in series are indispensable. Never leave this machine unattended after you have powered it up, or while it is working. Keep an eye on the machine until it has come to a complete standstill. Unplug the power cord when you do not use this machine, or before you do any maintenance work, change the connections and move the machine. Please read this User's Guide before doing any maintenance work. Keep your workplace inaccessible to children. Lock your working room. Store your log splitter in a room which is inaccessible to children and other persons who are not familiar with how to use this machine. 2.5 PROPER USAGE This machine is in conformity with the applicable ec-machine directive. Logs may only be split in the direction of the grain. IMPORTANT Never try to split logs lying in horizontal position or crosswise to the grain. This machine has been designed and The safety, working and maintenance instructions given built on condition that this User's by the manufacturer as well as the dimensions indicatGuide be followed. Any modifications ed in the technical specifications must be kept. The relto this machine or using it for any evant rules for the prevention of accidents and all other purposes it has not been designed generally accepted safety regulations must be obfor can lead to serious or fatal acciserved. dents and will result in the annulThis log splitter may only be used, maintained or rement of any right to claim under paired by skilled persons who are familiar with it and warranty. have been informed on the hazards related to it. Any unauthorized modifications made to this log splitter will exclude the manufacturer's liability to any damage resulting therefrom. This log splitter may only be used in connection with original accessories and tools from its manufacturer. Any usage in excess of this will be considered improper. The manufacturer will not be liable to any damage resulting therefrom, and the risk of it shall solely be borne by the user. 2.6 Residual Risks Even proper usage can still involve the following residual risks: 2.7 Injuries to your fingers and hands caused by the splitting tool. Injuries by workpieces and parts coming off as a result of improper holding and guiding. Injuries by contact with live parts when electric components are opened or defective. Hearing impairment after working for a long time without wearing ear protection. Residual hazards can be minimized if you follow the instructions given in the "Proper Usage" and "Safety Instructions" chapters as well as in this User's Guide in general. Operating Conditions This log splitter is designed for outdoor temperatures between +5 °C and 40 °C. The air humidity at the workplace should not exceed 50 % at 40 °C. This machine can be stored or handled at outdoor temperatures between -25 °C and 55 °C. 18 2.8 Electrical Safety When equipment like this is being started a short-time voltage drop may occur, particularly if the mains quality is poor. Such drops can affect other consumers (e. g. flickering of a lamp). At a mains impedance of Zmax < 0.448 Ω, such trouble is not to be expected. (For further information, please contact your local energy supply company.) 2.9 Electrical Connection The three-phase 400 V/50 Hz motor of this log splitter should be connected to a standard 400 V + 10 %/50 Hz + 1 Hz power supply source provided with a residual-current circuit breaker. The main connection and any extension cables must have five wires = 3P + N + PE (3/N/PE). Also, the main connection must be fused (16 A max.) Electric cables must be of H 07 RN type and in conformity with EN 60245. CAUTION Any unprofessional use of extension cables can cause overheating of this log splitter. Ensure that the extension cable is not longer than 10 m and its wire cross section is not less than 2.5 mm². Never use uninsulated or bare cables, respectively. The extension cable must be suitable for outdoor use. 2.10 IMPORTANT Make sure that the electric circuit is fused, and that the power, voltage and frequency of the motor is supported by your mains supply. Also, make sure, that your power supply is earthed. Connect your log splitter to earth. Never open the ON/OFF switchbox. However, if it should become necessary to do so, contact a skilled electrician. Make sure that you will never touch live contacts, specifically when you plug or unplug your log splitter. This machine and its power cord must never get into contact with water. Never use its power cord to move/shift your log splitter. Always unplug the power cord before handling your log splitter. Do not yank the plug out of the wall socket by the cable and protect the latter against heat sources, oil and objects which can damage it. Neither expose your log splitter to rain nor to wetness. Assembly and Preparation Unpacking (Fig. 1.2). Unpacking this log splitter requires at least two persons. To place the log splitter on the floor, proceed step by step as described below. Ensure that block (B) supports the log splitter box (A) at a point above its middle. The other end of block (B) should rest on a fixed object such as a wall. Fasten wedge (C) under the lifted box to prevent the latter from slipping off. After that, you can remove the packing carton from the log splitter. Assembly (Fig. 1.3) 1. Pull out spring (A) to release lock (B). Apply a thin film of grease to the points marked in the sketch below. Then insert the lever and make sure that it has reached its intended end position (C). Now, latch the lever by lock (B) and spring (A). Perform the same procedure for the other lever. 2. You can set three different table positions to be able to split logs of various lengths. Insert the table into one of the three fixtures (E) provided for this purpose and turn hooks (D) by 90° lock it on eitheside. 19 Transporting the Log Splitter to the Working Area (Fig. 2) For easier handling, this log splitter is provided with two small wheels. To move the log splitter hold transport handle (A) with your hand and carefully tilt back the log splitter. Make sure that the oil tank cap is closed. 2.11 IMPORTANT If you use a crane to handle the log splitter use a suitable lifting rope to sling the housing and hoist the machine carefully. never hang the crane hook into the transport handle. Startup Please follow the instructions given below before getting started: The machine must be placed so as to be stable and secured against skidding. Provide sufficient room around your log splitter so that you can safely operate it. Ensure that no unauthorized persons (especially children) can approach your working area. Prior to startup, all guards and safety devices must have been properly attached. Check whether all screws, bolts, hydraulic couplings and pipe clamps have been properly tightened. Always make sure before each starting that the hydraulic oil level is sufficient. This machine must never be used when it is in an inoperable condition or needs some maintenance. Before using this log splitter, get familiar with its controls and safety elements and with how they work. Make sure that the data indicated on the type label conform with your mains data before you connect your log splitter. Size of Logs (Fig. 3) Choose your workplace in consideration IMPORTANT of your safety regulations. Keep your logs to be split Never try to split fresh wood. ready to hand. Remove the split logs from the workdry wood is much easier to split than ing area. fresh, wet logs. in addition, it does Before you split your logs, sort out those logs which not tend to get jammed during splitare longer than 104 cm. If you want to split logs ting so frequently. which are very big in diameter it is recommended that they should not exceed a maximum length of 100 cm. You can adjust three different table heights (Fig. 3): 52 cm, 78 cm and 104 cm. Always choose the suitable height for the respective log length. Always use the locking device to secure the table at the desired position. Do not run this log splitter under full load for more than 5 seconds. 20 2.12 Application (Figs. 4 – 7) 1. To ensure longer life apply some grease to the sliding surfaces of the arm whenever you intend to use this machine (Fig. 5). 2. Always lay the power cord so that it cannot be damaged (by your working). 3. Open the vent plug. Open the hydraulic oil tank cap for a few turns whenever you start your log splitter. Completely close the hydraulic oil tank cap after work. 4. Check the running direction of the motor. When you start the motor the splitting blade will be automatically moved to its topmost position. If the splitting blade is already at its topmost position press the two operating levers down to activate the splitting mechanism. This will bring the splitting blade down. If the splitting blade does not move upward after you have started the motor immediately stop the machine. After that, use a screwdriver to change the polarity of the motor (Fig. 6). If you have no adequate qualification to do so contact an electrician under any circumstances. IMPORTANT There is a vent plug at the machine front side (Fig. 4). Every time you want to begin your work, you should screw out this plug some four turns to guarantee good air circulation in the oil tank. Before you transport this machine, close this plug to avoid oil leakage. If you leave the vent plug tightened while you are working the hydraulic movements will lead to some overpressure which can damage your machine. CAUTION Never run the motor in the wrong direction. This will inevitably lead to damage to the pumping system, as a result of which you will no longer be entitled to claim under warranty. 5. If you want to run this log splitter at very low temperatures run the machine idle for 15 min. before beginning to work to allow the hydraulic oil to warm up. 6. Prior to beginning your work, perform the following steps to check the functionality of your log splitter. a. Press both operating levers down. This must bring the splitting blade down. The splitting blade must then come to a standstill some 5 cm above the topmost table position. b. If you release one of the two levers the splitting blade will stop at its current position. c. Releasing both levers will induce the splitting blade to automatically return to the top. 7. To set the splitting blade follow the steps described below (Fig. 7): a. Bring the splitting blade into the desired position. The topmost position of the splitting blade should then be some 3 – 5 cm above the log. b. Release one of the operating levers or stop your log splitter. c. Use a suitable tool to slacken star grip (A). Set the stroke adjusting rod so that it will act as a stop at the desired position. After that, re-tighten star grip (A). d. Release both operating levers or restart the motor e. Check your newly set positions. 8. Now, place vertically under the splitting blade the log to be split. Make sure that the log is even and does not fall over on the splitting table. Never try to split canted logs. 21 9. Adjust the two levers, depending on the log diameters. IMPORTANT Always split your logs along the grain. Never load the logs crosswise to the grain, as this can lead to severe damage to the mechanical and hydraulic systems. 10. Hold the log with both levers to guarantee a stable standing position of the log. Then move both levers down to split the log. Releasing one of the two levers will induce the splitting blade to stop. If you release both levers the splitting blade will automatically move to its topmost position. (Refer to Fig. 8.) 11. Immediately remove the split log parts from your working area and pile them up, if necessary. Thus you can reduce the riskof working accidents. 12. After you have finished your work, allow the splitting blade and the arm move to their topmost positions (parking positions). Then stop the motor and unplug the machine from your power supply source. Allow the machine to cool down. After that, you should clean and, if CAUTION necessary, lubricate your machine. This log splitter may only be stored in vertical position and at a dry and clean place. EnAccumulated log parts and wood chips are sure that the oil tank cap is well closed sources of danger. Always keep your surand that no oil will emerge during storrounding area clean so that you cannot slip. age. 2.13 Maintenance and care Maintain your log splitter carefully. Clean the machine after each use. To guarantee the best possible and safest performance keep your log splitter clean. Lubricate the machine according to the instructions. Check all seals, pipes and couplings for leakage before you start your log splitter. Keep the operating levers and the mains switch clean, dry and free of oil or grease. Cleaning the Log Splitter 5. Unplug the power cord. 6. Use a moist cloth to clean the plastic parts. Do not use any cleaning agents, solvents or pointed objects. 7. Use a soft brush to remove dust deposits from the motor ventilation slots and from moving parts at regular intervals. 8. Apply some oil to all moving parts at regular intervals. Hydraulic Oil Change IMPORTANT: The oil tank is factory-filled with high-grade viscosity class 20 hydraulic oil. Take waste oil to a public receiving depot or observe the relevant disposal regulations of your country where this log splitter is used. Do not dispose of the oil into sewerage systems, into the soil or into water bodies of any kind. 22 CAUTION Always disconnect your power supply source from your machine before you begin to release any jammed logs. Do not allow any other persons to assist you in releasing a jammed log. When releasing a jammed log, never stick into your log splitter any means such as foreign objects of any kind. Please do not maltreat the jammed log with your feet or with any objects either, as a sudden release of the jammed piece will cause the log pusher to give way which can lead to personal injuries or damage to your machine, respectively. All safety rules contained in the "General Safety Instructions" chapter shall apply to any of the interventions described before. The manufacturer will not be liable to any injuries of persons or animals or to damage to property as a result of improper use of this machine or of non-observance of the safety regulations. The hydraulic system is a closed system consisting of an oil tank, an oil pump and of control valves. Too low an oil level can damage the pump. The oil level should not be lower than 1 – 2 cm above the lower surface of the oil tank. Change the oil completely once per year. Ensure that no foreign particles will get into the oil tank. Properly dispose of the waste oil after each oil change. Allow your log splitter to run idle for a few minutes after each oil change before you place it into operation again. The following oil grades are suitable for this log splitter: SHELL Tellus 22 MOBIL DTE 11 ARAL Vitam GF 22 BP Energol HLP-HM 22 2.14 Troubleshooting and Fault Clearance Problem 5. 6. 7. 8. 2.15 Motor does not start. Wrong motor direction. Splitter not movIng although motor is running. Splitter working, however, with untypical noise and vibration. Possible Cause Remedy 1.1 No power in wall socket. 1.1 Check fuse box. 1.2 Extension cable defective. 1.2 Unplug, check and use new one, if necessary. 1.3 Wrong supply, 400 V, three-phase 1.4 current. Switch defective. 1.3 5-pole plug with 1.5 mm diameter. 2.1 Wrong polarity. 1.4 Have it checked by electrician. 2.1 Change polarity using a screwdriver (electrician). 2.2 Change polarity (electrician). 3.1 Valve not opened, 3.1 Tighten loose parts. caused by loose connection. 3.2 Oil level too low. 3.2 Replenish oil. 4.1 Oil level too low. 4.1 Replenish oil. Disposal Do not dispose your ZI-HS7 in the residual waste! Contact your local authorities for information about best available disposal possibilities in your area. Drain fuel from the fuel tank completely before disposing the machine. Disaggregate the machine into its components before disposing them. 23 2.16 24 Spare part drawings and spare part lists Pos. 25 Name Pcs. 1 Worktable 1 2 Circulate stem 3 4 Pos. Name Pcs. 42 Ajustable lever 1 2 43 switch 1 Armguard cover 22 4 44 Screw M4x60 2 Manipulative handle 2 45 Motor 1 5 Right log clamp 1 46 Bolt M10x30 10 6 Right armguard hold assembly 1 47 Oil coming spigot for pump 1 7 Star model knob 2 48 Pump 1 8 Left log clamp 1 49 Hose Hoop 4 9 Left armguard hold assembly 1 50 Suction hose 1 10 Locknut M8 2 51 Spring washer 8 4 11 Washer 8 8 52 Inner hexangular screw M8x85 2 12 Armguard handle pin 2 53 Oil returning hose 1 13 Thin nut M8 2 54 Oil returnning spigot for valve 1 14 Bolt M8x40 2 55 Washer groupware 20 7 15 Clip 4 56 Hollow bolt M20x1.5 1 16 Adjustable plank 1 57 Inner hexangular screw M8x35 2 17 Adjustable lever connector 1 58 High pressure oil pipe 3 1 18 handle jam 1 59 Valve 1 19 Four star knob 1 60 Pipe connector for valve 1 20 Tense pole guider 1 61 Oil going pipe spigot for pump 1 21 Nut cap M8 1 62 High pressure oil pipe 2 1 22 Tense pole 1 63 High pressure oil pipe 1 1 23 Short shaft 1 64 Three passage nut cap M20 1 24 Snap washer -shaft 22 2 65 Bolt M6x30 1 25 Up slip plank 4 1 66 Locknut M6 1 26 Slip plank adjuster 2 1 67 Oleaginous cover 1 27 Snap washer 6 12 68 O-ring 25x3.55 1 28 Gasket 6 10 69 Washer groupware 16 1 29 Inner hexangular screw M6x12 4 70 Bolt M16x1.5x25 1 30 Inner hexangular screw M6x16 6 71 Snap washer 16 4 31 Snap washer -shaft 19 2 72 wheel 2 32 Long shaft 1 73 Wheel shaft 1 33 Armguard hold limitative plank 2 74 Machine shelf 1 34 Locknut M4 1 75 Lock handle 6 35 Locknut M10 10 76 Snap Washer 20 2 36 washer 10 44 77 Bolt M10X35 6 37 Slip plank adjuster 1 1 78 Cylinder 1 38 Up slip plank 2 1 79 Down slip plank 4 39 Up slip plank 1 1 80 Knife rest pipe 1 40 Up slip plank 3 1 81 Pump cover 1 41 Thin nut M16 1 KONFORMITÄTSERKLÄRUNG / DECLARATION OF CONFORMITY Z.I.P.P.E.R® AUSTRIA GmbH Gewerbepark 8 A-4707 Schlüsslberg, Tel.: +43/72480/61116-700 Fax.: +43/7248/61116-720 www.zipper-maschinen.at [email protected] Bezeichnung / name Z.I.P.P.E.R Holzspalter / Z.I.P.P.E.R log splitter Type /type ZI-HS7 Richtlinien / directives EN 60204-1:2006 EN 609-1:1999+A2 ZEK 01.2-08/12.08 Zertifikatnummern/certificate numbers S 50145776 Prüfberichtsnummern / test report numbers 01-CZP-15022526 003 Ausstsellungsdatum / issuing date 26/01/2010 Ausstellungsbehörden / issuing authorities TÜV Rheinland Tillystraße 2 90431 Nürnberg Germany Hiermit erklären wir, dass die oben genannte Maschine den maßgeblichen Anforderungen des deutschen Produktsicherheitsgesetzes entspricht. Diese Erklärung verliert ihre Gültigkeit, wenn Veränderungen an der Maschine vorgenommen werden, die nicht ausdrücklich schriftlich im Vorfeld mit uns abgestimmt wurden. The above mentioned machine complies with all relevant requirements of the German law for product safety. Any manipulation of the machine not explicitly approved by us renders this document null and void. Schlüsslberg, 24.06.2011 Ort, Datum / city, date 26 Unterschrift / signature Erich Humer 27