1
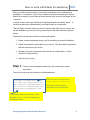
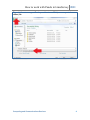
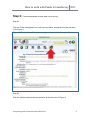
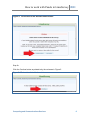
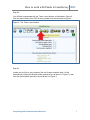
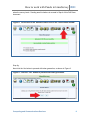
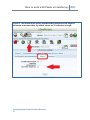
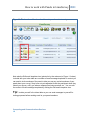
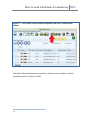
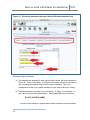
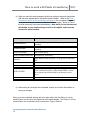
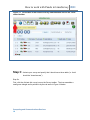
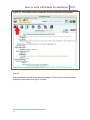
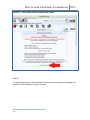
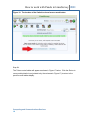
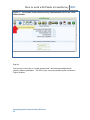
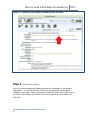
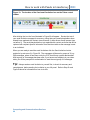
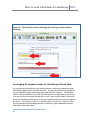
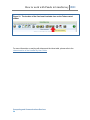
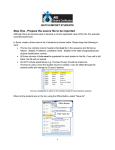
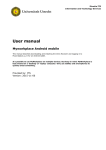
University of Guelph How to work with Panels in LimeSurvey LimeSurvey Drill Down Document Computing and Communications Services 7/14/2011 How to work with Panels in LimeSurvey 2011 Often you wish to restrict access to your survey to members of a pre-defined list of participants. For example, if your survey consists of questions comprising the various ballots for an election, you will want to restrict access to the survey to the people on the “voters list”. In online surveys such a pre-defined list of eligible participants is called a “panel”. In LimeSurvey panels are implemented by a concept known as a token table. This Drill-Down document shows you how to create a token table for your survey, and set the metadata in your survey so only people listed in the token table can take your survey. There are four broad steps involved in working with panels. 1. Create a comma separated values (csv) file containing your panel information. 2. Create and populate a token table for your survey. The token table is populated with the content from your csv file. 3. Activate your survey and specify that it should use a token table (i.e. that it should be “closed access”). 4. Announce your survey. Step 1: Create a comma separated values (csv) file containing your panel information. The csv file must have the information as illustrated below: firstname,lastname,email Mary,Smith,[email protected] Tom,Jones,[email protected] Emil,Alihe,[email protected] Reanne,Fruer,[email protected] The first line in the file must be: firstname,lastname,email Enter each panel member’s information on a separate line. This person’s firstname is Reanne. Their lastname is Fruer. Their email address is [email protected] Computing and Communications Services 2 How to work with Panels in LimeSurvey 2011 Note that: the first line in the csv file must read: you enter your panel members’ information on subsequent lines in the file. For each member of your panel, enter their firstname, lastname, and email address – separated by commas. You must supply the firstname, lastname and email address for every member of you panel. firstname,lastname,email It is often easiest to create and maintain your panel information in an Excel spreadsheet as shown in Figure 1. Figure 1: An Excel spreadsheet containing sample panel information Within Excel, you can then save the spreadsheet as a csv file as illustrated in Figure 2. Computing and Communications Services 3 How to work with Panels in LimeSurvey 2011 Figure 2: How to save your Excel spreadsheet as a CSV (comma separated values) file. Computing and Communications Services 4 How to work with Panels in LimeSurvey 2011 Step 2: Create and populate a token table in your survey. Step 2a: Click the Token management icon on the survey toolbar, as pointed to by the red arrow in the Figure 3: Figure 3: The location of the token management icon on the Survey toolbar. Step 2b: Click the Initialize tokens button as pointed to by the red arrow in Figure 4. Computing and Communications Services 5 How to work with Panels in LimeSurvey 2011 Figure 4: The location of the Initialize tokens button Step 2c: Click the Continue button as pointed to by the red arrow in Figure 5. Figure 5: The location of the Continue button Computing and Communications Services 6 How to work with Panels in LimeSurvey 2011 Step 2d: You will then be presented with the Token control toolbar, as illustrated in Figure 6. Click the Import tokens from CSV file icon, pointed to by the red arrow in Figure 6. Figure 6: The Token control toolbar Step 2e: Locate your csv file on your computer (the csv file was created in step 1 of this document) by clicking the Browse button (pointed to by red arrow 1 in Figure 7), then click the Upload button (pointed to by red arrow 2 in Figure 7). Computing and Communications Services 7 How to work with Panels in LimeSurvey 2011 Figure 7: The location of the Browse and Upload buttons Your csv file will be uploaded to the LimeSurvey server, and your token table will be populated with the information from the file. Step 2f: Next, generate tokens for each person in your token table by clicking the Generate tokens icon pointed to by the red arrow in Figure 8 below. A token is a unique password for each member of your panel. When a person accesses your “closed access” survey they will be asked for their token. Alternatively, within LimeSurvey you can send an email invitation to selected or all people in your token table. Within the email message is a customized link the respondent can click to access your survey. The link includes the respondent’s specific token so they will not be prompted for a token Computing and Communications Services 8 How to work with Panels in LimeSurvey 2011 when the survey loads. Sending email invitations is covered in Step 4 of this Drill Down document. Figure 8: The location of the Generate tokens icon on the Token control toolbar. Step 2g: Next click the Yes button to proceed with token generation, as shown in Figure 9. Figure 9: Click the “Yes” button to proceed with token generation. Computing and Communications Services 9 How to work with Panels in LimeSurvey 2011 Your tokens will be created. Each token will be unique. Step 2h: You can then click the Display tokens icon to display the contents of your token table. The location of the Display tokens icon is pointed to by the red arrow in Figure 10 below. Figure 10: The location of the Display tokens icon on the Token control toolbar. In the resulting display (shown in Figure B below), note the tokens that have been assigned to the various members of your panel. The tokens are unique and their length is determined by a setting in your survey’s metadata as illustrated in Figure A below. In Figure B, note also the icons beside each panel member’s entry, in the Actions column (outlined with a red rectangle in Figure B below). As with all icons in LimeSurvey, you can mouse over each icon to view the associated tooltip to determine the icon’s action. For example: a) clicking the pencil icon will let you edit the information (i.e. “attributes”) associated with the person’s entry in the token table. You can change any attribute. b) clicking the green gear icon will let you complete the survey on behalf of the panel member. c) clicking the red X icon will delete the entry from the panel. d) clicking the symbol that looks like an envelope will let you send an email invitation to the panel member inviting them to complete your survey. (This icon will change to “send a reminder email” after the initial invitation email has been sent). Computing and Communications Services 10 How to work with Panels in LimeSurvey 2011 Figure A: The location of the survey metadata setting that governs the length of the tokens in the token table. By default, tokens are 15 characters in length. Computing and Communications Services 11 How to work with Panels in LimeSurvey 2011 Figure B: The location of the icons beside each panel member’s entry. Note also the Edit email templates icon (pointed to by the red arrow in Figure 11 below). Included with your token table are a number of email message templates of content you can send to invite members of the panel to take your survey, remind members of your panel about your survey if they have not yet responded, thank the participant when they submit your survey, notify you when a response has been received, etc. You can edit the content of these message templates by clicking the Edit email templates icon. Tip: Include yourself in the token table so you can send messages to yourself for testing purposes before sending email to your panel members. Computing and Communications Services 12 How to work with Panels in LimeSurvey 2011 Figure 11: The location of the Edit email templates icon on the Token control toolbar. Clicking the Edit email templates icon pointed to by the red arrow in Figure 11 above presents the screen in Figure 12 below. Computing and Communications Services 13 How to work with Panels in LimeSurvey 2011 Figure 12: The screen displayed when you click the Edit email templates icon. Referring to Figure 12 above: a) The templates are arranged on tabs (see the area outlined with a red rectangle in Figure 12 – these are the tabs). In the figure the Invitation tab is the active tab so you are seeing the template for the email invitation message. This is the message that is sent to your panel members to invite them to take your survey). b) Email placeholders are present in your templates. In Figure 12, red arrows 1, 2, and 3 are pointing to email placeholders. Email placeholders are of the form: {PLACE_HOLDER_NAME} (note the name is always in capitals and is always enclosed in brace brackets) Computing and Communications Services 14 How to work with Panels in LimeSurvey 2011 c) When you send the email message LimeSurvey replaces the email placeholder with the value appropriate for the specific panel member. Refer to the Email Placeholder section of the LimeSurvey User Manual for a complete listing of all email placeholders (the section is within the Tokens chapter). Below is a list of the most commonly used email placeholders. Note that if you include an email placeholder in your email message it must be all capitals, and it must be enclosed in brace brackets. Email placeholder Description {ADMINEMAIL} Email of the Survey administrator (set in your survey’s metadata) {ADMINNAME} Name of Survey Administrator (set in your survey’s metadata) {SURVEYNAME} Title of your survey {SURVEYDESCRIPTION} Description of your survey {EMAIL} Email address of the recipient i.e. the person in the token table. {FIRSTNAME} First Name of the recipient i.e. the person in the token table. {LASTNAME} Last Name of the recipient i.e. the person in the token table. {SURVEYURL} The URL pointing to the survey start - if you are sending HTML emails this will be a fully linked HTML version. The recipient can click this link to go directly to your survey. {TOKEN} The recipient’s token to access the survey d) After making any changes to the template, ensure you click the Save button to save your changes. When you have completed working with your token table, click the Return to survey administration icon to return to the previous multi-toolbar display. The Return to survey administration icon is pointed to by the red arrow in Figure 13 below. Computing and Communications Services 15 How to work with Panels in LimeSurvey 2011 Figure 13: The location of the Return to survey administration icon on the Token control toolbar. Step 3: Activate your survey and specify that it should use a token table (i.e. that it should be “closed access”). Step 3a: First, click the Activate this survey icon on the Survey toolbar. The icon resembles a small green triangle and is pointed to by the red arrow in Figure 14 below. Computing and Communications Services 16 How to work with Panels in LimeSurvey 2011 Figure 14: The location of the Activate this survey icon on the Survey toolbar. Step 3b: After reviewing the content of the warning messages, click the Activate survey button as pointed to by the red arrow in Figure 15 below. Computing and Communications Services 17 How to work with Panels in LimeSurvey 2011 Figure 15: The location of the Activate survey button Step 3c: On the resulting screen, click the Switch to closed-access mode button that appears, as pointed to by the red arrow in Figure 16 below. Computing and Communications Services 18 How to work with Panels in LimeSurvey 2011 Figure 16: The location of the Switch to closed-access mode button Step 3d: The Token control toolbar will appear as shown in Figure 17 below. Click the Return to survey administration icon (pointed to by the red arrow in Figure 17) to return to the previous multi-toolbar display. Computing and Communications Services 19 How to work with Panels in LimeSurvey 2011 Figure 17: The location of the Return to survey administration icon on the Token control toolbar. Step 3e: Your survey is now active, in “closed access mode”, which means participants will require a token to participate. The URL of your survey is pointed to by the red arrow in Figure 18 below. Computing and Communications Services 20 How to work with Panels in LimeSurvey 2011 Figure 18: The URL of your survey is pointed to by the red arrow. Step 4: Announce your survey. Once your survey has been activated you announce its availability to your panel of respondents. You can do this within LimeSurvey by sending an email invitation message to your panel. Start this process by clicking the Send email invitation icon on the Token control toolbar. The location of the icon is pointed to by the red arrow in Figure 19. Computing and Communications Services 21 How to work with Panels in LimeSurvey 2011 Figure 19: The location of the Send email invitation icon on the Token control toolbar. After clicking the icon the form illustrated in Figure 20 will appear. Review the text of your email invitation message for accuracy, noting that some email placeholders have already been replaced with content (see red arrow 1) while others are still present (see red arrow 2). The email placeholders not yet replaced with content are those that will be replaced with recipient-specific information from the token table as the message is sent to an individual. When you are ready to send the email invitations click the Send invitations button pointed to by red arrow 3 in Figure 20. The messages will be sent in groups of X (e.g. 200) messages, where X has been set by the CCS LimeSurvey system administrator. After a group of X messages has been sent, if you have more recipients in your token table, you will be prompted for authorization to send the next group of X messages. Tip: Always send an email invitation to yourself first, to check for accuracy and completeness, before sending the invitation to your full panel. Refer to Step 2h and Figure B above for information on how to do this. Computing and Communications Services 22 How to work with Panels in LimeSurvey 2011 Figure 20: The form that appears containing the text of your email invitation message. Leveraging the dynamic nature of LimeSurvey’s token table As you send email invitations to your panel members, LimeSurvey updates the token table with the date/time the invitation was sent. As your panel members complete the survey LimeSurvey again updates the token table with this indication. This dynamic nature of the token table lets you track who has and has not responded to your survey. You can click the Send email reminder icon on the Token control toolbar to initiate the process of sending reminder emails to the panel members who have not yet completed the survey. The location of the icon is pointed to by the red arrow in Figure 21 below. As your reminder email messages are sent, LimeSurvey again updates the relevant information in the token table. Computing and Communications Services 23 How to work with Panels in LimeSurvey 2011 Figure 21: The location of the Send email reminder icon on the Token control toolbar. For more information on working with tokens and the token table, please refer to the relevant section of the LimeSurvey User Guide. Computing and Communications Services 24