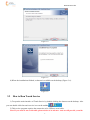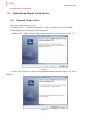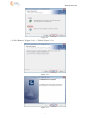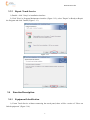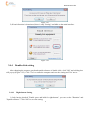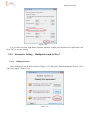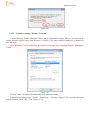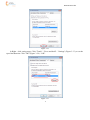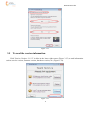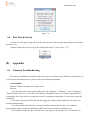
1
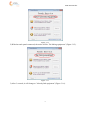
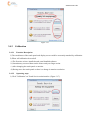
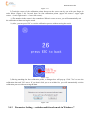
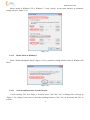
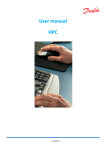
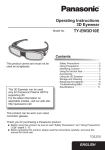
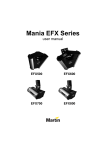
VIVA Services Lda. VIVA Infrared Touch Panel User Manual (For Windows) File N0. : 2014-01-1199 Contents 1 Product Appearance ......................................................................................................................... 1 2 Product Assembly Instruction .......................................................................................................... 1 2.1 Notice ............................................................................................................................................... 1 2.2 Touch Frame and Glass Bonding Step ............................................................................................. 2 3 Software Installation and Application Instruction ............................................................................ 3 3.1 Software Installation Instruction ...................................................................................................... 3 3.2 How to Run Touch Service .............................................................................................................. 5 3.3 Uninstall and Repair Touch Service................................................................................................. 6 3.4 Function Description ........................................................................................................................ 8 3.5 To read the version information ..................................................................................................... 18 3.6 Exit Touch Service ......................................................................................................................... 19 Appendix ........................................................................................................................................ 19 4.1 Common Troubleshooting ............................................................................................................. 19 4.2 After-sales Service........................................................................................... 4.3 Safety Precautions .......................................................................................................................... 22 Rua da Cortiça 14 - PITE Setor 7 - 7005-353 Evora – Portugal Ph: +351 26 673 1616 www.viva-services.eu VIVA Services Lda. 1. Product Appearance Figure 1-1 2 Product Assembly Instruction 2.1 Notice 1) The four housings of touch frame should not stand the strength, to avoid infrared ray deformation caused by housing deformation, which will lead to the signal too weak. 2) Proposal: The bottom of touch frame will use the large metal plate to support (refer to the figure2-1 green metal plate), which can make the front housing and touch frame combine so closely to avoid the shaking. 3) Proposal: To avoid touch frame to shake, we use metal plate to fix the four angles of touch frame (refer to figure2-2 green metal plate). 4) The distance between LED or LCD panel and touch glass is 2.5mm (this parameter is based on the glass deformation degree) which can prevent color halo issue. 5) Place touch frame’s long transmitter part connected to USB cable under the machine (figure 1-1), to make sure facade and obverse, top and bottom of touch panel to be installed correctly. 6) The shielding range of front housing can’t exceed filter PC at the housing slant, to avoid infrared ray transmission. 7) The USB cable can’t be pressed or pulled to protect its good contact. 8) If the USB cable needs to be extended, its overall length can’t be over 5m, otherwise it will affect the stability of USB signal transmission. 9) It’s better to adopt the 4mm thickness tempered glass for 42" or more than 42" touch frame based on the product safety and function stability. VIVA Services Lda. 2.2 Touch Frame and Glass Bonding Step 1) Please clean the outside frame and tempered glass before fixing the touch panel, to make sure the visual and installation effects. 2) One side of double-sided tape (proposed to use 3M double-sided tape) stick to the touch frame back (Note: the back of touch frame shows screw head, refer to figure 2-3) Figure 2-3 3) When tearing off the 3M double-sided tape (figure 2-4), we will stick the touch frame to the tempered glass and press it uniformly, at this moment, the touch panel assembly has been completed. Note: The touch screen will be more difficult to remove once it has been pasted, so we need more people’s cooperation, be sure to align the screen. Figure 2-4 4) After finishing adhesion, place the touch panel on a level for 24 hours. 2 VIVA Services Lda. 3 Software Installation and Application Instruction This section is to help user install and operate Touchservice program, including software installation instructions, function description and uninstalling etc. 3.1 Software Installation Instruction 3.1.1 Hardware Requirements CPU: 2.2 GHz dual-core processor Memory: 1 GB Hard disk requirement: 10 GB free disk space Note: The system used should meet above requirements to avoid insensitive reaction or other problems caused by systems with lower configuration. 3.1.2 Software Operation System 1) To connect infrared touch panel with your PC before installing software driver. 2) Commonly used operating systems: Windows XP and Windows 7. Note: If you need to use the touch panel on other operating systems, we will provide you with certain drivers. 3.1.3 Multi-touch Requirements 1) Operating Systems Supporting Multi-touch: Windows 8, Windows 7 Home Premium, Windows 7 Ultimate, Windows 7 Professional 2) Operating Systems Supporting Single Touch: Windows 7, Windows XP, Windows Vista Note:Systems above should be the original version, or else the touching function will be affected. 3.1.4 Installation Precautions 1) Before Installation to shut down the antivirus program and Trojan blocker such as (360 antivirus, 360 security guard, etc.); 2) To check whether there is another driver or service program in the system. If yes, please exit and uninstall them to avoid mutual interference. Make sure to install only one correct service program; 3.1.5 Installation Steps 1) Double-click "setup" to enter installation interface shown in figure 3-2. 3 VIVA Services Lda. Figure 3-1 Figure 3-2 2) To exit the installation, please click "Cancel"; to continue, click "Next". Figure 3-3 3) Start the installation by clicking "Install" (Figure 3-4). When completed, click "Finish" and exit. Check "TouchService.exe" in the finishing interface to allow service program to run automatically after the installation is finished. Otherwise, it won’t start automatically. 4 VIVA Services Lda. Figure 3-4 Figure 3-5 4) When the installations finished, a shortcut is available on the desktop (Figure 3-6). Figure 3-6 3.2 How to Run Touch Service 1) To open the main interface of Touch Service by double-clicking the shortcut on the desktop. Also you can double-click the touch service icon on the taskbar . 2) This service program requires the connection to be USB not serial cable. Note: If you need to use serial cable, please advise us in advance. And we will provide you with 5 VIVA Services Lda. another driver accordingly. 3.3 Uninstall and Repair Touch Service 3.3.1 Uninstall Touch Service Two ways to uninstall touch service: 1) "Control Panel" → "Uninstall a program" → Select "Touch Service" and "Uninstall". 2) Run the program to uninstall it by following steps: a) Double-click: "Setup" and go to "Preparing to install" interface shown as "Figure 3-7". Figure 3-7 b) Click "Next" (Figure 3-8) and go to Program Maintenance interface (Figure 3-9). Select "Remove". Figure 3-8 6 VIVA Services Lda. Figure 3-9 c) Click "Remove" (Figure 3-10) → "Finish" (Figure 3-11). Figure 3-10 Figure 3-11 7 VIVA Services Lda. 3.3.2 Repair Touch Service 1) Double - click "Setup" to installation interface. 2) Click "Next" to Program Maintenance interface (Figure 3-12); select "Repair" to Ready to Repair the Program and click "Install"(Figure 3-13). Figure 3-12 Figure 3-13 3.4 Function Description 3.4.1 Equipment Identification 1) If start Touch Service without connecting the touch panel, there will be a notice of "Have not linked equipment" (Figure 3-14). 8 VIVA Services Lda. Figure 3-14 2) With the touch panel connected, the notice will be "Be linking equipment" (Figure 3-15). Figure 3-15 3) After 3 seconds, it will change to "Already link equipment" (Figure 3-16). 9 VIVA Services Lda. Figure 3-16 3.4.2 Calibration 3.4.2.1 Function Description 1) The coordinates of the touch panel and display screen could be accurately matched by calibration. 2) When will calibration be needed? a) The first time to have installed touch panel bundled software. b) Inconsistency occurred between the mouse and your finger action. c) After changing the touch panel or monitor. d) Having move the touch panel or there is a change in monitor resolution. 3.4.2.2 Operating steps 1) Click "Calibration" on Touch Service main interface (Figure 3-17). 10 VIVA Services Lda. Figure 3-17 2) Touch the center of the calibration points shown on the screen one by one with your finger in order below (Figure 3-18). In total, there are four calibration points. (upper left corner→ upper right corner → lower right corner → lower left corner). a) The number in the center is the countdown. When it comes to zero, you will automatically exit the calibration without saving the result. b) Also, you can press ESC to exit the calibration process without saving the result. Figure 3-18 Figure 3-19 3) Having touching the four calibration points, a dialogue box will pop up. Click "Yes" to save the calibration data and "No" not to. If you don’t click yes or no within 10s, you will automatically exit the calibration process without saving the data. 11 Figure 3-20 3.4.3 Parameter Setting—excludes multi-touch mode in Windows 7 VIVA Services Lda. Mouse mode in Windows XP or Windows 7: click "setting" on the main interface to parameter setting interface (Figure 3-21). Figure 3-21 3.4.3.1 Mouse Mode in Windows 7 Select "Enable Multipoint-Touch" (Figure 3-22) to parameter setting similar to that of Windows XP above. Figure 3-22 3.4.3.2 Activate and Deactivate Touch Function 1) Not selecting "Use your finger as an input device" and click "Yes", a dialogue box will pop up (Figure 3-23), asking if you want to cancel the touching function. Click "Yes" to deactivate and "No" to activate. 12 VIVA Services Lda. Figure 3-23 2) If touch function is deactivated, there is only "Setting" available on the main interface. Figure 3-24 3.4.4 Double-click setting After changing the response speed and spatial tolerance of double-click, click "OK" and a dialog box will pop up (Figure 3-25). Click "Yes" to restart the computer and save the setting and "No" not to. Figure 3-25 3.4.4.1 Right-button Setting 1) Only having checked "Enable press and hold for right-button", you can set the "Duration" and "Spatial tolerance". Click "OK" to save the setting. 13 VIVA Services Lda. Figure 3-26 2) If you don’t need the right-button function, uncheck "Enable press and hold for right-button" and click "OK" to save the setting. 3.4.5 Parameter Setting—Multipoint-touch in Win 7 3.4.5.1 Multipoint-touch Click "Multipoint" on the main interface (Figure 3-27) and check "Enable Multipoint-Touch". Click "OK" and "Apply" (Figure 3-28). 14 Figure 3-27 VIVA Services Lda. Figure 3-28 3.4.5.2 Parameter Setting- Windows 7 System 1) After checking "Enable Multipoint-Touch" and go to parameter setting. There is "Pen and Touch" setting interface (which comes with Windows 7) (Figure 3-29) where detailed settings are available for pen and touch. Note: Windows 7’s own calibration procedure is available after checking “Enable MultipointTouch”. Figure 3-29 2) Click "Touch" for right-click and double-click parameter setting. 3) Double-click setting steps: "Touch" - "Double-tap" - "Settings" (Figure 3-30), to set the speed and spatial tolerance. Click "OK" - "OK" (Figure 3-32). 15 VIVA Services Lda. Figure 3-30 Figure 3-31 16 VIVA Services Lda. Figure 3-32 4) Right - click setting steps: Click "Touch" - "Press and hold" - "Settings" (Figure 3-33), to set the speed and duration. Click "OK" (Figure 3-34) - "OK". Figure 3-33 17 VIVA Services Lda. Figure 3-34 3.5 To read the version information Click "Service Version: 2.1.5.5" in blue in the lower right corner (Figure 3-35) to read information such as service version, firmware version, hardware version, etc. (Figure 3-36). Figure 3-35 18 VIVA Services Lda. Figure 3-36 3.6 Exit Touch Service 1) Click "X" in the upper right corner on the main interface will only hide the program on the taskbar but not to exit. 2) Right click Touch Service icon on the taskbar and choose "Exit" (Figure 3-37). Figure 3-37 四、 Appendix 4.1 Common Troubleshooting The software and hardware problems that may occur are as follows under different circumstances. If you could not find answers below, please contact our technical department. 1) Touch failure Problem: Touch screen does not respond at all. Solution: a) To check the touch screen status: right-click "My Computer" – "Manage" – "Device Manager" – "Human Interface Device" to see if the device has been identified. If there is no "HID-compliant device", it means the device has not been recognized or there is something wrong about it. You need to check the USB cable. b) To check whether the USB cable has been properly connected and whether the PC cable is on 19 normal communication. c) To check whether the software is correctly installed; whether there is anti-virus software protecting the registry during the installation which leads to an incomplete installation, etc. d) To confirm whether you have checked "Use your finger as an input device" on Touch Service VIVA Services Lda. setting interface. If not, please check. 20 VIVA Services Lda. e) For multi-point mode in Windows 7, you need to confirm you have checked "Use your finger as an input device". If not, please check. 2) Multi-touch failure Problem: multi-touch & writing failure Solution: a) To confirm whether the software you use supports multi-touch. Windows 7’s "paint" software can support multi-touch. b) To confirm whether the operating system you use supports multi-touch. Operating systems supporting multi-touch: Windows 7 Home Premium, Windows 7 Ultimate, Windows 7 Professional Operating systems not supporting multi-touch: Windows 7 Home Basic, Windows XP, Windows Vista Enterprise, Windows Vista Business Operating systems not supporting touch function: Windows Vista Home Basic, Windows Vista Ultimate Note: Systems above that don’t support multi-touch could use multi-touch function with TUIO protocol. c) Please re-confirm whether you have activated "Tablet PC Input Service". Setting steps: Right-click "My Computer" – "Properties" – "Pen and touch". If there is a notice of "No Pen or Touch Input is available for this Display", please enter "service.msc" in "search programs and files" in "start", and you can find "service", after clicking which you can find the list of service management window. Find "Tablet PC Input Service" and change its status to "start". The startup type is "Auto". 3) The touching response is slow Problem: when drawing lines, the lines do not appear right after the finger slides. Solution: a) It may be caused by the slow processing speed of the writing software. Use system’s "paint" software to test whether it is the problem. b) To confirm whether it’s the delay of graphic display or the writing. Connect the touch monitor with notebook for synchronous picture output. Click "Start" icon and observe whether the window appears on the notebook is synchronous with that on the touch monitor. If there is a delay, it’s the problem of the displaying speed instead of the writing. 4) The touch accuracy Problem: There is deviation between the touching point and the response point. Solution: a) To check whether there is dust or other small particles on the screen. When there is water or 21 other soft material sticking on the surface, it will be misjudged to be the touching point. To clean the screen and re-calibrate the touch screen can solve the problem. b) To check whether the mouse has been connected to the PC. Unplug the mouse and test touch performance. VIVA Services Lda. c) To confirm whether there is an error in Windows 7 calibration parameter. We suggest deleting Win 7’s calibration parameter and use Touch Service to calibrate the touch screen. e) You might not have touched the center of the calibration point during the calibration. Click "Calibration" - "Reset" in TouchService. 5) Broken line Problem: There are broken lines when drawing on the active area with normal connection. Solution: a) There may be an error in calibration data. Click "Reset". b) To check whether there are small particles on the touch screen surface. c) To check whether there are small particles on the borders like dust. d) To check whether PCBA is in correct order according to the assembly instruction. To confirm the connectors (pin header, FFC) are installed correctly. 6) Jumping cursor Problem: When the finger slides on the active area with normal connection, the cursor jumps. Solution: a) To check whether the mouse is connected to the PC. Unplug the mouse to test touch performance. b) The screen surface is broken or there are small particles blocking the beams. Clean the surface with alcohol and remove the particles. c) Light interference. When there is strong sunlight or high-power incandescent lamps directly shine on the touch screen; d) To turn off other infrared devices nearby (especially similar touch screens) to avoid the possibility of interference between devices. 7) The mouse cannot move the cursor Problem: When the finger slides on the screen with normal connection, the cursor does not respond. Solution: a) To check whether the mouse is connected to the PC. Unplug the mouse to test touch performance. b) To check whether there are small particles on the screen and borders. 8) Touch coordinates are reversed. Problem: Touch the active area with normal connection, the actual response and the touching action are reversed in X or Y direction. Solution: a) To check whether the installation of the touch panel is correct. Generally there are portrait and 22 landscape orientations. b) To check whether the front and back, top and bottom borders are reversed. c) If the installation is correct, please contact the software engineer to modify the touch software and solve the problem. VIVA Services Lda. 4.2 Safety Precautions Don’t frequently hot plug the USB. Don’t use sharp or hard object to knock or scrub the screen surface in case of scratches or damage. Don’t store the touch panel in a humid environment for a long time. To prevent other harmful substances like acids, alkalis. Don’t expose the touch panel directly to the sun or other heat source for a long time. Or else the touch panel and its electronic components can be damaged. End-users are not allowed to copy and decompile touch software coming with our touch panel. Please save it legally. Before installing and using the touch panel, please read the user manual carefully. If there is something wrong with the touch panel, please contact the authorized professional engineer for repair. Don’t disassemble the panel by yourself. 23