1
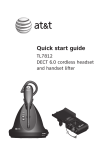
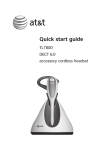
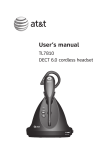
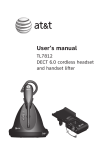
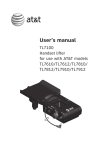
Quick start guide
TL7810
DECT 6.0 cordless headset
Introduction
The TL7810 is a cordless headset and base that allows you to
have handsfree phone conversations. It can be used in different
ways depending on your needs. Choose from the following three
options. Connect your TL7810:
• To a telephone line only (page 8). Connect the headset
to a telephone wall jack. Use the telephones on the same
telephone line to make or answer calls. The headset is a
supplementary device that can join the calls.
• To a traditional corded telephone (pages 9-10). Connect the
headset to a corded telephone. If you also install a lifter (AT&T
TL7100, purchased separately) on your corded telephone,
you can use the headset to remotely control the lifter for
answering or hanging up a call.
• To both a PC and telephone line (pages 11-12). Connect a
phone line to the headset base and the USB cable to your
PC. You can make and answer VoIP calls through SkypeTM or
Microsoft Lync , or landline calls using the AT&T Softphone
Call Manager.
Visit www.smbtelephones.att.com/downloads
to download the AT&T Softphone Call Manager. For
installation and operation instructions of the software, refer
to the Installation and Operation Guide which can also be
downloaded at
www.smbtelephones.att.com/downloads.
This quick start guide provides you with the basic installation and
setup instructions.
You may refer to the user's manual provided in the product
package for complete installation and operation instructions,
or you can visit www.smbtelephones.att.com/smb to
download the manual from the Product Support page.
For customer service or product information, visit our website at
www.telephones.att.com/smb or call
1 (800) 222-3111. In Canada, dial 1 (866) 288-4268.
The Skype name is a trademark of Skype.
Microsoft Lync is a registered trademark of Microsoft Corporation.
Quick reference guide - headset
(On/off button and light)
Press to make, answer or end a call.
MUTE
Press to mute the microphone during a call.
Press to mute the ringer in the earpiece when
there is an incoming call.
VOL+/VOLSlide the volume switch
to the right or left to
adjust the headset
ringer volume while
in idle mode, or the
listening volume while
on a call.
Earpiece
Battery with cover
attached
FLASH
Remove to replace the
battery.
Press to answer an
incoming call when you
receive a call waiting alert
during a call.
Microphone
The microphone
incorporates noise
canceling technology
for clearer calls.
Quick reference guide - headset base
Magnetic charging mount
PAIR
Place the headset here for
charging.
Use to initiate headset
registration or
deregistration.
MUTE (light)
PC (mode button
and light)
PHONE (mode button
and light)
VOLUME
/MICROPHONE
Press the volume keys on the side
of the headset base to adjust the
speaking volume when on a call.
(USB port)
Open the port cover to plug in the USB
cable for use with PC mode.
LIFTER
This jack is only used to connect an
AT&T handset lifter (model TL7100,
purchased separately).
CORDED HANDSET CONNECTED/
YES/NO
Choose the setting based on whether
you have connected to a corded
handset.
Quick reference guide - headset base
CORDED PHONE CONNECTION
jack (blue dot)
This jack is only used to connect
the corded phone connection cable.
TEL WALL JACK (red dot)
POWER jack (green dot)
Corded handset audio adjust switch
Use this switch to adjust the corded
handset audio when you have connected
the headset base to a corded telephone.
Battery installation
The battery is permanently attached to the battery compartment
cover. Do not try to separate them from each other. After
installing the battery pack, charge it for at least 15 minutes.
You may be able to make and receive short calls. For optimal
performance, charge the headset battery for at least three hours
before use. When fully charged, the headset battery provides
approximately 12 hours of talk time or 5 days of standby time.
When the headset is not in use, recharge it by returning it to the
headset base.
1. Insert the battery into the
battery compartment.
2. Press down on the battery until it
clicks into place.
NOTES:
• Remove any headset attachment, except the earbud, before battery replacement.
• To order a replacement battery (model BT191665), visit our website at
www.telephones.att.com/smb or call
1 (800) 222-3111. In Canada, dial 1 (866) 288-4268.
Headset base installation and battery charging
After installing the battery, charge the headset by placing it in
the magnetic charging mount as shown below. The light turns
on when the headset is charging.
1. Plug the small end of the headset base power adapter into
the POWER jack (green dot) at the back of the headset base.
Plug the large end into an electrical outlet not controlled by a
wall switch.
2. Insert the headset into the
magnetic charging mount.
. The magnet holds the top
of the headset in place.
The light turns on.
Magnetic
charging
mount
IMPORTANT INFORMATION
Use only the supplied rechargeable battery pack or replacement
battery pack (model BT191665). To order, visit our website at
www.telephones.att.com/smb or call
1 (800) 222-3111. In Canada, dial 1 (866) 288-4268.
Headset base installation
Installation options
There are three installation options as described below.
Option 1: Connect the headset to a telephone wall jack through
the line splitter provided (see page 8).
Option 2: Connect the headset to a corded phone using the
corded phone connection cable provided (see pages 9-10).
Option 3: Connect the headset to your computer using the USB
cable provided for VoIP calls (see pages 11-12).
Headset base installation
Option 1: Connect the headset to a telephone wall jack
1. Make sure the CORDED HANDSET
CONNECTED switch on the right side of the
headset base is set to NO.
2. Connect the line cords as shown below.
Use the included line splitter to connect the
headset base and your telephone to the
same telephone wall jack.
• Plug one end of the
telephone line cord into
the TEL WALL JACK
(red dot) at the back of
the headset base.
Telephone line cord
• Plug the other end of the
telephone line cord into
the line splitter.
• Use the attached
fastener to bundle
all line cords neatly.
• Plug the line splitter into
the telephone wall jack
(or a DSL filter if you
subscribe to DSL Internet
service).
Line splitter
• Connect another
telephone line
cord between the
telephone and the
line splitter.
Corded or
cordless phone
A DSL filter (not included) is
required if you have DSL
high-speed Internet service.
The DSL filter must be plugged
into a telephone wall jack.
NOTE: The headset base and headset do not have external ringers. When
you receive calls, the headset earpiece rings. If you have telephones
connected to the same telephone line as the headset base, you can rely on
the ringers of those telephones to alert you to incoming calls.
Headset base installation
Option 2: Connect the headset to a corded phone
1. Make sure the CORDED HANDSET
CONNECTED switch on the right side of the
headset base is set to YES.
2. Connect the line cords as shown below.
Use the included corded phone connection
cable to connect the headset base to your
corded telephone.
• Plug one end of the
corded phone connection
cable into the CORDED
PHONE CONNECTION
jack (blue dot) at the back
of the headset base.
• Use the attached
fastener to bundle
all line cords neatly.
A DSL filter (not
included) is required
if you have DSL
high-speed Internet
service. The DSL filter
must be plugged into
a telephone wall jack.
• Plug the other end
of the corded phone
connection cable into
the handset jack on
your corded phone.
• Unplug the curly
handset cord from
the handset jack
on the corded
phone and plug
it into the jack on
the corded phone
connection cable.
Corded phone
Headset base installation
Option 2: Connect the headset to a corded phone (cont.)
After you have connected the headset base
to your corded phone, you may need to
adjust the corded handset audio switch at
the bottom of the headset base for optimal
sound quality.
To adjust the corded handset audio:
• Lift the corded handset and then
press on the headset to check for a
dial tone. If there is no dial tone or the
dial tone is unclear, slide the corded
handset audio switch at the bottom of
the headset base from A to F until the
dial tone is clear.
10
Headset base installation
Option 3: Connect the headset to your computer
1. Connect the headset base to your computer using the
USB cable provided for VoIP calls. Plug the USB cable as
shown below. Wait for your computer to indicate that it has
recognized the headset.
2. Download and install the AT&T Softphone Call Manager on
your computer. The software is available for download at
www.smbtelephones.att.com/downloads.
For detailed installation and operating information, refer to the
Installation and Operation Guide for AT&T Softphone Call
Manager, available for download at
www.smbtelephones.att.com/downloads.
A DSL filter (not included) is required if you have
DSL high-speed Internet service. The DSL filter
must be plugged into a telephone wall jack.
• Plug one end of
the telephone line
cord into the TEL
WALL JACK (red
dot) at the back of
the headset base.
Telephone
line cord
• Plug the
other end
of the
telephone
line cord
into the
telephone
wall jack or
a DSL filter.
• Plug the large end
of the USB cable
into a USB port on
your computer.
• Plug the small end of the
USB cable into the port
labeled
on the right
side of the headset base.
11
• Use the attached
fastener to
bundle all line
cords neatly.
Headset base installation
Option 3: Connect the headset to your computer (cont.)
. After you have installed the AT&T Softphone Call Manager,
check to make sure the audio setting is properly configured
in your Windows system. If you have installed Skype and/or
Microsoft Lync and want to use them with your headset,
make sure the audio settings are configured correctly in the
programs as well.
a) Audio settings in Microsoft® Windows® system:
i. Launch the AT&T Softphone Call Manager program.
ii. Click on the Settings panel, then the General panel.
iii. Click on [Click to launch audio devices control panel].
iv. Make sure AT&T DECT Headset is selected under the
playback and recording settings in your Windows system.
b) Audio settings in Skype:
i. Launch the Skype program.
ii. Click on Tools, then Options.
iii. Click on Audio settings.
iv. Make sure AT&T DECT Headset is selected under the
speakers and microphone settings.
c) Audio settings in Microsoft Lync:
i. Launch the Microsoft Lync program.
ii. Click on Options, then Audio device.
iii. Make sure AT&T DECT Headset is selected under the
Audio device setting.
IMPORTANT
Periodically check for software updates. Go to the Support panel in
the AT&T Softphone Call Manager, then click on Check now. For
more details, refer to the Installation and Operation Guide for AT&T
Softphone Call Manager.
Windows® is a registered trademark of Microsoft Corporation.
12
Headset attachments
Earbud
There are a total of six earbuds provided. One of them has been
attached to the headset. They come in three sizes of which there
are two types: one normal and one providing a deeper fit. Follow
the steps below to change the earbud.
To remove the earbud from the headset earpiece:
Hold both sides of the earbud. Twist and pull the earbud until it
separates from the earpiece.
To attach the earbud to the headset earpiece:
1. Choose an appropriate earbud.
2. Position the earbud on the earpiece as shown below.
. Press the earbud down on the earpiece until it clicks into
place. Move the earbud around so that the protruding bump
on the earbud is pointing towards your mouth when placed on
your ear.
Protruding
bump
13
Headset attachments
Over the ear hook
There are three ear hooks provided. Choose the size that best fits
your need to attach to the headset. Follow the steps below to
attach an ear hook to the headset.
To position the headset to wear on the left or right ear:
• To wear on the left ear:
1. Make sure the ear hook loop
is positioned, as shown in
Figure 1 on the right.
2. Attach the ear hook to the
headset, as instructed on the
next page.
Ear hook loop
Figure 1
• To wear on the right ear:
1. Make sure the ear hook loop
is positioned, as shown in
Figure 2 on the right.
2. Attach the ear hook to the
headset, as instructed on the
next page.
Ear hook loop
Figure 2
14
Headset attachments
To attach the ear hook to the headset:
1. Make sure there is no headset attachment, except the earbud,
connected to the headset.
2. Insert the earpiece into the ear hook loop, as shown in Figure 3.
. Press the edge of the ear hook loop towards the earpiece until
it clicks into place, as shown in Figure 4.
4.Hook the headset onto the desired ear. Adjust the angle of the
headset until the microphone is pointing towards your mouth,
as shown in Figure 5.
Figure 3
Figure 4
Figure 5
15
Headset attachments
Over the head band
There are two over the head bands provided. Choose the one
that best fits your need to attach to the headset. Follow the steps
below to attach an over the head band to the headset.
To attach the head band to the headset:
1. Make sure there is no headset attachment, except the earbud,
connected to the headset.
2. Insert the earpiece into the loop of the ear pad, as shown in
Figure 6.
. Push the earpiece into the ear pad until it clicks into place, as
shown in Figure 7.
. Adjust the head band to fit your head. Adjust and rotate the
angle of the headset until the microphone is pointing towards
your mouth, as shown in Figure 8.
Figure 6
Figure 7
Figure 8
16
Headset attachments
Behind the neck band
To attach the headset to the neck band:
1. Make sure there is no headset attachment, except the earbud,
connected to the headset.
2. Insert the earpiece into the loop of the ear pad, as shown in
Figure 9.
. Gently press the earpiece inward until it clicks into place, as
shown in Figure 10.
. Place the neck band around your neck and over your ears.
. Adjust and rotate the angle of the headset until the microphone is
pointing towards your mouth, as shown in Figure 11.
Figure 9
Figure 10
Figure 11
17
Headset operation
Power on/off the headset
Power on the headset before use.
To power on the headset:
• Place the headset in the headset base.
-OR• Press and hold for two seconds.
The light flashes blue three times and you hear three beeps
when it is being powered on.
Power off the headset if it will not be used for a long time.
To power off the headset:
• Press and hold for four seconds.
The light flashes red three times and you hear three beeps
when it is being powered off.
Prolonged exposure to high volume levels using the headset may damage
your hearing.
PHONE mode and PC mode
Before using the headset, you may change its default mode to
PHONE mode or PC mode. When you press on the headset
while it is not in use, your headset automatically uses the default
mode you selected. When the headset is not in use, you can
choose between PHONE mode and PC mode.
To choose PHONE mode:
• Press the PHONE button on the headset base. The PHONE
light turns on.
To choose PC mode:
• Press the PC button on the headset base. The PC light turns on.
18
PHONE mode
Make a call
To make calls on your home or office telephone line, press
PHONE on the headset base for PHONE mode.
When the headset base is connected to a telephone wall jack
(installation option 1):
1. Follow the instructions in your telephone user’s manual for
making calls.
2. Press on the headset at any time to join the call.
. After you join the call, you can hang up the telephone and
continue the call on the headset.
When the headset base is connected to your corded phone
(installation option 2):
1. Lift the corded handset from the telephone base. Press on
the headset.
2. Follow the instructions in your telephone user's manual for
making calls. Do not hang up the corded handset until you are
ready to end the call.
NOTE: If you plug the headset into a telephone line without a telephone
connected, you cannot make calls.
Answer a call
When the headset base is connected to a telephone wall jack
(installation option 1):
• Press on the headset.
When the headset base is connected to your corded phone
(installation option 2):
1. Lift the corded handset from the telephone base.
2. Press on the headset at any time to join the call. Do not hang
up the corded handset until you are ready to end the call.
19
PHONE mode
End a call
When the headset base is connected to a telephone wall jack
(installation option 1):
• Press on the headset or place the headset in the headset base.
When the headset base is connected to your corded phone
(installation option 2):
• Hang up the corded handset, then press on the headset or
place the headset in the headset base.
20
www.telephones.att.com/smb
© 2012-2013 Advanced American Telephones. All Rights Reserved.
AT&T and the AT&T logo are trademarks of AT&T Intellectual Property licensed to
Advanced American Telephones, San Antonio, TX 78219.
The Skype name is a trademark of Skype.
Microsoft Lync is a registered trademark of Microsoft Corporation
Windows® is a registered trademark of Microsoft Corporation.
Printed in China. Issue 7 AT&T 01/13