1
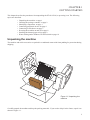
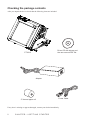
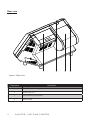
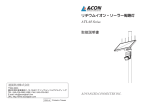
PT-6200
使用手册
1
All in one POS Terminal
PT-6212
User Manual
Copyright
This publication, including all photographs, illustrations and software, is protected under international
copyright laws, with all rights reserved. Neither this manual, nor any of the material contained herein, may be
reproduced without written consent of the author.
Disclaimer
The information in this document is subject to change without notice. The manufacturer makes no
representations or warranties with respect to the contents hereof and specifically disclaims any implied
warranties of merchantability or fitness for any particular purpose. The manufacturer reserves the right to
revise this publication and to make changes from time to time in the content hereof without obligation of the
manufacturer to notify any person of such revision or changes.
Trademark recognition
All product names used in this manual are the properties of their respective owners and are acknowledged.
Federal Communications Commission (FCC)
This equipment has been tested and found to comply with the limits for a Class A digital device, pursuant
to Part 15 of the FCC Rules. These limits are designed to provide reasonable protection against harmful
interference in a residential installation. This equipment generates, uses, and can radiate radio frequency
energy and, if not installed and used in accordance with the instructions, may cause harmful interference
to radio communications. However, there is no guarantee that interference will not occur in a particular
installation. If this equipment does cause harmful interference to radio or television reception, which can be
determined by turning the equipment off and on, the user is encouraged to try to correct the interference by
one or more of the following measures:
Reorient or relocate the receiving antenna.
Increase the separation between the equipment and the receiver.
Connect the equipment onto an outlet on a circuit different from that to which the receiver is connected.
Consult the dealer or an experienced radio/TV technician for help.
Shielded interconnect cables and a shielded AC power cable must be employed with this equipment to
ensure compliance with the pertinent RF emission limits governing this device. Changes or modifications not
expressly approved by the system’s manufacturer could void the user’s authority to operate the equipment.
Declaration of conformity
This device complies with part 15 of the FCC rules. Operation is subject to the following conditions:
This device may not cause harmful interference, and
This device must accept any interference received, including interference that may cause undesired operation.
i
About this manual
This manual is intended for system administrators who are familiar with setting up a new system and
installing an operating system.
The manual consists of the following sections:
Chapter 1 Getting Started:
This section covers unpacking and checking the
package contents, and identifying components.
Information on connecting peripheral devices, and
powering on is also provided.
Chapter 2 BIOS Setup Utility: The BIOS chapter provides information on navigating
and changing settings in the BIOS Setup Utility.
Chapter 3 Upgrading Components:This section provides information on upgrading
components.
Appendix: The appendix covers troubleshooting, information
on having the PT-6212 serviced, and technical
specifications.
Safety information
Before installing and using the PT-6212 POS, take note of the following precautions:
• Read all instructions carefully.
• Do not place the unit on an unstable surface, cart, or stand.
• Do not block the slots and opening on the unit, which are provided for ventilation.
• Do not push objects in the ventilation slots as they may touch high voltage components and result in
shock and damage to the components.
• Only use the power source indicated on the marking label. If you are not sure, contact your dealer or the
Power Company.
• The unit uses a three-wire ground cable, which is equipped with a third pin to ground the unit and
prevent electric shock. Do not defeat the purpose of this pin. If your outlet does not support this kind of
plug, contact your electrician to replace your obsolete outlet.
• Do not place anything on the power cord. Place the power cord where it will not be in the way of foot
traffic.
• Follow all warnings and cautions in this manual and on the unit case.
• When replacing parts, ensure that your service technician uses parts specified by the manufacturer.
• Avoid using the system near water, in direct sunlight, or near a heating device.
The system uses a 3V CR2032 battery mounted on the mainboard to
keep time. There is a risk of explosion if the wrong battery type is used
when replacing. Dispose of used batteries according to local ordinance
WARNING regulations.
The USB ports can be damaged if care is not taken when connecting
devices. Ensure USB devices are correctly inserted.
Plugging a phone line into the LAN port (RJ-45 connector) can damage
CAUTION the connector. Take care only plug an RJ-45 connector into the LAN port.
Revision history
Version 1.0, July 2009
ii
TABLE OF CONTENTS
CHAPTER 1 GETTING STARTED������������������������������������������������ 1
Unpacking the machine ��������������������������������������������������������������������������������1
Checking the package contents ��������������������������������������������������������������������2
Identifying components ���������������������������������������������������������������������������������3
Connecting peripheral devices�����������������������������������������������������������������������6
Connecting a cash drawer�����������������������������������������������������������������������������7
Powering the machine on and off�������������������������������������������������������������������8
Installing the thermal paper roll����������������������������������������������������������������������9
Printer Setting under Windows XP Professional������������������������������������������10
CHAPTER 2 BIOS SETUP���������������������������������������������������������� 13
About the Setup Utility ��������������������������������������������������������������������������������13
Entering the Setup Utility ������������������������������������������������������������������������14
BIOS navigation keys������������������������������������������������������������������������������14
Using BIOS ���������������������������������������������������������������������������������������������15
Standard CMOS features�����������������������������������������������������������������������������16
Advanced BIOS Features����������������������������������������������������������������������������18
CPU Feature������������������������������������������������������������������������������������������������20
Hard Disk Boot Priority���������������������������������������������������������������������������������21
Advanced Chipset Features�������������������������������������������������������������������������22
Integrated Peripherals����������������������������������������������������������������������������������24
► OnChip IDE Device�����������������������������������������������������������������������������25
► Onboard Device����������������������������������������������������������������������������������27
► SuperIO Device�����������������������������������������������������������������������������������28
Power Management Setup��������������������������������������������������������������������������29
PnP/PCI Configurations�������������������������������������������������������������������������������31
► IRQ Resources������������������������������������������������������������������������������������32
PC Health Status�����������������������������������������������������������������������������������������33
Frequency/Voltage Control��������������������������������������������������������������������������34
Other BIOS Options�������������������������������������������������������������������������������������35
CHAPTER 3 UPGRADING COMPONENTS������������������������������� 37
Safety and precautions �������������������������������������������������������������������������������37
Before you begin �����������������������������������������������������������������������������������������38
Upgrading the hard drive�����������������������������������������������������������������������������39
iii
APPENDIX���������������������������������������������������������������������������������� 41
Troubleshooting�������������������������������������������������������������������������������������������41
Tips for Troubleshooting�������������������������������������������������������������������������������41
The Power-On Self Test�������������������������������������������������������������������������������41
Beep Errors at POST�����������������������������������������������������������������������������������41
Beep Message Errors at POST �������������������������������������������������������������������42
General Problems ���������������������������������������������������������������������������������������43
Having the PT-6212 Serviced ���������������������������������������������������������������������44
Specifications�����������������������������������������������������������������������������������������������45
iv
CHAPTER 1
GETTING STARTED
This chapter describes the procedures from unpacking the PT-6212 POS, to powering it on. The following
topics are described.
•
•
•
•
•
•
•
•
Unpacking the machine on page 1
Checking the package contents on page 2
Identifying components on page 3
Connecting peripheral devices on page 6
Connecting a cash drawer on page 7
Powering the machine on and off on page 8
Installing the thermal paper roll on page 9
Printer Setting under Windows XP Professional on page 10
Unpacking the machine
The machine and cable accessories are packed in a cardboard carton with foam padding for protection during
shipping.
Figure 1.1 Unpacking the
machine
Carefully unpack the machine and keep the packing materials. If you need to ship it in the future, repack it as
shown in Figure 1.1.
1
Checking the package contents
After you unpack the device check that the following items are included.
Driver CD with drivers and
the user manual PDF file.
PT-6212
Adapter
3” thermal paper roll
Power Cable
If any item is missing or appears damaged, contact your dealer immediately.
2
C H A P T E R 1 G E T T I N G S TA R T E D
Identifying components
This section describes the parts and connectors on the machine.
Front-right view
1
2
3
4
5
Figure 1.2 Front-right view
Component
Description
1
Power Button
2
12.1-inch TFT LCD; 5-wire Resistive touch
3
IO Panel
4
LED Power Indicator
5
Tripple-track MSR
3
Rear view
1
2
Figure 1.3 Rear view
Component
4
Description
1
2x20 VFD customer display
2
Printer paper exit
3
80mm thermal receipt printer
4
Printer button
C H A P T E R 1 G E T T I N G S TA R T E D
3
4
I/O connectors
5
6
1
2
3
7
8
9
4
10
Figure 1.4 PT-6212 I/O connectors
Connector
Description
1
COM4 port
2
COM3 port
3
COM2 port
4
LAN port (RJ-45)
5
12V power connector
6
PS/2 keyboard port
7
RJ-11 cash drawer port
8
VGA port
9
COM1 port
10
USB ports
5
Connecting peripheral devices
Peripheral devices such as a printer or scanner can be connected to the machine. Refer to the user manual of
the device you are connecting for instructions on installing drivers where needed.
MR HS AA
Adapter
CD
OH
SD RD TR
ADSL modem or router
Keyboard
USB Compliant
devices
Cashdrawer
Monitor
Figure 1.7 Connecting peripheral devices
CAUTION
6
Do not plug a phone line into the RJ-45 (ADSL or router) connector.
Doing so can damage the connector.
C H A P T E R 1 G E T T I N G S TA R T E D
Connecting a cash drawer
Refer to the following to connect a cash drawer.
IMPORTANT
The cash drawer RJ-11 connector is DC+24V. Ensure the cash drawer
to be connected matches this power specification.
1. Locate the I/O panel that is at the
bottom of the machine.
2. Connect the RJ-11 cable from the
cash drawer to the RJ-11 connector on the I/O Panel.
Cashdrawer
7
Powering the machine on and off
Refer to the following to power on and off the machine.
1. Locate the I/O panel that is at the
bottom of the machine.
2. Connect the adapter to the
power cable, and then insert the
power plug into an electrical outlet
(AC100 - 240 V).
3. Press the power button, it’s at the
bottom left of the machine. The
power LED turns on.
4. To turn off the machine, shut down
the operating system. The main
power turns off automatically.
NOTE
8
You may need to force power off the machine, for example if the
operating system you are using does not support power down by the OS
or if the system crashes or hangs. To force power off , long press the
power button for five seconds.
C H A P T E R 1 G E T T I N G S TA R T E D
Installing the thermal paper roll
Refer to the following to install the thermal paper roll.
1. Press the release and open the printer cover.
2. Insert the thermal paper roll as
shown on the picture.
3. Pull a portion of the paper over the
printer output part.
4. Close the cover and press it down
until you feel a click.
NOTE
After installation,
the printer will
automatically feed
a few lines.
9
Printer Setting under Windows XP Professional
1. Start → Settings → Printers
and Faxes
2. Right click on “LK-T60” and
select “Properties”.
3. Select “COM5: Serial Port”
4. Click on “Apply”.
5. Select “Configure Port” to
enter “COM5 Properties”.
10
C H A P T E R 1 G E T T I N G S TA R T E D
6. Set the Bits per second to
“115200”.
7. Set the Flow control to “Hardware”.
8. Click on “Apply”.
9. Click on “OK”.
11
12
C H A P T E R 1 G E T T I N G S TA R T E D
CHAPTER 2
BIOS SETUP
The primary function of the BIOS (Basic Input and Output System) is to identify and initiate component
hardware. The BIOS parameters are stored in non-volatile BIOS memory (CMOS). CMOS contents don’t get
erased when the computer is turned off. The following topics are described in this chapter.
•
•
•
•
•
•
•
•
•
•
•
•
About the Setup Utility on page 13
Standard CMOS features on page 16
Advanced BIOS Features on page 18
CPU Feature on page 20
Hard Disk Boot Priority on page 21
Advanced Chipset Features on page 22
Integrated Peripherals on page 24
Power Management Setup on page 29
PnP/PCI Configurations on page 31
PC Health Status on page 33
Frequency/Voltage Control on page 34
Other BIOS Options on page 35
About the Setup Utility
The BIOS Setup Utility enables you to configure the following items:
•
Hard drives, diskette drives, and peripherals
•
Video display type and display options
•
Password protection from unauthorized use
•
Power management features
This Setup Utility should be used for the following:
•
When changing the system configuration
•
When a configuration error is detected and you are prompted to make changes to the Setup Utility
•
When trying to resolve IRQ conflicts
•
When making changes to the Power Management configuration
•
When changing the User or Supervisor password
13
Entering the Setup Utility
When you power on the system, BIOS enters the Power-On Self Test (POST) routines. POST is a series of
built-in diagnostics performed by the BIOS. After the POST routines are completed, the following message
appears:
Press DEL to enter SETUP
Press the delete key <Delete> to access the Award BIOS Setup Utility:
Phoenix - AwardBIOS CMOS Setup Utility
►►Standard CMOS Feature
►►Frequency/Voltage Control
►►Advanced BIOS Features
Load Fail-Safe Defaults
►►Advanced Chipset features
Load Optimized Defaults
►►Integrated Peripherals
Set Supervisor Password
►►Power Management Setup
Set User Password
►►PnP/PCI Configurations
Save & Exit Setup
►►PC Health Status
Exit Without Saving
Esc : Quit
F10 : Save & Exit Setup
↑ ↓ → ← : Select Item
Time, Date, Hard Disk Type...
Figure 2.1 Main BIOS menu
BIOS navigation keys
The BIOS navigation keys are listed below.
Key
Function
←↑↓→
Scrolls through the items on a menu
+/–/PU/PD
Modifies the selected field’s values Esc
Exits the current menu
F1
Displays a screen that describes all key functions
F5
Loads previously saved values to CMOS
F6
Loads a minimum configuration for troubleshooting
F7
Loads an optimum set of values for peak performance
F10
Saves the current configuration and exits Setup Shift + F2
Changes the color of the BIOS menu
14
CHAPTER 2 BIOS SETUP
Using BIOS
When you start the Setup Utility, the main menu appears. The main menu of the Setup Utility displays a list
of the options that are available. A highlight indicates which option is currently selected. Use the cursor arrow
keys to move the highlight to other options. When an option is highlighted, execute the option by pressing
<Enter>.
Some options lead to pop-up dialog boxes that prompt you to verify that you wish to execute that option.
Other options lead to dialog boxes that prompt you for information.
Some options (marked with a triangle ►) lead to submenus that enable you to change the values for the
option. Use the cursor arrow keys to scroll through the items in the submenu.
15
Standard CMOS features
Selecting Standard CMOS Features on the main menu displays the following menu:
Phoenix - AwardBIOS CMOS Setup Utility
Standard CMOS Features
Date (mm:dd:yy)
Time (hh:mm:ss)
►►IDE
►►IDE
►►IDE
►►IDE
►►IDE
►►IDE
Channel
Channel
Channel
Channel
Channel
Channel
0
0
2
2
3
3
Master
Slave
Master
Slave
Master
Slave
Video
Halt On
Base Memory
Extended Memory
Total Memory
↑↓→←:Move Enter:Select
F5:Previous Values
Mon, Jul 6 2009
8 : 33 : 14
Item Help
[ None]
[ None]
[ST380815AS]
[ None]
[ None]
[ None]
[EGA/VGA]
[All , But Keyboard]
Figure 2.2 Standard
CMOS Features menu
640K
409472K
490496K
+/-/PU/PD:Value F10:Save ESC:Exit F1:General Help
F6:Fail-Safe Defaults
F7:Optimized Defaults
Date and Time
The Date and Time items show the current date and time held by the machine. If you are running a Windows
OS, these items are automatically updated whenever you make changes to the Windows Date and Time
Properties utility.
Video
These fields is used to select the default video device.
Halt On
This item defines the operation of the system POST (Power On Self Test) routine. You can use this item to
select which types of errors in the POST are sufficient to halt the system.
Base Memory, Extended Memory, and Total Memory
These items are automatically detected by the system at start up time. These are display-only fields. You
cannot make changes to these fields.
•
Base Memory – This field displays the amount of conventional memory detected by the system during
boot.
•
Extended Memory – This field displays the amount of extended memory detected by the system during boot.
•
Total Memory – This field displays the total amount of memory (Base and Extended) detected by the
system during boot.
16
CHAPTER 2 BIOS SETUP
IDE Channel 0/2/3 Master/Slave
This field is used to configure the IDE hard drive installed in the system. Move the cursor to highlight the IDE
Primary/Secondary Master/Slave fields and press <Enter>. The IDE Primary Master submenu opens:
Phoenix - AwardBIOS CMOS Setup Utility
IDE Channel 0 Master
IDE HDD Auto-Detection
[Press Enter]
IDE Channel 0 Master
Access Mode
[Auto]
[Auto]
Capacity
40022 MB
Cylinder
Head
Precomp
Landing Zone
Sector
19158
16
0
19157
255
↑↓→←:Move Enter:Select
F5:Previous Values
Item Help
Figure 2.3 IDE Primary
Master submenu
+/-/PU/PD:Value F10:Save ESC:Exit F1:General Help
F6:Fail-Safe Defaults
F7:Optimized Defaults
IDE HDD Auto-Detection
Press Enter while this item is highlighted if you want the Setup Utility to automatically detect and configure a
hard disk drive on the IDE channel.
NOTE
If you are setting up a new hard disk drive that supports LBA mode,
more than one line will appear in the parameter box. Choose the line that
lists LBA for an LBA drive.
IDE Channel 0/1/2/3 Master/Slave
If you leave this item at Auto, the system will automatically detect and configure any IDE devices it finds. If
it fails to find a hard disk, change the value to Manual and then manually configure the drive by entering the
characteristics of the drive in the fields described below:
•
Capacity – displays the capacity of the HDD in megabytes (MB).
•
Cylinder – indicates the number of cylinders that the HDD has. A cylinder is the sum total of all tracks
that are in the same location on every disk surface.
•
Head – displays the number of heads in the HDD. A head is a device that reads and writes data on the
hard disk.
•
Precomp – displays the track where precompensation is initiated. Precompensation is a feature
whereby the HDD uses a stronger magnetic field to write data in sectors that are closer to the center
of the disk. In CAV recording, in which the disk spins at a constant speed, the sectors closest to the
spindle are packed tighter than the outer sectors.
•
Landing Zone – displays the location of the safe non-data area on a hard disk that is used for parking
the read/ write head.
•
Sector – displays the number of sectors available on the HDD. A sector is the smallest unit of storage
space on a disk.
Access Mode
This item defines special ways that can be used to access IDE hard disks such as LBA (Large Block
Addressing). Leave this value at Auto and the system will automatically decide the fastest way to access the
hard disk drive.
17
Advanced BIOS Features
Selecting Advanced BIOS Features on the main menu opens up this screen:
Phoenix - AwardBIOS CMOS Setup Utility
Advanced BIOS Features
►►CPU Feature
►►Hard Disk Boot Priority
Virus Warning
First Boot Device
Second Boot Device
Third Boot Device
Boot Other Device
Boot Up Numlock Status
Gate A20 Option
Security Option
APIC Mode
Small Logo(EPA) Show
↑↓→←:Move Enter:Select
F5:Previous Values
[Press Enter]
[Press Enter]
[Disabled]
[USB-ZIP]
[USB-CDROM]
[Hard Disk]
[Enabled]
[On]
[Fast]
[Setup]
[Enabled]
[Disabled]
Item Help
Figure 2.4 Advanced BIOS
Features menu
+/-/PU/PD:Value F10:Save ESC:Exit F1:General Help
F6:Fail-Safe Defaults
F7:Optimized Defaults
Virus Warning
When enabled, this item provides protection against viruses that try to write to the boot sector and partition
table of the hard disk drive. You need to disable this item when installing an operating system. We recommend
that you enable anti-virus protection as soon as you have installed an operating system.
First/Second/Third Boot Device
The BIOS loads the operating system from the disk drives in the sequence selected in these three fields.
Boot Other Device
When enabled, the system searches all other possible locations for an operating system if it fails to find one in
the devices specified under the First, Second, and Third boot devices.
Boot Up Numlock Status
This field is used to select power on state for NumLock.
Gate A20 Option
This feature is used to determine the method by which Gate A20 is controlled.
Option
Description
Normal
The system will force the chipset to use the slow keyboard controller to do the switching.
Fast
The system will allow the chipset to use its own 0x92 port for faster switching.
Security Option
Select whether the password is required every time the system boots or only when you enter setup.
Option
Description
System
The system will not boot and access to Setup will be denied if the correct password is not
entered at the prompt.
Setup
The system will boot, but access to Setup will be denied if the correct password is not
entered at the prompt.
18
CHAPTER 2 BIOS SETUP
APIC Mode
This item is used to activate the ACPI (Advanced Configuration and Power Management Interface) Mode.
ACPI is a power management specification that makes hardware status information available to the operating system. ACPI enables a PC
to turn its peripherals on and off for improved power management. It
also allows the PC to be turned on and off by external devices, so that
IMPORTANT mouse or keyboard activity wakes up the machine.
Small Logo(EPA) Show
This item enables you to show the company logo on the bootup screen.
19
CPU Feature
Selecting CPU Feature opens up this screen.
Phoenix - AwardBIOS CMOS Setup Utility
CPU Feature
Delay Prior to Thermal
Thermal Management
Execute Disable Bit
[16 Min]
Thermal Monitor 1
[Enabled]
Item Help
Figure 2.5 CPU Feature
submenu
↑↓→←:Move Enter:Select
F5:Previous Values
+/-/PU/PD:Value F10:Save ESC:Exit F1:General Help
F6:Fail-Safe Defaults
F7:Optimized Defaults
Delay Prior to Thermal
The Delay Prior To Thermal BIOS feature controls the activation of the Thermal Monitor’s automatic mode.
It allows you to determine when the Pentium 4’s Thermal Monitor should abe activated in automatic mode
after the system boots. For example, with the default value of 16 minutes after the system starts booting up.
Execute Disable Bit
When disabled, forces the XD feature flag to always return 0.
20
CHAPTER 2 BIOS SETUP
Hard Disk Boot Priority
Selecting Hard Disk Boot Priority opens up this screen.
Phoenix - AwardBIOS CMOS Setup Utility
Hard Disk Boot Priority
1. Ch2 M.
: ST380815AS
2. Bootable Add-in Cards
Item Help
Figure 2.6 Hard Disk Boot
Priority menu
↑↓→←:Move Enter:Select
F5:Previous Values
+/-/PU/PD:Value F10:Save ESC:Exit F1:General Help
F6:Fail-Safe Defaults
F7:Optimized Defaults
Hard Disk Boot Priority
This screen allows setting the boot priority. Use the PageUp and PageDown to change the order. And then his
Esc to set.
21
Advanced Chipset Features
This option displays critical timing parameters of the mainboard. Leave the items on this menu at their default
settings unless you are very familiar with the technical specifications of the system hardware. If you change
the values incorrectly, you may introduce fatal errors or recurring instability into the system.
Phoenix - AwardBIOS CMOS Setup Utility
Advanced Chipset Features
DRAM Timing Selectable
xx CAS Latency Time
xx DRAM RAS# to CAS# Delay
xx DRAM RAS# Precharge
xx Precharge dealy (tRAS)
xx System Memory Frequency
System BIOS Cacheable
Video BIOS Cacheable
[By SPD]
2
3
3
9
400MHz
[Enabled]
[Enabled]
Item Help
** VGA Setting **
On-Chip Frame Buffer Size [8MB]
Boot Display
[CRT+LFP(LVDS)]
Panel Type
[1024 x 768 24]
↑↓→←:Move Enter:Select
F5:Previous Values
Figure 2.7 Advanced
Chipset Features menu
+/-/PU/PD:Value F10:Save ESC:Exit F1:General Help
F6:Fail-Safe Defaults
F7:Optimized Defaults
DRAM Timing Selectable
Set this to the default value to enable the system to automatically set the SDRAM timing by SPD (Serial
Presence Detect). SPD is an EEPROM chip on the DIMM module that stores information about the memory
chips it contains, including size, speed, voltage, row and column addresses, and manufacturer.
CAS Latency Time
When the DRAM Timing Selectable is set to [Manual], this field is adjustable. When synchronous DRAM is
installed, the number of clock cycles of CAS latency depends on the DRAM timing.
DRAM RAS# to CAS# Delay
When the DRAM Timing Selectable is set to [Manual], this field is adjustable. This field lets you insert
a timing delay between the CAS and RAS strobe signals, used when DRAM is written to, read from, or
refreshed. Fast gives faster performance; and Slow gives more stable performance. This field applies only
when synchronous DRAM is installed in the system.
DRAM RAS# Precharge
When the DRAM Timing Selectable is set to [Manual], this field is adjustable. This setting controls the
number of cycles for Row Address Strobe (RAS) to be allowed to precharge. If insufficient time is allowed
for the RAS to accumulate its charge before DRAM refresh, refresh may be incomplete and DRAM may fail
to retain data. This item applies only when synchronous DRAM is installed in the system.
Precharge dealy (tRAS)
When the DRAM Timing Selectable is set to [Manual], this field is adjustable. This item controls the number
of cycles for Row Address Strobe (RAS) to be allowed to precharge. If insufficient time is allowed for the
RAS to accumulate its charge before DRAM refresh, refresh may be incomplete and DRAM may fail to retain
data. This item applies only when synchronous DRAM is installed in the system.
System Memory Frequency
When the DRAM Timing Selectable is set to [Manual], this field is adjustable. This item allows you select the
memory frequency.
22
CHAPTER 2 BIOS SETUP
System/Video BIOS Cacheable
These items allow the video and/or system to be cached in memory for faster execution. We recommend that
you leave these items at the default value.
** VGA Setting **
The following items allow you to configure the settings about On-Chip VGA.
On-Chip Frame Buffer Size
This item is used to select the video frame buffer size.
Boot Display
If you connect an external display to this machine, you can use this setting to turn off the LCD and only use
the external display. To use dual displays this must be set to CRT+LFP(LVDS).
Panel Type
This setting auto-detects the panel resolution and other panel settings. Unless you changed the panel, leave
this setting at its default.
23
Integrated Peripherals
This option defines the operation of peripheral components on the system’s input/output ports.
Phoenix - AwardBIOS CMOS Setup Utility
Integrated Peripherals
►►OnChip IDE Device
►►Onboard Device
►►SuperIO Device
Onboard Serial Port 3
Serial Port 3 Use IRQ
Onboard Serial Port 4
Serial Port 4 Use IRQ
Onboard Serial Port 5
Serial Port 5 Use IRQ
Onboard Serial Port 6
Serial Port 6 Use IRQ
Com1 With Voltage
Com2 With Voltage
↑↓→←:Move Enter:Select
F5:Previous Values
[Press Enter]
[Press Enter]
[Press Enter]
[3E8]
[IRQ5]
[2E8]
[IRQ10]
[4F8]
[IRQ11]
[4E8]
[IRQ5]
[None]
[None]
Item Help
Figure 2.8 Integrated
Peripherals menu
+/-/PU/PD:Value F10:Save ESC:Exit F1:General Help
F6:Fail-Safe Defaults
F7:Optimized Defaults
Onboard Serial Port 3/4/5/6
These items allow you to select an address for the third and fourth serial ports. The default setting is
3E8/2E8/4F8/4E8.
Serial Port 3/4/5/6 Use IRQ
These items allow you to select an corresponding interrupt for the third and fourth serial ports. The default
setting is IRQ5/IRQ10/IRQ11/IRQ5.
Com1/2 With Voltage
COM1/2 port can be set to supply both data and power to the peripherals that connect to them. Check if the
device you connect needs power from the COM1/2 port or if it has its own power supply. The factory setting
is None.
The voltage for the COM ports is set at None at the factory. However,
for example to provide power to an installed customer display, this
setting must be set at 12V for the corresponding COM port. For a 5V
IMPORTANT device such as a barcode scanner, the setting should be 5V.
24
CHAPTER 2 BIOS SETUP
► OnChip IDE Device
Use this item to enable or disable the PCI IDE channels that are integrated on the mainboard. Select the item
and press <Enter> to open the following menu:
Phoenix - AwardBIOS CMOS Setup Utility
OnChip IDE Device
IDE HDD Block Mode
IDE DMA transfer access
OnChip Primary PCI IDE
IDE Primary Master PIO
IDE Primary Slave PIO
IDE Primary Master UDMA
IDE Primary Slave UDMA
OnChip Secondary PCI IDE
IDE Secondary Master PIO
IDE Secondary Slave PIO
IDE Secondary Master UDMA
IDE Secondary Slave UDMA
[Enabled]
[Enabled]
[Enabled]
[Auto]
[Auto]
[Auto]
[Auto]
[Enabled]
[Auto]
[Auto]
[Auto]
[Auto]
Item Help
Figure 2.9 OnChip IDE
Device submenu
*** On-Chip Serial ATA Setting ***
SATA Mode
[IDE]
On-Chip Serial ATA
[Enhanced Mode]
xx PATA IDE Mode
Secondary
SATA Port
P0,P2 is Primary
↑↓→←:Move Enter:Select
F5:Previous Values
+/-/PU/PD:Value F10:Save ESC:Exit F1:General Help
F6:Fail-Safe Defaults
F7:Optimized Defaults
IDE HDD Block Mode
Enable this field if the IDE hard drive supports block mode. Block mode enables BIOS to automatically detect
the optimal number of block read and writes per sector that the drive can support and improves the speed of
access to IDE devices.
IDE DMA Transfer Access
This BIOS feature allows you to enable or disable DMA (Direct Memory Access) support for all IDE devices.
If you disable this BIOS feature, the BIOS will disable DMA transfers for all IDE drives. They will revert to
PIO mode transfers.
If you enable this BIOS feature, the BIOS will enable DMA transfers for all IDE drives. The proper DMA
mode will be detected at boot-up. If the drive does not support DMA transfers, then it will use PIO mode
instead.
It is highly recommended that you leave this BIOS feature at the default setting of Enabled. If the drive
supports DMA transfers, the proper DMA transfer mode will be enabled for that drive, allowing it to burst
data at anywhere from 33MB/s to 133MB/s (depending on the transfer mode supported).
On-Chip Primary/Secondary PCI IDE
Use this item to enable or disable the PCI IDE channels that are integrated on the mainboard.
IDE Primary/Secondary Master/Slave PIO
Each IDE channel supports a master device and a slave device. These items let you assign which kind of PIO
(Programmed Input/Output) is used by IDE devices. Choose Auto to let the system auto detect which PIO
mode is best, or select a PIO mode from 0-4.
IDE Primary/Secondary Master/Slave UltraDMA
Each IDE channel supports a master device and a slave device. This mainboard supports UltraDMA
technology, which provides faster access to IDE devices. If you install a device that supports UltraDMA,
change the appropriate item on this list to Auto. You may have to install the UltraDMA driver supplied with
this mainboard in order to use an UltraDMA device.
25
*** On-Chip Serial ATA Setting ***
The following items allow you to configure the settings about On-Chip Serial ATA.
SATA Mode
This feature allows users to select SATA mode.
On-Chip Serial ATA
This feature allows users to select the SATA function modes. Setting at Disabled will disable SATA controller.
Set at Auto will allow the BIOS to arrange it. Setting Combined Mode will make PATA and SATA combined.
Max. of 2 IDE drives in each channel (primary master/slave; secondary master/slave). Enhanced Mode allows
max. of 6 IDE drives supported. SATA Only will make SATA operates in legacy mode.
PATA IDE Mode
This option determines whether the IDE devices are considered the primary or secondary ports on the system.
SATA Port
This option controls the operation speed of the SATA 2 ports, allowing for either legacy SATA-150 operation
or full speed SATA 2 operation. Note that this setting is enabled only while the On-Chip Serial ATA option is
set to Enhanced Mode.
26
CHAPTER 2 BIOS SETUP
► Onboard Device
Use this item to enable or disable the PCI devices that are integrated on the mainboard. Select the item and
press <Enter> to open the following menu:
Phoenix - AwardBIOS CMOS Setup Utility
Onboard Device
USB Controller
USB 2.0 Controller
USB Keyboard Support
Azalia/AC97 Audio Select
Onboard Lan Boot ROM
[Enabled]
[Enabled]
[Enabled]
[AC97 Audio only]
[Disabled]
Item Help
Figure 2.10 Onboard
Device submenu
↑↓→←:Move Enter:Select
F5:Previous Values
+/-/PU/PD:Value F10:Save ESC:Exit F1:General Help
F6:Fail-Safe Defaults
F7:Optimized Defaults
USB Controller
This item must be enabled to use the Universal Serial Bus ports on the mainboard.
USB 2.0 Controller
The USB 2.0 Controller item allows USB 2.0 functionality.
USB Keyboard Support
Enable this item if you plan to use a keyboard connected through the USB port in a legacy operating system
(such as DOS) that does not support Plug and Play.
Azalia/AC97 Audio Select
This item allows you to select the Azalia/AC97 Audio support.
Onboard Lan Boot ROM
This feature allows users to enable or disable the onboard Lan boot ROM to boot system.
27
► SuperIO Device
Use this item to change settings for I/O devices. Select the item and press <Enter> to open the following
menu:
Phoenix - AwardBIOS CMOS Setup Utility
SuperIO Device
Onboard Serial Port 1
Onboard Serial Port 2
[3F8/IRQ4]
[2F8/IRQ3]
Item Help
Figure 2.11 SuperIO Device
submenu
↑↓→←:Move Enter:Select
F5:Previous Values
+/-/PU/PD:Value F10:Save ESC:Exit F1:General Help
F6:Fail-Safe Defaults
F7:Optimized Defaults
Onboard Serial Port 1/2
These items are used to assign the I/O address and IRQ for the onboard serial port 1/2. The default setting is
(3F8/IRQ4) / (2F8/IRQ3).
28
CHAPTER 2 BIOS SETUP
Power Management Setup
Use these items to control system power management. Modern operating systems take care of much of the
power management. This mainboard supports ACPI (Advanced Configuration and Power Interface).
Phoenix - AwardBIOS CMOS Setup Utility
Power Management Setup
ACPI Function
ACPI Suspend Type
Power Management
Video Off Method
Soft-Off by PWR-BTTN
Power On by Ring
Resume by Alarm
xx Date(or Month) Alarm
xx Time(hh:mm:ss) Alarm
[Enabled]
[S1(POS)]
[User Define]
[DPMS]
[Instant-Off]
[Disabled]
[Disabled]
0
0 : 0 : 0
Item Help
** Reload Global Timer Events **
Primary IDE 0
[Disabled]
Primary IDE 1
[Disabled]
Secondary IDE 0
[Disabled]
Secondary IDE 1
[Disabled]
PCI PIRQ[A-D]#
[Disabled]
↑↓→←:Move Enter:Select
F5:Previous Values
Figure 2.12 Power
Management Setup menu
+/-/PU/PD:Value F10:Save ESC:Exit F1:General Help
F6:Fail-Safe Defaults
F7:Optimized Defaults
ACPI Function
This mainboard supports ACPI (Advanced Configuration and Power management Interface). Use this item to
enable or disable the ACPI feature.
NOTE
ACPI is a power management specification that makes hardware status
information available to the operating system. ACPI enables a PC to
turn its peripherals on and off for improved power management. It also
allows the PC to be turned on and off by external devices, so that mouse
or keyboard activity wakes up the machine.
ACPI Suspend Type
Use this item to define how the system suspends. In the default, S1(POS), the suspend mode is equivalent to a
software power down. If you select S3(STR), the suspend mode is a suspend to RAM - the system shuts down
with the exception of a refresh current to the system memory.
Power Management
This item acts like a master switch f or the power-saving modes and hard disk timeouts. If this item is set to
Max Saving, power-saving modes occur after a short timeout. If this item is set to Min Saving, power-saving
modes occur after a longer timeout. If the item is set to User Define, you can define timeouts for the powersaving modes.
Video Off Method
This item defines how the video is powered down to save power.
Soft-Off by PWR-BTN
Under ACPI (Advanced Configuration and Power management Interface) you can create a software power
down. In a software power down, the system can be resumed by Wake Up Alarms. This item lets you install
a software power down that is controlled by the normal power button on your system. If the item is set to
Instant-Off, then the power button causes a software power down. If the item is set to Delay 4 Sec. then you
have to hold the power button down for four seconds to cause a software power down.
29
Power On by Ring
Use this item to enable modem activity to wakeup the system from a power saving mode.
Resume by Alarm
When set to Enabled, the following two fields become available and you can set the date (day of the month),
hour, minute and second to turn on your system. When set to 0 (zero) for the day of the month, the alarm will
power on your system every day at the specified time.
Date (of Month) Alarm
When set to “0” the system powers on everyday at the time specified in the “Time (hh:mm:ss) Alarm” field.
Select a date from 1 to 31 for the system to power on at the time specified in the “Time (hh:mm:ss) Alarm”
field.
Time (hh:mm:ss) Alarm
Set the time for the system to power on as defined in the ‘Date (of Month) Alarm” field. The time set in this
field must be later than the time in the RTC time as shown in the “Standard CMOS Features” on page 9.
** Reload Global Timer Events **
Primary IDE0
When the primary master HDD is working, the system timer will be re-loaded and the system will not go into
suspend mode.
Primary IDE1
When the primary master HDD is working, the system timer will be re-loaded and the system will not go into
suspend mode.
Secondary IDE0
When the primary master HDD is working, the system timer will be re-loaded and the system will not go into
suspend mode.
Secondary IDE1
When the primary master HDD is working, the system timer will be re-loaded and the system will not go into
suspend mode.
PCI PIRQ[A-D]#
When the PCI PIRQ[A-D]# has been alerted, the system timer will be re-loaded and the system will not go
into suspend mode.
30
CHAPTER 2 BIOS SETUP
PnP/PCI Configurations
This option configures how PnP (Plug and Play) and PCI expansion cards operate in the system. Both the
ISA and PCI buses on the mainboard use system IRQs (Interrupt ReQuests) and DMAs (Direct Memory
Access). You must set up the IRQ and DMA assignments correctly through the PnP/PCI Configurations menu;
otherwise, the mainboard will not work properly. Selecting “PnP/PCI Configurations” on the main menu
displays this menu:
Phoenix - AwardBIOS CMOS Setup Utility
PnP/PCI Configurations
Reset Configuration Data
Resources Controlled By
xx IRQ Resources
PCI/VGA Palette Snoop
[Disabled]
Item Help
[Auto(ESCD)]
Press Enter
[Disabled]
Figure 2.13 PnP/PCI
Configuration menu
↑↓→←:Move Enter:Select
F5:Previous Values
+/-/PU/PD:Value F10:Save ESC:Exit F1:General Help
F6:Fail-Safe Defaults
F7:Optimized Defaults
Reset Configuration Data
If you enable this item and restart the system, any PnP configuration data stored in the BIOS Setup is cleared
from memory.
Resources Controlled By
You should leave this item at the default Auto (ESCD). Under this setting, the system dynamically allocates
resources to plug and play devices as they are required. If you cannot get a legacy ISA (Industry Standard
Architecture) expansion card to work properly, you might be able to solve the problem by changing this item
to Manual, and then opening up the IRQ Resources sub-menu.
PCI/VGA Palette Snoop
This item is designed to overcome some problems that can be caused by some non-standard VGA cards. This
mainboard includes a built-in VGA system that does not require palette snooping so you must leave this item
disabled.
31
► IRQ Resources
This menu can only be accessed when the Resources Controlled by menu is set to Manual.
In the IRQ Resources sub-menu, if you change any of the IRQ assignations to Legacy ISA, then that Interrupt
Request Line is reserved for a legacy ISA expansion card. Press <Esc> to close the IRQ Resources sub-menu.
Phoenix - AwardBIOS CMOS Setup Utility
IRQ Resources
IRQ-3 assigned to
IRQ-4 assigned to
IRQ-5 assigned to
IRQ-7 assigned to
IRQ-9 assigned to
IRQ-10 assigned to
IRQ-11 assigned to
IRQ-12 assigned to
IRQ-14 assigned to
IRQ-15 assigned to
↑↓→←:Move Enter:Select
F5:Previous Values
32
[Reserved]
[Reserved]
[PCI Device]
[PCI Device]
[PCI Device]
[Reserved]
[Reserved]
[PCI Device]
[PCI Device]
[PCI Device]
Item Help
+/-/PU/PD:Value F10:Save ESC:Exit F1:General Help
F6:Fail-Safe Defaults
F7:Optimized Defaults
CHAPTER 2 BIOS SETUP
Figure 2.14 IRQ Resources
submenu
PC Health Status
On mainboards that support hardware monitoring, this item lets you monitor the parameters for critical
voltages, and critical temperatures. Several fields are for information only and are not configurable.
Phoenix - AwardBIOS CMOS Setup Utility
PC Health Status
CPU Warning Temperature
Current System Temp.
Current CPU1 Temperature
Current CPUFAN1 Speed
Current CPUFAN2 Speed
Vcore
Vccp
Vcc3
+ 5 V
+12 V
5VSB(V)
Shutdown Temperature
↑↓→←:Move Enter:Select
F5:Previous Values
[Disabled]
38ºC/ 100ºF
43ºC/ 109ºF
0 RPM
0 RPM
0.92 V
1.07 V
3.40 V
5.21 V
12.20 V
4.99 V
[Disabled]
Item Help
Figure 2.15 PC Health
Status menu
+/-/PU/PD:Value F10:Save ESC:Exit F1:General Help
F6:Fail-Safe Defaults
F7:Optimized Defaults
These items display the current status of system temperatures and power status.
CPU Warning Temperature
This item when enabled will sound an alarm when the temperature exceeds a particular setting.
Shutdown Temperature
This item allows setting the shutdown temperature. Once enabled, the machine will automatically shutdown
when the temperature reaches the limit specified.
33
Frequency/Voltage Control
Use these items to control system frequency and voltage.
Phoenix - AwardBIOS CMOS Setup Utility
Frequency/Voltage Control
Spread Spectrum
[Enabled]
Item Help
Figure 2.16 Frequency/
Voltage Control menu
↑↓→←:Move Enter:Select
F5:Previous Values
+/-/PU/PD:Value F10:Save ESC:Exit F1:General Help
F6:Fail-Safe Defaults
F7:Optimized Defaults
Spread Spectrum
When the motherboard clock generator pulses, the extreme values (spikes) of the pulses creates EMI
(Electromagnetic Interference). The Spread Spectrum function reduces the EMI generated by modulating the
pulses so that the spikes of the pulses are reduced to flatter curves. If you do not have any EMI problem, leave
the s etting at Disabled for optimal system stability and performance.
34
CHAPTER 2 BIOS SETUP
Other BIOS Options
This section covers the other options that are available from the main menu:
Phoenix - AwardBIOS CMOS Setup Utility
►►Standard CMOS Feature
►►Frequency/Voltage Control
►►Advanced BIOS Features
Load Fail-Safe Defaults
►►Advanced Chipset features
Load Optimized Defaults
►►Integrated Peripherals
Set Supervisor Password
►►Power Management Setup
Set User Password
►►PnP/PCI Configurations
Save & Exit Setup
►►PC Health Status
Exit Without Saving
Esc : Quit
F10 : Save & Exit Setup
↑ ↓ → ← : Select Item
Time, Date, Hard Disk Type...
Load Fail-Safe Defaults
This option opens a dialog box that lets you load fail-safe defaults for all appropriate items in the Setup
Utility. The fail-safe defaults place no great demands on the system and are generally stable. If the system
is not functioning correctly, try loading the fail-safe defaults as a first step in getting the system working
properly again. If you only want to load fail-safe defaults for a specific option, select and display that option,
and then press <F6>.
Follow these instructions: to load the fail-safe defaults:
1. From the main menu, scroll to Load Fail-Safe Defaults.
2. Press <Enter> to open the Load Setup Fail-Safe Defaults menu.
3. Press <Y>.
4. Press <Enter> to load the defaults.
Load Optimized Defaults
This option opens a dialog box that lets you load optimized defaults for all appropriate items in the Setup
Utility. The optimized defaults place demands on the system that may be greater than the performance level
of the components, such as the CPU and the memory. You can cause fatal errors or instability if you load the
optimized defaults when the hardware does not support them. If you only want to load Setup defaults for a
specific option, select and display that option, and then press <F7>.
Follow these instructions to load the optimized defaults:
1. From the main menu, scroll to Load Optimized Defaults.
2. Press <Enter> to open the Load Optimized Defaults menu.
3. Press <Y>.
4. Press <Enter> to load the defaults.
35
Set Supervisor and User Passwords
These items can be used to install a password. A Supervisor password takes precedence over a User password,
and the Supervisor can limit the activities of a User. To install a password, follow these steps:
1. Highlight the item Set Supervisor/User Password on the main menu and press <Enter>.
2. The password dialog box appears.
Enter Password:
3. If you are installing a new password, type in the password. You cannot use more than eight
characters or numbers. The Set Supervisor/User Password item differentiates between upper and
lower case characters. Press <Enter> after you have typed in the password. If you are deleting a
password that is already installed press <Enter> when the password dialog box appears. You see a
message that indicates that the password has been disabled.
PASSWORD DISABLED !!!
Press any key to continue . . .
4. Press any key. You are prompted to confirm the password.
Confirm Password:
5. Type the password again and press <Enter>, or press <Enter> if you are deleting a password that is
already installed.
Write the passwords down and keep them in a safe place.
If you do not save changes when you exit BIOS, changes to the passwords are saved anyway.
IMPORTANT
Save & Exit Setup
Highlight this item and press <Enter> to save the changes that you have made in the Setup Utility and exit the
Setup Utility. When the Save and Exit dialog box appears, press <Y> to save and exit, or press <N> to return
to the main menu.
Exit Without Saving
Highlight this item and press <Enter> to discard any changes that you have made in the Setup Utility and exit
the Setup Utility. When the Exit Without Saving dialog box appears, press <Y> to discard changes and exit,
or press <N> to return to the main menu.
NOTE
36
If you have made settings that you do not want to save, use the “Exit
Without Saving” item and press Y to discard any changes you have
made.
CHAPTER 2 BIOS SETUP
CHAPTER 3
UPGRADING COMPONENTS
This chapter describes how to upgrade components for the PT-6212. The following topics are described.
• Safety and precautions on page 37
• Before you begin on page 38
• Upgrading the hard drive on page 39
Safety and precautions
Computer components and electronic circuit boards can be damaged by discharges of static electricity.
Working on computers that are still connected to a power supply can be extremely dangerous. Follow these
guidelines to avoid damage to the computer or injury to yourself.
• Always disconnect the unit from the power outlet.
• Leave all components inside the static-proof packaging that they ship with until they are ready for installation.
• After replacing optional devices, make sure all screws, springs, or other small parts are in place and are
not left loose inside the case. Metallic parts or metal flakes can cause electrical shorts.
Only qualified personnel should perform repairs on the PT-6212. Damage
due to unauthorized servicing is not covered by the warranty. If you
are not confident of installing a hard drive or CompactFlash card, we
CAUTION recommend that you refer the job to qualified personnel.
If the LCD breaks and fluid gets onto your hands or into your eyes,
immediately wash with water and seek medical attention.
WARNING
WARNING
The inverter card has high voltage. Do not touch the inverter card while
power is connected to the machine. Unplug the power cord before
attempting to replace any part.
To prevent static damage to components, wear a grounded wrist strap.
Alternatively, discharge any static electricity by touching the bare metal
chassis of the unit case, or the bare metal body of any other grounded
CAUTION appliance.
Hold electronic circuit boards by the edges only. Do not touch the
components on the board unless it is necessary to do so. Do not flex or
stress the circuit board. Do not hold components such as a processor
CAUTION by its pins; hold it by the edges.
37
Before you begin
Make sure you have a stable, clean working environment. Dust and dirt can get into components and may
cause mal-function. Adequate lighting and proper tools can prevent you from accidentally damaging the
internal components.
Most of the electrical and mechanical connections can be disconnected by using your fingers. It is
recommended that you do not use needle-nosed pliers to disconnect connectors as these can damage the soft
metal or plastic parts of the connectors.
CAUTION
38
To prevent scratching the case of the machine, make sure the worktop
surface is clean and flat.
CHAPTER 3 UPGRADING COMPONENTS
Upgrading the hard drive
Refer to the following to remove and replace the hard drive.
1. Turn off the machine properly
through the operating system.
2. Disconnect the power cord from
the power outlet.
3. Remove the one screw
4. Pull out the hard drive tray.
5. Disconnect the power cable and
SATA cable from the hard drive.
6. Remove the four screws, then
remove the hard drive out from
the tray.
To replace the hard drive, reverse the above procedure.
39
40
CHAPTER 3 UPGRADING COMPONENTS
APPENDIX
This appendix describes locating and solving problems that you may encounter while using the PT-6212 POS.
Troubleshooting
Often after time spent troubleshooting, the problem is traced to something as simple as a loose connection.
Check the following before proceeding to the problem-specific solutions.
Tips for Troubleshooting
In each problem-specific section, try the steps in the order suggested. This may help you to solve the problem
more quickly. Try to pin point the problem and thus avoid replacing non-defective parts. For example, if you
replace batteries and the problem remains, put the original batteries back and go to the next step.
Keep a record of the steps you take when troubleshooting: The information may be useful when calling for
technical support or for passing on to service personnel.
•
Use some other electrical device to confirm that the electrical outlet is working.
•
Ensure all connections are securely attached.
The Power-On Self Test
The Power-On Self Test (POST) runs every time you turn on or reset the computer. The POST checks
memory, the mainboard, the display, the keyboard, the disk drives, and other installed options.
If failure is detected in an area other than the mainboard (such as the keyboard or an adapter card), an error
message is displayed on the screen and testing is stopped.
If your system does not successfully complete the POST, but displays a blank screen, have the PT-6212
serviced.
Beep Errors at POST
There are two kinds of beep codes in the BIOS.
•
Video error - a single long beep followed by three short beeps indicates a video error, the screen can
not be initialized and no information can be displayed.
•
DRAM error - a single long beep indicates that a DRAM error has occurred.
41
Beep Message Errors at POST
If the BIOS detects an error during the POST, a message is displayed. Refer to the following table for a list of
the errors that display.
WARNING
The system uses a 3V CR2032 battery (CMOS battery) mounted on the
mainboard to keep time. There is a risk of explosion if the wrong battery
type is used when replacing. Dispose of used batteries according to local ordinance regulations.
ERROR MESSAGE
CMOS BATTERY HAS
FAILED
CAUSE
SOLUTION
The CMOS battery is depleted.
Replace the battery.
The battery may be weak.
Replace the battery.
The CMOS may be corrupt.
Have the PT-6212 serviced.
HARD DISK(S) FAIL (80)
HDD reset failed.
Have the PT-6212 serviced.
HARD DISK(S) FAIL (40)
HDD controller diagnostics
failed.
Have the PT-6212 serviced.
HARD DISK(S) FAIL (20)
HDD initialization error.
Have the PT-6212 serviced.
HARD DISK(S) FAIL (10)
Unable to recalibrate fixed disk.
Have the PT-6212 serviced.
KEYBOARD IS LOCKED
OUT - UNLOCK THE KEY
The keyboard is locked and the
key-board controller is pulled
low.
Have the PT-6212 serviced.
KEYBOARD ERROR OR NO
KEYBOARD PRESENT
A keyboard is not detected.
Make sure the keyboard is
attached correctly and no key is
pressed during boot.
MANUFACTURING POST
LOOP
System keeps rebooting because
the keyboard controller is pulled
low for testing purposes.
Have the PT-6212 serviced.
BIOS ROM CHECKSUM
ERROR - SYSTEM HALTED
The ROM address is incorrect.
Have the PT-6212 serviced.
MEMORY TEST FAIL
The memory card is not
correctly installed or is
damaged.
Have the PT-6212 serviced.
CMOS CHECKSUM ERROR
42
APPENDIX
General Problems
Refer to the following general problems you may encounter.
PROBLEM
SOLUTION
The display screen is dark.
Make sure that the PT-6212 is not in suspend
mode.
An incorrect date and time are displayed.
Correct the date and time using the DOS DATE
and TIME commands or the options in the Setup
Utility. (You can also set the date and time in
Windows by double clicking the clock on the task
bar or in the control panel.) If the date and time
become incorrect after a short time, the CMOS
battery may be depleted. Replace the battery.
The following message appears at boot up:
Ensure that an operating system is installed.
“Invalid system disk, Replace the disk, and then
press any key”
Check the boot sequence in the BIOS setup utility.
You hear irregular beeps during operation of the
computer and the system halts.
Have the PT-6212 serviced.
An unidentified message is displayed.
Reboot the computer and run the BIOS Setup
Utility. Confirm the Setup Utility parameters. If the
same message is displayed after booting up again,
have the PT-6212 serviced.
You cannot operate the printer.
Check the printer cable connection. Ensure that the
printer power switch is turned on. Confirm that the
printer is on-line.
You cannot use a mouse or keyboard.
Check the cable connection.
Check the mouse or keyboard with another
computer to see if it works. If the same problem
occurs, replace the mouse or keyboard.
The screen is blank and you don’t hear any beeps.
Check that the AC adapter is connected to the PT6212 and the power cord is plugged into a working
electrical outlet.
Check that the power is on. (Press the power
switch again for confirmation.)
The screen is blank and you hear a continuous
beep, or two or more beeps.
Have the PT-6212 serviced.
Only the cursor appears.
Reinstall the operating system, and power on the
PT-6212.
Audio problems
Ensure the audio cable is not defective.
The mute is off.
43
Having the PT-6212 Serviced
If you are unable to solve the problem, you should have the terminal serviced. Pack the terminal in the
original carton. (See “Unpacking the PT-6212” on page 1.) Include a description of the problem and a
checklist of the steps you took when trying to fix the problem. The information may be useful to the service
personnel. Return the terminal to the place you purchased it.
44
APPENDIX
Specifications
LCD
12.1” TFT-LCD, resolution is 1024 x 768
Touch
5-wire Resistive touch (PS/2 interface)
CPU
Intel Celeron-M Processor @ 1GHz, FSB 400MHz, fanless design
Chipset
NB - Intel 910GMLE
SB - Intel ICH6-M
Memory
200-pin DDR2 SO-DIMM x 2 , Systme ships with 1G as the standard
BIOS
Award System BIOS, 4M bits flash ROM
Graphics
Integrated Intel® Graphics Media Accelerator 900 (Intel® GMA 900)
On board LVDS connector for LCD support
Default 8MB shared system memory
Ethernet
Realtek Giga LAN
Audio
VIA Two-channel AC’97 2.3 Audio Codec
HDD
Internal 3.5” type SATA HDD 80GB or above
I/O Interface
4 * COM ports
1 * VGA port
1 * RJ11 port for cash drawer(+24V)
1 * PS2 Keyboard port, auto routing for MSR, no jumper
1 * RJ-45 LAN port with activity and link LEDs
4 * USB ports
1 * DC +12V power adaptor connector
Preipherals
Tripple-track MSR (PS/2 interface)
Customer display module (serial interface)
3” Thermal receipt printer with cutter + control board (serial interface)
Operation System
POSReady 2009/WEPOS/Windows 2000//CE. Net/Linux
Power Supply
AC110V~240V/DC12V/12.5A 150 watt power adaptor
Operating
Temperature
0~+40˚C
Storage Temperature
-20˚C~+60˚C
Operating & Storage
Humidity
15%~80%
Dimension
Physical:328mm (W) x 289.3mm (D) x 246.8mm (H)
Color
White or Dark Charcoal
Certification
CE, FCC, UL, CUL, CB, VCCI, BSMI, 3C,
45
46
APPENDIX
版权
本手册所包含的图文和软件,受国际版权法保护。未经作者书面授权,不
得对本手册或手册所包含的任何内容进行复制。
免责声明
本手册内容如有更改,恕不另行通知,于此相关的内容制造商不予说明或
质量担保,并且对机器特殊用途的适销性和适用性,不做任何质量担保。 制
造商保留对本手册内容更改的权利。
商标识别
本手册中所有产品名称均为其所有者的公认财产。
联邦通信委员会 (FCC)
本设备根据FCC条例第15部分内容进行测定,符合A等电子设备规范。这些
规的定目的在于安装该类设备时,对居民区产生的有害干进行一定的防护。由
于该设备产生、利用并且能够辐射电波能,如果未按要求安装,可能对广播通
信造成干扰。然而,对于特殊用途的安装使用,也有可能发生这类情况。如果
确实对广播或电视通信发生了干扰(通过开、关该设备进行确认),建议通过
以下方法排除:
调整接收天线的方向或位置。
增大设备与信号接收体之间的距离。
将设备与信号接收体的插头分插在不同的插座上。
向经销商或者有经验的广播、电视技术人员寻求帮助。
为了保证设备的RF排放符合要求,设备内部连接线和AC电源线必须带屏
蔽。未经系统制造商许可,擅自对设备进行更改,使用者可能被取消设备操作
资格。
合格声明
本设备符合FCC条例第15部分的规定。操作以下列情况为准:
设备也许不会产生有害干扰;
能够承受所收到的甚至有可能引起意外操作的干扰。
手册简介
本手册适用于熟悉安装新系统和操作系统的系统管理员。内容如下:
2
准备工作
这一部分告诉您如何打开包装、核对包装物品、识别零部件以及如何连
接外围设备、如何对机器进行开电。
技术规格
安全信息
在安装和使用PT-6200POS机之前,请注意以下事项:
●仔细阅读所有说明。
●设备放置的台面或运输工具必须平稳。
●请勿阻塞设备上的散热孔。
●请勿将物体塞入散热孔,以免触及带高压电的零部件,使部件遭电击
损坏。
●仅适用规定的工作电源。如果您不确定,请与您的经销商或电力公司
联系。
●设备使用三芯电线,插头有三只插脚,其中一只接地,以防设备遭电
击。接地插脚不可废除。如果插座与插头不匹配,请联系电工进行调
换。
●请勿在电源线上放置任何物品。电源线放在没有行人往来的地方。
●请遵守手册内关于被设备的所有警告以及注意事项。
●更换零件时,确保维修人员使用的是制造商规定的产品。
●严禁近水、直射阳光下或加热设备附近使用该设备
主板上安装了 3V CR2032的电池支持时间显示。如果电池型号不
对,容易发生爆炸。根据当地法规处理废旧的电池。
警告
将电话线插入 LAN接口 (RJ-45 连接器) 可能会损坏连接器。
注意,LAN 接口仅可插入RJ-45连接器。连接设备时,注意USB
设备插入方式正确,以防USB接口被破坏。
注意
版次变更记录
2008年4月第一版
3
目
录
准备工作................................................................................... 1
打开产品包装........................................................................... 1
核对包装箱内的物品............................................................... 2
识别零部件............................................................................... 3
连接外围设备........................................................................... 6
机器通、断电........................................................................... 7
安装热敏打印纸....................................................................... 8
Windows XP Professional 下的打印机设置....................... 9
4
准备工作
本章介绍从打开PT-6200POS机包装到机器通电的过程,主题如下:
●第1页 打开产品包装
●第2页 核对包装箱内物品
●第3页 识别零部件
●第6页 连接外围设备
●第7页 连接钱箱
●第8页 机器通、断电
●第9页 安装热敏打印纸卷
●第10页 Windows XP Professional环境下打印机设置
打开产品包装
机器及电线组件装在带有泡沫衬垫的纸板箱内,运输途中可起到保护作用。
图1.1打开机器包装
仔细打开产品包装,并保存好包装材料。将来如需要运输,按照图1.1所
示进行包装。
1
核对包装箱内的物品
打开机器包装之后,检查包装内是否包含有下列物品:
如有任何物品遗漏或损坏,请立即与经销商联系。
2
识别零部件
这一部分对零部件以及机器上的接口进行了介绍。
前视图
零件
描述
1
电源按钮
2
10.4英吋 TFT 液晶显示器;5-线电阻式触摸屏
3
IO 面板
4
LED 电源指示灯
5
三通道MSR
3
后视图
图1.3 后视图
1
2x20 VFD 客显
2
打印纸出口
3
80mm 热敏票据打印机
4
打印机按钮
4
I/O 接口
图 1.4 PT-6200 I/O 接口
接 口
描 述
1
COM4接口
2
COM2 接口
3
LAN 接口 (RJ-45)
4
12V 电源接口
5
PS/2 键盘接口
6
RJ-11 钱箱接口
7
COM3 接口
8
COM1 接口
9
USB接口
5
连接外围设备
PT-6200可以连接打印机或扫描仪之类的外围设备。必要时参考使用手册
中关于驱动程序安装说明。
6
机器通、断电
参照下述步骤对机器进行通、断电。
1.找出位于机器底部的I/O板。
2.将适配器与电源线连接,然后
将 插 头 插 入 插 座 (AC100 - 240
V).
3.按位于机器底部左边的电源按
钮,电源指示灯打开。
4.关闭操作系统,机器关闭。主
机电源会自动关闭。
当操作系统不支持关机,或者您正在使用的操作系统崩溃、
死机,您需要按电源按钮五秒钟强行关闭电源。
7
安装热敏打印纸
参照下面步骤安装热敏打印纸
1.按release键打开机器罩盖。
2.如图所示插入热敏打印纸
卷。
3.将打印纸卷拉出打印机一
部分。
4.合上机盖,往下按,直到
听到啪嗒声。
注:
安装完毕,打印机会自动进
几行纸。
8
Windows XP Professional 下的打印机设置
1.Start → Settings →
Printers and Faxes
2.对准 “LK-T60”右击并
选择 “Properties”.
9
3.选择“COM5: Serial
Port”
4.点击 “Apply”.
5.选择“Configure
Port” 进入“COM5
Properties”。
。
10
规格
LCD
10.4” TFT-LCD, 分辨率 800 x 600
触摸屏
5-线电阻式触摸屏 (PS/2 接口)
CPU
Intel Celeron-M Processor @ 600MHz, L2 Cache
512KB, FSB 400MHz, 无扇设计
芯片
NB - Intel 82852GM SB - Intel 82801DB
内存
184-pin DDR DIMM x 1 ,系统标配为512MB
BIOS
Award System BIOS, 4M bits flash ROM
以太网
板载显卡;Intel®852GM(E) 集成动态视频共享内存
板载LVDS LCD接口支持最大64MB共享内存
RTL8110SE G
LAN
音频
Realtek 双通道 AC’97 2.3音频解码器
显卡
HDD
I/O 接口
外接设备
操作系统
Internal 3.5” type IDE HDD 80GB 或以上
4 * COM 接口(COM1 & 2 带 DC+5V或为了控制电压自选
DC+12V BIOS。COM3 带 DC+5V 或DC+12V跳线选择控制。
COM4 带DC+5V)
1 * RJ11 钱箱接口(+24V)
1 * PS2键盘接口, MSR自动路径, 无跳线
1 * RJ-45 LAN 连接 LED状态指示灯
4 * USB接口
三通道MSR(PS/2 接口) 客显(串口)
80mm热敏票据打印机,带裁纸刀 + 控制板(串口)
Windows XP, XP embedded, CE.Net, Linux (Fedora,
Red Hat, SuSE), WEPOS
工作电压
AC 100V~240V/DC12V/12.5A 150 电源适配器
工作温度
0~+40˚ C
储藏温度
工作及储藏度
-20˚ C~+60˚ C
10%~80%
颜色
白色或碳黑色
认证
CE, FCC, UL, CUL, CB, VCCI, BSMI, 3C,
11