1
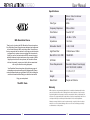
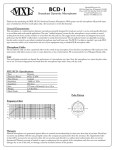
STEREO R Marshall Electronics Professional Audio Division Phone: 310-333-0606 800-800-6608 Fax: 310-333-0688 www.mxlmics.com [email protected] X/Y Stereo Tube Microphone User Manual STEREO Specifications Type: Stereo Tube Condenser Microphone MXL Revelation Stereo Thank you for choosing the MXL Revelation Stereo microphone. Your Revelation Stereo microphone was designed and engineered in the United States by MXL’s world-class team. It features two 6-micron capsules that are stacked in a 90-degree coincident-pair configuration to capture stereo recordings with the maximum fidelity, as well as two hand-selected EF86 vacuum tubes and individual balanced output transformers. As a member of MXL’s flagship series of studio microphones, the Revelation Stereo delivers the warmth, accuracy and clarity that are associated with only the finest recording equipment. Your Revelation Stereo microphone will provide many years of outstanding service and recordings of the highest quality. Please review this manual before you get started. You’ll find recording tips and other information that will help you obtain the best results. Enjoy your microphone! Tube Type: EF86 Frequency Response: 20Hz—20kHz Polar Pattern: Fixed 90° X/Y Sensitivity: -40 dB re 1 V/Pa Impedance: 140 ohms Attenuation Switch: 0 dB, -10 dB High-Pass Filter: 12 dB/octave at 125Hz Max SPL for 0.5% THD: 138 dB SPL S/N Ratio: 76 dB Power Requirements: Revelation Stereo Power Supply Unit 110/220 VAC, 50/60Hz Size: 11 1/2" x 2 1/2" Weight: 3 lbs Metal Finish: Purple and Chrome The MXL Team Warranty MXL microphones are guaranteed against defects in materials and workmanship for three years (except for the tubes, which is 90 days) from the date of purchase. If you encounter any problem with this unit, promptly contact the company from which you purchased it for assistance. The original dated sales receipt will be necessary for any warranty claim. Do not send any unit directly to us without prior authorization from our service department. Warranty coverage is limited to repair or replacement (at our option) of the microphone and does not cover incidental damages due to use of this unit, nor damage caused by accidental misuse of this product. 1 6 User Manual STEREO Acoustic guitar—There are several possibilities for using the Revelation Stereo with an acoustic guitar. On many guitars, you can get a great sound by positioning the microphone so that one capsule points toward the 12th fret and the other capsule points toward the sound holes. Subtle changes in the microphone’s position can make dramatic changes in tonal color. Moving the microphone farther away from the guitar gives recordings more room sound. This may be beneficial, depending on what feel you are looking for. When you are recording two or more guitars, placing the microphone directly in front of the performers or between them will capture the space and feel of the group and give a realistic recording of the performance. Contents Unpack your Revelation Stereo microphone carefully and verify that all of the following items are included: Revelation Stereo microphone 15-foot, 7-pin Mogami® cable Two 15-foot Mogami® XLR microphone cables Power supply Heavy-duty shock mount Aluminum flight case Vocals—The Revelation Stereo is perfect for recording solo vocalists and vocal ensembles. With the microphone placed in front of a group (facing the singers), it is easy to capture the spacing and depth of the recording. Varying the distance between the singers and the microphone will change the balance between direct sound and room sound. Placing the microphone closer will enhance the lower registers. With experimentation, you can get incredibly detailed recordings with the Revelation Stereo. Cleaning cloth Manual Certificate of authenticity If any of these items are missing or damaged, contact the company from which you purchased the microphone. Power requirements Drums and percussion—Place the Revelation Stereo over the drum kit, angled toward the kit. It will give a very realistic representation of the sound of the entire drum kit. Experimenting with position (moving the microphone toward the front or back of the kit or adjusting its vertical alignment) can make subtle changes to the tone of a recording. The Revelation Stereo is also perfect for percussion. It can be placed between a pair of congas, aimed at a group of percussionists or even pointed at a bell tree. The separation and depth bring extra realism to recordings. Polar Pattern/Frequency Chart 0 +20 The Revelation Stereo uses two EF86 tubes that require a dedicated power supply, which is included with your microphone. Even if your mixer has phantom power, you should defeat the phantom power as a precautionary measure when it is not needed to power other microphones. The power supply is switchable between 110 volts and 220 volts AC. In North America, the microphone is shipped with the setting at 110 volts. When the microphone is exported, it is shipped with the setting at 220 volts. However, you should ensure that the power supply’s voltage is at the correct setting for your region, as an incorrect voltage setting can cause permanent damage to the microphone and power supply. Right Left +10 0 270 -10 90 125 Hz -20 -30 20 50 100 200 500 1K 2K 5K 10K20K 180 5 Every MXL microphone is checked thoroughly before shipping. If you do not hear any sound from the microphone, check the power supply to make sure that it is switched on. The outputs from the Revelation Stereo are located on the power supply. Use the supplied Mogami® cables to connect the outputs from the power supply to your recording console or interface. Note: If you are using the microphone in mono with a single connection, the orientation of the microphone will need to be adjusted, as the capsules are oriented at 45 degrees from the front of the microphone. 2 User Manual STEREO WARNING: Do not “hot plug” the microphone. Always ensure that the power supply is off when plugging and unplugging the included 7-pin cable from the microphone to avoid damaging the microphone and power supply. Microphone cables A microphone cable can have a profound effect on the sound of any microphone. Even the finest microphone will sound poor if the interconnect cable allows noise to enter or causes distortion and loss of information. We strongly recommend that you always use the Mogami® cables that were supplied with your Revelation Stereo. Care Dust and foreign material can reduce the performance of a microphone over time, so you should store the Revelation Stereo in its case when not in use. Grill Bass roll-off switch The Revelation Stereo’s power supply features a bass roll-off switch that you can use to reduce proximity effect. Proximity effect is the distortion that often occurs when a sound source is too close to the microphone. Some microphone patterns (such as the cardioid pattern) boost bass as the sound source gets closer to the microphone. The bass roll-off switch reduces the low frequencies to give the sound a fuller range. -10 dB pad The Revelation Stereo can be used with very loud sound sources without significant distortion. If you hear distortion from the microphone, switch the -10 dB pad (which is located on the back of the microphone) to the “-10 dB” position. You also can move the microphone farther away from the sound source to avoid distortion. Shock mount The Revelation Stereo comes with a shock mount that was designed specifically to handle the microphone’s large size. A shock mount decouples the microphone from the stand and the recording environment. It also minimizes floor noise and any noise that is caused by handling the microphone stand. It should be considered standard equipment for every recording application. Because of the size and weight of the Revelation Stereo, we strongly recommended that you use only the included shock mount with this microphone. If you need to remove the microphone from its shock mount, hold the microphone securely and rotate the knurled nut at the base counterclockwise. 3 The Revelation Stereo has a single-layer mesh grill. This design minimizes standing waves and harmonic distortion. Because this type of grill leaves little protection between the microphone’s user and the capsule, we strongly recommend that you use a pop filter when you close-mike a vocalist. Using a pop filter will help protect your microphone’s sensitive capsule from the moisture of saliva and breath condensation. Using the Revelation Stereo The Revelation Stereo has two separate outputs, which are labeled “Left” and “Right.” Under normal circumstances, these outputs should be sent to separate channels of your console or interface and panned hard left and hard right. However, there may be times when you want to experiment with different settings for creative or artistic purposes. The microphone has two closely matched 32mm cardioid capsules, which are arranged as an X/Y 90-degree pair. The recording environment plays a large part in the quality of the recordings you will obtain. Experimenting with factors such as position and reflective panels will prove to be invaluable when setting up the microphone. Your ears are your best tools, so listen to the sound source directly and compare it to the sound that comes from the microphone. We recommend that you begin with all EQ levels flat and make small changes to obtain the desired sound. Application examples Piano—You can place the Revelation Stereo above a grand piano with the lid open, with the microphone’s capsules oriented toward the high and low strings, respectively. You can place the microphone near the hammers for an aggressive sound or place it toward the other end for a mellow sound. Experimentation is the key. 4