1
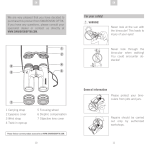
EN
DE
We are very pleased that you have decided to purchase this
product from Swarovski Optik. If you have any questions,
please consult your specialist dealer or contact us directly at
www.swarovskioptik.com.
1. Overview
EN
DE
WEEE/ElektroG
This symbol indicates that this product must not
be disposed of as household waste under the
WEEE Directive (Waste Electrical and Electronic
Equipment Directive) and national laws.
This product must be returned to a dedicated
collection site. You can obtain information about collection
sites for waste equipment from your local authorities or from
an authorised site for the disposal of waste electrical and
electronic equipment.
Disposing of this product correctly helps to protect the environment and prevents potential damage to both the environment and human health which could occur if the products
are not handled correctly.
2. For your safety!
2.1. Warning!
The product meets the requirements of a Class 1 laser pursuant to the applicable standards EN 60825-1, IEC 60825-1,
FDA 21 CFR 1040.10 and 1040.11 respectively except for
deviations pursuant to Laser Notice No. 50, dated June 24,
2007. As such, the instrument is safe for eyes and can be
used for any application, but must not be aimed at people
directly.
1
2
3
4
5
6
7
Comfort carrying strap
8 Battery compartment
cover
Eyepiece cover
9 Mode button
Twist-in eyecup
10 Objective lens cover
Focusing wheel
Dioptric adjustment ring, right 11 Snap Shot Adapter
12 Coin opener
Dioptric adjustment ring, left
Measurement button
13 Spare battery
2.2. General information
Under no circumstances should the housing be opened by
unauthorized personnel!
Never point the instrument at people
from close distances!
Please find our current product accessories at www.swarovskioptik.com.
18
19
DE
EN
DE
EN
Never look directly at the sun with
the binoculars! This will damage your
eyes!
Pos. A: Initial position without spectacles: Twist out the eyecups anticlockwise to the full extent.
Never look through the binoculars
when walking, you could encounter
obstacles!
Pos. B: Initial position with spectacles:
Twist in the eyecups clockwise until
they stop.
Please protect your binoculars from
jolts and jars.
Pos. C and D: Alternative positions or
interim adjustment stages for spectacle wearers and non-spectacle wearers.
Repairs should be carried out by
authorized service facilities only.
3.2. Adjusting the interpupillary distance
To see a single round image, adjust the separation between
the two halves of the binoculars until the irritating shadows
disappear.
3. Getting started
The battery is already inserted into the battery compartment.
The binoculars are ready for immediate use. Before switching
on the instrument, please make the following settings:
3.1. Adjusting the twist-in eyecups
In principle, you can choose between four different setting
positions that provide varying distances between your eye
and the lens. You can set the optimal distance according to
your personal preference.
20
3.3. Use with equal acuity of both eyes
a. Pull out the left and right dioptric adjustment ring and turn
it until the long bar on the dioptric scale is in line with the
small triangle underneath the ring.
21
EN
DE
DE
EN
5.Once you have finished, push the dioptric adjustment ring
back in.
6.Repeat steps 1 to 5 with the right dioptric adjustment
ring to optimally adjust the focus for the right eye (aiming
mark).
b. Once you have finished, push the dioptric adjustment rings
back in.
3.4. Dioptric compensation
To achieve optimal image quality, it is necessary to correct
any varying visual acuity between the left and right eye.
1.First pull out the left dioptric adjustment ring.
2.Turn the dioptric adjustment ring anticlockwise until it
stops.
3.Hold down the mode button for 4 seconds. This takes you
to the dioptric compensation adjustment mode (display
remains illuminated for 30 seconds). To exit this mode
early, press the measurement button or mode button
again.
4.Now look through the left eyepiece at the display with your
left eye and slowly turn the dioptric adjustment ring clockwise until the display comes into clear focus.
22
Note:
Setting the twist-in eyecups and eye relief precisely helps to
ensure maximum viewing comfort for the display (see chapter
3.1. and 3.2.).
Tip:
The aiming mark and range indication can be set comfortably
even without a target. Place the binoculars on a table upright
or look at a nearby dark object. Adjusting each dioptric
position separately allows you to achieve optimum sharpness
because your eye is not distracted by a target under observation.
3.5. Adjusting the focus
To adjust your object focus from the
shortest focusing distance (see Technical Data Sheet) to infinity, simply
turn the focusing wheel. In the infinity
position, the wide bar on the focusing
wheel points upward.
23
EN
DE
DE
EN
4. Operation
5.2. Additional functions and programmes
4.1. Single measurement
The following programmes (P) are available:
Briefly pressing the measurement
button causes the aiming mark to
appear. Once the button is released,
the measured range is shown on the
display. For optical safety reasons,
another measurement cannot be
taken until after approx. 2 seconds have elapsed. During this
safety pause, a continuous series of minus symbols appears
on the display. The measurement is in progress.
P1 Individual brightness settings
P2 Information shown on lower display row:
- Angle in degrees
- P2 off (lower display row off)
- Corrected ballistic shooting distance
(angle-dependent)
P3Toggle metres/yards
P4 Automatic brightness adjustment (on/off)
4.2. Scan Mode
Scan Mode is used to continually
measure the range of moving targets. The instrument switches to Scan
Mode automatically if the measurement button is held down for over 3
seconds. In Scan Mode, measurements will be taken continually until the measurement button
is released (max. 120 seconds). The maximum range of Scan
Mode is approx. 1,000 m.
If the measurement button is not pressed for 5 seconds, the
display turns off automatically.
5. Menu navigation
5.1. Display
1.Aiming mark
2.Display of the measured
range in yards or metres
(4-digit).
3.Measured angle in degrees
or corrected shooting
distance
4. Angle symbol
5. Display in yards (Y) or metres (M)
6. Degree symbol (°)
24
Factory settings:
-
-
-
-
P1:
P2:
P3:
P4:
Level 3
Off
Metre
On
Selecting the programmes:
Hold down the mode button for 2 seconds. This takes you to
the main menu: Now use the measurement button to make
the programme setting you require.
To switch to the next menu item, press the mode button
briefly. If you do not press any button within 5 seconds, the
menu will close automatically and and return to the measurement mode. Your settings are saved automatically.
See the Technical Data Sheet for more menu navigation
information.
Note:
Your settings are still retained even after replacing the battery.
25
EN
DE
DE
EN
5.3. Brightness setting display (P1, P4)
Display showing corrected shooting
distance
In P1 – individual brightness setting – first select the appropriate display brightness level for you. There are 5 brightness
levels to choose from.
In P4, turn the automatic brightness adjustment on or off.
-On: The binocular automatically adjusts the display brightness based on the brightness level you have chosen.
-Off: The display is constantly illuminated at the brightness
level you have chosen.
SWAROAIM (corrected ballistic shooting distance)
When shooting at an angle (up or down), the force and effect
of gravity is less than with a horizontal shot. This results in a
flatter trajectory and a shifting of the point of impact.
For a detailed description, visit WWW.SWAROVSKIOPTIK.COM.
5.5. Yard / metre setting (P3)
5.4. Angle program (P2)
For each distance measured, you can also display the angle
of the binoculars to the object under observation. This angular position means that the corrected shooting distance can
also be displayed.
The binoculars can display the measured distance in yards or
metres. To switch between these two units briefly press the
measurement button on menu P3. The unit chosen here also
applies for the corrected ballistic shooting distance.
Adjusting the measured angle
On the lower row of the display, you can show either:
• The angle
• Or no additional information
• Or the corrected shooting distance.
Display showing measured angle
6. Accessories
6.1. Assembly instructions for objective lens cover
Display not showing measured angle
6.2. Accessories
For detailed information about accessories, visit
WWW.SWAROVSKIOPTIK.COM.
26
27
EN
DE
DE
EN
Replacing the battery
7. General Information
• Use the coin opener to open the
battery compartment cover in the
focusing wheel. Remove the dead
battery.
7.1. Range
The following factors have an impact on the maximum
measurement range:
Angle to target
At right angle
Acute
• Insert a new CR 2 battery, making
sure that the poles are correctly
aligned (see markings inside com partment). Use leak-proof batteries only.
Warning: Do not use rechargeable batteries!
Size of object
Large
Small
Sunlight
•Finally, screw the battery cover back on.
Little (cloudy)
A lot (bright sunshine)
Atmospheric
conditions
Clear
Misty
Object structure
Plane (e.g. wall)
Variable
(e.g. bush, tree)
Range higher
Range lower
Colour of target
Light
Dark
Surface
Shiny
Matt
7.2. Serial number
The serial number of your binoculars
is located beneath the right dioptric
adjustment ring. To read it, pull out
the dioptric adjustment ring.
Batteries Directive
Batteries must not be disposed of as household
waste and you are legally obliged to return used
batteries. Local facilities exist for returning used
batteries free of charge (e.g. in retail outlets or
at communal collection points). Batteries are labelled with
a crossed-out wheeled bin and the chemical symbol of the
harmful substance they contain: “Cd” for cadmium, “Hg” for
mercury and “Pb” for lead.
Please help us to protect the environment.
7.3. Replacing the battery
Check how much charge is left in the battery. A flashing
aiming mark when the instrument is switched on indicates
a low battery. From the time the low battery indicator first
starts flashing, there is sufficient power for around 100 more
measurements.
28
29
EN
DE
DE
EN
7.4. Troubleshooting and display information
Problem
Probable Cause
Remedy
The field of view is
shaded at the
periphery (vignetted).
The eyecups have
not been adjusted
correctly for use with
or without spectacles.
Spectacle wearers
need to twist the eyecups right in to the
stop position. When
using without spectacles, the eyecups
need twisting out to
the required position
(see chapter 3.1.).
The display shows
“----” for the distance
measured.
1. The measurement
range has been
exceeded.
2. The object is not
reflective enough.
3. Target out of focus.
1. See chapter 4.
2. See chapter 7.1.
3. See chapter 3.5.
The display shows
“co” for the distance
measured (clean
optic).
1. The distance to
the target is shorter
than the minimum
measurement range.
2. The objective lens
is dirty.
1. See Technical Data
Sheet.
2. Clean the objective
lens.
The aiming mark
flashes when the
instrument is
switched on.
The battery is low.
There is sufficient
power for around 100
more measurements.
Replace the battery
or briefly warm the
current one.
8. Maintenance and care
8.1. Lens-cleaning cloth
You can clean high sensitive lens surfaces with the enclosed
special microfibre cloth. It is suitable for objective lens, ocular lens and spectacles.
Please keep the cloth clean, as dirt can damage the lens
surface. If the cloth becomes soiled it can be washed in
lukewarm soapy water and left to dry. Please only use for
cleaning lens surfaces!
8.2. Cleaning
We have designed all elements and surfaces to require little
care.
To ensure the long-lasting optical brilliance of your binoculars, you should keep the glass surfaces free of dirt, oil and
grease. When cleaning the lenses, first remove larger particles with an optical lens brush. For the subsequent thorough cleaning we recommend breathing
onto the lens surface to form a coat of condensation and then cleaning it with a soft, moist cloth.
The housing is best cleansed with a soft, moist cloth (don’t
use the lens-cleaning cloth).
Display, aiming mark Dioptric adjustment is See chapter 3.4.
and target are not all not optimal.
in focus at same time.
“Err” appears on the
display
Electronic fault
Press the measurement button again.
On repeated
occurrence of “Err”,
please contact
SWAROVSKI OPTIK
customer service.
In the event of hard-to-remove dirt (e.g. sand) the eye cups
can be unscrewed and cleaned easily.
30
31
EN
DE
DE
EN
8.3. Storage
FCC Compliance Statement
You should keep your binoculars in their bag in a dry, well
ventilated place.
This equipment has been tested and found to comply with the
limits for a Class B digital device, pursuant to part 15 of the
FCC Rules. These limits are designed to provide reasonable
protection against harmful interference in a residential installation. This equipment generates, uses and can radiate radio
frequency energy and, if not installed and used in accordance with the instructions, may cause harmful interference
to radio communications. However, there is no guarantee
that interference will not occur in a particular installation. If
this equipment does cause harmful interference to radio or
television reception, which can be determined by turning the
equipment off and on, the user is encouraged to try to correct
the interference by one or more of the following measures:
• Reorient or relocate the receiving antenna.
• Increase the separation between the equipment and receiver.
• Consult the dealer or an experienced radio/TV technician
for help.
6,/,
&$*(
/
If the instrument is wet, it must be
dried prior to storage.
In tropical regions or regions with a
high humidity the best place to store
the instrument in is an air-tight receptacle along with a moisture-absorbing
agent (e.g. silica gel).
9. Contents
EL Range
2x batteries (CR2)
Eyepiece cover
Objective lens cover
Comfort carrying strap
Snap Shot Adapter
Coin opener
Lens-cleaning cloth
Field Bag
Instruction manual, Technical Data Sheet
Quick Guide
EL Range DVD
Swarovski Optik KG is not responsible for any radio or
television interference caused by unauthorized modifications of this equipment or the substitution or attachment of
connecting cables and equipment other than those specified
by Swarovski Optik KG. The correction of interference
caused by such unauthorized modification, substitution or
attachment is the responsibility of the user.
10. Conformity
The device conforms to Directives 2002/95/EC on the restriction of the use of certain hazardous substances in electrical
and electronic equipment, 2002/96/EC on waste electrical
and electronic equipment (WEEE) and 2004/108/EC on electromagnetic compatibility.
32
All data are typical values.
We reserve the right to make changes regarding design and delivery.
We accept no liability for printing errors.
BA-697-01, 06/2011
33