1
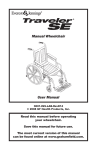
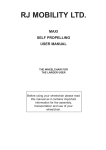
max mobility
®
Thumb Throttle Button Instructions [sold separately]
NOTE: Parts shown may differ slightly from your SmartDrive.
Rigid Frame Mount
The two (2) SmartDrive thumb throttle buttons are easily mounted to
each side of the wheelchair frame to allow for easy pressing without
having to remove your hands from the handrims.
1. Wrap the velcro loop around the rubber backing of the button
then around the side tubing of the wheelchair; feed the skinny
end of the velcro through the slot in the wider end and pull tightly
before laying down on its mating surface. Be sure the blue LED
is pointing up and the cables that come out of each button run
towards the back of the wheelchair (Fig A).
NOTE: If the chair has screw-down seat upholstery, loosen the screws and
feed the velcro strap under the metal bar (then retighten screws) to allow for
closer positioning of the buttons to the handrims.
Fig. A
2. The cable can be pulled apart to the desired split location [preferably
in the rear of the seat] and any extra cable can be managed under
the cushion. Use the provided velcro strips to strap down the button
cables to the upholstery. Be sure the cables do not stick out and will
not get caught in the spokes of the wheelchair (Fig. B). Place the
cushion over the cable to further secure the cable.
3. When the connector is not connected to the SmartDrive, it can
be magnetically connected to the provided metal holder (Fig. C).
Position the metal hold between the front and back parts of the
clamp, feeding the top screw through the hole in the holder. To
prevent rattle, tighten the top screw of the clamp completely before
tightening the bottom screw.
Fig. B
4. The position and orientation outlined in the Adaptive Clamp
Mounting Instructions are critical to the proper function of SmartDrive and must be heeded. Refer to that instruction to make sure
the clamp is oriented correctly.
Folding Frame Mount
The two (2) SmartDrive buttons are easily mounted to each side of the
frame of the wheelchair to allow for easy pressing without having to
remove your hands from the handrims.
1. Wrap the velcro loop around the rubber backing of the button then
around the side tubing of the wheelchair; feed the skinny end of the
velcro through the slot in the wider end and pull tightly before laying
down on its mating surface. Be sure the blue LED is pointing up and
the cables that come out of each button run towards the back of the
wheelchair (Fig. D).
Fig. C
Fig. D
2. The cable can be pulled apart to the desired split location (preferably in
the rear of the seat) and any extra cable can be routed at the rear of the
seat. Use the provided tie-straps to route the cables along the frame tubes
and out of the rear of the wheelchair. Be sure the cables do not stick out
and will not get caught in the spokes of the wheelchair (Fig. E).
Fig. E
3. When not in use the cable can be left to dangle out the back. Be sure
to leave enough slack to allow the cables to fold up with the wheelchair
when the chair is collapsed.
Rev. MX2 BP-A
max mobility
®
Thumb Throttle Button Instructions (continued)
The buttons should be placed as close to the wheelchair wheels as possible to allow for easy pressing without having to remove your hands from the handrims.
Button Operation/Activation
The thumb throttle buttons are used to activate the power assist without having to perform a push. This is done by pressing [with the
0.9 lbs (4 N) minimal needed force] and holding either of the frame mounted buttons [with the drive unit turned on and the buttons
plugged in] for longer than one (1) second, at which point the drive unit motor will start to drive. As either of the buttons is held, the
drive unit will slowly ramp up its speed at a slow rate of 2 ft/s2 to a maximum speed of 1.5 mph (2.4 km/h). This is a slow, comfortable
walking speed. Releasing the pressed button at anytime will deactivate the motor/power assist. If the motor is driving when the button
is pressed, it will first deactivate the motor. If it is continued to be held, then the motor will start to drive, slowly ramping its speed up.
This button activation is especially helpful in cases where performing a push is difficult, like when on hills or in thick carpet.
The buttons should be placed as close to the wheelchair wheels as possible to allow for easy pressing without having to remove your
hands from the handrims. Steering is still done by braking on the handrims, and as soon as the pressed button is released, the omnidrive wheel is deactivated. Remember that the device will still be in a state of power assist ready, so a performed push [when used with
a wristband] or press and hold of either of the buttons will re-activate the motor. Whenever a wristband is used, please note that pressing and releasing the button on the top of the wristband will deactivate the motor and turn it off, so the SmartDrive will not provide
power assist activated by a push, but the buttons can still be used.
If any malfunctions or thumb throttle button/deactivation/push detection issues are experienced with the SmartDrive, cease use of the
device and contact Max Mobility for immediate assistance.
Refer to the SmartDrive User’s Manual prior to use for further instruction on how to operate the SmartDrive.
Also, heed all warnings and cautions outlined in that manual.