1
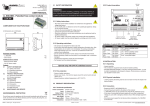
CONTENTS
1.
INTRODUCTION
1.1
1.2
1.3
1.4
2.
GETTING STARTED
2.1
2.2
2.3
2.4
2.5
3.
Overview ..................................................................................................................... 1
Scope of this guide ...................................................................................................... 1
Related documents....................................................................................................... 2
Conventions used in this guide .................................................................................... 2
Introduction ................................................................................................................. 3
Starting Respond CenterPoint............................................................................... 3
Accessing databases .................................................................................................... 3
Understanding the Respond CenterPoint main window ....................................... 6
Understanding Respond CenterPoint cards .......................................................... 9
ACCESSIBILITY
3.1
3.2
3.3
Introduction ............................................................................................................... 11
Accessing tabs and cards ........................................................................................... 11
Accessing fields......................................................................................................... 11
INDEX
Respond CenterPoint
Page i
1.
INTRODUCTION
1.1 Overview
Respond CenterPointTM is a system that helps you to record and track feedback,
from the moment it is received by your organization, up to the time that it has been
dealt with satisfactorily.
For each record, you can use Respond CenterPoint to capture:
Q
basic feedback details
Q
different aspects of the feedback, if this covers more than one issue
Q
contacts involved with the record
Q
activities carried out in connection with the record, for example correspondence
and phone calls
Q
costs incurred as a result of the feedback
Q
any other information that is relevant to your organization.
Respond CenterPoint also contains powerful analytical features that allow you to:
Q
filter old or unwanted feedback and send it to archives
Q
perform complex searches on all feedback captured
Q
produce a variety of charts and reports.
1.2 Scope of this guide
This guide should be read by anyone who requires information on entering feedback
into a database and analyzing that data.
The chapters contained in this guide are as follows:
Q
Chapter 2 – Getting Started
Describes Respond CenterPoint’s card file and other basic aspects of the
system
Q
Chapter 3 – Accessibility.
Describes how to use your keyboard to access tabs, fields, menus and menu
options, and also how to perform functions.
The list of chapters has been shortened for the purposes of this sample document.
Respond CenterPoint
Page 1
Using Respond CenterPoint
1.3 Related documents
There are two other guides in the Respond CenterPoint documentation set that
you may find useful:
Q
Installing Respond CenterPoint
provides information on how to install Respond CenterPoint
Q
Setting Up A Respond Database.
provides information on how to set up and customize a database.
1.4 Conventions used in this guide
In order to draw your attention to certain items in the text and to help you understand
instructions, this guide presents important items in a stylized way. Conventions are
used for the following:
Page 2
Q
menu options
Q
fields, checkboxes and radio buttons
Q
buttons on the screen and toolbars
Q
mouse actions
Q
other information.
This section has been shortened for the purposes of the sample document.
© 2006 Respond Group Ltd.
2.
GETTING STARTED
2.1 Introduction
This chapter provides information to familiarize users with the fundamentals of
Respond CenterPoint. It is assumed that readers have a basic familiarity with
Windows-based systems.
The chapter covers starting Respond CenterPoint, opening and closing databases,
viewing database activity, the Respond CenterPoint main window and the card
file. It also describes how to enter and save data, how to set user preferences, how to
get help on Respond CenterPoint, and how to exit Respond CenterPoint.
2.2 Starting Respond CenterPoint
Before you can use Respond CenterPoint you must start the system by selecting
the CenterPoint menu option from the Respond program group within your Windows
Start menu.
If you are starting Respond CenterPoint for the very first time, the Open Database
dialog box is displayed (Figure 2-1). You must now select a database to open.
Alternatively:
If you have used Respond CenterPoint before, it remembers the last database you
worked with and displays the Sign On dialog box (Figure 2-2) ready for you to sign
on to that database.
The Respond Integrated Sign-on plug-in enables you to be automatically signed
onto the appropriate Respond database, without requesting your User Id and
Password details.
System Administrators cannot use the integrated sign-on facility, as they are
required to enter their sign-on details for security reasons.
For information on setting up the Respond Integrated Sign-on plug-in, refer to
Chapter 3 ‘Using Respond Integrated Sign-on’ in the guide ‘Respond
Integrated Sign-on Guide’.
2.3 Accessing databases
You can set up many different databases within Respond CenterPoint for
recording feedback, compliments, incidents and so on. You need security access to a
Respond database in order to work with the data contained in that database.
Respond CenterPoint
Page 3
Using Respond CenterPoint
For each database you want to access, your System Administrator needs to allocate
you a User Id and password, which you use to sign on to the database.
Access to databases is defined by your System Administrator in the security area. If
you cannot access a database that you require or you do not know your User ID or
password, you must contact your System Administrator.
Opening a database
To open a database:
1. Select the Open Database option from the File menu.
The Select Database dialog box is displayed, as shown in Figure 2-1.
Figure 2-1 Select Database dialog box
2. Select the database you want to open from the list of databases displayed, then
click on the OK button.
The Sign On dialog box is displayed, as shown in Figure 2-2.
Click here to
change your
password
Figure 2-2 Sign On dialog box
3. Enter your User Id and your password. Respond CenterPoint displays an
asterisk (*) for every character you type in the Password field. This is to prevent
anyone else from reading your password as you type it.
The Respond Integrated Sign-on plug-in enables you to be automatically
signed onto the appropriate Respond database, without requesting your User Id
and Password details.
Page 4
System Administrators cannot use the integrated sign-on facility, as they are
required to enter their sign-on details for security reasons.
© 2006 Respond Group Ltd.
Using Respond CenterPoint
Accessing databases
For information on setting up the Respond Integrated Sign-on plug-in, refer
to Chapter 3 ‘Using Respond Integrated Sign-on’ in the guide ‘Respond
Integrated Sign-on Guide’.
4. Click on the OK button. The Respond CenterPoint main window is displayed,
with the database name displayed in the title bar.
For information on the layout of the Respond CenterPoint main window, refer to
‘Understanding the Respond CenterPoint main window’ on page 12.
Changing your password
Each time you sign on to a database, you have the opportunity to change your
personal password. Changing your password affects only the database you are signing
on to.
To change your password:
1. Start Respond CenterPoint and enter your User Id and password in the Sign
On dialog box (Figure 2-2).
2. Select the Change Password checkbox to indicate that you want to specify a new
password, then click on the OK button. The New Password dialog box is
displayed, prompting you to enter your new password.
3. Enter your new password, then click on the OK button. The Confirm New
Password dialog box is displayed, prompting you to verify your new password.
4. Enter your new password again, then click on the OK button. The Respond
CenterPoint main window is displayed.
The next time you sign on to the database, you must remember to use your new
password.
Opening the sample database
In addition to the databases set up by your organization, Respond CenterPoint is
supplied with a sample database.
For information on installing the sample database, refer to Chapter 3 ‘Installing
Respond CenterPoint’ in the guide ‘Installing Respond CenterPoint’.
You can use this database to:
Q
practise setting up and configuring a database
Q
teach yourself and other users to record and track feedback
Q
experiment with reporting, searching and charting.
Respond CenterPoint
Page 5
Using Respond CenterPoint
To open the sample database, follow the steps in ‘Opening a database’ on page 4,
making sure you select the CenterPoint Sample option from the Select Database
dialog box.
If the sample database is not displayed in the list of databases, it has not yet been
attached to Respond CenterPoint.
For information on attaching the sample database, refer to Chapter 4 ‘Maintaining
Databases’ in the guide ‘Installing Respond CenterPoint’ or contact your System
Administrator.
Closing a database
To close a database, select the Close Database option from the File menu. Respond
CenterPoint closes the database and removes the database name from the title bar.
2.4 Understanding the Respond
CenterPoint main window
The Respond CenterPoint main window is displayed when you start Respond
CenterPoint. You use this window to access all the main functions for capturing
and handling feedback.
This window consists of the following areas:
Q
title bar
Q
menu bar
Q
button toolbar
Q
feedback toolbar
Q
card file
Q
status bar.
Figure 2-3 illustrates the different areas of the window.
Page 6
© 2006 Respond Group Ltd.
Using Respond CenterPoint
Understanding the Respond CenterPoint main window
Title bar
Button Toolbar
Menu bar
Feedback
toolbar
Card file
Figure 2-3 Respond CenterPoint main window
The title bar
The title bar shows the name of the database that is currently open. If no database
name is displayed, there is no database currently open.
The button toolbar
The button toolbar contains shortcut buttons for commonly used functions. These are
summarized in the following table.
Button
Description
Creates a new record
Opens an existing record
Saves the current record
Changes the status of the current record
Adds a contact to the current record
Adds an aspect to the current record
Adds a cost to the current record
Adds a task to the current record
Respond CenterPoint
Page 7
Using Respond CenterPoint
Adds a note to the current record
Adds a telephone message to the current
record
Creates a new document for the current
record
Begins the Spell Checker facility
Displays the Diary window
Displays the Search window
Displays the Chart window
Displays the Report window
Holds All Outstanding Tasks
Re-Opens Outstanding Tasks
Displays the Address Look-up window
Displays the In Tray window
The Feedback toolbar
The Feedback toolbar is an optional toolbar that you can choose to display. It shows
the title of the current record in a drop down list.
The drop down list lists all records currently open. You can switch between records
simply by selecting the one you require.
For information on displaying the Feedback toolbar and setting the maximum number
of records you can have open at once, refer to ‘Setting your user preferences’ on
page 34.
The status bar
The status bar displays confirmation messages when you perform actions. It also
displays your user name and the current database name.
Page 8
© 2006 Respond Group Ltd.
Using Respond CenterPoint
Understanding Respond CenterPoint cards
2.5 Understanding Respond CenterPoint
cards
You use the Respond CenterPoint card file to capture and maintain feedback
details. When you first install Respond CenterPoint, there are five cards set up by
default:
Q
Feedback card
Q
Contact card
Q
Aspect card
Q
Activity card
Q
Cost card.
Your organization may decide to re-name any of these cards. For example, the
Feedback card may be re-named the Enquiry card. Your organization may also decide
to not use cards that are not relevant or to add extra cards. It is also possible to lock
the position of cards.
In addition, individual cards may be customized by:
Q
hiding fields
Q
customizing categories
Q
changing colors used.
The following sections describe each of the default cards, as customized within the
sample database.
Respond CenterPoint
Page 9
Using Respond CenterPoint
The Feedback card
You use the Feedback card, shown in Figure 2-4, to capture basic details such as the
title of the feedback, a description and the outcome. The card also shows:
Q
reference number and status
Q
the date on which the feedback was received
Q
the feedback age, which shows the number of elapsed and working days from the
receipt date until now
If the feedback status is Done, the number of days is calculated from the receipt
date to the done date.
Q
the name of the person who logged the feedback and when
Q
the name of the person who last modified the feedback and when
Q
the name of the person who changed the status of the feedback to Done
Q
the name of the person to whom it is allocated
Q
contacts and aspects involved.
Figure 2-4 Feedback card
In this example, the card is being used to record how the feedback was received, and
type of feedback. The Description field is being used to record a brief summary of
the feedback and the Action taken field is being used to record what action was taken
in response to the feedback.
Page 10
This chapter has been shortened for the purposes of the sample document.
© 2006 Respond Group Ltd.
3.
ACCESSIBILITY
3.1 Introduction
Respond CenterPoint allows you to use your keyboard to access tabs, fields,
menus and menu options, and also to perform functions. In this chapter, you will be
given instructions on which keys to press depending on which actions you want to
perform. This chapter also lists some of the features Microsoft Word offers to help
people with disabilities and outlines some of the major shortcuts.
3.2 Accessing tabs and cards
You can use the left (←) and right (→) arrow keys on your keyboard to view the
different tabs in a window. However, you cannot use these keys to access the
cards/tabs in the Respond CenterPoint Main window. The default shortcut keys
for accessing the different Respond CenterPoint cards are as follows:
Card
Shortcut keys
Contact
Shift+F1
Feedback
Shift+F2
Aspect
Shift+F3
Activity
Shift+F4
Cost
Shift+F5
You can set up your own shortcut keys to access the cards in the Respond
CenterPoint Main window using the Customization Manager.
For information on using the Customization Manager to set up shortcut keys, refer to
Chapter 3 ‘Using the Customization Manager’ in the guide ‘Setting Up A Respond
Database’.
3.3 Accessing fields
You can access certain fields within Respond CenterPoint using the keys on your
keyboard.
You can access the field you want by using the Tab key on your keyboard. Simply
press the Tab key until you reach the field you want.
If the field contains a letter with an underscore, you can press the following keys to
access the field:
Respond CenterPoint
Page 11
Using Respond CenterPoint
Alt+ (the letter with the underscore)
For example, in Figure 3-1 the letter ‘n’ has an underscore in the Contact field. To
access this field, you would simply press the Alt+N keys on your keyboard.
Figure 3-1 Contact field example
These shortcuts are either default shortcuts or have been configured using the
Customization Manager.
Respond CenterPoint default commands take precedence over custom
commands.
If a menu and a field have the same shortcut keys assigned to them, the menu
shortcut will take precedence. Therefore, it is advisable not to set up a field with the
same shortcut as a main menu.
For information on using the Customization Manager to set up shortcut keys, refer to
Chapter 3 ‘Using the Customization Manager’ in the guide ‘Setting Up A Respond
Database’.
This chapter has been shortened for the purposes of the sample documentation.
Page 12
© 2006 Respond Group Ltd.
INDEX
Field shortcuts ....................................................... 11
A
Accessing databases ................................................ 3
M
Main window........................................................... 6
B
Button toolbar
Main window...................................................... 7
C
Card file
Feedback card................................................... 10
Changing
password............................................................. 5
Closing
databases............................................................. 6
D
Database
accessing............................................................. 3
closing ................................................................ 6
opening ............................................................... 4
sample................................................................. 5
selecting.............................................................. 4
signing on to ....................................................... 4
Documentation set................................................... 2
F
Feedback card
overview ........................................................... 10
Feedback toolbar ..................................................... 8
Respond CenterPoint
O
Opening
databases............................................................. 4
P
Password, changing ................................................. 5
S
Sample database ...................................................... 5
Selecting a database................................................. 4
Shortcuts
fields ................................................................. 11
tabs and cards ................................................... 11
Signing on ............................................................... 4
Starting Respond CenterPoint ................................. 3
T
Tab and card shortcuts........................................... 11
W
Windows
main.................................................................... 6
Page 13