1
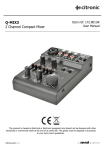
Q-MIX2
2 Channel Compact Mixer
Item ref: 172.800UK
User Manual
This product is classed as Electrical or Electronic equipment and should not be disposed with other
household or commercial waste at the end of its useful life. The goods must be disposed of according
to your local council guidelines.
Thank you for choosing this Citronic Q-MIX2 compact mixer. It is designed for home studio
mixing and podcasting, with USB interface to allow digital recording and play back from a
computer. The compact housing makes it ideal for users that are always on the move.
Caution:
To avoid damage to the unit, do not expose unit to rain or moisture. In the event of
spillage, stop use immediately and allow it to dry out. Get the unit checked over by
qualified personnel before carrying on using the mixer.
Avoid impact, extreme pressure or heavy vibration to the unit.
There are no serviceable parts inside the mixer – refer all servicing to qualified
personnel.
Keep out of direct sunlight and away from heat.
Keep away from damp and dusty environments.
Maintenance:
Use a soft cloth with a neutral detergent to clean the casing as required.
Use a soft brush to clear debris from the control surface.
Do not use strong solvents for cleaning the unit.
1.
Channel 1 input
2.
Impedance switch
3.
Channel 2/3 input
4.
Main output
5.
Monitor output
6.
Channel 2/3 level control
7.
Channel 1 level control
8.
Channel 1 peak level indicator
9.
Power indicator
10. Phantom power indicator
11. Monitor level control
12. Main output clip indicator
13. Master level control
14. Phantom power switch
15. USB input/output switch
172.800UK User Manual
1.
Input for channel 1, XLR + 6.3mm combo jack for balanced mono input.
2.
Channel 1 input impedance selector, press down for high impedance input signal to increase
signal to appropriate level. For line input leave switch up.
3.
Input for channel 2/3, 2 x AUX input can be used for stereo left/right input or 2 x mono input.
4.
Main output from mixer, 2 x AUX output, left and right channel.
5.
Monitor output, 6.3mm stereo jack output from mixer, suitable for headphone and desktop
monitoring.
6.
Channel 2/3 level control, a rotary control to control the level of channel 2/3 input. Ensure
switch is point at “MIN” when set up and gradually increase to desired level.
7.
Channel 1 level control, a rotary control to control the level of channel 1 input. Ensure switch is
pointed at “MIN” when set up and gradually increase to desired level.
8.
Signal peak indicator for channel 1, the red LED lights when the signal hits the maximum output
level. In this instance, reduce channel 1 level control and check if correct impedance is selected
to avoid damage to output unit and unwanted distortion.
9.
Power indicator, green LED lit when unit is powered up.
10. Phantom power indicator, red LED lit when phantom power is switched on for channel 1.
11. Monitor level control, a rotary control to adjust the level of monitor output. Ensure that this
switch is pointed at “MIN” when set up and gradually increase to desired level to avoid damage
to the monitor unit.
12. Main output clip indicator. This LED lights when the signal hits max output level at the onset of
clipping. In this instance, reduce the level on the master fader to avoid unwanted distortion and
damage to any connected equipment.
13. Master level control, a rotary control to control the level of main output. Ensure switch is
pointed at “MIN” when set up and gradually increase to desired level.
14. Phantom power switch, press down to switch +18Vdc on for XLR input.
15. USB input/output switch, USB operates as an output normally, press down to switch USB to an
input and assign signal to channel 2/3. USB operation requires compatible computer hardware
and operating system of Windows® 2000/XP, Vista, 7 or Mac OS X.
Connecting up:
To power up the unit, a USB A to USB B lead will be required. Plug USB B to the back of the unit and USB
A to laptop, PC, Mac or any other USB power supply. When connecting to laptop, PC or Mac, Q-MIX2
should be auto recognised as an external USB sound device, which allows audio to play into the mixer
through USB. If no response, please check USB diver is up to date and USB sound device is enabled on
your operating system.
To use Q-MIX2 as output to computer through USB, DAW software suite is required to allow audio signal
in from the USB.
To connect any active monitor or amplifier to the mixer, always ensure the monitors or amps are turned
FULLY down before making connection or disconnection. This is to avoid possible distortion and damage
to the output devices.
172.800UK User Manual
Specifications:
Power
USB2.0, 5Vdc, 500mA
Phantom power supply
18Vdc
Gain
0dB - 50dB
Frequency response
15Hz - 20kHz
Total harmonic distortion
0.01% @ 4dBu, 1kHz
Signal to noise ratio
100dB
Mic input impedance
1.5kΩ
Line input impedance
LowZ 22kΩ, HighZ 160kΩ
Main output impedance
470Ω
Monitor output impedance
100Ω
Dimensions
118 x 97.5 x 32mm
Weight
450g
Troubleshooting:
No Power LED
Ensure unit is connected to an active USB port.
Check signal source is playing and volume is turned up.
No audio from input
channels
Check condition of the input and output lead to ensure both leads and connectors
are in working condition.
Check channel level and master level control are turned up.
Check output device power on and volume is turned up.
Check phantom power is switched on for condenser mic input.
Ensure USB assign button is correctly selected.
No input/output
from USB
Check Line2/3 level control is turned up.
Check mixer is recognised by the computer.
Check volume control in computer/software is turned up.
Output is very
loud/distorted or
very low
Check input level is not set too high/low.
Check impedance switch is correctly selected.
Check channel level and master level control is not set too high/low.
Check output device gain control and volume control is not set too high/low.
Errors and omissions excepted.
Copyright© 2014. AVSL Group Ltd.
172.800UK User Manual