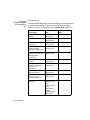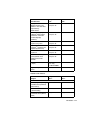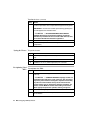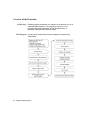
1
ViroSeq™ HIV-1 Genotyping
System
Version 2
User’s Manual
© Copyright 2000, 2011 Applied Biosystems
For Research Use Only. Not for use in diagnostic procedures.
ABI PRISM and its design, AmpErase, Applied Biosystems, BioMerge, and MicroAmp are registered trademarks, and
BigDye, BioLIMS, POP, POP-6, SQL GT, and ViroSeq are trademarks of Applied Biosystems or its subsidiaries in the U.S.
and certain other countries. AmpliTaq, AmpliTaq Gold, and GeneAmp are registered trademarks of Roche Molecular Systems,
Inc. Apple, Macintosh, and Power Macintosh are registered trademarks of Apple Computer, Inc. JAVA is a registered trademark of the Sun Microsystems, Inc. Long Ranger is a registered trademark of FMC Corporation. Microcon is a registered
trademark of Millipore Corporation or an affiliated company. All other trademarks are the sole property of their respective
owners.
Contents
1 Introduction
Chapter Overview . . . . . . . . . . . . . . . . . . . . . . . . . . . . . . . . . . . . . . . . . . . . . 1-1
Safety . . . . . . . . . . . . . . . . . . . . . . . . . . . . . . . . . . . . . . . . . . . . . . . . . . . . . . . 1-2
The ViroSeq HIV-1 Genotyping System . . . . . . . . . . . . . . . . . . . . . . . . . . . . 1-5
ViroSeq HIV-1 Genotyping System Components . . . . . . . . . . . . . . . . . . . . . 1-9
ViroSeq HIV-1 Genotyping System Software . . . . . . . . . . . . . . . . . . . . . . . 1-12
Materials and Equipment. . . . . . . . . . . . . . . . . . . . . . . . . . . . . . . . . . . . . . . 1-16
User-Supplied Materials and Reagents . . . . . . . . . . . . . . . . . . . . . . . . . . . . 1-20
Technical Support . . . . . . . . . . . . . . . . . . . . . . . . . . . . . . . . . . . . . . . . . . . . 1-25
2 Laboratory
Guidelines
Chapter Overview . . . . . . . . . . . . . . . . . . . . . . . . . . . . . . . . . . . . . . . . . . . . . 2-1
General Guidelines . . . . . . . . . . . . . . . . . . . . . . . . . . . . . . . . . . . . . . . . . . . . 2-2
Background to Laboratory Setup. . . . . . . . . . . . . . . . . . . . . . . . . . . . . . . . . . 2-4
Laboratory Design and Organization. . . . . . . . . . . . . . . . . . . . . . . . . . . . . . . 2-6
Infectious Material Work Area. . . . . . . . . . . . . . . . . . . . . . . . . . . . . . . . . . . . 2-9
RT-PCR Setup Work Area . . . . . . . . . . . . . . . . . . . . . . . . . . . . . . . . . . . . . . 2-10
Amplified DNA Work Area . . . . . . . . . . . . . . . . . . . . . . . . . . . . . . . . . . . . . 2-11
Safety Guidelines. . . . . . . . . . . . . . . . . . . . . . . . . . . . . . . . . . . . . . . . . . . . . 2-13
3 Thermal Cycler Settings
Chapter Overview . . . . . . . . . . . . . . . . . . . . . . . . . . . . . . . . . . . . . . . . . . . . . 3-1
General Information. . . . . . . . . . . . . . . . . . . . . . . . . . . . . . . . . . . . . . . . . . . . 3-2
Reverse Transcription Thermal Cycling . . . . . . . . . . . . . . . . . . . . . . . . . . . . 3-2
i
HIV Amplification Program . . . . . . . . . . . . . . . . . . . . . . . . . . . . . . . . . . . . . 3-3
HIV Sequencing Program . . . . . . . . . . . . . . . . . . . . . . . . . . . . . . . . . . . . . . . 3-3
4 HIV Genotyping Chemistry Protocol
Chapter Overview . . . . . . . . . . . . . . . . . . . . . . . . . . . . . . . . . . . . . . . . . . . . . 4-1
Planning Your Work . . . . . . . . . . . . . . . . . . . . . . . . . . . . . . . . . . . . . . . . . . . 4-2
Isolating Viral RNA from Blood Plasma . . . . . . . . . . . . . . . . . . . . . . . . . . . 4-4
Reverse Transcription Reactions. . . . . . . . . . . . . . . . . . . . . . . . . . . . . . . . . . 4-9
Amplifying Viral cDNA by PCR . . . . . . . . . . . . . . . . . . . . . . . . . . . . . . . . 4-13
Preparing PCR Products for the Sequencing Reactions . . . . . . . . . . . . . . . 4-16
Performing the Cycle Sequencing Reactions . . . . . . . . . . . . . . . . . . . . . . . 4-21
Purifying the Sequencing Reactions in Microcentrifuge Tubes . . . . . . . . . 4-23
Purifying the Sequencing Reactions in 96-Well Plates or Trays . . . . . . . . 4-27
Purifying Sequencing Reactions Using a 96-Well Centri-Sep Plate. . . . . . 4-29
5 Using the 310 Genetic Analyzer
Introduction. . . . . . . . . . . . . . . . . . . . . . . . . . . . . . . . . . . . . . . . . . . . . . . . . .
Overview of the Procedure . . . . . . . . . . . . . . . . . . . . . . . . . . . . . . . . . . . . . .
Preparing the Instrument. . . . . . . . . . . . . . . . . . . . . . . . . . . . . . . . . . . . . . . .
Preparing the Sample Sheet and Injection List . . . . . . . . . . . . . . . . . . . . . . .
Denaturing the Samples and Starting the Run . . . . . . . . . . . . . . . . . . . . . . .
Analyzing the Sequencing Data . . . . . . . . . . . . . . . . . . . . . . . . . . . . . . . . . .
5-1
5-2
5-3
5-6
5-8
5-9
6 Using the 377 DNA Sequencer
Chapter Overview . . . . . . . . . . . . . . . . . . . . . . . . . . . . . . . . . . . . . . . . . . . . . 6-1
Overview of the Procedure . . . . . . . . . . . . . . . . . . . . . . . . . . . . . . . . . . . . . . 6-2
Preparing the Instrument. . . . . . . . . . . . . . . . . . . . . . . . . . . . . . . . . . . . . . . . 6-3
Denaturing the Samples . . . . . . . . . . . . . . . . . . . . . . . . . . . . . . . . . . . . . . . . 6-8
Loading the Gel and Starting the Run for 36, 48, and 64 Lanes. . . . . . . . . . 6-9
Running Samples on a 96-Lane Gel . . . . . . . . . . . . . . . . . . . . . . . . . . . . . . 6-11
Analyzing the Sequencing Data . . . . . . . . . . . . . . . . . . . . . . . . . . . . . . . . . 6-13
ii
7 Analyzing HIV Sequencing Data
Introduction . . . . . . . . . . . . . . . . . . . . . . . . . . . . . . . . . . . . . . . . . . . . . . . . . . 7-1
Installing the Software . . . . . . . . . . . . . . . . . . . . . . . . . . . . . . . . . . . . . . . . . . 7-2
Using the ViroSeq HIV-1 Genotyping System Software . . . . . . . . . . . . . . . 7-6
Tutorial: Using the HIV-1 Genotyping System Software . . . . . . . . . . . . . . 7-10
HIV Genotyping Folder Organization . . . . . . . . . . . . . . . . . . . . . . . . . . . . . 7-14
About Projects and Sequence Segments . . . . . . . . . . . . . . . . . . . . . . . . . . . 7-15
Starting the Software . . . . . . . . . . . . . . . . . . . . . . . . . . . . . . . . . . . . . . . . . . 7-16
Creating a New Project . . . . . . . . . . . . . . . . . . . . . . . . . . . . . . . . . . . . . . . . 7-17
Opening a Previously Created Project . . . . . . . . . . . . . . . . . . . . . . . . . . . . . 7-18
Reviewing the Assembled Sequence . . . . . . . . . . . . . . . . . . . . . . . . . . . . . . 7-20
Editing the Sequence . . . . . . . . . . . . . . . . . . . . . . . . . . . . . . . . . . . . . . . . . . 7-27
Editing the Consensus Sequence Using the View Edit Window . . . . . . . . . 7-28
Reconciling Segment Mismatches. . . . . . . . . . . . . . . . . . . . . . . . . . . . . . . . 7-38
Saving Projects . . . . . . . . . . . . . . . . . . . . . . . . . . . . . . . . . . . . . . . . . . . . . . 7-40
Printing a Report . . . . . . . . . . . . . . . . . . . . . . . . . . . . . . . . . . . . . . . . . . . . . 7-41
Setting AutoLaunch . . . . . . . . . . . . . . . . . . . . . . . . . . . . . . . . . . . . . . . . . . . 7-43
8 Troubleshooting
Troubleshooting Table . . . . . . . . . . . . . . . . . . . . . . . . . . . . . . . . . . . . . . . . . . 8-1
A Quality Standards
B Preventing RNA Degradation
C Reference
D Amino Acid Codes
E IUB Codes
iii
Glossary
Index
iv
Introduction
1
Chapter Overview
1
Introduction This chapter describes the conventions used in this manual, provides
an overview of the ViroSeqTM HIV-1 Genotyping System, lists materials
needed to use the system, and tells you how to get help from Applied
Biosystems Technical Support.
In This Chapter The following topics are covered in this chapter:
Topic
See Page
Safety
1-2
The ViroSeq HIV-1 Genotyping System
1-5
ViroSeq HIV-1 Genotyping System Components
1-9
ViroSeq HIV-1 Genotyping System Software
1-12
Materials and Equipment
1-16
User-Supplied Materials and Reagents
1-20
Technical Support
1-25
Introduction 1-1
Safety
Documentation Five user attention words appear in the text of all Applied Biosystems
User Attention user documentation. Each word implies a particular level of observation
Words or action as described below.
Note
Calls attention to useful information.
IMPORTANT Indicates information that is necessary for proper instrument
operation.
CAUTION Cautions the user that a potentially hazardous situation
could occur, causing injury to the user or damage to the instrument, if this
information is ignored.
! WARNING ! Warns the user that serious physical injury or death to
the user or other persons could result if these precautions are not taken.
! DANGER ! Indicates an imminently hazardous situation that, if not
avoided, will result in death or serious injury.
Chemical Hazard ! WARNING ! CHEMICAL HAZARD. Some of the chemicals used with
Warning Applied Biosystems instruments and protocols are potentially hazardous
and can cause injury, illness or death.
1-2 Introduction
♦
Read and understand the material safety data sheets (MSDSs)
provided by the chemical manufacturer before you store,
handle, or work with any chemicals or hazardous materials.
♦
Minimize contact with and inhalation of chemicals. Wear
appropriate personal protective equipment when handling
chemicals (e.g., safety glasses, gloves, or clothing). For
additional safety guidelines consult the MSDS.
♦
Do not leave chemical containers open. Use only with
adequate ventilation.
♦
Check regularly for chemical leaks or spills. If a leak or spill
occurs, follow the manufacturer’s cleanup procedures as
recommended on the MSDS.
♦
Comply with all local, state/provincial, or national laws and
regulations related to chemical storage, handling, and
disposal.
Site Preparation A Site Preparation and Safety Guide is a separate document sent to all
and Safety Guide customers who have purchased a Applied Biosystems instrument.
Refer to the Guide written for your instrument for information on site
preparation, instrument safety, chemical safety and waste profiles.
About MSDSs Some of the chemicals used with this instrument may be listed as
hazardous by their manufacturer. When hazards exist warnings are
prominently displayed on the labels of all chemicals.
Chemical manufacturers supply a current MSDS before or with
shipments of hazardous chemicals to new customers and with the first
shipment of a hazardous chemical after an MSDS update. MSDSs
provide you with the safety information you need to store, handle,
transport and dispose of the chemicals safely.
We strongly recommend that you replace the MSDSs in your files each
time you receive one packaged with hazardous chemicals.
! WARNING ! CHEMICAL HAZARD. Be sure to familiarize yourself
with the MSDSs before using reagents or solvents.
Ordering MSDSs You can order free additional copies of MSDSs for chemicals
manufactured or distributed by Applied Biosystems using the contact
information below.
To order MSDSs...
Then...
Over the Internet
Go to our web site at:
www.appliedbiosystems.com/techsupport
a. Click on MSDSs
b. Enter keywords (or partial words), or a part
number, or the MSDSs Documents on
Demand index number.
c. Click on Search
d. Click on the Adobe Acrobat symbol to view,
print, or download the document, or check the
box of the desired document and delivery
method (fax or e-mail)
By automated
telephone service from
any country
Use “To Obtain Documents on Demand” on
page 1-30.
Introduction 1-3
To order MSDSs...
Then...
By telephone in the
United States
Dial 1-800-327-3002, then press 1
By telephone from
Canada
By telephone from any
other country
To order in...
Then dial 1-800-668-6913
and...
English
Press 1, then 2, then 1 again
French
Press 2, then 2, then 1
See “To Contact Technical Support by Telephone
or Fax” on page 1-26.
For chemicals not manufactured or distributed by Applied Biosystems,
call the chemical manufacturer.
1-4 Introduction
The ViroSeq HIV-1 Genotyping System
Intended Use The ViroSeq HIV-1 Genotyping System is used for identifying mutations
in the pol gene of the human immunodeficiency virus, type one (HIV-1).
The entire Protease gene and approximately two thirds of the Reverse
Transcriptase (RT) gene in the pol open reading frame are amplified
(approximately 1.8 kilobases (kb)). This amplicon is subsequently used
as a sequencing template to generate approximately 1.2 kb of
sequence data.
Facilitates Study of Genotypic analysis of this region of HIV-1 facilitates the study of the
Mutations and relationship between mutations and viral resistance to anti-retroviral
Viral Resistance drugs, specifically the protease and RT inhibitors.
The ViroSeq HIV-1 Genotyping System can be used to process
samples with viral loads between 2000 and 750,000 copies per milliliter
(cp/mL).
For Research Use The ViroSeq HIV-1 Genotyping System is for research use only, not for
Only use in diagnostic procedures.
Features of the The ViroSeq HIV-1 Genotyping System:
ViroSeq HIV-1 ♦ Includes the reagents needed to purify the viral RNA from human
Genotyping
blood plasma.
System
♦
Uses a reverse transcription-polymerase chain reaction (RT-PCR)
to generate amplified DNA from viral RNA.
♦
Incorporates the AmpErase® Uracil N-glycosylase (UNG)
contamination control system to safeguard against false genotyping
♦
Uses BigDye™ terminator sequencing chemistry.
♦
Uses a single tube for the RT and PCR for speed and convenience.
♦
Sequences both strands of amplified DNA to increase accuracy.
♦
Contains a synthetic, noninfectious, positive RNA control including
the entire protease gene and the 5´ 945 nucleotides (315 amino
acids) of the RT gene.
♦
Provides the required MicroAmp® Reaction Tubes and Microcon®
YM-100 microconcentrators.
♦
Includes ViroSeq HIV-1 Genotyping System Software.
Introduction 1-5
♦
Uses either the ABI PRISM® 377 DNA Sequencer or the ABI PRISM®
310 Genetic Analyzer from Applied Biosystems.
♦
Is optimized for use on the GeneAmp® PCR System 9600 and 9700
thermal cyclers from Applied Biosystems.
The Genotyping The process of HIV-1 genotyping with the HIV-1 Genotyping System
Process has five main stages:
Stage
Process
1
Isolating the HIV particles from plasma samples followed by the
purification of viral RNA
2
Performing a reverse transcription of the HIV genome using a
single primer
3
Performing PCR amplification of the protease and RT genes from
the cDNA made in the reverse transcription reaction
4
Direct sequencing of the PCR amplification product using six or
seven custom sequencing mixes
5
Identifying mutations in the protease or RT genes using the
ViroSeq™ HIV-1 Genotyping System Software
This process includes:
♦ Assembling the multiple sequences into a single contiguous
sequence
♦ Manual reviewing and editing of the assembled sequence in
comparison to a reference sequence, pNL4-3 strain of HIV-1,
recommended by the AIDS Clinical Trials Group (ACTG)
♦ Identifying mutations known to be related to drug resistance
mutation and novel mutations with no previously identified
effects
RNA Purification Viral RNA is purified from HIV particles that are isolated from plasma by
centrifugation.
1-6 Introduction
Reverse The target for reverse transcription is the HIV-1 RNA prepared from
Transcription plasma. The procedure is carried out using a single primer and the
enzyme murine leukemia virus (MuLV) reverse transcriptase. This
reaction produces a mixture of single-stranded cDNA fragments of
varying length which represent the entire HIV-1 pol gene.
PCR The cDNA products from the RT reaction are amplified. The resulting
amplicon encompasses the entire HIV protease gene, and the 5´ end of
the RT gene. The PCR procedure employs AmpliTaq Gold® for high
specificity and efficiency and AmpErase UNG anticontamination
chemistry to eliminate false genotyping.
For more information about the PCR procedure, see “ViroSeq HIV-1
Genotyping Process Summary Diagram” on page 1-8.
Sequencing The PCR products are sequenced using custom primers formulated
with the BigDye Terminator sequencing chemistry. The sequencing
products are analyzed on an ABI PRISM 310 Genetic Analyzer or 377
DNA Sequencer. DNA basecalling is performed by the DNA
Sequencing Analysis software.
For more information about sequencing chemistry, see the Automated
DNA Sequencing Chemistry Guide (P/N 4305080).
Data Analysis The ViroSeq HIV-1 Genotyping System Software automatically imports
the sequence data from the DNA Sequencing Analysis software, and
assembles the six or seven sequence segments into a single sequence,
which is then compared to the reference strain.
After editing, a ViroSeq HIV-1 Genotyping System Report of the data is
generated.
For more information about the ViroSeq HIV-1 Genotyping System
Software, see page 1-12.
Introduction 1-7
ViroSeq HIV-1 The following diagram summarizes the HIV genotyping process:
Genotyping
Process Summary
Diagram
1-8 Introduction
ViroSeq HIV-1 Genotyping System Components
Three Types of Three types of oligonucleotide primers are provided, preformulated,
Primers are with the HIV-1 Genotyping System:
Provided ♦ Single primer for reverse transcription
♦
Sequence-specific primers for PCR (“forward” and “reverse” in the
figure below)
♦
Sequence-specific primers for cycle sequencing (A, B, C, D, F, G,
and H in the figure below)
A
Forward primer
B
D
C
5´
3´
Protease
Reverse Transcriptase
Integrase
3´
5´
F
0
500
H
G
1000
Reverse primer
1500
2000
Bases
Sequence The seven HIV-1 sequence-specific primers hybridize to the PCR
Generated product, as shown in the figure above. A sequence in both directions for
all regions improves the accuracy of the data analysis.
Primers A and D Why Primers A and D Were Created
Two primers (A and D) have been provided for sequencing the 5´ end of
the PCR product. Due to known sequence polymorphism upstream of
the protease gene, it has been necessary to design these two different
sequencing primers.
Note If throughput is not an issue for your laboratory, you may choose to use
both primers for every sample.
Introduction 1-9
About Primers A and D
The following table describes the two primers:
Primer
A
Description
This is the preferred primer because it will provide the forward
sequence of the entire protease gene.
Use primer A first, because it works well with the majority of
sequences.
D
If...
Then...
primer A does not give good
results
repeat the procedure using
primer D.
This primer extends more efficiently than primer A for some
sequences.
The disadvantage of primer D is that the first 4 to 8 codons of
the protease gene are not sequenced in the forward direction.
Enzymes The following table describes the four different enzymes provided with
the HIV-1 Genotyping System:
Enzyme
Description
MuLV reverse transcriptase
Produces single-stranded cDNA
from viral RNA
AmpliTaq Gold DNA Polymerase
♦ Generates double-stranded DNA
fragments from the cDNA
♦ Amplifies the double-stranded
DNA
♦ Provides hot-start for improved
PCR performance
1-10 Introduction
AmpliTaq® DNA Polymerase, FS
Creates extension products during
the cycle sequencing reaction
AmpErase Uracil N-glycosylase
(UNG)
Cleaves uracil-containing PCR
products, reducing contamination
from previous PCR reactions
RNase Inhibitor Included with the HIV-1 Genotyping System is an RNase inhibitor that
protects RNA against degradation by RNases. For more information
about how to prevent RNA degradation, see page 2-2 and Appendix B,
“Preventing RNA Degradation.”
Controls About the Controls
Positive and negative controls are provided with the HIV-1 Genotyping
System.The controls are introduced into the genotyping procedure in
place of viral RNA at the RT step and are processed the same way as
the HIV-1 RNA samples from blood plasma.
Positive and Negative Controls Described
Control
Description
Positive RNA
Control
The positive control (RNA Control, PRT/5´RT) allows
the effectiveness of the procedure to be monitored.
A 2.8-kb fragment of RNA contains the entire
protease gene and the 5´ end of the reverse
transcriptase gene. In the RT-PCR reactions, a 1.8-kb
product is generated.
To prevent contamination of reagents, do not store the
positive RNA control in the RT-PCR module.
Note
The positive RNA control is not infectious.
IMPORTANT Keep the positive RNA control on ice
during use.
Negative Control
The RNA Diluent, supplied with the HIV-1 Genotyping
System, is used as a negative control as well as being
used to dilute RNA samples.
The negative control provides a check for the
contamination of any reagents used in the procedure.
Introduction 1-11
ViroSeq HIV-1 Genotyping System Software
Overview Three different types of software are used with the HIV-1 Genotyping
System:
♦
Data Collection software for an ABI PRISM® instrument
♦
ABI PRISM® DNA Sequencing Analysis software
♦
ViroSeq HIV-1 Genotyping System Software
Data Flow The flow of data between the different software applications is shown
Diagram below.
The data from the Data Collection software are analyzed by the DNA
Sequencing Analysis software and automatically imported into the
HIV-1 Genotyping System Software.
You can run the HIV-1 Genotyping System Software on the collection
computer or export the data to a separate computer.
Data Collection The Data Collection software should already be installed on your
Software computer, but you will need to configure it before running your samples
(see Chapter 5, “Using the 310 Genetic Analyzer,” and Chapter 6,
“Using the 377 DNA Sequencer.”).
Note The Data Collection software is different for the ABI PRISM 310 and
ABI PRISM 377 instruments.
1-12 Introduction
DNA Sequencing The DNA Sequencing Analysis software is the same for the
Analysis Software ABI PRISM 310 Genetic Analyzer and the ABI PRISM 377 DNA
Sequencer. It was supplied with your instrument and should already be
installed on your computer.
For more information about this software, see the ABI PRISM DNA
Sequencing Analysis Software User’s Manual (P/N 903564).
ViroSeq HIV-1 About the HIV-1 Genotyping System Software
Genotyping The ViroSeq HIV-1 Genotyping System Software is provided on a CD. It
System Software is used with the DNA Sequencing Analysis software and will analyze
data from either instrument.
What the HIV-1 Genotyping System Software Does
The HIV-1 Genotyping System Software:
♦
Assembles the six or seven sequences obtained from a single
plasma sample into a “project.”
♦
Compares the overlapping segments to each other and to the
sequence of the HIV-1 pNL4-3 reference strain.
♦
Allows you to examine the electropherograms of the sequence
segments and assembled sequence, and then edit the assembled
sequence to eliminate regions of poor quality data and correct for
basecalling errors. This produces a consensus sequence.
♦
Automatically analyses the consensus sequence to show the
“position of interest,” defined as the following options:
♦
–
Base mismatches between sequence segments
–
Multibase positions (those that indicate detectable levels of
more than one genotype in the HIV population of the plasma
sample)
–
Discrepancies between the consensus sequence and
reference sequence
–
Base mutations that result in amino acid changes
–
Base mutations that correlate with base mutations reported to
confer resistance to specific drugs
–
Bases that you have edited
Generates a genotype report.
Introduction 1-13
Saving Files with a FASTA File Format
If you want to compare two or more assembled or consensus
sequences, the HIV-1 Genotyping System Software will allow you to
save your files with a FASTA file format, which you can export to other
sequence comparison programs.
Sample Naming Sample Naming Requirement
IMPORTANT The ViroSeq HIV-1 Genotyping System Software uses the
sample name to group sequencing data for a given plasma sample. All
information to the left of the open, square bracket ([) must be identical for all
sequencing files from the plasma sample. The bracket, and any information to
the right of the bracket, is ignored by the software with regard to grouping, and
may be used for comments, such as the date and the primer name.
Sample Naming Example
For the ViroSeq HIV-1 Genotyping System Software to recognize the
HIV data files created by the Data Collection software, the samples
loaded onto the instrument may be named using the ACTG 320
file-naming conventions.
The conventions specify that the following information is provided in the
sample name, in the order given:
Name Part
Example
Sample identification number
630417L
Date of visit to the lab
021599
Lab code number
Not included in this example
Open square bracket
[
Primer letter
A
Date of sample analysis
021699
For the example given in the table, the full sample name would be:
630417L021599[A021699
1-14 Introduction
Projects Samples with the same name to the left of the square bracket are
automatically grouped together by the HIV-1 Genotyping System
Software into a single project. Samples in a project are assembled by
the software into a single sequence.
A prerequisite for grouping particular samples into a project is that they
are all saved in the same run folder by the Data Collection software.
One run folder is created for each sample sheet filled out in the Data
Collection software. Therefore, when you fill out the sample sheet, take
into consideration the sample data that you want to include in a given
project.
Multibase Analysis Plasma samples may contain multiple strains of HIV, so it is possible
that more than one genotype may be present in a single sample. In
such cases, some base positions will have more than one nucleotide
present (these positions are referred to as multibase positions).
During analysis, the HIV-1 Genotyping System Software identifies
multibase positions based on a 30% threshold level. This means that if
the peak height of a second nucleotide at any position is present at 30%
or greater of the peak height of the main nucleotide, that position will be
labeled as a multibase.
Conventional multibase nomenclature based on IUB codes are used to
label the multibases. For more information about IUB Codes, see
Appendix E, “IUB Codes.”
Computer To run the HIV-1 Genotyping System Software, you will need:
Requirements ♦ A Power Macintosh® computer, or later, using Macintosh® system
software (Mac OS) 8.0 through 9.0 (or equivalent), and running at
150 mHz or higher.
♦
At least 64 MB of RAM, with 32 MB available
♦
At least 500 MB of hard disk memory available
♦
A CD-ROM drive
♦
A color printer
Introduction 1-15
Materials and Equipment
Contents of the The HIV-1 Genotyping System includes four modules, which contain the
HIV-1 Genotyping main consumable materials needed to perform the sample preparation,
System RT-PCR, sequencing, and quality control for 48 reactions.
For more information about these modules, see “Modules and Storage
Conditions” on page 1-17.
The contents of this HIV-1 Genotyping System (P/N 4315425) are listed
below.
Materials
Part Number
HIV Sample Prep Module RUO
4306027
ViroSeq™ HIV-1 RT-PCR Module RUO, version 2
4314888
HIV Sequencing Module RUO
4305611
HIV RNA Control Module RUO, version 2
4315236
MSDS, Formamide Recrystallized
L0044
MSDS, HIV Sample Prep
4306194
MSDS, DTT 100mM
4315270
Microcon YM-100 microconcentrators
4312669
MicroAmp ® Tubes
M0035
HIV-1 Genotyping The HIV-1 Genotyping System Software is sold separately.
System Software
Item
Part Number
ViroSeq HIV-1 Genotyping System Software v2.x
4307816
Parts Sold The following components are sold as part of the complete kit but can
Separately also be purchased individually.
Note
The ViroSeq RT-PCR module is not sold separately.
Parts Sold Separately:
Item
1-16 Introduction
Part Number
ViroSeq HIV-1 Genotyping System User’s Manual
4315267
ViroSeq HIV-1 Genotyping System Quick Reference
Guide (available spring 2000)
4315422
Parts Sold Separately:
(continued)
Item
Part Number
HIV Sample Prep Module
4306027
HIV Sequencing Module, Prt/5´RT
4305611
HIV RNA Control, Prt/5´RT v2
4315236
Modules and The HIV-1 Genotyping System comprises four modules. The volumes
Storage Conditions listed are approximate and exceed volumes needed for 48 reactions.
Sample Prep Module
Volume per
Tube (mL)
Color of
Tube Cap
No. of
Tubes
Viral Lysis Buffer
15
Clear
2
RNA Diluent
2
Clear
3
Tube Name
Store this module at –15 to –25 °C in a manual-defrost freezer that is
designated amplicon free.
ViroSeq RT-PCR Module, Prt/5´RT v2
Tube Name
Volume
(µL)
Color of
Tube Cap
No. of
Tubes
AmpliTaq Gold
27.5
Gold
1
RNase Inhibitor
55
White
1
MuLV Reverse
Transcriptase
55
Purple
1
HIV PCR Mix v2
1650
Blue
1
HIV RT Mix v2
450
Blue
1
RNA Diluent
2000
Clear
1
AmpErase UNG
55
Green
1
DTT, 100 mM
25
Yellow
1
Low Mass Ladder mix
55
Clear
1
Agarose Gel Loading
Buffer
275
Clear
1
Store this module at –15 to –25 °C in a manual-defrost freezer that is
designated amplicon free “clean.”
Introduction 1-17
Sequencing Module, Prt/5´RT
Tube Name
Volume
(µL)
Color of
Tube Cap
No. of
Tubes
Formamide
2000
Clear
1
Loading buffer
1000
Clear
1
HIV SEQ MIX A
600
White
1
HIV SEQ MIX B
600
White
1
HIV SEQ MIX C
600
White
1
HIV SEQ MIX D
600
White
1
HIV SEQ MIX F
600
Red
1
HIV SEQ MIX G
600
Red
1
HIV SEQ MIX H
600
Red
1
Store this module at –15 to –25 °C in a manual-defrost freezer that is
designated amplicon “dirty.”
RNA Control, Prt/5´RT
Tube Name
RNA Control Prt/5´RT
v2
Volume (µL)
Color of
Tube Cap
No. of
Tubes
50
Clear
1
Store this module at –15 to –25 °C in a manual-defrost freezer that is
designated amplicon free “clean.”
1-18 Introduction
Run Module The run modules used with the Data Collection software are provided
on the CD. The names of the run modules are listed below for the
different instruments.
Instrument
Run Module
ABI PRISM 310 Genetic Analyzer
HIV-310 Run ModuleH
ABI PRISM 377 DNA Sequencer
HIV Run Module 377-36
IMPORTANT See page 5-4 (ABI PRISM ® 310 Genetic Analyzer) or page 6-4
(ABI PRISM ® 377 DNA Sequencer) for the directions for installing run modules.
Kit Validation This RT-PCR procedure has been validated using only the materials
specified in this manual. The use of alternative materials and equipment
is likely to produce unreliable results. For example:
♦
MicroAmp tubes are manufactured to have a highly uniform wall
thickness, which gives consistent heating and cooling properties.
Other tubes may not be manufactured to the same specifications
and can lead to poor results.
♦
The use of thermal cyclers other than those listed can result in
considerable variability because of differences in:
–
Temperature ramping times
–
The point at which the timing of each step begins
–
Temperature calibration
Note
It is recommended that you regularly calibrate your thermal cyclers.
Note The HIV-1 Genotyping System entitles you to full customer support for
the product when you follow this procedure exactly as written. Only the
procedure described in this manual has been validated to work correctly.
Introduction 1-19
User-Supplied Materials and Reagents
Preparation of A list of materials that you must supply for the preparation of viral RNA
Viral RNA is given below. These materials should be dedicated to biohazard
preparations and not be part of general laboratory equipment.
Description
Supplier
Microcentrifuge tubes, 1.5-mL,
sterile and RNase-free
Sarstedt (P/N 72.692.005) or
equivalent
Microcentrifuge, refrigerated.
♦ Baxter /Heraeus
Choose one of the following:
♦ Beckman
♦ 17R, 22R, or 28R Biofuge
♦ GS-15R
Note The requirements for this
centrifuge are that it must be:
♦ Refrigerated
♦ Able to centrifuge samples to
21,000–25,000 x g
Ethanol,a 95% nondenatured, ACSb
Reagent Grade
Major laboratory suppliers (MLS)
Isopropanol (2-propanol), 100%
anhydrous
MLS
Pipettes, filter-plugged tips
MLS
Clorox bleach or other
EPAc-approved disinfectant
This must be purchased through a
laboratory supply company and not
bought from a general store.
Note Clorox bleach, purchased
through laboratory suppliers, has
been specifically validated for use as
a disinfectant for work with HIV.
Sterile, deionized, RNase-free water
MLS
a. Store at –20 °C and keep bottles tightly closed to minimize dilution with water vapor in
the air.
b. American Chemical Society
c. Environmental Protection Agency
1-20 Introduction
Preparation of A list of materials specific for the preparation of PCR products for
PCR Products for sequencing is given below.
Sequencing
Description
Supplier
Sterile, deionized water
MLS
Agarose
Nucleic acid electrophoresis grade
Ethidium bromide
MLS
Sequencing A list of materials specific for the sequencing reactions and purification
Reactions of sequencing ladders is given below. For a list of tube options, see the
thermal cycling materials list on page 1-22.
Description
Supplier and Part Number
Sodium acetate, 3 M, pH 4.6
Applied Biosystems (P/N 400320)
Ethanola
95% and 70%,
nondenatured, ACS Reagent Grade
MLS
Centri-Sep 96 plates
Princeton Separations (P/N CS-961)
Sterile, deionized water
MLS
Scotch tape 425-3 (for plate
precipitation.)
3M Company
a. Store at –20 °C and keep bottles tightly closed to minimize dilution with water vapor in
the air.
General A list of general laboratory equipment needed to perform the assay is
Laboratory given below.
Equipment
Description
Supplier and Part Number
Centrifuge, benchtop,
nonrefrigerated
Eppendorf 5415 or equivalent
Centrifuge, refrigerated, with plate
holder if needed
Eppendorf 5403, Jouan
CR422/GR-422 or equivalent
RNase free microcentrifuge tubes,
1.5-mL
Sarstedt or MLS
Vortex mixer
MLS
Pipettes, filter-plugged tips
MLS
Conical tubes, 15-mL and 50-mL
MLS
Introduction 1-21
Thermal Cycling A list of materials that you must supply for thermal cycling is shown
below. You will not need to use all of the materials listed because you
can choose whether to contain your samples in:
♦
Individual MicroAmp® Reaction Tubes in a MicroAmp® Base
♦
MicroAmp® 8-Strip Reaction Tubes in MicroAmp® Trays
♦
MicroAmp® Optical 96-Well Reaction Plates for the GeneAmp®
PCR System
Thermal Cycling Materials
Description
Supplier
Thermal cycler
Applied Biosystems
GeneAmp® PCR
System 9600 or 9700
1-22 Introduction
Part Number
N801-001 (9600)
N805-001 (9700)
MicroAmp Reaction
Tubes with Caps,
0.2-mL
Applied Biosystems
N801-0540
MicroAmp 8-Strip
Reaction Tubes
Applied Biosystems
N801-0580
MicroAmp ® Caps,
8-Strip
Applied Biosystems
N801-0535
MicroAmp ® Cap
Installing Tool
Applied Biosystems
N801-0438
MicroAmp Base
Applied Biosystems
N801-0531
MicroAmp ® 9600
Tray/Retainer Set
Applied Biosystems
N801-5530
MicroAmp Optical
96-Well Reaction Plate
Applied Biosystems
N801-0560
MicroAmp ® Full Plate
Cover
Applied Biosystems
N801-0550
403081
Sequencing A list of equipment and consumables that you must supply for
sequencing is given below.
Sequencing Equipment and Consumables
Description
Supplier
Part Number
General Materials
dRhodamine Matrix
Standards Kit
Applied Biosystems
403047
Materials Needed If Using the ABI PRISM 310 DNA Sequencer
310 Capillaries,
61 cm x 50 µm
Applied Biosystems
402840
POP-6™ Performance
Optimized Polymer
with TSR
Applied Biosystems
402844
Genetic Analyzer
Septa for 0.5-mL
Sample Tubes
Applied Biosystems
401956
Genetic Analyzer
Sample Tubes (0.5-mL)
Applied Biosystems
401957
10X Genetic Analyzer
Buffer with EDTA
Applied Biosystems
402824
Genetic Analyzer
Retainer Clips
Applied Biosystems
402866
310 Glass Syringe,
1.0-mL
Applied Biosystems
604418
Materials Needed If Using the ABI PRISM 377 DNA Sequencer
Front Glass Plate,
36-cm
Applied Biosystems
401840
Rear Glass Plate,
36-cm
Applied Biosystems
401839
Step Glass Plate,
36-cm (For 96-well
gels only)
Applied Biosystems
4305384
Gel Spacers 36-cm,
0.2 mm thick
Applied Biosystems
401836
Introduction 1-23
Sequencing Equipment and Consumables
Description
Supplier
Shark-tooth Combs,
0.2 mm thick, one of
the following:
Applied Biosystems
96-well
1-24 Introduction
(continued)
Part Number
36-well
401828
48-well
402177
64-well
402180
0.4 mm mylar sharks
tooth
4305385
0.4 mm single use
sharks tooth comb
4309457
TBE, 10X buffer
(890 mM Tris, 890 mM
boric acid, 20 mM
EDTA)
MLS
Long Ranger™ Singel
pack for ABI
sequencers 377-36 cm
The FMC Corporation
50696
8-well syringe loader
Kloehn Ltd.
18597
Needles
Kloehn Ltd.
18663
Technical Support
Contacting You can contact Applied Biosystems for technical support by telephone
Technical Support or fax, by e-mail, or through the Internet. You can order Applied
Biosystems user documents, MSDSs, certificates of analysis, and other
related documents 24 hours a day. In addition, you can download
documents in PDF format from the Applied Biosystems Web site
(please see the section “To Obtain Documents on Demand” following
the telephone information below).
To Contact Contact technical support by e-mail for help in the following product
Technical Support areas:
by E-Mail
Product Area
E-mail address
Genetic Analysis (DNA
Sequencing)
[email protected]
Sequence Detection Systems and
PCR
[email protected]
Protein Sequencing,
Peptide and DNA Synthesis
[email protected]
Biochromatography, PerSeptive
DNA, PNA and Peptide Synthesis
systems, CytoFluor®, FMAT™,
Voyager™, and Mariner™ Mass
Spectrometers
[email protected]
Applied Biosystems/MDS Sciex
[email protected]
Chemiluminescence (Tropix)
[email protected]
Hours for In the United States and Canada, technical support is available at the
Telephone following times:
Technical Support
Product
Hours
Chemiluminescence
8:30 a.m. to 5:30 p.m. Eastern Time
Framingham support
8:00 a.m. to 6:00 p.m. Eastern Time
All Other Products
5:30 a.m. to 5:00 p.m. Pacific Time
Introduction 1-25
To Contact
Technical Support
by Telephone or
Fax
In North America
To contact Applied Biosystems Technical Support, use the telephone or
fax numbers given below. (To open a service call for other support
needs, or in case of an emergency, dial 1-800-831-6844 and press 1.)
Product or
Product Area
Telephone
Dial...
Fax
Dial...
ABI PRISM® 3700 DNA
Analyzer
1-800-831-6844,
then press 8
1-650-638-5981
DNA Synthesis
1-800-831-6844,
then press 21
1-650-638-5981
Fluorescent DNA
Sequencing
1-800-831-6844,
then press 22
1-650-638-5981
Fluorescent Fragment
Analysis (includes
GeneScan® applications)
1-800-831-6844,
then press 23
1-650-638-5981
Integrated Thermal
Cyclers (ABI PRISM ® 877
and Catalyst 800
instruments)
1-800-831-6844,
then press 24
1-650-638-5981
ABI PRISM ® 3100 Genetic
Analyzer
1-800-831-6844,
then press 26
1-650-638-5981
BioInformatics (includes
BioLIMS™, BioMerge™,
and SQL GT™
applications)
1-800-831-6844,
then press 25
1-505-982-7690
Peptide Synthesis (433
and 43X Systems)
1-800-831-6844,
then press 31
1-650-638-5981
Protein Sequencing
(Procise‚ Protein
Sequencing Systems)
1-800-831-6844,
then press 32
1-650-638-5981
PCR and Sequence
Detection
1-800-762-4001,
then press 1 for
1-240-453-4613
PCR,
2 for the 7700 or
5700,
6 for the 6700
or dial
1-800-831-6844,
then press 5
1-26 Introduction
Product or
Product Area
Telephone
Dial...
Fax
Dial...
Voyager‰ MALDI-TOF
Biospectrometry and
Mariner‰ ESI-TOF Mass
Spectrometry
Workstations
1-800-899-5858,
then press 13
1-508-383-7855
Biochromatography
(BioCAD‚ Workstations
and Poros‚ Perfusion
Chromatography
Products)
1-800-899-5858,
then press 14
1-508-383-7855
Expedite‰ Nucleic acid
Synthesis Systems
1-800-899-5858,
then press 15
1-508-383-7855
Peptide Synthesis
(Pioneer‰ and 9050 Plus
Peptide Synthesizers)
1-800-899-5858,
then press 15
1-508-383-7855
PNA Custom and
Synthesis
1-800-899-5858,
then press 15
1-508-383-7855
FMAT‰ 8100 HTS System
and Cytofluor‚ 4000
Fluorescence Plate
Reader
1-800-899-5858,
then press 16
1-508-383-7855
Chemiluminescence
(Tropix)
1-800-542-2369
1-781-275-8581
Applied Biosystems/MDS
Sciex
1-800-952-4716
(U.S. only),
or 1-781-271-0045
1-650-638-6223
Outside North America
Telephone
Dial...
Region
Fax
Dial...
Africa and the Middle East
Africa (English Speaking)
and West Asia (Fairlands,
South Africa)
27 11 478 0411
27 11 478 0349
South Africa
(Johannesburg)
27 11 478 0411
27 11 478 0349
Middle Eastern Countries
and North Africa (Monza,
Italia)
39 (0)39 8389 481
39 (0)39 8389 493
Introduction 1-27
Telephone
Dial...
Region
Fax
Dial...
Eastern Asia, China, Oceania
Australia (Scoresby,
Victoria)
61 3 9730 8600
61 3 9730 8799
China (Beijing)
86 10 64106608
86 10 64106617
Hong Kong
852 2756 6928
852 2756 6968
Korea (Seoul)
82 2 593 6470/6471
82 2 593 6472
Malaysia (Petaling Jaya)
60 3 758 8268
60 3 754 9043
Singapore
65 896 2168
65 896 2147
Taiwan (Taipei Hsien)
886 2 2358 2838
886 2 2358 2839
Thailand (Bangkok)
66 2 719 6405
66 2 319 9788
Austria (Wien)
43 (0)1 867 35 75 0
43 (0)1 867 35 75 11
Belgium
32 (0)2 712 5555
32 (0)2 712 5516
Czech Republic and
Slovakia (Praha)
420 2 61 222 164
420 2 61 222 168
Denmark (Naerum)
45 45 58 60 00
45 45 58 60 01
Finland (Espoo)
358 (0)9 251 24 250
358 (0)9 251 24 243
France (Paris)
33 (0)1 69 59 85 85
33 (0)1 69 59 85 00
Germany (Weiterstadt)
49 (0) 6150 101 0
49 (0) 6150 101 101
Hungary (Budapest)
36 (0)1 270 8398
36 (0)1 270 8288
Italy (Milano)
39 (0)39 83891
39 (0)39 838 9492
Norway (Oslo)
47 23 12 06 05
47 23 12 05 75
Poland, Lithuania, Latvia,
and Estonia (Warszawa)
48 (22) 866 40 10
48 (22) 866 40 20
Portugal (Lisboa)
351 (0)22 605 33 14
351 (0)22 605 33 15
Russia (Moskva)
7 095 935 8888
7 095 564 8787
South East Europe
(Zagreb, Croatia)
385 1 34 91 927
385 1 34 91 840
Spain (Tres Cantos)
34 (0)91 806 1210
34 (0)91 806 1206
Sweden (Stockholm)
46 (0)8 619 4400
46 (0)8 619 4401
Switzerland (Rotkreuz)
41 (0)41 799 7777
41 (0)41 790 0676
The Netherlands
(Nieuwerkerk a/d IJssel)
31 (0)180 331400
31 (0)180 331409
Europe
1-28 Introduction
Telephone
Dial...
Fax
Dial...
United Kingdom
(Warrington, Cheshire)
44 (0)1925 825650
44 (0)1925 282502
All other countries not
listed (Warrington, UK)
44 (0)1925 282481
44 (0)1925 282509
Region
Japan
Japan (Hacchobori,
Chuo-Ku, Tokyo)
81 3 5566 6006
81 3 5566 6505
Latin America
Del.A. Obregon, Mexico
To Reach
Technical Support
Through the
Internet
305-670-4350
305-670-4349
We strongly encourage you to visit our Web site for answers to
frequently asked questions and for more information about our
products. You can also order technical documents or an index of
available documents and have them faxed or e-mailed to you through
our site. The Applied Biosystems Web site address is
http://www.appliedbiosystems.com/techsupp
To submit technical questions from North America or Europe:
Step
Action
1
Access the Applied Biosystems Technical Support Web site.
2
Under the Troubleshooting heading, click Support Request
Forms, then select the relevant support region for the product
area of interest.
3
Enter the requested information and your question in the
displayed form, then click Ask Us RIGHT NOW (blue button with
yellow text).
4
Enter the required information in the next form (if you have not
already done so), then click Ask Us RIGHT NOW.
You will receive an e-mail reply to your question from one of our
technical experts within 24 to 48 hours.
Introduction 1-29
To Obtain Free, 24-hour access to Applied Biosystems technical documents,
Documents on including MSDSs, is available by fax or e-mail or by download from our
Demand Web site.
To order
documents...
Then...
by index
number
a. Access the Applied Biosystems Technical Support
Web site at
http://www.appliedbiosystems.com/techsupp
b. Click the Index link for the document type you want,
then find the document you want and record the
index number.
c. Use the index number when requesting documents
following the procedures below.
by phone for
fax delivery
a. From the U.S. or Canada, call 1-800-487-6809, or
from outside the U.S. and Canada, call
1-858-712-0317.
b. Follow the voice instructions to order the
documents you want.
Note
through the
Internet for fax
or e-mail
delivery
There is a limit of five documents per request.
a. Access the Applied Biosystems Technical Support
Web site at
http://www.appliedbiosystems.com/techsupp
b. Under Resource Libraries, click the type of
document you want.
c. Enter or select the requested information in the
displayed form, then click Search.
d. In the displayed search results, select a check box
for the method of delivery for each document that
matches your criteria, then click Deliver Selected
Documents Now (or click the PDF icon for the
document to download it immediately).
e. Fill in the information form (if you have not
previously done so), then click Deliver Selected
Documents Now to submit your order.
Note There is a limit of five documents per request
for fax delivery but no limit on the number of
documents you can order for e-mail delivery.
1-30 Introduction
Laboratory
Guidelines
2
Chapter Overview
2
Introduction This chapter gives guidelines for the safe and effective use of the
ViroSeqTM HIV-1 Genotyping System.
In This Chapter The following topics are covered in this chapter:
Topic
See Page
General Guidelines
2-2
Background to Laboratory Setup
2-4
Laboratory Design and Organization
2-6
Infectious Material Work Area
2-9
RT-PCR Setup Work Area
2-10
Amplified DNA Work Area
2-11
Safety Guidelines
2-13
Laboratory Guidelines 2-1
General Guidelines
Collecting and Samples must be collected and stored according to the methods
Storing Samples discussed in the DAIDS Virology Manual for HIV Laboratories or other
relevant regulations and guidelines (see Appendix C, “Reference.”)
Before You Begin Before you begin this protocol you must:
♦
Make sure that your lab has been prepared for work with HIV and is
in compliance with all applicable regulations.
♦
Make sure that all lab personnel know how to work safely with HIV
and blood products.
♦
See the “BIOHAZARD Warning” on page 2-13.
♦
Know how to protect RNA samples from degradation by RNase
enzymes. See Appendix B, “Preventing RNA Degradation.”
♦
Understand the principles of reverse transcription, PCR, and
dye-terminator cycle sequencing.
Sample Handling Add reagents to individual tubes or wells in exactly the order given in
Protocol this manual. Keep only the working sample tube open. All other sample
tubes should be capped to restrict sample cross-contamination.
Pay special attention to the stated working temperature. Many reactions
are prepared on ice.
IMPORTANT Viral pellets and precipitated RNA are nearly invisible and can
be dislodged when the supernatant is removed. Laboratory personnel should
read and follow the protocol very carefully at these points in the assay.
Preventing RNA RNA is easily degraded by RNases that are present on hands, lab
Degradation surfaces, and glassware, etc. Take all precautions to prevent RNase
contamination of reagents and mixes.
Specifically:
♦
Store all reagents according to the directions starting on page 1-17.
♦
Keep all reagents on ice when setting up assays.
♦
Do not freeze-thaw the RNA control more than four times.
♦
Always wear gloves when working with RNA.
2-2 Laboratory Guidelines
For more information about handling RNA, see Appendix B, “Preventing
RNA Degradation.”
General PCR PCR is a sensitive technique that can amplify single DNA molecules
Practices (Mullis et al., 1987; Saiki et al., 1985; Saiki et al., 1988).
To prevent DNA contamination, which can give failed or false positive
results, follow these general guidelines (Kwok and Higuchi, 1989).
♦
Designate separate areas, equipment, and supplies for:
–
Reagent storage and preparation
–
RNA preparation
–
RT and PCR setup
–
PCR amplification and sequencing
♦
Wear a new or designated lab coat for each area.
♦
Change gloves often and before beginning each step.
♦
Follow a disciplined work flow (i.e., sample prep to RT-PCR to
sequencing)
♦
Once you have worked with open amplicon (post-PCR), do not
return to pre-PCR areas until the following day.
♦
Keep caps on reagents and sample tubes when they are not being
used. Minimize arm movements over open tubes during pipetting.
♦
Regularly clean lab benches and equipment with a solution of 10%
bleach.
Laboratory Guidelines 2-3
Background to Laboratory Setup
Sensitivity of PCR The ViroSeq HIV-1 Genotyping System (and other PCR-based tests)
are so sensitive that minute amounts of DNA can be amplified.
Precautions must therefore be taken to prevent contamination of
samples that have not yet been amplified (Kwok and Higuchi, 1989).
While contamination of amplified DNA with unamplified DNA (genomic
DNA) does not pose a problem, ordinary precautions, such as changing
pipette tips between samples, should be taken when handling and
analyzing PCR product. This action should effectively prevent
cross-contamination between samples of amplified DNA.
Sources of There are three potential sources of laboratory contamination:
Contamination
Contamination by Human Genomic DNA from Equipment or the Work
Environment
Because of the specificity of the HIV Genotpying System amplification,
contamination of samples with non-HIV DNA will not affect results.
However, care should be taken while handling and processing samples
to prevent chance contamination by human DNA. Gloves should be
worn at all times and changed frequently. Sample tubes should be
closed when not in use. Dispersal of aerosols should be limited through
careful handling of sample tubes and reagents.
Cross-Contamination During Sample Preparation
Extra care should be taken during DNA extraction and RT-PCR setup to
prevent transfer of DNA from one sample to another. Use a new,
filter-plugged pipette tip for each sample, open tubes carefully, and
keep sample tubes closed when you are not using them.
PCR Product Carryover
PCR product carryover occurs when amplified DNA contaminates a
sample which has not yet been amplified. It is important to isolate and
contain amplified PCR product to prevent it from coming into contact
with unamplified samples.
Carryover is a concern because PCR product serves as an ideal
template for subsequent amplifications of that same target. A single
PCR amplification produces an enormous number of copies (as many
2-4 Laboratory Guidelines
as 1013) that can potentially contaminate samples that have not yet
been amplified.
Minute amounts of DNA can be transferred between samples by
splashing or the movement of aerosols. As the number of copies of
amplified DNA in a completed PCR reaction is so high, inadvertent
transfer to one that has not yet been amplified may result in the
amplification and detection of the contaminating sequence.
For example, if reuse of a pipette tip transfers 0.1 µL of a completed
PCR amplification, then as many as 1010 copies of amplifiable
sequence will be added to the unamplified sample. By comparison, a
nanogram of human genomic DNA contains only about 102 copies of a
single-copy locus such as FGA.
UNG AmpErase® UNG (uracil N-glycosylase) is included in the Version 2 kit.
It is used during the 50 °C incubation just before AmpliTaq® Gold
activation. It destroys the PCR product that is carried over from previous
HIV-1 Genotyping System version 2 amplification reactions.
Laboratory Guidelines 2-5
Laboratory Design and Organization
Isolating Work Special consideration should be given to the design and organization of
Areas the laboratory. The laboratory must be organized so that the area where
amplified DNA is handled is physically isolated from the work areas for
DNA extraction and RT-PCR setup.
Different parts of the HIV Genotyping procedure should be performed in
different work areas, each ideally with dedicated equipment and
supplies to minimize the likelihood of contamination. The three
suggested work areas are:
♦
Infectious Material Work Area. This work space is for performing the
extraction steps.
♦
RT-PCR Setup Work Area. RT and PCR reagents, and DNA sample
additions are made here.
♦
Amplified DNA Work Area. This area is dedicated to PCR
amplification and detection, and other activities that require
handling of amplified DNA.
If possible, the Infectious Material Work Area and RT-PCR Setup Work
Areas should be separate from each other to prevent potential transfer
of exogenous RNA and DNA into the RT-PCR Setup Work Area. If the
DNA extraction and RT-PCR Setup Work Areas are in the same room,
they should be clearly delineated. Benchtop biological safety cabinets
may serve to isolate areas within a room.
The pipettors and other equipment used for RNA extraction are
routinely exposed to relatively high concentrations of human genomic
DNA and should not be used for RT-PCR setup. Dedicated pipettors
and plugged pipette tips should be used for setting up and adding DNA
to the PCR reaction tubes.
If possible, use a dedicated area such as a biological safety cabinet with
an ultraviolet (UV) source for RT-PCR setup. The UV germicidal lamps
in most biological safety cabinets quickly damage any DNA left on
exposed surfaces, making it unsuitable for subsequent amplification. All
equipment and supplies used for RT-PCR setup should be kept in this
cabinet or a dedicated “clean” area at all times. Do not use these items
to handle amplified DNA.
Strict physical isolation must be maintained between the area
designated for handling amplified DNA and the other areas to avoid
transfer of amplified DNA out of the designated work area.
2-6 Laboratory Guidelines
The Amplified DNA Work Area should be in a separate room and must
have a dedicated sink. It may make it easier to contain PCR product
within this laboratory area if you:
♦
Use color coded tape to identify the supplies and reagents used for
handling PCR product
♦
Post signs to indicate the use of PCR product in the Amplified DNA
Work Area
Because of the equipment used in the Amplified DNA Work Area, a
relatively large space is required. This space requirement exceeds the
space requirement for RNA extraction and RT-PCR setup. A common
mistake is to allocate more space for DNA extraction and RT-PCR setup
than for PCR amplification and PCR product detection.
Amplified DNA or equipment and supplies used to handle amplified
DNA should not be taken out of the designated work area. If the work
area for amplified DNA is in a separate but contiguous room, the user
should make sure that air flows toward the amplified DNA area. In
addition, it is helpful if there is a separate exit from the Amplified DNA
Work Area that does not exit into the pre-PCR work areas.
Laboratory Guidelines 2-7
Work Area
Diagram
INFECTIOUS MATERIAL WORK AREA
Specimen handling
RNA extraction
Storage of extracted RNA samples
RT-PCR SETUP WORK AREA
RT-PCR reagent and
DNA sample additions
X
AMPLIFIED DNA WORK AREA
GeneAmp® PCR System 9600
and 9700
2-8 Laboratory Guidelines
DNA quantitation
(agarose gel)
• ABI PRISM® 377 and
ABI PRISM® 310 instruments
• Gel pouring
Storage of amplified DNA
samples
Microcon® cleanup of sequence
reaction setups
Infectious Material Work Area
Overview This work area should be used for:
♦
Specimen handling
♦
Extraction of RNA
♦
Storage of RNA samples
The work surface, equipment, and supplies used in this area must be
clean and free of PCR product.
The reagents used for RNA extraction should be prepared in this work
area. Portions of the samples to be tested are transferred from this area
to the RT-PCR setup Work Area for processing.
Special ♦
Precautions
Limit the number of samples processed at the same time to a
manageable number. This precaution will reduce the risk of sample
mix-up and the potential for sample-to-sample contamination.
♦
Use disposable gloves at all times. Change gloves frequently to
avoid sample-to-sample contamination. Change gloves whenever
they might have been contaminated with DNA and whenever you
are leaving the work area.
♦
Use sterile, disposable, hydrophobic filter-plugged pipette tips and
microcentrifuge tubes.
IMPORTANT Do not use gamma irradiation to sterilize microcentrifuge tubes,
as this may inhibit PCR subsequently carried out in these tubes.
♦
Always change pipette tips before handling a different sample.
♦
Store reagents as small aliquots to minimize the number of times a
given tube of reagent is opened. Record the lot numbers of
reagents used in each set of samples so that if contamination
occurs it can be more readily traced.
♦
Avoid splashes. Some types of sample tubes have tightly fitting
caps which may cause splashing when they are forced open.
Centrifuge all liquid to the bottom of the closed tube before opening
it. Use a tube-decapper device to open tubes more easily. Clean the
tube-decapper device often.
♦
Include reagent blank controls with each set of DNA extractions to
check for the presence of contaminating DNA in the reagents.
Laboratory Guidelines 2-9
♦
Before setting up the Infectious Material Work Area, clean all work
surfaces thoroughly with a 10% (v/v) bleach solution. Use
disposable bench paper (for example, Benchkote sheets) on
permanent work surfaces to prevent the accumulation of human
DNA.
♦
Wear a labcoat dedicated to pre-amplification sample handling
when working in the Infectious Material Work Area.
RT-PCR Setup Work Area
Overview This work area is used for combining PCR reagents and extracted RNA
to the appropriate reaction tubes.
Special ♦
Precautions
Use dedicated pipettors for adding RNA sample to the PCR
reaction mixture.
♦
Use a new sterile, disposable, hydrophobic filter-plugged pipette tip
for each RNA sample addition to a PCR reaction tube. Discard
used pipette tips.
♦
To minimize cross-contamination, always add the RNA to the PCR
tubes last.
♦
Make additions to the negative control (no RNA added) tube last.
This control will provide a check for contamination occurring during
RT-PCR setup.
♦
Avoid handling the inside surface of the tube caps.
♦
Change gloves frequently whenever they may have been
contaminated with DNA or RNA, or were used to handle anything
outside of the RT-PCR setup Work Area.
♦
Store the RT-PCR reagents in a refrigerator that is located in the
Infectious Material Work Area. Do not store the reagents close to
samples containing high levels of DNA and RNA.
2-10 Laboratory Guidelines
Amplified DNA Work Area
Overview This work area should be a physically separate area used only for those
activities that involve the handling of amplified DNA. These activities
include the:
♦
Pouring of gels
♦
Electrophoresis of amplified DNA
♦
Waste disposal of amplified DNA solutions
♦
Storage of amplified DNA
Dedicated Amplified DNA or equipment and supplies used to handle amplified
Equipment and DNA should not be taken out of the Amplified DNA Work Area. Samples
Supplies that have not yet been amplified should never come into contact with
this equipment.
Special Even in the Amplified DNA Work Area, amplified DNA should be
Precautions handled carefully to avoid dispersal around the room. Reducing the
dispersal of amplified DNA within this work area will reduce the
potential for transfer of amplified DNA to other work areas.
♦
Always remove your gloves and lab coat when leaving the Amplified
DNA Work Area to avoid the transfer of amplified DNA into other
work areas.
♦
Reduce dispersal of DNA around the work area by changing gloves
whenever they may have become contaminated with amplified
DNA.
♦
Avoid splashing by opening tubes that contain amplified DNA
carefully. It may be helpful to spin down the contents of the
amplified DNA tubes before opening. A tube-decapper device
makes it easier to open the tubes.
♦
Use disposable bench paper to cover the work area used to
prepare samples for electrophoresis. This prevents the
accumulation of amplified DNA on permanent work surfaces. A
10% (v/v) bleach solution should be used periodically to wash
exposed work surfaces. Soap and water can also be used to clean
work surfaces.
♦
Use the thermal cycler for the RT-PCR reactions and for the
denaturing of the DNA in formamide before sequencing.
Laboratory Guidelines 2-11
♦
Quantitation of amplified DNA by gel electrophoresis may be
performed in this room.
♦
Do not remove DNA samples from the Amplified DNA Work Area.
Store tubes of amplified DNA in this area.
2-12 Laboratory Guidelines
Safety Guidelines
BIOHAZARD ! WARNING ! BIOHAZARD. Biological samples such as tissues and
Warning blood have the potential to transmit infectious diseases. Follow the U.S.
Department of Health and Human Services guidelines published in
Biosafety in Microbiological and Biomedical Laboratories (stock no.
017-040-00547-4) and in Occupational Safety and Health Standards, Toxic
and Hazardous Substances (29 CFR §1910.1030),or international
equivalents, concerning the principles of risk assessment, biological
containment, and safe laboratory practices for activities involving clinical
specimens. You can obtain additional information by connecting to the
government web site, http://www.cdc.gov
Hazardous Waste ! WARNING ! CHEMICAL WASTE HAZARD. Wastes produced by
Applied Biosystems instruments are potentially hazardous and can cause
injury, illness, or death.
♦
Read and understand the material safety data sheets (MSDSs)
provided by the manufacturers of the chemicals in the waste
container before you store, handle, or dispose of chemical
waste.
♦
Handle chemical wastes in a fume hood.
♦
Minimize contact with and inhalation of chemical waste. Wear
appropriate personal protective equipment when handling
chemicals (e.g., safety glasses, gloves, or clothing).
♦
Seal the waste container with the cap provided after disposing
of the contents.
♦
Dispose of the contents of the waste tray and waste bottle in
accordance with good laboratory practices and local,
state/provincial, or national environmental and health
regulations.
Always use adequate ventilation such as that provided by a fume
hood.
Precautions When working with human blood or blood products, always observe
Universal Precautions and follow these general guidelines:
♦
Never pipette by mouth.
♦
Do not eat, drink, or smoke in the laboratory.
Laboratory Guidelines 2-13
♦
Wear two pairs of disposable gloves, sleeve covers on the glove
cuffs, a laboratory coat, and eye protection at all times during the
procedure. Wear any other personal protective equipment that may
be required.
♦
Use sterile, disposable filter-plugged pipette tips.
♦
Dispose of unused reagents and waste in accordance with county,
federal, state, and local regulations.
♦
Do not use this kit after its expiration date.
♦
Read the Material Safety Data Sheets relating to the reagents used
in this user’s manual.
♦
Clean and disinfect all work surfaces with 10% (v/v) Clorox bleach
or other EPA (Environmental Protection Agency)-approved
disinfectant.
♦
Autoclave any equipment or materials that have come into contact
with blood products.
♦
Do not touch anything outside the hood until you have changed
your outer gloves.
♦
Dispose of all human blood products and associated materials
according to your institution’s safety guidelines.
♦
When you finish your work, wash your hands thoroughly with soap
and water.
2-14 Laboratory Guidelines
Thermal Cycler
Settings
3
Chapter Overview
3
Introduction This chapter describes the thermal cycler settings for the GeneAmp®
PCR Systems 9600 and 9700. For complete operating instructions,
refer to the following manuals:
Operating Instruction for...
Manual
GeneAmp PCR System 9700
96-Well Sample Base Module
GeneAmp PCR System 9700 Base
Module User’s Manual
(P/N 4303481)
96-Well Sample Block Module
GeneAmp PCR System 96-Well
Sample Block Module User’s Manual
(P/N 4303480)
GeneAmp PCR System 9600
GeneAmp PCR System 9600 User’s
Manual
(P/N 0993-8660)
In This Chapter The following topics are covered in this chapter:
Topic
See Page
General Information
3-2
Reverse Transcription Thermal Cycling
3-2
HIV Amplification Program
3-3
HIV Sequencing Program
3-3
Thermal Cycler Settings 3-1
General Information
Ramping Times For all thermal cycling profiles, select the shortest ramping times
possible.
Reverse Transcription Thermal Cycling
Programming The following table describes the thermal cycler program for the reverse
Settings transcription step using the GeneAmp PCR Systems 9600 and 9700.
3-2 Thermal Cycler Settings
Temperature ( °C)
Time (min)
Process
42
60
Reverse transcription
99
5
MuLV Reverse Transcriptase
denaturation
4
HOLD
Holds for at least 10 min
HIV Amplification Program
GeneAmp PCR The following table describes the thermal cycling program for the HIV
System 9600 and PCR amplification on the GeneAmp PCR Systems 9600 and 9700.
9700 Note Set the 9700 for MaxMode, not 9600 emulation mode.
Number
of Cycles
Temperature
( °C)
Time
1
50
10 min
AmpErase® UNG
contamination control
1
93
12 min
AmpliTaq® Gold activation
40
93
20 sec
DNA denaturation
64
45 sec
Primer annealing
66
3 min
Primer extension
1
72
10 min
Final extension
–
4
HOLD
Process
–
HIV Sequencing Program
Programming The following table describes the thermal cycling program for
Settings sequencing the PCR products using the GeneAmp PCR System 9600
and 9700.
Number
of Cycles
Temperature
( °C)
Time
25
96
10 sec
DNA denaturation
50
5 sec
Primer annealing
60
4 min
Primer extension
4
HOLD
–
–
Process
Thermal Cycler Settings 3-3
HIV Genotyping
Chemistry Protocol 4
Chapter Overview
4
Introduction This chapter describes the chemistry-related procedures used to
prepare samples for sequencing.
In This Chapter The following topics are covered in this chapter:
Topic
See Page
Planning Your Work
4-2
Isolating Viral RNA from Blood Plasma
4-4
Reverse Transcription Reactions
4-9
Amplifying Viral cDNA by PCR
4-13
Preparing PCR Products for the Sequencing Reactions
4-16
Performing the Cycle Sequencing Reactions
4-21
Purifying the Sequencing Reactions in Microcentrifuge Tubes
4-23
Purifying the Sequencing Reactions in 96-Well Plates or Trays
4-27
Purifying Sequencing Reactions Using a 96-Well Centri-Sep
Plate
4-29
HIV Genotyping Chemistry Protocol 4-1
Planning Your Work
Organizing Your You have three options for organizing your samples. You can use:
Samples ♦ Individual MicroAmp® Reaction Tubes in a MicroAmp 9600
Tray/Retainer set.
♦
MicroAmp® 8-Strip Reaction Tubes in MicroAmp® 9600
Tray/Retainer set.
♦
MicroAmp® Optical 96-Well Reaction Plates.
If you have a small number of samples, it may be more convenient to
use individual tubes. Otherwise, use Optical 96-Well Reaction Plates to
hold your samples.
Three Procedures There are three procedures for performing sequencing reactions in this
Described manual.
The procedures are for samples contained in:
♦
Individual MicroAmp Reaction Tubes
♦
Either MicroAmp Optical 96-Well Reaction Plates or 8-Strip
Reaction Tubes in MicroAmp® Trays
♦
Centri-Sep 96 plates
Use the procedure that is correct for the type of sample container you
are using.
Timing To help you plan your work, the approximate time required for each step
in the HIV genotyping procedure is shown below. The actual time will
depend on the number of samples you are processing and your
familiarity with the procedure.
Times for Each Step:
Step
Isolating viral RNA from blood plasma
Approximate Time (hours)
3–3.5 (for 6–16 samples)
Reverse transcription
1.5
PCR
4.5
Agarose gel electrophoresis
2
Sequencing reactions
3
4-2 HIV Genotyping Chemistry Protocol
Times for Each Step:
(continued)
Step
Approximate Time (hours)
Either:
♦ Ethanol precipitation
1.0
♦ Cleanup using the Centri-Sep 96 plate
Sequencing on the ABI P
Sequencer
RISM ®
1.5
377 DNA
Sequencing on the ABI PRISM ® 310
Genetic Analyzer
8
2
(per sequencing reaction)
Stopping Points If you are unable to perform the entire procedure without interruption,
stop the protocol and store your samples only at certain points.
The acceptable stopping places are:
After you have...
Purified the HIV RNA
Store at...
–80 ˚C
See page...
4-8
Performed the reverse transcription
–15 to –25 ˚C
4-12
Performed the PCR
–15 to –25 ˚C
4-15
Purified the PCR products
–15 to –25 ˚C
4-16
Purified the cycle sequencing
reaction products
–15 to –25 ˚C
4-26, or
4-28, or
4-30
You will be reminded in the text when you reach these stopping points.
HIV Genotyping Chemistry Protocol 4-3
Isolating Viral RNA from Blood Plasma
About the The procedure for isolating viral RNA from blood plasma begins with
Procedure samples of blood plasma with viral load of 2000–750,000 cp/mL. The
blood used to prepare the plasma samples must be collected with
ACD-A or EDTA anticoagulants. Do not use samples containing
heparin.
Flow Diagram The following diagram summarizes the procedure for isolating and
purifying the viral RNA.
4-4 HIV Genotyping Chemistry Protocol
Precooling the To precool a refrigerated, benchtop centrifuge:
Centrifuge
Step
Action
1
Install an empty centrifuge rotor according to the manufacturer’s
instructions.
2
Start a run with the temperature set to 2–6 ˚C.
Pelleting the Virus The HIV is isolated from each plasma sample by centrifugation. The
viruses form a pellet and the plasma supernatant is removed.
To pellet the virus:
Step
Action
1
Thaw the plasma samples.
2
Briefly vortex.
3
Aliquot 0.5 mL of the blood plasma into each Sarstedt screw cap
tube and screw on the tube cap.
4
IMPORTANT Place an orientation mark on the side of the tube
and on the cap.
5
Insert the microcentrifuge tubes into the precooled microcentrifuge
rotor with the orientation mark facing the outside rim of the rotor.
This will help you locate the pellet after centrifugation.
6
Centrifuge at 4 ˚C at 21,000–25,000 x g for 1 hr.
7
During the centrifugation:
a. Prepare 70% ethanol and place on ice.
b. Thaw the Viral Lysis Buffer by either:
– Heating the tubes at 37 ˚C
– Leaving the tubes at room temperature until they are thawed
c. Briefly vortex the Viral Lysis Buffer tubes and keep them at room
temperature until needed.
d. Store the RNA diluent on ice until needed.
Note If you use the room temperature method and a precipitate
forms, heat the buffer to 37 ˚C.
8
Remove the tubes as soon as the centrifuge rotor stops.
HIV Genotyping Chemistry Protocol 4-5
To pellet the virus:
Step
9
(continued)
Action
Without disturbing the pellets, which may not be visible, remove the
residual supernatants with a disposable fine-tipped transfer pipette.
IMPORTANT Remove the residual supernatant by pipetting from
the side opposite the orientation mark.
! WARNING ! BLOODBORNE/INFECTIOUS WASTE
HAZARD. Discard the supernatants following recognized
disinfection procedures and in accordance with all local, state,
and national bloodborne/infections regulations.
10
Screw on each tube cap.
11
Increase the temperature in the centrifuge to 15–25 ˚C (room
temperature).
Lysing the Viruses To lyse the viruses:
Step
Action
1
Add 600 µL of Viral Lysis Buffer to each pellet and screw on the tube
cap.
2
Vortex each tube gently for 3–5 seconds.
3
Incubate at 15–25 ˚C (room temperature) for 10 minutes.
Precipitating Viral To precipitate viral RNA:
RNA
Step
1
Action
Add 600 µL of 100% isopropanol to each tube, and screw on the
tube cap.
! WARNING ! CHEMICAL HAZARD. Isopropyl alcohol is a
flammable liquid and vapor. It may cause eye, skin, and upper
respiratory tract irritation. Prolonged or repeated contact may
dry skin and cause irritation. It may cause central nervous
system effects such as drowsiness, dizziness, headache, etc.
Please read the MSDS and follow the handling instructions.
Wear appropriate protective eyewear, clothing, and gloves.
2
Vortex each tube gently for 3–5 seconds.
3
Centrifuge samples at room temperature, and 12,500–15,000 x g
for 15 minutes.
4-6 HIV Genotyping Chemistry Protocol
To precipitate viral RNA:
Step
4
(continued)
Action
Without disturbing the pellets, which may not be visible, remove the
supernatants with a fine-tipped transfer pipette.
! WARNING ! BLOODBORNE/INFECTIOUS WASTE
HAZARD. Discard the supernatants following recognized
disinfection procedures and in accordance with all local, state,
and national bloodborne/infections regulations.
Washing the RNA To wash the RNA pellet:
Pellet
Step
1
Action
Add 1.0 mL of freshly prepared 70% ethanol, precooled to 4 ˚C, to
each tube, and then cap.
! WARNING ! CHEMICAL HAZARD. Ethanol is a
flammable liquid and vapor. It may cause eye, skin, and upper
respiratory tract irritation. Prolonged or repeated contact may
dry skin. Exposure may cause central nervous system
depression and liver damage. Please read the MSDS and
follow the handling instructions. Wear appropriate protective
eyewear, clothing, and gloves.
2
Vortex gently for 3–5 seconds. You do not need to not dislodge the
pellet.
3
Replace the microcentrifuge tubes in the rotor with the orientation
mark facing the outside rim of the rotor.
4
Centrifuge samples at room temperature and 12,500–15,000 x g
for 5 minutes.
5
Without disturbing the pellets, which may not be visible, remove the
supernatants with a fine-tipped transfer pipette.
! WARNING ! BLOODBORNE/INFECTIOUS WASTE
HAZARD. Discard the supernatants following recognized
disinfection procedures and in accordance with all local, state,
and national bloodborne/infections regulations.
6
Pulse-spin at low speed for 5–10 seconds to collect the residual
ethanol at the bottom of the tube.
HIV Genotyping Chemistry Protocol 4-7
To wash the RNA pellet:
Step
7
(continued)
Action
Remove any residual supernatant with a fine pipette tip (e.g., a
Gilson P-200 micropipette tip) or a fine-tipped transfer pipette. The
pellets should still be visible.
IMPORTANT All ethanol must be removed. Any residual ethanol
will inhibit the reverse transcription reaction.
! WARNING ! BLOODBORNE/INFECTIOUS WASTE
HAZARD. Discard the supernatants following recognized
disinfection procedures and in accordance with all local, state,
and national bloodborne/infections regulations.
8
If there is still some residual ethanol in the tubes, leave the tube
caps open for 1 minute or longer.
Resuspending the Use the following procedure to resuspend the washed RNA pellets
RNA before storing them.
IMPORTANT From this point forward, unless otherwise specified, all steps
must be performed on ice.
To resuspend the RNA:
Step
1
Action
If...
Then...
the viral load is known to be less
than 15,000 cp/mL
add 50 µL of RNA Diluent.
the viral load is known to be greater
than 15,000 cp/mL
add 100 µL of RNA
Diluent.
2
Screw on the microcentrifuge tube caps.
3
Resuspend the RNA pellets by vigorously vortexing for 10 seconds.
4
Pulse-spin at low speed for 5–10 seconds to collect the contents at
the bottom of the tube.
5
Immediately place on ice.
6
Either...
Or...
proceed immediately to the RT step.
store the RNA at –60 to
–80 ˚C.
See “Reverse Transcription
Reactions” on page 4-9.
4-8 HIV Genotyping Chemistry Protocol
Reverse Transcription Reactions
About the During the reverse transcription (RT) reaction, the Moloney murine
Reaction leukemia virus (MuLV) reverse transcriptase generates a
single-stranded cDNA from the HIV-1 RNA.
Overview To set up the RT reactions, you will perform the following steps:
HIV Genotyping Chemistry Protocol 4-9
Preparing the RT To avoid pipetting small volumes, do not prepare single reactions.
Master Mix IMPORTANT Set up the reactions on ice or on a cold block.
To prepare the RT master mix:
Step
1
Action
Thaw all reagents and samples and immediately place them on ice.
IMPORTANT Samples and reagents must be kept cold at all
times. Do not leave samples and reagents to thaw unattended.
2
Place the RNase Inhibitor and MuLV Reverse Transciptase on ice.
3
a. Thaw the HIV RT mix and DTT solution at room temperature.
b. Vortex them briefly to mix.
c. Place them on ice.
4
Prepare the RT master mix in a RNase-free 1.5-mL microcentrifuge
tube, and on ice, as follows:
Volume for 1
Reaction (µL)
Volume for
16 Reactions
(µL)
HIV RT Mix
8
128
RNase Inhibitor
1
16
MuLV Reverse Transcriptase
1
16
DTT, 100 mM
0.4
6.4
Final volume of RT master
mix
10.4
166.4
Reagent
CAUTION CHEMICAL HAZARD. Dithiothrietol (DTT) may
cause eye, skin, and respiratory tract irritation, central
nervous system depression, and damage to the kidneys.
Please read the MSDS and follow the handling instructions.
Wear appropriate protective eyewear, clothing, and gloves.
Prepare sufficient volume for 1–2 extra reactions, as some of the
mix will be lost during pipetting.
5
Mix the solution thoroughly by flicking the tube with your fingertip.
6
Pulse-spin the RT master mix at low speed for 5–10 seconds to
collect the contents at the bottom of the tube.
4-10 HIV Genotyping Chemistry Protocol
Preparing the RT Use the RT master mix to set up the RT reactions with the viral RNA
Reactions preps. These reactions should be prepared in precooled 200-µL
MicroAmp Reaction Tubes.
IMPORTANT Keep all tubes on ice, or a cold block, while preparing these
reactions. Do not freeze and thaw the RNA control more than four times.
To prepare the RT reactions:
Step
1
Action
Add 10 µL of RT master mix to each MicroAmp Reaction Tube.
You will need one tube for each HIV sample plus two tubes for the
controls.
2
a. Add 10 µL of the negative control, positive control, or viral RNA
to each of the MicroAmp Reaction Tubes (from step 1).
b. Close the tube cap after each addition.
Negative
Control:
RNA
Diluent +
RT master
mix
Note
3
Positive
Control:
RNA
Control +
RT master mix
HIV samples + RT
master mix
The final volume of the reaction mixes is 20 µL.
Pulse-spin at low speed for 5–10 seconds to collect the contents at
the bottom of the tube.
IMPORTANT These tubes should be placed on ice until starting
the RT reactions.
HIV Genotyping Chemistry Protocol 4-11
Performing the RT To ensure reproducibility, perform the reverse transcription reactions in
Reactions MicroAmp Reaction Tubes and use a calibrated thermal cycler for the
incubation step.
IMPORTANT Use the correct tray and retainer assemblies for the tubes and
thermal cycler.
IMPORTANT The efficiency of the reverse transcription reaction is highly
dependent on the conditions of the incubation. Do not vary from the procedure
described in the table below.
To perform the RT reaction:
Step
1
Action
Select the RT program. Review your thermal cycler program for
correctness:
Temperature
(°C)
Time
(min)
42
60
Reverse transcribes RNA
99
5
Denatures MuLV reverse
transcriptase
4
Hold
Holds until you are ready
Process
2
Make sure that the thermal cycler is at 42 ˚C.
3
Transfer the MicroAmp Reaction Tubes (that are on ice) into the
preheated thermal cycler.
4
Start the thermal cycler.
5
When the program has finished, either hold the samples at 4 ˚C
until you are ready to perform the PCR (for at least 10 minutes) or
store at –15 to –25 ˚C.
4-12 HIV Genotyping Chemistry Protocol
Amplifying Viral cDNA by PCR
About the PCR For convenience and to minimize contamination, PCR is performed in
Procedure the same tube as the reverse transcription reaction. Using the
single-stranded cDNA products of the reverse transcription step as
template, the PCR step generates double-stranded DNA suitable for
sequencing. The PCR primers in this reaction specifically amplify the
HIV protease and the 5´ end of the RT gene. AmpliTaq Gold® is used
for PCR because it provides an invisible hot-start, which improves the
specificity and efficiency of the reaction.
Note The MuLV reverse transcriptase was inactivated by the previous thermal
cycling step in which the samples were incubated at 99 ˚C for 5 minutes.
Overview You will perform the following steps to amplify your DNA samples:
HIV Genotyping Chemistry Protocol 4-13
Preparing the PCR Prepare the PCR master mix as follows:
Master Mix
Step
1
Action
Prepare the PCR master mix by combining the following reagents:
Volume for
One Reaction
(µL)
Volume for 16
Reactions
(µL)
HIV PCR Mix
29.5
472
AmpliTaq Gold
0.5
8
Reagent
AmpErase®
UNG
Final volume
1
16
31.0
496
CAUTION CHEMICAL HAZARD. AmpErase uracil
n-glycosylase may cause eye and skin irritation. Please read
the MSDS and follow the handling instructions. Wear
appropriate protective eyewear, clothing, and gloves.
For multiple reactions, prepare sufficient volume for 1–2 extra
reactions, as some of the mix will be lost during pipetting.
2
Mix the solution thoroughly by flicking the tube with your fingertip.
3
Pulse-spin the PCR master mix at low speed for 5–10 seconds to
collect the contents at the bottom of the tube.
Preparing the In this part of the procedure, the PCR master mix is added to each of
PCRs the RT reaction tubes. Prepare the PCRs as follows:
Step
1
Action
Add 30 µL of PCR master mix to each RT reaction tube, and close
the tube cap.
The final volume is now 50 µL.
2
Pulse-spin at low speed for 5–10 seconds to collect the contents at
the bottom of the tube.
4-14 HIV Genotyping Chemistry Protocol
Performing the Thermal cycling is performed in a GeneAmp® PCR System 9600 or
PCR 9700 thermal cycler from Applied Biosystems.
Note The thermal cycling process should take about 4 hours. If it takes
30 minutes less or 30 minutes more, there is probably a problem with the
ramping times. In this situation, call a service engineer.
Follow the steps below to amplify the DNA.
Step
Action
1
Place the MicroAmp Reaction Tubes containing the PCRs into the
thermal cycler.
2
Select the 9600 or 9700 PCR program shown below.
Review your thermal cycler program for correctness.
GeneAmp PCR System 9600 or 9700
Number
of Cycles
Temperature
(°C)
Time
1
50
10
1
93
12 min
AmpliTaq Gold activation
40
93
20 sec
DNA Denaturation
64
45 sec
Primer Annealing
66
3 min
Primer Extension
72
10 min
Final Extension
4
HOLDa
1
–
Process
AmpErase UNG activation
–
a. Do not leave tubes on hold for more than 24 hours, because residual UNG activity
may destroy your amplified DNA. If the reactions cannot be analyzed within
24 hours, store them at –15 to –25 ˚C.
3
Start the thermal cycler.
4
When the program is complete, either remove the tubes and
continue, or store your samples at –15 to –25 ˚C.
HIV Genotyping Chemistry Protocol 4-15
Preparing PCR Products for the Sequencing Reactions
Overview At this point, the sample tubes contain double-stranded DNA (PCR
products) with the 5´ end of the RT gene and the entire protease gene.
Before sequencing these PCR products, they must be purified to
eliminate unreacted primers and dNTPs.
Purify the PCR products using a Microcon®-100 microconcentrator.
A summary of the preparation steps is shown below.
Concentrating and To concentrate and purify the PCR product:
Purifying the PCR
Step
Action
Product
1
Assemble the microconcentrator by inserting a Microcon-100 spin
column into one of the supplied 1.5-mL collection tubes. Make sure
that the white membrane is face up.
2
Pipette 300 µL of sterile, deionized water onto the top of the
microconcentrator.
IMPORTANT Avoid touching the membrane with the pipette tip.
3
Pipette the entire 50-µL PCR product into the water in the
microconcentrator.
IMPORTANT Avoid touching the membrane with the pipette tip.
4
Seal firmly with the attached tube cap.
5
Centrifuge the prepared microconcentrator in a fixed-angle rotor at
room temperature and at 450–550 x g for 15 minutes.
6
Open the tube cap and pipette 35 µL of sterile, deionized water into
the center of the microconcentrator.
IMPORTANT Avoid touching the membrane with the pipette tip.
4-16 HIV Genotyping Chemistry Protocol
To concentrate and purify the PCR product:
Step
7
(continued)
Action
a. Remove the microconcentrator from the tube containing filtrate.
b. Place the microconcentrator upside down on top of a new
1.5-mL tube.
c. Discard the tube with the old filtrate.
8
Centrifuge again at room temperature and at 450–550 x g for 5
minutes.
This step transfers approximately 30–50 µL of the purified PCR
product to the new tube.
9
Remove the microconcentrator and discard it.
10
Close the sample tube, and either place your samples on ice until
ready for the next step or store at –15 to –25 ˚C.
Evaluating the You may see variability in the yield and purity of the PCR products. This
PCR Products for reflects variability in the viral load of the original plasma samples.
Yield and Purity To maximize the quality of the sequencing reactions, evaluate the
quality of the PCR products before sequencing. To do this, run the PCR
products on an agarose gel, and compare them to a “DNA Mass
Ladder” containing DNA fragments of known sizes and amounts. Use
this information to determine how much to dilute the PCR product
before performing sequencing.
HIV Genotyping Chemistry Protocol 4-17
Running the Follow the procedure below to electrophorese your PCR products.
Agarose Gel
To run the agarose gel:
Step
1
Action
Prepare:
♦ A 1% agarose gel
♦ Gel buffer containing 0.5 µg/mL of ethidium bromide.
Note CHEMICAL HAZARD. Ethidium bromide is a known
mutagen (i.e., it can change genetic material in a living cell and
has the potential to cause cancer). Please read the MSDS and
follow the handling instructions. Wear appropriate protective
eyewear, clothing, and gloves.
Note
gels.
You can either prepare your own gels or purchase prepared
2
For each sample, mix 5 µL of Gel Loading Buffer and 5 µL of
purified PCR product.
3
Briefly vortex the tubes.
4
Pulse-spin the tubes at low speed.
5
Load 6 µL of the DNA Mass Ladder solution into lane 1 and 3 µL
into lane 2.
Pipette accurately because these standards are used as references
to determine PCR-product dilutions.
6
Load the entire 10-µL samples onto the remaining gel lanes.
7
Electrophorese at 10 V/cm until the bromphenol blue has migrated
at least 5 cm into the gel.
8
Examine the gel under UV light.
9
Photograph your gel using an exposure time that does not saturate
the film and shows the differences in intensity of the mass ladder
fragments.
The correct exposure of the photograph is important, because you
will use the information from the gel to determine PCR product
dilutions.
4-18 HIV Genotyping Chemistry Protocol
Diluting the PCR The PCR products must be diluted before being sequenced. Follow the
Products for table below to determine the correct dilution.
Sequencing To dilute the PCR products:
Step
1
Action
Compare the intensity of each PCR-product band to the intensities
of the Low Mass Ladder bands. From your comparison, estimate
the mass of DNA in the sample. Dilute your sample, which has a
volume of 25–45 µL, according to the table immediately below.
If the mass of the 1.8-kb
product band is...
Then...
greater than 100 ng
add 315 µL of sterile, deionized
water to the sample
between 60–100 ng
add 105 µL of sterile, deionized
water to the sample
between 40–60 ng
add 35 µL of sterile, deionized
water to the sample
between 20–40 ng
add water to a final volume of
60 µL
less than 20 ng
the sample may not be suitable
for sequencing because there
may not be enough DNA
The table below lists the masses of the DNA fragments in each
band of the 3-µL and 6-µL Low Mass Ladders gel lanes.
Band
(kb)
Mass (ng)
6 µL Mass
Ladder in a Lane
3 µL Mass Ladder
in a Lane
2.0
100
50
1.2
60
30
0.8
40
20
0.4
20
10
0.2
10
5
Note
The 0.4 kb and 0.2 kb bands may not be visible on the gel.
HIV Genotyping Chemistry Protocol 4-19
To dilute the PCR products:
Step
(continued)
Action
2
Vortex briefly.
3
Pulse-spin at low speed for 5–10 seconds to collect the contents at
the bottom of the tube.
IMPORTANT Keep the diluted reactions on ice.
4-20 HIV Genotyping Chemistry Protocol
Performing the Cycle Sequencing Reactions
Overview The sequencing mixes provided with the HIV Genotyping System
contain custom sequencing primers formulated with the BigDye™
Terminator sequencing chemistry. The PCR products are used as
templates in the cycle sequencing reactions, which generate
fluorescently labeled DNA size ladders for sequencing.
A summary of the preparation for cycle sequencing is shown below.
About the HIV Seven HIV SEQ MIXES are provided, one for each sequence-specific
SEQ MIXES and primer.
Primers You have the option of using six primers (A, B, C, F, G, and H) or seven
(including D) for your initial sequencing run.
For more information about sequencing primers, see “Primers A and D”
on page 1-9.
IMPORTANT Do not expose mixes to light for extended periods.
HIV Genotyping Chemistry Protocol 4-21
Preparing To prepare the sequencing reactions:
Sequencing
Step
Action
Reactions
1
Prepare the following sequencing reaction mixes in either:
♦ One MicroAmp Reaction Tube for each HIV SEQ MIX
♦ MicroAmp 8-Strip Reaction Tubes in a MicroAmp Tray
♦ An Optical 96-Well Reaction Plate
Volume for One
Reaction (µL)
Component
Add one of the following HIV SEQ mixes to
each tube or plate well:
♦ HIV SEQ MIX A
12
♦ HIV SEQ MIX B
♦ HIV SEQ MIX C
♦ HIV SEQ MIX D
♦ HIV SEQ MIX F
♦ HIV SEQ MIX G
♦ HIV SEQ MIX H
Diluted, purified PCR product
8
Final Volume
20
2
Close the tube caps or place a MicroAmp® Full Plate Cover over the
plate.
3
Spin at room temperature and at low speed for 5–10 seconds to
collect the contents at the bottom of the tube.
4
Load the MicroAmp tubes, plate, or tray into the thermal cycler.
5
Select the Cycle Sequencing program. Review your thermal cycler
program for correctness:
Number of Cycles
Temperature (°C)
Time
25
96
10 sec
50
5 sec
–
6
Start the thermal cycler.
4-22 HIV Genotyping Chemistry Protocol
60
4 min
4
HOLD
Purifying the Sequencing Reactions in Microcentrifuge Tubes
Overview At the end of the cycle sequencing reactions, each tube contains a
fluorescently labeled DNA sequence ladder. Before electrophoresis,
each sequence must be purified to remove unincorporated dyes and
salts, both of which can interfere with the electrophoresis and data
analysis.
The sequences can be purified by:
♦
Ethanol precipitation in individual tubes or 96-well trays, or
♦
Spin column filtration using Centri-Sep 96 plates
Flow Diagram The procedure for purifying the sequencing reactions by ethanol
precipitation is outlined below.
HIV Genotyping Chemistry Protocol 4-23
Ethanol Quality It is important to use absolute ethanol to precipitate the sequencing
reactions. If there is too much water in the ethanol, the precipitation will
be less efficient and less DNA will be recovered.
Ethanol You can precipitate the sequencing reactions with ethanol in one of
Precipitation three ways:
Choices ♦ Individual microcentrifuge tubes
♦
MicroAmp 8-Strip Reaction Tubes in a MicroAmp Tray
♦
MicroAmp Optical 96-Well Reaction Plates
If you are purifying the
sequencing reactions in...
Then...
individual microcentrifuge tubes
follow the protocol in this section.
a MicroAmp Optical 96-Well
Reaction Plate or MicroAmp 8-Strip
ReactionTubes in a MicroAmp Tray
go to page 4-27.
Purifying the To purify the sequencing reactions in tubes:
Sequencing
Step
Action
Reactions in Tubes
1
Label a 1.5-mL microcentrifuge tube for each sample.
2
Begin preheating a heat block that holds 1.5-mL tubes to 95 ˚C.
3
Prepare a sodium acetate/ethanol solution.
IMPORTANT A fresh batch of this solution must be made for each
set of precipitations.
! WARNING ! CHEMICAL HAZARD. Ethanol is a
flammable liquid and vapor. It may cause eye, skin, and upper
respiratory tract irritation. Prolonged or repeated contact may
dry skin. Exposure may cause central nervous system
depression and liver damage. Please read the MSDS and
follow the handling instructions. Wear appropriate protective
eyewear, clothing, and gloves.
4-24 HIV Genotyping Chemistry Protocol
To purify the sequencing reactions in tubes:
Step
(continued)
Action
Volume for
One
Reactiona
(µL)
Volume for 13 Plasma
Samples using 7 Primers
(mL)
3.0 M Sodium acetate,
pH 4.6
2
0.182
100% Ethanol
50
4.550
Final Volume
52
4.732
Reagent
a. Prepare about 10% more solution than you need.
4
Add 52 µL of the sodium acetate/ethanol solution to each labeled
1.5-mL microcentrifuge tube.
5
Transfer the 20 µL of each sequencing reaction to the
corresponding labeled microcentrifuge tube from step 4, and close
the tube cap.
6
Vortex for 3–5 seconds.
IMPORTANT Thorough mixing at this step is essential for efficient
precipitation.
7
Spin at room temperature and maximum speed (greater than
12,500 x g) for 30 minutes.
8
Remove the sodium acetate/ethanol mixture from each tube by
carefully aspirating the solution.
9
Add 250 µL of cold 70% (v/v) ethanol to the tube, and close the
tube cap.
10
Vortex for 3–5 seconds.
11
Spin at room temperature and maximum speed (greater than
12,500 x g) for 5 minutes.
12
Remove all of the ethanol by carefully aspirating the solution.
13
Dry the pellets in the preheated 95 ˚C heat block for 2 minutes.
IMPORTANT Do not overdry the pellets.
HIV Genotyping Chemistry Protocol 4-25
To purify the sequencing reactions in tubes:
Step
14
(continued)
Action
If you...
Then...
plan to perform
electrophoresis now
for instructions, see:
♦ Chapter 5, “Using the 310
Genetic Analyzer.”
♦ Chapter 6, “Using the 377 DNA
Sequencer.”
do not plan to perform
electrophoresis now
4-26 HIV Genotyping Chemistry Protocol
seal the tubes and store at
–15 to –25 °C.
Purifying the Sequencing Reactions in 96-Well Plates or Trays
Overview The procedure for purifying the sequencing reactions in plates or trays
is similar to the procedure for purifying the sequencing reactions in
MicroAmp Reaction Tubes. The main differences are in the number of
samples processed and the centrifugation steps.
Ethanol Quality It is important to use absolute ethanol to precipitate the sequencing
reactions. If there is too much water in the ethanol, the precipitation will
be less efficient and less DNA will be recovered.
Purification To purify the products of the sequencing reactions:
Step
1
Action
Prepare the sodium acetate/ethanol solution.
IMPORTANT A fresh solution must be made for each set of
precipitations.
! WARNING ! CHEMICAL HAZARD. Ethanol is a
flammable liquid and vapor. It may cause eye, skin, and upper
respiratory tract irritation. Prolonged or repeated contact may
dry skin. Exposure may cause central nervous system
depression and liver damage. Please read the MSDS and
follow the handling instructions. Wear appropriate protective
eyewear, clothing, and gloves.
Volume for
One
Reactiona
(µL)
Volume for 13 Plasma
Samples using 7 Primers
(µL)
3.0 M sodium acetate,
pH 4.6
2
0.182
100% ethanol
50
4.550
Final Volume
52
4.732
Reagent
a. Prepare about 10% more solution than you need.
2
Add 52 µL of the sodium acetate/ethanol solution to each
sequencing reaction.
3
Cover the Optical 96-Well Reaction Plate with 3M 425-3
adhesive-backed aluminum foil tape.
4
Seal the tape to the tops of the wells by pressing firmly.
HIV Genotyping Chemistry Protocol 4-27
To purify the products of the sequencing reactions:
Step
5
(continued)
Action
Mix by either inverting three times or vortexing.
IMPORTANT Thorough mixing at this step is essential for efficient
precipitation.
6
Centrifuge at 2000 x g for 20 minutes.
7
Remove the foil tape.
8
Invert the plate on a folded lab tissue and centrifuge at 150 x g for
1 minute.
9
Add 150 µL of 70% ethanol to each well.
10
Centrifuge at 2000 x g for 5 minutes.
11
Invert the plate on a folded lab tissue and centrifuge at 150 x g for
1.0–1.5 minutes.
12
If you plan to perform electrophoresis now, see:
♦ Chapter 5, “Using the 310 Genetic Analyzer.”
♦ Chapter 6, “Using the 377 DNA Sequencer.”
If you do not plan to perform electrophoresis now, seal the tubes
and store at –15 to –25 °C.
4-28 HIV Genotyping Chemistry Protocol
Purifying Sequencing Reactions Using a 96-Well Centri-Sep Plate
‘
About Using the An alternative method to ethanol precipitation that allows purification of
Centri-Sep Plate sequencing reactions in a 96-well format is the Centri-Sep 96 Plate
(Princeton Separations, PN CS-961). This plate has 96 prepackaged,
hydrated spin columns that remove excess dye terminators and
nucleotides from the sequencing reactions. Following the spin column
centrifugation step, the sequencing reactions are dried in a vacuum
centrifuge (speed-vac), dissolved in a loading buffer, and loaded onto
the 377 instrument.
Procedure To purify the sequencing reactions:
Step
Action
1
Allow the Centri-Sep 96 plate to come to room temperature
(approximately 2 hours).
2
Remove the adhesive-foil sealing film from the bottom of the
Centri-Sep 96 plate and then from the top.
3
a. Place the Centri-Sep 96 plate on top of a MicroAmp Optical
96-Well Reaction Plate, tape the two plates together with a base,
and centrifuge at 700 x g for 2 minutes.
b. Discard the remaining liquid in the Optical 96-Well Reaction
Plate by shaking it vigorously.
c. Wash and save the MicroAmp Optical 96-Well Reaction Plate for
future use as a wash plate.
4
Transfer the sequencing reactions (20 µL) to the individual wells in
the Centri-Sep 96 plate.
Carefully place samples on the centers of the gel beds. Do not
place the samples on the side of the wells.
Avoid touching the gel bed with the pipette tips.
Note Use a multichannel pipettor to transfer the sequencing
reactions. This will minimize the chance of sample mix-up during
the transfer process.
5
Place a 96-well collection plate (a thin-walled plate provided by
Princeton Separations) on a 96-well base, then place the
Centri-Sep 96 plate on top.
6
Tape the plates to the 96 well base, making sure that you align the
alphanumeric indices on all the plates.
HIV Genotyping Chemistry Protocol 4-29
To purify the sequencing reactions:
Step
7
(continued)
Action
Centrifuge at 700 x g for 2 minutes.
You should recover approximately 20 µL from each well.
8
Remove the 96-well collection plate.
9
Dry the samples in a speed-vac equipped with the appropriate
rotor.
10
Seal the plate with ThermaSeal (included in the Centri-Sep 96 plate
package) for storage, at 2 to 8 °C, in a dark box.
Note
4-30 HIV Genotyping Chemistry Protocol
The products of sequencing reactions are light sensitive.
Using the 310 Genetic
Analyzer
5
Introduction
5
In This Chapter This chapter describes the operation of the ABI PRISM® 310 Genetic
Analyzer used its the corresponding autosampler tray.
The following topics are covered in this chapter.
Topic
See Page
Overview of the Procedure
5-2
Preparing the Instrument
5-3
Preparing the Sample Sheet and Injection List
5-6
Denaturing the Samples and Starting the Run
5-8
Analyzing the Sequencing Data
5-9
Assumptions The instructions in this chapter assume that you are already familiar
with the ABI PRISM 310 instrument.
For more detailed information about how to perform a sequencing run,
refer to the ABI PRISM 310 Genetic Analyzer User’s Manual
(P/N 903565).
Using the 310 Genetic Analyzer 5-1
Overview of the Procedure
At This Stage Following ethanol precipitation, the samples are dye-labeled sequence
ladders that are ready to be run on an automated DNA sequencer. The
samples may be run in 1.5-mL microcentrifuge tubes, MicroAmp®
8-Strip Reaction Tubes, or MicroAmp® Optical 96-Well Reaction Plates.
Flow Diagram An overview of a sequencing run is shown below.
5-2 Using the 310 Genetic Analyzer
Preparing the Instrument
For First Time If you are using the HIV Genotyping System for the first time you:
Users ♦ Will need to install the appropriate run modules.
♦
May need to:
–
Make a dRhodamine matrix file
–
Install the appropriate dye set/primer (mobility) file.
Run Modules A run module is a file that is used to define the run conditions during
data collection on the 310 Genetic Analyzer. Run conditions include
electrophoresis voltage, temperature, and run time.
Use the run module named HIV-310 Run ModuleH that is included on
the CD-ROM provided with the HIV Genotyping System.
Do not use the other run modules on this CD-ROM because they define
run conditions that are inappropriate for the current kit configuration.
About the Dye A dye set/primer file is used by the ABI PRISM® DNA Sequencing
Set/Primer File Analysis software to compensate for the mobility effects that different
dyes impart on the fragments of the sequence ladder during
electrophoresis. Use of the proper dye set/primer file will result in more
evenly spaced peaks in the electropherograms.
For the sequences generated with the HIV Genotyping System, use the
dye set/primer file named DT POP- 6{BD Set-Any Primer}.
Obtaining the Dye If you do not already have the dye set/primer file named DT POP- 6{BD
Set/Primer File Set-Any Primer}, you can obtain it from:
♦
The Applied Biosystems Product Software Library web site at:
http://www.appliedbiosystems.com/techsupport
♦
Your local Field Applications Specialist. Call Applied Biosystems
Technical Support or your local sales office for more information
IMPORTANT Dye set/primer file names for the BigDye™ terminators are
similar to those for the dRhodamine terminators. If you inadvertently select a
dye set/primer file for the dRhodamine terminators, it is possible to reanalyze
the data with the correct file.
Using the 310 Genetic Analyzer 5-3
Installing the Run To install the run modules and dye set/primer file:
Module and Dye
Step
Action
Set/Primer File
1
Copy the run module (HIV-310 RunModuleH) into the Module folder
located within the Collection software folder of your computer.
2
If necessary, copy the DT POP6{BD Set-Any Primer} dye
set/primer file for the ABI PRISM 310 Genetic Analyzer into the ABI
folder within the System Folder.
3
Restart the Data Collection software and/or DNA Sequencing
Analysis software if either was open while the files were installed.
Preparing an How Instrument/Matrix Files Are Used
Instrument/Matrix Instrument/matrix files are used by the ABI PRISM DNA Sequencing
File Analysis software to compensate for the overlapping fluorescence
emission spectra of the different dyes in a dye set.
Before Running Your Samples
The following table lists the actions to take before running your samples
and explains where to get additional information.
If...
Then...
you have not already generated a
matrix file on the ABI PRISM 310
Genetic Analyzer using the
dRhodamine Matrix Standards Kit,
the HIV-310 RunModuleH, and
POP-6™ polymer
you will need to do this when you run
your first samples.
For more information about...
Refer to...
making the matrix file
♦ The ABI PRISM 310 Genetic
Analyzer User’s Manual
(P/N 903565) and
♦ The Automated DNA Sequencing
Chemistry Guide (P/N 4305080)
Note Although BigDye terminators and dRhodamine terminators require
different dye set/primer files, both chemistries use a matrix made with the
dRhodamine matrix standards.
Note
Matrix files are specific to a particular instrument, polymer, and dye set.
5-4 Using the 310 Genetic Analyzer
Preparing the To prepare the ABI PRISM 310 Genetic Analyzer:
Instrument
Step
1
Action
Prepare 1X Genetic Analysis Buffer by mixing:
Reagent
PRISM®
ABI
EDTA
Volume (mL)
310 Genetic Analyzer Buffer with
1.5
Deionized water
13.5
Final Volume
15.0
2
If switching applications, or if the sequencing polymer has not been
used for more than one week, discard the polymer and flush water
through the pump block.
3
Inspect and clean the detector window.
4
Install the 61-cm capillary.
5
Select Autosampler Calibration from the Instrument menu of the
Data Collection software.
Follow the prompts to calibrate the autosampler.
6
Verify that there are no visible crystals in the POP-6 polymer.
If you do see crystals, leave the polymer at room temperature until
they are completely dissolved.
CAUTION CHEMICAL HAZARD. POP-6 polymer may cause
eye, skin and respiratory tract irritation. Please read the MSDS
and follow the handling instructions. Wear appropriate
protective eyewear, clothing, and gloves. Use for R&D
purposes only.
7
Take up approximately 0.5 mL of POP-6 into the 1-mL glass
syringe.
8
Install the 1-mL glass syringe on the pump block.
9
Prime the block with polymer.
10
Load 1X Genetic Analysis Buffer into the buffer reservoir.
11
Load the autosampler with the following reagents:
Reagent
Autosampler Position
1X Genetic Analysis Buffer
1
Water (in the buffer vial)
2
Water (in a 1.5-mL microcentrifuge
tube with the cap removed)
3
Using the 310 Genetic Analyzer 5-5
Preparing the Sample Sheet and Injection List
Preparing the To prepare the sample sheet:
Sample Sheet
Step
Action
1
From the File menu, select New.
2
Select the sequence sample sheet that corresponds to the
autosampler tray that you are using (either 48 or 96 well).
The Sample Sheet window opens.
3
Enter the names of your samples into the Sample Name column
using the naming convention:
sample ID-visit date-lab code-[primer-analysis date.
For more information about sample naming conventions, see
page1-14.
4
In the Dye Set/Primer list, select DT POP6{BD Set-Any Primer}.
5
a. Click the Dyeset/Primer column heading to select the entire
column.
b. From the Edit menu, select Fill Down (Cmd-D).
6
In the Matrix list, select the appropriate matrix file.
For more information, see page 5-4.
7
From the File menu, select Save.
8
Enter a name for your sample sheet.
9
Save your sample sheet in the Sample Sheet folder within the
310 Collection Software folder.
10
5-6 Using the 310 Genetic Analyzer
Click Save.
Preparing the To prepare the injection list:
Injection List
Step
Action
1
From the File menu, select New.
2
Select Sequence Injection List.
The Injection List dialog box opens.
3
a. Click the Sample Sheet field to display a pop-up menu of
sample sheets stored in the Sample Sheet folder.
b. Select the sample sheet you want to use for the run.
The injection list is automatically filled with information from the
selected sample sheet.
4
Select the HIV-310 RunModuleH from the Module pop-up menu.
5
The blank row inserted at the bottom of the injection list must
remain blank.
If you need to add a blank row, highlight the last row of the
injection list and select Clear from the Edit menu.
All items are cleared from the row.
6
Set the capillary read length to 50 cm.
Using the 310 Genetic Analyzer 5-7
Denaturing the Samples and Starting the Run
Denaturing the Before loading the samples, they must be dissolved in Template
Dye-Labeled DNA Suppression Reagent (TSR) and denatured.
Fragments To denature the samples:
Step
1
Action
Add 20µL of TSR to each sample pellet.
IMPORTANT Only prepare the number of samples that can be
run within 48 hours. Do not leave samples in TSR for longer than
48 hours.
2
Close the tubes, or cover the wells.
3
Vortex for 3–5 seconds.
4
Pulse-spin at room temperature for 5–10 seconds to collect the
contents at the bottom of the tube.
5
Heat the samples in a thermal cycler at 95 °C for 2 minutes.
6
Transfer each denatured sequencing reaction to a 0.5-mL Genetic
Analyzer Sample Tube.
7
Place a Genetic Analyzer Septum on each Genetic Analyzer
Sample Tube.
8
Load the autosampler tray with the Genetic Analyzer Sample
Tubes.
9
Click Start in the Injection List.
The run will begin after the heat plate has reached 50 °C.
5-8 Using the 310 Genetic Analyzer
Analyzing the Sequencing Data
DNA Sequencing The following table lists the settings to use in the Sample Manager
Analysis Software window of the ABI PRISM DNA Sequencing Analysis software:
Settings
Sample Manager
Choose
Basecaller
ABI-CE1
Basecaller Settings
HIV 580
See “Creating a New Basecaller Setting” below.
Dye Set/Primer file
DT POP6{BD Set-Any Primer}
Instrument file
The file you have generated on the ABI PRISM
310 Genetic Analyzer, using the dRhodamine
Matrix Standards Kit, the HIV-310 Run ModuleH,
and POP-6 polymer.
For additional instructions, see “Analyzing the Sequencing Data” on
page 6-13.
Creating a New About Basecaller Settings
Basecaller Setting The Basecaller setting in DNA Sequencing Analysis software allows
you to define automatically the number of bases that you want to
process in your sequence data files.
For the data files generated with the ViroSeq™ HIV-1 Genotyping
System, all sequences should be processed to stop at 580 bases.
Procedure
To create a new Basecaller Setting:
Step
1
Action
Start the DNA Sequencing Analysis software.
2
Select Preferences from the Edit menu.
3
Select Basecaller Settings.
The Preferences dialog box opens.
4
Click the Create a set button.
The title of the button changes to Save this set as.
Using the 310 Genetic Analyzer 5-9
To create a new Basecaller Setting:
Step
5
(continued)
Action
Select the checkbox labeled Set endpoint after n bases, and enter
580 in the text box.
The Basecaller Settings should now look like this:
s
6
Click the Save this set as button.
The following dialog box opens:
7
Enter HIV 580 in the text box.
8
Click Save.
5-10 Using the 310 Genetic Analyzer
Using the 377 DNA
Sequencer
6
Chapter Overview
6
Introduction This chapter describes the operation of the ABI PRISM® 377 DNA
Sequencer used with its corresponding autosampler tray.
In This Chapter The following topics are covered in this chapter:
Topic
See Page
Overview of the Procedure
6-2
Preparing the Instrument
6-3
Denaturing the Samples
6-8
Loading the Gel and Starting the Run for 36, 48, and 64 Lanes
6-9
Running Samples on a 96-Lane Gel
6-11
Analyzing the Sequencing Data
6-13
Assumptions The instructions in this chapter assume that you are already familiar
with the ABI PRISM 377 DNA Sequencer.
For more information about performing a sequencing run, see the
ABI PRISM 377 DNA Sequencer User’s Manual (P/N 4303613).
Using the 377 DNA Sequencer 6-1
Overview of the Procedure
At This Stage Following ethanol precipitation, the samples are ready to be run on an
automated DNA sequencer. The sequences may be in 1.5-mL
microcentrifuge tubes, MicroAmp ® 8-Strip Reaction Tubes, or
MicroAmp ® Optical 96-Well Reaction Plates.
Flow Diagram An overview of the procedure used to complete the sequencing is
shown below.
6-2 Using the 377 DNA Sequencer
Preparing the Instrument
For First Time If you are using the HIV Genotyping System for the first time you:
Users ♦ Will need to install the appropriate run modules.
♦
May need to:
–
Make a dRhodamine matrix file
–
Install the appropriate dye set/primer (mobility) file.
Run Modules A run module is a file that is used to define the run conditions during
data collection on the 377 DNA Sequencer. Run conditions include
electrophoresis voltage, temperature, and run time.
Use the run module named HIV Run Module 377-36 that is included on
the CD-ROM provided with the HIV Genotyping System. This module is
used for all gel formats on the 377 DNA Sequencer.
Do not use the other run modules on this CD-ROM because they define
run conditions that are inappropriate for the current kit configuration.
About the Dye A dye set/primer file is used by the DNA Sequencing Analysis software
Set/Primer File to compensate for the mobility effects that different dyes impart on the
fragments of the sequence ladder during electrophoresis. Use of the
proper dye set/primer file will result in more evenly spaced peaks in the
electropherograms.
For the sequences generated with the HIV Genotyping System, use the
dye set/primer file named DT {BD Set-Any Primer}.
Obtaining the Dye If you do not already have the dye set/primer file named DT {BD
Set/Primer File Set-Any Primer}, you can obtain it from:
♦
The Applied Biosystems Product Software Library web site at:
http://www.appliedbiosystems.com/techsupport
♦
Your local Field Applications Specialist. Call Applied Biosystems
Technical Support or your local sales office for more information
IMPORTANT Dye set/primer file names for the BigDye™ terminators are
similar to those for the dRhodamine terminators.
If you inadvertently select a dye set/primer file for the dRhodamine
terminators, it is possible to reprocess the data with the correct file.
Using the 377 DNA Sequencer 6-3
Installing the Run To install the run modules and Dye Set/Primer file:
Modules and Dye
Step
Action
Set/Primer File
1
Copy the HIV Run Module 377-36 into the Module folder within the
Collection software folder.
The run module is on the CD-ROM supplied with the HIV
Genotyping System.
2
If necessary, copy the DT{BD Set Any Primer} file for your
instrument into the ABI folder within the System folder.
3
Restart the Data Collection software and/or DNA Sequencing
Analysis software if either was open when the files were installed.
Preparing an How Instrument/Matrix Files Are Used
Instrument/Matrix Instrument/matrix files are used by the ABI PRISM DNA Sequencing
File Analysis software to compensate for the overlapping fluorescence
emission spectra of the different dyes in a dye set.
Preparing an The following table lists the actions to take before running your samples
Instrument/Matrix and explains where to get additional information.
File
If...
Then...
you have not already generated an
instrument file for use with the
dRhodamine Matrix Standards Kit,
and an HIV Run Module 377-36 on
the ABI PRISM ® 377 DNA Sequencer
you will need to do this while running
your first samples.
For more information about...
Refer to...
generating an instrument file
directions in the following:
♦ The ABI PRISM dRhodamine
Matrix Standards Kit User Bulletin
(P/N 904917), or
♦ The ABI PRISM 377 DNA
Sequencer User’s Manual
(P/N 4303613)
Note Although BigDye terminators and dRhodamine terminators require
different Dye Set/Primer files, both chemistries use the same instrument/matrix
file made with the dRhodamine matrix standards.
6-4 Using the 377 DNA Sequencer
Note The instrument/matrix file that you generate is specific to a particular
instrument and dye set. You cannot use an instrument/matrix file that has been
created on a different instrument or with a different dye set.
Preparing the Gel Follow the directions in the Long Ranger™ Singel pack for ABI PRISM
sequencers 377-36 cm to prepare the gel for 36, 48, and 64 lanes.
Instructions for preparing a 96-lane gel are on page 6-11. For
information on plate, spacer, and comb information, see “Sequencing”
on page 1-23.
! DANGER ! CHEMICAL HAZARD. Long Ranger Singel pack contains
ammonium persulfate, acrylamide, formaldehyde and urea. In addition,
the Long Ranger Singel pack may contain one or more crosslinkers that
have various toxicological effects. Contact FMC for further information
about the composition of your Lot. Ammonium persulfate is an oxidizer,
and contact with other materials may cause a fire. Exposure causes burns
to the eyes, skin, and respiratory tract. Acrylamide is harmful if in contact
with the skin or if swallowed. It may cause eye, skin and respiratory tract
irritation. Exposure to acrylamide may cause damage to the nervous
system and reproductive system. Acrylamide may also cause an allergic
reaction, is a possible cancer and birth defect hazard, and may cause
kidney damage. Formaldehyde may cause an allergic reaction and is a
probable human cancer hazard. Urea may cause eye, skin and respiratory
tract irritation. Please read the Long Ranger Singel pack MSDS and follow
the handling instructions. Wear appropriate protective eyewear, clothing,
and gloves.
.
Filling Out the To fill out the sample sheet:
Sample Sheet
Step
Action
1
Start the Data Collection software.
2
From the File menu, select New.
A Create New message box opens.
3
Click Sequence Sample.
4
Enter the names of your samples into the Sample Name column
using the naming convention:
sample ID-visit date-lab code-[primer-analysis date
For more information about sample naming conventions, see
page1-14.
5
In the Dye Set/Primer pop-up menu, select DT {BDSet AnyPrimer}.
6
Select the appropriate instrument/matrix file in the Instrument File
pop-up menu.
Using the 377 DNA Sequencer 6-5
To fill out the sample sheet:
Step
(continued)
Action
7
Fill down the Dye Set/Primer and Instrument File columns by clicking
the column headings and selecting the Fill Down command from
the Edit menu.
8
Enter additional information into the Project and Comment columns
if desired.
9
Save the sample sheet into the Sample Sheet folder.
Performing a Plate Perform a plate check to make sure that the plates are clean.
Check
To perform the plate check:
Step
Action
1
Mount the gel in the instrument.
2
Click Plate Check.
3
Examine the baseline data.
If...
Then...
each of the four-color
baselines is flat
continue with the procedure.
one or more of the baselines
are noisy
remove the plates from the
instrument, clean them, and
repeat the plate check.
IMPORTANT Do not use the
gel.
Setting Up a Run To set up a run:
Step
Action
1
From the File menu, select New.
2
Click Sequence Run. This opens the Run window.
3
Select Plate Check E from the Plate Check Module list.
4
Select Seq PR 36E-1200 from the Prerun Module list.
5
Select HIV Run Module 377-36 from the Run Module list.
6-6 Using the 377 DNA Sequencer
To set up a run:
Step
6
(continued)
Action
From the Lanes list, select the correct number of lanes for the gel
you are running (that is, 24, 36, and so forth).
Note You must select the number of lanes before selecting the
sample sheet.
7
Select the correct comb type for the gel you are using.
8
a. Click the Sample Sheet field to display a pop-up menu of sample
sheets stored in the Sample Sheet folder.
b. Select the sample sheet for the current run.
The Run File is automatically filled with information from the
selected sample sheet.
9
From the Instrument File list, select the instrument file that was
made with the dRhodamine Matrix Standards Kit on the instrument
you are running.
10
In the Well-to-Read Distance box, make sure that 36 cm is selected.
Prerunning the To prerun the 36-, 48-, and 64-lane gel:
36-, 48-, and
64-lane Gel Step Action
1
Add 1X TBE buffer to both lower and upper buffer chambers
(about 1500-mL total).
2
Use a syringe and needle to rinse 1X TBE buffer around the
comb, removing air bubbles.
3
Attach the heat plate and hoses.
4
Close the instrument door.
5
Click Prerun.
The Scan window is displayed.
6
Prerun the gel for approximately 20 minutes or until the
temperature reaches 50 °C.
Note
While prerunning the gel, you can denature your samples.
Using the 377 DNA Sequencer 6-7
Denaturing the Samples
Denaturing the Before loading your samples, they must be dissolved in a gel-loading
Sequencing buffer solution and denatured. We recommend preparing an excess of
Reactions formamide loading buffer solution. The volumes in the following table
will provide sufficient excess solution for the indicated number of
reactions.
Step
1
Action
Prepare the following loading buffer/formamide solution in a 1.5-mL
microcentrifuge tube. You need 5 µL for each sequencing reaction.
Prepare a fresh mix for each use.
Volumes for 1, 36, 48, 64, and 96
Reactions (µL)
Chemical
1
36
48
64
96
Formamide
5
190
250
330
500
Loading buffer
1
38
50
66
100
Final Volume
6
228
300
396
600
! WARNING ! CHEMICAL HAZARD. Formamide is harmful
if absorbed through the skin and may cause irritation to the
eyes, skin, and respiratory tract. It may cause damage to the
central nervous system and the male and female reproductive
system, and is a possible birth defect hazard. Please read the
MSDS and follow the handling instructions. Wear appropriate
protective eyewear, clothing, and gloves.
2
Resuspend each sample pellet in 5 µL of the above solution, and
vortex for 3–5 seconds.
3
Pulse-spin at room temperature and low speed for 5–10 seconds.
4
Heat the samples in a thermal cycler at 95 °C for 2 minutes.
6-8 Using the 377 DNA Sequencer
Loading the Gel and Starting the Run for 36, 48, and 64 Lanes
Loading Samples To load samples onto the gel:
Step
1
Action
Pause the prerun.
This allows the instrument to continue heating while the samples
are loaded.
2
Load the samples into alternate lanes, for example, lanes
1, 3, 5, 7....
Use the table below to select a sample volume to load.
Comb Size
Sample Loading Volume (µL)
36
1.5
48
1.0
64
0.8
3
Prerun samples into the gel for 2 minutes.
4
Pause the electrophoresis prerun.
5
Load the remaining samples into the remaining alternate lanes, for
example, lanes 2, 4, 6, 8....
Starting the Run To start the run:
Step
Action
1
In the Run window, click Cancel.
2
Click Terminate.
This ends the prerun.
Note It is very important to terminate the prerun. Data will not be
collected in the prerun mode.
3
Click Run.
4
Name the gel file.
Using the 377 DNA Sequencer 6-9
To start the run:
Step
5
(continued)
Action
Click Save to save the gel file into your run folder.
The run takes 7 hours.
The Status window should show the following setpoints:
6-10 Using the 377 DNA Sequencer
Setpoint
Value
EP Voltage
1680 V
EP Current
50 µA
EP Power
150 W
Gel Temperature
51 °C
Laser Power
40 mW
Running Samples on a 96-Lane Gel
About Running Running samples on a 96-lane gel involves some protocol modifications
Samples on a as outlined in the procedure below. The plates are prepared using
96-Lane Gel special stepped front plates, and the upper buffer chamber contains
water, not 1X TBE during the prerun step. These modifications help to
improve sequence quality when the samples are loaded. Once the gel
is loaded and prerun for 2 minutes, 10X TBE is added to the upper
buffer chamber to produce 1X TBE.
Sequencing To prepare the sequencing reactions for the 96-lane sequencing gel,
Reaction Methods use either of the following methods:
Method
See Page
Purifying the Sequencing Reactions in 96-Well Plates or Trays
4-27
Purifying Sequencing Reactions Using a 96-Well Centri-Sep
Plate
4-29
Procedure To run samples on a 96-lane gel:
Step
Action
1
Prepare the sequencing gel with the stepped front glass plate and
using the smooth/flat side of a 96-lane sharks-tooth comb.
2
After the gel is polymerized, place it on the ABI PRISM 377
instrument.
3
Prepare a 1X TBE buffer solution in the lower buffer chamber.
4
Add 540 mL of deionized water to the upper buffer chamber.
Note Running the samples into the gel with water in the upper
chamber will improve the sequence resolution.
5
Load 1 µL of each sample onto the gel using a multichannel loader.
Note If you are not loading all 96 lanes of the gel, make sure that
you add loading buffer/formamide mix to the empty wells. Loading
buffer/formamide mix helps to minimize differences in salt
concentration between lanes and improves the lane tracking after
electrophoresis. It also results in straighter tracking on the outside
lanes of the gel.
Note Using an 8-channel gel loader helps to load 96 samples. A
Kloehn loader is recommended.
Using the 377 DNA Sequencer 6-11
To run samples on a 96-lane gel:
Step
(continued)
Action
6
Prerun the samples onto the gel for 2 minutes.
7
End the prerun.
8
Remove the comb from the gel and rinse the surface of the gel with
a syringe.
9
Add 60 mL of 10X TBE to the upper buffer chamber, and mix
completely.
6-12 Using the 377 DNA Sequencer
Analyzing the Sequencing Data
Steps Before Before processing the data with the DNA Sequencing Analysis
Processing Data software, perform the following steps for each sequence:
Step
1
Action
Check the tracking for each lane on the gel image.
2
If the lane tracking is...
Then...
acceptable
proceed using the DNA
Sequencing Analysis software
not acceptable
retrack the lane.
Refer to the DNA Sequencing
Analysis Software User’s
Manual.
3
Extract data from all retracked lanes, then proceed with the DNA
Sequencing Analysis software.
Sequencing The following table lists the settings to use in the Sample Manager
Analysis Settings window. Once the settings have been verified, click the Start button.
After analysis, check the data for each sequence to determine if the
start point is appropriately set.
Parameter
Select...
Basecaller
ABI100
Basecaller Settings
HIV 580
See “Creating a New Basecaller Setting” below.
Dye Set/Primer file
DT{BD Set Any Primer}
Instrument file
The file you have generated on the
ABI PRISM 377, using the dRhodamine Matrix
Standards Kit and the HIV Run Module 377-36.
Using the 377 DNA Sequencer 6-13
Creating a New About Basecaller Settings
Basecaller Setting The Basecaller setting in the DNA Sequencing Analysis software allows
you to define automatically the number of bases that you want to
process in your sequence data files.
For the data files generated with the ViroSeq™ HIV Genotyping
System, all sequences must be processed to stop at 580 bases.
Procedure
To create a new Basecaller Setting:
Step
1
Action
Start the DNA Sequencing Analysis software, and select
Preferences from the Edit menu and Basecaller Settings from the
submenu.
The Preferences dialog box opens.
2
Click the Create a set button.
3
Select the checkbox labeled Set endpoint after n bases and enter
580 in the text box.
The title of the button changes to Save this set as.
The Basecaller Settings should now look like this:
6-14 Using the 377 DNA Sequencer
To create a new Basecaller Setting:
Step
4
(continued)
Action
Click the Save this set as button.
The following dialog box opens:
5
Enter HIV 580 in the text box, and click Save.
Using the 377 DNA Sequencer 6-15
Analyzing HIV
Sequencing Data
7
Introduction
7
In This Chapter This chapter describes how to use the ViroSeq™ HIV-1 Genotyping
System Software to perform genotyping and mutation analysis of HIV-1.
IMPORTANT The sample files must be correctly processed using the
ABI PRISM® DNA Sequencing Analysis software before the HIV-1 Genotyping
System Software can be used.
The following topics are covered in this chapter:
Topic
See Page
Installing the Software
7-2
Using the ViroSeq HIV-1 Genotyping System Software
7-6
Tutorial: Using the HIV-1 Genotyping System Software
7-10
HIV Genotyping Folder Organization
7-14
About Projects and Sequence Segments
7-15
Starting the Software
7-16
Creating a New Project
7-17
Opening a Previously Created Project
7-18
Reviewing the Assembled Sequence
7-20
Editing the Sequence
7-27
Editing the Consensus Sequence Using the View Edit Window
7-28
Reconciling Segment Mismatches
7-38
Saving Projects
7-40
Printing a Report
7-41
Setting AutoLaunch
7-43
Analyzing HIV Sequencing Data 7-1
Installing the Software
Introduction The HIV-1 Genotyping System Software is supplied on the CD provided
with the HIV Genotyping System Starter Kit.
Before Installing Make sure that your computer meets the minimum requirements for
the Software running the software. For more information about computer
requirements, see page 1-15.
Procedure To install the HIV-1 Genotyping System Software:
Step
Action
Turning Off Extensions and Disabling Virus Protection
1
Close all applications.
2
Turn off all extensions in the Macintosh® Control Panels Extensions
Manager, except for the Apple® CD-ROM extension.
If you turn off the CD-ROM extension, you will not be able to use
the CD.
3
Disable any virus protection software.
4
Restart the computer to register the changes to the Extensions
Manager.
Installing the Software
1
Insert the CD into the CD drive.
The icon for the CD will appear on the desktop.
2
Double-click the icon for the CD.
3
Double-click HIV Genotyper Installer.
A startup display appears.
7-2 Analyzing HIV Sequencing Data
To install the HIV-1 Genotyping System Software:
Step
4
(continued)
Action
Click Continue.
The following message box appears:
Pull-down menu
5
If you...
Then select...
are installing the software for
the first time
Full Install.
reinstalling the software
Reinstall Application.
Analyzing HIV Sequencing Data 7-3
To install the HIV-1 Genotyping System Software:
Step
6
(continued)
Action
Use the pull-down menu to select the disk onto which the program
will be installed.
You will usually select the name that is assigned to your hard drive
icon in the Finder, for example, Hard Drive.
7
Click Install.
The following dialog box opens:
8
Click Install.
An alert box will remind you that after installation the computer will
have to be restarted.
At this time you have the option to cancel the installation.
9
Click Yes.
If the installation is successful, the following message box opens:
7-4 Analyzing HIV Sequencing Data
To install the HIV-1 Genotyping System Software:
Step
10
(continued)
Action
Click Restart, Continue, or Quit.
The following dialog box opens:
11
a. Click Restart.
b. Turn on the extensions that you want to use in the Macintosh
computer Control Panels Extensions Manager.
c. Restart the computer a second time to register the changes to
the Extensions Manager.
Analyzing HIV Sequencing Data 7-5
Using the ViroSeq HIV-1 Genotyping System Software
Software Overview Genotype analysis of the sequencing data is performed using the HIV-1
Genotyping System Software. This software processes the six or seven
sample files that correspond to a single plasma sample to generate a
project. A project is an assembly of the sample files containing all the
sequencing information required to produce a genotyping result. The
project format supports manual review and editing of the
electropherogram data to generate a final consensus sequence for the
HIV protease and RT genes.
Sources of The HIV-1 Genotyping System Software uses three sources of
Information information in the analysis process. The following table describes where
these information-containing files are located.
File
Where located
Segments created from the DNA
Sequencing Analysis files.
In the folder selected when creating
the files.
pNL4-3 reference sequence,
GenBank Accession Number
M19921.
within the software as part of the
gene profile
Compendium of known resistance
mutations from the Los Alamos
Database (see step 6 on page 7-9).
For More For more information about using the HIV-1 Genotyping System
Information Software, the following have been included:
Item
Flow Diagram
See Page
7-7
Automated Processes
7-8
Tutorial: Using the HIV-1 Genotyping System Software
7-10
7-6 Analyzing HIV Sequencing Data
Flow Diagram The following flow diagram shows the software steps involved in the
genotyping process:
Analyzing HIV Sequencing Data 7-7
Automated The results are stored in the project file.
Processes
Automated software processing sequence:
Step
1
Action
The sample data files are imported into the HIV-1 Genotyping
System Software.
The relevant segment information are automatically extracted from
a folder that you select and are used to create the project file.
The sample name is used to group the files into projects. All titles
with identical sample names will be grouped for analysis
Note
The sample file name is not used to group the projects.
If...
Then...
you want to include comments
unique to a particular sample
file (e.g,. the primer name)
use the open square bracket ([)
to separate this information
from the sample name.
Note Any information to the
right of the open bracket is
ignored.
2
For more information
about...
See page...
Sample naming
1-14
After the project file is created, the segment electropherogram data
are automatically analyzed for mixed base positions and the
appropriate International Union of Biochemists (IUB) letter codes
are assigned.
See Appendix E, “IUB Codes.”
A position is defined as a mixed position if in one segment the
smaller peak is at least 30% of the larger peak, and a second
segment shows the presence of the smaller peak.
3
The segments are compared to the reference sequence pNL4-3 to
determine segment identity.
Based on the segment identity, regions of poor or unnecessary
sequences are automatically inactivated or trimmed.
The sequence in a trimmed region plays no further role in the
analysis. It is, however, available for viewing.
7-8 Analyzing HIV Sequencing Data
Automated software processing sequence:
Step
4
(continued)
Action
The trimmed segments are assembled and a project consensus
sequence is derived using the CAP assembly algorithm (Huang,
1992).
Positions that disagree between two overlapping segments are
categorized as Mismatches. Mismatches can be either individual
basecall differences as well as insertions and deletions (indels).
5
The consensus is compared to the pNL4-3 reference sequence.
Positions within the consensus sequence that disagree with the
reference sequence are categorized as variants (see step 6 below
for further discussion of variants).
6
The consensus is compared to the table of known HIV antiviral
resistance mutations (Korber et al., 1997).
Consensus positions that vary from
the reference and...
7
Are categorized as...
match the table of known HIV antiviral
resistant mutations
Reported Variant
are not included in the table
Novel Variant
Any position along the consensus in which at least one of the
segments has a multibase position is categorized as a “Multibase
Position.” The smaller peak height must be at least 30% of the
height of the larger peak.
If...
Then...
this multibase position results
in one or more amino acids for
this codon
each is listed by the single
letter amino acid code in the
translation.
Analyzing HIV Sequencing Data 7-9
Tutorial: Using the HIV-1 Genotyping System Software
Steps to Using the To use the HIV-1 Genotyping System Software:
Software
Step
1
Action
From the Apple menu, select About This Computer.
Make sure that there is a minimum of 32 MB of memory available
by closing nonessential applications.
2
Open the HIV-1 Genotyping System Software by double-clicking
the icon for HIV Analysis.
The HIV-1 Genotyping System Software startup display appears,
followed by the Project Status window.
The Project Status window can be empty, or it may contain a list of
projects that are currently in the Completed folder.
3
In the Project Status window, click the New button to begin a new
project.
If you want to open a project that has already been analyzed but is
not in the Completed folder:
a. Click the Find button. The Macintosh computer navigation
window opens.
b. Scroll to the location of the project and click Open.
4
a. Locate the QA10 set of data files in the QA10 folder.
The QA10 folder is located within the Demo folder in the Projects
folder of the HIV Genotyping folder.
b. Click Open when you see the list of sequence data files.
A progress box appears, showing how the HIV-1 Genotyping
System Software is processing the set of data files.
When processing is complete, the Navigation window opens.
5
Click the blue turn triangle to view the entire Navigation window with
the Alignment View of the segment assembly.
For more information, see “Reviewing the Assembled Sequence”
on page 7-20.
7-10 Analyzing HIV Sequencing Data
To use the HIV-1 Genotyping System Software:
Step
6
(continued)
Action
Click on the left end of the Navigation bar to open the View/Edit
window.
This presents the first position of interest in the sequence for the 5´
end of the alignment (primers A, D, and F).
You can take the following actions:
Step
a.
Action
To select the positions of interest that you want to
examine in your initial review of the data
a. Click the Feature Selection button in the View/Edit
window.
The Feature Selection window appears.
b. Select the checkboxes labeled Multibase Positions
and Mismatches Between Segments.
For more information, see “Setting Active Positions of
Interest” on page 7-34.
b.
Close the Feature Selection window by clicking the close
box. The selection is automatically saved.
The change in the number of positions of interest will be
apparent on the Navigation Bar (i.e., the number of
colored vertical lines will decrease).
c.
Click the Auto jump on edits button so that as you make
the edits, the cursor moves automatically to the next
position of interest to the right.
If...
Then...
you do not edit a position
of interest
click the right arrow
button to move to the
next position of interest.
Analyzing HIV Sequencing Data 7-11
To use the HIV-1 Genotyping System Software:
Step
7
(continued)
Action
Continue editing until all currently selected positions of interest
have been reviewed.
You can take the following actions:
8
To...
Then...
make edits
use letters on the keyboard or
use the buttons on the Editing
Palette (see “Editing Bases” on
page 7-35).
perform any trimming or
untrimming that is necessary
see “Trimming Sequence
Segments” on page 7-33.
When you are satisfied with your edits, you can take the following
actions:
To...
Then...
save the project
select Save from the File menu.
save the project in the FASTA
or .GT format
select Save Fasta (-F) or
Save Genotype (-G) from
the File menu.
For more information, see
“Saving Projects” on
page 7-40.
9
Review the automated processing and edits.
To review the automated processing and your manual edits to this
point, select History from the Window menu. The History window
appears.
For more information, see “The History Window” on page 7-26.
7-12 Analyzing HIV Sequencing Data
To use the HIV-1 Genotyping System Software:
Step
10
(continued)
Action
To review the electropherogram or make additional edits.
If...
Then...
you want to review the
electropherograms
go to the Feature Selection
window, and select the
features that you would like to
inspect.
For more information, see
“Setting Active Positions of
Interest” on page 7-34.
you make additional changes
11
save them as in step 8 on
page 7-12.
From the File menu, select Print (-P) to print a report.
For more information, see “Printing a Report” on page 7-41.
Analyzing HIV Sequencing Data 7-13
HIV Genotyping Folder Organization
Introduction During installation, the HIV-1 Genotyping System Software installer
creates folders that are used to store your data before, during, and after
analysis.
Folder Diagram The following diagram shows the contents of the HIV Genotyping folder:
HIV Genotyping The following table describes the items in the HIV Genotyping folder:
Folder Contents
Contents of the HIV Genotyping Folder
This folder...
Contains...
Config
Resources that are used by the software.
Project
The following items:
Folder
Description
Demo
Contains data for demonstrating
this software.
Completed
Contains completed project files.
Also contains the Reports folder,
where completed Genotype (.gt)
and FASTA (.fasta) reports are
placed.
Archives folder
Initially this folder is empty.
Move the files that you want to
save for future reference into this
folder.
7-14 Analyzing HIV Sequencing Data
Contents of the HIV Genotyping Folder
This folder...
(continued)
Contains...
Do Not Modify the Following Items
AutoLaunch
AutoLaunch application.
Use to set the day and the folder in which the HIV-1
Genotyping System Software polls the DNA
Sequencing Analysis software for sample files (see
“Setting Up the Application” on page 7-44).
quitCAP, runCAP,
and closeCAP
Scripts
Utility files that are used by the software to perform
sequence assembly.
Cap
Sequence assembly software module.
JavaClasses.jar
All the classes of executable software.
HIV Analysis
Application software.
About Projects and Sequence Segments
What Is a Project? A project is the organization and assembly of the six or seven sequence
segments that are generated from a single RT-PCR product. The project
will also contain all user-defined edits and changes to the sequence
data.
All the necessary data for each segment is included in the appropriate
project. Segments belonging to a project are identified by a unique
sample name. The name of the project is the same as the sample
name.
How Sequence The sequence segments that are contained in a project are defined by
Segments are the:
Defined ♦ Folder in which the sample files are stored.
♦
Sample name that you assigned the segments when filling out the
sample sheet of the Data Collection software.
For more information on sample naming, see page 1-14.
Analyzing HIV Sequencing Data 7-15
Starting the Software
Before Starting the Ensure that there is sufficient Finder memory by closing all
Software nonessential applications.
To Check the Amount of Memory Available
From the Apple menu, select About This Computer. Make sure that at
least 32 MB of memory is available.
Creating Projects The following table describes how to create projects manually:
Manually
To...
Then...
manually create individual projects
place into one folder all the data files
for the sample that you wish to
assemble.
Note Commonly, these files will
already be part of a run folder.
If sample files for more than one project are included in a folder,
projects will be sorted according to the sample name.
Procedure To start the HIV-1 Genotyping System Software:
Step
1
Action
Double-click HIV Analysis.
This opens the HIV-1 Genotyping System Software, and the Project
Status window appears.
2
7-16 Analyzing HIV Sequencing Data
If you want to...
Then see page...
Create a new project
7-17
Open an existing project
7-18
Creating a New Project
Procedure To create a new project:
Step
1
Action
Click New in the Project Status window.
This opens the standard Macintosh computer navigation box.
2
Navigate to the folder that contains the samples you want to use to
create a project.
3
Select any file in the folder, and click Open.
The HIV-1 Genotyping System Software creates the projects from
all the sample files that are in the folder, assembles and analyzes
them and displays the data.
Analyzing HIV Sequencing Data 7-17
Opening a Previously Created Project
Where Projects The software saves previously created projects in the Completed folder.
Are Saved All the projects that are in this folder are listed in the Project Status
window.
The following table describes the values for the Status field:
If Status is...
OK
?
Then...
the segments were found at the expected locations.
one or more input segments were not identified by the
software.
Procedure The following table describes two ways to open a project:
To open projects...
listed in the Project
Status window
Take this action
You can either...
a. Select the project
that you want to
open.
b. Click Open.
Double-click the
project name.
7-18 Analyzing HIV Sequencing Data
Result
The Navigation
window opens.
To open projects...
Take this action
present in other folders
a. In the Project Status window, select Find.
This opens a standard Macintosh computer
navigation box.
b. Navigate to the folder that contains the project
that you want to open.
c. Select the project, and click Open.
Analyzing HIV Sequencing Data 7-19
Reviewing the Assembled Sequence
About This Step Whether you have created a new project or opened an existing project,
the next step in the genotyping procedure is to review the assembled
sequence.
Reviewing Process The following table defines the steps in your reviewing process:
Step
Action
1
Use the features in the Navigation window to review the entire
assembled project.
2
You will use the View Edit window to trim poor quality data, edit the
assembled sequence, and generate a consensus sequence.
The Navigation and View Edit windows are linked, so that a change
in analysis settings results in corresponding changes in the
Navigation window.
The Navigation About the Navigation Window
Window The Navigation window provides an overview of the overlap in the
sequence segments and the number of positions of interest.
How You Can Use This Window
The following table describes actions you can perform from this window:
You can...
For more information, see...
add and remove segments from the
project
♦ “Adding Segments to a Project”
on page 7-24.
♦ “Removing Segments from a
Project” on page 7-25.
Select an area of interest in the
Navigation bar and jump to the area
of interest in the View Edit window.
7-20 Analyzing HIV Sequencing Data
page 7-21.
Navigation Window Example
The following figure shows an entire assembled project displayed in the
Navigation window.
2
1
3
4
Features of the Navigation Window
The following table describes the callouts in the “Navigation Window
Example” above.
Navigation Window Features
Page 7-21
Callout
1
Feature
Description
Turn Triangle
Clicking the turn triangle toggles between the
option of:
♦ Displaying a graphical representation of the
sequence segments’ alignment.
♦ Not displaying the graphic.
Analyzing HIV Sequencing Data 7-21
Navigation Window Features
Page 7-21
Callout
2
(continued)
Feature
Description
Vertical colored bars indicate
positions of interest
A position of interest is any base in the consensus
that is:
They are represented by
color-coded vertical lines on the
Navigation bar.
♦ Different from the HIV-1 pNL4-3 reference strain
♦ Found in the lookup table of known resistance
positions.
Resistance mutations are those mutations
reported to confer resistance to a specific
anti-viral drug. The HIV-1 Genotyping System
Software contains an internal table that lists all of
the resistance mutations known at the time of
release. This table is derived from the Los
Alamos HIV database and is updated annually.
♦ Designated as mixed base in at least one
segment at that position.
♦ A deletion relative to the reference sequence
♦ An insertion at that position.
♦ Identified to have mismatches between the
segments.
The default is to have all of the feature selections
chosen.
To...
See...
change the position of
interest criteria use the
“Setting Active
Positions of Interest”
on page 7-34.
Feature Selection
window
7-22 Analyzing HIV Sequencing Data
Navigation Window Features
Page 7-21
Callout
3
(continued)
Feature
Description
Navigation Bar
A graphical representation of the assembled
sequence with an amino acid numbering scale.
Note A consensus position can
be a position of interest based on
more than one criterion.
The positions of interest are displayed within the
graphic.
The following table defines the colors within the
assembled/consensus sequence graphic:
Color
Meaning
gray
Background (no differences relative
to the reference)
red
Active position of interest
Note A red line from top to bottom
in the navigation bar denotes an
insertion.
4
Alignment View
black
Mismatches between segments
green
Known or unknown variant between
reference and consensus
blue
Multibase position
yellow
Shows where the assembled
consensus uses data from only one
sequence segment or no sequence
segments.
The sequence segments graphic displays the
sequence segments in a project labeled with the
name and showing overlap.
Verify that the location and orientation of the
segments are similar to the figure in the “Navigation
Window Example” on page 7-21.
The segments are depicted as follows:
Feature
Meaning
Right arrow
Forward sequences
(generated with primers A–D)
Left arrow
Reverse sequences
(generated with primers F–H)
Analyzing HIV Sequencing Data 7-23
Adding Segments About Adding Segments to a Project
to a Project In certain situations, you may find it necessary to add or remove
individual segments to a project. Adding segments in this way allows
the user to specify which files are to be used in generating the project.
Typically you will add or remove segments manually if:
♦
The original sample name was incorrect.
♦
A segment sequence was repeated to improve data quality.
♦
The location of the segment was incorrect (e.g., the start and stop
points were incorrectly set so that the read length was
inappropriate).
Procedure
Note When adding segments to a project, be careful not to add a sequence
data file that is already part of the project.
To add segments to a current project:
Step
Action
1
Open the project to which you will add the segment.
2
Select Add Segment (-A) from the Edit menu.
The following window appears (see below).
7-24 Analyzing HIV Sequencing Data
To add segments to a current project:
Step
3
(continued)
Action
Click the Add button.
The standard Macintosh computer navigation box appears.
4
Navigate to the folder that contains the sample files you want to
add.
5
You can either:
♦ Select the file and click Open, or
♦ Double-click the selected file
The sample file is listed in the text area of the Add to Project
window.
6
Repeat step 5 as needed.
7
Click Submit.
The progress window appears, describing the process of adding
the segment to the project.
Removing About Removing Segments from a Project
Segments from a It may be necessary to remove a segment from a project if:
Project
♦
Excessive mismatches cannot be handled by trimming. In this
situation, you may want to repeat the sequencing for that segment
and then manually add it to the project as described above (see
“Adding Segments to a Project” on page 7-24).
♦
The original sample name was incorrect.
Analyzing HIV Sequencing Data 7-25
Procedure
To remove segments from a project:
Step
1
Action
In the Alignment View, click the segment that you want to remove.
The segment becomes highlighted with a black bold line.
2
Select Remove Segment (-R) from the Edit menu.
The progress window appears, describing the process of removing
the segment from the project.
The segment is removed from the graphic and the project.
The History The History window displays a current summary of the number of
Window known and unknown nucleotide variants relative to the reference
sequence. Subtotals of the number of known and unknown variants in
the protease and RT genes are also shown. These numbers are
updated only when changes are saved to the Project file.
Showing a Log of All Edits
When you have edited the consensus sequence, select Save from the
Edit menu.
7-26 Analyzing HIV Sequencing Data
The History window shows a permanent record of segments that were
added, removed, rejected, trimmed, or edited.
Note The large dot seen after lane number in the Data Collection software
and the DNA Sequencing Analysis software is converted by the HIV-1
Genotyping System Software to straight quotes ( " ).
Editing the Sequence
About This Step Once the project has been assembled and you have reviewed it in the
Navigation window, the next step is to review and edit the data.
Consensus A consensus sequence is calculated from the base assignments in
Sequence Defined each of the sequence segments. It may include mixed base positions
and deletions, and reflect differences among segments.
Cursor The following table describes how to show the cursor line:
To...
Then...
show the cursor line in the View Edit
window
select Toggle Position Cursor (-T)
from the Edit menu.
turn the cursor line off
select Toggle Position Cursor again.
Overview of the To edit the sequence:
Editing Procedure
Procedure
See Page
Trim the ends of each segment, if
needed, to remove poor quality base
calls.
“Trimming Sequence Segments” on
page 7-33.
Verify multibase positions.
“Setting Active Positions of Interest”
on page 7-34.
Reconcile mismatched bases (those
bases in overlapping segments that
do not agree with each other).
“Editing Bases” on page 7-35.
Analyzing HIV Sequencing Data 7-27
Editing the Consensus Sequence Using the View Edit Window
The Editing Trimming and base editing are carried out using the features of the View
Process Edit window as follows:
Step
Action
See Page
1
Trimming Sequence Segments.
7-33
2
Edit positions of interest to generate an edited
consensus sequence.
7-35
Before Manually Before manually editing the HIV-1 Genotyping System Software project,
Editing the Project make sure that in the DNA Sequencing Analysis Software the:
♦
Tracking is correct.
♦
Start and stop points are correct.
♦
Sample naming is correct.
♦
Matrix is appropriate for the analysis.
Displaying the To display the View Edit window, double-click anywhere in the
Window navigation bar in the Navigation window.
For an example of the Navigation window, see page 7-21, and for a
description of the bar, see callout 3 on page 7-23.
7-28 Analyzing HIV Sequencing Data
Window Example The following is an example of the View Edit window:
11
12
13
14
10
15
9
16
17
8
7
6
5
4
3
2
1
Analyzing HIV Sequencing Data 7-29
Features of the The following table describes the callout numbers in the previous figure:
View Edit Window
Callout
number
1
Feature
Description
Position Information box
Explains why a position in the consensus has been
identified as a position of interest.
The following table describes positions of interest and their definitions:
Item
Definition
Novel Variant
Change in the sequence that has not been reported as a resistance mutation in
the Los Alamos HIV database
Reported
Variant
A variant that is reported in the Los Alamos HIV database
Mismatch
When two or more segment sequences do not agree at a given position
Mixture
More than one nucleotide present at a single position
Indel
A base insertion or deletion in a sequence that cannot be aligned with other
segments or with the HIV-1 pNL4-3 reference strain
Insertion
A set of three or multiple of three bases that cannot be aligned with the HIV-1
pNL4-3 reference strain, but that are present in more than one segment and are
believed to have biological significance.
While the consensus/reference sequence will be aligned and not showing the
insertion, the segments will show the insertion and they will not be in alignment
with the consensus/reference sequence.
The box, shown in electropherograms in the View Edit window (see below),
represents the sequence that is not shown in the consensus/reference
sequence.
Note The insertion box is controlled by the Toggle Position Cursor (-T) from the Edit menu. If
the Toggle Position Cursor command is off, then the insertion box is not visible.
7-30 Analyzing HIV Sequencing Data
Callout
number
2
Feature
Description
Segment electropherogram
Electropherogram of a sequence segment.
The name and orientation of the segment is shown
in the box to the right of the segment
electropherogram. An example is shown below.
See callout number 6
on page 7-31
See callout number 5 on
page 7-31
See callout number 4 on
page 7-31
3
Position of interest
(currently active)
Designates the currently active position of interest
according to the current feature selections.
4
Consensus sequence
Sequence calculated from the base assignments in
each of the sequence segments.
It may include mixed base positions and deletions,
and reflect differences among segments.
5
Reference sequence
The sequence of the HIV-1 pNL4-3 reference
strain.
6
One-letter amino acid code
Identifies all possible amino acid translations of
each codon in the consensus sequence.
Note When two (or more)
amino acids are displayed in the
translation information for one
codon, this is displayed in the
printed report as:
A1 PositionN A2, A1 PositionN
A3; that is, L33I, L33V.
A = Amino Acid
7
Codon number
Identifies the codon of the gene you are editing.
8
Jump to leftmost position of
interest (
)
Click this button to move the cursor to the leftmost
position of interest.
Analyzing HIV Sequencing Data 7-31
Callout
number
9
Feature
Description
Reverse Jump button (
)
Click this button to move the cursor to the previous
position of interest.
You may also use the Reverse Arrow (¨) key on
the Macintosh computer expanded keyboard.
10
Trim button (
11
Revert button (
12
IUB code buttons/Editing Palette
window
Use to edit the consensus sequence.
Auto jump on edits checkbox
See “Moving Among Positions of Interest” on
page 7-36.
13
(
14
)
See “Trimming Sequence Segments” on
page 7-33.
)
Reverts the active position of interest in the
consensus sequence to the original base
assignments, regardless of any manual edits
performed.
)
For a list of the International Union of Biochemists
(IUB) codes, see Appendix E, “IUB Codes.”
Reverse jump checkbox
(
)
Note This is only active when
the checkbox labeled “Auto jump
on edits” is selected.
15
Feature Selection button
(
Click this button to display the feature selection
window.
)
For more information on...
using the Feature Selection window
to set active positions of interest
16
Forward Jump button (
)
See Page
7-34
Click this button to move the cursor to the next
position of interest.
Note You may also use the Forward Arrow (Æ)
key on the Macintosh computer expanded
keyboard.
17
Jump to the rightmost position of
interest (
)
7-32 Analyzing HIV Sequencing Data
Click this button to move the cursor to the rightmost
position of interest.
Trimming About Trimming Sequences
Sequence The HIV-1 Genotyping System Software automatically trims data at the
Segments ends of the segments based on recognition of the sequence segments
being analyzed. Regions of an electropherogram that have been
trimmed are indicated by a gray background. Trimmed regions remain
visible but are not used to calculate the consensus sequence.
About Manual Trimming
There are certain situations in which you may wish to manually modify
the trimmed regions. Manual trimming is normally performed when the
data quality of one segment is causing excessive mismatches. By
trimming that region of the segment, the number of mismatches can be
minimized.
To Manually Trim Regions
Step
1
Action
Click the position in the electropherogram where you want to start
the trimming procedure.
The inverted selection extends either to the right or to the left,
depending on which end of the segment is closest, and trims the
sequence to the nearest end.
Note To undo the trim selection, drag it off the window using the
mouse.
2
Click the Trim button.
A progress dialog box appears.
About Manually Untrimming
Untrimming is the process of changing the region of sequence that the
HIV-1 Genotyping System Software has automatically trimmed.
If...
Then...
you feel that too much sequence has
been trimmed automatically, and if
the data quality for that region is
acceptable
you can manually change the
trimmed region.
Analyzing HIV Sequencing Data 7-33
To Manually Untrim Regions
Step
1
Action
Click on the portion in the electropherogram where you want the
trimmed region to end.
The portion of the trimmed electropherogram that is not selected
will remain trimmed. The deselected portion that is gray will be
white and untrimmed.
2
Click the Trim button.
Setting Active What Are Active Positions of Interest?
Positions of Active positions of interest are the only positions in the project that can
Interest be edited. These positions are defined by the user in the Feature
Selection option of the View Edit window.
Procedure
To set active positions of interest:
Step
1
Action
You can either...
Result
click the feature selection
button in the View Edit window.
The feature selection window
appears.
select Analysis from the
Window menu.
2
Make the check boxes of your choice.
3
Deselect all the other checkboxes.
7-34 Analyzing HIV Sequencing Data
To set active positions of interest:
Step
4
(continued)
Action
Click the Close box to close the window.
In the assembled sequence graphic of the Navigation window, only
those positions of interest corresponding to the above selections
are identified.
Active positions of interest are indicated by red vertical lines.
Editing Bases If mismatches occur between overlapping segments, you will need to
perform manual editing to reach agreement.
To edit the consensus base at a position of interest:
Step
Action
1
Click the position of interest.
2
In the Editing Palette window (see figure below), click the button that
corresponds to the IUB one-letter code for the replacement base.
Note You may also use the letters on the Macintosh computer
keyboard to edit the sequence.
Note The IUB one-letter codes are listed in Appendix E, “IUB
Codes.”
3
Click the right arrow.
This moves the current position of interest to the next active
position of interest.
If...
Then...
you first select the Auto jump
you do not need to click the
right arrow.
on edits checkbox
The cursor automatically jumps
to the next position of interest
once the edit has been made.
Analyzing HIV Sequencing Data 7-35
Moving Among The following are the cursor controls for moving among the positions of
Positions of interest:
Interest ♦ Cursor Control Using the View Edit Menu
♦
Cursor Control Using the Navigation Window
Cursor Control Using the View Edit Menu
For more information, see “Editing the Consensus Sequence Using the
View Edit Window” on page 7-28.
View Edit menu Cursor Controls
Control Feature on the View
Edit menu
Forward jump button
(right arrow)
Take this action
Click to move to the next active position
of interest to the right.
Note You may also use the Forward
Arrow (Æ) on the Macintosh computer
expanded keyboard.
Reverse jump button (left arrow)
Click to move to the next active position
of interest to the left.
Note You may also use the Reverse
Arrow (¨) on the Macintosh computer
expanded keyboard.
Home arrow
Click to move to the first (5´ most) active
position of interest.
End arrow
Click to move to the last (3´ most) active
position of interest.
Auto jump on edits checkbox
7-36 Analyzing HIV Sequencing Data
If...
Then...
you select this
checkbox in the
View Edit window
the cursor moves
to the next
position of interest
to the right after
you click the IUB
code button for
the replacement
base.
View Edit menu Cursor Controls
Control Feature on the View
Edit menu
(continued)
Take this action
Reverse jump checkbox
If...
Then...
you select this
checkbox in the
View Edit window
the current
position of interest
automatically
jumps to the next
position of interest
to the left.
Note This works only when the
checkboxes labeled Reverse jump and
Auto jump on edits are selected.
This occurs after you click the IUB code
button for the replacement base.
Cursor Control Using the Navigation Window
For more information, see “Features of the Navigation Window” on
page 7-21.
Control Feature
To...
Then...
Navigation Bar
move the current
position of interest to
that location
click on a position of
interest in the
assembled sequence
graphic.
Analyzing HIV Sequencing Data 7-37
Reconciling Segment Mismatches
About Reconciling The following table describes how to reconcile segment mismatches:
Segment
Then...
Mismatches To...
reconcile segment mismatches after
editing the consensus sequence
a. Examine the consensus
sequence in more detail.
b. Adjust the active positions of
interest.
The active positions of interest
are set using the feature selection
window.
Active positions of interest are those
that are available for editing.
Analysis Options The following table describes the analysis options:
Description of Analysis Options
Option
Description
Novel variants from reference
Locates unreported differences
relative to the reference.
Multibase positions
Allows you to go to the consensus
sequence positions that are derived
from segments that have more than
one nucleotide at a position.
Mismatches between segments
Locates differences in a consensus
sequence position that is derived
from segments that do not agree at
that position.
Show saved positions
Locates bases that were manually
edited and saved in the project.
Insertions
Locates extra bases that code for
amino acid(s) that cannot be aligned
with the HIV-1 pNL4-3 reference
strain.
Show Resistance positions
Locates positions in the consensus
sequence that are found in the
resistance mutations table (see
“Resistance Mutations” below).
7-38 Analyzing HIV Sequencing Data
Resistance Definition of Resistance Mutations
Mutations The mutations that are listed in the Los Alamos database (Korber et al.,
1977) have been reported to confer resistance to a specific antiviral
drug. The HIV-1 Genotyping System Software contains an internal table
that lists all of the resistance mutations known at the time of the
software release. This table will be updated annually.
Changing Positions of Interest to Review in the Report
To...
Then...
review only those positions that will
change the genotyping results of the
analysis on the report
in the Feature Selection window (see
“Setting Active Positions of Interest”
on page 7-34):
♦ Uncheck all selections in the
Global Settings section.
♦ Check the Show Resistance
positions checkbox in the
Features from Gene Profile
section.
For information about printing the
report, see page 7-41.
Analyzing HIV Sequencing Data 7-39
Saving Projects
Formats in Which From the File menu you can save projects in the following formats:
to Save Projects
Choose...
To...
Save
save the manual edits made in the project.
(-S)
Save FASTA
(-F)
save the assembled sequence in the standard FASTA
format.
Many bioinformatics programs can read this format.
The FASTA files are saved to the Report folder located in
Projects:Completed folder.
Save Genotype
(-G)
save the assembled sequence in a tab-delimited format
that can be imported into spreadsheets or database
programs.
The genotype files are saved to the Report folder located
in Projects:Completed folder.
7-40 Analyzing HIV Sequencing Data
Printing a Report
About the Report Generate a project report after you have edited and reviewed the
consensus sequence. The report summarizes the genotype and quality
control information for the project.
IMPORTANT Before printing a final report, examine the quality standards in
Appendix A.
Printing the Note Before printing, you must select a printer from the Chooser.
Report From the File menu, select Print Report (-P), and click Print when the
Print dialog box appears. The report is not displayed on the computer
screen.
Report Example An example of a report is shown next.
6
7
5
8
4
9
3
10
2
1
11
Analyzing HIV Sequencing Data 7-41
Report Description The following table describes the contents of each area in “Report
Example”:
Callout
number
1
Heading
Quality Control Information.
In each pair of histogram bars, the left bar represents the
number before editing and the right bar is the total number
after editing.
2
Insertions
Total number of nucleotide insertions.
3
Novel nucleotide variants.
Total number of nucleotide changes that result in novel amino
acid variants that are not reported in the Los Alamos HIV
database.
4
Reported nucleotide variants.
Total number of nucleotide changes that result in amino acid
variants that are reported in the Los Alamos HIV database.
5
HIV-1 Genotyping System Software version number and the
version of database.
6
Sample Name.
7
Date the report was printed.
8
Summary of project consensus sequence.
9
Reported variants at the amino acid level.
10
Novel variants at the amino acid level.
11
Quality Control Information legend.
Heading
Description
Mismatches
Nucleotide bases in a segment that do not agree with
the bases in the overlapping segment(s).
Variants
Amino acid changes resulting from nucleotide changes.
Mixtures
More than one nucleotide detected at a single position,
due to a mixture of viral strains.
Singles
Positions of interest in single coverage area.
Edits
Total number of edits performed.
7-42 Analyzing HIV Sequencing Data
Setting AutoLaunch
About The AutoLaunch folder contains the AutoLaunch application.
AutoLaunch AutoLaunch is an independent program that allows the HGS software to
create projects automatically from sample files in a run folder.
Note
Using the AutoLaunch application is optional.
How to Use Start this application, and leave it running. The AutoLaunch program
AutoLaunch must be running to launch the analysis. You can specify a time each day
for the AutoLaunch program to review the contents of a run folder to
determine if new sample files have been generated from which projects
can be created. The AutoLaunch program is particularly useful if you
have performed an overnight sequencing run because it can create
projects that will be ready for review.
Automatically If you make an alias of the AutoLaunch application and put the alias in
Starting your startup folder, when you turn on your Macintosh computer the
AutoLaunch application will start.
To make an alias of the application, select the icon and click -M. Put
the alias in your Startup Items folder, which is located in the System
Folder.
Analyzing HIV Sequencing Data 7-43
Setting Up the To set AutoLaunch:
Application
Step
1
Action
Open the HIV Genotyping folder, open the AutoLaunch folder, and
take the following action:
a. Place the folder titled PutMeInYourRunFolder in the Run folder.
b. Double-click the AutoLaunch application, which has the following
icon:
The following window opens.
2
Navigate to the Run folder, and click Open.
The Run folder is located in the Collection Software folder in the
ABI PRISM ® 377 and ABI PRISM ® 310 Data Collection software.
3
Use the Earlier and Later buttons to adjust the hour.
4
Close the dialog box. The program is still running.
AutoLaunch runs as follows:
a. Polls the folder at the set time, waits 5 minutes before polling the
folder again to ensure that the folder is stable, before to
launching the HIV-1 Genotyping System Software.
b. The application sets the polling time for one day later and runs in
the background.
Reopening or The following table explains how to reopen and quit the AutoLaunch
Quitting application:
AutoLaunch
To...
Go to...
reopen the AutoLaunch window
the Apple menu and select About...
7-44 Analyzing HIV Sequencing Data
To...
Go to...
quit the AutoLaunch application
the Apple menu and select Quit
(-Q).
To...
See...
create projects manually in the HIV-1
Genotyping System Software
“Creating a New Project” on
page 7-17.
Before Manual Verify the following:
Editing of the ♦ The tracking is correct.
Projects
♦
The start and stop points are appropriate.
♦
The samples are named properly.
♦
The matrix from the correct instrument is used.
Analyzing HIV Sequencing Data 7-45
Troubleshooting
8
8
Troubleshooting Table
How to Use Use the following troubleshooting table to diagnose and solve problems.
The troubleshooting recommendations are based on the assumption
that all kit reagents are stored according to their manufacturers’
specifications and that the directions in this manual have been followed
correctly.
Troubleshooting Table
Observation
Possible Causes
Recommended Action
Presence of precipitate in
Viral Lysis Buffer.
Storage temperature is too
low.
♦ Warm the buffer in a 37 ˚C water bath
until the precipitate is dissolved.
Performance is not
affected once the
precipitate is redissolved.
♦ Store at 2–8 ˚C.
♦ PCR product for a
sample is not visible on
the agarose gel.
But
♦ Positive Control shows
a clear band.
Not enough RNA in
RT-PCR.
If the sample
was...
resuspended in
100 µL Sample
Diluent
Repeat DNA
purification step,
but resuspend
RNA in 50 µL
Sample Diluent.
resuspended in
50 µL Sample
Diluent
Repeat RNA
purification step,
but this time start
with 1 mL plasma.
And
♦ Mass ladder is clear
and well defined.
Then...
Troubleshooting 8-1
Troubleshooting Table
(continued)
Observation
Possible Causes
Recommended Action
♦ PCR product for a
sample is not visible on
the agarose gel.
Residual ethanol
supernatant was left in the
tubes during the RNA
washing steps.
Carefully remove the ethanol
supernatant, following the instructions at
each step (see “Washing the RNA Pellet”
on page 4-7).
Viral RNA pellet may have
been lost after
precipitation.
Allow ethanol to evaporate by leaving the
tube cap open.
♦ PCR product for a
sample is not visible on
the agarose gel.
Thermal cycler used for
RT or PCR is not
calibrated correctly.
Check calibration of the thermal cycler.
And
RNase contamination
leading to degradation of
RNA.
♦ Decontaminate your work space and
tools.
But
♦ Positive Control shows
a clear band.
And
♦ Mass ladder is clear
and well defined.
♦ PCR product for the
Positive Control is not
visible.
But
♦ Mass ladder is clear
and well defined.
The orientation mark on the tube should
face the outside rim of the rotor during
centrifugation, and the supernatant must
be carefully removed from the side
opposite the orientation mark (see
“Precipitating Viral RNA” on page 4-6).
♦ Use fresh reagents.
♦ Repeat RT-PCR with positive control.
Poor yield of PCR product
after Microcon®
purification.
♦ Repeat RT-PCR. Load product onto an
agarose gel before Microcon
purification. If smear is seen at
approximately 100 bp, amplicon
contamination of PCR may be
suspected.
♦ Make sure that the thermal cycler was
preheated to 42 ˚C before inserting the
reaction tubes for the RT reaction.
♦ Make sure that the RT reactions were
set up on ice or on a cold block.
8-2 Troubleshooting
Troubleshooting Table
(continued)
Observation
Possible Causes
Recommended Action
♦ A 1.8 kb PCR band with
an intensity greater
than the 2.0 kb mass
ladder band.
Too much RNA input into
the RT-PCR.
♦ Dilute RNA 1:10 with RNA Diluent,
then repeat RT-PCR.
Reagents and/or samples
were not kept at 2–6 ˚C
until the start of the RT
reaction.
♦ Keep all samples and reagents on ice.
And
♦ Nonspecific bands on
the agarose gel, which
are >10% of the 1.8 kb
PCR band.
But
♦ RNA control has a clear
and well-defined band.
And
♦ Mass ladder is clear
and well defined.
All of the following:
♦ RT-PCR bands appear
smeared on the
agarose gel.
♦ RNA control bands
appear smeared.
♦ Mass ladder is clear
and well defined.
Any of the above
conditions, when the mass
ladder is either absent or
abnormal in any way.
PCR product samples
were heated at high
temperature, then quickly
cooled resulting in
denatured PCR product.
Poor agarose gel
conditions.
♦ Move tubes quickly to the thermal
cycler, which is prewarmed to 42 ˚C.
♦ Reheat samples, then slowly cool to
allow reformation of double-stranded
DNA.
♦ Use new agarose, running buffer,
loading buffer, and ethidium bromide.
♦ Rerun the agarose gel.
Troubleshooting 8-3
Troubleshooting Table
(continued)
Observation
Possible Causes
Recommended Action
Sequencing
electropherogram
fluorescence intensity is
too low (<100).
♦ The concentration of
the sequencing
template is below the
range of the assay.
♦ If sufficient PCR product remains,
repeat the sequencing reactions.
♦ The sample was lost
during ethanol
precipitation.
♦ If necessary, repeat the RT-PCR
reaction and Microcon purification.
♦ Use a lower dilution of the PCR
product and repeat the sequencing
reactions.
Make sure that the absolute ethanol you
used is fresh. If in doubt, start again with
a new bottle.
Make sure that the proper volume of
3 M sodium acetate was added to the
sodium acetate/EtOH mixture used for
the precipitation steps.
Thorough mixing at this step is very
important.
Make sure that you do not disturb the
pellet when aspirating supernatant.
After resequencing the sample,
resuspend the dried pellet in 3 µL (rather
than 5 µL) Formamide:Loading Buffer.
Run a BigDye sequencing standard
(P/N 4304154) to verify:
♦ Gel quality.
♦ That the instrument is operating within
specifications.
Centrifugation forces for
the precipitation steps
were incorrect.
Follow instructions for the precipitation
steps exactly as written.
Sequencing
electropherogram
fluorescence intensity is
too high (peak tops are cut
off, peaks are too wide at
the beginning of the run).
The concentration of the
sequencing template is
above the range of the
assay.
♦ Make a larger dilution of the PCR
product prior to sequencing.
Dye blobs are present at
the beginning of the
sequence, obscuring the
electropherogram peaks.
Incomplete removal of
unincorporated BigDye™
Terminators.
Make sure that you adequately vortex
samples during the washing steps.
8-4 Troubleshooting
♦ Repeat the sequencing reactions.
Troubleshooting Table
(continued)
Observation
Possible Causes
Recommended Action
Noise in the sequencing
data.
Residual ethanol
supernatant was left in the
reaction during pelleting
and washing steps.
Carefully remove the ethanol
supernatant, following the instructions at
each step.
Poor matrix.
♦ Make another matrix each time your
instrument has been serviced,
especially if adjustments were made to
the optical system.
♦ Run a BigDye™ sequencing standard
(P/N 4304154) to verify gel quality.
Troubleshooting 8-5
Quality Standards
A
A
Introduction The quality of your genotyping data depends on many factors. Before
producing a final report, examine the quality standards described below
and evaluate whether your report will meet these standards.
Quality of the A sequence file from an individual primer should pass these quality
Primer Sequence standards:
♦
Data was analyzed using the ABI100 basecaller (ABI PRISM® 377
DNA Sequencer) or the ABI CE-1 (ABI PRISM® 310 Genetic
Analyzer).
♦
Data was analyzed with DNA Sequencing Analysis software version
3.1 to 3.3.
♦
The peak spacing is between 9.1 and 14 (inclusive).
Reasons for Repeat the sequencing from the appropriate primer if there is:
Repeating the ♦ Disagreement in any base call between forward and reverse
Sequencing
primers that cannot be reconciled. If there is any disagreement,
repeat the forward and reverse primer reactions.
♦
The presence of one or more insertion or deletion in the sequence
of one primer that have not been verified by the opposite sense
primer.
Quality Standards A-1
Quality of the The characteristics of a high quality consensus sequence are that:
Consensus ♦ There are no unresolved ambiguities (Ns).
Sequence
♦
There are data from sequences in both orientations for each base
reported in the consensus, except at the 3´ -most end and the 5´
-most end, if only the D primer sequence is used in the consensus.
♦
Base mixtures are verified by sequencing in both orientations. In at
least one orientation:
♦
A-2 Quality Standards
–
The smaller peak should be at least 30% of the maximum peak
height.
–
Both peaks should be clearly visible in the second orientation
but do not have to meet the 30% criteria.
All the individual sample files used to generate the consensus meet
the individual quality criteria.
Preventing RNA
Degradation
B
B
Introduction To be successful with this genotyping procedure, it is essential to
prevent degradation of your RNA samples.
How RNA Is RNA is degraded by RNases. These enzymes occur naturally in cells
Degraded and are liberated during cell lysis. RNases can remain in samples
derived from cells if purification is not complete. In addition, RNases
can be introduced into samples by contact with surfaces that we have
touched. This is because our skin secretes RNases.
RNases are very stable and do not need any cofactors, so they linger
on surfaces and remain functional under a wide range of environmental
conditions. They have a high activity, so only a small amount of
contamination can cause significant loss of a sample of RNA.
Sources of Sources of RNase contamination include:
Contamination ♦ General laboratory glassware and plasticware
♦
Hands
♦
Contaminated solutions
Preventing RNA Degradation B-1
Precautions Follow these precautions during the genotyping procedure to help
prevent RNA degradation (Sambrook et al., 1989).
♦
Purchase gel solutions from a MLS which has analyzed solutions
for the absence of RNases and DNases.
♦
Use only new sterile plasticware.
♦
Keep separate stocks of chemicals for use with RNA only.
♦
Keep a selection of glassware, plasticware, and chemicals for use
with RNA sample preparation only.
♦
Bake all glassware and metal spatulas in an oven at 300 °C for at
least 4 hours.
♦
Wear gloves at all times and change them frequently.
♦
Select plasticware that is resistent to chloroform and either:
–
Rinse with chloroform.
! WARNING ! CHEMICAL HAZARD. Chloroform is extremely toxic
and a potential human carcinogen. This chemical is highly corrosive to
skin and eyes. Please read the MSDS and follow the handling instructions.
Wear appropriate protective eyewear, clothing, and gloves.
–
Treat all water and salt solutions with diethylpyrocarbonate
(DEPC), which inactivates RNases. (Solutions containing EDTA
cannot be treated with DEPC).
To treat solutions:
Step
1
Action
Add DEPC to a concentration of 0.2% (v/v).
CAUTION CHEMICAL HAZARD. Diethylpyrocarbonate
(DEPC) is a combustible liquid and vapor. It may be
harmful if swallowed or inhaled. Exposure may cause
irritation to the eyes, skin and respiratory tract. Please
read the MSDS and follow the handling instructions. Wear
appropriate protective eyewear, clothing, and gloves.
B-2 Preventing RNA Degradation
2
Store for at least 12 hours at 37 °C.
3
Heat to 100 °C for 15 minutes or autoclave for 15 minutes at
15 lb/sq. in. on the liquid cycle.
Reference
C
C
DAIDS Virology Manual for HIV Laboratories. 1977. Publication NIH, 97,
3828. U.S. Department of Health and Human Services, Washington,
D.C.
Huang, X. 1992. A contig assembly program based on sensitive
detection of fragment overlaps. Genomics 14:18–25.
Korber, B. et_al., eds. 1997. Human Retroviruses and AIDS 1997: A
Compilation and Analysis of Nucleic Acid and Amino Acid Sequences.
Los Alamos (NM): Theoretical Biology and Biophysics Group, Los
Alamos National Laboratory.
http://hiv-web.lanl.gov/HTML/compendium.html. Accessed 16 Aug.
1999.
Kwok, S. and Higuchi, R. 1989. Avoiding false positives with PCR.
Nature 339:237–238.
Mullis, K.B. and Faloona, F.A. 1987. Specific synthesis of DNA in vitro
via a polymerase-catalyzed chain reaction. Methods Enzymol.
155:335–350.
Saiki, R.K., et al. 1985. Enzymatic amplification of b-globin genomic
sequences and restriction site analysis for diagnosis of sickle cell
anemia. Science 230:1350–1354.
Saiki, R.K., et al. 1988. Primer-directed enzymatic amplification of DNA
with a thermostable DNA polymerase. Science 239:487–491.
Sambrook, J. et al., 1989. Molecular Cloning: A Laboratory Manual.
Cold Spring Harbor (NY): Cold Spring Harbor Laboratory Press. 3 v.
U.S. Department of Health and Human Services Occupational Safety
and Health Administration. 1998. Occupational Safety and Health
Standards, Toxic and Hazardous Substances: Bloodborne pathogens.
29 CFR §1910.1030.
Reference C-1
Amino Acid Codes D
D
The following table lists the amino acids, and the corresponding
three-letter and one-letter codes.
Three-Letter
Code
One-Letter Code
Alanine
Ala
A
Arginine
Arg
R
Asparagine
Asn
N
Aspartate or Aspartic acid
Asp
D
Cysteine
Cys
C
Glutamine
Gln
Q
Glutamate or Glutamic acid
Glu
E
Glycine
Gly
G
Histidine
His
H
Isoleucine
Ile
I
Amino Acid
Leucine
Leu
L
Lysine
Lys
K
Methionine
Met
M
Phenylalanine
Phe
F
Proline
Pro
P
Serine
Ser
S
Threonine
Thr
T
Tryptophan
Trp
W
Tyrosine
Tyr
Y
Valine
Val
V
Amino Acid Codes D-1
IUB Codes
E
E
The following table lists the International Union of Biochemists (IUB)
codes and complements:
IUB Codes
Complements
A = adenosine
S = G or C (Strong—3 H
bonds)
A
T,
U
R
Y
C = cytidine
W = A or T (Weak—2 H bonds)
C
G
Y
R
G = guanosine
Y = C or T (pYrimidine)
G
C
K
M
T = thymidine
B = C, G, or T
T
A
M
K
U = uracil
D = A, G, or T
U
A
S
W
K = G or T (Keto)
H = A, C, or T
D
H
W
S
M = A or C (aMino)
V = A, C, or G
H
D
B
V
R = A or G
(puRine)
N = aNy base
N
N
V
B
IUB Codes E-1
Glossary
This glossary includes some of the special terms used in this manual. If a special term is not
defined here, check the index to see if it is explained elsewhere in the manual.
Assembled Sequence
A sequence that is assembled from individual sequence segments but
which has not been edited to make a consensus sequence.
Consensus Sequence
A sequence that results after the assembled sequence is edited.
Crucial Position
A base that if changed will change the genotypic assignment.
Discrepancy
The state that exists when the consensus sequence does not agree with
the reference sequence.
Edited Position
A base that has been edited to produce the consensus sequence.
Insertion
Additional groups of 3 bases that cannot be aligned with the HIV-1 pNL4-3
reference strain, but that are found in all segments and are believed to
have biological significance.
Mismatch
The instance when two or more segment sequences do not agree.
Mixture
The state of more than one nucleotide showing at a single position in a
segment.
Multibase Position
A base position that the DNA Sequencing Analysis software basecaller has
been unable to call as a single, specified base.
Novel Variant
A change in the sequence that produces an amino acid change that is not
associated with a resistance mutation reported in the Los Alamos HIV
database.
Project
The sequence segments, assembled sequence, and consensus sequence
that are all part of a single genotyping analysis.
Glossary-1
Resistance Position
(Known Variant)
A base position that is known to produce an amino acid change that
confers resistance to one or more particular anti-HIV drugs.
Reported Variant
An amino acid variant that is reported in the Los Alamos HIV database.
ACTG
Abbreviation for Aids Clinical Trials Group.
Segment
A single sequence derived from one primer and stored as one sample file.
Unknown Variant
A base position that is identified as an amino acid mutation that has not
previously been documented.
Glossary-2
Index
Numerics
310 Genetic Analyzer
analyzing the sequencing data 5-9 to 5-10
denaturing samples and starting the run 5-8
preparing the Injection List 5-7
preparing the instrument 5-3 to 5-5
preparing the Sample Sheet 5-6
procedure overview 5-2
table of modules 5-3, 6-3
377 DNA Sequencer, using
analyzing the sequencing data 6-13 to 6-15
denaturing the samples 6-8
loading the gel and starting the run 6-9
preparing the instrument 6-3 to 6-7
procedure overview 6-2
running samples on a 96-lane gel 6-11 to
6-12
96-lane gel
running samples 6-11 to 6-12
96-well
ethanol precipitation of sequencing reactions
in plates or trays 4-27 to 4-28
purifying sequencing reactions using
Centri-Sep plate 4-29 to 4-30
A
ABI Prism 310
analyzing the sequencing data 5-9 to 5-10
denaturing samples and starting the run 5-8
preparing the Injection List 5-7
preparing the instrument 5-3 to 5-5
preparing the Sample Sheet 5-6
procedure overview 5-2
ABI Prism 377, using
analyzing the sequencing data 6-13 to 6-15
denaturing the samples 6-8
loading the gel and starting the run 6-9
preparing the instrument 6-3 to 6-7
procedure overview 6-2
running samples on a 96-lane gel 6-11 to
6-12
ACTG, defined Glossary-2
adding segments to a project 7-24 to 7-25
AIDS Clinical Trial Group, defined Glossary-2
amino acid codes, table of D-1
amplified DNA work area 2-11
AmpliTaq DNA Polymerase enzyme, description
of 1-10
AmpliTaq Gold DNA Polymerase enzyme,
description of 1-10
analysis settings, changing 7-38 to 7-39
analyzing sequencing data
ABI Prism 310 5-9 to 5-10
ABI Prism 377 6-13 to 6-15
assembled Sequence, defined Glossary-1
AutoLaunch 7-43 to 7-45
B
biological safety cabinet
to prevent contamination
2-6
C
carryover, as a source of laboratory
contamination 2-4
chloroform hazard B-2
codes
amino acid, table of D-1
computer requirements 1-15
consensus sequence
restoring original 7-32
consumables user supplied 1-22 to 1-24
contamination
sources of laboratory contamination 2-4 to
2-5
by equipment or work environment 2-4
cross-contamination during sample
prep 2-4
PCR product carryover 2-4
crucial position, defined Glossary-1
cursor, toggling 7-30
customer support
e-mail address 1-25
help 1-25 to 1-30
Internet address 1-29
Index-1
telephone/fax 1-26 to 1-28
cycle sequencing
performing the reactions 4-21 to 4-22
primers 1-9 to 1-10
D
Data Collection software, described 1-12
denaturing samples
310 Genetic Analyzer 5-8
377 DNA Sequencer 6-8
discrepancy, defined Glossary-1
DNA
for sequencing, preparation of 1-21
Sequencing Analysis software 1-13
DNA extraction work area 2-9 to 2-10
Documents on Demand 1-30
dye set
310 Genetic Analyzer 5-3, 6-3
E
editing
restoring original consensus 7-32
showing history of edits 7-26
trimming sequence segments 7-33
e-mail, address for technical support 1-25
enzymes, provided with system 1-10
ethidium bromide hazard 4-18
evidence
handling work area 2-9
exporting projects 7-40
editing the sequence
about 7-27
editing the sequence, using the View Edit
window 7-28 to 7-37
folder organization 7-14
generating a report 7-41
installing 7-2 to 7-5
opening a project 7-18
overview of the procedure 7-6 to 7-9
projects and sequence segments,
about 7-15
quality standards, judging A-1 to A-2
reviewing the assembled sequence 7-20 to
7-26
saving projects 7-40
starting the software 7-16
tutorial, using the software 7-10 to 7-13
genotyping process, described 1-6
guidelines
laboratory setup
design and organization 2-6 to 2-12
DNA extraction work area 2-9 to 2-10
evidence handling work area 2-9
PCR setup work area 2-10
sources of laboratory
contamination 2-4 to 2-5
cross-contamination during sample
prep 2-4
from equipment or work
environment 2-4
PCR product carryover 2-4
F
FASTA format, saving in format 7-40
Feature Selection window, using 7-38 to 7-39
G
gel
loading and starting run 6-9
preparing the gel 6-5
running samples on a 96-lane gel 6-11 to
6-12
GeneAmp PCR System 9600 and 9700 3-3
Genotype format, saving in format 7-40
genotyping HIV
changing analysis settings 7-38 to 7-39
Index-2
H
help
e-mail address 1-25
Internet address 1-29
telephone hours 1-25
telephone/fax 1-26 to 1-28
troubleshooting table 8-1 to 8-5
History window, about 7-26
HIV Genotyping System
about 1-5 to 1-9
component information 1-9 to 1-11
controls 1-11
materials and equipment 1-16 to 1-19
software 1-12 to 1-15
installing 7-2 to 7-5
user-supplied equipment and
consumables 1-22 to 1-24
user-supplied materials and reagents 1-20
to 1-21
HIV Genotyping System Software
about 1-12 to 1-15
changing analysis settings 7-38 to 7-39
editing the sequence 7-27 to 7-37
folder organization 7-14
generating a report 7-41
installing 7-2 to 7-5
opening a project 7-18
overview of procedure 7-6 to 7-9
projects and sequence segments,
about 7-15
quality standards, judging A-1 to A-2
reviewing the assembled sequence 7-20 to
7-26
saving projects 7-40
setting folder for analyzed files 7-43 to 7-45
software 1-12 to 1-15
starting the software 7-16
tutorial, using the software 7-10 to 7-13
I
Injection List, preparing 5-7
insertion box, toggling using the Toggle Position
Cursor command 7-30
Insertion, definition Glossary-1
installing
HIV software 7-2 to 7-5
run modules and dye set/primer files 5-4
instrument file, preparing for 377 DNA
Sequencer 6-4
Internet address
Documents on Demand 1-30
isolating the virus 4-4 to 4-8
L
laboratory setup
amplified DNA work area 2-11
design and organization 2-6 to 2-12
DNA extraction work area 2-9 to 2-10
evidence handling work area 2-9
PCR setup work area 2-10
sources of laboratory contamination 2-4 to
2-5
cross-contamination during sample
prep 2-4
from equipment or work
environment 2-4
PCR product carryover 2-4
loading volume 6-9
M
materials and equipment
contents of system 1-16
kit validation 1-19
modules and storage conditions 1-17 to
1-18
parts sold separately 1-16
run modules 1-19
software 1-16
user-supplied equipment 1-22 to 1-24
user-supplied materials 1-20 to 1-21
microcentrifuge tubes, sterilizing 2-9
microcentrifuge tubes, using to purify DNA 4-23
to 4-26
mismatch, defined Glossary-1
Mixture, definition Glossary-1
multibase position, defined Glossary-1
MuLV reverse transcriptase enzyme, description
of 1-10
N
negative control, described 1-11
noise, troubleshooting 8-5
P
PCR
GeneAmp PCR System 9600 and 9700 3-3
product carryover as a source of
contamination 2-4
product carryover, source of laboratory
contamination 2-4
troubleshooting 8-1 to 8-2
PCR product precautions 2-4
plates
using 96-well Centri-Sep plate 4-29 to 4-30
using to purify DNA 4-27 to 4-28
positive RNA control, described 1-11
Index-3
precautions
setting up
amplified DNA work area 2-11
PCR work area 2-10
RNA extraction work area 2-9 to 2-10
primer file
310 Genetic Analyzer 5-3, 6-3
printing, reports 7-41
projects
about 7-15
adding segments 7-24 to 7-25
defined Glossary-1
exporting in FASTA format 7-40
exporting in Genotype format 7-40
opening 7-18
removing segments 7-25
working with 1-15
purifying dye-labeled DNA
in microcentrifuge tubes 4-23 to 4-26
in plates or trays 4-27 to 4-28
using 96-well Centri-Sep plate 4-29 to 4-30
Q
quality standards, judging
A-1 to A-2
R
reagents 1-20 to 1-21
removing segments from a project 7-25
report, generating 7-41
resistance mutations, defined 7-39
Revert button 7-32
RNA B-1 to B-2
RNase inhibitor 1-11
run modules
310 Genetic Analyzer 5-3 to 5-5
377 DNA Sequencer 6-3 to 6-7
S
safety guidelines, preparing sequencing
samples 2-13 to 2-14
sample naming conventions 1-14
Sample Sheet, completing
310 Genetic Analyzer 5-6
377 DNA Sequencer 6-5
samples
amplifying viral cDNA by PCR 4-13 to 4-15
Index-4
generating viral cDNA by reverse
transcription 4-9 to 4-12
guidelines for preparing sequencing
samples 2-2
isolating vial RNA from blood plasma 4-4 to
4-8
loading volume 6-9
performing the cycle sequencing
reactions 4-21 to 4-22
planning your work 4-2 to 4-3
preparing DNA for sequencing
reaction 4-16 to 4-20
purifying dye-labeled DNA
ethanol precipitation in 96-well plates or
trays 4-27 to 4-28
using 96-well Centri-Sep plate 4-29 to
4-30
purifying dye-labeled DNA in microcentrifuge
tubes 4-23 to 4-26
safety guidelines 2-13 to 2-14
saving projects 7-40
segment, defined Glossary-2
sequencing
amplifying viral cDNA by PCR 4-13 to 4-15
generating viral cDNA by reverse
transcription 4-9 to 4-12
guidelines for preparing samples 2-2
isolating viral RNA from blood plasma 4-4
to 4-8
performing the cycle sequencing
reactions 4-21 to 4-22
planning your work 4-2 to 4-3
preparing DNA for sequencing
reactions 4-16 to 4-20
purifying dye-labeled DNA
in microcentrifuge tubes 4-23 to 4-26
in plates or trays 4-27 to 4-28
using 96-well Centri-Sep plate 4-29 to
4-30
safety guidelines 2-13 to 2-14
troubleshooting 8-4 to 8-5
software
data flow diagram 1-12
DNA Sequencing Analysis software 1-13
HIV Genotyping software
changing analysis settings 7-38 to 7-39
editing the sequence
about 7-27
using the View Edit window 7-28 to
7-37
folder organization 7-14
generating a report 7-41
installing 7-2 to 7-5
opening a project 7-18
overview 7-6 to 7-9
projects and sequence segments,
about 7-15
quality standards, judging A-1 to A-2
reviewing the assembled
sequence 7-20 to 7-26
saving projects 7-40
starting the software 7-16
tutorial, using the software 7-10 to 7-13
part number 1-16
sterilizing microcentrifuge tubes 2-9
evidence handling work area 2-9
PCR setup work area 2-10
WWW address
Documents on Demand 1-30
Applied Biosystems 1-29
T
technical support 1-25 to 1-30
e-mail address 1-25
Internet address 1-29
telephone/fax 1-26 to 1-28
thermocyclers, programming 3-3
Toggle Position Cursor command 7-30
trays, using to purify DNA 4-27 to 4-28
trimming sequence segments 7-33
troubleshooting table 8-1 to 8-5
tutorial, using the software 7-10 to 7-13
U
ultraviolet (UV) light and destruction of DNA
2-6
V
viral cDNA
amplifying by PCR 4-13 to 4-15
generating by reverse transcription
4-12
preparation of 1-20
4-9 to
W
work area
amplified DNA work area 2-11
DNA extraction work area 2-9 to 2-10
Index-5
Headquarters
850 Lincoln Centre Drive
Foster City, CA 94404 USA
Phone: +1 650.638.5800
Toll Free: +1 800.345.5224
Fax: +1 650.638.5884
Worldwide Sales Offices
Applied Biosystems vast distribution and
service network, composed of highly trained
support and applications personnel, reaches
into 150 countries on six continents. For
international office locations, please call our
local office or refer to our web site at
www.appliedbiosystems.com.
www.appliedbiosystems.com
Applied Biosystems is committed to providing the
world’s leading technology and information for life
scientists.
Printed in the USA, 12/2000
Part Number 4315267_Rev3