1
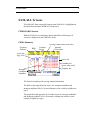
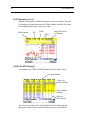
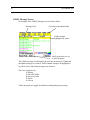
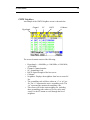
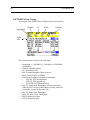
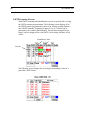
ZK-SAM, ZK-SAMp,
ZK-MPS, ZK-MPSp
User Manual
ZK Celltest, Inc.
256 Gibraltar Drive
Suite 109
Sunnyvale, CA 94089
(Tel) 408.752.0449 (Fax) 408.752.0477
Web: www.zk.com
e-mail: [email protected]
Release Version: 10.4
Release Date: March 1, 2012
ZK User Manual
0
Table of Contents
Configurations ....................................................................................................................1
Features Table .........................................................................................................1
Compatible Devices ................................................................................................1
Quick Start ..........................................................................................................................2
Voice Call Testing ..................................................................................................2
Data Call Testing ....................................................................................................2
Product Description ............................................................................................................3
ZK-SAM .................................................................................................................3
ZK-SAMp ...............................................................................................................3
ZK-MPS ..................................................................................................................3
ZK-MPSp ................................................................................................................3
Operation & Screens ...........................................................................................................4
Status Elements .......................................................................................................4
Compact Flash Memory Card .....................................................................4
Device Port 1, 2, 3, 4 and 5 Indicators ........................................................5
Zoom Line ...................................................................................................5
Hyperband Indicator .......................................................................5
Battery Level Indicator ...............................................................................6
Memory Indicator .......................................................................................6
Markers .......................................................................................................6
Time and GPS .............................................................................................6
WAAS .........................................................................................................7
Main Menu ..............................................................................................................8
SAM-ALL Screens .................................................................................................9
CDMA/EvDO Screens ................................................................................9
CDMA Summary ...........................................................................9
EvDO Summary Screen ................................................................10
CDMA/EAMPS Handoff ..............................................................10
EvDO Handoffs ............................................................................11
CDMA Message Screen ................................................................12
CDMA EvDO Message Screen ....................................................13
PN Call Follow Screen .................................................................14
CDMA EvDO Data Testing Screen ..............................................15
CDMA/EvDO Scanning Screens ..............................................................16
PN Scan Screen (CDMA and EvDO) ...........................................16
EvDO Scanning Screens ...............................................................17
GSM/UMTS/HSPA Device Screens ........................................................18
GSM Summary 1 ..........................................................................18
GSM Neighbor Screen ..................................................................19
GSM Handoff ...............................................................................19
GSM Messages .............................................................................20
1
ZK Celltest, Inc.
GPRS/EDGE Data Testing Screen ...............................................21
UMTS Summary - Graph .............................................................22
UMTS Neighbors ..........................................................................23
UMTS/HSPA Data Testing ..........................................................24
GSM/UMTS Scanning Screens ................................................................25
GSM RSSI/BSIC Scanning Screen ...............................................25
UMTS Scanning Screens ..............................................................26
LTE Device Screens .................................................................................28
LTE Summary Screen ...................................................................28
LTE Data Screen ...........................................................................29
LTE Throughput Graph Screen ....................................................30
LTE OTA Messages Screen .........................................................30
LTE Scanning Screens ..............................................................................31
LTE Scan Channels Screen ...........................................................31
CW Scanning Screens ...............................................................................33
Phone Summary ........................................................................................34
Replay ...................................................................................................................35
Floor Plan Navigation ...........................................................................................36
Loading a Floor Plan Image ......................................................................36
Using a Floor Plan image in SAM -ALL ..................................................38
Function Key Operation ................................................................39
Saving a Floor Plan Image ............................................................40
Audible Alerts .......................................................................................................42
Log Memory .........................................................................................................42
Log File Upload ....................................................................................................43
On-Demand ...............................................................................................43
Auto ..........................................................................................................44
Shutdown ..................................................................................................45
Log File Upload Status .............................................................................45
Configuration Menus ............................................................................................46
Device Setup .............................................................................................47
Setting up a CDMA/EVDO Phone for Voice Testing ..................47
Alerts Setup .......................................................................48
Setting up a CDMA/EVDO Phone for Data Testing ....................50
Auto Redial: ......................................................................50
FTP Upload: ......................................................................50
FTP Download: .................................................................50
FTP Setup . . .: ..................................................................51
HTTP Test: .......................................................................52
HTTP Test Setup . . .: .......................................................52
Link Setup . . .: ..................................................................53
Default Setup . . .: .............................................................53
Setting up the Scanner (PN and EvDO Scanner) ..........................54
ZK User Manual
2
Scan Mode ........................................................................54
1x Correlation Length .......................................................54
Synchronization Mode: GPS or Network .........................55
Scan Channel List Setup . . . .............................................55
Setting up a GSM/UMTS Phone ..................................................57
Alerts Setup - ....................................................................58
Setting up a GSM device for GPRS/EDGE/UMTS/HSPA Data Testing .................................................................................................59
Auto Redial: ......................................................................59
FTP Upload: ......................................................................59
FTP Download: .................................................................59
FTP Setup . . .: ..................................................................60
HTTP Test: .......................................................................60
HTTP Test Setup . . .: .......................................................61
Link Setup . . .: ..................................................................61
Default Setup . . .: .............................................................62
Setting up the High Performance HRG (GSM/BSIC Scanner) ....62
Setting up High Performance UMTS Scanning ............................64
Setting up an LTE Device .............................................................65
Setting up LTE Scanning ..............................................................67
Setting up CW Scanning ...............................................................68
Cell Site Names ........................................................................................69
How to create a ZK cell site file ...................................................70
Export a default Cellsite File to use as a template ............71
Create a custom Cellsite File using Excel ........................71
Import your custom Cellsite File into the ZK unit. ...........71
Global Setup .............................................................................................72
Job ID ............................................................................................72
Auto Start ......................................................................................73
Auto Keylock ................................................................................73
GPS Setup . . . ...........................................................................................74
Features . . . ...............................................................................................74
ZK User Manual
Configurations
Features Table
Below is a table of the Features and Options available on each of the data
collection products, ZK-SAM, ZK-SAMp, ZK-MPS and ZK-MPSp.
ADD WAAS GPS
Compatible Devices
Go to http://zk.com/support/release_info_new_10.html for an updated list
of compatible devices.
NOTE: If you do not see an acceptable device on the list please contact
[email protected] to request a device for us to evaluate.
1
2
ZK Celltest, Inc.
Quick Start
NOTE: The Compact Flash memory card must be properly inserted into its
slot for the unit to function properly. It is important to be aware that the CF
card must be inserted with the top side facing the SAM cover. When
removing the Compact Flash card you must FIRST turn the unit off, otherwise you risk losing data and corrupting the compact flash card file system.
Voice Call Testing
To get up and running right away do the following:
Step 1. Securely install the Compact Flash memory card in the unit.
Step 2. After installation, turn on the phones, and turn on power to the ZK
unit.
Step 3. In the Configuration-->Device Setup Screen select the correct
phones for the phone connections.
Step 4: For some devices you may need to enable the phone diag port.
Contact [email protected] for the correct settings for your device.
Step 4:In the Main Menu highlight SAM-ALL and press ENTER
Step 5: Use the arrow keys to change screens.
Data Call Testing
To get up and running right away do the following:
Step 1. Securely install the Compact Flash memory card in the unit
Step 2. After installation, turn on the phones, turn on power to the ZK unit.
Step 3. In the Device Setup Screen configure for the CDMA/EVDO, GSM/
UMTS, IDEN or LTE device and connect the data-capable device to
the unit.
Step 4: For some devices you may need to set the data interface settings.
Contact [email protected] for the correct settings for your device.
Step 5. Configure the Link. See “Link Setup . . .:” on page 53.
Step 6. Configure the FTP/HTTP settings See
Step 7. In the Main Menu highlight SAM-ALL and press ENTER.
Step 8. Use the left/right arrow keys to change screens and go to the “Data
Test” Screen.
ZK User Manual
3
Product Description
ZK-SAM
The vehicular only ZK-SAM can be configured with a choice of air interface technologies and up to five simultaneous device connections.
The ZK-SAM is typically used by Cellular Technicians to monitor and troubleshoot network and cell site related problems.
ZK-SAMp
The ZK-SAMp has an internal battery, shoulder bag and an option for floor plan
navigation in addition to all the capabilities of the ZK-SAM.
The ZK-SAMp is used for indoor and walk testing applications as well as outdoor drive testing.
ZK-MPS
The ZK-MPS can be configured with a choice of air interface technologies, internal high performance multi-technology scanners and up to four device connections.
The ZK-MPS is typically used by System Performance and RF Engineers to
design and optimize cellular networks.
ZK-MPSp
The ZK-MPSp has an internal battery, shoulder bag and an option for floor plan
navigation in addition to all the capabilities of the ZK-MPS.
The ZK-MPSp is used for indoor and walk testing applications as well as outdoor drive testing.
4
ZK Celltest, Inc.
Operation & Screens
ZOOM Line
Idle - White Background
Traffic Channel - Yellow Backgroud
Power On/Off
Escape Key
Enter Key
Volume
Arrow
Keys
Backlight
Phone Port
Indicator
# SATS
Speaker
Shift Key
Function Keys
Marker
Time
Memory
Battery level
Status Elements
The status elements provide general information about the operation and
the functionality of the screens.
Compact Flash Memory Card
A compact flash memory card is used to store log data. The units typically
arrive with a high quality card and if needed, you can replace this card with
most commercial grade versions. It is recommended that you format any
CF card from the Utilities option at the Main menu.
ZK User Manual
IMPORTANT: DO NOT REMOVE THE CARD WHEN THE UNIT
IS POWERED ON. ONLY REMOVE THE CARD AFTER YOU
HAVE TURNED THE UNIT OFF. CARDS LESS THAN 256MB ARE
NOT SUPPORTED. THE MAXIMUM SIZE CARD THAT WE
HAVE TESTED IS 2GB.
VERIFY THAT THE CARD IS INSERTED WITH THE PROPER
ORIENTATION -- THE LABEL ON THE CARD SHOULD FACE
UP, TOWARD THE TOP COVER OF THE UNIT.
ONLY CF CARDS WITH FAT-16 FORMATTING ARE SUPPORTED.
Device Port 1, 2, 3, 4 and 5 Indicators
There is an indicator on some screens that allows the user to switch
between devices. When the indicator is displayed in the lower left corner of
the display the user can press the up/down arrow keys to switch between
devices.
Note: For MPS units (with scanner) Device Port 1 is dedicated to the scanner. The up/down arrows will switch between scanner technologies in addition to switching between devices.
Zoom Line
The Zoom Line (Top Line) displays the Paging/Idle channels as inverse
video (light text on a dark background). Traffic channels are shown as normal video (dark text on a light background). Serving channel information is
shown on the zoom line.
Hyperband Indicator
This letter will appear on the screen to distinguish the frequency hyperband. The meaning of the letters are as follows:
a = 2100 AWS
c = 850 cellular
g = 900 GSM
d = 1800 DCS
p = 1900 PCS
t = Upper 700 LTE
s = Lower 700 LTE
5
6
ZK Celltest, Inc.
Battery Level Indicator
NOTE: Valid for ZK-SAMp and ZK-MPSp. A battery icon is used to indicate the current storage level of the main battery. The unit will power down
when the battery has only five-percent charge remaining.
When the battery level drops below a safe operating capacity, the unit will
give warning to the operator with both a message and an audio announcement. Replace the battery with a fully charged one.
Before removing the battery, make sure that external power is disconnected
and the unit is turned off. Loosen the thumb screw to the battery compartment and remove the battery door. Pull the battery cord to remove the battery.
Performance Tip: A fully charged battery (two hours of charging time) typically provides three to fours hours of operation. To increase the battery
life, set the backlight to its lowest setting.
Memory Indicator
An icon is used to indicate the amount of free memory on the Compact
Flash card for data. When memory is full the data will be overwritten on a
first in - first out (FIFO) basis.
The amount of data stored is dependent on the disk space of the compact
flash card. Typically, up to 5MB of data per CDMA phone and up to 7MB
per GSM phone can be stored per hour. The scanner logs less than 1MB per
hour.
Markers
Pressing the ENTER key inserts a marker into the data file for postprocessing. When a marker is entered, the “Pushpin” icon will be displayed
with the number of the marker next to it.
Time and GPS
The Time indicator appears on every screen. Units with GPS will display a
circle and, in the lower portion of the screen, the number of locked-in satellites.
ZK User Manual
The time is generated by an internal clock backed up by an internal lithium
battery. This battery is maintained in a charged state as long as the unit is
connected to external power (or portability battery for portable units). Time
will be backed up for at least one month when disconnected from power.
For units with GPS receivers the internal clock is updated by GPS time (if
there is a current fix) each time the user goes into and out of the SAMALL.
WAAS
When WAAS is available the ‘G’ will change to ‘W’ indicating the GPS is
operating with the more accurate WAAS GPS corrections. For information
on WAAS go to http://en.wikipedia.org/wiki/
Wide_Area_Augmentation_System
7
8
ZK Celltest, Inc.
Main Menu
The Main Menu is displayed after the unit is powered on and goes through
it's start up procedure. The main menu contains the following functions:
TABLE 1:
Menu Item
SAM-ALL
Upload Log File
Firmware Updates
Configuration
Utilities
System Information
Description
Live call follow, coverage and interference measuring
Log Upload-- ftp log files to a central data collection server
Information screen about software upgrade availability
A list of menus to customize the configuration
Screen for reformatting the Compact Flash card and exporting
configuration
Provides software and hardware version information and available free memory
ZK User Manual
9
SAM-ALL Screens
The SAM-ALL data screens will appear when SAM-ALL is highlighted in
the Main Menu and the ENTER key is depressed.
CDMA/EvDO Screens
With the EvDO device technology option enabled the following set of
screens are displayed in the SAM-ALL mode.
CDMA Summary
Frequency
Channel
RSSI
Transmit
Power
Serving Channel data (zoom line)
Transmit
Gain Adjust
Active Set
Agg. Ec/Io
Active Set
Candidate Set
(green when avail)
Strongest
Candidates
Neighbors
Neighbor Set
The Zoom Line displays the serving channel information.
The table on the right shows the Active set, strongest candidates and
strongest neighbors PNs, Ec/Io and cellnames (color coded by neighbor set
type).
The graph shows the aggregate Ec/Io of the Active set, strongest candidates
and strongest neighbors over a 40-second, scrolling time window (color
coded by neighbor set type).
10
ZK Celltest, Inc.
EvDO Summary Screen
With the EvDO option an additional summary screen is available. Since the
EvDO phone is monitoriong both the CDMA channel and the EvDO channel an additional summary screen is provided.
EvDO channel
PN
SINR
TxPwr
Sector ID24 (hex)
or Cellname
CDMA/EAMPS Handoff
An example of the CDMA/EAMPS Handoff screen is shown below.
Serving Channel
Yellow for
Traffic channel
Prior soft/hard
handoffs
White for
Idle Channel
This screen shows the last 10 soft/hard handoffs. The information displayed in the table is the last measured data just prior to the handoff.
ZK User Manual
11
The following describes the items in the columns:
• mm:ss - the time in minutes:seconds the handoff occurred
• Chan - Carrier frequency of the channel just prior to the
handoff
• RSSI - Received Signal Strength just prior to the handoff
• PN1 - Strongest PN of the Active Set
• PN2 thru 6 - Active Set members
EvDO Handoffs
The following EvDO handoff screen is displayed when performing EvDO
testing.
EvDO channel
PN
Sector ID24 (hex)
SINR
TxPwr
or Cellname
This screen shows the last 10 soft/hard EvDO handoffs. The information
displayed in the table is the last measured data just prior to the handoff.
The following describes the items in the columns:
• mm:ss - the time in minutes:seconds the handoff occurred
• Chan - Carrier frequency of the channel just prior to the
handoff
• Rssi - Received Signal Strength just prior to the handoff
• PN1 - Strongest PN of the Active Set
• PN2 thru 6 - Active Set members
12
ZK Celltest, Inc.
CDMA Message Screen
An example of the CDMA Message screen is shown below.
Message Class
Current/serving channel data
Traffic channel
highlighted in yellow
Scroll up/down to see up
to 1001 messages
The CDMA message screen displays the over-the-air messages. Uplink and
downlink messages are colored. Traffic channel messages are highlighted
in yellow. Parts of the Order messages are decoded.
The Class categories are:
P=Paging
F=Forward Traffic
R=Reverse Traffic
S=Synch
A=Access
All the messages are logged for further decoding and post-processing.
ZK User Manual
13
CDMA EvDO Message Screen
With the EvDO option enabled an additional EvDO message screen is displayed.
EvDO channel
PN
Sector ID24 (hex)
SINR
TxPwr
or Cellname
The CDMA EvDO message screen displays the over-the-air messages.
Uplink and downlink messages are colored. Traffic channel messages are
highlighted in yellow.
All the messages are logged for further decoding and post-processing.
The “Chan” field descriptors are as follows:
A = Access
F = Forward Traffic
R = Reverse Traffic
CD = CDirected Control
CB = Broadcast Control
The “Proto” field extracts the descriptor of the message from the IS856
Message Protocol Type Name.
14
ZK Celltest, Inc.
PN Call Follow Screen
If the PN Scanner is set to the Call Follow mode, then the following screen
will be available for display. The top half of the screen will display the pilot
set information collected from the phone, the bottom half of the screen will
display the pilot polluters and missing neighbors.
.
Active Set
Pilot
Polluters
Phone data
Scanner data
Missing Neighbors
Pilot Polution Threshold: Identified as a pilot polluter if the PN is not in the
Active Set and its level measured by the scanner is within X of the Aggregate Ec/Io of the Active set where X equals the pilot Pollution Threshold.
Example: If the Pilot Pollution Threshold is set as +10 dB, then a PN is a
pilot polluter if it is within 10dB of the Aggregate Ec/Io. If the Aggregate
Ec/Io is equal to -3 and the measured PN is -9 dB, then it is a polluter; however, if the measured PN is -14dB, then it will not be a polluter.
Missing Neighbor Threshold: Threshold value (T_ADD, T_Drop, or
USER value) can be used to calculate the threshold. PNs with a measured
Ec/Io value above this threshold will be reported as missing neighbors.
Note: the polluters/missing neighbors are cleared each time a new PN scan
completes.
ZK User Manual
15
CDMA EvDO Data Testing Screen
When performing an EvDO data test the following data testing screen is
available.
EvDO channel
•
•
•
•
•
•
PN
Sector ID24 (Hex)
SINR
TxPwr
or Cellname
FTP DL IP: IP address of the phone under test
DRC: Data Rate Control - The fastest data rate that can be
supported. Indicator of the quality of the radio channel.
APPL TP: Application Layer Throughput
RLP TP: Radio Link Protocol Downlink Throughput Essentially the throughput of the RF link.
Phys Fwd: Throughput of the Physical Layer Forward
Path
BER: Bit Error Rate
Three throughput categories are displayed; Current, Average and Peak.
• Current: This is the 5 second rolling average of throughput as it is being measured
• Average: This is the cumulative average of throughput for
the current session
• Peak: This is the highest value of throughput measured
for the current session
16
ZK Celltest, Inc.
CDMA/EvDO Scanning Screens
With the CDMA and EvDO scanner technology options enabled the following set of screens are displayed in the SAM-ALL mode.
PN Scan Screen (CDMA and EvDO)
When the PN Scanner is set to scan user-settable channels, the following
screen is available.
Up to seven CDMA and/or EvDO carriers can be displayed on a single
screen. The three strongest PNs along with their Ec/Io are displayed for
each carrier. The top 25 PNs are logged for each carrier.
If multiple PN Scanners are attached then each Scanner will be associated
with its own screen. The up/down arrow keys are used to switch between
scanners.
Strongest PNs in each carrier
Carriers
(up to 7)
ZK User Manual
17
EvDO Scanning Screens
If the EvDO scanning feature is enabled then the scanner will scan the userdefined EvDO carriers. This screen reports PNs from strongest to weakest
for the EvDO carrier channel 589.
Press to view more PNs
A graphical representation is displayed on the followin screen.
18
ZK Celltest, Inc.
GSM/UMTS/HSPA Device Screens
With the GSM/UMTS/HSPA device technology option enabled the following set of screens are displayed in the SAM-ALL mode.
GSM Summary 1
The following screen shows the measured data for GSM Summary 1.
BCCH
Time Slot
RSSI
BSIC
Cellname or CID
Serving Channel
and neighbor RSSI
Parameters shown are as follows:
• 621 = channel number (ARFCN or BCCH)
• E = Time slot (0=A, 7=G)
• dBm=RSSI Sub (-85)
• BSIC (Base Station Identifier Code)=13
• CID (Cell Identity)=5023
• MAIO (Mobile Allocation Index Offset) = 1
• PL (Mobile Transmit Power)=6
• TA (Timing Advance)=2
• RLT (Radio Link Timeout) = 32
• Q (RxQUAL Sub- Audio quality measurement)=0
• FER (Frame Error rate) = 0
• AMR = 7.4H (Half-rate)
• LAC (Location Area Code) = 6037
ZK User Manual
19
GSM Neighbor Screen
The following screen shows the measured data for GSM Summary 2.
BCCH
Time Slot RSSI
BSIC
Cellname or CID
Neighbor RSSI
and BSIC
This screen displays the GSM neighbors in tabular form including the userdefined cellnames. To see the entire GSM neighbor list, use the F2 soft key
to scroll through list of channels.
GSM Handoff
An example of the GSM Handoff screen is shown below.
BCCH
Time Slot RSSI
BSIC
Cellname or CID
Paging channel
is in white
Traffic channel
is in yellow
20
ZK Celltest, Inc.
This screen shows the last 9 handoffs. The information displayed in the
table is the last measured data just prior to the handoff.
Description of column headings:
• RSSI - Received Signal Strength just prior to the handoff
• dRSSI - delta in Received Signal Strength (Rssi after
minus Rssi before)
• BSIC- BSIC just prior to handoff
• N1 - Strongest neighbor channel just prior to handoff
• RSSI (N1) - RSSI of strongest neighbor channel just prior
to handoff
• BSIC (N1) - Color code (BSIC) of strongest neighbor
channel just prior to handoff
GSM Messages
An example of the GSM Messages screen is shown below.
Time Slot RSSI
BCCH
BSIC
Cellname or CID
Paging channel
is in white; Traffic
channel messages
in yellow.
Forward and reverses
traffic channels are
colored
Uplink
Downlink
User can scroll to view
last 1001 messages
Over-the-air GSM messages are displayed and logged. The user can use the
function keys to scroll and view the last 1001 messages
ZK User Manual
21
GPRS/EDGE Data Testing Screen
An example of the GPRS/EDGE Data Testing screen is shown below.
BCCH
RSSI
BSIC
Cellname or CID
Test Type
Radio Link Layer
Throughput
Application layer
throughput
Time slots used
Three tests are performed http download, ftp upload and ftp download. The
current average and peak values for the session are displayed and logged.
Below is a description of the displayed parameters.
•
•
•
•
•
FTP DL IP: IP address of the phone under test
RLC TP: Radio Link Control Layer Throughput
APPL TP: Application Layer Throughput
Timeslots: Time Slots used
CS: Coding Scheme
22
ZK Celltest, Inc.
UMTS Summary - Graph
An example of the UMTS Summary Graph screen is shown below.
Channel
Hyperband
RSCP
SC
Cellname
Compressed
Mode
The screen elements consist of the following:
• Hyperband: c= 800 MHz, p= 1900 MHz, u=2100 MHz,
g=900 MHz
• Channel: Channel number
• SC: Scrambling Code of Best Server
• RSCP: Signal strength of the best server
• Cellname
• Neighbors: Displays the neighbors from best to worst Ec/
No.
•The scrambling code will have either an “a” or “m”
prefix. The “a” represents the active scrambling
code. The “m” represents the monitored scrambling
code.
•This screen will list only the neighbors that the phone
has been able to measure a Ec/No value.
ZK User Manual
23
UMTS Neighbors
An example of the UMTS Neighbor screen is shown below.
Channel
Hyperband
SC
RSCP
Cellname
The screen elements consist of the following:
•
•
•
•
•
•
•
•
Hyperband: c = 800 MHz, p= 1900 MHz, u=2100 MHz,
g=900 MHz
Channel: Channel number
SC: Scrambling Code
RSCP: Signal strength of the best server
Cellname
Neighbors: Displays the neighbors from best to worst Ec/
No.
The scrambling code will have either an “a” or “m” prefix. The “a” represents the active scrambling code. The
“m” represents the monitored scrambling code.
This screen will list the entire neighbor set, including
those scrambling codes where no Ec/No can be measured. Use the F2 button to scroll through the list of
neighbors.
24
ZK Celltest, Inc.
UMTS/HSPA Data Testing
An example of the HSDPA Data Testing screen is shown below.
Channel
Hyperband
SC
RSCP
Cellname
Status
Line
The screen elements consist of the following:
•
•
•
•
•
•
•
•
•
•
•
Hyperband: c = 800 MHz, p= 1900 MHz, u=2100 MHz,
g=900MHz
Channel: Channel number
SC: Scrambling Code
RSCP: Signal strength of the best server
Mode: Either UMTS or HSDPA.
Status Line: IP address assigned to the mobile.
•
FTP DL: FTP download test
•
FTP UP: FTP uploadd test
•
HTTP DL: HTTP download test
App TP: Application Throughput. Current value represents the last 5 second of the transfer, Average value represents the average for the entire file.
RLC TP: Radio Link Throughput
MAC TP: MAC Layer Throughput
BLER: Block Error Rate
CQI: Call Quality Index
ZK User Manual
GSM/UMTS Scanning Screens
With the GSM and UMTS scanner technology options enabled the following set of screens are displayed in the SAM-ALL mode.
GSM RSSI/BSIC Scanning Screen
This screen requires the GSM RSSI/BSIC scanning option to display. The
following screen displays the GSM scanning information.
Graph of strongest GSM channels
Channel, BSIC and cellname
The user can select to decode BSIC or not. The BSIC will not be displayed
if the user chooses not to decode the BSIC. The user-defined cellname will
be displayed.
25
26
ZK Celltest, Inc.
UMTS Scanning Screens
With UMTS scanning enabled additional screens are provided for viewing
the UMTS scanning measurements. The following screen displays all of
the UMTS carriers programmed by the user in “Setting up High Performance UMTS Scanning” beginning on page 64. Up to 7 carriers can be
measured by the scanner simultaneously. The top three strongest Scrambling Codes are displayed for each UMTS Carrier along with their Ec/No
values.
Scrambling Codes
Carriers
The following screen displays the six strongest Scrambling Codes for a
particular UMTS Carrier.
ZK User Manual
This information can also be represented graphically. Note that signals
below the noise floor will not be graphed in order to enhance visibility of
valid data.
27
28
ZK Celltest, Inc.
LTE Device Screens
With the LTE device technology option enabled the following set of
screens are displayed in the SAM-ALL mode.
LTE Summary Screen
The LTE Summary Screen provides the serving channel information and
PCI neighbor information. A graphical and tabular representation of the
signal levels are presented.
Physical Cell Identifier
Carrier Channel
Reference Signal Received Quality
Hyperband
t = 700 LTE
Reference Signal
Received Power
LTE Cell Names
ZK User Manual
29
LTE Data Screen
The LTE Data Screen provides a real-time display of the throughput and
other values during data file transfers.
Channel Quality Indication
Rank Indicator
Radio Link
Control
Throughput
Downlink
Uplink
Peak vale for current file
Cumulative average for current file
5 second rolling average
30
ZK Celltest, Inc.
LTE Throughput Graph Screen
The LTE Throughput Graph provides a graphical display of the current
throughput values over time. Color coding differentiates between upload
and download values.
Download
Upload
LTE OTA Messages Screen
The LTE Message screen displays the OTA messages along with the time
of the message and the direction. The underlying data of the messages are
logged in hexadecimal format in the log file on the Compact Flash card. In
order to decode the data portion of the messages a third party post-processing tool is required. Contact ZK for information on third part tools that can
decode these messages.
ZK User Manual
31
LTE Scanning Screens
With LTE enabled the user can view the signal information on up to 7 LTE
carriers. This screen shows the top three IDs for up to 7 carriers.
LTE Scan Channels Screen
This screen displays up to 7 LTE carriers showing the top three PCIs for
each carrier.
Frequency
Channel RSSI
Physical Cell Identifier
Reference Signal
Receive Quality
LTE Frequency
Channel
This screen shows all the PCIs for an individual carrier. If more than 6 exist
the user can scroll down using a function key.
LTE Frequency
Channel
Reference Signal
Receive Quality
Reference Signal
Receive Power
Physical Cell Identifier
Signal to
Interference
Ratio
32
ZK Celltest, Inc.
This is a graphical representation of PCIs for an individual LTE carrier.
ZK User Manual
CW Scanning Screens
With this feature the user can define two channels to scan and report the
signal strengths.
SMPL is the number of samples taken on the frequency in the last second
which are averaged together to calculate the RSSI that is displayed. To
increase the number of samples taken turn off other scanning technologies
being simultaneously scanned.
With CW enabled upon entering SAM-ALL you may see the following
warning screen. If your requirement is to achieve 40-lambda sampling then
you should scan only one CW channel and turn off all other scanning. If
you do not require 40 lambda then disregard this warning by pressing the
Enter key.
33
34
ZK Celltest, Inc.
Phone Summary
This screen displays key information for up to five phones simultaneously.
The screen is a combination of text and graphics. Users can compare the
performance of different systems and technologies or view data from multiple phones on the same system.
Serving Channel Info
Neighbor Channel Info
Data Throughput
GSM Voice
Device 1
EVDO Data
Device 2
CDMA Voice
Device 3
Device 4
Device 5
ZK User Manual
Replay
Up to 30 minutes of log data for Replay is stored automatically. To enter
replay mode press the F4 function key and wait a couple seconds.
The bottom row of the display will look like the following:
The data on the display will be paused at the time you pressed the Replay
function key.
NOTE: Real-time data will continue to be logged to the Flash card while
you are in the Replay mode.
The double-left arrows increment backwards in time to the nearest event or
30 seconds, whichever comes first. The double-right arrows do the same in
the forward direction. The single arrow is Play. When data is playing the
single arrow turns into a double line which is the Pause button.
To identify where you are in time press the Enter key (while in Replay
mode) and the following screen will appear.
The top half shows the events that have occurred. The blue bar across the
middle-bottom part of the screen indicates your current position in time relative to the amount of data stored. In this case you are near the beginning of
the data. If the blue bar is filled then you would be near or at the end of the
data (time when you entered Replay). You can use the arrow keys to
maneuver the time at which you want to start Replay.
Press Enter to exit this screen and view the other screens. To go back to
Real time press the F4 (Real Time) function key.
35
36
ZK Celltest, Inc.
Floor Plan Navigation
The floor plan option is available on the ZK-SAMp and the ZK-MPSp.
When GPS is not available such as indoors or when a user wants to overlay
the data onto a floor plan image like a football stadium or college campus
then this feature can be used.
IMPORTANT: When logging using the floor plan data it is important to
understand the use of the Job ID feature. Log files can not be given a name
by the user before collecting data. The Job ID feature allows you to add a
name in to the log file header so that the post-processing software can distinguish between job names. For example, if multiple floors of an office
building are collected a different Job ID name should be assigned before
collecting data on each floor. This allows the post-processor to identify
which log files correspond to which floor or (Job ID name) so that each
floor can be plotted separately. See “Job ID” beginning on page 72 for
more information on configuring and using Job ID.
Loading a Floor Plan Image
1. Make sure the image(s) you would like to import is either a Bitmap or
JPEG. The file must have the proper extension (".bmp" or "jpg"). Files without one of these extensions will not show up in the Floorplan menu.
2. Place the file(s) on your compact flash card in the ZK\floorplans directory.
3. Turn on your unit and navigate to "Configuration -> Floor Plan Setup".
Press ENT to enable Floorplan. You should now see a new option called
Floor Image; scroll down and press ENT to enter the Floor Image menu.
ZK User Manual
37
4. You will now see a list of the files that were placed in the ZK\floorplans
directory. Remember, any files do not have either a .bmp or .jpg extension
will not display in this menu! Scroll up/down to select the desired Floorplan
image and press ENT. This image will now be the current image that will
display in SAM-ALL mode. (Only one image can be used in SAM-ALL at
any given time, to use a different image, the user must exit SAM-ALL,
return to the Floor Image menu, select a different image, then return to
SAM-ALL.)
5. You are now ready to enter SAM-ALL mode. Press ESC until the Main
Menu appears, highlight SAM-ALL, then press. Depending on the size of
the file, you may notice SAM-ALL will take a little longer than usual to
load.
38
ZK Celltest, Inc.
Using a Floor Plan image in SAM -ALL
Once you have entered SAM-ALL, press the F1 key to enter Floorplan
mode. Below is a quick description of key functions and navigation of the
Floorplan mode.
When the screen is in the Zoom mode you can press the arrow keys to
zoom in or out. To log data to the screen and to pan the image press the F4
“Pan” button.
ZK User Manual
39
When the screen is in the “Pan” mode as shown below the arrow keys are
used to move the cursor to a location. To log a data point press the “Enter”
key. A colored dot will appear. If the data being plotted has some sort of
gradient or scale applied to it, then the breadcrumbs dropped will be color
coded accordingly. For example, a good RSSI value will have a blue breadcrumb associated with it whereas a bad RSSI value will have a red breadcrumb associated with it. When you zoom in the values of the data you are
viewing will be displayed. If no data is present to be plotted, or if the data
does not fit a color coding scheme, e.g. PN numbers, the crumbs will be
black.
Use arrow keys to
move cursor
Press “Enter” to log
data point
Press to change the
parameter being
displayed
At any time, you can change what the breadcrumbs represent by going into
the preferences menu and selecting another device or parameter. Selecting
accept afterwards will immediately change all of the breadcrumbs to represent the settings selected in the preferences menu.
Function Key Operation
F1: SAM
Return back to the SAM-ALL session
F2: Undo
Undo the last breadcrumb dropped
If the last breadcrumb dropped is currently on-screen it will be removed. If
the last breadcrumb is not currently on-screen, pressing Undo will cause
the window to pan over to where the breadcrumb is placed. Pressing it
again will then remove the breadcrumb.
F3: Prefs Enter the preferences screen
40
ZK Celltest, Inc.
Once in the Prefs screen, pressing the up/down arrows allows you to select
different categories. Pressing the left/right arrows allows you to select different values for each category, and pressing the ENT key selects whatever
value is currently highlighted. Different categories will be displayed for
different device types, so your window may differ from the screenshot
above. When all of your preferences have been highlighted press “F3” to
save them.
F4: Zoom/Pan Toggle between panning
When not in the preferences menu you can pan around the image in addition to zooming in and out. The label above F4 indicates the mode you
would like to enter. In Fig. 1, Zoom is listed, indicating the system is currently in pan mode. Use the arrow keys on the right of the display to pan
around and change the zoom levels.
Saving a Floor Plan Image
Make sure you are finished dropping breadcrumbs on the image. Exit from
floor plan into SAM-ALL by pressing the “SAM” F1 function key then
press “ESC” key to exit SAM-ALL. The floor plan image along with the
overlaid data will display.
Press the '*' key on the lower right of the head unit display to save the
image. A message will appear and an audio indication will notify you that
an image is being saved.
Press the “Prefs” function key to change the data being displayed and save
another image. You can save multiple images in this way.
ZK User Manual
The saved images are stored in the export directory on the Compact Flash
card. It will look like the image shown below on your PC.
When you are finished saving images select “Done”.
41
42
ZK Celltest, Inc.
Audible Alerts
The user can set up audible alerts. See .“Device Setup” beginning on
page 47
To view the alerts the following screen is displayed:
This screen shows the time of the alert, alert type, the value measured and
the threshold set by the user. When an alert occurs a voice announcement is
played through the display speaker.
Log Memory
Log data is stored directly to the compact flash card in the directory /zk/
logs.
Data is stored in 2 to 30-minute length files. When the disk is full the oldest
log file is deleted and replaced by the newest log file.
Log data is stored in gzip format. Gzip is an open source compression format that can be uncompressed by most decompression software packages.
Once decompressed the files are in ASCII comma-delimited format. Contact ZK Celltest for a detailed description of the log file format.
For mapping, the log files can be imported by ZK KPI Mapper and most
3rd party Post Processing Applications. Contact ZK to see which software
packages support our format.
ZK User Manual
Log File Upload
The user can configure the SAM to send data files to an FTP server. Three
upload modes are available: On-Demand, Auto and Shutdown.
After changing the configuration settings for the Upload the unit will
reboot to save these settings.
On-Demand
In this mode the user can upload files when they choose (on demand).
From the Main Menu choose “Upload Options . . .” to view the following
screen. Select “On-Demand” in the first row. Select the XX number of
minutes of log data you want to send and the unit will transmit the files
containing the last XX minutes logged.
Choose the port that the modem is connected to and program the FTP and
Link settings the same as you would when you set up a device for data testing. See “Setting up a CDMA/EVDO Phone for Data Testing” beginning
on page 50.
To begin the upload process, select, “Start Upload ...”
43
44
ZK Celltest, Inc.
Auto
In the Auto mode the unit is uploading while data is being collected. If in
the shared mode the modem will alternate between collecting data and
sending log data to the FTP server. Once the pre-determined file size is
logged it will be sent to the FTP server and the cycle will be repeated. If in
the dedicated mode then the unit will continue to collect data while the file
is be uploaded with the dedicated modem.
The Problem Alert Period can be set between 1 and 1440 minutes. An audible alert will be generated if there are files to be uploaded and no file has
been uploaded for the confgured time period. This is to indicate to the user
that there is a problem with data uploading.
ZK User Manual
Shutdown
In the Shutdown mode the unit will transmit the data when the unit is powered off. If the unit is installed in a vehicle with the ignition sense wire
properly connected then it will begin uploading when the vehicle power is
turned off. When the files have been transmitted the unit will fully power
off on its own.
Log File Upload Status
When the unit is uploading the following screen shows the status.
FTP Status
Current File
Files remaining
The status bar will provide information on current throughput speed with
an estimate of the amount of time left in the process. When the process is
complete, press ENT to return to the main menu.
45
46
ZK Celltest, Inc.
Configuration Menus
Some menu items may not appear if their associated option has not been
purchased. For example, if you did not purchase the CDMA technology
option then CDMA Cellnames will not appear in the menu.
When CONFIGURATION is selected from the main menu, the following
screen is displayed.
ZK User Manual
Device Setup
In the Configuration menu select Device Setup to configure the ports. This
menu allows you to configure ports for the user-selected data collection
devices.
When selected the following screen will appear. Note that for the ZK-SAM
and ZK-SAMp the Scanner Setup selection will be replaced by Device #1
Setup.
Setting up a CDMA/EVDO Phone for Voice Testing
The following screen allows the user to set up a CDMA/EVDO phone as
Device #2
Note: To change the device type highlight “Type Setup . . .” and press
ENT..
47
48
ZK Celltest, Inc.
By pressing the Voice Auto Dial Setup . . . menu item the following menu
appears:
The autodial mode can be repeating, continuous, or turned off . When the
mode is set for repeating, the call length must be set. When the unit is in the
SAM-ALL mode the phone will continue to make repeated calls. The
phone will stop autodialling when the unit is not in the SAM-ALL mode.
The call down length is the time between the end of the call and the start of
the next call.
Alerts Setup
When the type is CDMA/EVDO and the Mode is Voice and you select the
Alerts Setup . . . the following screen appears.
ZK User Manual
When Mode is Data and you select the Alerts Setup . . . the following
screen appears:
To change the thresholds highlight the parameter and press the ENT key.
Brackets appear around the selection. Use the arrow keys to change the
threshold values and press the ENT key to save.
To toggle the sound, highlight and press the ENT key. If it is in the ON
position and an alert occurs a voice announcement will be heard when in
the SAM-ALL realtime mode.
The alert threshold is compared to an average of the parameter over a 5
second period and if exceeded then an alert is generated. Further, in order
to prevent multiple alerts of the same type occurring in a short period of
time a 60 second squelch period is applied to that alert.
49
50
ZK Celltest, Inc.
Setting up a CDMA/EVDO Phone for Data Testing
The following screen allows the user to set up a CDMA phone for data call
testing. The phone must be programmed for data testing service from the
carrier.
Make sure you have enabled data testing. To enable features See “Features
. . .” on page 74.
In the Device Setup menu select “CDMA/EVDO” and “Data” for the testing mode and highlight “Data testing Setup . . .” and press ENTER. The
following screen will appear.
Auto Redial: A single data test session consists of a FTP Upload, FTP
Download and an HTTP- download. With Auto redial turned ON the call
will be terminated and re-originated after each data test session. With Auto
redial turned OFF the call will be continuous and the data session will continue to repeat until the call is dropped or terminated by the user. After the
call is terminated it will attempt to re-originate.
FTP Upload: The first of three data tests performed. This test can be individually turned ON or OFF.
FTP Download: The second of three data tests performed. This test can be
individually turned ON or OFF.
ZK User Manual
FTP Setup . . .: Allows the user to set up the FTP session parameters. Highlighting FTP and pressing ENTER displays the following screen:
The unit ships with settings defaulted to the ZK FTP servers. Ninety days
of service are free at the time of purchase of the data testing feature. Additional access to the ZK servers must be purchased.
Users can set up their own FTP server, however, the FTP settings for the IP
Address, Username, password and download file must match the settings
on the FTP server. The user can change the size of the file that is used for
the FTP upload.
Note: The default password for the ZK Server is hidden. If you are using
the ZK server service and your usage time runs out you need to contact ZK
to extend the service.
51
52
ZK Celltest, Inc.
HTTP Test: The third of three data tests performed. This test can be individually turned ON or OFF.
HTTP Test Setup . . .: Allows the user to set up the HTTP session parameters. Highlighting DATA TEST HTTP SETUP and pressing ENTER displays the following screen:
The unit ships with settings defaulted to the ZK HTTP servers. Ninety days
of service come free with the purchase of the data testing feature. Additional usage time for the ZK servers must be purchased.
Users can set up their own HTTP server, however, the HTTP settings for
the IP Address and download file must match the settings on the HTTP
server.
ZK User Manual
53
Link Setup . . .: Allows the users to set up the wireless link parameters.
Highlighting this and pressing ENTER displays the following screen.
Link Type: The user can choose the type of data call to make.
CDMA-CS = circuit switched CDMA
QNC = Quick Net Connect
IS2000 = 1XRTT/EVDO (sometime referred to as 2.5G or
3G)
DialNumber: This is the phone number that the phone dials to
establish a data call. Contact the network provider for the
correct number.
Username: This is the username required for the phone to log into
the wireless data network. Contact the network provider for
the correct username.
Password: This is the password required for the phone to log into
the wireless data network. Contact the network provider for
the correct password.
Default Setup . . .: This selection will default all of the data testing settings
back to using the ZK Servers for FTP and HTTP (factory defaults).
NOTE: Default settings will NOT work for the Link Setup. The “Link
Setup” needs to be configured as it is dependent on the service provider
and the phone.
54
ZK Celltest, Inc.
Setting up the Scanner (PN and EvDO Scanner)
From the “Configuration” menu select “Device #1 Setup . . .” then select
“Scanner” and turn “PN Scanner” to “On”. See the following screen.
Select “PN Scanner Setup . . .” and press Enter.
Scan ModeThere are two modes for the HPN, the Scan_Channel and
Follow_Phone modes. In Scan_Channel mode the HPN scans all PNs in up
to seven user-defined carrier channels.
1x Correlation LengthThe 1x Correlation Length is the window size in
chips that the scanner uses to determine the Ec/Io of each PN. The smaller
the window size the faster the scanning speed.
ZK User Manual
Synchronization Mode: GPS or NetworkThe Synchronization Mode
can be GPS or Network. For CDMA/EvDO networks the scanner requires
a time reference in order to properly correlate on the PNs. The PN code
transmitted is the same but the PN number is determined by the offset in
time from a reference signal. If the scanner has no reference then it can not
correlate the correct PN. The scanner can synchronise the time either
directly from GPS since the CDMA/EvDO network is based on the GPS
time reference, or it can get the reference signal directly from the SYNC
message from the CDMA/EvDO network. The Network Sync mode works
the same way that a normal cell phone gets the reference time. When performing scanning measurements indoors or in areas with poor GPS coverage it is recommended to use the Network Sync mode. It may take a couple
minutes for the scanner to initially synchronise in this mode but it will
accurately measure the PNs once synchronised.
Scan Channel List Setup . . .Selecting the “Scan Channel List Setup”
displays the following screen where the user can enter the band, channels
to scan, PN Increment and the technology.
The unit will log the top 25 PNs in each channel. The PN Increment can be
any number from 1 to 15. This value should be equal to the PN Increment
set in the infrastructure. Typically, this value is either 2 or 3. If you are not
sure what the setting should be, use 1. When the PN Increment is 1 then all
512 PNs are scanned in each channel. When it is set to 2, then every other
PN is scanned, and so on. Typical scanning speed for all configured carriers
will be once per second.
55
56
ZK Celltest, Inc.
The following screen shows the setup menu for the Follow_Mode.
In this mode the scanner can be configured to follow a CDMA phone (follow phone) connected to another port. The follow phone makes voice or
data calls and the scanner scans the PNs on the same carrier channel as the
follow phone. In addition, the scanner is using the same PN Increment that
the follow phone is told to be used by the network.
The scanner compares the Ec/Io values of the PNs it scans with the follow
phone’s neighbor list and values. If there are PNs that are stronger than the
Missing Neighbor threshold and are not in the neighbor list then they are
Missing Neighbors. There are three modes for the Missing Neighbor
Threshold as follows:
• USER - In this mode the user chooses a fixed value in Ec/Io (dB).
When the scanner measures detects a PN that is not in the Neighbor
list AND is stronger than the threshold it is displayed and logged as a
Missing Neighbor.
• T_DROP - The unit obtains the value of T_DROP from the follow
phone. The T_DROP value is used as the Missing Neighbor threshold. When the scanner measures detects a PN that is not in the Neighbor list AND is stronger than T_DROP it is displayed and logged as a
Missing Neighbor.
• T_ADD - The unit obtains the value of T_ADD from the follow
phone. The T_ADD value is used as the Missing Neighbor threshold.
When the scanner measures detects a PN that is not in the Neighbor
list AND is stronger than T_ADD it is displayed and logged as a
Missing Neighbor.
ZK User Manual
If there are PNs that are not in the Active Set and are within the range of
the Pilot Pollution threshold then they are Pilot Polluters. The Pilot Pollution threshold value is set by the user. Pilot polluters can come from PNs in
or not in the follow phone’s Neighbor list.
A PN is a Pilot Polluter when the Aggregate Ec/Io of the Active Set minus
the Ec/Io of the measured PN is lower than the Pilot Pollution threshold.
(Agg. Ec/Io - PN Ec/Io) < Pilot Pollution Threshold.
For example, if the Pilot Pollution threshold is +5dB, the Aggregate Ec/Io
of the Active Set is -6dB and the measured PN is -10dB the PN is a Pilot
Polluter. [-6 - (-10) = +4] As you can see, +4 is less than +5 so the PN is a
Pilot Polluter.
Setting up a GSM/UMTS Phone
The following screen allows the user to set up a GSM phone.
Select Voice for the Testing Mode.
The autodial can be set up and the phone number can be entered by the user
in the Voice Auto Dial Setup.
57
58
ZK Celltest, Inc.
Alerts Setup - When you select the “Alerts Setup . . .” and “More Alerts
Setup . . .” the following screens appear.
To change the thresholds highlight the parameter and press the ENT key.
Brackets appear around the selection. Use the arrow keys to change the
threshold values and press the ENT key to save.
To toggle the sound, highlight and press the ENT key. If it is in the ON
position and an alert occurs a voice announcement will be heard when in
the SAM-ALL realtime mode.
The alert threshold is compared to an average of the parameter over a 5
second period and if exceeded then an alert is generated. Further, in order
to prevent multiple alerts of the same type occurring in a short period of
time a 60 second squelch period is applied to that alert.
ZK User Manual
59
Setting up a GSM device for GPRS/EDGE/UMTS/HSPA Data Testing
The following screen allows the user to set up a GSM/UMTS device for
data call testing. The phone must be programmed for data testing service
from the carrier.
Make sure you have enabled data testing. To enable features See “Features
. . .” on page 74.
In the Device Setup menu select “GSM/UMTS”, “Data” for the Testing
Mode, highlight “Data testing Setup . . .” and press ENTER. The following
screen will appear.
Auto Redial: A single data test session consists of a FTP Upload, FTP
Download and an HTTP- download. With Auto redial turned ON the call
will be terminated and re-originated after each data test session. With Auto
redial turned OFF the call will be continuous and the data session will continue to repeat until the call is dropped or terminated by the user. After the
call is terminated it will attempt to re-originate.
FTP Upload: The first of three data tests performed. This test can be individually turned ON or OFF.
FTP Download: The second of three data tests. This test can be individually turned ON or OFF
60
ZK Celltest, Inc.
FTP Setup . . .: Allows the user to set up the FTP session parameters. Highlighting “FTP Setup . . .” and pressing ENTER displays the following
screen:
The unit ships with settings defaulted to the ZK FTP servers. Ninety days
of service are free at the time of purchase of the data testing feature. Additional access to the ZK servers must be purchased.
Users can set up their own FTP server, however, the FTP settings for the IP
Address, Username, password and download file must match the settings
on the FTP server. The user can change the size of the file that is used for
the FTP upload.
Note: The default password for the ZK Server is hidden. If you are using
the ZK server service and your usage time runs out you need to contact ZK
to extend the service.
HTTP Test: The third of three data tests performed. This test can be individually turned ON or OFF.
ZK User Manual
HTTP Test Setup . . .: Allows the user to set up the HTTP session parameters. Highlighting DATA TEST HTTP SETUP and pressing ENTER displays the following screen:
The unit ships with settings defaulted to the ZK HTTP servers. Ninety days
of service come free with the purchase of the data testing feature. Additional usage time for the ZK servers must be purchased.
Users can set up their own HTTP server, however, the HTTP settings for
the IP Address and download file must match the settings on the HTTP
server.
Link Setup . . .: Allows the users to set up the wireless link parameters.
Highlighting this and pressing ENTER displays the following screen.
61
62
ZK Celltest, Inc.
DialNumber: This is the phone number that the phone dials to
establish a data call. Contact the network provider for the
correct number.
Username: This is the username required for the phone to log into
the wireless data network. Contact the network provider for
the correct username.
Password: This is the password required for the phone to log into
the wireless data network. Contact the network provider for
the correct password.
APN: The network APN must be entered here. Defaults are provided for soem Carriers.
Default Setup . . .: This selection will default all of the data testing settings
back to using the ZK Servers for FTP and HTTP (factory defaults).
NOTE: Default settings will NOT work for the Link Setup. The “Link
Setup” needs to be configured as it is dependent on the service provider
and the phone.
Setting up the High Performance HRG (GSM/BSIC Scanner)
To setup the GSM/BSIC Scanner on the ZK-MPS select “Scanner” and
“GSM Scanner Setup” on the following screen.
ZK User Manual
Selecting the “GSM Scanner setup” displays the following screen where
the user can enable or disable scanning blocks, select the band and enable
or disable BSIC decoding.
If “Setup . . .” is selected the following screen appears. This screen allows
you to program list of user-defined channels to scan.
63
64
ZK Celltest, Inc.
Setting up High Performance UMTS Scanning
By selecting “UMTS Scanner Setup . . .” on the previous screen and pressing “Enter” the following screen will display. The user can select up to 7
UMTS carriers to scan simultaneously.
ZK User Manual
Highlighting “Scan Channel List Setup . . .” in the previous screen and
pressing “Enter” will display the following screen.
The user can select the UMTS carriers to scan.
Setting up an LTE Device
In the Device Setup screen select LTE for the device. Select the device
model then highlight and select Data Testing Setup.
Select Manual Mode for LTE testing when you are using a ZK compatible
LTE Android handset. <Manual Mode allows you to run apps on the
Android handset such as Speednet, FTP apps or custom apps that generate
data transfers. The ZK unit will log and display the LTE parameters and
throughput information.
65
66
ZK Celltest, Inc.
Manual mode offloads the throughput processing to the handset therefore
the user can capture very high data rates and log exactly what the phone is
experiencing. In addition, the user can connect multiple LTE devices and
run them simultaneously without any processor limitations.
When connecting an LTE Modem device you must select Auto for the
Mode and follow the instructions in“Setting up a CDMA/EVDO Phone for
Data Testing” beginning on page 50.
Selecting the Alerts menu allows you to create thresholds for uplink and
downlink throughput. Highlight UL or DL Throughput and press Enter on
the following screen and you can change the threshold values.
ZK User Manual
Setting up LTE Scanning
By selecting “LTE Scanner Setup . . .” from the Scanner Setup screen the
following screen will display. The user can select up to 7 LTE carriers to
scan simultaneously.
The channel numbers and widths can be defined in the following screen.
67
68
ZK Celltest, Inc.
Setting up CW Scanning
To set up CW scanning select “CW Scanner Setup . . .” from the Scanning
Setup screen.
This screen allows you to enable/disable CW scanning per channel. You
can also define the technology, band, channel or frequency.
ZK User Manual
Cell Site Names
NOTE: A maximum of 20,000 cellsite names can be stored. A three-sector
cell will use three cellsite names.
See “Appendix A - Cellsite File Format v4.6” on page A-1 for the file
format of the cellsite.txt file.
The Cellsite feature allows users to define their own names of the cell or
sector. A table is provided that stores the cellsite information. Default
tables are pre-loaded. This table can be transferred to a PC to use as a template for editing and imported back into the unit. The name of the cell or
sector will be displayed various SAM-ALL mode display screens.
If more than one cellname has the same PN, BSIC or channel number
(depending on the technology) and hyperband then the unit chooses the
closest cellsite name to the current location of the unit by comparing the
current GPS position of the unit with the GPS positions of the cell site via
the cellsite.txt file.
By highlighting Cell Site Names. . . in the Configuration menu and pressing the enter key the following screen will be displayed.
69
70
ZK Celltest, Inc.
Default settings are pre-loaded. By highlighting “Default Setting . . .” and
pressing ENTER, the following screen will appear.
The user selects the technology in the following screen.
By selecting LTE in the previous screen the following screen appears.
The user can select any of the default items corresponding to their frequency band. For GSM the default cellnames consist of “NAMEXX”
where “XX” is the BSIC value. For CDMA the default cellnames consist of
“NAMEXXX” where “XXX” is the PN Offset value.
How to create a ZK cell site file
Users can create their own cellname table by exporting the default table
and using it as a template to add their cellnames of choice then importing
this file back into the main memory of the unit. User-defined cell names
will be displayed on various screens.
ZK User Manual
71
Export a default Cellsite File to use as a template
1From the ZK unit main menu, go to "Configuration... -> Cell Site Names... ->
Default Setting...".
2. Select the desired technology, then select the desired band. You should see a
message "Default cellname installed successfully. Press ENTER to continue." Press ENT.
3. Press ESC twice to return to the Cell Site Names menu. Select "Export" and
press ENT. You should see "Export completed"; press ENT.
4. Power off the ZK unit. Remove the Compact Flash Card from the unit and
place it in your PC's flash card reader.
5. On your PC, navigate to the \ZK\EXPORT directory on the CFC. You
should see a file named "CELLSITE.TXT". This is an example file of the
technology/band selected in step 2.
Create a custom Cellsite File using Excel
1. From Excel, go to File -> Open (in Office 2007, Office Button -> Open).
2. Select "All Files" from the "Files of type:" drop-down menu.
3. Navigate to the directory containing the "CELLSITE.TXT" created in Step
1. Select the file and press Open.
4. In the Text Import Wizard dialog box that appears, select Delimited and
press Next. Check the Comma box and press Finish.
5. You can now edit this file to match your own list of cellsites. Use the Cellsite Format document as a guide to what belongs in each field.
6. Note: For Fields 2 and 3, any letter or number is allowed, as well as the following characters: _(underscore), + (plus), - (minus) and * (asterisk). Blank
fields and all other special characters, such as periods (.) or commas (,) are
not valid and will cause an error upon import.
7. When you are finished customizing your cellsite file, go to File -> Save As
(or Office Button -> Save As -> Other Formats).
8. From the "Save as type" drop-down menu, select "CSV (Comma delimited)" and press Save to save a file named "CELLSITE.csv".
Import your custom Cellsite File into the ZK unit.
1. Make sure that you are able to see file extensions in Windows. For example,
in XP, go to Tools -> Folder Options. Click the View tab. In the Advanced
Settings window, make sure the "Hide extensions for known file types" box
is un-checked.
2. Copy the "CELLSITE.csv" file created in Step 2 into the \ZK\IMPORT
directory on the Compact Flash Card.
3. Rename the file to "CELLSITE.txt". Windows will give a warning about
changing file extensions. In this case, we really do want to change the
extension; press Yes.
4. With the ZK unit still powered off, remove the CFC from the card reader
72
ZK Celltest, Inc.
and place it back in the ZK unit.
5. Power on the ZK unit and go to Configuration -> Cell Site Names. Highlight "Import" and press ENT.
6. If everything has been done correctly, then you should get the message
"Import Completed". If not, then there will be an error screen explaining
what is wrong with the cellsite file.
Global Setup
The Global Setup menu has various settings that set global parameters.
Job ID
The Job ID is arbitrary text the user can enter which will be logged in the
top of each log file. It is limited to 30 characters.
Allowable characters are upper and lower case letters, numbers 0 through 9
and dash.
The Job ID name that is entered is embedded in the header line of the log
files collected after you enter and save the Job ID name. This is particularly
useful when collecting indoor files. If the user wants to collect several
floors of a hotel then a different Job ID name should be entered prior to
collecting data for each floor. When the post-processing (mapping) software imports and converts the indoor log files it will ask the user if they
want to sort the files by Job ID name. This way the user can create output
plots by Job ID or in this case by Hotel floors so that each floor can be plotted separately.
ZK User Manual
Auto Start
This tells the unit to automatically go to the SAM-ALL screens or the
Select Channel screens after the unit is powered on. You can disable this by
selecting “Off”.
Auto Keylock
When enabled this feature turn off functionality of the keypad (except the
ESC key) while in SAM-ALL mode and driving more than 5mph. This is a
safety feature.
73
74
ZK Celltest, Inc.
GPS Setup . . .
This screen is only available on units with the GPS option.
Use the ENTER key to change to the number of minutes the unit may wait
to obtain a GPS before automatically going into data collection mode. Use
the arrow keys to change in a range of 0 to 45 minutes, then press enter.
Audible alerts that inform the user when a loss of GPS signal occurs can be
turned on or off.
Features . . .
The unit can be configured with a combination of phone ports and technologie. To enable any of these features you must purchase the option from
ZK Celltest. If you have purchased any of these options on a new unit or
sent your unit in for a hardware upgrade along with buying any of these
options then ZK will enable these features for you at the factory. If you
want to purchase the option and would like to enable the feature yourself,
then you will need to contact ZK and provide your Purchase Order reference number and the serial number of your unit. A ZK representative will
send you a 9- digit number. When you receive the 9-digit number, select
the feature you want to enable on the following screen and press enter.
ZK User Manual
In the screen above we highlight “Phone3: DISABLED” and press
ENTER. The following screen appears.
Enter the Unlock Code and press ENTER. The feature will now be enabled.
75
76
ZK Celltest, Inc.
ZK User Manual
A-1
Appendix A - Cellsite File
Format v4.6
NOTES:
1) ZK-SAM/ZK-MPS with 9.4 firmware or newer supports a maximum of
24,320 cellnames. The limit was 3000 in 8.x, 9.0 and 9.2 firmware versions.
2) With a GPS capable unit the current position is compared to the cell’s
latitude/longitude as entered into the table to determine the closest co-color
code cellsite record.
3) When a GPS fix is not available the cellsite name displayed is NOT
guaranteed to be the correct one.
4) Not all fields/options are supported by all products, for example RMS
mapping software supports more fields/options than ZK-SAM.
All files must comform to the ZK Celltest standard file format as defined
elsewhere. For example all files must begin an appropriate @START line
and end with an @END line.
Example valid @START line:
@START ZK-SAM CELLSITE 2012-02-06 18:14:33 4.6 10.4A 0000013362 20120206181433 1 FILE -0800
Cellsite File Format
Field #
Field Name
Example
Units
Min
Max
Blank
1
Cell Type
C
1 char
-
-
no
2
Sector ID
B
1-4 char
-
-
no
Comments
C = CDMA (+ optional Analog)
T = TDMA (+ optional Analog)
G = GSM BSIC-defined sector (G & GC records cannot be mixed in one
cell site file)
GC = GSM Channel (BCCH)-defined sector (G & GC records cannot be
mixed in one cell site file)
I = iDen
U = UMTS
L = LTE
A = Analog (Hyperband must be 'c').1
3
Cell Site Name
N_First-St
1-20 char
-
-
no
Cell Site Name is intended to be the same for all sectors in the same Cell.
Sector ID field is intended to differientiate sectors on a cell.
CellSiteName and SectorID will be shown as follows in screen and log
files:
SectorID.CellSiteName
Note: For Fields 2 and 3, any letter or number is allowed, as well as the following characers: _ (underscore), + (plus), - (minus) and * (asterisk). Blank
fields and all other special characters, such as periods (.) or commas (,),
are not valid and will cause an error upon import.
A-2
ZK Celltest, Inc.
Cellsite File Format
Field #
Field Name
Example
Units
Min
Max
Blank
Comments
4
Latitude
37.3800
degrees
-90
90
no
5
Longitude
-121.9409
degrees
-180
180
no
Degrees.decimal format is required. Six digits to the right of the decimal
point are preserved.
6
sector
Orientation
25
degrees
0
359
yes
0 degrees is north, 90 degrees is east, 180 degrees is south, 270 degrees
is west.
7
sector
Beam Width
120
degrees
1
360
yes
c = Cellular / GSM850 (Hypeband must be 'c' for Analog Celltype)
p = PCS-1900
g = GSM-900
d = DCS-1800
i = 800MHz iDEN band
j = 900Mhz iDEN band
u = UMTS band (2100Mhz)
a = AWS band
s = Lower 700Mhz (3GPP Band 12 & Band 17)
t = Upper 700Mhz (3GPP Band 13 & Band 14)
8
Hyperband
c
1 char
-
-
no
9
Band
A
1 char
A
F
no
Must be A if hyperband is u, i, j, g or d.
Must be A or B if hyperband is c.
10
Analog DCC1
2
decimal
0
3
yes
Optional for Cell Type=C or T. If Cell Type='A', this field is required.
Hyperband must be c if DCC is specified.
If SAT is specified then DCC must be specified as well.
11
Analog SAT1
1
decimal
0
2
yes
Optional for Cell Type=C or T
If Cell Type='A', this field is required
Hyperband must be c if SAT is specified. If DCC is specified then SAT
must be specified as well.
12
Analog
Channel Set #1
12
decimal
1
21
yes
If sector# is blank then only SAT/DCC are used for cellname look-up.
Hyperband must be c.
Cell Type='C'
CDMA PN
501
decimal
0
511
no
CDMA PN
Cell Type='T'
TDMA DVCC
196
decimal
0
255
no
TDMA DVCC
Cell Type='G'
GSM BSIC
25
octal
0
77
no
GSM BSIC (BSIC in OCTAL (0-77), not decimal (0-63))
Cell Type="GC"
GSM BCCH
150
decimal
0
1023
no
GSM Broacast Control CHannel -- BCCH (BCCH in decimal (0-1023))
Cell Type='I'
iDEN Carrier#
5EF
hexadecimal
001
5EF
no
iDEN Carrier Number
Cell Type=’U’
UMTS Scambling Code
501
decimal
0
511
no
UMTS Primary Scrambling Code
(see 3GPP TS 25.213 section 5.2.2)
Cell Type=’:L’
LTE PCI
(Physical Cell ID)
100
decimal
0
503
no
Physical Cell ID = (Secondary Sync * 3) + Primary Sync
Cell Identifier
13
(Technology
Specific)
Cell Type='A'
Analog (blank)
The only case where blank is valid for this field is for Cell Type = A (Analog).
(blank)
(blank)
(blank)
(blank)
yes
For an analog only cell site, Color Code(s) indicated in Analog DCC and
Analog SAT and Analog Channel Set# fields.
14
15
iDEN BRR
iDEN Color Code
123
15
decimal
decimal
000
0
999
15
yes
Base Radio information.
This field is only supported for iDEN (Cell Type = I) -- it must be blank for
other Cell Types.
This is a 3 digit decimal number which is intended to be used to encode
inforrmation related to the base radio associated with the iDEN carrier
number. If the imported field is blank the value 000 will be reported/
exported.
iDEN Color Code
iDEN - no This field is only supported for iDEN (Cell Type = I) -- it must be blank for
others - yes other Cell Types.
This field is required for iDEN (Cell Type = I).
ZK User Manual
NOTES:
1) Analog cellname look-up is not supported for ZK-SAM products. The analog specific fields may
import and export but there is no reporting of cellname for Analog for ZK-SAM.
A-3
A-4
ZK Celltest, Inc.
Cellsite File 4.x Format & Document History:
* 2007-03-05, removed some incorrect comments about display/logging of “SectorID.Cellname”.
Cosmetic clean-up to formatting.
V4.2 -- 2007-04-23, (first supported by 9.2 firmware) NOTE: Now this version is now essentially
obsolete. V4.2 iDEN cellsite files were only supported by the “iDEN phase 1” 9.2 firmware release.
This version add iDEN support, including new iDEN only BRR field # 14. Also many refinement to
document content and formatting.
V4.3 -- 2007-06-14 (first supported by 9.4 firmware) Added iDEN Color Code field -- required by
the 9.4 firmware releases and newer for cellsite files containing iDEN entries. Renamed the field
#13 from “Color Code” to “Cell Identifier” to avoid confusion between field #13 and #15.
* 2007-07-03, updated note to indicate new ZK-SAM firmware versions support 24,320 cell site file
entries.
V4.4 -- 2007-11-20 (first supported by 9.6 firmware) Added UMTS support, including UMTS
hyperband (2100Mhz downlink) support.
V4.5 (pre-July 2010 firmware) -- 2008-12-19 Added AWS hyperband support to field #8.
V4.5 (post-July 2010 firmware) -- Adds LTE and 700Mhz uppper/lower band support.
Firmware versions 9.10B through 9.13C2 and 10.0A through 10.2K.
V4.6 -- 2012-02-27 -- Same as V4.5 “post-July 2010 firmware”. Changed firmware to report new
version for unambiguous differentiation from early-V4.5 files.
V4.6 -- 2012-09-15 -- Adds information on allowed characters for field #2 (sector ID) and field #3
(cell site name).