1
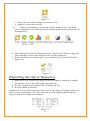
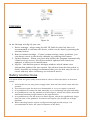
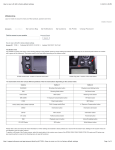
USER MANUAL MY 3D Table 10/60/200 1 Contents: Device’s purpose and working principle 3 Package details 3 Technical specifications 4 Product initialization 7 Starting operations 9 Software installation 9 Handling the USB connected camera 9 Preparation to shoot 9 Shooting 11 Handling a camera connected through a DN cable 12 Preparation to shoot 12 Shooting 12 Photo editing 13 Exporting the clip 14 Script configuration 15 “Options” tab 17 Safety instructions 17 Terms and conditions of warranty 18 Movie Yeah links 19 Warranty certificate 20 2 Device’s purpose and working principle 3D imagery is the modern way of presenting products in the virtual space and in catalogues. This technology helps you present you product as voluminous and exact as possible, enabling your client to see the product from all angles. We obtain a 3D image by stitching together a sequence of images into a clip. The MY 3D TABLE is designed to automatically generate rotating images and to post them on the sites. The MY 3D TABLE’s working principle is based on the creation of a sequence of images of an object, which rotates on a platform, with subsequent editing of the resulting images in the installed software. MY 3D TABLE was designed as a user friendly product, even for nonprofessionals, who have no expertise in the field of object photography. To start using the MY 3D TABLE it is sufficient to just connect the computer, camera, install software, configure system parameters and you are ready to shoot. The procedure of shooting is exactly the same as shooting some object in other cases. Only the product (object) is installed on the disk shaped platform, showered with light and the camera is configured. The only difference is that instead of taking one single shot the system takes the set number of images of the object, rotating it along with the disk platform. The equipment allows the following configurations: 1. 2. 3. 4. Number of images per rotation. Rotation speed for the disk-platform Pause before and after the shot. Mode of shutter release: using a remote trigger cable or through USB (for Canon and Nikon cameras). The included software allows you to upload the images to your computer, edit them and then export ready sequences in a format suitable for posting the image (JavaScript + HTML5). Package details 1. 2. 3. 4. 5. 6. My 3D Table USB A – USB B cable USB A – mini USB cable Power adapter Replaceable disk-platform Flash card* 1 pcs 1 pcs 1 pcs 1 pcs 1 pcs 1 pcs 3 *Carrying software, drivers and instructions Technical specifications Maximum product weight, kg: MY 3D Table 10 10 MY 3D Table 60 60 MY 3D Table 200 200 Disk diameter, mm MY 3D Table 10 minimum 275 MY 3D Table 60 minimum 450 MY 3D Table 200 minimum 800 Power supply, V 12-24 Current, A 0,8 Camera Shutter control using remote cable Control using USB Canon EOS D30 Yes No EOS D60 Yes No EOS-1D Yes No EOS-1Ds Yes No EOS 10D Yes No EOS 300D/Digital Rebel Yes No EOS-1D Mark II Yes No EOS 20D Yes No EOS-1Ds Mark II Yes No EOS 350D/Digital Rebel XT Yes No EOS 5D Yes No 4 EOS-1D Mark II N Yes No EOS 30D Yes No EOS 400D/Digital Rebel XTi Yes Yes EOS-1D Mark III Yes Yes EOS 30D Yes No EOS 400D/Digital Rebel XTi Yes Yes EOS-1D Mark III Yes Yes EOS 40D Yes Yes EOS-1Ds Mark III Yes Yes EOS 450D/Rebel XSi Yes Yes EOS 1000D/Rebel XS Yes Yes EOS 5D Mark II Yes Yes EOS 50D Yes Yes EOS 500D/Rebel T1i Yes Yes EOS 7D Yes Yes EOS-1D Mark IV Yes Yes EOS 550D/Rebel T2i Yes Yes EOS 60D Yes Yes EOS 600D Yes Yes EOS Rebel T3 Yes Yes EOS Rebel T3i Yes Yes EOS 5D Mark III Yes Yes EOS-1D X Yes Yes Nikon D2x Yes Yes * Nikon D200 Yes Yes * Nikon D3X Yes Yes Nikon D3S Yes Yes * Nikon 5 Nikon D300 Yes Yes * Nikon D300s Yes Yes Nikon D3000 Yes Yes * Nikon D3100 Yes Yes Nikon D3200 Yes Yes Nikon D4 Yes Yes Nikon D40 No Yes * Nikon D50 Yes Yes Nikon D5000 Yes Yes Nikon D5100 Yes Yes Nikon D5200 Yes Yes Nikon D60 Yes Yes Nikon D600 Yes Yes Nikon D70 Yes Yes * Nikon D70s Yes Yes * Nikon D700 Yes Yes * Nikon D7000 Yes Yes * Nikon D80 Yes Yes * Nikon D800 Yes Yes Nikon D800E Yes Yes Nikon D90 Yes Yes Sony Alpha Yes * No Pentax DSLR Yes No Остальные *- Limited support (It is advisable to check additionally, while buying the equipment) 6 Connecting the device There are connectors on the rear panel of My 3D Table, which can be used to connect the camera and the computer, firmware update button, power supply connector, as well as LED, which shows if the device is connected to power supply or not. You can see connector location in figure 1: Computer connector Power ON/OFF button Camera connector Power supply connector LED Firmware update button Figure 1 The product package includes (USB A – USB B) cable to connect MY 3D Table to the computer, (USB A – USB mini) cable to connect the camera to the computer, as well as the power cable. To turn ON the device connect it to power supply adopter. Then connect MY 3D Table to the computer using the relevant cable to connect to USB port. The camera can be connected using the port on the MY 3D Table (Using the remote shutter trigger cable) or directly to the computer using USB A – USB mini cable (recommended connection plan). The device connection circuits are shown in figures 2 and 3. It is most convenient to connect the camera using the USB cable if you are operating a Canon or Nikon camera. In this case the shutter is controlled by the USB control program and the resulting images are automatically loaded into the software. Connection using remote shutter trigger cable enables the use of any camera, which supports remote shutter trigger. In this case the shutter is triggered by a special close contact, which is fitted in the table. You have to keep in mind that in this case all the resulting images remain on the camera’s memory card and you will need to transfer them from the memory card to your computer manually. This connection circuit is suitable for cameras which do not support USB connection, when you shoot RAW format, as well as when using non7 standard shooting methods. Please keep in mind that for using the remote shutter trigger cable you might need additional connectors and adapters, depending on the camera you use. Since there are great many different cables and adapters for remote trigger, we cannot include these in the package. Figure 2 Figure 3 The accompanying software is capable of using hardware resources of multicore processors and video cards for speedy handling of large files. Since the 3D shooting technology uses a large number of images of higher resolution, for convenient functioning it is recommended to use latest computers with sufficient memory installed. Attention! The manufacturer of MY 3D Table cannot guarantee proper functioning of equipment if you are using unlicensed OS. 8 To be able to transfer the images from the camera to the computer you must be using Windows Vista/7/8 (X86/x64). Please note that the operating mode of the software allows for the rotation of the table in one direction. This helps exclude any margin of error for positioning, which might occur in case of changing the direction of rotation. Start of operations To start operating the device it is necessary to: 1. Connect it to power mains, to the computer using the included USB cable. 2. Connect the camera using the remote shutter trigger cable (fig 2) or the USB cable (fig 3). Installing the software It is mandatory to install the driver, windows update and the MY 3D Creator program. You can find all the files or their links, on the flash-card, which comes with the device. The software can be updated free of cost. Using a camera connected through the USB cable Preparing for shooting 1. Turn ON the camera and prepare it for shooting: Turn OFF auto focus (AF) on the lens or on the camera body, depending on the camera model; Select manual settings (M) and set exposure as per the conditions; Turn OFF camera’s auto-off function (optional); Select JPG format for shooting (not RAW); Adjust lights; Make sure that the camera is not MASS STORING. While selecting lighting for use with MY 3D Table you must consider the following: a) the dimensions of the object shot (light should be spread over the whole surface of the object) b) the material of the object (some materials are sensitive to extended exposure to high temperatures, for example light from halogen lamps or from other such sources) c) maximum desired speed of rotation of the disk-platform (the built-in flashes in cameras have certain intervals between charges) d) the camera’s structure (some models have limitations when it comes to the method of synchronization of shutter with studio pulse lights) 9 2. Turn ON the table and wait until the device is visible in the system. 3. Launch software (Start-> All programs -> My 3D Creator). 4. In the dialogue window create new project and set its save location (figure 4). Figure 4 5. Press the “Connect equipment” button in the software window (fig 5) Figure 5 Then make sure that the software has identified the camera and the Table (figure 6). When using a crane it should be also be identified in the similar fashion Figure 6 To check if the table is functional or not use the following buttons ►►, █. 10 Shooting 1. Select the camera control mode: USB control. Select camera model in the dropdown menu. To check if the camera is working or not use the “Take photo” button (fig 7). Figure 7 2. Select the desired number of shots (fig 8). Figure 8 For example you can set 24 shots horizontally. The vertical shot quantity is required when using a crane. 3. Select the speed of Table’s rotation (Revolutions per minute). using the “Speed” slider (fig 9). To control speed it is recommended that you launch rotation speed using ►► buttons Figure 9 4. Start shooting using ► button. To stop the process before the set finishing parameters are reached, you can use the █ Button. 5. If using the USB connection mode for camera the software automatically transfers the images to the computer for editing (fig 10). 11 Figure 10 Using the camera connected with remote control cable Preparing for shooting 1. Turn ON the camera and prepare it for shooting: Turn OFF auto focus AF on the lens or on the camera body depending on the camera model; Select manual M mode and set exposure according to shooting conditions; Disable AUTO OFF mode (optional) Select image format: JPG or RAW; Set studio lights. While selecting lighting for use with MY 3D Table you must consider the following: a) the dimensions of the object shot (light should be spread over the whole surface of the object) b) the material of the object (some materials are sensitive to extended exposure to high temperatures, for example light from halogen lamps or from other such sources) c) maximum desired speed of rotation of the disk-platform (the built-in flashes in cameras have certain intervals between charges) d) the camera’s structure (some models have limitations when it comes to the method of synchronization of shutter with studio pulse lights) 2. Turn ON the table and wait until the device is visible in the system. 3. Launch software (Start-> All programs -> My 3D Creator). Shooting 1. Select camera control mode: using remote trigger cable Shutter Cable. To check the camera you can use the Take photo button (fig 11) 12 Figure 11 2. Select the desired number of shots (fig 8). For example you can set 24 shots horizontally. The vertical shot quantity is required when using a crane. 3. Select the speed of Table’s rotation (Revolutions per minute). Using the “Speed” slider (fig 9). To control speed it is recommended that you launch rotation speed using >> buttons 4. Start shooting using > button. To stop the process before the set finishing parameters are reached, you can use the □ Button. 5. When using the Shutter Cable mode you have to transfer the images to the computer manually. For the purpose in the “Edit” tab use the “Add photo” button (fig 12). It is preliminarily necessary to connect the camera to the computer using USB cable or insert the camera’s memory card into the computer’s slot. When connected through USB, you should remember that the files could be added one by one. The easiest method is to copy the files out of the camera into a folder on your computer, from where you can add them into the software out of the local folders. Please don’t forget that the software only renders JPG images. If you shot in RAW format, you must transfer the files to the computer, then use a photo editor to process RAW images. Figure 12 Photo editing After loading the images into the software it is necessary to edit them (if you had not edited them in the photo editor). 1. Click on one image to select it for editing. 1.1. Let us see the editing process when we use frame based editing: Press the CUT button (fig 13) 13 Figure 13 Select the area of the image you want to edit. Apply or Cancel the actions. 1.2. Apart from framing, you can also rotate image by 90◦, edit RGB levels, brightness, and contrast and add watermark (with variable level of transparency). 2. After editing the selected image press the “Apply to all” button, apply the given changes to all of the images in the current sequence. 3. If the result was not satisfactory, you can press the “Cancel all” button (figure 14) Figure 14 Exporting the clip or Sequence 1. Make sure that at least one image is selected (this is required to enable the software to get the right image proportions). 2. Set the required resolution of the 3D image (fig 15). 3. Set the ZOOM resolution. Please note: A very high resolution will create a very large 3D image, which will take a lot of server space. The user will only see the zoomed photo from the angle at which the image was zoomed. Figure 15 14 4. Select the file format (we recommend JPG) (figure 16). 5. Select image quality (you should select the level of quality at which you think that the image looks acceptable; we recommend a max 90% quality level). Figure 16 6. After configuring all the parameters, press the EXPORT button, to enable the software to replicate the images and create the script. Script configuration To start working with the script you must press the PREVIEW button I the left lower corner (fig 17). Figure 17 If you shoot using the RT cable then first of all you should select the frame rate. For example set 24 frames horizontally. The vertical frame number is set only if you use the crane (fig 18). If your camera is connected suing the USB cable you can skip this step. Figure 18 In “Base Configuration” tab (fig 19) you must set the following parameters: Figure 19 1. Speed – this is used to set the rotation speed of the object in the resulting 3D image 15 2. This is used to set the braking speed of rotation of the object in the resulting 3D image, when rotated using the cursor. 3. Tip – This can be used to provide additional information, which will be shown when the mouse goes over the 3D image (ALT text) 4. Clockwise – direction of rotation. 5. Counter clockwise – direction of rotation In “CONTROL” tab (fig 20) you can set the following parameters: Figure 20 6. «Invert – This can be used to set the change of direction of rotation by moving the cursor the other way. 7. Without click – control rotation without need to click the mouse 8. Half turn – if you select this the 3D image will turn from the first to the last frame and then in the opposite direction in reverse mode. This option can be used to shoot non-stationary subjects like people. In the loading options you can set the following options(fig 21): Figure 21 9. Auto start – when selected the 3D image starts to rotate as soon as it loads. This rotation can be continuous or with delays as set by the user. 10. Load on click – If selected the 3D images starts to load after you click the mouse. This can reduce the amount of traffic used by your site. In the “Initial animation” (fig 22) you can set the following parameters: Figure 22 11. Start animation – in this tab you can opt for the speed and duration of rotation of 3D image before it stops. The default setting is to allow the image to rotate non-stop. In the “Preview” (fig 23) you can open the final file in the browser, as well as you can access the source images and the JavaScript files. 16 Figure 23 Options Figure 24 In the Settings tab (fig 24) you can: 1. Device settings – when using the MY 3D Table for the first time it is recommended to calibrate the device, which can be done by pressing the relevant button. 2. Reset to default settings – If your custom settings cause problems, you can always revert to the factory defaults by pressing this button. 3. Update software – When you press this button the program automatically connects to our server, check for available updates and if there are updates, it offers you to install them. 4. Log file – this button opens a dialogue window, which shows error information gathered for our experts. We will not describe this option in detail, because we strongly recommend that you use this only in case of errors and only after contacting our technical service. Safety instructions You must follow the given safety instruction in order to allow the device to function stably. 1. You should not use any power supply other than the one which came with the product. 2. You must not open the device or disassemble it, or try to repair it yourself. 3. It is prohibited to rotate the disk manually as it can damage the gear assembly. 4. It is prohibited to use the platform to shoot objects, which are heavier than the maximum handling weight shown in the specification. 5. It is prohibited to use the device to shoot objects, which are significantly larger than the size of the platform. To shoot such objects you should use a larger platform. 6. When shooting heavier objects or objects with high inertial torque, it is recommended to lower the speed of rotation of the disk. 17 Terms and conditions of warranty Warranty period is 24 months from the date of sale. Product warranty is valid only in EU countries under the following conditions: 1. The product must be bought in the EUcountries and should be used as per the instructions in the user manual. 2. The warranty period for the product and its components and parts, which have a limited warranty, extends for the time for which the product remains under repair. 3. If the product is repaired under warranty and some part of component is replaced with a new one, the changes part carries a warranty of six months from the date of return of the product to the customer. 4. The manufacturer is relieved of liability for deficiencies in the product if such results from the breach of instructions by the user, due to improper transportation, storage, third party actions or force majeure and particularly I case of defects caused by the following reasons: (1) Alterations to the product’s structure, which were not officially approved by Movie Yeah! (2) Connection of other products, using it together with other accessories and expendables, other than the ones recommended by Movie Yeah! This warranty is an extension of the constitutional and other consumer rights and in no way does it limit them. This warranty supplements the consumer’s constitutional and other rights and in way limits them. ATTENTION! To avoid unnecessary obstacles in service and provision of others of your demands, stipulated by the law, we hereby solemnly recommend that you should keep the documentation, which comes with the product, safe during the whole period of tis use (this warranty certificate, user manual, etc.), as well as the documents affirming your legal purchase (cash receipt, invoice etc.). 18 Manufacturer: LLC “Movie YEAH” 190068, Saint Petersburg Fontanka embankment 128 section b, Telephone: +7 (812) 385 03 49 www.movie-yeah.com Video tutorial, examples of use, master class: youtube.com/MYSteadicam Join our VK.COM group and you will be the first to know about updates, discounts and competitions:: vk.com/movieyeah if you follow us on Instagram you get 10% discount for online purchases on our site: instagram.com/movie_yeah/ Discounts, competitions, www.facebook.com/movieyeah 19 latest news: 20