1
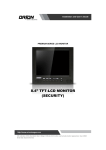
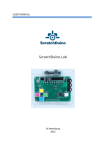
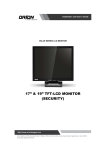
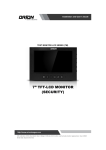
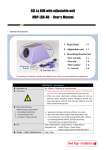
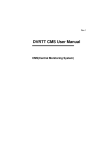
User's Guide LCD MONITOR
LCD MONITOR User's Guide
17" & 19" Color TFT LCD Monitor
KMC-17B & KMC-19B User's Manual for Operation and installation
Screen Size : KMC-17B (17" inch TFT LCD)
KMC-19B (19" inch TFT LCD)
Display Size : KMC-17B (337.920mm X 270.336mm)
KMC-19B (376.320mm X 301.056mm)
Brightness : KMC-17B (250 cd /㎡)
KMC-19B (300 cd /㎡)
Contrast : KMC-17B (600 : 1,Typical)
KMC-19B (700 : 1,Typical)
Pixel Pitch : KMC-17B (0.264mm X 0.264mm)
KMC-19B (0.294mm X 0.294mm)
Resolution : 1280 X 1024 @ 75Hz
Response Time : Tf=6msec , Tr=2msec
View Angle : 140 / 140(Horizontal / Vertical)
One Screen Control : Monitor, OSD, Graphics, Language & Volume
Control Functions : Power switch with LED display
KMC-17B (17" TFT LCD)
KMC-17B & KMC-19B
06.07
KMC-19B (19" TFT LCD)
User's Guide LCD MONITOR
LCD MONITOR User's Guide
17" & 19" Color TFT LCD Monitor
TABLE OF CONTENTS
KMC-17B & KMC-19B User's Manual for Operation and installation
1. INSTALLATION
02
1.1 PARTS
02
1.2 How to Install
02
2. FEATURES
03
2.1 Display Mode (17 inch)
03
2.2 Specifications (17 inch)
03
2.3 Display Mode (19 inch)
04
2.4 Specifications (19 inch)
04
3. CONTROLS AND FUNCTIONS
05
3.1 MENU / EXIT
05
3.2 SOURCE / DOWN
05
3.3 VOL / ENTER
05
3.4 POWER ON / OFF
05
4. OSD (On Screen Display) SETTING
Thank you very much for
purchasing KOCOM
TFT LCD Monitor.
Please read this manual
thoroughly to ensure correct
usage.
before operation
06
4.1 Self - Test display
06
4.2 OSD Menu Description
06
5. SAFETY INSTRUCTION
10
6. INFORMATION TO THE USER
13
KMC-17B (17" TFT LCD)
KMC-19B (19" TFT LCD)
01
User's Guide LCD MONITOR
LCD MONITOR User's Guide
1. INSTALLATION
2. FEATURES
1.1 PARTS
2.1 Display Mode (17 inch)
■ POWER ADAPTOR
■ INSTALLATION DRIVER
■ VGA SIGNAL CABLE DRIVER
Resolution
H-Frequency(KHz)
V-Frequency(Hz)
640 × 350
720 × 400
31.47
70.0
31.47
70.0
31.47
60.0
35.00
66.7
37.86
72.8
37.50
75.0
35.16
56.0
37.88
60.3
48.08
72.2
46.87
75.0
49.73
75.0
48.36
60.0
56.48
70.1
60.02
75.0
64.00
60.0
80.00
75.0
640 × 480
■ TFT LCD MONITOR
■ USER'S MANUAL
800 × 600
User's Manual
832 × 624
1024 × 768
1280 × 1024
2.2 Specifications (17 inch)
1.2 HOW TO INSTALL
Details
Spec
4
1
2
3
5
6
7
8
9
10
■ TFT LCD MONITOR BACK SIDE
02
① : DC Power in
② : Signal cable from signal source
③ : Stereo in
④ : Stereo out
⑤ : AUDIO - L
⑥ : AUDIO - R
⑦ : S - VIDEO input
⑧ : S - VIDEO output
⑨ : CVBS - intput
⑩ : CVBS - output
Screen size
Display size
Screen coating
Pixel pitch
Brightness
Contrast scaling
Viewing angle
Response time
Input Signal
Speaker (Option)
H-Frequency
V-Frequency
Resolution
Panel color
Power
Consumption
Product size
Monitor
Weight
Package
17″
337.920mm × 270.336mm
Anti-glare & Hard-coating
0.264mm × 0.264mm
250 cd/㎡
600 : 1
70 / 70 / 75 / 65 (Ieft / right / up / down)
Tf = 6msec, Tr = 2msec
Analog RGB 0.7Vp-p, Audio in, S-Video in, CVBS in
2W × 2W
30 81kHz
55 75Hz
1280 × 1024 @ 75Hz
16.2M Colors
40W (Normal mode)
5W (Power-saving mode)
438 × 149 × 450 (W×D×H)
4.6kg
6.5kg
03
User's Guide LCD MONITOR
LCD MONITOR User's Guide
3. CONTROLS AND FUNCTIONS
2.3 Display Mode (19 inch)
Resolution
H-Frequency(KHz)
V-Frequency(Hz)
640 × 350
31.5
70.0
720 × 400
31.5
70.0
640 × 480
31.5
60.0
640 × 480
37.5
75.0
800 × 600
37.9
60.0
800 × 600
46.9
75.0
1024 × 768
48.4
60.0
1024 × 768
56.5
70.0
1024 × 768
64.0
75.0
1280 × 1024
64.0
60.0
1280 × 1024
80.0
75.0
2.4 Specifications (19 inch)
Details
Spec
Screen size
Display size
Screen coating
Pixel pitch
Brightness
Contrast scaling
Viewing angle
Response time
Input Signal
Speaker (Option)
H-Frequency
V-Frequency
Resolution
Panel color
Power
Consumption
Product size
Monitor
Weight
Package
04
19″
376.320mm × 301.056mm
MENU
SOURCE
EXIT
3.1 MENU : Activates and exits the On Screen Display.
This button can also be used to move previous menu or status.
OSD MENU (MAIN) : Inpit Source, Screen, Audio, OSD, Color, Utility, Exit.
EXIT : Exits the On Screen Display.
Anti-glare & Hard-coating
0.294mm × 0.294mm
300 cd/㎡
700 : 1
70 / 70 / 75 / 65 (Ieft / right / up / down)
Tf = 6msec, Tr = 2msec
Analog RGB 0.7Vp-p, Audio in, S-Video in, CVBS in
2W × 2W
30 81kHz
55 75Hz
3.2 SOURCE / ▼ (DOWN)
SOURCE : Select input source, and move the previous menu.
▼ (DOWN) : This button allows user to enter the sub-menu of the activated function
when down key is pressed on the main menu.
3.3 VOL ( / VOL / ENTER / ▶)
Adjust the volume / Adjust menu settings and move the OSD (On Screen Display) menu.
Accepts your selection or displays the current mode.
1280 × 1024 @ 75Hz
16.2M Colors
45W (Normal mode)
5W (Power-saving mode)
495 × 155 × 508 (W×D×H)
5.4kg
3.4 POWER ON / OFF (
)
Tums the power ON or OFF. There will be a few seconds delay before the display appears.
The power LED(next to the power switch) lights with green when the power is turned ON.
The power is turned off by pressing the power switch again and the power LED goes Red.
7.4kg
05
User's Guide LCD MONITOR
LCD MONITOR User's Guide
: Saturation (AV/ S-VIDEO Mode)
Adjust the intensity of color level.
4. OSD (On Screen Display) Setting
4.1 SELF - TEST DISPLAY
When there is no cinnection at PC
the On Screen Display will show of 3 seconds.
Check
Input
: Hue (AV / S-VIDEO Mode)
Adjust the tone of color.
Signal
: Sharpness
Adjust the tone of color.
4.2 OSD MENU DESCRIPTION
Input Source
: Input Source Mode
Select PC or AV, S-VIDEO.
OSD
S-
PC
▶
Move :
▶, ▼ ,
: Audio Mode
Audio
Audio
OSD
OSD
AV
Exit :
Volume
Volume
Mute
Mute
: Screen Mode
OSD
Exit :
OSD : OSD Mode
▶, ▼ ,
Exit :
■ (VIDEO/S-VIDEO MODE)
▼
▼
: Contrast
Increase or decrease the intensity (lightness or dimness) of the image.
▼
A
H. Position
V. Position
Transparency
OSD Timer
Language
English
: H. position (PC Mode)
Move image horizontally on screen right or left.
France
OSD
▼
: V. Position
Move the OSD position to up
( ▶ ) of down ( )
Deutsch
: Transparency
Select the OSD background.
: V. position (PC Mode)
Move image vertically on screen up or down.
: Phase (PC Mode)
Adjust the number of horizontal picture elements.
: H. Position
Move the OSD position to right
( ▶ ) of left ( )
▶
OSD
OSD
▼
▶
▼
: Brightness
Increase or decrease the intensity of the image.
: Clock (PC Mode)
Adjust the vertical noise of screen image.
OSD
OSD
▶
▶
Move :
ON
: Mute
Selects the sound on and off.
O S D
Exit :
OFF
: Volume
Adjust audio volume.
Brightness
Contrast
H. Position
Hue
Sharpnes
■ PC
06
▶, ▼ ,
▼
Brightness
Contrast
H. Position
V. Position
Clock
Phase
Move : ▶, ▼ ,
Move :
▼
Screen
OSD
▶
Screen
: OSD Timer
Select the OSD display timing.
A
: Language
Select a language among English, Fran• ais, Deutsch, Espa–lo,
Danish, Italiano.
07
User's Guide LCD MONITOR
LCD MONITOR User's Guide
: Color Mode
: Exit Mode
COLOR
Exit
OSD
OSD
OSD
Color Temp
Red
Green
Blue
9300K
Red
Green
Blue
6500K
User
▶
K
Move :
■ PC
K
PC
▶, ▼ ,
Exit :
■ (VIDEO/S-VIDEO MODE)
Exit
OSD
H : 64.0 KHz
V : 60.0 KHz
▶
COLOR
Move :
▶, ▼ ,
S-
Exit :
NTSC
H : 15.734 KHz
V : 60 Hz
OFF
ON
■ EXIT : Turn off OSD Menu.
: Color Temp (PC Mode)
Adjust color temperature to 9300, 6500, user.
(note : 9300 is factory default)
: Red
Adjust red color for user.
: Green
Adjust green color for user.
: Blue
Adjust blue color for user.
: Utility Mode
Utilit
Utilit
OSD
OSD
Recall
AUT
Recall
AUT
Lock
Lock
Full Auto
▶, ▼ ,
Exit :
▶
■ PC MODE
▶
Move :
Move :
▶, ▼ ,
Exit :
■ (VIDEO/S-VIDEO MODE)
: Recall
Select to reset all setting to the factory default values.
AUT
: Full Auto ( PC Mode)
Select ON or OFF (ON : Control key lock. OFF : Control key unlock)
: Lock
Select ON or OFF (ON : Control key lock. OFF : Control key unlock)
08
09
User's Guide LCD MONITOR
LCD MONITOR User's Guide
5. SAFETY INSTRUCTION
Warning
※ Follow this safety instruction to use the monitor properly and prevent the damages.
※ This safety instruction has 'Warning' and 'Caution' as below.
Warning - If the user does not follow this instruction,
Do not install this monitor on the outside
and near water. If may cause damage to
the product, electric shock and fire.
For cleaning do not use liquid cleaners.
Never touch the power plug with wet-hands
When lightning and thundering, unplug the
monitor from the wall outlet and never touch it.
Unplug this product from the wall outlet, when
It does not operate for a long time.
it may cause the serious damage to the user.
Caution - If the user does not follow this instruction, it may cause the slight
damage to the user or cause some damages to the monitor.
※ Save this user’s guide book for later use
Warning
Never remove the back over and
touch the inside of the monitor.
If you need a service, please
contact the service center
Keep away the monitor from the
direct sunlight and a heating appliance
When smoking and noising from the monitor,
unplug the product from the wall outlet and
contact a service center.
Never push objects of any kind into
this product as they may result in
a risk of fire or electric shock
Connect the power code to the wall
outlet tightly. If the power code or plug
are defective and the wall outlet is not
tight, please do not use them
Warning : How to fix
Do not open this product as it contains high voltage inside.
It may create an electric shock.
It the user disassembles and remove the back cover, it does not make sure
to make up for the damages and do a service and exchange the monitor.
10
11
User's Guide LCD MONITOR
LCD MONITOR User's Guide
Cautions
Cautions
Install this monitor some distance
From the wall and do not install unless
Proper ventilation is provided.
Place this product on a stable place.
If not, it may fall, causing serious
Damages to the monitor and people.
The openings must not be blocked by
curtain, rug or other similar surface.
When carrying this monitor, be careful
not to damage the panel and drop it
It may cause some trouble.
For cleaning, unplug the monitor from the
Wall outlet. Do net use the liquid cloth.
Use the soft cloth.
Do not use the chemical liquid for cleaning.
It may cause fading and breakage.
6. INFORMATION TO THE USER
INFORMATION TO THE USER
This equipment has been tested and found to comply with the limits for a Class B digital device,
Before carrying the monitor, tum it off and
Unplug the signal cables and the power code
From the wall outlet.
Install this monitor about 50cm far from
the eyes and an angle of 0~15 degrees
below eyes. Too close installation may
cause having weak sight
Take the power plug out from the wall outlet.
Do not pull the cable. It may snap the innerwires and cause overheating and fire.
pursuant to part 15 of the FCC Rules. These limits are designed to provide reasonable protection
against harmful interference in a residential installation. This equipment generates, uses and
can radiate radio frequency energy and, if not installed and used in accordance with the instructions,
may cause harmful interference to radio communications.
However, there is no guarantee that interference will not occur in a particular installation.
If this equipment does cause harmful interference to radio or television reception, which can be
determined by turning the equipment off and on, the user is encouraged to try to correct the
interference by one more of the following measures:
- Reorient or relocate the receiving antenna.
- Increase the separation between the equipment and receiver.
- Connect the equipment into an outlet on a circuit different from that to
which the receiver is connected.
- Consult the dealer or an experienced radio / TV technician for help.
Do not press the LCD panel with hands or
the sharpened material hardly.
Warning
The manufacturer is not responsible for any Radio or TV interference caused
by unauthorized modifications to this equipment. Such modifications could
void the user's authority to operate the equipment.
12
13