1
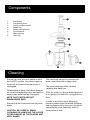
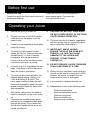
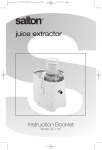
Operating Instructions
800W Juicer
Models: GJE300G, GJE300R
General care and safety guide
Thank you for choosing this GOLDAIR Juicer. This GOLDAIR
appliance has been designed and manufactured to high standards
of engineering and with proper use and care, as described in this
leaflet, will give you years of useful service. Please read these
instructions carefully and keep them for future reference.
ALWAYS
✔ Always ensure hands are dry before handling
the plug or switching on the Juicer.
✔ Always use the Juicer on a secure, dry, level
surface.
✔ Always disconnect the Juicer from the supply
if it is left unattended and before assembling,
disassembling or cleaning.
✔ Carry out regular checks of the supply cord
to ensure no damage is evident.
✔ Return the Juicer after a malfunction, or if it
has been damaged in any manner, to an
authorised electrical service technician for
examination, repair or adjustment as special
purpose tools are required.
✔ Children should be supervised to ensure that
they do not play with the appliance.
✔ Take care when handling the sharp cutting
blades while emptying the bowl and during
cleaning.
✔ Switch off the appliance and disconnect from
supply before cleaning, changing accessories or
approaching that move in use.
✔ Avoid contact with the moving parts. Keep
hands, hair, clothing, as well as spatulas and
other utensils away from blades of the Juicer
during operation to reduce the risk of injury to
person and/or damage to the Juicer.
✔ If the supply cord is damaged, it must be
replaced by the manufacturer, its service agent
or similarly qualified persons in order to avoid a
hazard.
✔ Ensure that the area around the Juicer is
clear from other liquids during use, as this may
leak into the Juicer during operation and cause
a motor malfunction.
TECHNICAL SPECIFICATION
Model No:
GJE300G, GJE300R
Power Supply:
220 - 240VAC 50Hz
Power:
800W
NEVER
✘ Never use this appliance outdoors.
✘ Never use this appliance for any purpose
other than its intended use. This appliance is for
household use only or in similar applications
such as:
•
Staff kitchen areas in shops, offices and
other working environments;
•
Farm houses
•
By clients in hotels, motels and other
residential type environments;
•
Bed and breakfast type environments
✘ This appliance is not intended for use by
persons (including children) with reduced
physical, sensory or mental capabilities or lack
of experience and knowledge, unless they are
supervised or have been given instruction
concerning the use of the Juicer by a person
responsible for their safety.
✘ Never place this appliance on or near a hot
gas or electric burner or where it could touch a
heated oven or microwave oven.
✘ Never use harsh, abrasive or caustic
cleaners to clean this appliance.
✘ Never operate the appliance with a damaged
cord or plug, after it malfunctions, or if it has
been damaged in any manner.
✘ The Juicer is not intended to be operated by
means of an external timer or separate remotecontrol system.
✘ Never use the appliance if the rotating sieve
is damaged
Components
1.
2.
3.
4.
5.
6.
7.
8.
Pushing bar
Transparent cover
Juicing net/filter basket
Middle ring
Safety locking handle
Pulp container
Main machine
Juicer jug
Cleaning
Ensure the juicer’s control switch is set to
the 0 (OFF) position, the power supply is
turned off at the outlet and the juicer is
unplugged.
Disassemble all parts (see above diagram
for correct disassembly order) and wash in
warm soapy water and dry thoroughly.
NOTE THAT PARTS ARE NOT
DISHWASHER SAFE
Ensure all pulp is removed from the juicer
blade.
CAUTION: BE CAREFUL WHEN
CLEANING OR HANDLING THE JUICER
FILTER BASKET AS THE BLADES ARE
VERY SHARP.
The main body cannot be cleaned with
water, wipe clean with a damp cloth.
The juicer blade should be cleaned
carefully after each use.
Store the juicer in a dry ventilated place if it
is not going to be used for a long period of
time.
In order to avoid the motor becoming
blocked, please clean the waste container
and any residue left in the juicer chute/lid if
operating the juicer frequently within a
short period of time.
Before first use
Before first use
Carefully unpack the Juicer and remove all
packaging material.
Clean the various Juicer accessories in
warm soapy water. Rinse and dry
thoroughly before use.
Operating your Juicer
1.
Ensure the juicer is turned off.
2.
Plug the unit into a 220-240V power
outlet and turn the power on at the
power outlet.
3.
Clean fruit and vegetables thoroughly,
ready for juicing.
4.
If juicing fruit with stones or hard
seeds, pit the fruit. Remove any hard
inedible skins, i.e. skin of melons,
pineapples and mangoes prior to
juicing. If citrus fruits are being used,
remove the skin prior to juicing.
5.
If pieces of fruit or vegetables are very
large, chop them to a size that will fit
down the juicer’s food chute.
6.
7.
8.
Turn the speed control switch to the
desired speed setting. Setting 1 is
LOW and Setting 2 is HIGH. The
lower speed setting is better for soft
fruits and vegetables, while the higher
speed setting is better for hard fruits
and vegetables.
Ensure the safety catch is locked in
position -vertically on top of the juicer
lid.
Press the food pusher slowly down
until all fruit or vegetables have gone
through the juicer. Do not press the
food pusher rapidly as the juicer will
not be as effective.
9.
CAUTION: DO NOT PUT YOUR HAND
OR ANY OTHER OBJECT IN THE FOOD
CHUTE DURING OPERATION.
10. The juice from the fruit and/or vegetables
will flow directly into the jug and the pulp
will be collected in the pulp bin.
11. IMPORTANT: WHILE JUICING,
ENSURE THE PULP BIN DOES NOT
OVERFILL AS THIS CAN CAUSE
DAMAGE TO THE JUICER AND
PREVENT IT FUNCTIONING
CORRECTLY.
12. DO NOT OPERATE JUICER FOR MORE
THAN 30 SECONDS AT A TIME
13. When juicing is complete, ensure that the
juicer’s control switch is set to the 0 (OFF)
position, the power is turned off at the
outlet and the juicer is unplugged.
14. It is now safe to disassemble the unit.
15. Disassemble Juicer in the following order
•
•
•
•
•
Remove pushing bar
Remove transparent cover
Remove juicing net
Remove middle ring
Remove pulp container
Recipes
Apple, Carrot & Ginger Juice
3 green apples
3 carrots, greens removed
2cm piece of fresh ginger
Process the ingredients in juicer and serve.
Blueberry Grape Juice
A handful of grapes
1 cup of blueberries, fresh or thawed from
frozen
1 peeled grapefruit (optional)
Process the fruit in juicer and serve.
Apple Kiwifruit Juice
3 kiwifruit, peeled
2 apples
Process the fruit in juicer and serve.
Pineapple Orange & Strawberry Cocktail
2 peeled oranges
1 cup of fresh, cubed pineapple, skin removed
6 strawberries
Process the fruit in juicer and serve.
Cucumber & Celery Cooler
3 carrots, greens removed
1/4 medium cucumber, peeled
1 stalk celery, cut into 5cm pieces.
1 apple
1/2 lemon, peeled (optional)
Process the ingredients in juicer and serve.
Calcium Drink
4 carrots, greens removed
1/2 cup of fresh broccoli pieces
2 apples
A small handful of fresh parsley
1/2 lemon, peeled (optional)
Process the ingredients in juicer and serve.
Fruit Punch
6 strawberries, fresh or thawed
1 apple
1/2 peeled orange
Process the fruit in juicer and serve.
Potassium Drink
4 medium carrots, greens removed
1 apple
1 stalk of celery, cut into 5cm pieces
A small handful of fresh parsley
A small handful of fresh spinach
1/2 lemon, peeled (optional)
Process the ingredients in juicer and serve.
Ginger Ale with Lemon & Lime
A handful of grapes
2 apples
2cm piece of fresh ginger
1/2 lime
1/4 lemon
sparkling mineral water
Remove the grapes from the stem.
Juice the apple and ginger together, then juice
the rest of the fruit.
Pour the juice in a large glass, fill to the top
with sparkling water and serve with ice.
Sparkling Juice
2 kiwifruit
1 peeled orange
1/2 mango, skin removed.
sparkling mineral water
Process the fruit in a juicer. Pour the juice in a
large glass and fill to the top with
sparkling water and serve.
Apple Cider with Ginger
2cm piece of ginger
3 apples
Process in juicer and serve.
Peach Pear & Apple Juice
1 apple
2 pitted peaches
1 pear
Process in juicer and serve.
SUPPORT AND TECHNICAL ADVICE
Goldair – New Zealand
Monday – Friday 8am-5pm
Phone +64 (0)9 917 4000
Phone 0800 232 633
[email protected]
Goldair – Australia
Monday – Friday 8am-5pm
Phone +61 (0)3 9336 4423
Phone 1300 465 324
[email protected]
Two year warranty
Thank you for purchasing this Goldair product. Your product is warranted against faults and manufacture
when used in normal domestic use for a period of two years. In non-domestic use Goldair limits the
voluntary warranty to three months.
Goldair undertake to repair or replace this product at no charge if found to be defective due to a
manufacturing fault during the warranty period.
This warranty excludes damage caused by misuse, neglect, shipping accident, incorrect installation, or
work carried out by anyone other than a qualified electrical service technician.
PLEASE KEEP YOUR RECEIPT AS THIS WILL HELP VERIFY YOUR WARRANTY.
The benefits given to you by this warranty are in addition to other rights and remedies available to you
under law in relation to the goods or services to which this warranty relates.
In Australia, our goods come with guarantees that cannot be excluded under the Australian Consumer
Law. You are entitled to a replacement or refund for a major failure and compensation for any other
reasonably foreseeable loss or damage. You are also entitled to have the goods repaired or replaced if the
goods fail to be of acceptable quality and the failure does not amount to a major failure.
In New Zealand this warranty is additional to the conditions and guarantees of the Consumers Guarantee
Act (1993).
Goldair – New Zealand
CDB Goldair
PO Box 100-707
N.S.M.C
Auckland
Phone +64 (0)9 917 4000
Phone 0800 232 633
www.goldair.co.nz
Goldair – Australia
CDB Goldair Australia Pty
PO Box 574
South Morang
Victoria, 3752
Phone +61 (0)3 9336 4423
Phone 1300 GOLDAIR (1300 465 324)
www.goldair.com.au
IMPORTANT: Please complete and retain this warranty card
Name ……………………………………………… Purchased from …………………………………
Address …………………………………………… Date of purchase …………………………………
………………………………………………………. Name of product …………………………………
Suburb …………………………………………… Model no ……………………………………………
Attach a copy of the purchase receipt to this warranty card
Due to continual design improvements, the product illustrated in this User Manual may differ slightly from the actual product.