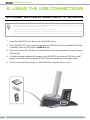
1
DVR Station Gen 5 User Manual - version 3 Table Of Contents 1. introduction����������������������������������������������������������������������������������������������������������������2 1.1. What can the DVR Station do?������������������������������������������������������������������� 3 1.2. How to use the remote control��������������������������������������������������������������� 3 2. Hardware Setup������������������������������������������������������������������������������������������������������ 6 2.1. Connection Principles ������������������������������������������������������������������������������� 6 2.2. inserting the DVR adapter������������������������������������������������������������������������� 6 2.3. Connecting the power charger/adapter����������������������������������������������� 6 2.4. installing the dvr station������������������������������������������������������������������������� 7 3. Scheduling TV recordings������������������������������������������������������������������������������11 3.1. What’s required to use this function?������������������������������������������������� 11 3.2. activating the TV program guide online ��������������������������������������������� 11 3.3. transferring the program data to the archos��������������������������������� 12 3.4. configuring the TV control settings��������������������������������������������������� 14 3.5. Scheduling your recording��������������������������������������������������������������������� 17 4. Recording audio/video manually��������������������������������������������������������������19 4.1. recording audio manually����������������������������������������������������������������������� 19 4.2. recording video manually����������������������������������������������������������������������� 20 5. editing your recordings�������������������������������������������������������������������������������� 22 5.1. Example 1����������������������������������������������������������������������������������������������������� 22 5.2. Example 2����������������������������������������������������������������������������������������������������� 22 6. using the usb connections������������������������������������������������������������������������� 24 6.1. Connecting a USB external device to the ARCHOS����������������������������� 24 6.2. Connecting the ARCHOS to a computer������������������������������������������������� 25 VERSION 3.0 - P/N: 105817V3 DVR Station Gen 5 1. introduction While reading this manual, you should refer to the appropriate side (Europe / North America) of the Connection Guide Sheet. This separate sheet is included in the DVR Station’s box. An introductory note from archos... Dear Customer, Thank you for choosing this ARCHOS product. We hope that you will enjoy using it and that it will give you satisfaction for many years to come. Wishing you the best multimedia experience, The ARCHOS Team. All the information contained in this manual was correct at the time of publication. However, as we are often updating and improving our products, your DVR Station may have a slightly different appearance or modified functionality than presented in this manual. where to find the information you may need? Latest version of the manual Visit www.archos.com/manuals to download the most recent PDF version of this manual. Troubleshooting See the Frequently Asked Questions section at www.archos.com/faq Technical Support Visit www.archos.com/support for e-mail support. U.S. & Canada: Call 877-300-8879 (toll free) Europe: please register your product before contacting Technical Support (www.archos.com/register). User Manual - version 3 1.1. What can the DVR Station do? When connected to your ARCHOS device and to your home entertainment system, the DVR Station will allow you to: • schedule TV recordings via the ARCHOS TV Program Guide (EPG). • schedule TV recordings manually. • record audio/video manually, directly on your ARCHOS device, from most any stan- dard audio/video source. • display video from the ARCHOS device on your TV. • connect a compatible USB device (digital camera, USB key, external hard drive) to your ARCHOS device, in order to play or transfer its contents onto the ARCHOS. Only with Gen 5 WiFi-enabled ARCHOS devices: • access the ARCHOS Content Portal, directly on your TV, so that you can purchase movies or songs. See the manual of your ARCHOS. • browse the web, directly on your TV, with the optional Web Browser plug-in, available for purchase at www.archos.com. See the manual of your ARCHOS. • play, directly on your TV, media files stored on a computer connected to your home WiFi network. See the manual of your ARCHOS. Your ARCHOS device will automatically start charging every time you place it in the powered DVR Station. 1.2. How to use the remote control • If you are using the DVR Station to display the contents of the ARCHOS on your TV, you will need to use the DVR Station’s included remote control to navigate through the ARCHOS interface. • The DVR Station has an infrared receiver located on the front of the device, on the right side. • Point the supplied remote control towards the infrared receiver to control your ARCHOS device. DVR Station Gen 5 This part of the remote control is used for the Web Browser and the Widgets (only with Gen 5 WiFi-enabled devices). Use the direction pad to move the cursor that appears on the screen. Pressing this button will activate 2 modes at the same time: - the “left button lock” mode: the direction pad will act as if you moved a mouse while holding its left button at the same time. It will allow you, for example, to use sliders or other dragging controls. - the navigation buttons, at the top right, will allow you to move from one link/field to another (normally they scroll the page up/down). Press again to disable these 2 modes. This button is like a mouse’s left button. Depending on where you are in the interface, it will allow you to open a link, execute a function, etc (same as if you tapped on the screen). This button is like a mouse’s right button. Depending on where you are in the interface, pressing this button will display a contextual menu (same as if you held down on the touchscreen). User Manual - version 3 2 These are the main buttons: Navigation buttons: move from one item to another Enter/Accept or Play/Pause/Resume Escape/Back/Stop High-speed fast forward, list scrolling or zoom in High-speed fast rewind, list scrolling or zoom out Display a text description of the available menu icons Switch the display of the image between the built-in LCD screen and a TV Turn on the ARCHOS / put it into standby mode Increase/decrease volume Mute sound Tab between available screens 3 The keyboard can be used, for example, to enter a Web address, write an e-mail (only with Gen 5 WiFi devices), name/rename a folder, etc: Caps Lock key Green Alt key: enable the keys’ green secondary functions Blue Alt key: enable the keys’ blue secondary functions Shift key delete character before cursor In order to type one of the green/blue secondary characters in capital letters (é, è, ç, etc.), press Caps Lock, then Alt green/blue, and press the corresponding key. DVR Station Gen 5 2. Hardware Setup 2.1. Connection Principles • The ARCHOS DVR Station allows you to record video from most any standard video source. Typically this is your home television system. By placing the DVR Station next to your television, you have a simple way to connect and disconnect your ARCHOS device simply by placing it into the station. • The DVR Station is a ‘pass-through’ device. This means that when your ARCHOS device is not placed in it and video is playing (DVD, Television, etc.), it simply passes the audio and video signals through the DVR Station to your television. • What this means is that you will place the ARCHOS DVR Station ‘between’ your television reception device (Cable box, satellite receiver, Digital TV receiver, etc.) and your television. See Diagram B on the Connection Guide. • When connecting cables between devices, always remember that the OUT connectors of one device must be connected by cables to the IN connectors of the next device. You can think of it as the signals traveling out of one device into the next device. Finally, make sure that you always match the color of the connector with the color of the jack it is being plugged into. 2.2. inserting the DVR adapter ! ▲ Never insert your ARCHOS device in the DVR Station without the corresponding plastic DVR adapter as this could easily damage the connectors. • See Diagram A on the Connection Guide. • Take the DVR adapter that came with your ARCHOS Gen 5 device. The plastic DVR Adapter does not come with the DVR Station. • Insert the DVR Adapter into the DVR Station. This will allow your ARCHOS device to perfectly fit into the DVR Station. If you need to remove the DVR Adapter from the DVR Station, we recommend that you use a screwdriver: insert it in the square-shaped hole, underneath the device, and push until the DVR Adapter comes out. See following image: 2.3. Connecting the power charger/adapter When connected to the charger/adapter, the DVR Station will also allow you to charge your ARCHOS. Just insert your ARCHOS into the powered DVR Station, and it will start charging. The battery will be completely charged when the green CHG light (on the ARCHOS device) blinks. User Manual - version 3 1. Connect the included charger/adapter to the jack labeled DC-IN on the back of the DVR Station. 2. Then plug the other end of the charger/adapter into an available wall socket. If you have correctly connected the charger/adapter, the DVR Station’s LED indicator (on the front of the device, on the right side) will light up. ! ▲ Use only the supplied ARCHOS charger/adapter as other adapters may damage this device (even if they give the same voltage rating). 2.4. installing the dvr station • The way you install your DVR Station will vary depending on the number of audio-visual devices you have and how your entertainment system is set up. • These different ways of installing the DVR Station are described in the following sections. tuner and TV (diagram B on the connection guide) • This shows the basic connection setup of a television source (tuner), the DVR Station, and your TV. • When connected to your ARCHOS device, TV and tuner (satellite receiver, digital TV receiver, cable/DSL box, VCR or DVD Recorder), the DVR Station will allow you to do everything described in the Introduction. 1 Your tuner needs to be connected to your home antenna/satellite/cable. 2 Connect your tuner’s TV outputs to the DVR Station’s inputs. 3 Connect the DVR Station’s outputs to your TV’s inputs. 4 In order to display the contents of the ARCHOS on your TV, make sure that the ARCHOS “TV Settings” reflect your DVR/TV configuration: - From the Home Screen, select the “Settings” menu item, then choose “Display”. - “TV Standard”: “NTSC (USA)” or “PAL (Europe)”: select the one that is compatible with your country’s television system. - “TV Connection”: based on how you have connected the DVR Station to your TV. You can also connect your DVD player (output) either to your TV (if it has secondary input connector) or to your tuner (if it has an input connector). DVR Station Gen 5 TV only (diagram C on the connection guide) When connected to your ARCHOS device and TV, the DVR Station will allow you to do everything described in the Introduction, except scheduling TV recordings. 1. Connect the DVR Station’s outputs to your TV’s inputs (to display the image of the ARCHOS device on your TV). 2. Connect your TV’s outputs to the DVR Station’s inputs (to be able to record from your television). Verify that your TV has audio/video outputs. Check your television manual. 3. In order to display the contents of the ARCHOS on your TV, make sure that the ARCHOS “TV Settings” reflect your DVR/TV configuration: - From the Home Screen, select the “Settings” menu item, then choose “Display”. “TV Standard”: “NTSC (USA)” or “PAL (Europe)”. “TV Connection”: based on how you have connected the DVR Station. TV only (diagram D on the connection guide) If your TV has no audio/video outputs, you will not be able to record from it. You will only be able to display the contents of the ARCHOS on your TV. 1. Connect the DVR Station’s outputs to your TV’s inputs. 2. Make sure that the ARCHOS “TV Settings” reflect your DVR/TV configuration: - From the Home Screen, select the “Settings” menu item, then choose “Display”. “TV Standard”: “NTSC (USA)” or “PAL (Europe)”. - “TV Connection”: based on how you have connected the DVR Station. final steps 1. Do not place the ARCHOS in the powered DVR Station yet. If you can still watch TV, it means that you have correctly connected the DVR Station as a pass-through device. If you cannot watch TV anymore, this means that there is an incorrect connection. Check the previous connections steps carefully. User Manual - version 3 ! ▲ Before inserting the ARCHOS device into the DVR Station, always make sure that the ARCHOS is off! 2. Now insert your ARCHOS device (that is off) into the powered DVR Station. When the ARCHOS is on, press the TV/LCD button (or the TV button on the included remote control). Make sure that your TV is switched to the AV input that is used to connect the DVR Station: The DVR Station will stop passing through the normal TV signals to the television and send sound and images from your ARCHOS device. If you can see the contents of the ARCHOS on your TV, you can move on to the next chapters. If you cannot see the contents of the ARCHOS on your TV, or if the image is altered, try to modify the ARCHOS “TV Settings”: - From the ARCHOS Home screen, select the “Settings” menu item, then choose “Display”. - Change the following parameters: “TV Standard” - choose between the “NTSC (USA)” and “PAL (Europe)” systems (select the one that is compatible with your country’s television system). “TV Format” - “4:3” or “16:9” - the format used by your television set to display images. - the option “Wide screen” becomes available when you set the “TV standard” parameter to “PAL (Europe)”. “TV Connection” - select the type of video output (“Composite”, “S-Video” or “RGB”), based on how you have connected the DVR Station to your TV. DVR Station Pass-through table The DVR Station will pass through the following video signals when the Archos device is not set to external display or is not placed in the DVR Station. DVR Station Gen 5 Video input Composite yellow connector or supplied scart (Europe) Video Output Composite yellow connector Composite Yes No yellow connector or supplied scart (Europe) S-Video Composite RGB yellow connector or supplied scart (Europe) Pass-through (PR/R, PB/B, Y/G) will only show black & white image No S-Video or S-Video on supplied scart (Europe) S-Video Yes S-Video Composite No or S-Video on supplied scart (Europe) S-Video or S-Video on supplied scart (Europe) yellow connector RGB (PR/R, PB/B, Y/G) will only show black & white image No Note: you can use the DVR Station’s RGB output connectors in order to get the best image quality from the Archos to the television, but it will not pass through any DVR input video source. Notes for North America: Although your DVR Station has connectors for composite video (yellow), Archos has supplied S-Video cables in order that you get the best possible quality video recording. Archos recommends that you use these connections instead of the composite connector (yellow). Notes for Europe: To get the best recording quality from your TV or other tuner devices, Archos recommends that you record from an S-Video signal. You may be able to do this by setting the scart connector on the back of your tuner (satellite receiver, Digital TV Adapter, VCR, etc.) to send out an S-Video signal. Check the manual of the device to see if this can be set. If the device can be set to exit an S-Video signal through the scart connection, then you should set your television as well to expect an S-Video signal (sometimes called ‘Y/C’) from its scart connector. See your television’s manual on how to do this. Make sure to set your Archos device to send out an S-Video signal as well (Menu > Settings > Display > TV Connection > S-Video). 10 User Manual - version 3 3. Scheduling TV recordings With the ARCHOS TV Program Guide (EPG), you will be able to schedule recordings easily. You have a one year free subscription to the TV Program Guide. 3.1. What’s required to use this function? • In order to use this functionality, you will need to connect the powered DVR Station to your Gen 5 ARCHOS device and to a tuner, which can be either: - a satellite receiver a Digital TV receiver a cable/DSL box a VCR a DVD Recorder • See Diagram manual. B on the Connection Guide, and the ‘Hardware Setup’ chapter of this You tuner will need to be connected to your home antenna/satellite/cable. 3.2. activating the TV program guide online After having set the DVR Station to your home television system, you will need to activate the TV Program Guide (EPG) online. This is a one-time operation. 11 DVR Station Gen 5 1. Go to www.archos.com/register 2. Access your ARCHOS account (or create one if you don’t have one yet) and register your ARCHOS Gen 5 device. If you have already registered your ARCHOS Gen 5 device, find the line that matches your product and click on More... (on the right). 3. Follow the instructions on screen to activate the TV Program Guide. If you have a non-WiFi device, you will be asked to download ArchosLink, a PC program which is required to transfer the TV Program Guide data to your ARCHOS. 3.3. transferring the program data to the archos Once you have activated the TV Program Guide online, you now need to transfer its data onto your ARCHOS. There are two ways to do this: • directly on your ARCHOS, via the WiFi (for WiFi-enabled devices) • using your computer, via ArchosLink (for non-WiFi devices, or if you cannot or do not want to transfer the data over the WiFi) WiFi devices First time Procedure 1. Turn on your ARCHOS device. 2. From the Home screen, select the “Recorder” icon. 3. Select the “Update” menu item. Your ARCHOS will automatically connect to a configured network. If your ARCHOS finds a configured WiFi network and if you have correctly activated the TV Program Guide online, the TV Program data will start updating automatically. This operation can take several minutes. ! ▲ Do not try to operate the device while it is downloading TV Program information. Updating the TV Program Guide periodically • Every time you transfer the TV Program Guide information to the ARCHOS, your device will memorize all the TV Programs within a certain period of time. • Remember to update the data periodically: the ARCHOS will remind you to update your TV Guide before it becomes obsolete (select the “Settings” menu item if you want to set the update reminder). 12 User Manual - version 3 • You also have the possibility to let the ARCHOS automatically update the TV Program Guide information at night: - Select the “Settings” menu item and set the “Automatic Updates” parameter to “On”. - Then leave your ARCHOS on the powered DVR Station at night. If your ARCHOS finds a configured WiFi network, the data will be updated automatically during the night. Thus you must leave your WiFi connection powered throughout the night. Non-WiFi devices At the end of the online activation process, you were asked to download ArchosLink. This PC program is required to transfer the TV Program Guide data to your ARCHOS. You can also use this method with a WiFi device, if you cannot or do not want to update the data over the WiFi. In this case, go to www.archos.com to download ArchosLink. Update Procedure 1. On your computer, install ArchosLink and run it. 2. Connect the ARCHOS to your computer. 3. In the first part of the Podcast tab, click on the TV Program Guide update line. In the second part of the screen, you will see progression bars indicating the status of the Program Guide download/synchronization. - Europe: if you have correctly activated the TV Program Guide online, ArchosLink will start transferring the data to your ARCHOS. This operation can take several minutes. - USA: in the second part of the Podcast tab, click on the Download TV Program Guide button (see image): ArchosLink will start transferring the data to your ARCHOS. This operation might take time depending on the number of channels included in your TV Guide. 3. When the progression bars are at 100%, it means that the download/synchronization is finished. You can now disconnect the ARCHOS from your computer. Every time you transfer the TV Program Guide information to the ARCHOS via ArchosLink, your device will have approximately 2 weeks of guide information (if available for your country). Remember to update the data before the end of this period. 13 DVR Station Gen 5 3.4. configuring the TV control settings Your ARCHOS needs to be connected to the DVR Station. You also need to have connected your tuner to the DVR Station (see: Diagram B on the Connection Guide sheet). • From the ARCHOS Home Screen, select the “Settings” menu item, and choose “TV Control” to display the “TV Control” settings screen. • This settings screen allows you to set the DVR Station’s IR emitter as well as configure the channel list. verifying the channel list 1. From the “TV Control” screen, select “Set TV Channel List”. 2. Verify that the channel list on the ARCHOS is the same as on your tuner. 3. Here you can deselect/select a channel or change the number of a channel. Setting the IR Emitter • The DVR Station has a high-powered infrared LED, located on the front of the device, at the same place as the infrared receiver (see: How to Use the Remote Control). • It allows your ARCHOS device to communicate with your tuner (VCR, cable box, satellite receiver or Digital TV receiver), so that it can turn it on and off, and change channels on it. • This is a one time step to set your ARCHOS device to send the correct infrared codes to control your tuner. If you do not plan on making scheduled recordings, then you do not need to set the infrared emitter code. 1st Test: turning your tuner off 1. From the “TV Control” screen, select “Set Infrared Emitter”. This first screen allows you to correctly set the codes and parameters so that the DVR Station can turn your tuner on/off automatically (for a scheduled recording). 14 User Manual - version 3 2. “TV Receiver”: select the type of tuner that you want to control with the IR Emitter (“VCR”, “Cable/DSL box”, “Satellite Receiver”, “DVD Recorder” or “Digital TV”). 3. “Receiver brand”: choose the brand of your tuner. You can use the the remote control to scroll the list faster. buttons on 4. Select the “Test power Off code” button. Make sure that your tuner is on. Your ARCHOS device will then try to turn your tuner off. After a few seconds, your ARCHOS will ask you if the device responded correctly: If your tuner turned off, select “Yes”, and move on to the next section. If your tuner did not turn off, select “No, try next code”. Your device will try turning the tuner off again, using a different code. Repeat this operation until the ARCHOS manages to turn the tuner off. If none of the codes work, check that the DVR Station is positioned in a way that allows the infrared signal to reach your tuner’s receiver. Note: In some rare cases the ON/OFF functionality may not work. 2nd Test: changing channels on your tuner After you select “Yes” at the end of the 1st test, the following screen appears. It allows you to correctly set the parameters so that the DVR Station can change channels on your tuner (for a scheduled recording). 1. For the “Channel” parameter, select the highest channel that is currently memorized on your tuner. 15 DVR Station Gen 5 2. Select the “Test channel select” button. Make sure that your tuner is on. Your ARCHOS device will then attempt to switch your tuner to the selected channel. After a few seconds, your ARCHOS will ask you if the device responded correctly: If this worked, select “Yes”. If this did not work, select “No, try next option”. Your device will try again to switch your tuner to the selected channel, using a different option*. Repeat this operation until it works. *Here is a description of the different parameters automatically set by the ARCHOS: - “Key Delay”: delay between the emission of each digit of a channel (“Short”, “Normal”, “Long”). - “Key: Enter”: Set to “On” if normally, you have to press an “OK” button on your turner’s remote control after you enter the channel number. Example: If you normally press 1, 3, “OK” to access channel 13, then this parameter is set to “On”. - “Key: -/--”: Set to “On” if normally, you need to press a special key on your tuner’s remote control before entering a channel with several digit numbers (that is to say a channel greater than 9). This key is often represented with this symbol: “-/--”. - “Switches on with”: see below. - “Time until video”: see below. If the ARCHOS did not manage to switch your tuner to the selected channel, you can try using a different ON/OFF code (see: 1st Test: turning your tuner off) and do the 2nd test again. 3. After you selected “Yes” at the end of the 2nd step, the following screen appears. You will have to set these two parameters: - “Switches on with”: this depends on what key you normally press, on your tuner’s remote control, to turn it on. If you normally press the “Power” key, select “Power”. If you can press any channel key, then select “Any channel”. If you can press any key, select “Any key”. - “Time until video”: select the amount of time it normally takes between the moment you turn on your tuner, and the moment the image appears on your TV (“0...10 seconds”, “10...30 seconds”, “>30 seconds”). 4. When you have finished, select “Done”, and a confirmation message will appear. Select “OK”. 16 User Manual - version 3 3.5. Scheduling your recording 1. In the Home screen, select the “Recorder” icon to display the ARCHOS TV Program Guide. 2. This screen’s menu items will allow you to choose a different day, update the Program Guide data, or change various settings (program guide update and channel list configuration). 3. Navigate through the different TV programs, and simply select the one you wish to record. 4. A new window will appear with a description of the TV program. Select “Record”. 5. You will go back to the TV Program Guide and a ‘REC’ icon will now appear next to the TV Program you selected. ! ▲ Make sure the ARCHOS is placed in the DVR Station at the scheduled time for the recording. the manual “tv scheduler” • From the ARCHOS Home Screen, select the “Recorder” icon, and switch to the “TV Scheduler” tab ( button). • This screen allows you to view and edit your scheduled recordings. It also allows you to schedule recordings manually, if you are not using the TV Program Guide. 17 DVR Station Gen 5 • Here you can schedule a new recording or edit an existing one: you can remove it, edit its title, change the time, date, channel, etc. You also have the possibility to add a safety margin to the beginning/end of the scheduled recording. To set this parameter, use the “Settings” menu item. Notes about the scheduler • The scheduler automatically reorganizes the recording events chronologically. • In order for a scheduled recording to start, you must leave the ARCHOS device on the home menu screen or leave it in stand-by mode. If you are listening to music, watching a video or looking at photos with the device, it will not interrupt you to make the scheduled recording. • Once the scheduled recording has been made, or the date of a recording has been passed without the recording having been made (the ARCHOS was not connected to the DVR Station or was not in standby mode), the schedule entry will be erased from the scheduler. 18 User Manual - version 3 4. Recording audio/video manually 4.1. recording audio manually With the DVR Station, you will be able to record audio from most any standard audio source (hi-fi, turntable, boombox, etc). recording procedure 1. Your ARCHOS needs to be connected to the DVR Station. Also connect your audio source’s outputs to the DVR Station’s inputs. 2. In the Home screen, select the “Recorder” icon and use the tabs ( button) to access the “Video Recorder” mode. Then select the “Audio Recorder” menu item. 3. This screen will allow you to adjust the recording sound gain (left/right arrows) as well as configure other recording parameters (see next section). 4. You can now tell the ARCHOS to start recording from the audio source (“REC” yellow icon, “Start Recording” menu item, or OK button). You can pause and resume your recording at any time. 5. Close the screen to stop and save the recording*. * All audio recordings made by your ARCHOS device are saved in the Music/(Rec) folder. If you wish to keep them in a different location, you can use the “Move” function of the ARCHOS file browser after recording. “Audio recorder” settings To access the “Audio Recorder” settings screen, select the “Settings” menu item: - “Set Title”: allows you to give a personalized title to the recording, using the keyboard. - “Format”: you can choose between “PCM” (uncompressed) and “ADPCM” (compressed) WAV format. - “Sampling”: choose the sample rate for your recording (a higher rate gives higher sound quality but a larger file). 19 DVR Station Gen 5 Be careful that the audio source is supplying a line-level and not an amplified signal (turning down the volume of the player will work if you are using the headphone out signal of your audio device). A signal that is amplified too much will result in a terribly distorted recording. 4.2. recording video manually With the DVR Station, you will be able to record video from most any standard video source. recording procedure 1. Your ARCHOS needs to be connected to the DVR Station. Also connect your video source’s outputs to the DVR Station’s inputs. 2. In the Home screen, select the “Recorder” icon and use the tabs ( cess the “Video Recorder” mode. button) to ac- 3. This screen will allow you to adjust the recording sound gain (left/right arrows) as well as configure other recording parameters (see next section). 4. You can now tell the ARCHOS to start recording from the video source (“REC” yellow icon, “Start Recording” menu item, or OK button). You can pause and resume your recording at any time. 5. Close the screen to stop and save the recording*. * All video recordings made by your ARCHOS device are saved in the Video/(Rec) folder. If you wish to keep them in a different location, you can use the “Move” function of the ARCHOS file browser after recording. “Video recorder” settings To access the “Video recorder” settings screen, select the “Settings” menu item: - “Auto Stop Rec”: the duration of time after which the ARCHOS will automatically stop recording. If you disable this function, the recording will continue until you press hard drive fills up. or until the entire - “Rename”: allows you to define the filename before the recording begins, using the keyboard. - “Source”: you can choose which video input (“Auto”/“Composite”/“S-Video”) you want the ARCHOS to use. Normally, with a good video signal, you can set it to “Auto” and your ARCHOS will scan the DVR station inputs to see which one is receiving video. 20 User Manual - version 3 - “Format”: “Auto”/“4:3”/“5:3”/“16:9”/“2.35”. This is the aspect ratio of the screen that the ARCHOS device will record. You can set this manually, but in most cases you can just leave it on “Auto”. - “Widescreen”: “Auto”/“On”/“Off”. If your tuner (cable box, satellite receiver, etc.) outputs a video signal in widescreen, you can force the ARCHOS to recognize this signal. This should be set to “On” if recordings show people that look unusually tall and thin. But in most cases you can just leave it on “Auto”. - “Bitrate”: 500kb/s, 1000kb/s, 1500kb/s, 2000kb/s, 2500kb/s. Use this to set the encoding quality. The higher the encoding rate, the higher the image quality but also more hard drive space will be used. - “Sampling”: 32kHz, 48kHz. This is the sound sampling rate. The higher value gives a higher quality sound but will take up more space on the hard drive. - “Brightness”: adjusts the recorded image brightness. - “Contrast”: adjusts the recorded image contrast. - “Saturation”: use this to de-emphasize or saturate the colors in the recorded image. - “Hue”: changes the color spectrum in the recorded image. - “Reset”: changes the above settings to the default values. Copy Protection • The ARCHOS recording system is designed to respect the Macrovision™ copyright protection system. If the source of your video is copy-protected, the device will record in protected mode. You will see a ‘P’ icon on the recording screen (not during playback), indicating that the file will be a protected file. • Protected files can only be played back on the ARCHOS that created them, and not on a computer. The playback of protected files is also limited to the built-in LCD screen and cannot be displayed on an external television. 21 DVR Station Gen 5 5. editing your recordings • Video files recorded with the ARCHOS DVR Station can be edited by deleting the sections you do not wish included. The editing you can do is either cropping or cutting of particular segments of the video file. • You will mark a segment of your video file, and then you will tell the ARCHOS to delete everything except the marked segment or to delete the marked segment from the video file. These operations can be done multiple times on the same video file. • Once finished, you will have the option to save the edit marks with the video or to write a new video file. If you save your file with edit marks, you can always go back and change your edits at another time. The actual video information is not deleted. On the other hand, you can write a new file which will only include the video parts that you specified in the edit session. This file will be smaller but you can never un-edit it. 5.1. Example 1 You have recorded a music video program and would like to keep one single music presentation. But you do not want to keep the rest of the television recording. Beginning of recording Video section to keep End of recording 1. Open the video file you want to edit and pause it. 2. In the progression bar, go to the beginning of the desired section (a), select the “Insert a mark” menu item, and choose “Start Mark”. 3. Forward to the end of the desired section (b), select the “Insert a mark” item, and choose “End Mark”. menu 4. Select the “Edit Selection” menu item and choose “Crop”, which will delete everything except the designated section. 5.2. Example 2 You have recorded a television program but would like to remove certain sections before the program started, parts during the program, and the program afterwards because you had recorded a little extra. 22 User Manual - version 3 1. Open the video file you want to edit and pause it. 2. In the progression bar, go to the beginning of the first undesired section (a), select the “Insert a mark” menu item, and choose “Start Mark”. Forward to the end of the first undesired section (b), select the “Insert a mark” menu item, and choose “End Mark”. Select the “Edit Selection” menu item and choose “Cut”, which will cut out this part of the recording. 3. Go to the beginning of the second undesired section (c), select the “Insert a mark” menu item, and choose “Start Mark”. Forward to the end of the second undesired section (d), select the “Insert a mark” menu item, and choose “End Mark”. Select the “Edit Selection” menu item and choose “Cut”, which will cut out this section. 4. Do the same for the other section(s) that you want to cut out. • If you want to keep the edit points and be able to re-edit another time, select the “Save edit” menu item, and choose “Save”. • If you want to save the edited file as a new individual file, select the “Save edit” menu item, and choose “Write to new File”. A confirmation screen will pop up. • If you want to cancel the edit points and restart editing, choose the “Cancel changes and restart edit” menu item. 23 DVR Station Gen 5 6. using the usb connections 6.1. Connecting a USB external device to the ARCHOS • The DVR Station allows you to connect a USB external device to your ARCHOS, so that you can transfer files or play content directly on the ARCHOS. • These devices can be Mass Storage Class (MSC) or PTP devices. • Check your manufacturer’s information to find out whether your device is an MSC or PTP device. Non Mass Storage Class devices such as printers, Ethernet adapters, mice, keyboards, etc. are not supported. 1. Insert the ARCHOS Gen 5 device into the DVR Station. 2. Once the ARCHOS is on, connect the external USB device (with a standard USB cable if needed) into the DVR Station (USB A port). 3. Turn on the external USB device if needed (check the documentation of your external USB device). 4. A double browser window will appear on the ARCHOS: the external USB device will appear in the left panel, and your ARCHOS device’s hard drive in the right panel. USB A 5. You can then play files directly on the ARCHOS or transfer them onto it. 24 User Manual - version 3 To disconnect 1. Make sure that no transfer is being made (the HDD light, on your ARCHOS device, should not be flickering). 2. From the File Browser, select the “Remove safely” menu item. 3. You can now pull out the USB cable on either end. ! ▲ Note: you may not always be able to copy files to your external USB device from your ARCHOS. 6.2. Connecting the ARCHOS to a computer 1. Insert the ARCHOS Gen 5 device into the DVR Station. 2. Plug the ARCHOS USB cable (supplied with your ARCHOS Gen 5 device) into the DVR Station (USB B port). 3. Plug the other end of the ARCHOS USB cable into your running computer. 4. The ARCHOS will ask you if you want to connect it or charge its battery. Choose to connect it. USB B 5. The ARCHOS’ icon will appear on your computer. You can now start transferring files onto it. See the manual of your ARCHOS Gen 5 device to learn how to transfer files, and how to disconnect the ARCHOS from your computer. 25