1
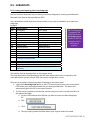
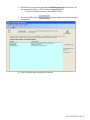
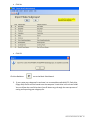
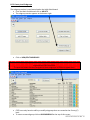
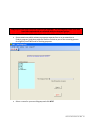
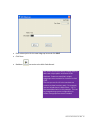
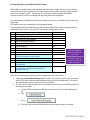
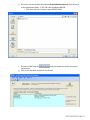
Training Manual for Users Transitioning from ERS4 To NEERS5 June 2006 Developed by the NEERS5 Training Committee In Cooperation with the University of Georgia and CSREES, USDA ACKNOWLEDGEMENTS This manual was truly a collaborative effort among state and Federal partners. In July of 2005, an EFNEP meeting was held during the Society for Nutrition Education Conference in Orlando. The opportunity was presented for volunteers to work on various aspects of the Nutrition Education Evaluation and Reporting System (NEERS5). There was a tremendous response. Committees were formed and volunteers have given this project tremendous effort over the past year. The NEERS5 Training Committee, chaired by Heather Danis of the University of Vermont, conducted a survey to determine the preferred format for training materials. The vast majority of respondents indicated that a manual in electronic form would be preferred. Therefore, this manual was developed and copied onto the same CD as the NEERS5 county level software (CRS5) for easy reference. The manual will also be available on the NEERS5 website. Please note that this is the Transition Manual for those who are familiar with ERS4. A comprehensive NEERS5 Manual is being developed which assumes no knowledge of ERS4. In January of 2006, Gail Hanula of the University of Georgia volunteered to Chair the NEERS5 Training Committee on an interim basis while Heather Danis was on leave. She led the effort to develop the ERS4 to NEERS5 Transition Manual with co‐author Tiffany Williams, EFNEP Data Manager at the University of Georgia. Margaret LaShore of Michigan State University was instrumental in assisting with the Youth section. Extensive field testing was conducted by NEERS5 Training Committee members and NEERS5 Coordinating Committee members. Numerous sites across the country contributed to this effort, reviewing both the software and the manual. I am grateful to all of the NEERS5 committee members for their efforts. The committee members are listed on the following page. In addition, special thanks go to Earl Merrill of Acorn Data Systems for development of the software and extensive review of the manual, to Sylvia Montgomery for her input, coordination and testing of the software and to Dr. Mary McPhail Gray at CSREES for her support in making NEERS5 become a reality. Wells Willis EFNEP National Program Leader, EFNEP CSREES, USDA June, 2006 ACKNOWLEDGEMENTS USDA CSREES EFNEP Staff: Wells Willis, EFNEP National Program Leader Sylvia Montgomery Stephanie Blake Acorn Data Systems, Software Designer/Programmer: Earl Merrill NEERS 5 Coordinating Committee: Barbara Sutherland, University of California Davis Linda Drake, University of Connecticut Susan Baker, Colorado State University Peggy Martin, Iowa State University (Co‐Chair, Nutrition/Diet Analysis) Lorelei Jones, North Carolina State University (Co‐Chair Nutrition/Diet Analysis) Bev Phillips, University of Wisconsin (Co‐Chair, Youth) Donna Vandergraff, Purdue University (Co‐Chair, Youth and Behavior Checklist) Jean Anliker, University of Massachusetts (Co‐Chair, Behavior Checklist) Heather Danis, University of Vermont (Chair, Training) Gail Hanula, University of Georgia (Interim Chair, Training) NEERS 5 Training Committee: Heather Danis, University of Vermont (Chair) Gail Hanula, University of Georgia (Interim Chair) Tiffany Williams, University of Georgia Karen Martin, Michigan State University Margaret LaShore, Michigan State University Karen Barron, University of Idaho Susan Stephenson‐Martin, Rutgers Andrew Campbell, Rutgers Michelle Scott‐Pierce, Cornell Peggy Martin, Iowa State University Kristin Taylor, Iowa State University Donna Vandergraff, Purdue Julie Gray, Purdue Lorelei Jones, North Carolina State University Dwayne Watson, North Carolina State University Steven Williams, University of Missouri Leslie Speller‐Henderson, Tennessee State University Wilda Wade, North Carolina A&T University Brenda Sheik, Oklahoma State University Barbara Sutherland, University of California Davis Jill Murray, Oregon State University Heli Roy, Louisiana State University Table of Contents 1. Getting Started in CRS5 1.1. 1.2. How to Use This Manual Important Features in CRS5 2. Installing CRS5 from a CD 3. First Time Log‐in for CRS5 3.1. Creating New Users and Passwords 4. System Configuration 5. Converting ERS4 to CRS5 5.1. Option 1 – State Level Conversion of County DBs 5.1.1. Back Up County Data in ERS4 5.1.2. Renaming your ERSDAT40.ZIP file 5.1.3. Install CRS5 at State Level 5.1.4. Install CRS5 at Counties Level 5.1.5. Converting DBs from ERS4 to CRS5 5.1.6. Backing up CRS5 DB in CRS Tools 5.1.7. County Restoration of .ZIP file 5.2. Option 2 – County Level Conversion of County DB 5.2.1. Back Up County Data in ERS4 5.2.2. Renaming your ERSDAT40.ZIP file 5.2.3. Install CRS5 at the County Level 5.2.4. Convert DB from ERS4 into CRS5 6. Creating a New Database 7. The Staff Switchboard 7.1. 7.2. 7.3. 7.4. Accessing Professionals, Paraprofessionals, and Volunteers Entering Staff Entering Hours The Volunteer Screen 8. The Adult Switchboard 8.1. 8.2. 8.3. 8.4. Entering Data for Adults Adding New Adults Important Information New Features 8.4.1. Verify Address 8.4.2. Number of Contacts 8.4.3. Default Profiles 8.5. Subgroups 8.5.1. Creating and Importing State Level Subgroups 8.5.2. Creating County Level Subgroups 8.6. Public Assistance 9. The Nutrition Switchboard 9.1. 9.2. 9.3. Accessing Diet Recalls New CRS5 Features Converting ERS4 Recalls into CRS5 10. The Checklist Switchboard 10.1. 10.2. 10.3. Accessing Behavior Checklists Entering Checklists Exporting Question Sets 10.3.1. Importing Question Sets in CRS5 11. The Youth Switchboard 11.1. 11.2. 11.3. The Youth Switchboard Adding Youth Groups Youth Question Database Practice Sets 1. Getting Started in CRS5 1.1. How to Use This Manual This manual is best viewed in color because there are numerous references that are color coded. 1. This manual refers to databases as a DB or DBs. 2. The screens in this manual will be referred to by their title. Titles can be found by looking in the top left corner next to the CRS5 icon. a. Example 1 ‐ This screen would be referred to as the “Adult Switchboard” screen b. Example 2 ‐ This is the “View/Edit Adult” screen. 3. Throughout these directions New Features will be highlighted in red boxes 4. Tips throughout these directions will be highlighted in purple boxes 5. These buttons appear throughout CRS5 a. They are referred to throughout this manual. i. The BLUE explode button brings up another screen to enter more information. ii. The PURPLE button brings up a menu to enter Recalls and Checklists. iii. The YELLOW X button is always for deleting a record, recall, or other information. ________________________________ CRS5 Transition Manual June 2006 6 1.2. Important Features 1. Required fields throughout the program will have a yellow background o You will not have the option to save screens until all yellow required fields are entered. 2. Always use the BACK DOOR to navigate out of screens in CRS5 3. Using the TAB key throughout this program will ease your data entry. o Place the cursor in the first box on the screen. o Hit TAB to go to the next field. o Hold down the SHIFT key and press TAB to go back to a field. ________________________________ CRS5 Transition Manual June 2006 7 4. Some boxes that appear in BLUE Color throughout CRS5 have the ability to allow you to select more than one item in the box when it is appropriate, such as race, subgroups, or public assistance. o Click on the item once to select it. o If you made an error in your selection click again to unselect that object. o Click on as many items as needed ________________________________ CRS5 Transition Manual June 2006 8 5. Quick Access to Change Data DBs o From the Main Switchboard you can now change DBs by clicking on the BLUE explode button next to the current DB You are taken to the “Attach DataDB” screen where you can select a new DB and attach it. • In CRS5 there are no Table DBs to keep track of in this section. • This screen shows you the DBs that are available on your computer. • The current DB that is attached in CRS5 appears below as well as the DB that you are selecting to attach. • Highlight the DataDB you wish to attach and click ________________________________ CRS5 Transition Manual June 2006 9 6. Sorting Columns o Any screen in any module has the ability to be sorted in different ways. o For example this adult screen can be sorted by ID, Name, City, Staff, or Program Status. o Simply click on the column header once to sort the list in ascending order, click twice to sort in a descending order. This screen is sorted by ID in ascending order. This screen is sorted by Staff in descending order. ________________________________ CRS5 Transition Manual June 2006 10 7. New Features on the Summary Screens o Always click o Click the printer icon to exit a report screen to print the report o The “W’ icon allows you to send this report to a .rtf file that can be opened in Microsoft Word. Clicking on this icon will send the report to a new Word document and you can save and edit the report there. o The “email/paperclip” icon allows you to e‐mail the report to someone as a snapshot attachment. This is set up to use your default e‐mail client to send the e‐mail (i.e. Outlook, Outlook Express, Thunderbird, etc.) This icon will not function properly if you are using a web based client to view your e‐mail (Yahoo, Hotmail, etc.). o The “magnifying glass” and drop down menu are ways you can zoom in and out of the document to change the view. o To scroll through the pages of the report use the arrows at the bottom left of the screen. o One page forward To the last page ________________________________ CRS5 Transition Manual June 2006 11 2. CRS5 INSTALLATION FROM CD • • • Insert your CRS5 Installation CD into a CD-ROM drive on your computer. It has an autoplay feature. If it does not start running automatically open “My Computer” from your desktop. Right Click on the CD drive that contains the CRS5 Installation and click on Autoplay. Once CRS has started running you will see this screen. Follow all of the steps for installation using the default folders that are suggested during installation. • • • Click Next Choose standard Click Next ________________________________ CRS5 Transition Manual June 2006 12 • Click NEXT • Click NEXT ________________________________ CRS5 Transition Manual June 2006 13 ________________________________ CRS5 Transition Manual June 2006 14 • Click FINISH ________________________________ CRS5 Transition Manual June 2006 15 3. First Time Log‐In for CRS5 After you have successfully completed installing CRS5, you can LOG IN. • Open the CRS5 Program and you will be asked for a NAME & PASSWORD o The icon will look like this • The default Name is ERS • The default Password is ERS o Both are case sensitive • You should now be in the CRS Program on the main switchboard ________________________________ CRS5 Transition Manual June 2006 16 3.1. Creating New Users and Passwords User Names and Passwords do not convert over from ERS4 to CRS5. You must create new users and passwords in the new system. Directions for Entering New Users and Changing Passwords Open CRS (Looking at Main Switchboard) • System Administration • Security Functions • Add User • Type a User Name in the top box • Select the appropriate group for this user (Manager or User) • Add You will then get a message that says a user _____ has been added with password ____ (The same as the user name but in all lower case letters) o Click OK o This is the default password. You must log out and log back in to change the password. • OK – This message simply tells you that your user name has been added to the “Managers” Group • Change Password o Type in New Password and Confirm o Save Changed Password o OK o Back out to the Main Switchboard NEW Terminology in CRS5: The new terms Managers and Users are equivalent to Executive Level and Data Entry Level from ERS4. • MANAGERS have total access to change the passwords of any user without knowledge of their old password. Managers can also add and delete users. • USERS only have access to change their own password. ________________________________ CRS5 Transition Manual June 2006 17 4. System Configuration • On the “Main Switchboard” screen click on • Next click on o On this screen there are five important things you will enter. This information migrates from ERS4 if it was properly entered there. The following information is for setting up a NEW DB. • o Select your state from the drop down menu o Enter the Unit ID that corresponds with the county you are in. The county ID codes can be found at http://www.itl.nist.gov/fipspubs/co‐codes/states.htm o Choose the correct use of this system by determining if it is for EFNEP or NON‐ EFNEP use o Choose your Institution from the drop down menu if this DB is for EFNEP use. The Institution box will disappear if you choose NON‐EFNEP. o Enter the county name in the “Unit Name” box For example Chesapeake EFNEP would enter Unit ID ‐ 550 Unit Name – Chesapeake EFNEP Check the Period Begin and Period End Dates. The current year is Fiscal Year 2006. 1. The beginning date for this reporting period is Oct. 1, 2005. 2. The end date will be Sept. 31, 2006. ________________________________ CRS5 Transition Manual June 2006 18 • Choose which Poverty Level Table you will be using by clicking on one of the three choices: 48 Contiguous States and DC, Alaska, or Hawaii. • The Default Nutrition Method allows you to choose which method will compute your nutrition information. This determines the Default Nutrition Method for your state. When the first recall for an adult is entered, the system will prompt for the method to be used for that individual, with the one selected here as the default. o Choose Computerized Analysis or Food Group Intake. o Do not choose External Analysis. This method was created for the conversion process from ERS4 to CRS5 and should not be used as a Default Nutrition Method. • • After you have entered all of the preceding information correctly click . Back out to the Main Switchboard ________________________________ CRS5 Transition Manual June 2006 19 5. Converting ERS4 to CRS5 States may choose one of two options when it comes to converting ERS4 data to CRS5. This is an either/or scenario. o Option 1 ‐ All county data sent to the state office is converted at the state office and the new CRS5 databases are then sent to the counties. o Option 2 – All counties do their own database conversions. Directions for both options follow. 5.1. Option 1: State Level Conversion 1. 2. 3. 4. 5. 6. 7. 8. Back Up County Data in ERS4 Renaming your ERSDAT40.ZIP file Send file via e‐mail to the state office Install CRS5 at State Level Install CRS5 in County Converting DBs from ERS4 to CRS5 Backing up CRS5 DB in CRS Tools County Restoration of .ZIP file * *While the state data coordinator has the data they can convert each county DB. Then the state data coordinator can e‐mail the converted DB back to the county and have them restore the file – which is a familiar process from ERS4. ________________________________ CRS5 Transition Manual June 2006 20 5.1.1. Back Up County Data in ERS4 Counties should: • Log into ERS4 • • • • • (the Ambulance Icon to the right of the screen) Go to ERS Tools Make sure you are attached to the DB that you want to back up Click ‐ Repair/Compact Data DB “OK” Backup • Insert a Floppy Disk – or you can change the path to save it to your hard drive. If you do this click browse and find the folder where you want to back up your file. o Click ‐ Backup o “Yes” (To delete all files from ROOT directory) o “OK” (Note: it takes only 1 disk) o “OK” Restore – this is to test the DB that you just backed up – this is optional • “Next” • “Test” • “OK” • “Cancel” • “Back” door (in upper left corner) • Exit ________________________________ CRS5 Transition Manual June 2006 21 5.1.2. Renaming your ERSDAT40.ZIP file This step may not be needed in all states. Some e‐mail systems are rejecting .ZIP files and you may experience problems trying to send .ZIP files through e‐mail for backup purposes. • From the desktop screen on your computer double click on “My Computer” • Open up the 3 ½ Floppy (A:\) • RIGHT Click on the ersdat40.zip file and you will see a menu o Click on “Rename” towards the bottom of the list o Rename the file ERSDAT40.ZIP.RemoveThis – (again this is just a suggestion – you can choose any neutral file extension you wish) o Next a screen will come up and say “If you change a file name extension, the file may become unstable. Are you sure you want to change it?” Click YES 5.1.3. E‐mail this file to the state EFNEP data coordinator • You may now attach this ersdat40.zip.RemoveThis file to an e‐mail and send to the appropriate person. Be sure “Ersdat40.ZIP.RemoveThis” comes up under “current attachments” Please make sure that you can see the extensions for known file types. From your My Documents folder go to • Tools • Folder options • View • Under Advanced Settings make sure the box that reads “Hide Extensions for known file types” is UNCHECKED • This will help you in the renaming process to make sure that you are changing the correct extension. ________________________________ CRS5 Transition Manual June 2006 22 A file with the .ZIP extension looks like this A file renamed with the .ZIP.RemoveThis will look like this Save this file to a floppy disk and send to your state data coordinator or save this file to your hard drive and attach it to an e‐mail to your state data coordinator. You do not need to change the .ZIP file extension if you are not e‐mailing the file. 5.1.3. Install CRS5 at the State Level See instructions in section 2 of this manual 5.1.4. Install CRS5 at the county level The program CD should be obtained from your state office. Install the program using previous directions given in section 2 of this manual. ________________________________ CRS5 Transition Manual June 2006 23 5.1.5. Converting DBs from ERS4 to CRS5 Creating a Folder for conversion • System Administration • DataDB • New DB • Click on Windows Explorer The Windows Explorer Icon in CRS5 works!! You can use this icon to access Windows Explorer outside of CRS5 if you need to add folders or check files locations. • Windows Explorer will open up in a new window • Find the location C:\E5 CRS Data This is the default folder CRS5 created and this is the location you should use to store your DBs. When you are finished making folders you can “X” out or close Windows Explorer Tip – To make a new folder in Windows Explorer right click in the white space and go to “New”; then Click “Folder” and your new folder will appear and you can give it a proper name. ________________________________ CRS5 Transition Manual June 2006 24 • Go back to your task bar and maximize CRS5; you should be on the screen where we left off o Enter Nick Name o Click Browse o Now locate the folder that you just created – in this case it was C:\E5 CRS Data\Colquitt_06 o Click OK o Click SAVE ________________________________ CRS5 Transition Manual June 2006 25 • Now highlight the DB that you just created and click ATTACH at the bottom of the screen • You will get the following screen message: • Click CONVERT ________________________________ CRS5 Transition Manual June 2006 26 • Now click “Locate DataDb” to search for the location where your ERS4 files were located • • I want to convert Colquitt 06 so I am going to find the file in ERS4 that was the Colquitt 06 data. You are looking for the folder that contains your data. The file you need is ersdat40.mdb • When you have located the file highlight it and click OPEN ________________________________ CRS5 Transition Manual June 2006 27 • It is very important to make sure that the correct file path shows up on this screen. This process does not change or alter your ERS4 data. It is literally migrating your DBs to a new location. You will still be able to access your data in ERS4 if you need it. • After you have verified that the ERS4 Data DB is the correct file click CONVERT • While it is converting you may get some messages like: o This is due to a flaw in ERS4 that allowed deletion of a paraprofessional or volunteer who was the leader of a group. CRS5 cannot have a youth leader who is not in the staff (professional, paraprofessional, volunteer) table. If it encounters a non‐existent leader, it is removed from the list of leaders for that group. If you have leaders that are removed during this process they will need to be re‐entered in CRS5 once this process is complete. • Click OK and let it continue the process ________________________________ CRS5 Transition Manual June 2006 28 • • When the process is finished it will take you back to the “Main Switchboard” You should receive an error telling you that your System Information is missing. o Click OK • You are missing the Institution name. Highlight your institution from the drop down menu. • Verify the other information and click SAVE. • You can now verify which DB you are attached to by looking in the top box ________________________________ CRS5 Transition Manual June 2006 29 5.1.6. Backing up CRS5 DB in CRS Tools Once you have successfully converted a DB go to ERS tools to back it up. • Click on the Ambulance/Disk icon • Enter your password, if needed • Click on BACKUP DATADB ________________________________ CRS5 Transition Manual June 2006 30 • Since this is a .ZIP file you can back it up into the folder where the DB is currently located. This could help you remember where the files are stored. • After you have chosen the appropriate folder click BACKUP • The next screen message will appear like this • Click OK ________________________________ CRS5 Transition Manual June 2006 31 • If you wish to test this backup file go to RESTORE o Find the appropriate file and click NEXT o Click TEST • • Click OK BACK DOOR When you are finished backing up all of your county DBs click EXIT SYSTEM E‐mail each .zip file to the appropriate county level person. If you need to rename the zip file see Renaming .ZIP Files in section 5.1.2. ________________________________ CRS5 Transition Manual June 2006 32 5.1.7. County Restoration of .ZIP File • Save the .ZIP file that was received via e‐mail to the c:\E5 CRS Data folder that was created during CRS5 installation. o Counties may need to create folders by years within this folder to help keep data organized (i.e. c:\E5 CRS Data\Colquitt_06 or C:\E5 CRS Data\Colquitt_07) o If the .ZIP extension was renamed during e‐mail process make sure that when you save the file now you restore it to its original sate. o The file should be named E5CRSDATA.ZIP • • • Log into CRS5 Go to CRS Tools by clicking the ambulance icon. Click RESTORE DATA DB ________________________________ CRS5 Transition Manual June 2006 33 • • Choose the correct “Restore‐From File” path by clicking LOCATE Once you have found the correct path where the .ZIP file is stored click NEXT • • Choose the correct “Restore‐To Directory” path by clicking BROWSE Once this correct path has been chosen click RESTORE ________________________________ CRS5 Transition Manual June 2006 34 • Click OK You are now back on the Database Tools screen (CRS5 Tools). Click the CRS5 icon in the middle of the screen to return o CRS5. ________________________________ CRS5 Transition Manual June 2006 35 • • Once back into CRS5 click on the BLUE EXPLODE button near the top of the screen to go to the DB screen Highlight the DB you just restored in CRS5 Tools and click ATTACH Verify the correct information in the top box. If everything appears correctly the county is now ready to being entering data in CRS5 ________________________________ CRS5 Transition Manual June 2006 36 5.2 Option 2: County Level Conversion 1. 2. 3. 4. Back Up County Data in ERS4 Renaming your ERSDAT40.ZIP file Install CRS5 at the County Level Convert DB from ERS4 into CRS5 5.2.1. Back Up County Data in ERS4 Counties should: • Log into ERS4 • Go to ERS Tools (the Ambulance Icon to the right of the screen) • Make sure you are attached to the DB that you want to back up • Click ‐ Repair/Compact Data DB • “OK” • Backup • Insert a Floppy Disk – or you can change the path to save it to your hard drive. If you do this click browse and find the folder where you want to back up your file. o Click ‐ Backup o “Yes” (To delete all files from ROOT directory) o “OK” (Note: it takes only 1 disk) o “OK” Restore – this is to test the DB that you just backed up – this is optional • “Next” • “Test” • “OK” • “Cancel” • “Back” door (in upper left corner) • Exit ________________________________ CRS5 Transition Manual June 2006 37 5.2.2. Renaming your ERSDAT40.ZIP file This step may not be needed in all states. Some e‐mail systems are rejecting .ZIP files and you may experience problems trying to send .ZIP files for backup purposes. • From the desktop screen on your computer double click on “My Computer” • Open up the 3 ½ Floppy (A:\) • RIGHT Click on the ersdat40.zip file and you will see a menu o Click on “Rename” towards the bottom of the list o Rename the file ERSDAT40.ZIP.RemoveThis – (again this is just a suggestion – you can choose any neutral file extension you wish) o Next a screen will come up and say “If you change a file name extension, the file may become unstable. Are you sure you want to change it?” Click YES You may now attach this ersdat40.zip.RemoveThis file to an e‐mail and send to the appropriate person. Be sure “Ersdat40.ZIP.RemoveThis” comes up under “current attachments” Please make sure that you can see the extensions for known file types. From your My Documents folder go to • Tools • Folder options • View • Under Advanced Settings make sure the box that reads “Hide Extensions for known file types” is UNCHECKED • This will help you in the renaming process to make sure that you are changing the correct extension. A file with the .ZIP extension looks like this A file renamed with the .ZIP.RemoveThis will look like this Save this file to a floppy disk and send to your state data coordinator or save this file to your hard drive and attach it to an e‐mail to your state data coordinator. You do not need to change the .ZIP file extension if you are not e‐mailing the file. ________________________________ CRS5 Transition Manual June 2006 38 5.2.3. Install CRS5 at the county level The program CD should be obtained from your state office. Install the program using previous directions given in Section 2 – Installing CRS5 from a CD 5.2.4. Converting DBs from ERS4 to CRS5 Creating a Folder for conversion • System Administration • DataDB • New DB • Click on Windows Explorer The Windows Explorer Icon in CRS5 works!! You can use this icon to access windows explorer outside of CRS5 if you need to add folders or check files locations. • Windows Explorer will open up in a new window • Find the location C:\E5 CRS Data This is the default folder CRS5 created and this is the location you should use to store your DBs. When you are finished making folders you can “X” out or close Windows Explorer Tip – To make a new folder in Windows Explorer right click in the white space and go to “New”; then Click “Folder” and your new folder will appear and you can give it a proper name. • Go back to your task bar and maximize CRS5; you should be on the screen where we left off o Enter Nick Name o Click Browse ________________________________ CRS5 Transition Manual June 2006 39 • Go back to your task bar and maximize CRS5; you should be on the screen where we left off o Enter Nick Name o Click Browse o Now locate the folder that you just created – in this case it was C:\E5 CRS Data\Colquitt_06 o Click OK o Click SAVE ________________________________ CRS5 Transition Manual June 2006 40 • Now highlight the DB that you just created and click ATTACH at the bottom of the screen • You will get the following screen message: • Click CONVERT ________________________________ CRS5 Transition Manual June 2006 41 • Now click “Locate DataDB” to search for the location where your ERS4 files were located • • You are looking for the folder that contains your data. The file you need is ersdat40.mdb I want to convert Colquitt 06 so I am going to find the file in ERS4 that was the Colquitt 06 data. • When you have located the file highlight it and click OPEN • ________________________________ CRS5 Transition Manual June 2006 42 • It is very important to make sure that the correct file path shows up on this screen. This process does not change or alter your ERS4 data. It is literally migrating your DBs to a new location. You will still be able to access your data in ERS4 if you need it. • After you have verified that the ERS4 Data DB is the correct file click CONVERT • While it is converting you may get some messages like: o This is due to a flaw in ERS4 that allowed deletion of a paraprofessional or volunteer who was the leader of a group. CRS5 cannot have a youth leader who is not in the staff (professional, paraprofessional, volunteer) table. If it encounters a non‐existent leader, it is removed from the list of leaders for that group. If you have leaders that are removed during this process they will need to be re‐entered in CRS5 once this process is complete. • Click OK and let it continue the process ________________________________ CRS5 Transition Manual June 2006 43 • • When the process is finished it will take you back to the “Main Switchboard.” You should receive an error telling you that your System Information is missing. o Click OK • You are missing the Institution name. Highlight your institution from the drop down menu. • Verify the other information and click SAVE. • You can now verify which DB you are attached to by looking in the top information box on the Main Switchboard. ________________________________ CRS5 Transition Manual June 2006 44 6. Creating a New Database From the main switchboard click on the BLUE EXPLODE buttonYou are now on the Attach DB screen. • Click • Create a New Nick Name for this Database. • Go to on the button and find the folder C:/E5 CRS Data ________________________________ CRS5 Transition Manual June 2006 45 • • Right click in the white space and go to New and the click on Folder. Name your folder with the appropriate unit name and year. This will help you keep your folder organized as you change years and create multiple units. • Close this Windows Explorer Window when you are finished and return to CRS5. ________________________________ CRS5 Transition Manual June 2006 46 • Click • • • Find the C:/E5 CRS Data folder and then click on the folder inside that you created for your new Database. Click OK Click Save • Click and locate the folder that was just created. ________________________________ CRS5 Transition Manual June 2006 47 • Click ________________________________ CRS5 Transition Manual June 2006 48 • • • • The system will now take you to the System Configuration screen. Enter all of the necessary information here and verify that it is correct. Click The system will now take you to the Main Switchboard. ________________________________ CRS5 Transition Manual June 2006 49 7. The Staff Switchboard 7.1. Accessing Professionals, Paraprofessionals, & Volunteers • • From the “Main Switchboard” click on the STAFF button. Enter all personnel who are working with your nutrition program. Staff members that were previously entered in ERS4 will migrate into CRS5 when your database (DB) is converted. ________________________________ CRS5 Transition Manual June 2006 50 7.2. Entering Staff o From the Staff Switchboard (as seen above): • Click “View/Edit” • Click Add • Click Next • Complete required fields and other data as needed in your state (screen for professional below) • Click Save at the bottom of the screen ________________________________ CRS5 Transition Manual June 2006 51 7.3. Entering Hours • • On the Staff Switchboard there is an “Enter Hours” Button at the bottom. Click this button to enter hours for all staff members. Click on the BLUE explode button to enter hours for each individual. TIP: Note that you can select by Staff Type at the top so that you are only viewing one group of staff at a time. • At the end of the reporting year, enter hours spent with Adults and Youth in each program. o SAVE o Back out to the Main Switchboard TIP: TAB A warning will appear between fields if the total FTE hours and the computer are over the FTE will add the hours for the fiscal totals. year (2080) ________________________________ CRS5 Transition Manual June 2006 52 7.4. The Volunteer Screen • • Volunteers are entered under the Staff Switchboard on the Main Switchboard. Click STAFF o VOLUNTEERS o VIEW/EDIT VOLUNTEER Volunteers that were entered in ERS4 can be found here • • • o If you wish to add new volunteers click ADD VOLUNTEER Make sure that you assign the correct Paraprofessional or Professional to the Volunteer Check the appropriate box for their volunteer role in EFNEP The “SAVE” button will not appear until all required fields are completed TIP: TAB between fields and the computer will add the totals. The tabs go down the column and then across ________________________________ CRS5 Transition Manual June 2006 53 8. The Adult Switchboard 8.1. Entering Data for Adults • • • • • From the “Main Switchboard” screen, click on Adults. This is where you will begin entering data for new or existing clients To add an adult click ADD ADULT button at the top right. The list of existing clients can be sorted by ID, Name, City, Staff, or Program Status. Clicking on one of these options will sort this list in ascending order. Clicking again will re‐sort the data in descending order. This screen also provides the user with specific information about each client, including which staff member they are assigned to, as well as information concerning their program status. • To edit information on an Adult from this screen click on the BLUE explode button and you will go straight to their record. • To edit diet recalls or behavior checklists on an adult click on the PURPLE explode button . Adults can be • The Yellow X will delete a client. filtered by staff and program type. New CRS5 feature: Sorting Lists, Staff Assignment, Program Status ________________________________ CRS5 Transition Manual June 2006 54 8.2. Adding NEW Adults • • • Click You will then be prompted to assign this adult to the staff person who is working with him/her. Choose the appropriate staff member from drop down menu. (If a staff member is not listed, back out and go to the Staff Switchboard to enter the staff member.) Click “Add” • New CRS5 feature – Creating Default profiles for entering adults See Section 8.4.3 You will be taken to a screen that says “New Adult” which should look similar to the page below. ________________________________ CRS5 Transition Manual June 2006 55 TIPS 1. Hitting the TAB key after finishing in each field will take you to the next field. 2. Fields that appear in YELLOW are required fields. You will not be able to save this record until all of the yellow fields are entered. • Now you can enter all the demographic information you have on the client into the appropriate fields. • CLICK when you have finished entering all of this data. The following screen is a sample record of adult information that has already been entered. New CRS5 feature ‐ Verifying the address is optional. See section 8.4.1. ________________________________ CRS5 Transition Manual June 2006 56 8.3. IMPORTANT INFORMATION FOR ENTERING CLIENT DATA. • • Under the SUBGROUP category, select the appropriate SUBGROUP for each client. EFNEP clients must have the “A” EFNEP Subgroup selected. The “Number of Children” category must be completed. The “Ages of Children” should be entered, separated by commas. Use zero for infants. Make sure to repeat age for twins, as each age listed represents one child. Do not include children over the age of 19. • One last thing to check as a client graduates is the number of lessons. Please enter the NUMBER OF LESSONS TAUGHT upon exit or graduation. If this is not completed, it will indicate that clients were not taught any lessons before graduating. • Remember that any fields that are yellow are required and you must enter data there in order to have the ability to save. • CLICK SAVE when you have finished entering all of this data. ________________________________ CRS5 Transition Manual June 2006 57 8.4. New CRS5 Features on the Adult Screen 8.4.1. VERIFY ADDRESS When you enter a city, state, and zip code you have the option to VERIFY ADDRESS. To verify addresses you must be connected to the internet. • • • • • Clicking “Verify Address” allows CRS5 to give you the Congressional district of the address, the county, and the latitude/longitude coordinates of the location. This is information that will allow you to pull data specific to Congressional districts or by zip code. Verifying the address also ensures accuracy that will help later when trying to follow up with a client. Verifying the address is OPTIONAL and if you choose not to verify addresses, it will not prevent you from saving the records and moving on with your data. If only the city, state, and zip code are listed, “General Delivery” will appear in the address line. Before Verification After Verification To change an address after it has been verified, click on “Unlock Address” 8.4.2. NUMBER OF CONTACTS When clients are converted from ERS4 to CRS5 the Number of Contacts are set to equal the number of lessons. The Number of Contacts box is to reflect the # of times you have contact with a client. For instance you may have met with a client or group 5 times, but taught 10 lessons because 2 lessons were taught per visit. Contacts would be 5, number of lessons would be 10. The Adult screen also asks that you enter # of Contacts. • • ________________________________ CRS5 Transition Manual June 2006 58 8.4.3 DEFAULT PROFILES Default profiles can be utilized for large groups that will have similar information such as city, state, zip, residence type, lesson type, and/or subgroup. You can choose to enter only some of the information in the profile while leaving other parts blank. (Example – city and state with no zip code where zip codes vary) For Example, if you have a large number of EFNEP clients in Athens, Georgia which has multiple zip codes you may want to enter a profile for Athens, Georgia but leave the zip code blank. You could also choose to enter the Subgroup “EFNEP” for this profile. You might name it Athens EFNEP. o Default profiles are meant to save time entering data that may be identical on individual records o Once a Default Profile is created it is available to any user of that database. . • From the Add Adult screen there is now an option for creating “Default Profiles” • Click on “View/Edit Profiles” • You will go to a screen that looks like: • o Click Add Profile on the left o Enter the Name for the profile you are creating. (32 characters max) o You can choose to enter info in any or all of the following fields • city, state, zip, residence type and lesson type, and/or subgroup The Default Profiles section can also be accessed from the Adult Switchboard by clicking on the “Defaults for New Adults” button Each time you enter an adult, the list of default profiles will appear and you can select the one profile you wish to use. The list appears alphabetically. ________________________________ CRS5 Transition Manual June 2006 59 8.5. SUBGROUPS 8.5.1 Creating and Importing State Level Subgroups The first and most important step in creating a state level subgroup is creating a spreadsheet in Microsoft Excel that can be imported into CRS5. Your spreadsheet should have three columns and as many rows as needed for your state level subgroups. Example: State GA GA GA GA GA GA GA GA GA GA SubgroupName MomsHelper BasicEFNEP FoodSmart TodaysMom 4HDOT TestGroup Teen+Pregn/Breastfeeding ClientsAged65+ GardeningProject ClientW/ChronicDisease SubgroupDescription Mom's Helper Basic EFNEP Food $mart Today's Mom 4H DOT Test Teen+Pregn/Breastfeeding Clients Aged 65+ Gardening Project Client W/Chronic Disease TIP: The Subgroup Spreadsheet file MUST be named StateSubgroup.xls in order for CRS5 to recognize the file and import it properly. Spreadsheet must be formatted as above with the first row providing the column names. State: Two letter state abbreviation. SubgroupName: Name of Subgroup (max of 24 characters) SubgroupDescription: Brief description of subgroup (max 50 characters) The headers must be named exactly as they appear above. The state abbreviation should always be the two letter abbreviation that corresponds to the state abbreviation you are using in CRS5 (see system configuration screen). There are three options for deploying these subgroups to the county level. 1. Upload this StateSubgroups.xls file to your FTP site that county users may access within CRS5 with a username and password that you have provided them. This option will automatically place this file in the correct location. 2. This file can be e‐mailed to the counties and then they must save it on their hard drive in the appropriate folder. a. Log into CRS5 and attach the DB that you want to import the State Subgroups for. b. Click c. Click d. This step simply creates the folder where your imports need to be saved. ________________________________ CRS5 Transition Manual June 2006 60 e. Go back to the e‐mail with the attached StateSubgroups.xls file and save it to the appropriate folder. C:/E5 CRS Data/UnitName/IMPORT i. Each unit will have to have its own IMPORT folder. f. Go back to CRS5 and click the blue box. and you should see the file show up in g. Click on the file name to perform the import ________________________________ CRS5 Transition Manual June 2006 61 • Click Yes • Click OK Click the Backdoor out to the Main Switchboard. 3. If you create your subgroup list and save it to a removable media disk (CD, flash drive, floppy disk) the file must be saved onto the computer’s hard drive in the correct folder. You can follow the e‐mail directions from #2 above to go through the same process of saving and importing your subgroup list. ________________________________ CRS5 Transition Manual June 2006 62 8.5.2 County Level Subgroups The subgroup section is now located under the Adult Switchboard. • From the Main Switchboard click on ADULTS • The subgroup section appears at the bottom right. • Click on VIEW/EDIT SUBGROUPS This screen will list any subgroups that exist from the Federal, State, and County level that have migrated into CRS5 from ERS4. The previous letters that were assigned to these subgroups in ERS4 also appear here. • • CRS5 users only have the ability to modify subgroups that are created at the County (C) level. ________________________________ To create a new subgroup click on ADD SUBGROUP at the top of this screen. CRS5 Transition Manual June 2006 63 Subgroups are no longer limited to letters of the alphabet. The old subgroup codes from ERS4 have been replaced with an unlimited ability to designate groups. • Some states have public assistance programs separate from or as an extension to Federal programs, and these might be useful to include as part of the screening process for eligibility into EFNEP and for tracking purposes. • Select a name for your new Subgroup and click NEXT ________________________________ CRS5 Transition Manual June 2006 64 • • Enter a description for the new subgroup here and click SAVE Click Done • Backdoor out twice to the Main Switchboard TIP: States will have the ability through SRS5 to add state unique public assistance to the database. States can send their unique subgroups to the counties for inclusion in their CRS5. The two you see for VA in the test data are present to show how they work. For example, you can include them in adult filters. “VA” is the state abbreviation in this example. This can be changed using system configuration to reflect the appropriate state as needed. ________________________________ CRS5 Transition Manual June 2006 65 8.6 Importing State Level Public Assistance Codes While CRS5 is equipped with some standard Public Assistance codes, there may be a need to customize this list from a state level to include a specific state public assistance programs that need to be included in CRS5. The process for creating and importing state level public assistance codes is similar to creating and importing state level subgroups. Your spreadsheet should have three columns and as many rows as needed for your state level subgroups The headers must be named exactly as they appear below. The state abbreviation should always be the two letter abbreviation that corresponds to the state abbreviation you are using in CRS5 (see system configuration screen). State ProgramName FoodAssistance Emergency Feeding Sites or Soup Kitchens YES GA Senior Dining Sites GA YES Applying for Food Stamps GA Social Security Disability GA Supplemental Security Income GA Food Pantries GA YES Medicaid/Medicare GA TIP: The Subgroup Child Health Plus GA Spreadsheet file MUST be named Spreadsheet must be formatted as above with the StatePublicAssistance.xls first row providing the column names. in order for CRS5 to recognize the file and State: Two letter state abbreviation. ProgramName: Name of Public Assistance (max of import it properly. 47 characters) FoodAssistance: Enter YES if this program provides food assistance. Anything other than YES is assumed to be NO. There are three options for deploying these subgroups to the county level. 1. Upload this StatePublicAssistance.xls file to your FTP site that county users may access within CRS5 with a username and password that you have provided them. This option will automatically place this file in the correct location. 2. This file can be e‐mailed to the counties and then they must save it on their hard drive in the appropriate folder. a. Log into CRS5 and attach the DB that you want to import the State Subgroups for. b. Click c. Click d. This step simply creates the folder where your imports need to be saved. ________________________________ CRS5 Transition Manual June 2006 66 e. Go back to the e‐mail with the attached StatePublicAssistance.xls file and save it to the appropriate folder. C:/E5 CRS Data/UnitName/IMPORT i. Each unit will have to have its own IMPORT folder. f. Go back to CRS5 and click and you should see the file show up in the blue box. g. Click on the file name to perform the import ________________________________ CRS5 Transition Manual June 2006 67 • Click YES • • Click OK Click the Backdoor out to the Main Switchboard. 3. If you create your State Public Assistance list and save it to a removable media disk (CD, flash drive, floppy disk) the file must be saved onto the computer’s hard drive in the correct folder. You can follow the e‐mail directions from #2 above to go through the same process of saving and importing your Public Assistance list. ________________________________ CRS5 Transition Manual June 2006 68 9. The Nutrition Switchboard 9.1. Accessing Diet Recalls There are three ways to access the Nutrition section. 1. Nutrition Switchboard 2. Adult Switchboard 3. Individual Client Record 1. Nutrition Switchboard o If you wish to access the recalls for clients from the Nutrition Switchboard go to the Main Switchboard and click NUTRITION. • Click View/Edit Recalls ________________________________ CRS5 Transition Manual June 2006 69 This screen looks similar to the Adult screen. The new categories of city, staff, and program status also appear here. • You can sort by these categories as well. Click directly on the column header, once for ascending order or twice for descending order. • The unique columns on this screen are the “# of Recalls” and “RM”. o The # of Recalls column appears so that you can immediately identify who may be missing diet recalls. o The column “RM” stands for Recall Method and it corresponds to the list above it that tells how this diet recall was analyzed. • After the blue explode button there is an additional column that indicates the # of recalls that the client had in ERS4, such as 2E4 (2ERS4 Recalls) or 1E4 (1ERS4 Recall). More information concerning the ERS4 conversion/migration will follow this section. • Click on the BLUE EXPLODE button to enter the client’s individual record and edit food recalls. ________________________________ CRS5 Transition Manual June 2006 70 2. Adult Switchboard o From the “Main Switchboard” Click on ADULTS • Click on View/Edit Adults – which should bring you to the following screen. • • Select the Client you wish to enter RECALLS for by clicking on the PURPLE Button in the middle. Click Recalls o Click ADD RECALL if you need to enter a new diet recall for this client o Click the BLUE EXPLODE button if you wish to edit a recall that already exists. ________________________________ CRS5 Transition Manual June 2006 71 3. Individual Client Record o If you are already in a client’s record you can jump directly to the Recall section by clicking on the PURPLE button labeled “J” • You will get the following options: • Choose Recalls and follow the directions above from #1. ________________________________ CRS5 Transition Manual June 2006 72 9.2. New CRS5 Features in the Nutrition Switchboard • This screen shows the individual recalls for a client. You have three options on this screen. o If you have converted your DB from ERS4 your screen will look like the one below. o Please note the column titled “Method” If you were using the Computerized Analysis method for Diet Recalls in ERS4 your recalls will convert over into CRS5 automatically. This is referred to as the “External Method.” See next page for more information on this. If you were using the Food Group Analysis for Diet Recalls in ERS4 then your recalls should convert over into CRS5 using the same method (Food Group Analysis). Click on the BLUE Explode button to enter an existing individual recall. ________________________________ CRS5 Transition Manual June 2006 73 • This is the screen shot of a client who has had her ERS4 recall converted into CRS5 using the external method. (This happened automatically when the ERS4 DB migrated into CRS5.) o Note that you may enter the client’s activity level here if you have obtained that information. For recalls that have been converted the default setting is “Not Provided.” For NEW recalls the default is set to sedentary for computing calories. o Notice that all of the dietary information is there, but there is no way to edit individual food items. o Once the recall is converted into CRS5 you will not be able to edit individual food items unless you delete this External Method Recall and manually convert the entire ERS4 recall. This process is explained in the following section titled “Converting ERS4 Recalls to CRS5.” o Click SAVE to return to the Recalls Screen. • • When ERS4 data is migrated into CRS5, diet recalls analyzed by computer analysis (C) become “E”‐ External Analysis! If both entry and exit recalls are from ERS4 and no changes need to be made, the process is complete and nothing further needs to be done. If the entry recall was in ERS4, and an exit recall has not been entered, the ERS4 recall must be converted, food by food. See the following section titled “Converting ERS4 Recalls to CRS5.” ________________________________ CRS5 Transition Manual June 2006 74 From the Recalls Screen you may want to preview an individual report or recall summary. When you are on this screen click the PRINTER icon and you will come to the following screen. • The Participant Diagnostic Report is not available. • The Food Recall Review is not available if your reports were converted using the External Analysis Method (E). If you convert recalls or enter new recalls in CRS5 this feature will work for you. • The One Day Recall Summary is available. Please note the example found below. ________________________________ CRS5 Transition Manual June 2006 75 9.3. Converting ERS4 Recalls to CRS5 ‐ Method 1 Status • • If both entry and exit recalls were entered for a client in ERS4 the recalls do NOT have to be converted manually. If only an entry recall was entered for a client in ERS4, it will be necessary to convert this recall to CRS5 before you can add an exit recall. This is because both entry and exit recalls must be in the same format. • From an individual RECALL screen, click CONVERT ERS4 RECALL • • Because these recalls were converted into CRS5 using the External Analysis Method (#3) you will see the following screen This screen simply means that clicking OK will delete the External Analysis recalls. The ERS4 food items are still there and you can convert them individually. Click OK to continue ________________________________ CRS5 Transition Manual June 2006 76 • • This screen shows the existing ERS4 recalls for this individual. Click CONVERT for the recall you wish to use. You are now looking at the Edit Recalls – Using Foods Database Screen • • Everything appears as ZERO because the food items have not been converted. Click VIEW/EDIT FOOD ITEMS Now click ADD ERS4 FOOD ITEM ________________________________ CRS5 Transition Manual June 2006 77 • • Now you will see the screen that shows all of the foods on this recall from ERS4. Starting with the first food item, Click CONVERT • The following screen shows you the keywords in CRS5 that closely match your previous food entry in ERS4. TIP: Choose the broadest category first. You will get a longer list of possible choices and you will be more likely to find the correct food. If you choose too many key words you may not get any correct matches because your search was too narrow. For example, just choose ORANGE by highlighting it and clicking OK. There are 84 possible choices. If you choose ORANGE, JUICE, and FRESH there are 2 results. Just remember to choose the broadest category from the keywords and then choose the correct food from the next list that comes up. • Highlight your choice of JUICE and ORANGE and click OK. • On this screen you can see the corresponding ERS4 Food Item ________________________________ CRS5 Transition Manual June 2006 78 • If this list is too long you still have the option to type additional key words on this screen to help narrow your search. Simply type another keyword after ORANGE JUICE to narrow down the list. TIP: Clicking on the Blue explode box will bring back the ERS4 Food Word TIP: If you are converting recalls from Selection Box ERS4 into CRS5 it would be very that you saw beneficial to have the actual 24 hour above. food recall in front of you to help increase accuracy. Since there are thousands more choices of foods in the new database, you may find an item here that more accurately reflects what your client actually ate. You may not have had that option in ERS4 and were forced to choose the best match available. If the recall were available for this client I would be able to know more specifically what kind of coffee they actually had that morning for breakfast. • Find the food item from the list that is the most accurate match for the ERS4 Food Item. In this case, I would choose ORANGE JUICE. • Once you highlight ORANGE JUICE you are taken to the Food Quantity screen • On this screen you must make sure that something is selected in all three areas. You will not have the option to save this until something is entered for Meal Type, Portion Size, and Number of Portions. ________________________________ CRS5 Transition Manual June 2006 79 • • • • • The Meal Type will default to the corresponding meal that was previously selected in ERS4. The previously entered ERS4 Quantity x Unit is displayed on this screen for reference. For this example – highlight 1 fl oz. for the portion size because it corresponds to the FL OUNCE unit previously used in ERS4. Then use the TAB key to go to NUMBER OF PORTIONS and enter 16 to reflect the 16 FL OZ. from ERS4. Or you could select 1 Cup (8 fl oz) and then enter 2 for Number of Portions. After entering the amount, press the ENTER key or the TAB key to activate the Save button. Click SAVE to save the record of this food item ________________________________ CRS5 Transition Manual June 2006 80 • You are now back at the Convert ERS4 Food Items to CRS5 screen. • Notice the checkmark next to the Coffee entry. This means that is has been successfully converted into CRS5. You may now follow the preceding steps to convert the rest of the food items on this recall. • ________________________________ CRS5 Transition Manual June 2006 81 • • When all of the items have been successfully converted you can back out of this screen and back out of the Meal Items Screen to return to Edit Recall screen. You can now see all of the nutrient analysis for this recall. • • Click Save Click Save again to exit this Recall screen. ________________________________ CRS5 Transition Manual June 2006 82 10. The Checklist Switchboard 10.1. Accessing Behavior Checklists There are three ways to access the Behavior Checklist section: 1. Adult Switchboard – “View/Edit Adults” screen 2. Checklist Switchboard – “View/Edit Checklists” 3. Individual Client Record – “Edit Adult” screen 1. Adult Switchboard • • From the “Main Switchboard” Click on ADULTS Click on View/Edit Adults – which will bring you to the following screen. • Select the Client you wish to enter checklist for by clicking on the PURPLE box • Click CHECKLISTS in the middle. o Click ADD SURVEY if you need to enter a new checklist for this client o Click the BLUE EXPLODE button if you wish to edit a checklist that already exists. TIP ‐ To change the date of Checklists that you have already entered you must do it on this screen. Click CHANGE SURVEY DATE CHECKLISTS will migrate from ERS4 unchanged. They will appear as they did before and you can continue to enter the data as you were doing in ERS4. ________________________________ CRS5 Transition Manual June 2006 83 2. Checklist Switchboard • From the Checklist Switchboard you can access the checklists for clients. • Go to the Main Switchboard and click CHECKLISTS. • Click on View/Edit Checklists This screen looks similar to the Adult screen. The new categories of city, staff, and program status also appear here. You can sort by these categories as well. The unique column on this screen is the “# of Checklists” which appears so that you can immediately identify who may be missing behavior checklists. You can sort the list by this category by clicking directly on it, once for ascending order or twice for descending order. ________________________________ CRS5 Transition Manual June 2006 84 3. • Client Record If you are already in a client’s record you can jump directly to the Recall or Checklist section by clicking on the PURPLE JUMP (J) box • • You will get the following options: Click CHECKLISTS o Click ADD SURVEY if you need to enter a new checklist for this client o Click the BLUE Explode button if you wish to edit a checklist that already exists. CHECKLISTS will migrate from ERS4 unchanged. They will appear as they did before and you can continue to enter the data as you were doing in ERS4. ________________________________ CRS5 Transition Manual June 2006 85 10.2. Entering Checklists There are two ways to enter data on the checklist: Click on the corresponding numbers to enter the checklist data or • OR • Type in the numbers and tab between questions. Check marks will automatically appear in the response categories. • Click SAVE when you are finished • Click SAVE again and you will return to the Adult Checklist Screen • • From the ADULT CHECKLISTS screen you can “BACK DOOR” out twice to the Main Switchboard ________________________________ CRS5 Transition Manual June 2006 86 10.3 Importing Question Sets If you are currently using additional question sets in ERS4 you can import them into CRS5 through the Data Interchange section. You will only need to complete this step if you are currently using additional question sets in ERS4. Begin in SRS4 on the Main Switchboard • Click on ________________________________ CRS5 Transition Manual June 2006 87 • Click on Export Sets • Highlight the Question Set that you wish to export and click on the top arrow to move the question set into the box on the right. When the number of the question set • is in the Sets to Export box, click Now choose a location to save the .MDB file. ________________________________ CRS5 Transition Manual June 2006 88 • Click Browse • • • • You can save this file to the C:/E5 CRS Data folder since much of your other data will be here as well. Click OK Click TIP: You can export multiple sets of questions if you have created them in SRS4. Just make sure that ALL the numbers for the question sets you want to export are in the right box. Click OK ________________________________ CRS5 Transition Manual June 2006 89 Backdoor out twice to the Main Switchboard and Exit SRS4. 10.2.1. Importing Checklist Questions into CRS5 There are three options for deploying these Checklist Questions to the county level. 1. Upload this CKQSET40.MDB file to your FTP site that county users may access within CRS5 with a username and password that you have provided them. This option will automatically place this file in the correct location. 2. This file can be e‐mailed to the counties and then they must save it on their hard drive in the appropriate folder. You CANNOT e‐mail an .MDB file. Numerous e‐mail clients will block access to an .MDB attachment. You must change the file extension. Example: CKQSET40.MDB.RemoveThis a. These following steps create the folder where your imports need to be saved. (If you have already imported Subgroups or Public Assistance your IMPORT folder already exists and you can skip to step E.) b. Log into CRS5 and attach the DB where you want to import the Question Sets. c. Click d. Click e. Go back to the e‐mail with the attached CKQSET40.MDB.RemoveThis file and save it to the appropriate folder. C:/E5 CRS Data/UnitName/IMPORT f. When you save this file to the hard drive, simply delete the .RemoveThis from the file extension and save the file to the folder C:/E5 CRS Data/Unit Name/IMPORT i. Each unit will have to have its own IMPORT folder. g. Go back to CRS5 and click the blue box. and you should see the file show up in ________________________________ CRS5 Transition Manual June 2006 90 h. Click on the file name to perform the import • Click YES ________________________________ CRS5 Transition Manual June 2006 91 • Click OK Backdoor out to the Main Switchboard. ________________________________ CRS5 Transition Manual June 2006 92 10.2.2. Utilizing Checklist Question Sets In order to utilize this imported Question Set you must go into an individual record and enable this feature. Use the following directions as a guide to insure that you have imported the questions sets you wish to use. • From the Main Switchboard click • Then click • Click on the BLUE Explode button to open an individual’s Checklist. • Click on ________________________________ CRS5 Transition Manual June 2006 93 • Highlight the Question Set that you previously imported and click ________________________________ CRS5 Transition Manual June 2006 94 You are now back at the individual screen. Notice that the button now says “Remove Additional Questions” Click on the BLUE Explode button This screen reflects the 10 base checklist questions. Notice the tab that says Additional Questions. ________________________________ CRS5 Transition Manual June 2006 95 Click on the Additional Questions Tab and you should see the question set that you previously imported. Now you can enter the appropriate responses to the questions. Click Backdoor out twice to the Main Switchboard. ________________________________ CRS5 Transition Manual June 2006 96 11. The Youth Switchboard Most of the information used for Youth Groups in CRS5 is the same as in ERS4; however there have been a few format changes. These changes will be identified throughout the instructions. A major change which is still in the developmental stages for NEERS5 is Youth Evaluation. The Youth Impact Indicators which were used in ERS4 will continue to be used in NEERS5 at least until the Youth Question Database (YQD) and accompanying instructions for use have been thoroughly field tested. Instructions for using the Practice Sets are included at the end of this section. Additional information on the YQD will be provided throughout the year. Adding youth by groups is a good management concept. It allows collecting data for youth in a time efficient manner. On the Youth Switchboard there are two main options: Adding Youth Groups and Reports. Each option will be discussed separately starting with Adding Youth Groups. ________________________________ CRS5 Transition Manual June 2006 97 11.2. Adding Youth Groups From the Main Switchboard click on the YOUTH button Click YOUTH GROUPS If previous Youth Groups have been added or converted from ERS4 they will appear. This screen has several new features. You can sort the columns by column heading. Also, program type and delivery method are given on this screen. The leader is referred to by name instead of by number and the number of youth in each group is listed on this screen. To add a new group click • • A default ID number will appear. This can be changed if desired. Click Group Enrollment ________________________________ CRS5 Transition Manual June 2006 98 NEW - Click to verify address if required information has been entered Complete the following: Group name, program type, delivery mode, name and address of the youth site with zip‐codes. o The city, state, and zip code are required fields. o “Verify Address” enables you to determine Congressional district, county name and Latitude/Longitude information. o The computer with the CRS5 software must have INTERNET ACCESS for the VERIFY ADDRESS option to work. o If you choose not to verify the address you will still be allowed to save your data and move forward. ________________________________ CRS5 Transition Manual June 2006 99 Listing at least one Youth Leader is required in CRS5. To add leaders click on the BLUE explode button above the Blue leader box. The “Youth Group Leaders” box appears. Click ADD LEADER to choose a leader from the staff database. CHANGE RANK - You can click these arrows to change the rank or order of the leaders for this group. The “Add Group Leader” dialogue box appears which consists of a list of staff and volunteers Click the hand icon to add this leader to the youth group. You can only choose one leader at a time. If you have to choose multiple leaders you will need to repeat the above steps starting at the Youth Group Leaders Screen. ________________________________ CRS5 Transition Manual June 2006 100 Demographic information concerning Gender, Youth in Other 4‐H, Residence, Ethnicity, Race, and Grade: o Start by clicking inside the box next to Females. If you start here you can tab through all of the information in order. If your state utilizes Race/Ethnic Subcategories click on the BLUE explode button to enter the additional race information concerning Subcategories. This information is in addition to what you have already reported in the boxes above this section. ________________________________ CRS5 Transition Manual June 2006 101 If you enter numbers that do not add up equally across all categories you will get a message that looks like this: NEW – CRS5 helps our math by double checking the totals across all fields. You will not be able to save a group record unless all the totals are EQUAL. ________________________________ CRS5 Transition Manual June 2006 102 11.3 Youth Question Database Practice Question Sets The Youth Question Database (YQD) is a new evaluation component which will be added to NEERS5/CRS5 in the near future. It is in the development/testing stage and more information will be forthcoming. A demonstration/practice section is included in this release of NEERS5 as a preview. PLEASE NOTE THAT ANY INFORMATION ENTERED IN THE YQD DEMONSTRATION/PRACTICE SECTION OF THIS RELEASE OF CRS5 WILL NOT BE USED FOR EVALUATION AND REPORTING PURPOSES. This section is for your information only. Demonstration Instructions with Fictitious Data for Practice: From a Youth Group screen, click on the ARROW button next to the column, “Set Name.” Question Sets are listed for the purpose of practicing with fictitious data. In the complete YQD when it is released, states may, at their discretion, choose to develop their own Question Sets (for use in their counties) of evaluation questions selected from the entire collection of evaluation tools that will be in the YQD. ________________________________ CRS5 Transition Manual June 2006 103 • • For this practice, click on the set of practice questions entitled, Professor Popcorn. Give the set a name that fits your needs. In this example, this Question Set will be part of the evaluation for our nutrition education program called Better Health. We will type in “BetterHealth” as the name for this Question Set (12 characters max). • Click Save Notice that the set name, “BetterHealth” now appears in the Question Sets box. From this point, you can add evaluation data by clicking on the BLUE explode button beside the BetterHealth Question Set and then beside each question used in the evaluation. ________________________________ CRS5 Transition Manual June 2006 104 Click on the BLUE explode button for Question 1, “When do I wash my hands? “ Enter date of Pretest and response information for this question on the Pretest. Note that you will be entering summary data from a group of youth who answered this question—in other words, enter the total number of responses for each possible answer category. Percentages are not used. Enter date of Pretest and response information for this question on the Pretest. Note that this is the total number of responses for each category. Percentages are not used. Out of the number of youth who were asked the question, complete the information in the appropriate columns. The column heads will vary depending upon the response choices for each question. The number of non‐responses will be calculated based on the total number of youth who were asked the question minus the responses in the preceding columns. ________________________________ CRS5 Transition Manual June 2006 105 Example: Date of Responses Before: 6/16/06. Number of youth who answered all 3 correct: 0 Number of youth who answered 2 of 3 correct: 10 Number of youth who answered 1 of 3 correct: 15 Number of youth with no correct answers: 3 Number of non‐responses: This will be calculated for you after you enter total number of participants asked the question. Total number of participants asked the question: 30* *Note that this may not be the total number of youth in the group. Notice that the number of non‐responses is now filled in, n=3 ________________________________ CRS5 Transition Manual June 2006 106 For this example enter post test information as follows: Date of post‐test (after): July 6, 2006 Number of youth who answered all 3 correct: 8 Number of youth who answered 2 of 3 correct: 11 Number of youth who answered 1 of 3 correct: 7 Number of youth with no correct answers: 1 Number of non‐responses: This will be calculated for you after you enter total number of participants asked the question. Total number of participants asked the question: 28* *Note that this may not be the total number of youth in the group nor will it necessarily be the same as the number who took the pre‐test. Notice that the number of non‐responses is now filled in, n‐1. Click Save to return to the Test Questions screen to enter data for additional questions. If you are finished entering question data click the Backdoor to go out to the Edit Youth Group screen. ________________________________ CRS5 Transition Manual June 2006 107 In this practice example, we will be using a question from the Food Safety data set in addition to Professor Popcorn. Click on the arrow under “Question Sets.” Highlight Food Safety. Name this question set “BetterFood.” Click Save Click the Blue Explode button beside Better Food. Click the Blue explode button beside Question 1, “It’s time for a snack. What kind of snack do you like the best?” ________________________________ CRS5 Transition Manual June 2006 108 Complete the date of the pre‐test (before) – June 16, 2006. Notice that these response choices are set up differently from the Professor Popcorn set. The number of responses to Choice A was 3, B = 2, C = 11 and the total number of youth who were asked the question was 28. Notice that “12” is filled in under number who didn’t respond. Click Save and complete responses to additional questions for practice if desired. When you are finished entering test data: Click Save Backdoor out to the Edit Youth Group screen Click Save and return to the Youth switchboard. Information on how to submit your evaluation tools for review is available on the NEERS5 website ‐ www.csrees.usda.gov/NEERS5. States are encouraged to submit tools as soon as possible. ________________________________ CRS5 Transition Manual June 2006 109