1
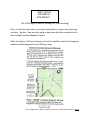
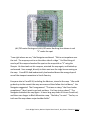
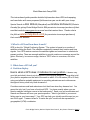
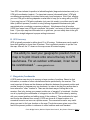
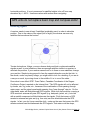
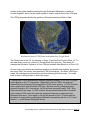
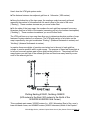
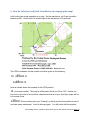
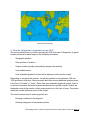
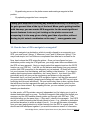
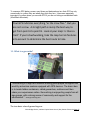
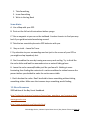
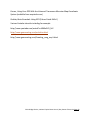
Practical GPS & Map Grid Backcountry Training Guide For Boy Scouts, Venturers and Unit Leaders This practical guide on how to use GPS and associated map grid technology in the backcountry is intended to help Troops train their Scouts on GPS and associated mapping skills during campouts, hikes, geocaching expeditions and other outdoor events. GPS (“Global Positioning System”) is literally space‐age technology that tells you exactly where in the world you are. GPS units are now a common feature in cars and trucks. We routinely use them to find our way around town, on long distance trips and on vacation. A different kind of GPS has become an important backcountry tool. These lightweight battery‐powered portable GPS units have saved lives. But this kind of GPS is less than useless if you don't know how to use it. Using GPS effectively in the backcountry requires training and familiarity not just with GPS technology but also with aspects of maps you may not have learned before: map grid technology including UTM grid coordinates, map scales and map datums. Chain Bridge District Scouts learned some important lessons at our Fall 2009 Camporee: (1) You cannot expect to rely on a GPS in the backcountry if you don't know how to use it. (2) Even though Scouts may think a GPS is “more fun” than a map, they need to understand that they should always use a GPS WITH a topographic map and a compass, not instead of them. The map is always your most important tool. (3) Using a GPS effectively in the backcountry requires training on the grid that overlays modern topographic maps ‐‐ how to convert between UTM grid coordinate readings and points on a topographic map (taking Chain Bridge District, National Capital Area Council, Boy Scouts of America Page 1 map scales and map datum into account). While these skills are not hard to understand, map grids are new for many Scouts as well as for experienced backcountry outdoorsmen and longtime Scouters. Essential Skills & Knowledge 1. What is a GPS and how does it work? 2. What does a GPS tell you? (the great things about GPS) 3. What does a GPS NOT tell you? (the limitations of GPS) 4. How Do I Use My GPS? 5. Grid Technology: UTM Grid Coordinates & Gridded Maps 6. Grid Technology: Map Datums 7. How do I plot UTM grid coordinates on a topographic map? 8. How do I use a map and compass to navigate to a “waypoint” or landmark? 9. How do I program a waypoint/landmark into my GPS? 10. How do I use a GPS to navigate to a waypoint/landmark? 11. What is a geocache? 12. More Resources “Black Mountain” Based on a True Story Crew 812‐A was triumphant ‐ they had made it to the top of Black Mountain! It had been tough caterpillaring up all those switchbacks, but the view from the top was spectacular. When it came time to descend to Black Mountain Camp, the Crew’s Navigator used his compass to figure out which of two trails to take, took the one he thought was right and began hiking down the steep incline. But after awhile, the “trail” from the summit seemed to peter out. Chain Bridge District, National Capital Area Council, Boy Scouts of America Page 2 Black Mountain, Philmont South Country (Google Earth Satellite Image) "What kind of a trail is this?" asked one Scout as he stepped over deadfall. "Where do we go from here?" Philmont's trails, while unblazed, are usually very distinct. This was no trail – it was a runoff stream bed! The Scouts stopped, sat down, pulled out their topographic map and oriented it with their compass, but could not tell where in the world they were. Crew 812‐A was temporarily misplaced on a steep mountainside in a remote part of South Country. An Advisor took out a small inexpensive GPS unit he had purchased on eBay for under $50. He hit the power button. In a few moments, the GPS had picked up signals from a network of satellites orbiting the earth about 20,000 km above him at 14,000 km/hour and announced that it was "ready to navigate." The GPS's small screen was now displaying (using the NAD83 map datum) the Crew's current position down to 10 or 20 meters in accuracy: Chain Bridge District, National Capital Area Council, Boy Scouts of America Page 3 ELEV 10316 ft 13S 0492752 UTM 4033421 GPS UTM Display in Meters (Easting First, then Northing) Okay, so the Crew knew their current grid coordinates in meters with space‐age accuracy. Big deal. How was that going to help them find their way back to the trail and down to Black Mountain Camp? While the Advisor’s GPS was obtaining a fix on the satellites, the Crew's Navigator studied the following panel on the Philmont map: Chain Bridge District, National Capital Area Council, Boy Scouts of America Page 4 The Advisor called out the UTM grid coordinates (rounding to the nearest 10 meters) and the Crew Navigator wrote them on the map with a Sharpie: " 492750 Easting … 4033420 Northing" The Crew's Navigator focussed on what the map panel said: "the grid is read from left to right, then bottom to top in meters to get an X,Y (Eastings, Northings) position." The Navigator’s job now: plot the Crew's current position on the map using the grid printed on the map. The navigator took a 1:24000 grid grid overlay from his backpack's outer pocket. He located the 4033000 Northing/492000 Easting grid square on the South Country map (it was right on the edge of the map and said "Black Mountain" in the middle of it). He placed the 1:24000 grid overlay down on top of it. Here's what he saw: 1:24000 Grid overlay Placed Over Topo Map "Okay," he said aloud, "Easting 492750 Northing 4033420. That means we go 750 meters to the right and 420 meters up.” With the Advisor looking over his shoulder to double‐check, the Navigator’s eye focused on the X where the two lines intersected: Chain Bridge District, National Capital Area Council, Boy Scouts of America Page 5 (492)750 meter Easting and (4033)420 meter Northing lines shown in red “X” marks the spot "I see right where we are," the Navigator exclaimed. "We’re not anywhere near the trail. The map says we're on the other side of a ridge." He lifted the grid overlay off the map and marked the spot on the map with an “X” using the Sharpie. He then took out his compass, oriented the map again, and looked up and around. Sure enough, directly to their west was the ridge he was seeing on the map. Crew 812A had inadvertently bushwacked down the wrong slope of one of the steepest mountains in South Country. Everyone else in Crew 812A, including the Advisors, stared at the map. "We could go back up to the summit the way we came and then follow the trail down," the Navigator suggested. The Crew groaned. "That was so steep," the Crew leader complained. "I don't want to go back up there. Can't we just go down?" The Navigator looked at the map again. It was a long way down to Urraca Creek trail, and then even longer to Black Mountain camp. "Bad idea," he said. "Too far, no trails and the map shows major boulder fields." Chain Bridge District, National Capital Area Council, Boy Scouts of America Page 6 The Advisor, who was staring at the map, thought a minute more, and then suggested "Well, we could go around." "What do you mean?' asked the Navigator. "I mean we could follow our contour line around the mountain to the west. Go neither up nor down. We will eventually intersect the trail." Following a Contour Line That's precisely what the Crew set about to do. It began following compass bearings around the mountain while maintaining constant elevation. About 45 minutes later, after crossing some boulder fields and avoiding a steep dropoff, Crew 812A had successfully bushwacked around Black Mountain to the Black Mountain Camp trail. It wasn't long before they were in Black Mountain Camp, enjoying the cool water of Urraca Creek and getting ready to shoot black powder rifle. Chain Bridge District, National Capital Area Council, Boy Scouts of America Page 7 Black Mountain Camp 2009 This instructional guide provides detailed information about GPS and mapping, and concludes with some proposed field exercises you can do with your troop. Special thanks to Ron Wilson (Maryland) and Andrew Kalinowski (Ontario Canada) for giving Chain Bridge District BSA permission to excerpt portions of their excellent website www.gpsnuts.com and use that content here. Thanks also to the folks at www.maptools.com for permission to excerpt portions of their excellent website. 1. What’s a GPS and how does it work? GPS is short for “Global Positioning System.” The system is based on a number of satellites orbiting the Earth. The satellites consistently transmit their location and time signals. Your GPS receiver receives the satellite signals and uses them to calculate its present position. There are enough satellites to provide continuous coverage around the globe. Obviously, in common usage, the term “GPS” refers to a receiver, not to the satellites. 2. What does a GPS tell you? A. Position display Here’s what a GPS does: it indicates its own position. It does a very good job and what it does is a truly awesome technological advance. Being able to tell your position anywhere on the face of the earth to within 10 to 20 meters (30 to 60 feet) using cost-effective portable equipment is something adventurers and outdoorsmen throughout history could only have dreamed of. Countless mariners and land adventurers lost their lives when they became lost. You cannot be truly lost if you have a functional GPS. You know exactly where you are. Need a medivac helicopter rescue in the backcountry? Send your grid coordinates and Search and Rescue will know your precise position. Want to get back to your secret fishing spot or your base camp? Your GPS can help you virtually mark the spot so you can find it again. Treasure Island’s “X marks the spot” would now be expressed in geographical (UTM) coordinates. Chain Bridge District, National Capital Area Council, Boy Scouts of America Page 8 Your GPS can indicate its position in latitude/longitude (degrees/minutes/seconds) or in UTM grid coordinates (meters). For important reasons (discussed below), UTM grid coordinates are preferred for modern backcountry land navigators. But in fact, whether you use UTM grid or lat/long depends on what kind of map you’re using with your GPS. If your map has no UTM grid coordinates (not even tick marks), you either need to add them (a difficult process) or switch to using lat/long degrees/minutes/seconds (with associated polar coordinate conversion problems). Note however that all modern USGS topo maps have UTM grid coordinate “tick marks”, and many of them include grid lines. If your topo map has tick marks but no grid lines, you can easily draw in the grid lines with a straight edge and a proper writing instrument. B. GPS Accuracy GPS is typically accurate to within about 10 to 20 meters. Outdoorsmen rarely need to know their position to closer than 20 meters. This is sufficient precision to put an X on the map. After all, the “X” drawn on the map covers 20 meters anyway. “The ability to read your geographic position from a map or to plot it back onto one is the key to GPS usefulness. For an outdoor enthusiast, it can never be overstressed.” – www.gpsnuts.com C. Waypoints/Landmarks A GPS receiver can store in its memory a large number of positions. Based on that information, a number of other calculations are also performed by the receiver. The most important of these are the distance and direction between the present position and another location (or between any two locations). In order to do that, the receiver has to know where the “other” location is. There are two basic ways of telling this to the receiver. One is by storing your present position as a “waypoint” or landmark. Another one is by inputting the coordinates of a waypoint into the GPS (often done by starting with your current position and editing some of the numbers). The coordinates for input can be also be obtained from a map. A GPS can show all of these locations in a numerical format or as icons on a plotter screen. The numerical format is very useful when you want to find your location on the map. The plotter screen gives more of the feel for the present position in reference to other locations and route traveled. Chain Bridge District, National Capital Area Council, Boy Scouts of America Page 9 3. What a GPS does NOT tell you? A GPS is not a replacement for a map. It is meant to be used in conjunction with a map. Read the above statement to yourself aloud three times. It is that important!! Even using top of the line receivers with mapping displays, the maps are generally not as detailed as an average topographical map and the display is often smaller than a topo map. Why would anyone want to look at a topo map through a little tiny window the size of a GPS display? An old trusty paper topo map is an excellent source of information and can always give a better overall view. It can get wet or torn, but it doesn’t need batteries to operate and it cannot break down. Do yourself a favor and have one with you every time you go off the beaten tract. And they are now downloadable for free from USGS.gov (if you want a large printed topo map, you probably have to order from USGS, print at REI, etc.). A GPS is not a replacement for a compass. It is a different tool altogether. The compass rose displayed by a GPS can easily fool you into believing that a compass is a built-in feature. But the “compass” displayed by most GPS units is based on calculations done by the unit, not by measuring the Earth’s magnetic field. Since the receiver “knows” where it was a moment ago and it also “knows” where it is right now, it can calculate the direction between the two and show it in the form of a compass rose. This is not a reading of magnetic north – it is based on a calculation from position coordinates. Have a look at the GPS screen shot below: Chain Bridge District, National Capital Area Council, Boy Scouts of America Page 10 It is NOT a compass. The display is meant to graphically show in which direction the unit is moving. You must be moving for this to work at all. When moving slowly, it’s not a good idea to rely on the track and bearing indicated by a GPS unit. The faster you move, the more accurate the readings are. When you move at a fast steady pace, the readings become usable. But your compass is generally more accurate for bearings under all circumstances. If you must rely on your GPS to tell you a heading, you must be moving. Move fast and steady before taking a reading. Some newer, more expensive GPS units have built-in electronic compasses that actually do measure the Earth’s magnetic field. They units can display magnetic north with high accuracy. However, it’s generally easier to orient a map with a real magnetic compass, and its often easier to follow a bearing using a real compass. And real magnetic compasses don’t need batteries, are completely waterproof, are extremely lightweight and are very accurate. The best idea is to train your Scouts (and yourself) to carry and use a real compass even if the GPS has an electronic magnetic compass. If you’re shopping for a GPS, you don’t need to spend extra money to get one with an electronic compass. Regular magnetic compasses cost much less and they never run out of batteries. Chain Bridge District, National Capital Area Council, Boy Scouts of America Page 11 “I'm very bad at directions and maps, will a GPS help me? Probably not. A basic backcountry-type GPS will do little more than report your current position as a geographic coordinate. You'll need to relate these coordinates to your position on a map and then decide how to navigate based on that.” – www.maptools.com GPS Reliability A GPS, being an electronic device, is subject to failure. Even the best of equipment can break down, be mechanically damaged, lost, or simply run out of batteries. Most of the receivers on the market can survive a lot of abuse. But there are a number of reports where a receiver failed and lost its ability to lock onto the satellites or lost memory and all saved positions with it. The bottom line is; if you are using a GPS for real land navigation, always have a compass and a map with you. Elevation Display Be aware that the vertical heights displayed by your recreational GPS receiver will not agree well with USGS map elevations. The main source of error has to do with the arrangement of the satellite configurations during fix determinations. The earth blocks out satellites needed to get a good quality vertical measurement. DO NOT USE GPS ELEVATIONS FOR CRITICAL NAVIGATION DECISIONS. They are useful only for relative elevation measurements. GPS heights are based on an ellipsoid (a mathematical representation the earth’s shape), while USGS map elevations are based on a vertical datum tied to the geoid (or what we commonly call mean sea level). Basically these are two different systems. Once the vertical datum is taken into account, the accuracy permitted by geometry considerations remains less than that of Chain Bridge District, National Capital Area Council, Boy Scouts of America Page 12 horizontal positions. It is not uncommon for satellite heights to be off from map elevations by +/- 400 ft. Use these values with caution when navigating. GPS units do not replace basic map and compass skills! Receiving signals A receiver needs to see at least 3 satellites (preferably more) in order to calculate position. Due to the nature of the signal (line of sight), the receiver can see only satellites that are above the horizon: Terrain obstructions, foliage, or even a human body can block or attenuate satellite signals as well. In most situations, there are enough satellites visible to a receiver to calculate the position. If your receiver cannot lock on to three or more satellites, change your position. Simple turning around to face the opposite direction may do the trick. In the woods, under very heavy foliage, you might need to look for a clearing. If you are in a canyon or such, try moving closer to the middle of it or to one of the sides. Does cloud cover affect GPS? Dave Patton, Canadian Coordinator of the Degree Confluence Project, reported on the Internet that: “The GPS signals will not be affected by clouds, rain, fog, snow, etc., because of the combination of their passing through water vapor, and the signal wavelength meaning they "pass through" rain etc. On the other hand, water will block/attenuate GPS signals. Most cloth that would be covering a GPS receiver’s antenna will pass GPS signals (e.g. backpack, jacket, etc.), but cloth with a metallic component will block/attenuate the signals. Cloth that covers a GPS receiver’s antenna and gets wet (e.g. from rain) can also block/attenuate the GPS signals. In fact, you don’t even need the cloth – water on the case that covers the GPS receiver antenna can block/attenuate the GPS signals. That water could be drops, Chain Bridge District, National Capital Area Council, Boy Scouts of America Page 13 and/or a film of water. Similarly, GPS signal reception is degraded in wet forest canopy conditions compared to when the forest canopy is dry.” 4. How Do I Use My GPS? When all else fails, read the manual! If you are anything like most people, the last thing you do is read the user’s manual. That’s just fine, but in the case of a GPS, you’ll be better off reading it sooner or later. It’s perfectly OK if you don’t understand many of the terms, or what some of the options really do. With time, you may find a need for most of them, but for now let’s concentrate on the basic ones. Put the batteries in and let’s push some buttons. If you have the unit turned on for a while, especially outdoors, a message “POSITION ACQUIRED” (or similar) will appear. Most new units out of the box will automatically lock onto satellites and acquire a position within 5 minutes (position acquisition usually takes less time if you have had the unit on recently in or about the same area). Throughout this guide, you might have to refer to the manual, in order to find out which particular buttons to push, in order to get to a particular function. Basic setup – the two things you have to do if you plan to use a GPS with maps There are only two options you have to set, in order for the receiver to work properly with a printed map. The first option is DATUM (see below). If the receiver is set to display a position in a different datum than the one indicated by your map, the indicated position might be wrong by hundreds of meters (yards). For topographic maps of North America, the most commonly used datum is NAD27. Some newer maps use WGS84 or the nearly identical NAD83 (used on Philmont maps). The Datum of your GPS MUST agree with the Datum of your Map! Chain Bridge District, National Capital Area Council, Boy Scouts of America Page 14 The second option is POSITION FORMAT. It determines the format in which the position is displayed by the GPS receiver. We all learned latitude and longitude in degrees/minutes/seconds back in grade school, but for GPS, the easiest format to use is UTM. All current topographical maps for North America show the UTM grid. More about UTM below. You want your compass and your GPS to be indicating the same kind of north (true or magnetic). In the system setup, under “UNITS” you may want to set BEARING to “MAG” (magnetic). This will cause the unit to display course / bearing information in relation to the Magnetic North and match your magnetic compass readings (not corrected for declination). It is not the same as True North! Many users select magnetic north as zero degrees so they can follow a compass bearing without converting the azimuth to true north. Many GPS units automatically calculate the local magnetic variation (declination) for the fix time and date. Note: if your compass has a declination adjustment (e.g., check out the Brunton Eclipse compass), you can alternatively set your compass to do the conversation from magnetic north to true north by programming in the declination indicated on your map. You can then set your GPS for true north. Now, your map, your compass and your GPS will all be operating using true north (your compass is now doing the conversion from magnetic north to true north). This is essentially the same (within 2 degrees) of “grid north” shown on your gridded map. Under “UNITS” consider setting to “METRIC”. Understandably, for many of us “STATUTE” may be a more familiar option, but for working with UTM, it is best to get familiar with the metric system. It corresponds directly with the UTM grids on the topo maps. For the unfamiliar with the metric system, every time we mention “meter” think “yard”, and you will not be that far off. Always carry spare batteries for your unit. In the wild, don’t throw out the old ones. They not only are a toxic waste, they might be able to provide enough power for one more position fix, when your back-up battery set dies unexpectedly. Nothing beats the real experience. Before leaving for less civilized areas, get a topo map of your neighborhood. Practice navigation in a local park or conservation area. After all, any excuse to be outdoors is good. 5. Grid Technology: UTM Grid & Gridded Topo Maps It turns out that the most confusing aspect of using a GPS is conceptual: what do those numbers it gives you actually mean on a map. Your location on any topo map can be specified with reference to a grid system. All USGS topo maps display two different grid systems; latitude/longitude (L/L) and Universal Transverse Mercator (UTM). Most people are probably already somewhat familiar with L/L (degrees/minutes/seconds Chain Bridge District, National Capital Area Council, Boy Scouts of America Page 15 relative to the prime meridian passing through Greenwich Observatory outside of London England), but by far the easier system to use for map plotting is the UTM grid. The UTM grid system divides the world into 60 equal zones from West to East: Worldwide Grid of UTM Zones as displayed by Google Earth The West Coast of the US, for example, is Zone 10 and the East Coast is Zone 18. To see what Zone you are in, check out Google Earth (turn grids on). This shows for example that Northern Virginia is in Zone 18S and northern New Mexico is in Zone 13S. On topo maps you will see an occasional marking for latitude and longitude, but you will see many other “tick marks” that represent UTM grid markings. On newer USGS topo maps, the markings are extended into grid lines covering the whole map. You might have to draw in the grid lines on older topo maps. “Through time, USGS policies have changed regarding whether or not a full UTM grid would appear on the 7.5’ map series. Beginning in the mid 1950’s, the grid was indicated by blue ticks around the projection at 1000 meter spacing. In 1979, the ticks were replaced with a full-line black UTM grid. Because so many complaints were received through a 1991 user survey, the full grid was removed in early 1992. Blue ticks returned to the maps. In 1994, another survey indicated that either a complete grid or internal 1000 meter ticks were the preferred treatment as opposed to the perimeter ticks alone. Once again, a full grid will appear on the 7.5’ series with the exception of single edition quadrangles published cooperatively with the U. S. Forest Service.” – United Stated Geological Survey Chain Bridge District, National Capital Area Council, Boy Scouts of America Page 16 Here's how the UTM grid system works: ►The distance between two adjacent grid lines is 1 kilometer (1000 meters). ►Along the bottom/top of the topo maps, the numbers under/over each grid mark represent the number of kilometers that tick mark is East of the start of the zone (“Easting”). These numbers increase as you move further East. ►On the sides of the topo maps, the numbers for each grid line represent how many kilometers that line is North of the equator (assuming you're in the northern hemisphere) (“Northing”). These numbers increase as you move further North. The UTM grid lines on a topo map thus allow you to determine absolute position of map features in meters relative to a reference. The UTM grid position of a location on the map is specified by two grid coordinates: “Easting” (distance Eastwards in meters) and “Northing” (distance Northwards in meters): In practice three more digits of precision are tacked on to the end of each grid line number to resolve position within a grid square. The purpose of these last three digits is to tell you how many meters past a given grid line the position is. They simply tell how many meters you are East of the nearest grid line and then how many meters you are north of the nearest grid line: Plotting Easting 435500, Northing 4248500 (500 meters to the East, 500 meters to the North of the 0435000E 4248000N Grid Corner) This coordinate pair means “435500 meters (i.e., 435.5 kilometers) East of the zone’s lower left-hand corner, and 4248400 meters (4248.5 kilometers) North of the Equator”. Chain Bridge District, National Capital Area Council, Boy Scouts of America Page 17 By convention, the Easting coordinate increases as you move more east (that’s why it’s called “Easting” rather than “Westing”) and the Northing coordinate increases as you move more north. Easting is always given first, followed by Northing. As a practical matter, the location of a UTM grid coordinate pair is found on the map by using a measuring device (or the naked eye) to subdivide the 1000 meter (1 km) UTM grid squares into tenths or hundredths. This will narrow down the coordinate to a 100 or 10 meter square. A 100 meter square is about the size of two football fields placed side to side. A 10 meter square is about 1/3 of one football field. Usually the measurements are made using a simple mylar or paper scale or a coordinate reader (as in the Black Mountain example above), although a simple metric ruler or graduated compass baseplate will also work. You can even estimate with your naked eye (with less accuracy). Note that the large numbers that are located adjacent to the tick marks around the perimeter of the map represent tens of thousand and thousands of meters. The millions and hundreds of thousands of meters are shown with small numbers and are sometimes dropped when giving UTM grid coordinates. Also, the last digit of a UTM coordinate pair (meters) is sometimes dropped (or rounded to zero) because it’s difficult to resolve down to less than 10 meters with the eye using a 1:24000 topographic map. Is the UTM system based on True North or Magnetic North? “The grid line at the center of a zone is the only one that is aligned with true north.The UTM grid lines are aligned with true north at the center of each UTM zone, which would have an easting value of 500km. As you move away from the central meridian, grid north, will vary a bit from true north. Most USGS topo maps will show the value for grid north (labeled GN) on their declination diagram. Usually it's less than a degree off of true north, and many backcountry navigators ignore the difference and use the UTM grid lines as true north reference for plotting compass bearings.” – www.maptools.com Chain Bridge District, National Capital Area Council, Boy Scouts of America Page 18 6. How do I plot (or read) Grid Coordinates on a topographic map? Let's look at two actual examples on a map. On the map below, you'll see a position labeled as 001. Notice that it is located right at the intersection of 2 grid lines. The UTM coordinates for this position would be given as the following: 18 435000 E 4248000 N Now let's break down the numbers in this UTM position. 18 = the zone number. This map is in Maryland, which is in Zone 18 S. Unless you live close to the start of a new Zone, chances are that all of your local topo maps will be in the same Zone. 435000 These numbers give your "Easting" or which grid line the position is east of and how many meters past. Look at the map again. You will notice that the position Chain Bridge District, National Capital Area Council, Boy Scouts of America Page 19 35 grid line. 001 is right on the 4 It is 000 meters east of that line, so the last 3 digits of the position are 000. The E refers to Easting as explained above. 4248000 N In a similar fashion, these numbers give your "Northing" or how many meters north you are from the nearest grid line. Check out the map again and 48 line. you will notice that position 001 was right on the 42 It is 000 meters north of that line, so the last 3 digits of the position are again 000. The N refers to the Northing. In the second example, notice the Waypoint numbered 002. It is located exactly in the center of a grid square. It's UTM position would be given as: 18 435500 E 4248500 N Now let's break down the numbers in this UTM position: 18 = Once again, this is the Zone number. 435500 As before, these numbers give your "Easting", or which grid line the position is east of and how many meters past. Look at the map again. You will notice 35 36 grid line and the 4 grid line. that the position 002 is halfway between the 4 There are 1000 meters between these two lines so half way over is 500 meters East of 35 line. Hence, the last 3 digits of the position are 500. The E refers to the 4 Easting as explained above. 4248500 N In a similar fashion, these numbers, as noted above, give your "Northing" or how many meters north you are from the nearest grid line. Check out the 48 line map again and you will notice that position 002 was halfway between the 42 49 line, so it is 500 meters North of the 4248 line. and the 42 Hence, the last 3 digits of the position are again 500. The N refers to the Northing. OK, this example was easy because the position was in the middle of a grid, but what happens if it's not? Actually, the answer to this problem is quite simple. Almost all 7.5 min. topo maps are 1:24000 scale. Chain Bridge District, National Capital Area Council, Boy Scouts of America Page 20 On a 1:24000 map, 1 mm measured on the map corresponds to 24000 mm (or 24 meters) on the ground. With this knowledge, all you have to do is take out a small metric ruler (or use the scale on the base of your compass if it has one,) and measure the distance from the given grid line to the position point in millimeters and multiply by 24. This will give you the number of meters to use in the last three digits of the UTM coordinate for Easting or Northing. If you're out in the field and you don't feel like going to the trouble of actually measuring the distance, you can simply estimate the measurements and get reasonably close. Or you can use a 1:24000 grid overlay as described above (these are inexpensively available from various vendors including www.maptools.com and the USGS). If you want more information about how to read UTM grid coordinates on topo maps, consider purchasing the following book from www.maptools.com: Chain Bridge District, National Capital Area Council, Boy Scouts of America Page 21 7. Grid Technology: Map Datums What Is a Datum? A feature that is commonly overlooked by the beginning GPS user is the notion of a map datum. A datum is an attempt by map makers to correct for the fact that the earth isn't perfectly round, but rather elliptical in shape. While a projection is used in mapping to define the earth on a flat surface, a datum is used to describe the actual shape of the earth in mathematical terms. But there is more than one mathematical interpretation of the earth's shape. Over the years, a variety of different datums have been developed and used as references on maps all over the world. The problem that arises from this is that the same position on earth will have different UTM grid coordinates depending on the datum used to prepare the map. The same is true for your GPS. It will give different coordinate values for the same position, based on which datum you have it set for. A datum also defines the association of Easting/Northing coordinates to points on the surface of the earth, and defines the basis for elevation measurements. The military, most geocaching websites and Google Earth all use the WGS84 datum, and this is the default for most GPS units. WGS84 and NAD83 map datums are so close to one another that you don’t need to worry about the difference between them: 1. 2. 3. 4. North Pole Equator South Pole Semi‐minor axis or polar radius 5. Semi‐major axis or equatorial radius Semi-major axis Semi-minor axis NAD83 6,378,137.0 6,356,752.3141 WGS84 6,378,137.0 6,356,752.3142 Most USGS topographic maps use a differentChain Bridge District, National Capital Area Council, Boy Scouts of America Page 22 map datum: “1927 North American datum” or “NAD27” Legend from Bottom of USGS Map The North American Datum of 1927 (NAD27) Ellipsoid was created by way of manual surveying of the entire continent in the 19th century. The geodetic "center" of NAD27 is a base station at Meades Ranch in Kansas. Perhaps eventually USGS will change all of its maps over to NAD83 but for now, whenever you are working with both a map and a GPS, check the “Map Datum” of your map and make sure you GPS is set to the same thing. “The trick is to make sure that your GPS is set to the same datum that your map is referenced to.” – www.gpsnuts.com Most USGS topo maps are referenced to NAD 27 (1927 North American Datum), but some of the newer ones use NAD 83. This information is printed in the lower left corner of the topo maps. Once again, BE SURE YOUR GPS IS SET TO THE SAME DATUM AS YOUR TOPO MAP! Failure to do so could result in errors of 200 meters or more in your displayed position. Consult your GPS owners manual to learn how to set the correct datum to match your map's datum. Experience has shown that the position differences between NAD27 and NAD83/WGS84 can vary by as much as 100 meters in easting and several hundred meters in northing. Chain Bridge District, National Capital Area Council, Boy Scouts of America Page 23 8. How do I use a map and compass to navigate to a point defined by grid coordinates? Once you have plotted your grid coordinates on your topographic map, it is straightforward to now use your map and compass to navigate to that point. An article from the April 2008 issue of Boys Life (found at http://boyslife.org/outdoors/outdoorarticles/3877/compass-tips-and-tricks/ ) tells you how and even includes a video. The basic procedure is as follows: 1. Align one edge of the compass with your starting point . 2. Align the forward edge of the compass with your destination. 3. Turn the compass housing until north on the dial is aligned with north on your map (if your map is gridded, the vertical lines indicate true north within a small margin of error). The direction you need to go can be read on the compass base. 4. [Advanced: adjust the bearing by adding or subtracting the declination (the difference between true and magnetic north at your location – you can find out declination from your topo map and/or your GPS) Some compasses include a declination adjustment that can be set without tools] 5. Hold the compass in front of you near your midsection with the arrow pointing away from you at a 90-degree angle. Rotate your body — and the compass with it — until the compass needle is aligned with the “N” on the dial. (i.e., “put the dog in the doghouse”) 6. Follow the arrow on the compass base to your destination. Magnetic declination, sometimes called magnetic variation, is the angle between magnetic north and true north. Declination is considered positive east of true north and negative when west. Magnetic declination changes over time and with location. Chain Bridge District, National Capital Area Council, Boy Scouts of America Page 24 World Declination Map 9. How do I program a waypoint into my GPS? The most common form of position recording by GPS is the use of Waypoints. A typical receiver will store for each waypoint the following information: - Geographic position. - Date and time of creation. - Unique number (usually automatically assigned by receiver). - User editable name. - User selectable graphic icon that will be displayed on the plotter screen. Depending on the particular receiver, it might be possible to store between 100 and 1000 positions in that form. Some receivers also allow storing additional position points in the form of “Events” or “Icons”. Other than user selectable graphical symbol, there is no stored information that could be accessed directly through the receiver. Events are displayed on the plotter screen in their proper positions in the form of icons. They serve mainly as a visual reference point on the screen. The most common ways to enter waypoints are: - Entering coordinates of a waypoint. - Creating a waypoint at the present position. Chain Bridge District, National Capital Area Council, Boy Scouts of America Page 25 By positioning cursor on the plotter screen and creating a waypoint at that position. - By uploading waypoints from a computer. “Study your map before entering any unfamiliar territory. It allows you to get a general idea of the lay of the land. When you’re getting familiar with the map, you can create GPS waypoints for the most significant terrain features. Later on, just looking on the plotter screen and comparing it to the map gives a fairly good idea of position, without having to plot actual coordinates on the map.” – www.gpsnuts.com 10. How do I use a GPS to navigate to a waypoint? In order to navigate to a destination, which is usually referred to as a waypoint on a GPS, you must know 2 things; 1) Where am I now? and 2) Where am I going? This may sound simple, but it’s a little more complicated than what we’ve covered so far. Now, here's where the GPS enters the picture. Once you have figured out your destination position using the UTM grid lines, you simply enter those coordinates into the GPS unit as a waypoint. Next you simply select that waypoint and use the GOTO function on your GPS unit. It will tell you the distance and bearing from your present position (the GPS knows this) to the waypoint you just entered. All that's left is to take out your compass, find that bearing, and start walking in that direction. If you have to make a detour around some obstruction, don't worry about it. Just check your GPS periodically and it will give you the new bearing and distance to the waypoint. Remember that if you must use the GPS navigation feature, it will be more accurate if you more quickly and steadily (stopping and starting will cause the GPS’ arrow to give conflicting and incorrect indications). On most units today, there is also a plotter screen that will draw a line that represents the path you have walked and a symbol for the waypoint you have entered. By comparing the two, you can evaluate your progress towards your destination. In other words, a GPS provides a second, independent tool for helping you to get to a desired destination read on a map. The Earth’s magnetic field guides you though your compass, and the GPS satellite network guides you through your GPS unit. They should be telling you the same thing – if they aren’t, check your map again. Your GPS can tell you other information that’s pretty handy to know – e.g., distance to destination and current elevation (to within a margin of error). You can get this same information from your map (paying attention to terrain features) but the GPS is a good check. You should use both techniques together if you want the maximum amount of information. Chain Bridge District, National Capital Area Council, Boy Scouts of America Page 26 To conserve GPS battery power, may hikers and backpackers turn their GPS on only occasionally to confirm they are where they think they are. It becomes especially important to confirm where you are with GPS if you are not hiking on established trails (think Black Mountain). Your GPS indicates everything “as the crow flies.” But you are not a crow. A straight path is rarely the best way to get from point A to point B. Look at your map! Is there a trail? If you’re bushwacking, take the map terrain features into account to determine the best route to take. 11. What is a geocache? “Geocaching is a high-tech treasure hunting game played throughout the world by adventure seekers equipped with GPS devices. The basic idea is to locate hidden containers, called geocaches, outdoors and then share your experiences online. Geocaching is enjoyed by people from all age groups, with a strong sense of community and support for the There are hundreds of geocaches hidden in our Northern Virginia area. There are environment.” – www.geocaching.com The tree basic rules of geocaching are: Chain Bridge District, National Capital Area Council, Boy Scouts of America Page 27 1. Take Something 2. Leave Something 3. Write in the Log Book Some hints: A. Use a Map with your GPS B. Print out the full set of instructions before you go. C. Take a waypoint at your car or the trailhead. It makes it easier to find your way back if you get disoriented wandering around. D. Take the ten essentials plus extra GPS batteries with you. E. Stay on trails – Leave No Trace. F. Pay attention to your surroundings and not just to the screen of your GPS or you might end up hopelessly lost. G. Don't vandalize the area by turning over every rock and log. Try to think like the cache hider and look for manmade cairns or natural hiding places. H. Leave the cache covered/hidden just like you found it. Nothing is more frustrating than finding the contents of a cache vandalized or stolen because the person before you decided to make the cache more visible. I. Don't devalue the cache. Don't be afraid to leave something without taking something either. Make sure the treasure stays something worth finding. 12. More Resources 2009 edition of the Boy Scout Handbook http://education.usgs.gov/common/lessons/gps_questions_and_answers.html www.gpsnuts.com http://www.maptools.com/tutorials.html Chain Bridge District, National Capital Area Council, Boy Scouts of America Page 28 Carnes, Using Your GPS With the Universal Transverse Mercator Map Coordinate System (available from maptools.com) Grubbs, Basic Essentials Using GPS (Falcon Guide 2d Ed.) Various Youtube tutorials including for example http://www.youtube.com/watch?v=HMXa3U5_N‐E http://www.geoscouting.com/activities.html http://www.geoscouting.com/Scouting_mag_may1.html Chain Bridge District, National Capital Area Council, Boy Scouts of America Page 29 Practical Skill Exercises For Scout Troops To Do Before They Go Basic Skills to Teach/Learn: (a) What are UTM grid coordinates? (b) How do you plot UTM coordinates on a topographic map? (c) How do you determine the UTM coordinates of features on a topographic map? (d) How do you use a map and compass to navigate from one UTM coordinate to another? (e) How do you use a GPS receiver to determine the UTM coordinates of your present position? (f) How do you program a waypoint into a GPS receiver and use the “Goto” function? (g) Geocaching and Geocache Etiquette 1. What are UTM Coordinates? Use a GPS to read current location in UTM grid coordinates Materials: a roll of flag tape a meter stick or metric tape measure a gridded topo map of your current location (draw in grid lines beforehand) “Draw” a square with flag tape in a field measured for 10 meters by 10 meters square. This represents a UTM grid square on a topo map. Each patrol sends a representative to stand at the lower right-hand corner of the square. The SPL yells out the last three numbers of a UTM coordinate pair (first Easting, then Northing) within the UTM grid square. The scouts standing at the corner move to the position within the square they believe correspond to the coordinate pair, with their patrols yelling instructions on where to go. Chain Bridge District, National Capital Area Council, Boy Scouts of America Page 30 This is also a great opportunity to go over the concept of map scale … perhaps using the model train analogy. Note that the 10 meter x 10 meter flag tape square represents 1 kilometer (1000 meters) on a gridded map and is therefore at a scale of 1:1000. Note: perhaps because it’s math, the concept of map grids and grid coordinates is possibly the most difficult aspect of teaching GPS to Scouts. Grid coordinates are simple once you understand them, but they take some practice to understand and use. Without an understanding of grid coordinates, the readout of a GPS is essentially incomprehensible (like a secret code) and cannot be related to a topographic map. Understanding the “code” of UTM grid coordinates is the key to understanding how to effectively use a GPS. 2. Plot UTM grid coordinates on a topo map using grid overlay and/or compass ruler Materials for each patrol: a gridded topo map (draw in grid lines beforehand) a grid overlay (or a compass with a scale on its baseplate, or a small plastic metric ruler); NOTE: make sure the grid overlay corresponds to the scale of the map you are using (e.g., 1:24000) pencil with eraser Optional: a GPS unit (set for UTM + the correct map datum) + batteries Chain Bridge District, National Capital Area Council, Boy Scouts of America Page 31 This exercise can be conducted indoors. Each patrol is given a topo map and a pencil. The leader announces a first set of UTM grid coordinates corresponding to a feature on the topographic map (e.g., a school, a swamp, a mountaintop, etc.). Each patrol plots the coordinates on the map and writes an “X” in pencil. The process is repeated for further sets of coordinates. The patrol that can accurately list the most topographic features corresponding to the UTM coordinates wins. Bonus: if GPS units are used and Troop is outdoors, the patrols can be asked to plot their current position on the map. 3. Determine coordinates of a topographic feature on a topo map using grid overlay and/or compass ruler Materials for each patrol: a gridded topo map (draw in grid lines beforehand) a 1:24000 grid overlay (or a compass with a 1:24000 scale on its baseplate or small clear plastic mm metric rulers) pencil with eraser paper The leader yells out the name of a topographic feature on the map. Each patrol locates the feature on the map, and determines its corresponding UTM coordinates. The exercise is repeated for a number of features. 4. Program GPS waypoint for (3) Materials (in addition to above) for each patrol: a GPS unit (set for UTM + the correct map datum) + batteries (all patrols should have the same kind of GPS) Quickstart guide (or user manual) for GPS Unit An older scout who has read the GPS manual goes over how to program waypoints into the GPS unit. Patrol members take turns programming waypoints determined from (3) into their GPS. This exercise can be done indoors. All patrols should preferably have the same kind of GPS. Chain Bridge District, National Capital Area Council, Boy Scouts of America Page 32 5. Determine compass bearing and distance from current (or some other starting) location to UTM destination using topo map and compass Materials for each patrol: a gridded topo map (draw in grid lines beforehand) a compass a 1:24000 grid overlay (or use 1:24000 scale on compass baseplate or small clear plastic mm metric rulers) pencil with eraser paper This exercise can be done indoors or outdoors. Each patrol finds the starting location on the map. This could be the current location, or any other starting location (e.g., if the map is for some area other than the one the Troop is conducting the exercise). The leader then announces the UTM coordinates for the destination. The patrols plot the destination on the map, and use their compass to determine the bearing from the starting point to the destination. The patrols each measure the line-of-sight distance on the map from start point to destination with the grid overlay, compass baseplate or ruler. If done outdoors, the patrols can be asked to follow the bearing to that destination. 6. Determine compass bearing and distance from current location to Destination using GPS Materials (in addition to above) for each patrol: a GPS unit (set for UTM + the correct map datum) + batteries (all patrols should have the same kind of GPS) Quickstart guide (or user manual) for GPS Unit This exercise requires the topo maps to be for the location the Troop is currently at, and also requires the Troop to be outdoors. The ideal is to do the exercise immediately above this, and follow it with this one. Program a Chain Bridge District, National Capital Area Council, Boy Scouts of America Page 33 GPS waypoint with the UTM coordinates of the destination. Compare the bearing indicated by the GPS with the one determined using map and compass. It is necessary to move steadily to any kind of accurate navigation indication from the GPS “goto” function. 7. Geocaching Materials: a GPS unit for each patrol (set for UTM, all same map datum) + batteries sealable containers to serve as geocaches items to place in the containers (three points of Scout Oath, 12 points of Scout law, jigsaw puzzle pieces, patches, etc.) a gridded topo map of your area (yes you can/should use maps when you go geocaching) Before the exercise, hide loaded geocaches and take accurate GPS locations for each (which may be stored as waypoints in your GPS). Preferably, program each GPS with all of the geocache waypoints in advance. Each patrol is issued a programmed GPS. The patrols are dispatched to different locations so they will find geocaches in different orders. The first patrol to find all geocaches and return to the starting point wins the competition. This is a good time to go over Geocaching safety and etiquette. [end of document] Chain Bridge District, National Capital Area Council, Boy Scouts of America Page 34