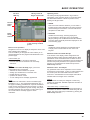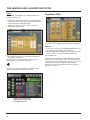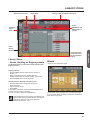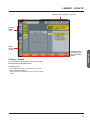
1
Operation manual
English
Table Of Contents
Contents
Table Of Contents................................................... 3
Important safety instructions.................................. 4
Introduction............................................................. 5
Getting Started....................................................... 6
Front And Rear....................................................... 7
DSP 6000 - Card And Connections........................ 8
Remote CPU.......................................................... 9
TC Icon................................................................. 10
Installing Additional I/O Cards.............................. 11
Updating System 6000 MKII Software................. 12
Network Basics..................................................... 18
TC Icon Editor Installation.................................... 22
Savvy WI-fI networking for System 6000............. 23
Basic Operation.................................................... 24
Library - Recall..................................................... 26
The Wizard And Algorithm Filter........................... 27
Library Store......................................................... 29
Bank And Naming Display.................................... 30
Library - Delete..................................................... 31
Frame Page.......................................................... 32
Frame System - Main........................................... 33
Frame System - I/O.............................................. 39
Frame system - Licenses..................................... 42
Engine Edit Page.................................................. 43
Icon Setup Page................................................... 44
SMPTE................................................................. 45
TC Icon Software Editor....................................... 47
Room Simulation For
Multichannel Music And Film................................ 50
Sample Rate Conversion Filters - ADA 24/96...... 54
Clock And Synchronization In System 6000......... 56
License Agreement............................................... 64
Technical Specifications
- Mainframe 6000 MKII......................................... 66
Technical Specifications
- TC Icon & Remote CPU..................................... 67
TC Electronic, Sindalsvej 34, DK-8240 Risskov
Prod No: 606146014 - Rev. 2.1
3
Important safety instructions
The exclamation point within an equilateral triangle is
intended to alert the user to the presence of important
operating and maintenance (servicing) instructions in
the literature accompanying the product.
The lightning flash with an arrowhead symbol within an
equilateral triangle, is intended to alert the user to the
presence of uninsulated “dangerous voltage” within the
product’s enclosure that may be of sufficient magnitude
to constitute a risk of electric shock to persons.
1
2
3
4
5
6
7
Read these instructions.
Keep these instructions.
Heed all warnings.
Follow all instructions.
Do not use this apparatus near water.
Clean only with dry cloth.
Do not block any ventilation openings. Install in accordance with the
manufacturer’s instructions.
8 Do not install near any heat sources such as radiators, heat registers,
stoves, or other apparatus (including amplifiers) that produce heat.
9 Do not defeat the safety purpose of the polarized or grounding-type
plug. A polarized plug has two blades with one wider than the other.
A grounding type plug has two blades and a third grounding prong.
The wide blade or the third prong are provided for your safety. If the
provided plug does not fit into your outlet, consult an electrician for
replacement of the obsolete outlet.
10 Protect the power cord from being walked on or pinched particularly at
plugs, convenience receptacles, and the point where they exit from the
apparatus.
11 Only use attachments/accessories specified by the manufacturer.
12
Use only with the cart, stand, tripod, bracket, or table
specified by the manufacturer, or sold with the apparatus. When a cart
is used, use caution when moving the cart/apparatus combination to
avoid injury from tip-over.
13 Unplug this apparatus during lightning storms or when unused for long
periods of time.
14 Refer all servicing to qualified service personnel. Servicing is
required when the apparatus has been damaged in any way, such
as power-supply cord or plug is damaged, liquid has been spilled
or objects have fallen into the apparatus, the apparatus has been
exposed to rain or moisture, does not operate normally, or has been
dropped.
Warning
• To reduce the risk of fire or electrical shock, do not expose this equipment to dripping or splashing and ensure that no objects filled with liquids, such as vases, are placed on the equipment.
•
This apparatus must be earthed.
•
Use a three wire grounding type line cord like the one supplied with the
product.
•
Be advised that different operating voltages require the use of different
types of line cord and attachment plugs.
•
Check the voltage in your area and use the correct type. See table
below:
4
Voltage Line plug according to standard.
110-125V
UL817 and CSA C22.2 no 42.
220-230V
CEE 7 page VII, SR section 107-2-D1/IEC 83 page C4.
240V
BS 1363 of 1984. Specification for 13A fused plugs and switched and unswitched socket outlets.
•
•
•
This equipment should be installed near the socket outlet and
disconnection of the device should be easily accessible.
Do not install in a confined space.
Do not open the unit - risk of electric shock inside.
Caution:
•
You are cautioned that any change or modifications not expressly
approved in this manual could void your authority to operate this
equipment.
• To completely disconnect from AC mains, disconnect the power supply cord from the AC receptacle.
• The mains plug of the power supply shall remain readily operable.
•
Danger of explosion if battery is incorrectly replaced.
Replace only with the same or equivalent type.
•
Ventilation should not be impeded by covering the ventilation openings
with items, such as newspapers, tablecloths, curtains, etc.
Service
•
There are no user-serviceable parts inside.
•
All service must be performed by qualified personnel.
EMC / EMI
This equipment has been tested and found to comply with the limits for a
Class B Digital device, pursuant to part 15 of the FCC rules.
These limits are designed to provide reasonable protection against harmful
interference in a residential installations.
This equipment generates, uses and can radiate radio frequency energy
and, if not installed and used in accordance with the instructions, may
cause harmful interference to radio communications. However, there is no
guarantee that interference will not occur in a particular installation.
If this equipment does cause harmful interference to radio or television
reception, which can be determined by turning the equipment off and on, the
user is encouraged to try to correct the interference by one or more of the
following measures:
•
•
•
•
Reorient or relocate the receiving antenna.
Increase the separation between the equipment and receiver.
Connect the equipment into an outlet on a circuit different from that to which the receiver is connected.
Consult the dealer or an experienced radio/TV technician
for help.
The user may find the following booklet, prepared by the Federal
Communications Commission, helpful:
“How to identify and Resolve Radio/TV interference Problems.”
This booklet is available from the US. Government Printing Office,
Washington, DC 20402, Stock No. 004-000-0034-4.
For the customers in Canada:
This Class B Digital apparatus meets all requirements of the Canadian
Interference-Causing Equipment Regulations. Cet appareil numérique de
la classe B respecte toutes les exigences du Réglement sur le matériel
brouilleur du Canada.
Licenses
If you have purchased any of the optional software
Licenses or the TC Icon Software Editor, then read
the License Agreements in the Appendix section
prior to use.
Introduction
Thank you for purchasing the System 6000 and welcome to an endless world of
opportunities.
System 6000 comes in two basic versions: Reverb 6000 and Mastering 6000, each offering the
best tools possible for effects and dynamics processing. System 6000 is a constantly evolving
platform and will be continuously improved and kept up to date with new algorithms and new
features.
Notice that a Reverb6000 can be updated with Mastering algorithms, and vice versa, by the
purchase of additional licenses.
Flexibility
Multiple Inputs and Outputs together with a powerful Digital Signal Processing
platform and an extremely intuitive user-interface, turn System 6000 into a very flexible machine
for several applications.
Algorithms
Several stereo algorithms like Reverb, Delay, Phaser, Chorus, Pitch and Multiband Dynamics,
are offered together with a new world of Multi-channel processing such as Reverb, Multiband
Dynamics and Pitch Change. The list is long, be sure to keep up to date via www.tcelectronic.
com
The manual
We are confident that the System 6000 is so easy to operate, that you will not need to read this
manual to the detail. However, for specific information please refer to the two manual booklets:
This Operation manual covers:
• Hardware and Installation - that explains how to connect the different components in the
system, and how to update them.
• System 6000 Operation - that provides instructions on how to operate the different features in
System 6000.
• In-Depth Information - contributes with several interesting articles that not
necessarily relates directly to operating the System 6000, but gives background information that
might be of interest.
• Appendix contains information such as safety instructions, technical specifications and license
agreements.
The Algorithm manual covers:
Descriptions and parameter explanations of all algorithms
As System 6000 is a constantly evolving product you should stay informed regarding software
and manual updates via our site at www.tcelectronic.com
We hope you will have a lot of creative and interesting working hours with your System 6000.
Feel free to contact us with any comments or questions via [email protected].
TC Electronic
Please note: We reserve the rights to change the contents
of this manual at any time. The latest manual revision can
always be downloaded from www.tcelectronic.com. If you
need additional information and support, be sure to visit the
TC Support Portal: www.tcelectronic.com/support
5
Getting Started
This is an illustration of how to connect a standard System 6000 as it comes with one Mainframe and one TC Icon.
We recommend reading through the entire Hardware & Installation section before operating.
Please note that a crossed ethernet cable (supplied) must be used in this type of setup. When the system is
connected to a HUB as a part of a major network non-crossed ethernet cables must be used (not supplied).
6
FrontPAGE
And HEAD
Rear
Power Key
Reset (countersunk)
Switches power On/Off.
Press and hold this button during boot to reset the frames
IP address to the default setting: 192.168.1.xx*, - where
“xx” is the last two digits in the frames serial number.
PCMCIA slot
For handling of preset banks.
Power On LED
During start-up this LED is red. When the unit is ready for
use, the LED will turn green.
* Note - if the frames serial number ends on “00”, the IP
address will be: 192.168.1.100, as “00” is not a valid IP
number in all networks.
System 6000 Mainframe Rear
DSP Slot
I/O Slot - A
I/O Slot - B (AES-8)
I/O Slot - C
Serial Number
I/O Slots A, B and C
Ground Lift
These slots are used for the optional I/O cards ADA 24/96
and AES-8. Slots must be filled consecutively in alphabetic
order.
The System 6000 DSP card fits in the DSP slot only. When
I/O cards are mounted, dip switches on the cards must be
set accordingly. Please see the following page.
An AES-8 card should be installed in “I/O Slot B (AES-8)”
only. If your mainframe rear panel carries a label saying
BUS updated you can install the AES-8 card yourself
following the instructions on the next of this chapter.
Use this standard chassis ground lift if you encounter
problems with hum.
DSP Slot
General Purpose Input. Connect a TC Master Fader or a
tip to ground switch. Applications vary depending on the
specific algorithm.
The System 6000 DSP card is placed in the DSP Slot.
Power In
100-230V AC. 50/60Hz - auto-select.
LAN/Ethernet
Connection for external control devices e.g. the TC Icon.
The type is 32 bit PCI Ethernet interface fully compliant
with IEE 802.3u 10/100 Mbps CSMA/CD standards.
The connector type is a 100Base-T RJ-45 (CN13)
HW & installation
System 6000 Mainframe Front
MIDI In, Thru and Out
5 pin DIN connectors.
Remote
This connection is for service and test purposes only.
Pedal
Rack-mounting Advice
• The M6000 should not be placed in an environment with a temperature exceeding 50 degrees Celsius.
• Do not cover the ventilation openings on the sides of the frame.
The cooling fan is activated according to the
temperature inside.
SMPTE
1/4” connection for SMPTE sync. Input.
7
DSP 6000 - Card And Connections
BNC
connector
Use the supplied cable to connect the AES/EBU Inputs/
Outputs.
Cable type is twisted pair (12 pairs) with common screen.
Recommended impedance: 110 Ohm.
One end is equipped with an AES/EBU 25 pin DSub
connector, the other end is equipped with four male XLR’s
and four female XLR’s.
Male XLR’s are marked with: Out - 1 to 4.
Female XLR’s are marked with: IN- 1 to 4.
Extension cables must be constructed according to AES/
EBU-3 standards.
Following is the pin-out:
Pin number
1
2
3
4
5
6
7
8
9
10
11
12
13
13
14
15
16
17
18
19
20
21
22
23
24
24
25
Cable pair
number
XLR
XLR-pin Assignment
1a
Female 1
2
2a
Female 2
2
3a
Female 3
2
4a
Female 4
2
5a
Male 1
2
6a
Male 2
2
7a
Male 3
2
8a
Male 4
2
No connection
9a
Female 1
1
No connection
9b
Female 2
1
10a
Female 3
1
10b
Female 4
1
1b
Female 1
3
2b
Female 2
3
3b
Female 3
3
4b
Female 4
3
5b
Male 1
3
6b
Male 2
3
7b
Male 3
3
8b
Male 4
3
11a
Male 1
1
11b
Male 2
1
12a
Male 3
1
12b
Male 4
1
Shield
no connection
Note: Twisted cable pairs must be respected
8
Input 1/2 +
Input 3/4 +
Input 5/6 +
Input 7/8 +
Output 1/2 +
Output 3/4 +
Output 5/6 +
Output 7/8 +
No connection
Common
No connection
Common
Common
Common
Input 1/2 Input 3/4 Input 5/6 Input 7/8 Output 1/2 Output 3/4 Output 5/6 Output 7/8 Common
Common
Common
Common
Common
Sync In Word Clock
For connections to external clock via the standard BNC
connector (see illustration above).
When several devices are connected in a chain and
synced via Word Clock, termination on the last device of
the chain is necessary.
As the System 6000 is expected to be the last unit in such
a chain (or the only), the factory default setting on the
System 6000 DSP card is: TERMINATED (75 Ohm).
If you need to terminate the Word Clock signal elsewhere
in the chain you will need to un-terminate the System 6000
DSP card. To do this you must remove the DSP card from
the mainframe and remove the termination jumper:
•
•
•
•
Switch off the power and disconnect main power cord.
Loosen the two screws holding the DSP card and remove the card gently.
Remove the terminating jumper near the BNC plug.
Insert the card gently in the DSP slot and remount the screws.
Termination jumper
Pins connected via jumper
: Terminated (75 Ohm).
Pins NOT connected via jumper: Not Terminated
Dip switches 1 to 4 should ALWAYS be set to off.
General Handling
When inserting or removing any modules, avoid touching
the circuit board by handling only the rear panel of the
module. To minimize the static potentials that can cause
damage to the electronic circuits, you should observe
precautionary grounding techniques such as touching a
grounded System 6000 Mainframe immediately before
inserting modules.
Remote
PAGE HEAD
CPU
Remote CPU front panel
Power Key
HW & installation
Switches power On/Off. Green LED indicates power on
state.
Remote CPU rear panel
COM port 1
LAN 1
connection for
setups with
multiple frames
PS-2 connection
for PC keyboard
and mouse
Connection
for TC Icon
Connection for
VGA monitor
COM port 2
Ethernet/LAN
connection for sw
updates etc.
2 x USB
Power In
Type A
Standard
100 - 240V
Connectors
Ethernet Connection
Monitor
32 bit PCI Ethernet interface fully compliant with IEE
802.3u 10/100 Mbps CSMA/CD standards.
The connector type is a 100Base-T RJ-45 (CN13)
By connecting a monitor via this standard 15 pin D-Sub
you can have the exact same picture as displayed on the
TC Icon, running in parallel with the Icon. Color depth is 24
bit with a screen resolution of 640 x 480 pixels at 60 Hz.
Connection for PC keyboard or mouse
A standard PS2 Y-splitter must always be used when
connecting a PS2-mouse, a keyboard or both.
This cable is not supplied with the unit.
Connection for TC Icon
36 pin multi-cable connection for TC Icon.
TC Connection Cable.
Use the special TC Icon cable supplied with the
unit ONLY !
Power
Connect 100-240V AC, 50/60 Hz auto-select.
Rack-mounting Advice
•
•
The CPU unit should not be placed in an environment with a temperature exceeding 50 degrees Celsius.
Do not cover the ventilation openings on the back of the Remote CPU.
The cooling fan is activated according to the
temperature inside.
USB Connection
USB connection for some TC products with USB
connection. E.g. Reverb4000
Com ports / RS232
For connection of TC units with RS232 interface. E.g. P2
and DB2.
9
TC Icon
TC Icon Rear
279 mm
TC Icon Front
198 mm
Screen
The TC Icon screen is a touch-sensitive capacitive screen.
The resolution is 640 x 480 16 bit color resolution. The
touch calibration as well as brightness and colors can be
adjusted/selected in the TC Icon Setup menu.
Maintenance
The touch screen must be cleaned only with a soft cloth
slightly moistened with water or a mild detergent solution.
Do not spray liquids directly on the screen.
Faders
The Faders are touch-sensitive. The sensitivity of the
Faders can be adjusted so response to movement is
achieved only when operated with your finger-tips.
This way unintended movement of the Faders with e.g. a
sleeve etc. will not result in changes in parameter values.
The sensitivity can be adjusted in the TC Icon Setup menu.
10
TC Connection Cable.
Use the special TC Icon cable supplied with the unit ONLY!
No other cables can be used. The 7.5 meters (22 feet)
cable cannot be extended as this will reduce the power for
the Icon supplied via the cable!
Mic stand mounting
There are two standard threads. 3/8” and 5/8”. The TC Icon
can be mounted on both types without further accessories.
Mounting of plate.
Mount the supplied plate on the rear of the TC Icon, to
assure stable operation when placed on a table or similar.
This is easily done using the 4 screws and screwdriver
supplied with the unit.
Dimensions
D: 279mm
W: 198mm
H front: 33mm
HEAD
Installing AdditionalPAGE
I/O Cards
Caution!
The servicing instructions are for
use by qualified personnel only. To
reduce the risk of electric shock do
not perform any servicing other than
that in the operation instructions
unless you are qualified to do so.
Slot A
I/O Cards
Dip 1 Dip 2 Dip 3 Dip 4
onoffoffoff
on
on
off
off
offonoffoff
onoffonoff
Before mounting modules in your M6000, switch off the
power and unplug the main power cable. Remove the
dummy-panel or original module from the slot where you
want to install the module. The module should then be
removed from the shielded bag and mounted directly in the
Mainframe by handling the rear panel of the module only.
Avoid touching any components on the PCB-Board.
ADA 24/96 Parameters
To access card specific parameters via the TC Icon:
• Press Frame, System, I/O and Slot A, Slot B or Slot C.
To install an ADA 24/96 or AES-8 card in your Main
Frame 6000
1.Switch OFF the unit and disconnect the main
power cord.
2.Remove the DUM-1 option plate(s) or module by
loosening the 2 screws.
3.Insert the card gently and mount the two screws.
ADA 24/96 cards can be mounted in slots A, B or C.
The AES-8 card must be placed in the AES slot.
Level In
Changes the analog nominal Input level between +6dBu
and +30dBu in 6dB increments.
The analog Input level enables you to match the System
6000 Mainframe Input to the Output of e.g. your mixer. If
the nominal operating level your mixer is e.g. +4dBu and
you select +12dBu on the Level In parameter you will have
a headroom of 8dB. If you select +16dBu in the Analog In
the headroom will be +12dB, and so forth.
Level Out
Static Electricity
As all computer hardware can be sensitive to static
electricity, certain precautions must be taken to protect it
from damage during storage and handling.
Storage
Non-mounted modules should always be stored in
anti-static shielded bags.
General Handling
When inserting or removing any modules, avoid touching
the circuit board by handling only the rear panel of the
module. To minimize the static potentials that can cause
damage to the electronic circuits, you should observe
precautionary grounding techniques such as touching a
grounded System 6000 Mainframe immediately before
inserting modules.
Removing Modules
Before removing any card from your Mainframe, switch off
the power and unplug the main power cable. Unplug all
other connections from the module before unscrewing the
two screws securing the module in the Mainframe. When
removing a module from a Mainframe, the card should
be mounted directly in another Mainframe or placed in an
anti-static shielded bag.
Changes the analog Output level between +6dBu and
+24dBu in 6dB increments.
Filter
Select filter type. Chose between - Linear, Natural, Vintage,
Bright and Standard (Std). Further information on these
filters please read the chapter: In Depth Information.
These filters are only available in 44.1 and 48kHz.
Soft Clip
Softclip algorithm running in the 96kHz domain right after
the AD conversion before the down-sampling filter.
Output Connection
Please select the type of connection you are using on the
Output of the card. Select between:
Balanced or unbalanced (with signal on pin 2 or pin 3).
If you are connecting unbalanced cables to the
Outputs when Outmode set to BAL, the Outputs will be
muted due to the short circuit the unbalanced cables cause.
11
HW & installation
Mounting Modules
I/O cards MUST be mounted in slots A, B and C
consecutively starting in slot A. Dip-switches must be
correctly set on the I/O cards.
Slot A
Slot B
AES-8
Slot C
Slot C
Slot B / AES-8
Updating System 6000 MKII Software
Keeping your software updated
System 6000 is a constantly evolving platform and updating software is a standard procedure to keep the system
up-to-date. Depeding on your setup, software-updates can be done in a couple of different ways described on the following
pages.
Software types
There are three types of software in a System 6000 mainframe, one for the TC Icon Remote CPU MKII and then the TC
Icon Software Editor for PC and Mac, that can be used instead of a TC Icon (hardware version)
• F
rame software
• Net (Ethernet) software
• DSP software
• Software for the TC Icon Remote CPU MKII
• TC Icon Software Editor form Mac or PC
Note: There is also software for the optional AES-8 card. This software is rarely updated and should only be upgraded if
a newer AES-8 software version than the one you are currently using, is available. Please follow the update instructions
provided with the downloaded AES-8 software.
Before diving into the actual update procedures, you should check whether you have the latest software installed already.
12
Updating System 6000 MKII Software
Updating Remote CPU MKII software
Update Remote CPU 2
HW & installation
TC ICON MKII
REMOTE CPU MKII
LAN 2
Standard
Ethernet cable
INTERNET
Remote CPU MKII software is updated directly via the
internet.
- Connect Remote CPU MKII LAN 2 to your internet router
using a standard ethernet cable
- Go to the Setup/Update page and press the UPDATE
FROM TC WEBSITE button
- That’s it!
If you see a message “Download from web failed”, go to the
Setup/Net page and ensure that it says:
“Connected. TC Website Available”, under Internet DHCP
Connection (LAN 2)
If the message is: “Connected. TC Website Not Available”
or “LAN 2 Not Connected”, then check cables and try again.
If the problem continues you may need to look into firewall
issues with your network administrator.
13
Update Mainframe SW
Updating System 6000 MKII Software
Updating Mainframe 6000 MKII software
TC ICON EDITOR
on PC OR MAC
M6000 MKII
X-Coupled
Ethernet cable
- Download and install TC Icon Editor on a Mac or a PC
- Download Frame, DSP & Net software to a folder on your
computer.
PC example:
Create a folder in the root directory (C), and call the folder
s6kupdate. The path for this folder is then “C:\s6kupdate”.
Unzip and place the Frame, DSP & Net software in this
folder.
Mac example:
Create a folder on your Macintosh HD and call the folder
s6kupdate.
The path is then “//Volumes/Macintosh HD/s6kupdate”.
Unzip and place the Frame, DSP & Net software in this
folder.
- Disconnect your computer from your internet router
- Connect the Mainframe 6000 MKII LAN port to you
computers netcard using a X-coupled ethernet cable
- Open the TC Icon Editor, select the Frame to update and
go to the Frame/System/Update page
- Enter the path for the software:
“C:\s6kupdate” (for Windows)
or “//Volumes/Macintosh HD/S6kupdate” (for Mac) as
Update Folder path
- Select Frame and press Update SW
- Select Net and press Update SW
- Select DSP and press Update SW
14
The Icon Editor shows the update status via a progress bar.
A log file of the update can be obtained for service
purposes. The file is saved at the location where the
software is updated from. The file lists the result of the
operation and can be opened with most text editors.
To verify correct update-procedure has taken place,
check the software version numbers both before
and after an update. These version numbers are
located on the Frame/System/Version page.
Updating System 6000 MKII Software
Advanced setup
- Central Server setup for software for update and preset handling
“TC NETWORK” (Static IP) - STUDIO A
“TC NETWORK” (Static IP) - STUDIO B
M6000 MKII
8 x XLR FOR DIGITAl I/O
LAN 1
8 x XLR FOR DIGITAl I/O
LAN 2
M6000 MKII
TC ICON EDITOR
on PC OR MAC
TC ICON MKII
Static IP
10.10.10.1
Standard Ethernet Cables
Static IP
10.10.10.2
Static IP
10.10.10.3
Standard Ethernet Cable
REMOTE CPU MKII
Static IP
10.10.10.2
DHCP
e.g. 192.168.1.2
M6000 MKII
Static IP
10.10.10.1
HW & installation
X-Coupled ethernet cable
CENTRAL SERVER
100 MBit HUB
Static IP
10.10.10.4
LAN 1
DHCP
e.g. 192.168.1.1
CENTRAL SERVER
LAN 2
DHCP
e.g.192.168.1.10
SWITCH/
ROUTER
TC ICON MKII
TC ICON ELEVATED
Mounted on 3/4” or 5/8” fittings
INTERNET
15
Updating System 6000 MKII Software
Central Server (MotherShip) setup
This is a typical setup in larger studio facilities with several
rooms, where you place software updates and e.g. a preset
vault on a central server/computer in a shared folder.
The illustration on the previous pages shows two studios
and a central server with internet access.
LAN 1 TC Network connects:
- Local System 6000 Mainframes
- Local Remote CPU LAN 1
- E.g. PC/Mac running the TC Icon Editor
Updating your software:
• Download the software from:
http://www.tcelectronic.com/system6000support.asp and place the software in a shared folder on the “central
server”.
• Select the frame you are about to update
• Go to the Frame-System-Update-Frame page
• Then set the Update Folder path to the shared folder
• Press Update SW
• Repeat for DSP and NET (Ethernet)
Example: PC update folder path
LAN 2 Internet
- Connects to central server and internet
To learn about shared folders please refer to the sections:
- Shared folders PC - basics
- Shared folders Mac - basics
Two networks
- two sets og IP addresses
This setup includes two networks. The static “TC Network”
and the DHCP. Each network must use its own unique
group of IP addresses.
We assume that the Router in the uses the standard group
of IP addresses: 192.168.1.xx, and we must therefore give
TC Icon Remote CPU MKII’s LAN1 and all System 6000
mainframes its own group.
E.g. 10.10.10.xx, where x is unique for each unit.
(please see illustration on the previous page)
- First change the IP addres of the System 6000
Mainframes to 10.10.10.x via the TC Icon Editor.
Reboot each frame
- Then change the LAN 1 IP address on the Remote CPU MKII to e.g. 10.10.10.x
Reboot the Remote CPU MKII
16
Example: MAC update folder path
Log File,
As explained on the previous page, a log file of the update
can be obtained for service purposes. The file is saved at
the location where the software is uploaded from. The file
lists the result of the operation and can be opened with
most text editors.
The file is saved in the same folder as the software is
placed and read/write access for that folder must be set.
Preset Vault on Central Server
In larger studio facilities with several studios, preset banks
and automation presets can be stored on a central server in
a setup similar to the one described on the previous pages.
We recommend creating two seperate shared folders on
the server. One for preset banks and one for automation
presets.
In the examples below we use the following folder names:
Automation Presets
Automation presets are stored and recalled directly to and
from a shared folder on the central server.
The exact path to the folder on the server must be entered
in the Folder Path field on the Auto File page.
Example: Path to folder with presets banks - PC
“S6Kpresets” - for preset banks
“S6Kautomation” - for automation presets
HW & installation
Presets
Presets are handled as entire Banks and you load/save an
entire bank between the server and your local System 6000
MKII Mainframe. *
The exact path to the folder on the server must be entered
in the File Folder field on the Library bank page.
Example: Path to folder with automation presets - Mac
Example: Path to folder with presets banks - PC
To learn about shared folders please refer to the sections:
- Shared folders PC - basics
- Shared folders Mac - basics
Example: Path to folder with automation presets - Mac
* Detailed description on bank handling is described in the
manual section “Library Bank”.
17
Network Basics
Subnet Mask & TCP/IP addresses
The Subnet Mask is a number that defines a group of
computers (or Icons/Mainframes) connected to the network.
All units in the group must have the same Subnet Mask.
The System 6000 Subnet Mask is by default 255.255.255.0
The TCP/IP address is unique to each unit connected in the
network. An IP address consists of 4 numbers separated by
a “.” Example: 192.168.1.1
The first three numbers (e.g. “192.168.1”) must be the
same for each unit, but no two units in the subnet can have
the same the last number.
The TC Icon default address is
The M6000 default address is
Setting Subnet Mask & TCP/IP on a PC
To find the TCP/IP address and the Subnet Mask settings
on your computer running Windows:
Example - Windows XP
Go to Control Panel, Network Connections, Internet
Protocol (TCP/IP)
: 192.168.1.125
: 192.168.1.xx
- where “xx” is identical to the last two digits in the
Mainframes serial number. This way multiple System 6000
Mainframes can be setup directly out of the box without
changing the IP numbers.
If your computer’s IP address (or any in the network) is one
of the above you have two options. Either to alter the three
last number in your computer’s IP address or to alter the
last number in the TC Icon and Mainframe IP addresses.
Setting Subnet Mask & TCP/IP
Subnet Mask & TCP/IP address on a Mac
Example OSX
• Go to “System Preferences - Network
• Under Configure select “manually”
• Set TCP/IP address
Setting the Subnet and TCP/IP on System 6000 Mainframe
is done via the TC Icon page: frame/system/main/net
Setting TCP/IP on TC Icon Remote CPU MKII is done on
via the Setup/Net page.
Resetting a frames IP address
By pressing and holding the reset button on the frontpanel
during boot-up, the frames IP address can at all times be
reset to default: 192.168.1.xx*, - where “xx” is the last two
digits in the frames serial number.
* If the frames serial number ends on “00”, the IP address
will be: 192.168.1.100, as “00” is not a valid IP number in
all networks.
There is a small risk that two frames have the same
last 2 digits in the serial number and thus will
conflict after a reset. Solution: - reset one frame and
change its IP address before connecting the
second.
18
For further information please refer to you operating
systems manual.
Network Basics
Shared folders PC - basics
When sharing a folder on Windows XP/VISTA/WIN7 you
have to make sure that the user of the TC Icon Remote
CPU MKII has rights to access read/write in the share
folder.
Now go to the folder you want to share
•
•
•
•
•
Right-click on the folder and select properties
Select Sharing
Mark “Share this folder”
Type in the name ”iconupdate” as share name
Mark “Maximum allowed” in User Limit
The default user on your hardware ICON is already setup:
User name : ICON
Password: Administrator
(Notice the capital letters, as these are case sensitive)
This user has to be added on the computer holding your
shared folder for software updates and preset handling:
- Press start in the lower left corner of your desktop
- Right click “My Computer” and click “Manage”
Computer Management now appears and you click “Local
Users and Groups”
• Then press “Permissions” and allow: Full Control, Change
and Read.
Then “Users“ and “Groups” appear and you double click on
“Users”
operation
• On the “General” page make sure that “Read only” is
NOT marked. This allows the update software to write
a Result file describing the update success/failure to be
written.
You typically have 3 accounts on your system,
Administrator, Guest, and the default account you created
while installing windows. You now have to add a new
account!
You right click the blank space underneath the 3 accounts
and click “New User”
• Press Apply and OK
• The path to the folder is now \\xxxx\iconupdate and it is
available on the network.
“xxxx” is the name of the computer.
To find the computers name:
Press, START and right-click on My Computer and
select properties. Select the tab “Computer Name”:
Type in user name : ICON
And Password
: Administrator
Leave Full name and Description blank unless you need
these information. All check boxes should be left as is.
Click “Create” and the “Close” and the user now has rights
to access the computer.
- in this case the name is “mypc”
19
Network Basics
Windows 7 note
For succesfully sharing a folder on Win7 x86/x64 you have
to setup sharing rights for the folder(any share) on the
machine.
Shared folders Mac - basics
On Mac computers shared folders are setup in System
Preferences - Shared.
- Open Network and Sharing Center by clicking the Start
button , clicking Control Panel, clicking Network and Internet,
and then clicking Network and Sharing Center.
- Click the arrow button next to Password protected
sharing, and then click one of the following options:
1 - In the Public Folder Sharing section select the following
option:
“Turn on sharing so anyone with network accesscan read
and write files in the Public folders.”
Press “+” under Shared Folders
2 - In the Password protected sharing section select the
following option:
“Turn off password protected sharing.”
• Select the folder holding the software and press “Add”.
• The folder is now shared.
If option 2 is NOT available it is most likely because you are
on a domain controlled network, and we advise talking to
your network administrator, before proceeding.
Advise for the network administrator:
The user should be able to sign out of the domain
controlled network. Logging into a local account will not
solve this issue.
A new account must be added to the domain with read/
write access to the shared folder on the Mothership.
20
Updating TC Icon/Remote CPU MK II From a Central Server
There are two ways of updating the software
Updating directly from the Internet
- if the TC Icon Remote CPU MKII’s LAN2 (Internet)
connection is connected directly to the internet, the
software can be updated directly.
See explanation on page 14.
Updating from a Central Server
- The software is downloaded, placed in a shared folder on
a central server and updated from there.
Updating directly from the Internet
• First of all you should check whether your Icon software
is up-to-date or not. Press Update Version Info on the
Frame System Version page
Three indications can be given:
“Connected. TC Website Available”. This indicates that
LAN2 is correctly connected to TC Electronics download
server. Go to the Update page and press “Update From TC
Website”.
TC Electronic does NOT have access to any files or
information on devices connected to LAN2.
“Connected. TC Website not Available”. This indicates that
LAN2 is correctly connected to the internet but you are
either on a closed network with no internet access, or the
download server at TC Electronic cannot be reached.
Updating from a Central Server
Updating TC Icon software from a shared folder on a PC
• Make sure your System 6000 is connected to the
Internet via the TC Icon Remote CPU MKII’s LAN2
Internet connection. Status on the connection can be
seen on the Setup/net page.
It should say “Connected to TC”
• Connect the LAN2 connection to your computers network
connection. For a direct connection use a X-Coupled
ethernet cable. If connected via a hub, use standard
(non-X-coupled) cables.
• Download and unzip the TC Icon cab file and place the
file in a folder. This folder needs to be shared.
To learn about shared folders please refer to the sections:
- Shared folders PC - basics
- Shared folders Mac - basics
- found on the previous pages.
Then enter the correct Network Folder Path to the shared
folder containing the software on the Setup/Net page.
Example PC:
Example Mac:
21
Operation
“LAN 2 Not Connected”. You are not connected to the
internet. Please check network setup and all cables, - then
try again.
TC Icon Editor Installation
The TC Icon Software Editor for PC and Mac is a fully
operational software version of the TC Icon Remote for the
System 6000. The software is free to download via www.
tcelectronic.com
Installation - PC
System Requirements
• Windows 2000, NT, XP, Vista or 7
• 1 GB RAM
• INTEL/AMD 1.66 GHz
Updating/installing the TC Icon Software Editor
• Go to:
http://www.tcelectronic.com/reverb6000software.asp - or
http://www.tcelectronic.com/mastering6000software.asp
• Download TC Icon Editor for Windows
• Open the zip-file
• Open the cab-file
• Copy the Icon file to your desktop (or another location)
Installation - Mac
System Requirements
• OSX 10.4, 10.5, 10.6
• Power PC or Intel Mac
• Stuffit Expander installed
Updating/installing the TC Icon Software Editor
• Go to:
http://www.tcelectronic.com/reverb6000software.asp - or
http://www.tcelectronic.com/mastering6000software.asp
• Download Icon Editor for Mac
• Open the Icon.dmg file placed on your desktop and drag the application to your desktop or another location of your choice
22
Savvy WI-fI networking for System 6000
Introduction
PC
Setting up a Wi-Fi connection in your System 6000 network
is basically making an access point in the network.
For this you can use any router with Wi-Fi or access point
you can buy today, but check that it has the features you
need before buying.
The TCP/IPV-4 protocol has to be set for “Use the
following IP address” and do only enter “IP address” and
“Subnetmask” (In this case as described above I would set
IP for 192.168.1.150 and Subnet mask 255.255.255.0)
(also see page 13 in this manual)
The Setup´s
Example:
It is possible to make 2 setups that basically access the
network in the same way but in fact are 2 totally different
products covering the PC/MAC side of things.
- The Router.
- The Airport Express.
Both setups can be accessed by both platforms MAC OS/
PC as long as you have a Wi-Fi card in the system, so it’s
possible to run multiple instances of the ICON software
either on one or multiple systems.
The Router/Airport Express setup
Operation
Connect you Router/Airport Express to your PC/MAC
with a standard ethernet cable and open your browser.
Access your Router/Airport Express by entering its default
IP address. The most commonly used default address is
“192.168.1.1”, but you should refer to the routers manual.
A good start is always “LOADING DEFAULT SETTINGS”
or using the reset to default button. Again, – look in your
Router/Airport Express manual.
Disabling DHCP
In your Router/Airport Express setup you will need to
disable DHCP. DHCP is a feature that allows the device to
automatically hand out IP addresses to all the connected
devices and we want to disable this feature as the System
6000 network is a network with static IP addresses for all
devices.
MAC
It is basically the same procedure as described above, but
on a MAC computer you are able to disable the TCP/IPV6
protocol.
Remember No 2 Fames/PC´s/MAC´s or ICON MKII are
allowed to have the same IP address on this static network.
Setting start IP
The default IP of TC ICON MKII is 192.168.1.125 and for
MKII frames it is 192.168.1.126, so if we set the Router/
Airport Express to a starting IP of 192.168.1.124 this will be
the first link in this chain of devices. The same goes for an
Access Point, always let it be the first link in the chain. This
is not mandatory but it is good to have a logical structure in
you network.
Wi-Fi setup
You can basically setup any type of encryption etc. on your
Wi-Fi Router/Airport Express.
We recommend to setup a basic Wi-Fi with no encryption in
the Router/Airport Express to start with.
The PC/MAC Wi-Fi card has to be setup with a static IP as
well as the rest of the System6000 network.
23
Basic Operation
List of connected
units
Introduction
Engine Structure
Accessing a Mainframe
Engine Resources
This section of the manual is a general introduction on
how to operate System 6000 via the TC Icon. The basic
System 6000 consists of a Mainframe with a DSP card and
up to three I/O cards, plus a TC Icon remote with Remote
CPU. Several mainframes as well as several TC Icons can
be hooked up at the same time via a standard Local Area
Network (LAN).
The core element of Mainframe 6000 is the 4 Engine
structure. This structure enables you to run up to four
powerful algorithms/presets simultaneously. Each Engine is
capable of utilizing up to 8 Inputs and 8 Outputs, depending
on the selected algorithm/preset. Up to 16 physical Input
and 16 physical Output channels can be routed in the most
flexible way.
• Power up all devices.
• The TC Icon Setup page appears (see above).
• On the Setup-Devices-Select page you press “DETECT”
and then assign the detected mainframes to the 8
locations as you prefer.
The Mainframe 6000 offers a large amount of real-time
DSP-resources. The flexible DSP distribution structure lets
you run up to 4 Engine presets at the same time using any
available algorithms. How about running your signal from
a full-blown VSS-5.1 Reverb through a MD-5.1 Multiband
Dynamics algorithm to a Toolbox-5.1 for e.g format
conversion and total control of levels? Setups like these
are no problem with the System 6000.
Assigning Frames to shortcut keys
- un-assign by pressing one of the eight shortcut keys
- select the Frame you wish to assign from the list of
connected units,
- then press the shortcut key you wish to assign to
Be aware that when using some of the most powerful
algorithms or running at 96kHz, less than 4 Engine
presets can be loaded simultaneously. Required Engine
resources pr. algorithm is listed for each algorithm in the
algorithm-chapter.
First time you connect the Mainframe and TC Icon you
must:
• Go to the Select page (top-tab), and press the large
Mainframe key of the connected frame you wish to
access (see Fig 2).
• TC Icon now retrieves data from the Mainframe.
• When ready you will see the Frame - Routing
display, and you are ready to operate the Mainframe.
To go back to the TC Icon pages press the Icon logo in the
top left corner.
24
PAGE HEAD
Basic operation
Library, Frame &
Engine select Tabs
Function
Select
Tabs
Operating Levels
The Library-Recall page illustrated in Fig.3 leads to
explanation of the “operating levels” in the System 6000.
We differentiate between 3 levels of presets: Scene,
Routing and Engine levels.
• SCENE
Fader
Group
Selector
This is the most extensive selection you can make. It includes all four Engine algorithms as well as Physical and virtual Engine connections. A Scene recall can be compared to a “total recall.”
• ROUTING
Parameter values present
in the currently recalled
preset.
Basic TC Icon operation
Navigation in the TC Icon display is easily done when a few
basic elements are explained.
The Icon Link key in the upper left corner allows you to
navigate between the two pages/modes illustrated on the
previous page.
In both modes you:
• Press the top-tabs to do primary selections
• Press the side-tabs or elements to do secondary
selections.
Fig. 1: Via the “overall” Select & Setup pages you access
overall settings and choices like:
• Selection of which mainframe to operate
• Setting up IP addresses for connected units
• Enable devices to network
• Updates via network or disk
• TC Icon settings such as display appearance
Fig. 2:
The selection of mainframe is done in the Select page
illustrated in “Fig 1”. The page/pages illustrated in Fig. 2 are pages containing parameters on a specific mainframe.
These are the Operating Pages and the page you will be
working in once the system is up and running. Only when
several mainframes are connected you will need to go to
the “overall” Select and Setup pages to switch
mainframe.
Handles all I/O Routings, including all physical I/O connections to the Engine I/O’s. No algorithm (Engine) settings are recalled/stored with this selection.
A Routing preset holds all parameters displayed on the Frame-Routing page.
• ENGINE
Handles the current algorithm in the selected Engine.
A single preset can be loaded to each of the four Engines.
Parameter Values and Fader Groups
In the bottom of the display, Fader assignments and
values will always reflect the last modified Engine. Most
parameters can be controlled via the 6 Faders. As some
algorithms hold numerous parameters and we operate with
6 Faders the preset parameters are organized in Fader
Groups. To scroll between the Fader Groups use the
Fader Group selectors.
Parameter value - Fine Adjust
Any parameter value can be adjusted in two accuracies.
A Normal and a Fine Adjust - mode. To switch between the
two modes press the Value Fields above the faders.
As shown in the illustration the Fine Adjust mode will be
indicated with two triangles in the value field.
Fader 6
Any parameter can always be assigned to Fader 6 by pressing the parameter. Detailed explanation will follow in
the next sections.
User Fader Group - Custom Group
A User Fader group where you can assign parameters to all 6 faders can also be created and saved along with the
preset. The User Fader group is selected by pressing the Fader Group selectors.
25
operation
The Icon
LINK key
Library - Recall
Operation Level Tabs
Bank Selectors
Search
Library, Frame and Engine selectors
Function
Select
Tabs
Fader
Group
Selector
Parameter Fader
values present in
the last modified
Engine.
Library Recall
On the Library Recall page the following banks are
available for recall operations.
Scene
Gives access to the following preset banks:
• Factory F1: Scene ROM bank
• User U1: User Scene bank
Routing
Gives access to the following preset banks:
• Factory F1: ROM bank
• User U1: User Scene bank
Engine 1-4
Gives access to the following preset banks:
• Factory Reverb banks (For Reverb 6000)*
• Factory Master (mastering) banks (For Mastering 6000)*
• User banks
If both Mastering and Reverb options are installed, the
Factory button is used to switch between Reverb and
Mastering presets.
26
Recalling a Scene or an Engine preset
• Press the RECALL tab to select the Recall page.
• Now select the level of: Scene, Routing or Engine 1-4.
• Select which bank you wish to recall from: Factory
or User. If a System 6000 formatted PCMCIA card
is inserted in the Mainframe, card-banks will also be
available and displayed below the User banks.
• Select presets pressing:
Bank, Decade (=tens) and preset number.
(grayed out numbers indicates that the Decade is empty)
• Press the Recall key to recall/load the preset.
When trying to load an algorithm that requires more
DSP power than currently is free, a Pop-up display
will ask to load the “Empty Engine” preset into an
Engine of your choice. The “Empty Engine” preset is
located as preset 00 in the Reverb Music bank.
Search / Wizard Algorithm Filter
See next page.
PAGEFilter
HEAD
The Wizard And Algorithm
Introduction
To easily find the perfect preset for your application among
the vast amount of presets available in the System 6000,
we have added a Wizard function. Basically the Wizard
allows you to set up a few criteria and thereby narrow
down the pool of presets to select from. All Reverb Factory
presets are marked with Wizard category-tags. When
storing User presets you can assign a Wizard category
tag yourself to each preset. To further narrow down your
selection you can use the Algorithm Filter. Via this filter you
can select categories or specific algorithms to select from.
Finally you can search on preset names that includes
specific words such as “Hall or Cathedral”.
The Wizard
The Wizard is of course 100% non-destructive and
you can at any time press Reset to cancel all Wizard
settings and obtain full access to all presets.
To access; press the Wizard tab on the Wizard “main-page”.
Search “main-page”
Press Search
to enter Wizard
and Algo filter
Press Algo to enter
Algorithm Filter
Press Reset to
reset all Wizard
settings
Mode
Enable Wizard
Press to enable the Wizard.
operation
Wizard Category
Select which main categories you would like to select
presets from. Options are: Music-Reverb or Film-Reverb.
Show Factory - Show User
Select whether you wish to be able to recall from either
Factory or User preset banks or from both.
Engine Output Format
Press Output Format to activate the Output format filter.
Then specify which Output format the presets you are
searching for should have.
Options are Mono/Stereo or Multichannel or both.
Now go to the Type page and select Wizard tags.
(see next page)
Preset Name Filter
Search function on presets names
Preset Name Filter
• Press and a keyboard will pop up.
• Enter any relevant keyword (e.g. “arena”) - and only
presets with names containing “arena” will be listed.
The hierarchy of the Algorithm Filter and Wizard:
1
Wizard
2
Preset Name Filter
3
Applies specifically for
Reverb presets
Applies for all preset
types
Algorithm Filter
27
The wizard and algorithm filter
Type
This is where you make the most detailed selection of
presets to choose from.
Algorithm Filter
• Specify from which types of presets you would like to
recall. Types varies depending on the selected Wizard
Category selected on the Mode page.
• Pressing the top field in each column will select or
deselect the entire column.
To access; press the Algo tab on the Wizard “main-page”.
Operation
• Now press OK and and you will return to the Wizard
“main-page” (see below).
On this page you will now have an overview of your
Wizard, Name and Algo Filter selections.
You can at any time press Reset to cancel all Wizard
settings and obtain full access to all presets.
Overview of selections via
Wizard, preset name Filter
and Algorithm Filter
28
• Press one or more of the six Category Filter keys for an
application specific selection of preset types.
• Use the Slider and the Select key in the Algorithm Filter
section to select or de-select individual Algorithms.
• Press OK to exit.
Whether you now wish to do a standard preset recall from
the Factory/User recall pages; or use the Wizard function
to further narrow down the selection, you can only see and
recall presets matching the Algorithm Filter settings.
Example: You wish to select between various Surround
presets but only in 5.1.
PAGEStore
HEAD
Library
Operation Level Tabs
Name Field
Library, Frame and Engine selectors
Press
WIZARD to add
Wizard tags to
presets.
Function
Select
Tabs
Fader
Group
Selector
On the Store page you may store Scene, Routing and
Engine presets.
operation
Library Store
- Scene, Routing or Engine presets
Parameter Fader
values present in
the last modified
Engine.
Wizard
• Press to enter the Wizard page.
Storing a Preset
• Press the Store tab and select Scene, Routing or Engine 1-4.
• Select a preset location by pressing first the
decade-number and the a location within the decade.
• Press the Store key to store the preset.
Naming a Scene, Routing or Engine preset
• Press the Name field. A keyboard will pop up.
(See next page)
• Type in the new name.
• Press Enter.
The preset is not stored when the keyboard Enter key is
pressed. Only the name is entered.
To store you MUST press the red Store key.
Fader assignments in the bottom of the display will
always reflect the last modified Engine. The Engine
Fader Group selector in the lower left corner
indicates the Engine in use.
Via the Mode and Type pages you can add preset tags
to user presets. When recalling presets using the Wizard;
these are the tags used.
29
Bank And Naming Display
Library - Bank
Via the Library Archive page you can copy Scene,
Routing and Engine banks to and from a PCMCIA card
and to/from a folder on your computer if you are using
the TC Icon software Editor.
A 512kB PCMCIA card can hold:
500 Engine presets in 5 banks of 100 presets
250 Routing presets in 5 banks of 50 presets
250 Scene presets in 5 banks of 50 presets
File Folder
Enter the path to a folder (or shared folder) on a computer
or server. Please read more about shared folders on the
HW/Installation section fo this manual.
Naming Presets
All user preset types - on Scene, Routing or Engine
level can be renamed.
Basic Operation
Bank copying is handled as a complete User bank
transferal.
• Press Scene, Routing or Engine to select preset bank
type.
• Select “from” and “to” depending on your choice.
• Press Copy Bank.
Scene/Routing/Engine Banks
To/From - Bank/File
Scene, Routing or Engine banks can be backed up and
retrieved from a MS-DOS formatted PCMCIA or a file
location on a connected computer (when using the TC Icon
software editor).
Copy Bank
Press to activate copy function between the selected
Banks.
Rename
Press to rename the selected bank via the Naming pop-up
display.
Delete
Press to clear the selected Bank. You will be asked to
confirm your choice to avoid unintended deletion.
Using PCMCIA cards
To use a PCMCIA card with System 6000, the card must
be MS-DOS formatted. This is done from the Frame/
System/Card page.
A 1MB PCMCIA card can hold:
1000 Engine presets in 10 banks of 100 presets
500 Routing presets in 10 banks of 50 presets
500 Scene presets in 10 banks of 50 presets
30
Basic operation
• Press the Name field. A keyboard will pop up.
• Type in the new name.
• Press Enter.
The preset is not stored when the keyboards Enter
key is pressed. Only the name is entered.
To store you MUST press the red Store key on the
Store page.
The previous accessed display will always be present
beneath the keyboard. Current Fader values will be
displayed and faders can be used to adjust parameter
values.
Library
- Delete
PAGE
HEAD
Library, Frame and Engine selectors
Function
Select
Tabs
Parameter Fader
values present in
the last modified
Engine.
operation
Fader
Group
Selector
Library - Delete
For convenience it is possible to “clean up” the User
bank by deleting individual presets.
Deleting a Preset
• Press Delete (side tab) and select level by pressing Scene, Routing or Engine.
• Select decade and preset location and press the Delete
button.
31
Frame Page
Frame - Routing
To distribute a single Output of an Engine to
several physical Outputs:
• Route the Engine Output to a physical Output.
• Route the same Engine Output through a passive
channel of an algorithm loaded in another Engine.
E.g. channels 7 and 8 of the Toolbox-5.1.
When routing an Engine Output to an Engine Input with the
M5000 frame and no TC Icon, the Engine Input channel
number must match the Engine Output number from where
the signal originates.
E.g. Output channel 1 from Engine 1 to Input
channel 1 on Engine 2, 3 or 4.
Engine Processing Delay
Processing delay between the routed Engines behaves as
if the were external devices.
Introduction
The Routing page is the patch-bay of the System 6000
Mainframe. All routings of physical Inputs/Outputs as well
as internal routing between the Engines are setup here.
The understanding of this page is therefore essential to
operating the System 6000.
To access the Routing Page:
• Press Frame (upper tab)
• Press Routing (side tab)
• Press Route to enable routing facilities
This is the page where you:
• Have the overall view of all I/O’s
• Route physical Inputs to Engine Inputs
• Route Engine Outputs to physical Outputs
• Access Input and Output meters
Routing Inputs
• Press the Route key to select route operation.
• Press ENGINE 1 to 4 to select the Engine you
wish to route
• Select a physical Input or another Engine’s Output using Fader 1
• Select Engine Input using Fader 2
Routing Outputs
• Press the Route key to select Route operation
• Press Engine 1 to 4 to select the Engine you wish to route
• Select an Engine Output using Fader 5
• Select Physical Output using Fader 6
The I/O possibilities are as follows
• It is possible to connect any physical Input to several Engine Inputs (up to 32), however, it is not possible to connect more than one physical Input to the same Engine Input.
•
•
It is possible to connect all Engine Outputs (up to 32) to one single physical Output.
It is possible to connect an Engine Output to the Inputs of the three other Engines.
32
Internal overload LEDs and Reset Clip key
Each Engine is is constantly monitored for internal
overload. The small dot on the right side of the oval
Engine key indicates when internal overload occurs. In
this situation it is advisable to reduced the Input level of
algorithm loaded in that particular Engine.
If the “Sticky Clip function” is enabled on the Setup
Security page (accessed by pressing the TC Icon symbol in
upper left corner of the display), the LED will keep lit until
Reset Clip on the Frame Routing page is pressed.
Labels
The Input/Output fields can show either meters or the
labels/names on the Input/Output channels. To switch
between the two modes press “Labels”.
Renaming Physical Inputs and Outputs
Input and Output channels can be labeled individually. This
is a global renaming process and is accessed by pressing
System (side tab) followed by I/O and Labels. After that
follow the naming procedure described on page 6.
Meters
Engine I/O Meters
Engine I/O meters are shown at the left and right of the
large E 1-4 buttons in the middle of the display. The
number of meters shown will always reflect the number of
I/O channels in the loaded algorithm.
PAGE- HEAD
Frame System
Main
Frame - E1 to E4
Locked Clock Rate
The Clock Rate to which the Mainframe is currently locked.
If the incoming Sample Rate is +/- 0.2% away from 32,
44.1, 48, 88.2 or 96kHz the Sample Rate will be shown
with an added “!” to indicate that the Sample Rate is
inaccurate.
Color indications
Red color in Clock Status field: External clock source is
selected but no lock is achieved. Check connections and
external device. This is a critical alert and no signal will be
processed.
Yellow Color on I/O and Frame tabs:
This is a non-critical alert indicating that internal clock is
selected but a clock is present on the selected external
digital source. Internal clock should generally only be
selected when processing analog signals.
Clock
Clock Settings
To be able to successfully clock your system you must
select between two basic ranges of Sample Rates. We call
these ranges Normal and Double mode. Double mode
covers Sample Rates 88.2 and 96kHz, Normal mode
covers 32, 44.1 and 48kHz. If incorrect mode is selected
when trying to lock, no lock status can be obtained.
Normal Rate:
32, 44.1 or 48kHz are supported.
When Internal mode is selected 44.1 or 48kHz are
supported
Double Rate:
88.2 or 96kHz are supported.
Clock Master
Select the Clock source for the complete Mainframe,
including all Engines and all I/O’s.
The system will lock to and reject jitter at any Sample Rate
between:
•
•
•
•
•
30 - 34kHz
42.5 - 45.5kHz
46.5 - 48.5kHz
85 - 91kHz
93 - 97kHz
Sample Slip
Monitors the clock status of the incoming AES/EBU
inputs and indicates whether the incoming Clock is in sync
with the mainframe Clock settings. Three states of
incoming clock can be indicated.
Locked
The Input is in Sync with the Mainframe.
Sample Slip
The Input is out of sync with the Mainframe. Check that
there is only one Master Clock source in your setup.
Not Available
Indicates no connection available.
Select between:
Internal, Wordclock, AES 1-2, 3-4, 5-6 or 7-8.
A lock up to an external source will take up to 7 sec.
It is not necessary to have the physical input
routed to an Engine Input to have the clock accepted.
Internal Clock Rate
The internal Clock Rate can be set to 44.1 or 48kHz when
Clock Mode is set to Normal and 88.2 or 96kHz when
Clock Mode is set to Double.
33
operation
This page holds the User group parameters for all four
Engines. Selecting User group parameters is done from the
Engine pages. Values can be altered from both the Engine
Edit pages and the page displayed above. Press the
parameter you wish to assign to the Fader located below.
Detected Sample Rate
This is a read-only parameter indicating the actual incoming
Sample Rate. The tolerance of this detection is +/- 10Hz.
An incoming Sample Rate of 44.056kHz will be detected
as approx. 44.06kHz and the system indicates the Locked
Clock Rate 44.100kHz.
Frame
PAGE HEAD
system - main
SMPTE
Bank Mode
The Bank mode settings determine the destination bank
of the received program change on the specified MIDI
channels.
Normal mode:
This mode requires that the external sending MIDI device
can send both Controller 0 and 32 in addition to MIDI
program changes. This is an essential feature to recall
presets from a device holding more than 128 preset
location. (see table in next column for details)
Factory and User mode:
These modes will force any incoming program change
to access either Factory or User banks directly and are
typically used if your sending MIDI device cannot send
Controllers 0 and 32 as described above.
Basic Operation
• Press parameter to select and use Fader 6 to set value.
Reader Enabled
On/Off switch for the System 6000 SMPTE Reader.
Frame Rate
Range: 24 FPS, 25 FPS, 29.97 FPS,
30 Drop FPS, 30 FPS.
Running Status
The small field in the top left corner of the numeric display
will state “Running” when SMPTE clock is running.
MIDI Setup Page
Introduction
MIDI Channels
To recall presets for Scene, Routing and Engines 1 to 4
you must first setup individual MIDI channels for these
categories.
In the example above we have setup MIDI channels 1 to 4
for Engines 1 to 4 respectively; channel 5 to access Scene
presets and channel 6 to access Routing presets.
34
Normal mode
In Normal mode all banks can be accessed for program
changes. Bank selection is done via Ctrl 0 (MSB) and
Ctrl 32 (LSB):
• Controller 0 must be set to 0 in all cases.
• Controller 32 value must match the bank number you
wish to address according to the table below.
Ctrl
Ctrl
Ctrl
Ctrl
Ctrl
Ctrl
Ctrl
Ctrl
Ctrl
Ctrl
Ctrl
Ctrl
Ctrl
Ctrl
32
32
32
32
32
32
32
32
32
32
32
32
32
32
value
value
value
value
value
value
value
value
value
value
value
value
value
value
0 -
1 -
2 -
3 -
4 -
5 -
6 -
7 -
8 -
9 -
10 -
11 -
12 -
13 -
F1: F2: F3: F4: F5: F6: F7: F8: F9: F10: F11:
F12:
F13:
F14: Reverb A (Music Stereo)
Reverb B (Music Stereo)
Reverb (Music Surround)
Reserved
Reverb A (Film Stereo)
Reverb B (Film Stereo)
Reserved
Reverb (Film Surround)
Reserved
Mastering
Reserved
Pitch & Delay
Reserved
M5000 Presets
Ctrl 32 value 32 -
User bank
Ctrl 32 value 64 -
Ctrl 32 value 65 -
Ctrl 32 value 66 -
-
Ctrl 32 value 73 -
Card Bank 1
Card Bank 2
Card Bank 3
-
-
Card Bank 10
Example:
You wish to recall preset 10 from the Reverb (Music
Surround) bank. According to the table above:
• Set Ctrl 0 to “0” and Ctrl 32 to “2” and send program
change no 10.
SysEx Device ID
Range: 0 to 126
Select SysEx ID for the Mainframe.
MIDI Control Page
MIDI Dump Page
On MIDI Control Page the following options are
available:
Pressing these command buttons will dump the
current settings as SysEx messages to the MIDI Out
port of the Mainframe.
Read Program Change
Select whether the Frame should read incoming program
changes or not.
If connected to a MIDI sequencing device it is then
possible to store/recall current settings as part of your
sequencing project or as backup handling via MIDI.
Send Program Change
Select whether the Frame should send program changes to
MIDI out when presets are recalled via TC Icon or the TC
Icon Software editor.
Read Control Change
Select whether the Frame should Read Control Changes
messages.
Send Control Change
Options here are Single (7 bit) or Double (14 bit) precision.
Dump Scene
Press to dump the current scene to MIDI.
Scene presets include all current Routing and Engine
presets.
Dump Routing
Press to dump only the current Routing to MIDI.
No Engine settings are dumped.
Dump E1-4
Read SysEx - Send SysEx
Press to dump all currently loaded Engine settings to MIDI.
Presets loaded in all 4 Engines are included.
These two parameters determine whether the Frame
should read and send SysEx.
Dump E1, Dump E2, Dump E3 & Dump E4
These four keys are used to dump currently loaded preset
from a single Engine to MIDI.
35
operation
PAGE- HEAD
Frame system
main
PAGE HEAD
Frame
system - main
External MIDI Control - of Fader Parameters
From software version 2.5, all fader assignable parameters can be remote controlled via MIDI Control Change Messages.
To be able to control Faders you must create a dedicated Fader User Group holding these parameters. Page 20 in this
manual section explains how to create User Fader Groups.
Single Precision - Double Precision
We support both single (7bit) and double precision (14 bit) Controller Data, but you should notice that best resolution is
achieved using 14 bit Controller Data. By controlling parameters with Single precision you will be able to control in 128
steps for a complete parameter range. For most applications this will be quite fine and this is also the precision most
external controllers and especially sequencers support. This is called 7 bit precision.
However, System 6000 supports the 14 bit precision standard that has a considerably higher resolution: 128x128=16384
steps.
To achieve this resolution via an external fader control the external controlling device must be able to handle two
controllers at the same time on the same MIDI channel. The scheme below shows which controllers to assign to which
Faders for both Single Precision and Double Precision situations.
Single precision:
FADER
FADER
FADER
FADER
FADER
FADER
1
2
3
4
5
6
MIDI
MIDI
MIDI
MIDI
MIDI
MIDI
CC
CC
CC
CC
CC
CC
70
71
72
73
74
75
Sound
Sound
Sound
Sound
Sound
Sound
Controller
Controller
Controller
Controller
Controller
Controller
1
2
3
4
5
6
Double precision, LSB:
(Note that both LSB and MSB must be sent for double precision)
FADER 1 MIDI CC
48
General Purpose Controller
FADER 2
MIDI CC
49
General Purpose Controller
FADER 3
MIDI CC
50
General Purpose Controller
FADER 4
MIDI CC
51
General Purpose Controller
FADER 5
MIDI CC 52
Undefined
FADER 6
MIDI CC
53
Undefined
#1
#2
#3
#4
Double precision, MSB
(Note that both LSB and MSB must be sent for double precision)
FADER 1 MIDI CC
16
General Purpose Controller
FADER 2
MIDI CC
17
General Purpose Controller
FADER 3
MIDI CC
18
General Purpose Controller
FADER 4
MIDI CC
19
General Purpose Controller
FADER 5
MIDI CC
20
Undefined
FADER 6
MIDI CC 21
Undefined
#1
#2
#3
#4
MSB value indicates the actual double parameter change. So sending a LSB will not change
the value, but only cache this value for later use when receiving the MSB part.
The LSB must therefore be sent before the MSB.
36
PAGE- HEAD
Frame system
main
Setting up
Make sure to select MIDI channel settings corresponding
to the channels your external controller is using for each
Engine. This is setup in the MIDI Setup page.
How to record/playback MIDI data into/from DigiDesign
Protools 5.x ?
Recording
• On the TC Icon go to the Frame/System/Main/MIDI page, and set up the Send/Receive parameters as follows:
Send CC : ON
Receive CC : OFF
The following example explains how to avoid this on a
Protools System. If you are using other systems you should
look for similar features or use the feature introduced in
System 6000 Software version 2.5 (see below):
Example
• In DigiDesign Protools in the MIDI menu you disable MIDI
THRU. This way when the track is record enabled, the
incoming events are not echoed to the Output.
• In case your sequencer or MIDI data recorder does not
offer the possibility to mute the track while recording
you can use a new feature to avoid a MIDI loop with the
System 6000.
The new function is added to System 6000 software
version 2.5 and is located on the System/MIDI page.
The controls used are called Read/Send-Control/Program
Changes, and determines whether you want to send, or
receive MIDI Control Change/Program Changes.
This is especially helpful, in case you are using the
ICON faders to record the MIDI CC data to your external
application.
Playing Back
• On the TC Icon go to the Frame/System/Main/MIDI page, and set up the Send/Receive parameters as follows:
Send CC : OFF
Receive CC : ON
• Play back
For more info on MIDI recording in Protools, please
refer to your Protools Manual and Digidesign.
See previous page for overview of Single and Double
precision controller numbers.
37
operation
A few things to take into consideration when using the TC
Icon Faders to record automation into your sequencer:
Make sure that the record enabled MIDI track does not
echo back the MIDI Input to the System 6000. Otherwise
the System 6000 will receive double MIDI CC values, which
creates a MIDI loop and un-smooth automation data.
• Make sure that in the Protools MIDI menu, the MIDI
THRU function is disabled to avoid a MIDI loop while in
recording mode (as explained in the previous column).
• Make sure you have your MIDI Input devices correctly
configured in Protools. Set MIDI Thru to OFF in the MIDI
menu.
• Create new MIDI Track
• Set the MIDI Output channel of that track in the Mixer
window
• Add New MIDI controllers, and choose the right
Controller numbers from the list (see next page)
• Record the MIDI automation data using the Icon faders
or external MIDI faders/knobs
PAGE HEAD
Frame
system - main
Net
Error Indication
Software versions
Current installed software versions.
Network Identifier
Press the field “Network Identifier” to enter a name for the
Mainframe. This is the global TC network name for the
frame. By giving the frame a specific name it will be easier
to identify the frame when hooked up in a network with
several frames.
IP- address
The IP address for the Mainframe.
The first three numbers must be identical for all items in the
network and the last number must be unique.
Example
The TC Icon default address is
: 192.168.1.125
The M6000 default address is
: 192.168.1.xx
- where “xx” per default is the last two digits in the frames
serial number.
Please note that if the first three numbers are
altered on the Frame, the TC Icon is unable to
detect and “see” the Frame.
38
If “no Lock” is acheived or “Sample Slip” situations occur
this will be indicated via the small red dot in top of the
Frame Tab.
Press the Frame Tab and you will be guided to the exact
page where you can correct or compensate for these
situations. Simply press the “red” tabs.
Frame System
PAGE HEAD
- I/O
Via the I/O page the following operations are handled:
• Settings for the DSP card
• Settings for up to three I/O cards
• Labeling of all physical Input and Output channels
I/O - DSP
Basic operation
If more than one mainframe is connected:
• Press the Icon symbol in the upper left corner to enter the Select & Setup pages
• Select which mainframe you wish to setup
• Press the Icon symbol once again and and select System - I/O as illustrated above
I/O - SETUP
The following Setup page will appear in: Frame/
System/I/O/Setup when an AES-8 card is installed.
Status Bit
Status bit information can be set separately for each of the
AES Outputs.
operation
Options are:
AES/EBU :Professional usage of Status bits.
S/PDIF
: Consumer usage of Status bits.
Dither
Range: Off, 24, 20, 18, 16, 8
Dither is set for truncation to match the receiving device.
Clock Status - Sample Slip Detection
Input 1-2, Input 3-4, Input 5-6, Input 7-8
Input 9-10, Input 11-12, Input 13-14, Input 15-16 The graphics are based on the card DIP switch
settings, and may not reflect the physical back panel
of the frame.
Analog Input - Digital Input
With an AES-8 card installed in a Mainframe, you must
select whether Input channels 9 through 16 should be
digital or analog.
When Digital Input is selected:
Input channels 9-16 will be the AES-8 card.
When Analog Input is selected:
Only analog Inputs are available!
If an ADA-24/96 card is installed in slot A analog Input
channels 9-10 are available.
If ADA 24/96 cards are installed in both slot A and C,
analog Input channels 9-10 and 13-14 are available.
Monitors the Clock status of the incoming AES/EBU
Inputs and indicates whether the incoming Clock is in sync
with the mainframe Clock settings. Three states of
incoming clock can be indicated.
Locked
The Input is in sync with he Mainframe.
Sync Error (Red)
The Input is or has been out of sync with the mainframe.
Press the Reset key to see if Sample Slips are still
occurring. - If so - Check that there is only one Master
Clock source in your setup. This monitoring function is
excellent when trying to determine which connected device
is out of sync.
No Input
Indicates no connection available.
Please note the following:
• No Inputs on the AES-8 card are available when analog Input is selected.
• Digital Input must be selected to activate AES-8 card Input channels 9-16 even if no ADA 24/96 cards are present.
• Outputs 9-16 are always available. If ADA-24/96 cards are installed, they will output simultaneously with the AES-8 Outputs on channel 9-10 (Slot A) and 13-14 (Slot C).
39
PAGE HEAD
Frame
system - I/O
I/O - Slot A, B & C
This is where you setup card specific parameters.
Parameters are only available when a I/O Card is detected.
For the ADA 24/96 card the following parameters
can be set.
Output, pin 2 selected
Pin 2 hot, pin 3 connected to reference (shield) at the Input
of downstream device. In this mode pin 3 acts as a
reference Input for the ADA2496 Output stage and should
not be left un-terminated.
This mode will not work properly with balanced
inputs unless wiring is compensated as described. If
wired properly, this is the optimum output mode for
feeding unbalanced devices.
Output, pin 3 selected
Pin 3 hot, pin 2 not needed. In this mode pin 2 and pin 1
carry the same output reference.
This works with balanced inputs using 1:1 wiring,
but balanced mode should be selected if driving a
balanced input.
Filters
Level In
Changes the analog nominal Input level between +6dBu
and +30dBu in 6dB increments.
The analog Input level enables you to match the M6000
Input to the Output of e.g. your mixer. If the nominal
operating level on your mixer is e.g. +4dBu and you select
+12dBu on the Level In parameter you will have a
headroom of 8dB. If you select +16dBu in the Level In the
headroom will be +12dB, and so forth.
Level Out
Changes the analog output level between +6dBu and
+24dBu in 6dB increments.
Output Connection
Select the type of connection you are using on the Output
of the card. Select between:
Balanced or unbalanced (with signal on pin 2 or pin 3).
If you are connecting unbalanced cables to the
Outputs when Outmode is set to “Balanced”,
the Outputs will be muted/un-muted
sequentially via a gold-plated short circuit
protection relay. This is intentional and will not
cause damage to any device.
When operating the mainframe in normal Sample Rates
(32 - 48kHz) you can select different down- and
up-sampling filter types. The AD and DA conversions are
always performed in high-sample domain (88.2 to 96kHz).
Afterwards the digital down- and up-sampling is performed
in the digital domain using a local DSP on the ADA24/96
card. Select filter type according to the source material you
are working on.
Filters
Chose between - Linear, Natural, Vintage, Bright and
Standard (Std).
“Linear” filter
These filters are linear-phase and non-aliasing (the
stop-band starts below the Nyquist frequency).
The pass-band response is extremely smooth and
non-equiripple, extending beyond 20kHz. With the “Linear”
filters you’ll have a hard time discriminating between the
sound of the conversion chain and direct analog, even at
44.1kHz!
“Natural” filter
Based on the “Linear” filter class, but with a carefully
adjusted non-linear phase response, these filters obtain
an almost “better-than-live” reproduction of space while
retaining crystal-clear imaging and absolute tonal neutrality.
The “Natural” filters too are non-aliasing.
Balanced/Unbalanced Operation
“Vintage” filter
Some mastering studios prefer unbalanced wiring.
Please read these notes for optimum performance.
Preferably, balanced cables should be used on Inputs and
Outputs even for unbalanced setups.
Based on the “Natural” filters, here we’ve added a bit
of warmth and roundness to the treble by introducing a
smoother “tube like” roll-off. This filter would be an
exceptionally good choice when mastering material that
seems too hard in the high-end frequencies.
These filters too are non-aliasing and non-linear phase.
Unbalanced operation
Input
Pin 2 hot, pin 3 connected to reference (shield) at the
Output of upstream device.
40
Frame system
PAGE HEAD
- I/O
“Bright” filter
These filters are something entirely different: Ultra-short
impulse response, linear phase and quite a bit of deliberate
aliasing produces a “digital” and slightly aggressive sound
adding plenty of top-end life to e.g. Rock and Techno
recordings, or giving you the feeling of air you need when
you are mastering a somewhat dark sounding source
material.
“Standard” filter
This filter emulates the response of typical mid-end
converters: Equiripple half-band filters that are precisely
6dB down at the Nyquist frequency.
Please note the following:
• No Inputs on the AES-8 card are available when analog Input is selected.
• Digital Input must be selected to activate AES-8 card Input channels 9-16 even if no ADA 24/96 cards are present.
• Outputs 9-16 are always available. If ADA-24/96 cards are installed, they will output simultaneously with the AES-8 Outputs on channel 9-10 (Slot A) and 13-14 (Slot C).
I/O - Labels
These filters are available in 44.1 and 48kHz.
Softclip
The Softclip algorithm runs in the 96kHz domain right after
the AD conversion before the down-sampling filter.
Slot B with an AES-8 card installed
The following Setup page will appear in:
Frame/System/I/O/Setup when an AES-8 card is
installed.
All physical Inputs and Outputs can be named/renamed.
Enter the Titles page by pressing the tabs System and
Titles. Press any of the 16 Inputs/Outputs and the Naming
display will pop up. Enter adequate name for the Input/
Output and press Enter.
The names will be displayed on the Frame-Routing page.
The I/O Labels are global and are not stored or
recalled at any preset level.
Analog Input - Digital Input
With an AES-8 card installed in a Mainframe, you must
select whether Input channels 9 through 16 should be
digital or analog.
When Digital Input is selected:
Input channels 9-16 will be the AES-8 card.
When Analog Input is selected:
Only analog Inputs are available!
If an ADA-24/96 card is installed in slot A analog Input
channels 9-10 are available.
If ADA 24/96 cards are installed in both slot A and C,
analog Input channels 9-10 and 13-14 are available.
41
operation
AES-8 Card
PAGE HEAD
Frame
system - Licenses
Licenses
The System 6000 holds numerous algorithms as a part of
the standard package. Various other algorithms are
available. These algorithms require purchasing of Licenses.
The License types and their status (active/inactive )
available with the installed software are listed under
“License Type”. (see above)
To try out one or more of the licenses a time limited Demo
Key can be achieved by contacting TC Electronic.
Press the Get Demo Key and follow the instructions.
42
EnginePAGE
Edit HEAD
Page
Name of the currently
recalled preset
Library Frame and Engine Selectors
Overflow
Indication
Input
Meters
Parameter
Pages
Link key
Output
Meters
Fine Adjust
Mode
The Engine 1-4 Edit Pages
This is where you edit algorithm parameters.Parameters
in several algorithms are distributed on different pages. As
illustrated above the MD 5.1 has 6 pages: Main, Setup,
Expander, Compressor, Limiter and Output. Depending of
the quantity of parameters represented in the groups one
or more groups will be displayed.
Basic operation
•
•
•
•
Press E1 to E4 to select Engine. Parameters for the recalled algorithms are instantly available for editing.
Select a parameter group. In the example above - a MD 5.1 algorithm - the groups are Main, Setup, Expander, Compressor, Limiter and Output.
All parameters are assigned to the Fader Groups. Select Fader Group using the Fader Group selector.
Press any parameter and it is assigned to Fader 6.
Overflow Indication
If internal overflow occurs this will be indicated on the
Frame and Engine Tabs via a red LED.
Fader Group
Parameters/
Value fields
Fader User Group - Assign key
By pressing the Fader Group Selector Up key you enter
the User group. In this group you can assign any
parameter to any Fader. The User Fader group is stored
with a preset.
• Press the Link key.
• Select the Fader you wish to link a parameter to, by pressing the field just above the fader.
• Press the parameter you wish to link to the selected fader.
Bypass
The Bypass key will respond in different ways depending
on the recalled algorithm. See specific algorithm description.
In some algorithms the Bypass will work as a mute
function.
Naming a Preset
•
•
•
Press the Name field. A keyboard will pop up.
(See the “Naming display” section).
Type in the new name.
Press Enter.
Parameter value - Fine Adjust
Any parameter value can be adjusted in two accuracies.
A Normal and a Fine Adjust - mode. To switch between the
two modes press the Value Fields above the faders.
As shown in the illustration the Fine Adjust mode will be
indicated with two triangles in the value field.
43
operation
Fader Group
Selector
PAGE HEAD
Icon
Setup Page
Icon User Interface
Sticky Clip
Go to the Select & Setup pages pressing the TC Icon
key in the upper left corner.
Meter Clip Indicators
If the Sticky Clip function is activated the Internal Overload
LED on the Frame Routing page will stay lit once activated
until Reset Clip on the Frame Routing page is pressed.
Press SETUP (upper tab) and UI (side tab) to enter the
setup page for the TC Icon display.
TC Icon Display Parameters
In this display you setup various parameters regarding
the appearance of the display as well as the Fader Touch
Sensitivity.
Icon Color Scheme
Display Brightness
Adjust the brightness of the display using either the Arrow
cursors or simply drag the “Adjust handle”.
Show Mouse Cursor
Press to show mouse/pointer position.
Calibrate Display Touch
For optimal performance the Touch Screen will at times
need to be calibrated. Press and follow instructions to
Calibrate the Touch Screen.
Fader Sensitivity
To avoid accidental movement of the faders they are
sensitive to humidity and will only respond when touched
by your skin.
Enable Fader Touch
Enables touch sensitivity of the Faders.
AC/DC Sensitivity
Sets the Faders sensitivity to AC and DC. Adjust these
handles to achieve optimal performance in your
environment.
44
Color Scheme
Select the Color scheme of your choice. Depending on the
surrounding light conditions different schemes may be
more appropriate than others.
PAGESMPTE
HEAD
Auto Edit Page
Cursor
The white triangular cursor always indicates the current
clock position in relation to the Event List.
Event Parameters
For each Event the following parameters are available.
Time -
Device -
Event
-
indicates the SMPTE time at which the Event takes place.
indicating on which Device Mainframe the Event is taking place. Device numbers 1-8, corresponds to the Device position at the Select page.
states the occurring Event at the given time.
Follow
In the Auto Edit page all automation Events are listed and
handled.
Alternates between scrolling the event list and keeping the
current event at a fixed place in the screen.
Modify
Press to save the Event List locally on the Icon. It is possible
to save one Event List on the Icon. Additional cue-lists
can be stored and recalled on a PCMCIA card or on a
computer connected via ethernet.
The Keep key will turn red as soon as any editing of the list
has taken place, indicating that you must press to save the
list.
This key corresponds/is the same, as the Keep key located
on the File page. (see following page)
Press this key to access Event parameters for the currently
selected Event. (see further description below)
Insert
Press to insert an Event (see further description below)
operation
Keep
Delete
Press to delete the selected Event.
Modify/Insert - Edit
Write
When enabled any program change is written to the
SMPTE Event List. This can be. e.g Engine, Routing or
Scene recalls.
Read
When enabled the Event list will be executed according to
incoming SMPTE clock. Read and Write functions can be
activated simultaneously.
General Read and Write status is given in the
Icon Tab in the left corner.
Save
Press to save the Event list. The Save key will turn red as
soon as any editing of the list has taken place, indicating
that you must press to save the list.
This key corresponds/is the same, as the Save key located
on the file page. (see next page)
Be aware that until Save is pressed Edited
SMPTE information is not yet stored in the Event list.
For convenient indication the Save key will be red as
soon as any alteration of the current Event list is present.
Event Settings
Operation
•
•
•
To access Event settings press Modify in the Edit page.
Setup all parameters for the Event you are about to Modify or Insert.
Press OK to confirm.
Time
The time where the Event being Modified or Inserted
is taking place.
45
PAGE HEAD
Smpte
Step/Adjust
Range: Frame, 1 Second, 10 Seconds, 1 min.,
10 min. or 1 hour.
Use the Step parameter to select Adjust range and the
Adjust parameter to increase/decrease the time.
Device
This parameter selects which Mainframe connected to the
LAN you are working on. Device numbers 1-8, corresponds
to the Device position at the Select page.
Preset Type
Selects whether the preset Event you are working on is a
Scene, Routing, Engine or a System preset.
Remote device disk drive
Event lists can easily be organized and saved to a
PCMCIA card in the Mainframe.
Mainframe selection is done in the Auto Edit page.
Get List
Press to get a list of all SMPTE Event lists stored on the
PCMCIA card located in the Mainframe.
New
Press New to create and name a new Event list on the
PCMCIA card in the Mainframe.
Save
Bank
Press to save the current Event list to the card.
Select the bank related to the preset you are about to
setup/recall via SMPTE.
Load
Preset
Select the preset from the selected bank
File
Press to load Event list from card.
Delete
Press to delete selected Event preset from the
Event Preset list.
Options
Current List
Keep
Press to save the Event List locally on the Icon. It is possible
to save one Event List on the Icon.
The Keep key will turn red as soon as any editing of the list
has taken place, indicating that you must press to save the
list.
This key corresponds/is the same, as the Keep key located
on the Edit page. (see previous page)
Revert
This “Undo” function allows you to revert the to the last
saved SMPTE Event list. This is the List that is stored
locally on the TC Icon.
Clear
Press Clear to delete the entire SMPTE Event list present
in the TC Icon.
46
Automation Timecode Options
Master Sync Device
Select which of the Mainframes connected on the LAN you
wish to act as Master Clock.
Start Of Daytime
Range: 23:00:00:.00 or 00:00:00:00
If the SMPTE time code present on your tape media or film
does not start exactly at the beginning of the tape the
23:00:00:00 setting would be a good choice to keep
chronological order in the Event List.
TC Icon Software
Editor
HEAD
PAGE
The TC Icon Software Editor is a fully operational
software remote control for the System 6000
Faders at bottom
All functions available via the TC Icon hardware version are
also available via the Software Editor.
A network adapter must be installed in your computer for
connection to a Mainframe.
To install the TC Icon Software Editor, please follow the
instructions in the Hardware & Installation chapter.
The Hardware & Installation chapter also explains how to
setup TCP/IP addresses etc.
operation
Fader at right side
No faders
UI - Icon Views
On the Icon Setup page two sub-pages are available
for controlling the TC Icon appearance.
Fader appearance
Three options are available. Changes will take place next
time you open the TC Icon.
For better overview over several engines you can
open more instances of the Icon Editor and place
them next to each other.
On PC computers you simply click several times on
the Icon file to open more instances.
On Mac computers you will first need to copy the
Icon file a number of times and rename it e.g.
Icon1, Icon2 etc. Then open each instance.
47
Controlling more than 8 Frames
It is possible to control up to 32 System 6000 MKII Mainframes using
four instances of the TC Icon Editor on a PC*.
To do so, follow these steps:
- Place the TC Icon exe file on your desktop if it is not already there.
- Create three shortcuts to the Icon.exe file and rename each instance.
E.g. Icon 1, Icon 2 etc.
- Then right-click on each shortcut and enter the following lines in “Target”:
“C:\Documents and Settings\MYPC\Desktop\Icon.exe” \instance=1
“C:\Documents and Settings\MYPC\Desktop\Icon.exe” \instance=2
* Not available on Mac
48
PAGE HEAD
Room
Simulation For Multichannel Music And Film
Introduction
For more than 10 years TC Electronic has put considerable
research resources into perfecting digital room simulation.
Our achievements have been made possible by combining
scientific room models with intensive listening tests and
perceptual adjustments.
This is also the case with the VSS5.1 room simulator
which is the crown jewel of the algorithms included with
System 6000.
For this specific research project, the work started in 1995
on powerful Silicon Graphics computers, so we could ready
ourselves for today with plenty of real-time DSP power
available. Some of our work was made public in an AES
paper written in April 1999 and published September at
AES in New York City.
The unique combination of objective tests and scientific
modeling described has won acceptance in our industry
and is now the angle generally used for finding the right
balance between emotional impact, controllability and
range of credible results.
VSS5.1 covers from natural over super-natural to wild, wild
spaces.
Room Simulation
for Multichannel Film and Music
Presented at the AES 107th Convention, New York, NY,
1999 September 24-27. Republished with permission
from the AES, www.aes.org
KNUD BANK CHRISTENSEN AND THOMAS LUND
TC Electronic A/S
Sindalsvej 34,
DK-8240 Risskov,
DENMARK
To fully exploit new Reverb and Spatial algorithms for
5.1 and 7.1 environments in music and film, effect mixing
procedures may have to be changed slightly.
The paper will describe production techniques for
positioning of sources and listener in virtual rooms, and an
algorithm structure to achieve this.
0. INTRODUCTION
Typical production techniques involve only one or two
inputs to the room simulation system, thereby limiting the
precision of source positioning to be only a matter of send
level differences and power panning. This “one source one listener” model is not very satisfying when producing
for mono or stereo, but even worse when the reproduction
system is multichannel.
Multichannel recording and reproduction is an opportunity
for the production engineer to discriminate deliberately
between scenes or instruments heard from a distance, and
sources directly engaging the listener.
For film work, engaging audio has a very pronounced effect
for stimulating the viewer emotionally, and may therefore
significantly add to the illusion presented by the picture.
In the search of more authenticity in artificial room
generation, long term studies of natural early reflection
patterns have led us to propose new production and
algorithm techniques. Using ray tracing in conjunction with
careful adjustments by ear, we have achieved simulation
models with higher naturalness and flexibility, which is the
basis of true source positioning.
The paper will discuss two aspects of precise room
simulation for multi source, multichannel environments to
cover distant and engaged listening:
• Present different production techniques
• Describe an algorithm structure to achieve the objectives
1. SINGLE SOURCE REVERB
By having only one or two inputs in a room simulator,
the rendering is based upon multiple sources sharing the
same early reflection pattern, and therefore it is not really
convincing.
In the real world, all actors or instruments are not piled up
on top of each other.
50
Room simulation for multichannel music
PAGE
andHEAD
film
In many studios, one good reverb is used to render the
basic environment of a particular mix. One aux send, set at
different levels on the different channels, is used to obtain
depth and some complexity in the sound image.
To obtain a sound image of a higher complexity and depth,
several aux’s and reverbs have normally been used.
for home (110 degree surround speakers) and theatre (side
array surround speakers) reproduction.
The room simulator should also be flexible enough to easily
adopt to new multichannel formats, e.g. the Dolby EX
scheme.
Tuning of the levels, pans and reverb parameters in such a
setup may be very time-consuming.
By changing the production technique slightly, multiple
sends from e.g. the aux’s, Group busses or Direct outs of
the mixing console can be used to define several discreet
positions as inputs to the room simulation system.
For effect purposes, anything goes, but if the goal is a
representation of a natural room or a consistent rendering
of a virtual room, it may be hard to achieve using
conventional reverbs.
From a production point of view, multiple source room
simulation can be configured two ways, as described
below. Any large scale console build for stereo production
can adapt to both routing schemes.
1.2 Film and Post Production
2.1 The Additive Approach
For applications where picture is added to the sound,
several psychological studies have proven audio to be
better at generating entertainment pleasure and emotions
than visual inputs. When it comes to counting neurological
synapses to the brain, vision has long been known to
be our dominant input source. However, a study by Karl
Küpfmüller [4] has suggested, that stimulation of even our
conscious mind is almost equally well achieved from visual
compared to auditive inputs.
Sense
No of Synapses
Eye 10.000.000
Ear
100.000
Skin 1.000.000
Smell 100.000
Taste 1.000
Stimulation of conscious mind [4]
Conscious Input, bps
40
30
5
1
1
Realism in audio is just as important when it is
accompanied by picture.
In multichannel work for film, several reverbs configured as
mono in - mono out are often used on discrete sources. By
doing so, the direct sound and the diffused field are easy
to position in the surround environment. The technique
is therefore especially effective for point source distance
simulation.
As an alternative, several stereo reverbs are used on
the same sources to achieve a number of de-correlated
outputs routed to different reproduction channels.
With both approaches, adjustments can be very
time-consuming, and a truly engaging listening experience
is difficult to achieve.
2. MULTIPLE SOURCE ROOM SIMULATION
To obtain the most natural sounding and precise room
simulation, an artificial reverb system should be based
upon positioning of multiple sources in a virtual room. Each
source should have individual early reflection properties
with regards to timing, direction, filtering and level.
We have found this to be true for both stereo and
multichannel presentations.
If the target format is 5.1, at least two directional
configurations should exist in the room simulator, namely
The conventional approach to reverb is additive. Dry
signals are fed to the reverb system, and wet-only signals
are returned and added at the mixer.
With a multiple input room simulator, this configuration
works much better than with an single source reverb,
because at least each source can be approximated to fit
the nearest position rendered. However, normal power
panning still needs to be applied in the mixer.
An even more precise rendering can be achieved using the
integrated approach described below.
2.2 The Integrated Positioning Approach
The sources in a mix needing the most precise positioning
and room simulation, should be treated this way:
The source is completely positioned and rendered into
a precise position by passing the dry signal through the
simulation system, from which a composite output from a
number of source positions are available.
XY positioning to any target format, stereo or multichannel,
will be rendered as a best fit. The positioning parameters
(replacing conventional power panning) can be controlled
from a screen, a joystick or discrete X and Y controls.
With all positioning done in the room simulator, consoles
made for stereo production may thereby overcome some of
their limitations.
3. ALGORITHM STRUCTURE
This part of our paper describes a generic algorithm
currently in use for Multichannel Room Simulator
development. It is not a description of any particular
present or future product, but rather a presentation of the
framework and way-of-thinking that has produced our latest
Room Simulation products and is expected to produce
more in the future.
3.1 Design conditions
The overall system requirements can be stated as follows:
• The system must be able to produce a natural-sounding simulation of a number of sources in acoustic environments ranging from “phone-booth” to “canyon”
51
In depth
1.1 Music Production
PAGE HEAD
Room
simulation for multichannel music and film
• The system should not be limited to simulating natural acoustics: Often quite unnatural reverb effects are desired, e.g. for pop music or science fiction film effects.
• The system should be able to render the simulation via a number of different reproduction setups, e.g. 5.1, 7.1, stereo etc.
• The system should be modular so that new rooms, new source positions in existing rooms, new source types or new target reproduction setups can be added with
minimal change to existing elements.
• The system should be easily tuneable: In our experience, no semi-automatic physical modeling scheme, however elaborate, is likely to produce subjective results as good as those obtained by skilled people tuning a user-friendly, interactive development prototype by ear.
Fortunately there are a few factors that make the job easier
for us:
• There are no strict requirements for simulation accuracy: Certainly not physical accuracy (the sound field around the listener’s head), and not even perceptual accuracy (the listener’s mental image of the simulated event and environment). The listener has no way of A/B switching between the simulation and the real thing, so only
credibility and predictability counts: The simulation must not in any way sound artificial, unless intended to, and the perceived room geometries and source positions should be relatively, but not absolutely, accurate.
• Moore’s Law is with us. The continual exponential growth in memory and calculation capacity available within a given budget frame has two effects: It constantly expands the practical limits for algorithm complexity, and it makes it increasingly feasible to trade in a bit of code overhead for improved modularity, tuneability, etc.
• There are physical modeling systems readily available, which may provide a starting point for the simulation.
3.2 Block diagram
The overall block diagram of the Room Simulator is shown
in fig. 1. As often seen, the system is divided into two main
paths: An early reflections synthesis system consisting
of a so-called Early Pattern Generator (EPG) for each
source and a common Direction Rendering Unit (DRU)
that renders the early reflections through the chosen
reproduction setup. And a Reverb system producing the
late, diffuse part of the sound field. Note that - contrary to
what is normally the case - there is no direct signal path.
The dry source signals are merely 0th order reflections
produced by their respective EPGs. In the following, a
more detailed description of the individual blocks is given.
3.3 Early Pattern Generators
Each EPG takes one dry source input and produces a
large set of early reflections, including the direct signal,
sorted and processed in the following “dimensions”
• Level
• Delay
• Diffusion
• Color
• Direction
The Level and Delay dimensions are easily implemented
52
with high precision, the other 3 dimensions are each
quantized into a number of predefined steps, for instance
12 different directions. Normally, the direct signal will not
be subjected to Diffusion or Color. The quantization and
step definition of the Direction dimension must be the same
for all sources, because it is implemented in the common
Direction Rendering Unit. Physical modeling programs such
as Odeon [1] may provide an initial setting of the EPG.
3.4 Direction Rendering Unit
The purpose of this unit is to render a number of inputs
to an equal number of different, predefined subjective
directions-of-arrival at the listening position via the chosen
reproduction setup, typically a 5-channel speaker system.
Thus, the DRU may be a simple, general panning matrix,
a VBAP [2] system or an HRTF- or Ambisonics-based [3]
system.
3.5 Reverb Feed Matrix
The reverb feed matrix determines each source’s
contribution to each Reverberator input channel. Besides
gain and delay controls, some filtering may also be
beneficial here.
3.6 Reverberator
To ensure maximum de-correlation between output
channels, each has its own independent reverb “tail”
generator. Controllable parameters include:
Reverberation time as a function of frequency Tr(f)
• Diffusion
• Modulation
• Smoothness
We take particular pride in the fact that our “tail” can
achieve such smoothness in both time and frequency, and
that modulation may be omitted entirely. This eliminates the
risk of pitch distortion and even the slightest Doppler effect,
which tends to destroy focus of the individual sources in a
multichannel room simulator.
Again, an initial setting of Tr(f) may be obtained from
Odeon.
3.7 Speaker Control
This block is by default just a direct connection from input
to output. But it may also be used to check the stereo- and
mono compatibility of the final simulation result by applying
a down-mixing to these formats. Also it provides delay- and
gain compensation for non-uniform loudspeaker setups,
which may also - as a rough approximation - be used the
other way around to emulate non-uniform or misplaced
setups and thus check the simulation’s robustness to such
imperfections.
4. CONCLUSION
The system described above is evidently a very open
system under continual development. At the time of writing
these words, our test system is running in real time on a
multiprocessor SGI server with an 18-window graphical
user interface providing interactive access to approximately
2000 low- and higher-level parameters. However, this is
not the time or place to go into more details. When this
paper is presented at the 107th AES Convention in about
PAGE
Room simulation for multichannel music
andHEAD
film
4 months, we will have more real life experience with the
system.
If integrated positioning is used with multi-source room
simulation, our experiments have already shown how much
there is to gain in terms of realism and working speed. But
even with the less radical additive approach, virtual rooms
may be rendered more convincingly with multi-source
simulators.
For applications where picture is added to the sound, the
most stimulating source will be one, where audio and video
are treated with equal attention to quality and detail.
The new possibilities available from multi-source room
processors may be exploited to generate a real quality
improvement at the end listener, especially when his
reproduction system is multichannel.
More convincing sound generates more convincing picture.
REFERENCES
[1]http://www.dat.dtu.dk/~odeon/
[2] Ville Pulkki: “Virtual Sound Source Positioning Using Vector Base Amplitude Panning”, JAES Vol. 45, No. 6, pp. 456, 1997.
[3] Jérôme Daniel, Jean-Bernard Rault & Jean-Dominique Polack:
“Ambisonics Encoding of Other Audio Formats for Multiple Listening Conditions”, AES Preprint no. 4795, 1998.
[4] Küpfmüller, Karl: “Nachrichtenverarbeitung im Menschen”,
University of Darmstadt, 1975.
in depth
Fig 1
Overall block diagram of Room Simulation Algorithm
53
Sample
PAGE HEAD
Rate Conversion Filters - ADA 24/96
Sample Rate Conversion Filters
Introduction
The Delta-Sigma Converters of the ADA 24/96 operate
at 6.144MHz (48/96kHz sample rate) or 5.6448MHz
(44.1/88.2kHz) at the ends facing the analog world. But
the processing, transmission and storage of high-quality
audio material are often done at 48 or 44.1kHz. Conversion
to/from this low sample rate involves a series of digital
filters removing the signal components above one half the
sampling frequency (the Nyquist frequency) at all points
in the chain. The properties of the lowest filter stage
converting to/from 44.1 or 48kHz has profound influence
on sound quality, and getting down to 44.1kHz digital and
back to analog without severe loss of “air”, transparency
and spatial definition is usually considered impossible.
Furthermore, experience suggests that the optimum design
of this critical filter is program material dependent. And of
course there is always the matter of taste.
Therefore, when we designed the ADA 24/96, we did
not just do a careful circuit design around a set of
state-of-the-art 24-bit converter chips. We threw in the
powerful Motorola 56303 DSP chip as well, enabling us to
offer you a choice of different, carefully optimized filters for
the super-critical conversion stage from 96 to 48kHz.
The 5 different filter types described below have been
optimized individually for each of the two target sampling
rates (44.1 and 48kHz), enabling us to take full advantage
of the (comparatively) more relaxed design conditions at
48kHz. The optimization involved A/B comparison to a
direct analog transmission of live musical instruments.
Linear phase - non linear phase
When aiming for perfect sound reproduction, the best one
can hope for is a “straight wire”: Nothing added, nothing
removed and nothing changed. The output waveform is an
exact replica of the input waveform. In technical terms this
means
• Infinite signal-to-noise ratio and no distortion
• Linear phase response “from DC to light”.
• Dead flat magnitude response “from DC to light”
How does digital audio transmission and processing score
compared to this ideal?
• With state-of-the-art 24-bit converters and no-less-than 24-bit processing, the signal-to-noise ratio today is
sufficiently close to “infinite” and with proper dithering, distortion is no longer considered a problem, even at low levels.
•
Linear Phase is easily obtained: Perfect digital transmis-
sion is essentially just copying or storing and retrieving numbers, and if filtering is required, linear-phase FIR filters are the simplest kind.
54
• The Sampling Theorem puts a dramatic restraint on bandwidth: Any remaining signal components above the Nyquist frequency (only 22.05 kHz at 44.1 kHz sampling rate) turn into aliasing. Therefore the magnitude response has to drop sharply just above 20 kHz.
So far most designers of digital audio equipment have settled for 2 out of 3: Fought noise as best they could and kept the phase response linear. However, when the conditions change so dramatically from “Ideal” to “Having to give up on one goal out of three”, there’s no law saying that the other two goals don’t move! And - according to our experience - the linear-phase goal does indeed move!
Given the necessity of a sharp hi-cut filter, a perfectly linear
phase response is not optimal!
With a bit of mathematical and psycho-acoustical
reasoning, this is not surprising:
The sharp hi-cut filter is bound to add a lot of ringing to the
system’s impulse response. The phase response affects
the distribution of the ringing in time: Linear phase implies
a time-symmetric impulse response with equal amounts of
ringing before and after the actual impulse. Human hearing
is not time-symmetric, as anyone who has ever played a
tape backwards will know. On the other hand, we are not
insensitive to phase distortion either, so a compromise has
to be found.
The Filters
Through weeks of repeated listening tests and phase, as
well as magnitude response adjustments, we came up with
the Natural and Vintage filters that use slightly non-linear
phase responses.
The filters include some that are aliasing-free in the sense
that they achieve full attenuation at the Nyquist frequency
where aliasing starts to occur, as opposed to the cheaper
half-band filters often used, that are only 6 dB down at the
Nyquist please see fig. 1 and 2.
Fig. 1
Sample rate conversion filters PAGE
- adaHEAD
24/96
Fig. 2
Fig. 3 illustrates how attenuation is performed just above
FS/2 when operating at 48kHz sampling rate. As shown in
fig. 4 alias components will be reflected around FS/2 and
will disturb the high but still audible frequencies.
Fig. 3
96kHz Sampling
Attenuation of analog input signal vs frequency
LEVEL
-96dB
-120dB
-120dB
-144dB
FREQUENCY
in depth
96k
84k
72k
60k
48k
36k
24k
12k
DC
FREQUENCY
Note: Different downsampling
algorithms available
96k
-72dB
-96dB
84k
-72dB
72k
-48dB
Fs
96kHz
60k
-48dB
48k
-24dB
Fs/2
48kHz
36k
-24dB
-144dB
Fs/4
24kHz
0dBFS
24k
Fs
96kHz
12k
Fs/2
48kHz
0dBFS
DC
LEVEL
96kHz Sampling
Reproduced downsampled signal
Fig. 4
96kHz Sampling
Reproduced downsampled signal
uency
Fs
96kHz
LEVEL
Fs/4
24kHz
0dBFS
Fs/2
48kHz
Fs
96kHz
-24dB
-48dB
-72dB
Note: Different downsampling
algorithms available
-96dB
-120dB
96k
84k
72k
60k
48k
36k
24k
FREQUENCY
12k
-144dB
DC
96k
84k
QUENCY
55
Clock
PAGE HEAD
And Synchronization In System 6000
By Christian G. Frandsen
Introduction
This document will discuss the clock, synchronization and
interface design of TC System 6000 and deal with several
of the factors that must be considered when using a digital
studio. We will go through different aspects in this area e.g.
• What is jitter, what causes it and how is it removed on System 6000.
• Measurements comparing a conventional clock design to that of System 6000.
• Synchronization in digital audio studios in general.
The article is addressed to the users of System 6000 and
other high-end digital studio equipment. It is meant to
be a guide to an optimized digital studio setup. It is our
experience that many of the problems in a digital setup can
be solved by knowledge alone, so hopefully the document
will help to answer some of the questions and to clear
some of the typical misunderstandings relating to timing
and clock generation.
Quality of AD and DA conversion
When designing System 6000 and its ADA24/94
analog conversion card we looked carefully at a lot of
parameters in order to reach the highest possible overall
performance…
•
•
•
•
•
•
•
•
•
Frequency response
Distortion
Noise
Crosstalk
Common mode signals
Alias filtering
Jitter
Analog domain pre/post scaling of converters
Analog outputs optimized for balanced as well as unbalanced operation
After AD conversion, the analog signal is represented
only as a level and timing component. Lack of precision
in either area is detrimential to the process, so talking
about a converter being “20” or even “24” bit provides very
little information if the timing source is not equally well
quantified.
What is jitter?
Jitter is the variation in time of a clock signal from the ideal.
The amount and rate of the variation are the important
parameters. Research made through the last years
suggests that variations faster than 500 Hz are the most
audible [1]. If you are not familiar with the jitter terminology
it is important to notice that the sampling frequency (Fs)
could be 48.000 kHz (or maybe 256 times Fs equals
12.288 MHz) and that it is the variation of this clock that
has to be faster than 500Hz.
56
Jitter performance is measured in seconds and a typical
value could be in the area of 100 ps peak to 50 ns peak
(jitter is also often measured in peak to peak or RMS). The
typical jitter frequency spectrum tends to be low frequency
weighted.
Clock wander (clock frequency change over long time) is
also a kind of jitter but is so slow that it probably hasn’t got
a direct influence on the sound. Clock wander is typically
due to temperature change and aging of the clock crystals
in a device.
Sampling jitter.
Jitter only affects the sound quality when occurring in
relation with converters (Digital to Analog Converter DAC,
ADC or an Asynchronous Sample Rate Converter ASRC).
If the clock controlling an analog to digital conversion is
subject to significant jitter, the signal gets converted at
unknown points in time. Then, when playing back the
digital signal even by using a rock steady clock, the signal
is no longer identical to the first analog signal. You could
say that the time variation on the first clock has been
modulated onto the signal and therefore the signal is now
distorted.
Sampling jitter is a potential problem every time the signal
changes domain like in a DAC, ADC or an ASRC and as
a rule of thumb the internal clock of a digital audio device
is better jitter wise than when the device is clocked from a
digital input.
This is why quality conscious mastering studios put their
ADC in internal clock mode when feeding in analog
material, but switch to DA clocking when all material is
loaded. The converter performing the most critical task
(capturing or monitoring) is assigned the master clock role.
System 6000 is one of the first pro audio devices seriously
tackling the dilemma of which clock to use as master - AD
or DA. First of all, AD and DA share the same very local,
high quality clock. Secondly, even if an external clock is
used, its jitter is so attenuated, that it has no effect on the
conversion.
Interface jitter.
Interface jitter does not directly influence the sound. In
extreme cases, however, interface jitter can be so severe
that the transmission breaks down. At his point, of course,
audio quality will indeed be affected.
Interface jitter is the variation in time of the electrical signal
(carrying the digitized audio) being transferred between
two devices. The main issue in order for the interface to
work is that the receiving device is able to follow the timing
variations well enough to receive the correct data.
Often, a device receiving a digital signal is slave to the
incoming signal. This means that the device extracts
Clock and synchronization in system
PAGE HEAD
6000
Causes of Jitter
There are several ways that jitter find it’s way into a digital
studio setup.
Noise induced on cables
A digital receiver typically detects a rising or a falling edge
on a digital signal at approx. halfway level. Due to finite
rise/fall times on the signal, noise then can disturb the
detection so the receiver detects the edges imprecisely.
Therefore, both noise and other interference imposed
on the signal line and the slope of the signal edge has
influence on the precision of the receiver. Some digital
formats are unbalanced (coaxial-S/PDIF) and others are
balanced (AES/EBU). The balanced signals are more
immune to induced noise due to the noise being treated
as a common mode signal, which is suppressed to some
extend in the receiving device.
Data jitter (or program jitter)
Data jitter is caused by high frequency loss in cables and
the nature of some digital formats (e.g. AES/EBU and S/
PDIF). Because the electrical data patterns are irregular
and changes all the time, a specific edge in the signal can
arrive at different times depending on the data pattern prior
to the edge. If there weren’t any high frequency loss in the
cable this wouldn’t be the case.
By using cables with incorrect impedance there will be a
non-ideal transmission line that potentially contributes to
the sloped edges and high frequency loss, and therefore
indirectly generates jitter. In this respect, unbalanced
formats (like S/PDIF) is often superior to its balanced
counterparts.
Jitter accumulation
Jitter accumulation can happen in a chain of devices due
to intrinsic jitter PLUS jitter gain (see The clock design
on System 6000) in devices PLUS cable introduced jitter.
Every device and cable will add a bit of jitter and in the
end the jitter amount can get disturbing. There are ways to
overcome this potential problem (see Synchronization).
How to detect jitter in the system
How to detect sampling jitter
The higher rise/fall time of the program signal the more
sensitive it is to sample clock jitter and therefore one of
the best ways to analyze a converter performance jitter
wise is to apply a full-scale high frequency sine to the
converter. The sample clock jitter will then be modulated
onto the audio signal and it is now possible to measure
the jitter frequency spectrum by performing an FFT on the
converted audio signal.
In Figure 1 the DAC has been converting a 12 kHz sine.
The two curves illustrate the difference with and without 5
kHz 3.5ns RMS jitter being applied on the digital interface.
In this example the device has no rejection of the jitter
appearing on the digital interface so it is nearly directly
transferred to the converter where it is modulated into the
audio signal. A conventional design like this is discussed in
more details later.
The two jitter spikes are at the frequencies 12 kHz +/- 5kHz
and the level approx. -80 dB corresponds to the 5kHz
3.5ns RMS jitter being applied. Sampling jitter (for jitter
frequencies below Fs/2) will appear symmetrically around
the sine being converted. Jitter frequencies above Fs/2 will
be modulated into the audio signal in a more complex way.
Another thing to notice on Figure 1 is that on the curve with
5kHz jitter there is also a tendency of some low frequency
< 2 kHz (note 12 kHz +/- 2 kHz) noise jitter. This might be
due to noise in the circuit generating the 5 kHz jitter.
Optical formats
Some digital formats are optical (Toslink-S/PDIF and
ADAT) and they have a reputation of being bad formats
jitter wise. One of the reasons for this is that the most
common circuits used for converting between electrical and
optical signal are better at making a rising than a falling
edge. This causes asymmetries in the transferred digital
signal, which also contribute to data jitter.
Internal design
Every oscillator or PLL (phase locked loop) will be
uncertain about the time to some extent. (A PLL is typically
used to multiply frequencies or to filter a clock signal in
order to reduce jitter - jitter rejection).
This kind of basic incertainty is called intrinsic jitter and for
cheap designs it can be quite severe (there are examples
of up to 300ns peak where the limit for the AES format is 4
ns peak @ 48 kHz Fs, BW: 700 to 100 kHz [3]).
Devices that feature jitter rejection will typically be well
designed regarding intrinsic jitter as well.
Figure 1 FFT on a DAC. Measurement made on Audio
Precision System 2 Cascade using a 2k point FFT with 256
times average, and equiripple window. Two curves: Upper
with a 12kHz spike and two 12kHz +/- 5kHz spikes. Lower
only with a 12kHz spike.
57
in depth
the clock from the incoming digital signal in order to be
synchronized to the transmitting device. In conventional
circuit designs the extracted clock is typically used directly
for the converters. This means that the jitter on the digital
interface is fed nearly unaltered to the converters and
therefore manifests as sampling jitter.
PAGE HEAD
Clock
and synchronization in system 6000
How to detect interface jitter.
The typical way to investigate interface jitter is by
measuring the clock variations directly on the digital signal.
There are devices made specifically for interface testing.
The way they usually work is by applying a PLL circuit like
the ones used for jitter rejection (see The clock design on
System 6000) and then measure the amount that has been
stopped by the PLL.
This circuit will act like a low pas filter towards the jitter
variations and therefore it is the high frequencies that
are stopped by the PLL. This way you will measure the
jitter noise with a band limited filter that typically will have
settings like 50 to 100 kHz, 700 to 100 kHz and 1200 to
100kHz.
The clock design on System 6000
By applying different filters and therefore getting different
results you will have an idea of what jitter amount your
system is operating at and what jitter frequencies that
might be the potential problem.
Examples of interface jitter amounts
A test setup was made with 4 different devices connected
using AES/EBU. Short impedance matched cables were
used so there was only an insignificant amount of jitter
coming from this potential source.
Figure 3 Clock circuit in a conventional design and in
System 6000
Figure 2. Test setup for interface jitter measurement.
The secret is the PLL that is used to remove jitter that
might appear on the digital input and in a conventional
design is transferred nearly directly to the converters. The
PLL acts as a low pass filter and will reduce jitter noise of
higher frequencies than the corner frequency of the filter.
On System 6000 the corner frequency is as low as 50 Hz
and at 1.4 kHz the noise will be reduced by at least 100
dB. Figure 4 shows -69dB at 500 Hz, which corresponds to
filter suggestions, made from research in the last year’s [1].
Devices 1 to 3 are conventional designs with no jitter
rejection below 10 kHz.
Device 4 is System 6000 (with jitter rejection).
Band width
After device 1
After device 2
After device 3
After device 4
50 to 100 kHz
1.0 ns peak
2.2 ns peak
2.5 ns peak
1.1 ns peak
700 to 100 kHz 0.9 ns peak
1.6 ns peak
1.9 ns peak
0.9 ns peak
1200 to 100 kHz 0.9 ns peak
1.5 ns peak
1.7 ns peak
0.9 ns peak
Jitter rejection
Table 1 Interface jitter measurements.
In Table 1 the results from the interface jitter
measurements are shown. After device 1 the results
reflect only intrinsic jitter of this machine. Notice the slight
increase at 50Hz, which is common. After device 2 the
jitter amount has increased which in this case was due to
intrinsic jitter in device 2. The same thing was the case
after device 3. After System 6000 (device 4) jitter level has
dropped due to the jitter rejection in the system.
Figure 4 Jitter rejection filter (4’Th order filter)
There is still an increased level at 50Hz where the System
6000 jitter rejection filter has it’s corner frequency and this
is why the jitter at 50Hz isn’t as reduced as the level above
50Hz.
It is very difficult to design a low pass filter with a steep
slope without gain in the pass band. This type of gain can
contribute to jitter accumulation in a chain of devices. The
System 6000 gains as little as < 1dB at 2 Hz.
58
Clock and synchronization in system
PAGE HEAD
6000
System 6000 technical specifications
regarding the clock circuitry:
Figure 5 Zoomed picture of the jitter rejection filter.
Lock range
Jitter rejection filter (4’Th order filter): < -3dB @ 50 Hz
< -69dB @ 500 Hz
< -100dB @ 1.4 kHz
Jitter gain: < 1 dB @ 2Hz
Jitter rejection at
external sample rates: 30 to 34 kHz,
42.5 to 45.6 kHz,
46.5 to 48.5 kHz,
85 to 91 kHz,
93 to 97 kHz.
Internal sample rates: 96 kHz, 88.2 kHz, 48 kHz and 44.1kHz.
Internal clock precision: +/- 30 PPM.
Intrinsic interface jitter: < 1 ns peak,
BW: 700 to 100 Hz.
There are some devices on the market that feature jitter
rejection to some extent but most of them uses a common
technology (VCXO type of oscillator in the PLL). This
technology is limited in the terms of lock range. This
means that the jitter rejection only can be done at the
known frequencies e.g. 96 kHz, 88.2 kHz, 48 kHz +/- a
few hundred PPM. This is typically enough given the fact
that most clock oscillators have a precision of less than +/50ppm but if you want to use other sample rates (e.g. vary
speed or the broadcast related 44.056 kHz) you will have
to do without the jitter rejection.
in depth
System 6000 uses a special technology that makes it able
to lock to all sample rates from: 30 to 34 kHz, 42.5 to 45.6
kHz, 46.5 to 48.5 kHz, 85 to 91 kHz and 93 to 97 kHz. This
means that every signal at sample rates in these ranges
will be treated with the same jitter rejection filter. The
performance is not only good in a narrow range around
one or two sample rates.
Intrinsic jitter
The intrinsic sampling jitter on System 6000 has been
optimized through a long period of trimming in order to
make the perfect AD- and DA-conversion on the ADA24/96
card. This is also why the intrinsic interface jitter is as low
as < 1 ns peak, BW: 700 to 100 kHz that makes the perfect
starting point for the digital setup.
59
PAGE HEAD
Clock
and synchronization in system 6000
Measurements on System 6000
As mentioned before the higher frequency in the program
signal and the higher level the more sensitive it is to jitter
on the sampling clock. Therefore the measurements in
this document uses a 20 kHz sine at -1 dBFS and all
measurements are done at 48 kHz sample rate. The
measurements are done on the DA converter on the
ADA24/96 card and the test system is Audio Precision
System 2 Cascade.
slave to the digital input.
Notice that even with this much zoom the jitter on
internal-mode is not visible.
The very little jitter that shows on slave-mode is low
frequency weighted from 1kHz and down.
To show the effect of the jitter being modulated via the
clock into the audio signal the measurements are FFT’s of
the analog signal on the ADA24/96 output.
Every full view picture is made with an FFT: 2k point, 256
times average, and equiripple window. Every frequency
zoomed picture is made with an FFT: 16k point, 32 times
average, and equiripple window.
System 6000 performance
Figure 8 System 6000 DAC in slave mode, 1kHz jitter
applied.
Figure 8 is a full view picture when System 6000 is slave
and there is applied 1khz, 1.3us peak sine jitter. This is a
huge amount of jitter and actually beyond the tolerance
level specified by AES3-1992 amendment 1-1997 [3] that
all AES compatible devices should be able to lock to.
The performance of a conventional clock design
compared to the performance of the System 6000
Figure 6 System 6000 DAC in master mode
The system is running in internal master mode thus there
is no jitter being applied to the system. Notice the very flat
noise floor with no spurious signals.
Figure 9 Zoomed (frq. only) version of Figure 8 (lower) plus
the same level of jitter applied to a conventional design
(upper).
Figure 7 Zoomed version (both frq. and level) of Figure 6
plus System 6000 in slave mode.
On Figure 7 the system is running both internal master
mode (lower) and external slave mode (upper) where the
system is slave to the Cascade. There is no jitter being
applied from the Cascade so what is shown here is approx.
the difference in intrinsic jitter when the System 6000 is
60
On Figure 9 the 1 kHz, 1.3 us peak sine jitter is applied to
System 6000 (lower) and a conventional design (upper)
without jitter rejection. Notice that the jitter spikes on the
conventional design reaches -22 dB with reference to the
20 kHz tone where the System 6000 has filtered out this
jitter by approx. 100 dB down to -122 dB.
There are more spikes than 20 kHz +/- 1 kHz. There are
also +/- 2, 3 and 4 kHz, which are harmonics on the sine
jitter generator. The low frequency noise floor on the upper
curve is probably noise in the jitter generator.
Clock and synchronization in system
PAGE HEAD
6000
Figure 10 Zoomed (frq. only). System 6000 and
conventional design in slave-mode. Wide band jitter
applied.
Synchronization
Synchronization: The digital signal, word clock or AES 11.
There are several ways to obtain synchronization in a
setup: Using a digital signal (carrying audio), a digital signal
(not carrying audio) or a word clock.
•
Digital signal (carrying audio).
This is the simplest way to obtain sync and it involves only the two (or more) audio devices that are connected.
Typically the transmitting device is the master and the receiving device is the slave.
As mentioned earlier there is jitter to take into account
when selecting which device to be the master of timing.
Typically the internal clock in a device is the cleanest and
therefore when recording it is often the ADC that is the
master (see Figure 11). To get the best DA conversion
when mixing the DAC is often the master. But the DAC is
a receiver of the audio signal and therefore it is necessary
to send a synchronization signal from the DAC back to the
rest of the system. This can be done with a digital signal
that is or is not carrying audio and to which the system is
slave.
Figure 11 Digital studio setup with an ADC or DAC as
master.
• Digital signal (not carrying audio) e.g. AES11 or word clock.
This way typically involves a device that makes synchronization signals for the audio processing devices in the setup. This word clock generator is the master at all times and all the audio devices are slaves.
The word clock is a square wave signal (typically TTL level, 0 to 5V) with a frequency equal to the sample rate e.g. 48kHz. The impedance is 75 ohm and the connector is RCA phono or BNC.
The AES11 is an AES signal without audio and therefore the connector is XLR with a 110 ohm impedance.
61
in depth
On Figure 10 25 ns peak wide band jitter has been
applied to both System 6000 (lower) and a conventional
design (upper). The jitter level has formed a noise floor at
approx. -80 dB with reference to the 20 kHz tone on the
conventional design. The System 6000 curve reflects the
jitter rejection filter curve up to approx. 300 Hz (20 kHz +/300 Hz on this picture). Beyond 300 Hz the System 6000
has reduced the jitter so much that it is hidden in the noise
floor.
Clock
PAGE
HEAD
and synchronization in system 6000
period away from the signal on input 1. If the phase of a
signal (including two audio channels) is above the limit,
the current sample in this signal can be interpreted as
the previous or the next sample and this will add a delay
to these specific two audio channels. A summing of the
signals later in the setup (e.g. electrically or acoustically)
will result in a potential audible phase error.
Figure 13 Nominal phase tolerances and requirements of
AES signals.
Figure 12 Same setup with a word clock generator.
Example with DAC with and without word clock input.
Figure 12 shows the example setup with a word clock
generator included. Some devices may not feature a word
clock input and these devices will then slave to the digital
signal carrying audio.
One of the advantages of using a word clock generator is
that there is no constant switching between master and
slave configurations. Just the normal patching signals
around through the patch bay.
Another advantage is that potential jitter accumulation is
reduced. The jitter sources from the clock master to where
AD- or DA-conversion is done are reduced to the word
clock generator intrinsic jitter, the word clock line to the
converting device and the intrinsic jitter in this device. For
setups with devices without word clock input the chain is a
bit longer.
A disadvantage of using a setup with word clock might
be that there will typically not be so much optimizing of
the jitter e.g. the ADC being master when recording and
the DAC being master when mixing. Even though the
clock path is short (from the word clock generator to the
converting device) having the converting device being the
clock master could optimize the setup further jitter wise.
Nominal phase.
Digital mixers with a lot of digital inputs and other
equipment e.g. surround devices have to be able to receive
signals from several sources at the same time.
In Figure 13 the timing of different input and output
signals is shown. AES specifies that a device must be
able to receive a signal with a phase of up to +/- 25% of
the sample period away from the reference. This means
that if the device is slave to input 1 the phase on the
other input signals must fall within +/- 25% of the sample
62
It is difficult to make equipment transmitting a digital signal
at exactly the same time as it receives a signal. Typically
a device will have both a delay of a whole number of
samples but also a sub sample delay. The delay of a whole
number of samples is due to the routing of the signal in
the device and the sub sample delay is due to the specific
hardware in the device. AES specifies that the output must
fall within +/- 5% of the sample period from the reference
point (the incoming signal if the device is in slave mode).
See Figure 13.
Figure 14 Example setup. Device 5 is slave to the signal
from device 1.
Consider a setup like Figure 14 where device 2 to 4 adds
a sub sample delay of 10% of the sample period. There
will now be a difference between the two signals going into
device 5 of 30% of a sample period. Now device 5 might
interpret the two inputs wrong the way mentioned above.
In a whole number of samples this might not be a problem
because device 2 to 4 also has perhaps 10 samples delay
pr. device equals a total delay of 30. So the resulting 1
sample extra delay in this chain due to several sub sample
delays might not matter.
Another problem might be that perhaps the jitter level after
device 4 is quite high. This jitter will perhaps make the
signal from device 4 continuously cross the point in device
5 where the signal is interpreted as the current sample or
the next. This will make continuous slip samples (perhaps
with audible clicks) on the input on device 5 receiving
signal from device 4.
A way to work around this could be to have device 3
slaving directly to device 1 with an extra synchronization
signal. This way the 10% sub sample delay in device 2
will be eliminated. A setup using word clock generator
Clock and synchronization in system
PAGE HEAD
6000
ADAT interfaces are typically more sensitive to sub sample
delays or phase offsets than AES interfaces.
System 6000 technical specifications regarding in and
output phase:
Digital Output Phase: Input Variation Before
Sample Slip: < 3 % of sample period
+27 % / -73 % of sample period
Literature:
[1] Jitter: Specification and Assessment in Digital Audio
Equipment by Julian Dunn.
Presented at AES 93rd Convention, October 1992
Available at www.nanophon.com
[2] Audio Precision, Technotes by Julian Dunn.Technote
23, 24 and 25.
Available at www.ap.com
[3] Standard: AES3-1992 amendment 1-1997.
Available at www.aes.org
Other literature on the subject:
“Everything you always wanted to know about jitter but
where afraid to ask” by Bob Katz.
Available at www.digido.com
Measurement systems manufactured by:
Audio Precision www.ap.com
Prism Sound www.prismsound.com
in depth
will typically not suffer from this kind of problem due to
every device being slave to the same reference. Therefore
there will not be any chain of devices that potentially could
accumulate phase errors.
63
PAGE HEAD
License
Agreement
TC ELECTRONIC SOFTWARE LICENSE AGREEMENT
System 6000 Additional Software
PLEASE READ THIS LICENSE CAREFULLY BEFORE USING THE SOFTWARE. BY
PROCEEDING AND USING THE SOFTWARE, YOU ARE AGREEING TO BE BOUND
BY THE TERMS OF THIS LICENSE. IF YOU DO NOT AGREE TO THE TERMS OF
THIS LICENSE, PROMPTLY RETURN THE UNUSED SOFTWARE TO THE PLACE
WHERE YOU OBTAINED IT AND YOUR MONEY WILL BE REFUNDED.
1. License.
TC Electronic grants to you the right to use this copy of TC Electronic software and the
related documentation (the “Software”) on a single DSP Card. You own the media on
which the Software is recorded, but TC Electronic retains title to the Software and related
documentation including copies, regardless of form or media and to all copyrights therein.
You may not reproduce the media
holding the copy protection (“Authorization”) in any shape or form.
2. Transfer of Rights.
You may transfer all your license rights in the Software, the related documentation and
a copy of this License to another party, provided the other party reads and agrees to
accept the terms and conditions of this license.
3. Restrictions.
The Software contains copyrighted material, trade secrets and other proprietary material
of TC Electronic and/or its partners. In order to protect this, and except as permitted by
applicable legislation, you may not decompile, reverse engineer, disassemble or otherwise reduce the Software to a human perceivable form. You may not modify, network,
rent, lease, loan, distribute or create derivative works based upon the Software in whole
or in part. You may not electronically
transmit the Software from one DSP card to another in a network.
4. Termination.
This License is effective until terminated. You may terminate this License at any time by
destroying the Software, related documentation and all copies thereof. This License will
terminate immediately without notice from TC Electronic, if you fail to comply with any
provision of this License. Upon
termination you must destroy the Software, related documentation and fonts and all copies thereof.
5. Limited Warranty on Media.
TC Electronic warrants that the media on which the Software is recorded to be free from
defects in materials and workmanship under normal use for a period of ninety (90) days
from the date of purchase as evidenced by a copy of the receipt. TC Electronic entire
liability and your exclusive
remedy will be replacement of the media not meeting TC Electronic limited warranty and
which is returned to TC Electronic or an TC Electronic authorized representative with a
copy of the receipt. TC Electronic will have no responsibility to replace a disc damaged
by accident, abuse or
misapplication.
ANY IMPLIED WARRANTIES ON THE MEDIA, INCLUDING THE
IMPLIED WARRANTIES OF MERCHANTABILITY AND FITNESS FOR A PARTICULAR
PURPOSE ARE LIMITED IN DURATION TO NINETY (90) DAYS FROM THE DATE OF
DELIVERY. THIS WARRANTY GIVES YOU SPECIFIC LEGAL RIGHTS, AND YOU MAY
ALSO HAVE OTHER RIGHTS WHICH VARY BY JURISDICTION
6. Disclaimer of Warranty on TC Electronic Software.
You expressly acknowledge and agree that use of the Software is at your sole
risk. The Software and related documentation are provided on an “AS IS”
basis and without warranty of any kind. TC Electronic and TC Electronic’ Licenser(s)
(for the purposes of provisions 6 and 7, TC Electronic and TC Electronic’ Licenser(s)
shall be collectively referred to as “TC Electronic”)
EXPRESSLY DISCLAIM ALL WARRANTIES, EXPRESS OR IMPLIED, INCLUDING
BUT NOT LIMITED TO, THE IMPLIED WARRANTIES OF MERCHANTABILITY AND
FITNESS FOR A PARTICULAR PURPOSE.
TC ELECTRONIC DOES NOT WARRANT THAT THE FUNCTIONS CONTAINED IN
THE SOFTWARE WILL MEET YOUR REQUIREMENTS, OR THAT THE OPERATION
OF THE SOFTWARE WILL BE UNINTERRUPTED OR ERROR-FREE, OR THAT
DEFECTS IN THE SOFTWARE WILL BE CORRECTED.
FURTHERMORE, TC ELECTRONIC DOES NOT WARRANT OR MAKE ANY
REPRESENTATIONS REGARDING THE USE OR THE RESULTS OF THE USE
OF THE SOFTWARE OR RELATED DOCUMENTATION IN TERMS OF THEIR
CORRECTNESS, ACCURACY, RELIABILITY, OR OTHERWISE.
NO ORAL OR WRITTEN INFORMATION OR ADVICE GIVEN BY TC ELECTRONIC
OR AN TC ELECTRONIC AUTHORIZED REPRESENTATIVE SHALL CREATE A
WARRANTY OR IN ANY WAY INCREASE THE SCOPE OF THIS WARRANTY.
SHOULD THE SOFTWARE PROVE DEFECTIVE, YOU (AND NOT TC
ELECTRONIC OR A TC ELECTRONIC AUTHORIZED REPRESENTATIVE) ASSUME
THE JURISDICTIONS.
SOME STATES DO NOT ALLOW THE EXCLUSION OF IMPLIED WARRANTIES, SO
THE ABOVE EXCLUSION MAY NOT APPLY TO YOU.
64
7. Limitation of Liability.
UNDER NO CIRCUMSTANCES INCLUDING NEGLIGENCE, SHALL TC ELECTRONIC
BE LIABLE FOR ANY INCIDENTAL SPECIAL OR CONSEQUENTIAL DAMAGES
THAT RESULT FROM THE USE OR INABILITY TO USE THE SOFTWARE OR
RELATED DOCUMENTATION, EVEN IF TC ELECTRONIC OR A TC ELECTRONIC
AUTHORIZED REPRESENTATIVE HAS BEEN ADVISED OF THE POSSIBILITY OF
SUCH DAMAGES. SOME JURISDICTIONS DO NOT ALLOW THE LIMITATION OR
EXCLUSION OF
LIABILITY FOR INCIDENTAL OR CONSEQUENTIAL DAMAGES SO THE ABOVE
LIMITATION OR EXCLUSION MAY NOT APPLY TO YOU.
In no event shall TC Electronic’s total liability to you for all damages, losses, and causes
of action (whether in contract, tort (including negligence) or otherwise) exceed the
amount paid by you for the Software.
8. Governing Law and Severability.
This License shall be governed by and construed in accordance with the laws of
Denmark, as applied to agreements entered into and to be performed entirely within
Denmark between Danish residents. If for any reason a court of competent jurisdiction
finds any provision of this License, or portion
thereof, to be unenforceable, that provision of the License shall be enforced to the maximum extent permissible so as to effect the intent of the parties, and the remainder of this
License shall continue in full force and effect.
9. Complete Agreement.
This License constitutes the entire agreement between the parties with respect to the use
of the software and the related documentation and supersedes all prior contemporaneous understandings or agreements, written or oral, regarding such subject matter. No
amendment to or modification of
this License will be binding unless in writing and signed by a duly authorized representative of TC Electronic.
If you have any questions concerning this Agreement or TC Electronic, please
write to:
TC ELECTRONIC, Sindalsvej 34, 8240 Risskov, Denmark.
E-mail: [email protected]
License agreement
PAGE HEAD
End Users License Agreement (EULA) for TC ICON OS (Operating System)
Termination
contained in the TC Electronic A/S embedded system: TC ICON/Remote CPU 6000.
Without prejudice to any other rights, TC Electronic A/S may terminate this license if you
fail to comply with the licensing terms. In such event, you must destroy all copies of the
TC ICON OS and all of its component parts.
The TC ICON operating system is based on Microsoft NT.
Refund
If you do not agree to the terms of this EULA, TC Electronic A/S and Microsoft are
unwilling to license the TC ICON OS to you. In such event, you may not use the TC
ICON/Remote CPU 6000, and you should promptly contact TC Electronic A/S for
instructions on return of the unused products for a refund.
Client Access Licenses
If you use the TC ICON/Remote CPU 6000 to access or utilize the services or functionality of Microsoft Windows NT Server (all editions) or use the TC ICON/Remote
CPU 6000 to permit workstation or computing devices to access or utilize the services
or functionality of Microsoft Windows NT Server, you may be required to obtain a Client
Access License for the TC ICON/Remote CPU 6000 and/or each such workstation or
computing device.
Please refer to the end user license agreement for Microsoft Windows NT Server for
additional information.
No Warranties
EXCEPT AS EXPRESSLY PROVIDED IN THE LIMITED WARRANTY SECTION
ABOVE, THE TC ICON Operating System IS PROVIDED TO YOU “AS IS” WITHOUT
WARRANTY OF ANY KIND, EITHER EXPRESSED OR IMPLIED, INCLUDING, BUT
NOT LIMITED TO, WARRANTIES OF NON-INFRINGEMENT, MERCHANTABILITY,
AND/OR FITNESS FOR A PARTICULAR PURPOSE. THE ENTIRE RISK OF THE
QUALITY AND PERFORMANCE OF THE TC ICON OS IS WITH YOU.
No Liability for Consequential Damages
TC Electronic A/S’s SOFTWARE SUPPLIERS SHALL NOT BE HELD TO ANY
LIABILITY FOR ANY DAMAGES SUFFERED OR INCURRED BY YOU (INCLUDING,
BUT NOT LIMITED TO, GENERAL, SPECIAL, CONSEQUENTIAL OR INCIDENTAL
DAMAGES INCLUDING DAMAGES FOR LOSS OF BUSINESS PROFITS, BUSINESS
INTERRUPTION, LOSS OF BUSINESS INFORMATION AND THE LIKE), ARISING
FROM OR IN CONNECTION WITH THE DELIVERY, USE OR PERFORMANCE OF TC ICON OS.
Note on Java Support
The TC ICON OS may contain support for programs written in Java. Java technology
is not fault tolerant and is not designed, manufactured, or intended for use or resale as
online control equipment in hazardous environments requiring fail-safe performance,
such as in the operation of nuclear facilities, aircraft navigation or communication
systems, air traffic control, direct life support machines, or weapons systems, in which
the failure of Java technology could lead directly to death, personal injury, or severe
physical or environmental damage. Sun Microsystems, Inc. has contractually obligated
Microsoft Corporation to make this disclaimer.
EXPORT RESTRICTIONS
Export of the TC ICON OS from the United States is regulated by the Export
Administration Regulations (EAR, 15 CFR 730-744) of the U.S. Commerce Department,
Bureau of Export Administration (BXA). You agree to comply with the EAR in the export
or re-export of the TC ICON OS: (i) to any country to which the U.S. has embargoed or
restricted the export of goods or services, which as of May 1999 include, but not necessarily limited to Cuba, Iran, Iraq, Libya, North Korea, Sudan, Syria, and the Federal
Republic of Yugoslavia (including Serbia, but not Montenegro), or to any national of any
such country, wherever located, who intends to transmit or transport the TC ICON OS
back to such country; (ii) to any person or entity who you know or have reason to know
will utilize the TC ICON OS or portion thereof in the design, development or production
of nuclear, chemical or biological weapons; or (iii) to any person or entity who has been
prohibited from participating in U.S. export transactions by any federal agency of the U.S.
government. You warrant and represent that neither the BXA nor any other U.S. federal
agency has suspended, revoked or denied your export privileges. For additional information see http://www.microsoft.com/exporting.
Customer Remedies
TC Electronic A/S’s suppliers entire hability and your exclusive remedy shall be, at TC
Electronic A/S’s option, either (a) return of the price paid, or (b) repair or replacement of
the TC ICON/Remote CPU 6000 that does not meet the above Limited Warranty and
which is returned to TC Electronic A/S with a copy of your receipt. This Limited Warranty
is void if failure of the TC ICON/Remote CPU 6000 has resulted from accident, abuse,
or misapplication. Any replacement TC ICON/Remote CPU 6000 will be warranted for
the remainder of the original warranty period or thirty (30) days, whichever is longer.
Limitations on Reverse Engineering, Decompilation and Disassembly
You may not reverse engineer, decompile, or disassemble the TC ICON OS, except and
only to the extent that such activity is expressly permitted by applicable law notwithstanding this limitation.
Separation of Components
The TC ICON OS is licensed as a single product. Its component parts may not be separated for use on more than one TC ICON/Remote CPU 6000.
Single TC ICON/Remote CPU 6000
The TC ICON OS is licensed with the TC ICON/Remote CPU 6000 as a single integrated product. The TC ICON OS may only be used with the TC ICON/Remote CPU
6000 as set forth in these licensing terms.
Rental
You may not rent, lease or lend the TC ICON OS.
TC ICON OS transfer
appendix
You may permanently transfer all of your rights set forth in these licensing terms only as
part of a permanent sale or transfer of the TC ICON/Remote CPU 6000, provided you
retain no copies, you transfer all of the TC ICON OS (Including all component parts, the
media and printed materials, any upgrades, these licensing terms, and, if applicable, the
Certificate(s) of Authenticity), and the recipient agrees to these licensing terms. If the
TC ICON OS is an upgrade, any transfer must also include all prior versions of the TC
ICON OS.
Back-up Copy
If TC Electronic A/S has not included a back-up copy of the TC ICON OS with the TC
ICON/Remote CPU 6000, you may make a single back-up copy of the TC ICON OS.
You may use the back-up copy solely for archival purposes. Except as expressly provided in these licensing terms, you may not otherwise make copies of the TC ICON OS.
NOT FAULT TOLERANT
THE TC ICON OS MAY CONTAIN TECHNOLOGY THAT IS NOT FAULT TOLERANT
AND IS NOT DESIGNED, MANUFACTURED, OR INTENDED FOR USE OR
RESALE AS ON-LINE CONTROL EQUIPMENT IN HAZARDOUS ENVIRONMENTS
REQUIRING FAIL-SAFE PERFORMANCE, SUCH AS IN THE OPERATION OF
NUCLEAR FACILITIES, AIRCRAFT MACHINES, OR WEAPONS SYSTEMS, IN WHICH
THE FAILURE OF LICENSED SOFTWARE COULD LEAD DIRECTLY TO DEATH,
PERSONAL INJURY, OR SEVERE PHYSICAL OR ENVIRONMENTAL DAMAGE.
65
PAGE HEAD Specifications - Mainframe 6000 MKII
Technical
Digital Inputs and Outputs
Connectors:
Formats:
Word clock input:
Internal sample rate:
Internal clock precision:
Jitter rejection at external sample rates :
Rejection filter (4’th order) :
Rejection filter peak (jitter gain)
Intrinsic interface jitter :
Digital output phase :
Input variation before sample slip :
Output Dither:
Processing Delay:
Frequency Response DIO:
PCMCIA Interface
Connector:
Standards:
Card Format:
PC Card, 68 pin type 1 cards
PCMCIA 2.0, JEIDA 4.0
Supports up to 2 MB SRAM
Control Interface
MIDI:
GPI, Pedal, Fader:
Remote:
SMPTE:
Ethernet:
In/Out/Thru: 5 Pin DIN
¼” TS jack, 0 ohm to 50 kohm
Custom MIDI In & Out
Input for Cuelist Management
10/100 Mbits/s, Base-T
EMC
Complies with:
Safety
Certified to:
Environment
Operating Temperature:
Storage Temperature:
Humidity:
General
Finish:
Dimensions:
Weight:
Mains Voltage:
Power Consumption:
Backup Battery Life:
Warranty, Parts and labor:
66
SUB-D, 25 pole (8 channels AES/EBU in/out)
AES/EBU (24 bit)
BNC, 75 Ohm or Hi-Z, 0.6 to 10 Vpp
96 kHz, 88.2 kHz, 48.0 kHz, 44.1 kHz
+/- 30 ppm
30 to 34 kHz, 42.5 to 45.5 kHz, 46.5 to 48.5 kHz, 85 to 91
kHz and 93 to 97 kHz.
< -3 dB @ 50 Hz, < -65 dB @ 500 Hz,
< -100 dB @ 1.4 kHz
< 1 dB @ 2 Hz
< 1 ns peak, BW : 700 Hz to 100 kHz
< 3 % of sample period
+27 % / -73 % of sample period
HPF/TPDF dither 8-24 bit mono
0.15 ms + 0.21 ms per engine @ 48 kHz, 0.07 ms + 0.1
ms per engine @ 96 kHz
DC to 23.9 kHz ± 0.01 dB @ 48 kHz, DC to 47.9 kHz ±
0.01 dB @ 96 kHz
EN 55103-1 and EN 55103-2, FCC part 15 class B,
CISPR 22 class B
IEC 60065, EN 60065, UL 6500 and CSA E65
32° F to 122° F (0° C to 50° C)
-22° F to 167° F (-30° C to 70° C)
Max. 90 % non-condensing
Natual color anodized aluminum face plate.
Painted and plated steel chassis
19 x 3.5 x 12 inches (483 x 89 x 305 mm)
19 lbs. (8,6 kg)
100 to 240 VAC, 50 to 60 Hz (auto-select)
45 watts
>10 years
1 year
Technical Specifications - TC Icon & Remote
PAGE HEAD
CPU
Display Type:
Touch screen:
Faders:
Connection:
EMC
Complies with:
Safety
Certified to:
Environment
Operating Temperature:
Storage Temperature:
Humidity:
General
Finish:
Remote CPU 6000 mk II
6,5” TFT active matrix color LCD display, 640 x 480 pixels resolution. High
luminance (300 cd/m2, typ.)
Resistive, 20 gram activation force
Six (6), 90mm motorized with touch
sensitivity
36-pin MDR connection for Remote
CPU 6000 mk II
EN 55103-1 and EN 55103-2, FCC
part 15 class B, CISPR 22 class B
IEC 60065, EN 60065, UL 6500 and
CSA E65
32° F to 122° F (0° C to 50° C)
-22° F to 167° F (-30° C to 70° C)
Max. 90 % non-condensing
Weight:
Natural color anodized aluminum.
Stand plate in brushed stainless steel
D x W x Hfront x Hback: 11 x 7.8 x
1.3 x 3.9 inches
(279 x 198 x 33 x 100 mm)
5.56 Ib (2,51 kg)
Warranty, Parts and labor:
1 year
Dimensions:
CPU:
System disc:
System Memory:
Operating system:
Connections:
Ethernet interface:
USB interface:
COM interface:
Keyboard/Mouse:
External display:
Remote:
EMC
Complies with:
Safety
Certified to:
Environment
Operating Temperature:
Storage Temperature:
Humidity:
General
Finish:
Embedded AMD Geode LX-800,
500MHz
512MB CompactFlash Card
256MB SO DIMM 200-pin DDR
SDRAM
Windows Embedded Standard
Two separated 10/100 Mbits/s TC
Network (fixed IP) and firewalled internet network (dynamic IP). Standard
IEEE 802.3u protocol compatible on
RJ-45 connectors.
Two Universal Serial Bus ports, USB
2.0 compliant (for connection of TCE
products, e.g. Reverb4000, DB2)
Two RS-232 serial communication
ports. SUB-D 9 pin (for connection of
TCE products, e.g. P2, DB2)
Mini-DIN connector supports standard
PC/AT keyboard and a PS/2 mouse.
VGA output, SUB-D 15 pin
36-pin connection for TC Icon mk II
EN 55103-1 and EN 55103-2, FCC
part 15 class B, CISPR 22 class B
IEC 60065, EN 60065, UL 6500 and
CSA E65
32° F to 122° F (0° C to 50° C)
-22° F to 167° F (-30° C to 70° C)
Max. 90 % non-condensing
Power Consumption:
Backup Battery Life:
Natural color anodized aluminum face
plate. Painted and plated steel chassis
19 x 1.75 x 8.2 inches
(483 x 44 x 195 mm)
4,8 Ib. (2,2 kg)
100 to 240 VAC, 50 to 60 Hz
(auto-select)
50 watts
>10 years
Warranty, Parts and labor:
1 year
Dimensions:
Weight:
Mains Voltage:
appendix
TC Icon mk II
67