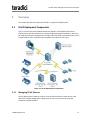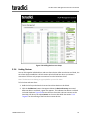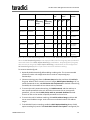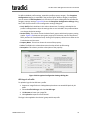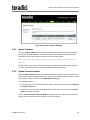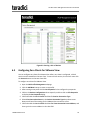
1
Teradici PCoIP® Management
Console User Manual
TER0812002
Issue 14
Teradici PCoIP® Management Console User Manual
Teradici Corporation
#101-4621 Canada Way, Burnaby, BC V5G 4X8 Canada
phone +1.604.451.5800 fax +1.604.451.5818
www.teradici.com
The information contained in this documentation represents the current view of Teradici Corporation as of the date of
publication. Because Teradici must respond to changing market conditions, it should not be interpreted to be a commitment
on the part of Teradici, and Teradici cannot guarantee the accuracy of any information presented after the date of
publication.
This document is for informational purposes only. TERADICI MAKES NO WARRANTIES, EXPRESS, IMPLIED OR STATUTORY, AS
TO THE INFORMATION IN THIS DOCUMENT.
Complying with all applicable copyright laws is the responsibility of the user. Without limiting the rights under copyright, no
part of this document may be reproduced, stored in or introduced into a retrieval system, or transmitted in any form or by
any means (electronic, mechanical, photocopying, recording, or otherwise), or for any purpose, without the express written
permission of Teradici Corporation.
Teradici may have patents, patent applications, trademarks, copyrights, or other intellectual property rights covering subject
matter in this document. Except as expressly provided in any written license agreement from Teradici, the furnishing of this
document does not give you any license to these patents, trademarks, copyrights, or other intellectual property. Visit
http://www.teradici.com/about-teradici/pat.php for more information.
© 2000-2014 Teradici Corporation. All rights reserved.
Teradici, PC-over-IP, and PCoIP are trademarks of Teradici Corporation and may be registered in the United States and/or
other countries. Any other trademarks or registered trademarks mentioned in this release are the intellectual property of their
respective owners.
TER0812002 Issue 14
2
Teradici PCoIP® Management Console User Manual
Revision History
Version
Date
Description
14
May 09, 2014
Updated document for release 1.10.1.
l
l
l
13
Jan 08, 2014
Updated browser versions that the MC web user interface
supports:
l
Firefox 23 (or later)
l
Internet Explorer 8 and 9
l
Internet Explorer 11 in compatibility view
Added note to "Certificates in a Profile" on page 75 to
explain how all certificates in a device's certificate store
are replaced by any certificates that are added to a profile
when the profile is applied.
Updated document for release 1.10.0:
l
l
l
l
l
l
l
l
TER0812002 Issue 14
Added support for firmware release 4.5.0. For details, see
section 2.4 "Management Console and Firmware Version
Compatibility" and also "PCoIP® Zero Client and Host
Administrator Guide" (TER1206003).
Added support for firmware release 4.2.0.
Updated section 2.4 "Management Console and Firmware
Version Compatibility".
Revised sections 3.5 "Running the Management Console"
and 4 "Virtual Machine Features".
In section 5.1.3 "Logging into the MC Web User Interface",
added details about the warning that displays during login if
another user is currently logged in.
Updated section 5.6.1 "Import Firmware" to state that only
firmware files containing both Tera1 and Tera2 firmware
(.pcoip files) can be imported. The .all file type is no longer
supported.
Added section 5.6.4 "Delete Firmware from the MC" to
explain how to remove a firmware file from the MC.
Added section 5.8.4 "Web Interface Session Timeout" to
explain how to configure an inactivity timeout period for
the web UI.
Updated MC screen captures to show new Teradici logo.
3
Teradici PCoIP® Management Console User Manual
Version
Date
Description
12
Aug 23, 2013
Updated document for release 1.9.1:
l
Added support for firmware release 4.1.2.
l
Added support for Internet Explorer 9.
11
Jul 05, 2013
Updated 3.3 "Installing the Management Console into Your
Existing VMware ESXi™ Server" to state that using the
VMware® vCenter™ Converter™ tool is mandatory when
importing the MC VM into a VMware ESXi host.
10
May 24, 2013
Updated document for release 1.9:
l
l
9
8
Aug 13, 2012
Jan 20, 2012
6
TER0812002 Issue 14
Dec 02, 2011
Oct 01, 2011
Added support for firmware release 4.1.
Updated document for release 1.8:
l
Added support for firmware release 4.0.0.
l
Added support for firmware release 4.0.1.
l
Added support for Tera2 devices.
l
Added DHCP Option Matching in AutoConfig.
l
Added Persistent AutoConfig.
l
Added Display Topology Configuration to profiles.
l
Enhanced Login process.
Updated document for release 1.7.1:
l
7
Upgraded the MC VM’s guest operating system to Ubuntu
Server 12.04.2 LTS.
Added support for firmware release 3.5.1.
Updated document for release 1.7:
l
Added support for firmware release 3.5.
l
Added Certificates to profiles.
l
Added Session Connection Type.
Updated document for release 1.6:
l
Added Remote Power Down.
l
Added Import and Export to profiles.
l
Added Retry and Apply AutoConfig.
l
Added Manage Device Naming.
l
Added Delete button to Device Management.
4
Teradici PCoIP® Management Console User Manual
Version
Date
Description
5
Jun 01, 2011
Updated document for release 1.5:
4
3
2
Sep 17, 2010
Mar 01, 2010
Aug 31, 2009
l
Added AutoConfig
l
Added support for firmware release 3.3 and 3.4.
l
Added OSD Logos to profiles.
l
Added Firmware to profiles.
l
Added Profile Application Status page.
l
Changed term Portal to zero client.
l
USB device bridging support.
l
Added support for profile scheduling.
l
Configurable DHCP Timeout options.
Updated document for release 1.3.30:
l
Added Device Log Monitoring.
l
Added support for firmware release 3.2.
Updated document for release 1.2:
l
Replaced PCoIPMC with MC.
l
Added support for Internet Explorer.
Updated document for release 1.1:
l
l
1
TER0812002 Issue 14
Apr 03, 2009
Updated Management Console Limitations.
Added Migrating to a new Version of the Management
Console.
Created document for initial release.
5
Teradici PCoIP® Management Console User Manual
Contents
Revision History
3
1 Introduction
9
1.1 About this Document
9
2 Overview
11
2.1 PCoIP Deployment Components
11
2.1.1 Managing PCoIP Devices
11
2.1.2 DNS Server
13
2.1.3 DHCP Server
13
2.2 Management Console Limitations
14
2.3 Management Console Concepts
14
2.3.1 Groups and Profiles
15
2.3.2 Fixed Seating
16
2.3.3 Device Discovery
16
2.3.4 AutoConfig
26
2.4 Management Console and Firmware Version Compatibility
27
3 Installation and Setup
32
3.1 Management Console Host System Requirements
32
3.2 Contents of the Management Console Package
32
3.3 Installing the Management Console into Your Existing VMware ESXi™ Server
33
3.4 Installing the Management Console Using VMware Player
33
3.5 Running the Management Console
34
3.6 Migrating to a New Version of the Management Console
35
3.6.1 Potential Problems and Workarounds
35
3.6.2 What Information Is Imported
36
3.6.3 Database Migration Procedure
36
4 Virtual Machine Features
38
4.1 Refresh Status
38
4.2 Set Web Interface Password
39
4.3 Change Hostname
39
4.4 Manage Networking
39
4.4.1 View Network Configuration
40
4.4.2 Configure IP Address
40
4.4.3 Configure DNS
40
TER0812002 Issue 14
6
Teradici PCoIP® Management Console User Manual
4.5 Database Management
41
4.5.1 Back Up Database
41
4.5.2 Restore Database
42
4.5.3 Delete Database
42
4.6 Change Time Zone
42
4.7 Restart Management Console Daemon
42
4.8 Halt Virtual Machine
43
5 Web Interface
44
5.1 Accessing the Management Console Web User Interface
44
5.1.1 Installing the MC Certificate in Internet Explorer
45
5.1.2 Installing the MC Certificate in Firefox
45
5.1.3 Logging into the MC Web User Interface
46
5.1.4 Accepting the Teradici End User License Agreement
47
5.1.5 Using the MC Home Page
48
5.2 Device Management
49
5.2.1 Device Discovery (Optional)
50
5.2.2 Legend
50
5.2.3 Querying Devices and Update Database
52
5.2.4 Filtering Devices
52
5.2.5 Configuring a Device Group
53
5.2.6 Linking Devices
54
5.2.7 Access Device Webpage
55
5.2.8 Deleting Devices
56
5.2.9 Summary Device Information
56
5.2.10 Configure Device Name
57
5.2.11 Device Details
58
5.3 Group Management
61
5.3.1 Manage Groups
62
5.3.2 View Profile Application Status
64
5.3.3 Manage AutoConfig
66
5.3.4 Persistent AutoConfig
68
5.3.5 View AutoConfig Status
70
5.4 Profile Management
72
5.4.1 Create a Profile
72
5.4.2 Duplicate a Profile
72
5.4.3 Delete a Profile
73
5.4.4 Modify Profile Name and Description
73
5.4.5 Modify Profile Properties
73
5.4.6 Import a Profile
76
5.4.7 Export a Profile
77
TER0812002 Issue 14
7
Teradici PCoIP® Management Console User Manual
5.5 Power Management
77
5.5.1 Sending Reset and Power off Commands
77
5.5.2 Power Management Status
79
5.5.3 Schedule Remote Power Down
80
5.5.4 View Remote Power Down Status
82
5.6 Update Firmware
82
5.6.1 Import Firmware
83
5.6.2 Update Device Firmware
83
5.6.3 View Status
85
5.6.4 Delete Firmware from the MC
86
5.7 Device Log Monitoring
86
5.7.1 Device Tree
87
5.7.2 Logging Controls
87
5.7.3 Status
88
5.8 Manage Settings
88
5.8.1 Database Management
89
5.8.2 Environment Settings
89
5.8.3 Manage Device Naming
90
5.8.4 Web Interface Session Timeout
90
5.9 Site Status
90
5.10 Online Help
92
6 Getting Started
93
6.1 Start the Management Console
93
6.2 Discover Devices
93
6.3 Adding Devices to a Group
93
6.4 Peering Devices
94
6.5 Configuring Zero Clients for VMware View
95
6.6 Familiarizing Yourself with the MC
96
Glossary of Definitions
98
TER0812002 Issue 14
8
Teradici PCoIP® Management Console User Manual
1
Introduction
The Teradici PCoIP® Management Console (MC) lets you centrally manage a PCoIP
deployment. The MC is packaged as a VMware® virtual machine (VM) and runs on VMware
Player, VMware Workstation, and VMware ESX® server. A web browser is used to access and
control the MC.
The MC lets you:
l
l
l
l
l
l
l
l
l
1.1
Access and update the configuration of your PCoIP devices.
Apply the same configuration data to groups of devices.
Update device firmware.
Reset devices.
Control the power state of host devices.
Remotely power down zero clients.
View status information.
Manage the monitoring of device event logs.
Automatically configure newly discovered devices with a profile (optionally with firmware
and OSD logo) based on device password, IP address, and DHCP option values.
About this Document
This document describes how to install and set up the MC. It also describes the features of
the tool. For more details about the individual PCoIP device configuration fields, see "PCoIP®
Zero Client and Host Administrator Guide" (TER1206003).
This document is arranged into the following sections:
l
l
l
l
l
Section 2 "Overview" provides a description of the components found in a PCoIP
deployment along with some important concepts associated with the MC.
Section 3 "Installation and Setup" describes how to install and set up the MC and migrate
from an old version of the tool to a new version.
Section 4 "Virtual Machine Features" details the features of the MC virtual machine.
Section 5 "Web Interface" discusses the web interface of the MC. This is the primary
mechanism for managing your PCoIP devices.
Section 6 "Getting Started" describes how to use the MC to perform some basic tasks,
such as starting the MC, logging into the web interface, discovering some devices, and
linking a pair of host and zero client devices. It also includes recommendations for
familiarizing yourself with the major capabilities of the MC.
Note: If you haven’t used the MC before and want to begin using the tool right away, review
Section 6 "Getting Started". The information in this section gets you to a point where you
TER0812002 Issue 14
9
Teradici PCoIP® Management Console User Manual
can establish a PCoIP session between the linked host and zero client devices, as well as a
PCoIP session in VMware View environment.
TER0812002 Issue 14
10
Teradici PCoIP® Management Console User Manual
2
Overview
This section describes the components found in a typical PCoIP deployment.
2.1
PCoIP Deployment Components
Figure 2-1 shows the recommended components found in a PCoIP deployment where
individual host and zero client devices are statically grouped together (peered). It shows the
MC used for peering and configuration. The figure does not show a connection broker, which
is required when hosts are dynamically assigned to zero clients as users log in.
Figure 2-1: PCoIP Deployment Components
2.1.1
Managing PCoIP Devices
A PCoIP deployment is made up of one or more PCoIP host and zero client devices. Each
device has multiple configuration settings that you can access and control using the
mechanisms explained below.
TER0812002 Issue 14
11
Teradici PCoIP® Management Console User Manual
Device Web Interface
Although you can configure each device individually via the Administrator Web Interface
(AWI), you are encouraged to use the MC (especially as the deployment grows). This ensures
that all PCoIP devices are configured uniformly and that the MC database accurately reflects
the device configuration settings.
For information about the device AWI, see "PCoIP® Zero Client and Host Administrator
Guide" (TER1206003).
PCoIP Management Console
The Teradici PCoIP Management Console (MC) lets you centrally manage a PCoIP
deployment. It lets you:
l
l
l
l
l
l
l
l
l
Access and update the configuration of your PCoIP devices.
Apply the same configuration settings to groups of devices.
Update device firmware.
Reset devices.
Control the power state of host devices that support power management.
Power off zero client devices.
View status information .
Manage the monitoring of device event logs.
Automatically configure newly discovered zero clients with a profile (optionally with
firmware and OSD logo) based on device password, IP address and DHCP option values.
The MC is packaged as a VMware virtual machine (VM) and runs on VMware Player. This lets
you install and run the MC on any host machine that can run VMware Player. You can also
install and run the MC on any VMware ESX server. See section 3.3 "Installing the
Management Console into Your Existing VMware ESXi™ Server" for details.
A web browser is used to access and control the MC.
The MC must be connected to the same network to which the PCoIP devices are connected.
This lets the tool communicate with the PCoIP devices.
Connection Broker
A connection broker is an optional component that lets you manage user access to
computing resources. Note that this component is not shown in Figure 2-1. In a PCoIP
deployment, a connection broker is used to assign connections between PCoIP host and
zero client devices. Deployments having the following requirement must install a connection
broker:
l
Hosts are dynamically assigned to zero clients based on the login credentials of the
person using the zero client.
TER0812002 Issue 14
12
Teradici PCoIP® Management Console User Manual
2.1.2
DNS Server
Figure 2-1 shows a DNS server with the MC DNS SRV record. This component is optional, but
highly recommended. The MC must discover the PCoIP host and zero client devices, and the
MC DNS SRV record facilitates automatic device discovery. You can also install a connection
broker DNS SRV record on the DNS server. PCoIP devices use this record to notify the
connection broker of their existence.
When a PCoIP device boots, it reads these records, which contain the addresses of the MC
and/or connection broker. After reading the records, the device sends messages to the MC
and/or connection broker notifying them of the device's existence. This ensures the MC
and/or connection broker is aware of the devices in the deployment as they are powered on.
The MC DNS SRV record is not required when one of the following conditions is true:
l
l
l
PCoIP DHCP Vendor Class Options are configured in the DHCP server. See "Configuring
DHCP Vendor Class Options on the DHCP Server" on page 19 for details on configuring
these options.
All PCoIP devices in a deployment reside on the same network subnet as the MC. In this
situation, the MC can find the devices using SLP discovery. All devices have the Enable
SLP Discovery configuration setting set to True.
The PCoIP MC DNS-Based Discovery Prefix setting for all devices is set to the hostname
prefix of the MC. You can only access this setting through the MC. You cannot access it
through the device AWI or zero client OSD interface. "PCoIP Management Console DNSBased Discovery Prefix" on page 23 describes how PCoIP devices use the PCoIP MC DNSBased Discovery Prefix setting to contact the MC. It also describes the system
requirements to use this option.
If none of the previous conditions are true, include a DNS server in your system and install
the MC DNS SRV record. See "Installing a DNS Service Record on the DNS Server" on page 17
for details on installing this record.
2.1.3
DHCP Server
A DHCP server with the PCoIP DHCP Vendor Class options (shown in Figure 2-1) is also an
optional component that is highly recommended. Like MC DNS SRV records, DHCP options
facilitate automatic device discovery. You can use these options in place of a DNS SRV record.
When a PCoIP device boots, it sends DHCP option 60 containing a PCoIP Vendor ID and
requests DHCP option 43, which contains the address of the MC. After receiving the address,
the device sends messages to the MC advertising its existence.
The PCoIP DHCP Vendor Class options are not required when one of the following conditions
is true:
l
The MC DNS SRV record is installed in the DNS server. See "Installing a DNS Service Record
on the DNS Server" on page 17 for details on installing this record.
TER0812002 Issue 14
13
Teradici PCoIP® Management Console User Manual
l
l
All PCoIP devices in a deployment are located on the same network subnet as the MC. In
this situation, the MC can find the devices using SLP discovery. All devices have the
Enable SLP Discovery configuration setting set to True.
The PCoIP MC DNS-Based Discovery Prefix setting for all devices is set to the hostname
prefix of the MC. You can only access this setting through the MC. You cannot access it
through the device AWI or zero client OSD. "PCoIP Management Console DNS-Based
Discovery Prefix" on page 23 describes how PCoIP devices use the PCoIP MC DNS-Based
Discovery Prefix setting to contact the MC. It also describes the system requirements to
use this option.
If none of the previous conditions are true, include a DHCP server in your system and
configure the PCoIP DHCP Vendor Class options. See "Configuring DHCP Vendor Class
Options on the DHCP Server" on page 19 for details on configuring this record.
Note: DHCP Options discovery is only available on PCoIP devices with firmware version 3.5.0
or higher.
2.2
Management Console Limitations
This section describes some limitations of the MC.
l
l
l
l
2.3
PCoIP devices managed by the MC must be loaded with firmware release 0.19 or greater.
The MC cannot discover devices loaded with older firmware releases. You must use the
device AWI to load and activate new firmware on each device running firmware releases
less than or equal to 0.18. See the PCoIP Zero Client and Host Administrator Guide
(TER1206003) for details on uploading firmware to a device using the AWI.
The current release of the MC is only compatible with the following browsers:
l Firefox 23 (or later)
l Internet Explorer 8 and 9
l Internet Explorer 11 in compatibility view
The MC supports linking PCoIP host and zero client devices in fixed seating mode where
the same zero client always connects to the same host. If dynamically assigning zero
clients to hosts is required, include a connection broker in the deployment.
The MC supports managing up to 2000 PCoIP devices. The tool may be able to support
more than 2000 devices, but the current version was tested with a maximum of 2000
devices. Support for more than 2000 devices will be included in a future release of the
tool. If your deployment has more than 2000 devices, contact your PCoIP equipment
supplier for help on managing more than 2000 devices.
Management Console Concepts
This section describes some key concepts to note before using the MC.
TER0812002 Issue 14
14
Teradici PCoIP® Management Console User Manual
2.3.1
Groups and Profiles
The MC manages the PCoIP devices using two important concepts (groups and profiles):
l
l
Profile: a set of device configuration settings
Group: a set of one or more devices with a single profile
Figure 2-2 shows an example of how groups of host devices could be related to profiles. The
figure shows three groups of devices. Two of the groups share the same profile. In this
example, configuration settings defined in the Development Profile are written to the devices
in the R&D and Engineering groups.
Figure 2-2: Management Console Groups and Profiles
Note some important rules regarding groups and profiles:
l
l
l
l
l
l
Each group has only one profile associated with it.
The same profile can be associated with multiple groups.
All configuration settings in a profile are written to all devices in a group when the profile
is applied to the group.
A profile can contain values for every configuration parameter, but this is not required.
You can define a profile that contains a subset of the configuration parameters.
If the firmware on a device is updated when a profile is applied, the profile settings are
written to the device after the new firmware is activated.
Profiles contain settings that let users specify if a device’s firmware is updated based on
the version of the firmware running on the device.
TER0812002 Issue 14
15
Teradici PCoIP® Management Console User Manual
l
l
2.3.2
When profile settings are written to devices, the settings might not take effect
immediately. Some settings are activated after a device is reset. Profile settings that
require a reset are preceded by the symbol within the MC Profile Set Properties and
Device Details webpages. Consider resetting your devices in the deployment after
updating device configuration settings.
When devices are added to a group and the group profile has not changed, apply the
profile to the newly added devices and not the entire group. This minimizes the number
of device resets.
Fixed Seating
The MC lets you link individual host and zero client devices so that each zero client always
establishes a connection to the same host. This relationship is called fixed seating. To
dynamically assign hosts to zero clients when your users log in, you must install a connection
broker. The MC does not support dynamically assigning hosts to zero clients.
2.3.3
Device Discovery
The MC must discover PCoIP devices before it can manage them. The MC supports
discovering devices in a deployment using one or more discovery mechanisms:
Recommended approaches:
l
Install a MC DNS SRV record. When DNS SRV record discovery is used, the PCoIP devices
advertise themselves to the MC. Devices that use the DNS server can find the MC. If DNSSRV discovery is not enabled, the MC must seek out and find devices using methods that
are often subject to limitations, such as being unable to search more than its local
subnet.
Note: Do not install a DNS SRV record if:
l Your network does not have a DNS server.
l You want to have multiple instances of the MC on your network to manage subsets of
your PCoIP devices. If you install a service record, the devices point to only one
instance of the MC.
See "Installing a DNS Service Record on the DNS Server" on page 17 for details.
l
Install PCoIP DHCP Vendor Class. When DHCP Options discovery is used, the PCoIP
devices advertise themselves to the MC. Devices that use the DHCP server can find the
MC. If DHCP is not enabled, the MC must locate devices using methods that are often
subject to limitations, such as being unable to search more than its local subnet.
Note: Do not install DHCP Options if:
l Your network does not have a DHCP server.
l You have PCoIP devices with a firmware version earlier than 3.5.0 in the network.
DHCP Options discovery is only available to PCoIP devices with firmware version 3.5.0
or higher.
See "Configuring DHCP Vendor Class Options on the DHCP Server" on page 19 for details.
TER0812002 Issue 14
16
Teradici PCoIP® Management Console User Manual
If you cannot install a DNS SRV record or DHCP Vendor Class Options, you may be able to
configure the devices to automatically notify the MC of their existence. PCoIP devices
support a configuration setting called the PCoIP MC DNS-Based Discovery Prefix.
Note: You can only access the PCoIP MC DNS-Based Discovery Prefix setting using the MC.
You cannot access it through the device AWI or zero client OSD interface.
See "PCoIP Management Console DNS-Based Discovery Prefix" on page 23 for details.
If you cannot install a DNS SRV record or use the PCoIP MC DNS-Based Discovery Prefix
configuration setting, the final automated device discovery option available is SLP discovery.
This device discovery method imposes a restriction that limits its usefulness. To use this
feature, all PCoIP devices and the MC must reside on the same network subnet.
If a deployment cannot support any of the previous device discovery options, you can use
the MC to configure devices. The MC supports a manual discovery feature that lets the MC
find devices.
Note: If you use this approach, note that if a device has DHCP enabled, the MC loses contact
with a device if its IP address changes. Should this occur, you must perform another manual
discovery search to find devices that were assigned new IP addresses.
See "Manual Device Discovery" on page 24 for more details.
Installing a DNS Service Record on the DNS Server
Before you can install the DNS service record:
l
l
The deployment must have a DNS server in the network.
Two DNS records must be installed on the DNS server:
l An A record (name record) for the MC
l A SRV record (service record)
Note: The following steps are an example of how to install a DNS SRV record to a DNS server
in Windows Server 2003. If you use a different type of server, modify the steps accordingly.
To add the MC DNS SRV record to DNS server in Windows Server 2003:
1. Enter DNS service configuration on domain controller.
2. Navigate to the local domain, and then select the _tcp entry folder.
TER0812002 Issue 14
17
Teradici PCoIP® Management Console User Manual
Figure 2-3: DNS Service Configuration Menu
3. Right-click, and then select Other New Records…
4. Select Service Location (SRV) and then Create Record…
5. Fill in the entries as shown in Figure 2-4. (Enter the hostname where the MC is installed
under the heading Host offering this service.)
Note: The PCoIP devices do not use the Port number setting. You can choose to set it to
50000 to reflect the listening port of the CMI server.
TER0812002 Issue 14
18
Teradici PCoIP® Management Console User Manual
Figure 2-4: DNS Service Location (SRV) Dialog Box
Configuring DHCP Vendor Class Options on the DHCP Server
Before you can install the DHCP options:
l
l
l
The deployment must have a DHCP server in the network.
The PCoIP devices must enable DHCP to send a request and receive the address of the
MC in response.
The DHCP server must support both DHCP Options 60 (Vendor class identifier) and 43
(Vendor specific information). See RFC 2132 for details on the DHCP options.
Note: The following steps are an example of how to configure DHCP Vendor Class Options in
a DHCP server in Windows Server 2003. If you use a different type of server, modify the steps
accordingly.
To add the PCoIP DHCP vender class options to the DHCP server in Windows Server 2003:
1.
2.
3.
4.
5.
Enter the DHCP service configuration on the DHCP Server console.
Right-click the DHCP server in the tree, and then choose Define Vendor Classes…
Click Add to add a new DHCP Vendor Class.
Enter PCoIP Endpoint in the Display name field.
Enter PCoIP Endpoint in the ASCII column as the Vendor ID.
TER0812002 Issue 14
19
Teradici PCoIP® Management Console User Manual
Note: For Cisco VXC 2111 and VXC 2211 PCoIP devices with firmware version 4.0.0 or higher,
use VXC2111 and VXC2211, respectively, as the Vendor ID.
Figure 2-5: Add a New DHCP Vendor Class Configuration
6.
7.
8.
9.
Click OK to save and close the dialog.
Right-click the DHCP server in the tree, and then choose Set Predefined Options…
Select PCoIP Endpoint as the Option class, and then click Add…
Enter the name MC Address, data type String, code 1, and description MC Address,
and then click OK.
TER0812002 Issue 14
20
Teradici PCoIP® Management Console User Manual
Figure 2-6: Add a DHCP Option Type Dialog Box
10. Click OK to save and close the dialog.
11. Expand the tree for the DHCP server, and expand the tree for the Scope to which you
want to add options.
12. Right-click Scope Options, and then choose Configure Options…
13. Click the Advanced tab, and then select the PCoIP Endpoint Vendor class.
14. Enable the checkbox for the MC Address, and then enter a valid MC IP address in the
Data entry field.
15. Click OK to save.
TER0812002 Issue 14
21
Teradici PCoIP® Management Console User Manual
Figure 2-7: DHCP Scope Options Dialog Box
Optionally, you can add MC AutoConfig Group and MC AutoConfig Behavior options in the
PCoIP Endpoint vendor class. Add the options in the Predefined Options and Values dialog
using the following values:
l
l
MC AutoConfig Group: Enter the name MC AutoConfig Group, data type String, code 2,
and description MC AutoConfig Group.
MC AutoConfig Behavior: Enter the name MC AutoConfig Behavior, data type Byte,
code 3, and description MC AutoConfig Behavior.
Then enter the data entry in the Scope Options dialog.
1. MC AutoConfig Group: String value of a group name.
2. MC AutoConfig Behavior: Byte value representing one of the following options:
0. AutoConfig: All new devices
Persistent AutoConfig: Only when device is in MC AutoConfig Group
1. AutoConfig: All new devices
Persistent AutoConfig: All grouped devices
2. AutoConfig: None
Persistent AutoConfig: None
MC AutoConfig Behavior option is only used when MC AutoConfig Group option is
configured. It is recommended to configure both options together.
TER0812002 Issue 14
22
Teradici PCoIP® Management Console User Manual
PCoIP Management Console DNS-Based Discovery Prefix
Each PCoIP device reads the PCoIP MC DNS-Based Discovery Prefix setting when it boots. If
this setting is not blank during startup, the device tries to contact the MC by combining the
string stored in this setting with variations of the domain name hierarchy.
System Requirements
The system requirements for MC DNS-Based Discovery are as follows:
l
l
l
l
The PCoIP devices and MC must be located within the same domain name hierarchy tree
(e.g., if a PCoIP device is located in the domain sales.europe.companyname.com, then
the MC’s domain name can be any one of: sales.europe.companyname.com,
europe.companyname.com, or companyname.com).
The PCoIP devices must enable DHCP to get the domain name and hostname (to get
DHCP options 15 and 12, respectively).
The DHCP server must support either DHCP options 12 (hostname), 15 (domain name), or
both. See RFC 2132 for details on the DHCP options. If the DHCP server only supports
DHCP options 12, the hostname string must contain the domain name.
PCoIP devices managed by a specific MC must have the PCoIP MC DNS-Based Discovery
Prefix setting equal to the MC’s hostname prefix (e.g., if the MC’s FQDN is pcoip_
mc1.europe.companyname.com, then the field must equal pcoip_mc1).
Algorithm
Each time a PCoIP device boots, it executes the MC DNS-based discovery algorithm if the
PCoIP MC DNS-Based Discovery Prefix setting is non-blank. The algorithm uses the setting
and the domain name hierarchy to search for a MC.
The PCoIP device gets the domain name string from the DHCP server using DHCP options 15.
Since some DHCP servers may not have DHCP options 15 implemented, the device also gets
the hostname using DHCP options 12 (assumed to include the domain name).
Since the device and MC may not be on the same domain (but must be within the same
hierarchy), the device creates many FQDN variations using the results from DHCP options 12
and 15. With each FQDN variation, the hostname prefix remains constant while the domain
hierarchy level changes.
The device sequentially attempts each FQDN possibility until a hit is found, at which point
the device completes the DNS-based discovery. The algorithm may take several minutes to
find the correct FQDN address of the MC (this depends on the number of levels in the
domain name hierarchy and the MC load).
In detail, the algorithm works as follows:
1. The device uses domain name variations based on the DHCP options 15 string. For
each FQDN possibility, the device attempts to transmit a status message to the MC at
the FQDN.
TER0812002 Issue 14
23
Teradici PCoIP® Management Console User Manual
2. If the transmission times out, the device creates the next FQDN variation by proceeding
one level up the domain hierarchy. The last domain name attempted has a single dot in
the string.
3. After exhausting the FQDN possibilities (based on the DHCP options 15 string), the
device waits for five minutes and then uses hostname variations based on the DHCP
options 12 string.
4. After failing to contact a MC using the DHCP options 12 string, the device waits for five
minutes and then cycles back to using DHCP options 15.
5. The device repeats this process until a MC is contacted.
Example:
In the following example, the DHCP options 15 returns sales.europe.companyname.com.
DHCP options 12 returns hostmachine1.sales.europe.companyname.com. Note that the
DHCP server may return no value for either option. The MC configured the PCoIP MC DNSBased Discovery Prefix setting in the device to equal pcoip_mc1.
The device creates the following FQDNs and sequentially attempts contact with the MC:
(attempt #1) pcoip_mc1.sales.europe.companyname.com
(attempt #2) pcoip_mc1.europe.companyname.com
(attempt #3) pcoip_mc1.companyname.com
<device delays for 5 minutes>
(attempt #4) pcoip_mc1.hostmachine1.sales.europe.companyname.com
(attempt #5) pcoip_mc1.sales.europe.companyname.com
(attempt #6) pcoip_mc1.europe.companyname.com
(attempt #7) pcoip_mc1.companyname.com
<device delays for 5 minutes>
(attempt #8) pcoip_mc1.sales.europe.companyname.com (repeat 1-7)
...
Attempts 1 to 3 use the domain name from DHCP options 15 string. Failing to contact the
MC, the device uses the DHCP options 12 string for attempts 4 to 7. Failing transmissions for
attempt 4 to 7, the device cycles back to using DHCP options 15.
Manual Device Discovery
Manual device discovery is not an automated discovery mechanism. This mechanism
supports discovering devices that are powered on and connected to the network when the
MC is commanded to discover devices.
The MC supports manually discovering devices at a specific IP address, in a range of IP
addresses or at an FQDN. This option is useful to quickly begin using the MC or when a
deployment uses the PCoIP MC DNS-Based Discovery Prefix configuration setting described
in "PCoIP Management Console DNS-Based Discovery Prefix" on page 23. In this situation,
TER0812002 Issue 14
24
Teradici PCoIP® Management Console User Manual
you can discover devices using this feature and configure the PCoIP MC DNS-Based
Discovery Prefix setting of each device so the devices contact the MC each time they boot.
Figure 2-8 shows the Management Console Device Management webpage with the Device
Discovery feature expanded.
l
l
When the IP address of a device is known and the device has not been discovered, enter
the address in the from IP field, and then select Discover Devices.
When a device is on a specific subnet but its IP address is not known, you can command
the MC to discover the devices in a range of IP addresses using both the from IP and
(optional) to IP fields. After you specify the address range, select Discover Devices.
Note: This process can take a few minutes to complete depending on the number of
addresses searched. A status bar appears while the tool discovers devices.
l
When the FQDN of a device is known and the device is not discovered, enter the FQDN in
the FQDN field and select Discover Devices.
Figure 2-8: Management Console Manual Device Discovery Feature
TER0812002 Issue 14
25
Teradici PCoIP® Management Console User Manual
2.3.4
AutoConfig
When the MC discovers new PCoIP zero clients, it automatically adds them to a group and
applies the group’s profile. You can create AutoConfig rules to let one group have one or
more criteria defined.
The MC supports the following criteria to decide how zero clients are automatically assigned
to groups using AutoConfig:
l
l
Each group can have an optional AutoConfig rule associated with it.
Rules are sets of optional password settings and optional IP address ranges:
l No Password: Add discovered zero clients to this group if they have no password
configured.
l Password: Add discovered zero clients to this group if they have the identical
password configured for the criteria.
l IP address range: Add discovered zero clients to this group if the IP address falls
within the range configured by the criteria. Not specifying an IP address range adds
zero clients that match the password criteria.
l DHCP Option Matching: Add discovered zero clients to this group if their PCoIP DHCP
option values are configured so that the group name is set in the MC AutoConfig
Group option and the MC AutoConfig Behavior option is not set to 2.
See "Configuring DHCP Vendor Class Options on the DHCP Server" on page 19 for
details.
When a zero client is discovered:
1.
2.
3.
4.
The device is listed in the AutoConfig status table with a status of Not Started.
The zero client IP address and password are compared against all AutoConfig rules.
If a match is found, the zero client is added to that group.
If the group‘s profile contains a firmware rule, the firmware is applied if it passes the
criteria and the device is rebooted.
5. The rest of the profile‘s properties are now applied to the device.
6. After applying the profile‘s OSD logo and properties, the zero client is rebooted.
See "Configuring DHCP Vendor Class Options on the DHCP Server" on page 19 for more
details on configuring AutoConfig.
TER0812002 Issue 14
26
Teradici PCoIP® Management Console User Manual
2.4
Management Console and Firmware Version Compatibility
Table 2-1: Management Console and Firmware Version Compatibility
MC Version
Compatible with
FW Versions
Fully Configures FW Versions
1.10.1
3.5.1 – current
3.5.1 – 4.5.0
Added the following features:
l
l
l
1.10.0
3.5.1 – current
Enable/disable new Auto Detect session connection type
for Tera2 zero clients (Profiles > Session Configuration).
Enable/disable new Low Bandwidth Text Codec mode for
TERA2321 zero clients (Profiles > Image Configuration)
Enable/disable new Enable Accelerated Monitor
Emulation setting for Tera2 host cards (Profiles > Display
Configuration).
3.5.1 – 4.2.0
Added the following features:
l
l
l
l
1.9.1
3.5.1 – current
An inactivity timeout period for the web UI can be
configured from the Settings webpage.
A warning displays during login if another user is currently
logged in.
Firmware patch releases can be uploaded within a profile.
The MC supports firmware combined files only (.pcoip
extension). The .all file type is no longer supported.
3.5.1 – 4.1.2
Added the ability to:
l
Configure preferred resolution override
l
Enable accept any peer
l
l
TER0812002 Issue 14
Configure connection server auto connect mode option:
Enable with retry on error
Configure display suspend timeout
27
Teradici PCoIP® Management Console User Manual
MC Version
Compatible with
FW Versions
Fully Configures FW Versions
1.9.0
0.19 – current
0.19 – 4.1.0
Added the ability to:
l
Configure Simple Certificate Enrollment Protocol (SCEP)
l
Configure zero client power down timeout
l
Disable Connection Management Interface (CMI)
l
Enable display cloning
l
Enable 802.1X support for legacy switches
l
l
l
l
1.8.1
TER0812002 Issue 14
0.19 – current
Configure OneSign mode proximity reader beep control
option: Use existing proximity card beep mode
Choose the Portuguese (Brazilian ABNT) and Slovak
(QWERTY and QWERTZ) keyboard layouts
Enable host hot-plug delay
Configure PCoIP Connection Manager Session Connection
Type
l
Configure custom session Server Name Indication (SNI)
l
Enable Differentiated Services Code Point (DSCP)
l
Enable transport congestion notification
0.19 – 4.0.3
28
Teradici PCoIP® Management Console User Manual
MC Version
Compatible with
FW Versions
Fully Configures FW Versions
1.8.0
0.19 – current
0.19 – 4.0.1
Added the ability to:
l
l
1.7.1
0.19 – current
Configure certification check mode in View Connection
Server mode
Enable certification check mode lockout in View
Connection Server mode
l
Clear trusted View Connection Server address cache
l
Configure session negotiation security level
l
Configure SNMP community name
l
Configure Imprivata OneSign appliance verification
l
Configure Imprivata OneSign desktop name mode
l
Enable proximity reader beep
l
Configure session lost timeout
l
Enable session disconnect hotkey
l
Configure display topology
l
Enable monitor emulation on video port 3 and 4
l
Enable Wake-on-USB
l
Enable Wake-on-LAN
l
Enable power on after power loss
l
Enable AES-256
0.19 – 3.5.1
Added the ability to:
TER0812002 Issue 14
l
Enable session login overlay: “Preparing Desktop…”
l
Choose the Turkish F keyboard layout
29
Teradici PCoIP® Management Console User Manual
MC Version
Compatible with
FW Versions
Fully Configures FW Versions
1.7.0
0.19 – current
0.19 – 3.5.0
Added the ability to:
l
Configure Imprivata OneSign authentication servers
l
Configure Self Help Link on VMware View login dialogs
l
Configure session connection type
l
1.5.20,
1.5.30, 1.6.0
0.19 – current
l
Enable/disable build to lossless
l
Configure maximum frame rate
l
Configure IPv6
l
Configure 802.1x authentication
l
Configure Hotkey to reset Zero Clients to factory default
l
Configure disconnect message dialog filter
l
Configure enhanced logging mode
l
Configure audio-in mode
l
Configure USB 2.0
0.19 – 3.4.1
Added the ability to:
l
Configure syslog
l
Configure static IP address fallback
l
l
1.4.30,
1.4.40
0.19 – current
Choose the Czech, Romanian and Slovenian keyboard
layouts
Configure the USB bridging override table
0.19 – 3.3.0
Added the ability to:
l
Configure View desktop name to select
l
Enable/disable zero client web interface
l
l
l
l
TER0812002 Issue 14
Configure minimum image quality and maximum initial
image quality on host devices
Selective display of zero client On-Screen Display menu
entries
VMware View Connection Server address cache behavior
and content
Choose the Estonian, Hungarian, Latvian and Serbian
keyboard layouts
Configure VMware View auto-logon
30
Teradici PCoIP® Management Console User Manual
MC Version
Compatible with
FW Versions
Fully Configures FW Versions
1.3.30
0.19 – current
0.19 – 3.2.0
Added the ability to:
l
1.2.20
0.19 – current
Danish, Finnish, Norwegian, Swedish, Turkish, Dutch,
Polish, Belgian, Russian and Lithuanian Keyboard Layouts
l
Advanced VMware View Settings
l
VMware View Kiosk Mode
l
Enable/disable Peer Loss Overlay
0.19 – 3.1.0
Added the ability to:
1.1.20
0.19 – current
l
Enable/disable SNMP server
l
Enable/disable host driver function
l
Configure session encryption modes
l
Choose the Korean keyboard layout
0.19 – 2.2
Added the ability to:
1.0.26,
1.0.28
TER0812002 Issue 14
0.19 – current
l
Configure View Connection Server address
l
Configure View Connection Server port
l
Enable/disable View Connection Server SSL
l
Enable/disable View Connection Server Auto Connect
l
Configure device bandwidth floor
0.19 – 1.10
31
Teradici PCoIP® Management Console User Manual
3
Installation and Setup
This section describes how to install and set up the MC. It also describes how to migrate
from an old version of the MC to a new version.
3.1
Management Console Host System Requirements
The MC server machine must meet the requirements of the virtualization environment in
which the MC VM will run.
l
l
l
l
3.2
The MC server machine must meet the requirements of the VMware Player 5. For a
VMware Player installation, see the VMware Player documentation
(http://www.vmware.com/pdf/desktop/vmware_player50.pdf) for the most up-to-date
requirements. The current requirements are:
l 64-bit x86 CPU with LAHF/SAHF support in long mode
l Processor speed: 1.3 GHz or faster
l Memory: 1 GB minimum, 2 GB recommended. You must have enough memory to run
the host operating system, the virtual machine, and applications on the host and
guest operating systems.
l Hard disk: At least 1 GB of free disk space for each guest operating system. For
installation, VMware Player requires approximately 250 MB (Windows) or 200 MB
(Linux) of free disk space.
The MC server machine CPU requirements differ based on the number of PCoIP devices
managed. If the MC manages fewer than 1000 devices, the server machine CPU should be
a 2 GHz or faster Intel Pentium 4 or better processor. If the MC manages 1000 or more
devices, the server machine CPU should be an Intel Core™2 Duo Processor or better.
The MC virtual machine is configured to use 640 MB of RAM. For best performance, the
server machine should have at least 1 GB of RAM to avoid excessive swapping.
The MC server machine must have 4 GB of available disk space to accommodate the
virtual machine’s disk image.
Contents of the Management Console Package
The zip file contains the following files:
l
l
l
Teradici_End_User_License_Agreement.pdf: Teradici end user license file.
PCoIP_MC_relA-B-C_vDEF.vmx: Teradici PCoIP Management Console VMware
configuration file for the virtual machine that hosts the Management Console.
PCoIP_MC_relA-B-C_vDEF.vmdk: Teradici PCoIP Management Console VMware virtual
disk file containing the virtual machine's hard drive. The size of this file increases as the
MC is used. The maximum size of the file is 4 GB.
TER0812002 Issue 14
32
Teradici PCoIP® Management Console User Manual
l
l
l
l
l
3.3
pcoipmc_cacert.p7b and pcoipmc_cacert.pem: PCoIP Management Console CA root
certificate in Internet Explorer and Mozilla Firefox formats. Refer to CA_root_certificate_
installation.txt for instructions on how to use these certificates to eliminate browser
certificate security warnings when accessing the web UI.
CA_root_certificate_installation.txt: Contains directions on how to install the PCoIP
Management Console root certificate into Internet Explorer and Mozilla Firefox. These
instructions are also available in sections 5.1.1 "Installing the MC Certificate in Internet
Explorer" and 5.1.2 "Installing the MC Certificate in Firefox".
README.txt: File describing the contents of the zip file
TER0812002_Issue_X-PCoIP_Management_Console_User_Manual.pdf: Teradici PCoIP
Management Console User Manual, where X is the current issue number
TER0904003_Issue_X-PCoIP_MC_Release_Notes.pdf: Teradici PCoIP Management
Console Release Notes, where X is the current issue number
Installing the Management Console into Your Existing VMware
ESXi™ Server
To install the MC into your ESXi server:
1. Download and install the free VMware vCenter™ Converter™ client from
http://www.vmware.com/products/converter/. You must use this standalone tool to
import the MC VM into a VMware ESXi host. Failure to do so can result in ESXi host
crashes, high CPU usage, and poor MC performance.
2. Click the Convert Machine button to launch the Conversion wizard.
3. Select source type VMware Workstation or other VMware virtual machine.
4. Use the Browse button to locate the PCoIP MC's .vmx file. Click Open, and then Next.
5. Select the destination type VMware Infrastructure virtual machine.
6. Enter the address, user name, and password of either the VMware vCenter or the
VMware ESX host. Click Next.
7. Edit the virtual machine name (optional), and then click Next.
8. Review the options, and then click Next.
9. Click Finish to begin the conversion.
10. Once complete, start the VM through VMware vSphere client or your preferred
mechanism.
11. See section 3.2 "Contents of the Management Console Package" to learn about the
contents of the MC virtual machine.
3.4
Installing the Management Console Using VMware Player
1. Download the VMware Player application. The MC is distributed as a VMware virtual
machine (VM) contained in a zip file. The VM is run using VMware Player. VMware
TER0812002 Issue 14
33
Teradici PCoIP® Management Console User Manual
Player is an application that you can download from
http://www.vmware.com/download/player/. Follow the directions provided by
VMware to download and install this application on the MC host machine.
2. Extract the contents of the file PCoIP_MC_relA-B-C_vDEF.zip into a folder on the MC
host machine. The release number (A-B-C) and build ID (DEF) are encoded in the
filename.
3. To start the MC, open the folder from step 2. Double-click the file PCoIP_MC_relA-BC_vDEF.vmx to launch VMware Player and have it load the MC VM.
You can also start the MC from within VMware Player. Select File > Open a Virtual
Machine, and then navigate to the PCoIP_MC_relA-B-C_vDEF.vmx file. Click Open.
Once VMware Player has launched the MC at least once, you can restart the MC from
within VMware Player’s startup screen by double-clicking on the PCoIP MC entry in the
list of recently opened VMs.
3.5
Running the Management Console
Before running the MC, make sure the MC host machine and PCoIP devices are connected to
the same network. The MC supports both DHCP and static IP addressing.
After starting the Management Console, you can display the MC VM console window using
one of the following methods:
l
l
From your vSphere client, right-click the MC VM in inventory, and then select Open
Console.
If you are using VMware Player, the MC VM console appears automatically. As the VM
boots, a series of standard Linux boot messages display before the top-level menu
appears.
The URL (web interface address) for the Management Console displays in the MC VM
console, as shown in Figure 3-1.
TER0812002 Issue 14
34
Teradici PCoIP® Management Console User Manual
Figure 3-1: MC VM Console
For information on how to access the MC VM console features, see section 4 "Virtual
Machine Features".
3.6
Migrating to a New Version of the Management Console
New releases of the MC are periodically released. These releases include support for new
features and/or bugs fixes. This section describes:
l
l
l
3.6.1
Potential problems that can occur when migrating to a new version of the MC along with
recommendations on how to avoid them.
Information that is and is not imported from a backed up database.
Steps to follow when migrating to a new version of the MC.
Potential Problems and Workarounds
Table 3-1 lists the problems that can occur when installing a new version of the MC. It
includes recommendations to follow in order to avoid or work around each problem.
TER0812002 Issue 14
35
Teradici PCoIP® Management Console User Manual
Table 3-1: Potential Problems Associated with Upgrading the MC
3.6.2
Problem
Workaround
The database restore
feature can only import
databases created by old
versions of the MC.
Do not try to import databases created by a newer version of the
MC into older versions of the MC.
When a deployment installs
a new version of the MC,
the PCoIP host and zero
client devices may lose
contact with the MC.
This problem does not occur if the IP address of the new
instance of the MC is the same as the old version of the MC. The
best option is to assign a static IP address to the MC.
If the MC IP address is assigned by a DHCP server and the
deployment installed a MC DNS SRV record, the PCoIP devices
eventually re-establish contact with the new version of the MC.
The devices are out of contact with the MC for up to n seconds,
where n is equal to the value of the Time-To-Live field included
in the MC DNS SRV record. You can force the devices to contact
the new MC by resetting the devices. You can also import the
database of the old version of the MC. This makes the MC aware
of the PCoIP devices in the deployment.
What Information Is Imported
When a database is imported into the MC, the following information is populated:
l
l
l
l
Device information for all devices (device details, profile, group, and peering information)
Previously imported firmware images
Profiles
Groups
If the imported database was created by an instance of the MC running release 1.1.x or
higher, the following additional information is populated. Databases created by release 1.0.x
of the MC do not export these settings.
l
l
l
MC web interface password
MC network configuration settings
MC hostname
The MC time zone settings are not imported.
Note: When migrating to a new version of the MC, you are responsible for reconfiguring the
settings that were not imported.
3.6.3
Database Migration Procedure
This section lists the process to migrate to a new version of the MC.
TER0812002 Issue 14
36
Teradici PCoIP® Management Console User Manual
1. Use the old version of the MC to back up the current MC database. See section 4.5.1
"Back Up Database"
2. Download the backed up database to a host computer. See section 5.8.1 "Database
Management".
3. See section 3.6.2 "What Information Is Imported" for a list of the settings that are and
are not imported by the new version of the MC when a database is restored. Before
you shut down the old version of the MC, write down the values of the settings that
are not imported.
4. Shut down the old version of the MC. See section 4.8 "Halt Virtual Machine".
5. Install and begin running to the new version of the MC.
6. Upload the database to the MC from the host computer. See section 5.8.1 "Database
Management".
7. Restore the database from the imported database. See section 4.5.2 "Restore
Database".
8. Configure the settings that were not imported when the database was restored.
TER0812002 Issue 14
37
Teradici PCoIP® Management Console User Manual
4
Virtual Machine Features
This section describes the features accessed and controlled through the MC VM console. The
top-level menu of the MC is shown in Figure 4-1.
To access the menus:
l
l
If you are using vSphere Client, click in the window to interact with the VM. To get back to
your host operating system, press Ctrl+Alt.
If you are using the VMware Player, the bottom of the window describes how to interact
with the VM and return to the host operating system.
Figure 4-1: Management Console VM Console
4.1
Refresh Status
The Refresh status option lets you refresh the information that appears in the MC VM
console window.
TER0812002 Issue 14
38
Teradici PCoIP® Management Console User Manual
4.2
Set Web Interface Password
The MC web interface is protected by a password. When a browser connects to the MC web
interface, you are prompted to enter a password. To configure this password, select the Set
web interface password option from the MC VM console.
4.3
Change Hostname
The default hostname of the MC is pcoip-mc. The MC registers this hostname with the DNS
server (if a server is present on the network). You can update this field using the Change
hostname option shown in Figure 4-1.
If a deployment installs more than one copy of the MC, make sure each instance of the
hostname is set to a unique value.
If the deployment does not install a MC DNS SRV record, you should configure the PCoIP MC
DNS-Based Discovery Prefix field of each PCoIP device to equal the hostname prefix of the
MC. See "PCoIP Management Console DNS-Based Discovery Prefix" on page 23 for additional
details on this field and the system requirements associated with using it. To configure this
field, configure the PCoIP MC DNS-Based Discovery Prefix setting in the profiles and apply
the profiles to the devices in the deployment.
4.4
Manage Networking
The MC communicates with a web browser through a network connection. You must assign
it a unique IP address. By default, the MC uses DHCP to acquire an IP address. You can
modify the MC network settings to use a static IP address if a DHCP server does not exist on
your network or you want to assign a static IP address. To modify the MC network settings,
select the Manage networking option shown in Figure 4-1.
The network options shown in Figure 4-2 appear:
TER0812002 Issue 14
39
Teradici PCoIP® Management Console User Manual
Figure 4-2: Manage MC VM Console Network Settings
4.4.1
View Network Configuration
The View network configuration option lets you view the current network configuration
settings of the MC.
4.4.2
Configure IP Address
The Configure IP address option lets you select:
l
l
4.4.3
DHCP
Static IP addressing: If you choose static IP addressing, you must configure the MC IP
address and subnet mask. The gateway address, broadcast address, and domain are
optional and can be left blank. After you update the IP address settings, the MC restarts
the network interface using the new settings.
Configure DNS
The Configure DNS option lets you configure the Domain Name Server(s) and search domain
(s) used by the MC. The MC queries the DNS Server(s) to determine if the MC DNS SRV record
and connection broker DNS SRV record are present. The status of these records appears in
the site status on the Home webpage. See section 5.9 "Site Status" for details.
Note: When the MC is configured to use DHCP, the DNS settings configured here may be
overwritten by the settings configured in the DHCP server.
TER0812002 Issue 14
40
Teradici PCoIP® Management Console User Manual
4.5
Database Management
The MC maintains a database containing information on the discovered PCoIP devices,
configuration data, such as device name, and other information, such as firmware images
that can be downloaded to PCoIP devices. The MC VM console supports commands that let
you back up and restore this database. You should use this feature when you upgrade the
MC.
Before you install the new version of the MC:
1.
2.
3.
4.
Back up the MC database.
Export the database to an external PC.
Install the new version of the MC.
Import the backed up database.
Select the Manage database option shown in Figure 4-1 to access these commands. Figure 43 shows the MC Manage database options.
Figure 4-3: Manage MC VM Console Database
4.5.1
Back Up Database
The Backup database to archive command lets you take a snapshot of the current database
contents and store it in an archive. The archive resides within the MC VM.
TER0812002 Issue 14
41
Teradici PCoIP® Management Console User Manual
You should use this command with the Download database command on the Database
Management webpage to back up and store the contents of the database somewhere
outside of the MC VM. See section 5.8.1 "Database Management" for details on
downloading a backup file to the host PC from the MC VM.
4.5.2
Restore Database
The Restore database from archive command lets you update the active MC database from
a previously stored archive. Note that the archive must already reside within the MC VM
before you restore the database.
You should use this command with the Upload command on the Database Management
webpage to restore the MC database from an archive located outside of the MC VM,
possibly on the MC host machine. See section 5.8.1 "Database Management" for
information on uploading a backup file to the MC VM from a host PC.
Note: Section 3.6.2 "What Information Is Imported" describes the specific information that is
and is not imported into the MC by the Restore Database command.
4.5.3
Delete Database
The Delete database archive command lets you delete a database archive from the MC VM.
4.6
Change Time Zone
The MC retrieves the current time from the host machine. The host machine provides this
time in Coordinated Universal Time (UTC) form. Because the host does not provide time zone
information, you must configure the time zone.
To configure the time zone:
1. Select the Change timezone option on the MC VM console.
2. Select a geographic area that determines the time zone. For example, select
America/New York if located in the same time zone as New York City.
Note: You can use the MC without configuring the time zone. If you do not configure the
timezone, the time that appears at the top of the MC VM console will be incorrect and the
timestamps that appear on various screens in the MC web interface will also be incorrect.
4.7
Restart Management Console Daemon
To restart the MC daemon, select the Restart MC daemon option on the MC VM console. A
message indicating the daemon is restarting appears on the MC VM console. This lets you
know when the restart is complete.
You should execute this command:
TER0812002 Issue 14
42
Teradici PCoIP® Management Console User Manual
l
l
4.8
If the MC daemon status reported on the console interface shown in Figure 4-1 is
stopped.
If the Management Console Health shown in the Site Status section of the Home page is
not “Good”.
Halt Virtual Machine
To perform a clean shutdown of the MC VM, select the Halt virtual machine option on the
MC VM console. You can restart the MC VM at a later time. When the MC VM is restarted,
the MC database is restored to the state it was in when the MC VM was last stopped.
TER0812002 Issue 14
43
Teradici PCoIP® Management Console User Manual
5
Web Interface
The MC web interface is the primary tool used to manage PCoIP devices in a deployment.
This section describes the features accessed and controlled through this interface.
5.1
Accessing the Management Console Web User Interface
Note: It is recommended that you install the PCoIP Management Console CA root certificate
before using the MC web user interface. See section 3.2 "Contents of the Management
Console Package" for information about this certificate.
To access the MC web user interface:
1. Connect a computer to the same network to which the MC server machine is
connected.
Note: This computer can be the server machine itself.
2. Open a web browser, and then enter the webpage URL of the MC (see Figure 3-1).
The MC web server is compatible with Firefox 23 (or later), Internet Explorer 8 and 9,
and Internet Explorer 11 in compatibility view. If you try to log into the MC web
interface using a different browser, an error message appears that lists the supported
browsers.
When the web browser first connects to the MC, a security warning appears that is
similar to the message shown in Figure 5-1 for Internet Explorer or the message shown
in Figure 5-2 for Firefox. For details on installing the required certificate, see section
5.1.1 "Installing the MC Certificate in Internet Explorer" and section 5.1.2 "Installing the
MC Certificate in Firefox".
Figure 5-1: Web Interface Security Warning in Internet Explorer
TER0812002 Issue 14
44
Teradici PCoIP® Management Console User Manual
Figure 5-2: Web Interface Security Warning in Firefox
5.1.1
Installing the MC Certificate in Internet Explorer
1. In a Windows Explorer window, right-click on the pcoipmc_cacert.p7b certificate file
and then select Install Certificate.
2. When the Certificate Import Wizard appears, click Next.
3. Select Place all certificates in the following store.
4. Click the Browse button, select Trusted Root Certification Authorities in the Select
Certificate Store dialog, and then click OK.
5. Click Next.
6. Click Finish to complete the import. The PCoIP Management Console CA root
certificate is now added the Windows Trusted Root Certification Authorities certificate
store.
7. Restart Internet Explorer so that it rescans the Windows certificate store.
5.1.2
Installing the MC Certificate in Firefox
1.
2.
3.
4.
5.
From the Firefox Tools menu, select Options.
Click the Advanced icon at the top of the window.
From the Certificates tab, click the View Certificates button.
From the Authorities tab, click the Import button.
From the Select File dialog, select pcoipmc_cacert.pem, and then click Open.
TER0812002 Issue 14
45
Teradici PCoIP® Management Console User Manual
6. When the Downloading Certificate dialog appears, check the option labeled Trust this
CA to identify web sites and then click OK. The PCoIP Management Console CA root
certificate appears in the list on the Authorities tab.
Note: In Firefox you can also disable the certificate warnings by adding an exemption for the
MC. To do this, click I Understand the Risks on the This Connection is Untrusted warning
page and follow the directions given to add an exemption.
5.1.3
Logging into the MC Web User Interface
After adding the security exception in Firefox or installing the certificate in either browser, the
web browser connects to the MC. You must enter a password, as shown in Figure 5-3. The
default password is blank. See section 4.2 "Set Web Interface Password" for details on
modifying the password.
Figure 5-3: Web Interface Login
If another user is already logged in, a warning message informs you, providing the IP address
from which the user is logged in and the length of time the user has been inactive. An
example is shown in Figure 5-4.
TER0812002 Issue 14
46
Teradici PCoIP® Management Console User Manual
Figure 5-4: Login Warning Message
5.1.4
Accepting the Teradici End User License Agreement
When you first log in to the MC, a prompt appears to accept the Teradici End User License
Agreement shown in Figure 5-5. You must complete this process once. For subsequent logins
to the MC, there is no prompt to accept this agreement. You can view the license agreement
by clicking the License Agreement link near the bottom of the MC webpages. The Teradici
End User License Agreement document is also included in the MC .zip file.
TER0812002 Issue 14
47
Teradici PCoIP® Management Console User Manual
Figure 5-5: Teradici End User License Agreement
5.1.5
Using the MC Home Page
After you log in, the MC Home webpage, shown in Figure 5-6, appears. The Home page lets
you:
l
l
l
l
l
l
l
l
l
l
l
l
l
Manage devices (see section 5.2 "Device Management"
Manage groups of devices (see section 5.3 "Group Management").
Manage device profiles (see section 5.4 "Profile Management").
Reset devices (see section 5.5 "Power Management").
Control the power state of host devices (see section 5.5 "Power Management").
Power off zero client devices (see section 5.5 "Power Management").
Update device firmware (see section 5.6 "Update Firmware").
Manage the monitoring of device event logs (see section 5.7 "Device Log Monitoring").
Upload/download MC database archives (see section 5.8 "Manage Settings").
Customize the MC configuration settings (see section 5.8 "Manage Settings").
Set or disable a web interface session timeout (see section 5.8 "Manage Settings").
View site status information (see section 5.9 "Site Status").
Access online help (see section 5.10 "Online Help").
TER0812002 Issue 14
48
Teradici PCoIP® Management Console User Manual
Figure 5-6: Home Webpage
5.2
Device Management
The Device Management webpage, shown in Figure 5-7, lets you:
l
l
l
l
l
l
l
l
l
l
Discover devices manually.
Query devices and update the database.
Display a subset of devices based on various filter criteria.
Configure the group each device belongs to.
Link host and zero client devices.
Open a web browser connected to device’s webpage.
View summary information about a device.
Configure the name of each device.
View device details (device configuration settings, profile settings).
Delete a device from the MC database.
TER0812002 Issue 14
49
Teradici PCoIP® Management Console User Manual
Figure 5-7: Device Management Webpage
5.2.1
Device Discovery (Optional)
See "Manual Device Discovery" on page 24 for details about the optional Device Discovery
feature.
5.2.2
Legend
The device management Legend, shown in Figure 5-8, describes the meaning of special
symbols and line colors that appear on the Device Management page. To open the Legend
box, select the “+” symbol next to the Legend text.
TER0812002 Issue 14
50
Teradici PCoIP® Management Console User Manual
Figure 5-8: Device Management Legend Box
The MC may draw a line between host and zero client devices. The line indicates that the two
devices are linked. Host and zero client devices are considered linked if a PCoIP session was
or still is active between the devices. The color of the line is important.
l
l
l
A green line indicates the two devices are peered by the MC. This means the MC
database contains information about the device peering.
A blue or orange line indicates the MC found peering information in the device
configuration settings read from the devices. The blue line indicates the host and
zero client are peered directly with each other. The orange line indicates the host
device is configured to accept connections from any zero client. To have the MC
maintain this peering information, link the devices in the MC. See section 5.2.6
"Linking Devices" for further details.
A dashed line indicates the device is peered with another device but the other device
is not drawn on the active screen. This may happen in deployments with large
numbers of devices.
The bold/non-bold state of the device field name indicates whether the device is currently in
a session. If a session is active between a host and zero client, the device field name appears
in bold characters.
The green/red color of the device field name indicates whether the device is currently online.
If a device’s last known state was online, the device field name in green characters appears.
Otherwise the device field name appears in red characters.
TER0812002 Issue 14
51
Teradici PCoIP® Management Console User Manual
The following device symbols indicate whether devices are peered:
5.2.3
l
Peered devices are represented by the
symbol.
l
Unpeered host devices are represented by the
l
Unpeered zero client devices are represented by the
symbol.
symbol.
Querying Devices and Update Database
The MC database contains a snapshot of each device’s configuration settings. The MC
automatically queries each device once an hour and updates its internal database. If you
want to force the tool to refresh its internal copy of the device settings, you can use the
Update box on the upper right hand side of the Device Management webpage. This feature
lets you update one, multiple, or all devices discovered by the MC.
Note: Updating a large number of devices can take a few minutes.
To update:
l
l
l
One device: Select the device to update, and then click the Update Device button.
Multiple contiguous devices: Select the devices by holding down the Shift key and
selecting the devices. After the devices are selected, click the Update Devices button.
All devices: Ensure no devices are selected by clicking the deselect links at the top of the
HOSTS and ZERO CLIENTS columns. When all devices are de-selected, click the Update All
button.
Note: To view the update time using the current version of the tool, from the Device
Management webpage, set the Field option in the Filter box to Last Updated.
5.2.4
Filtering Devices
The Filter box supports different ways to filter the PCoIP devices that appear in the HOSTS
and ZERO CLIENTS columns. This can be useful when searching for specific devices or subsets
of devices. You can filter devices using one or more of the following options:
l
The Field drop-down menu: Select the device data field that appears in the HOSTS and
ZERO CLIENTS columns. You can select from one of the following:
l Name: A user-defined value assigned to each device managed by the MC. This field is
stored in the MC database. It is not stored in the device configuration settings. See
section 5.2.10 "Configure Device Name" for more details.
l Unique ID: Read-only device configuration field provisioned at the factory.
l MAC Address: Read-only device configuration field provisioned at the factory.
l IP Address: Configured statically in the device or dynamically by a DHCP server.
l FW Version: Determined by the firmware loaded on the device.
l FQDN: The device FQDN if one is registered with the deployment's DNS server. If the
FQDN is not registered with the DNS server, the MC displays the device IP address.
TER0812002 Issue 14
52
Teradici PCoIP® Management Console User Manual
Last Updated: Displays the timestamp of when the MC last updated its internal
database with the actual device configuration settings.
l Label - Name: The PCoIP device name read from the device.
l Label - Description: The PCoIP device description read from the device.
l Label - Generic Tag: The generic tag read from the device.
l Description: Displays the PCoIP device type description.
Text field: Lets you enter a text string. The MC displays all devices in which the device
Field value matches the string. For example, if the Field menu specifies Firmware Version
and you enter the string 1.9 in the Text field, the tool displays all devices loaded with
release 1.9.
Processor Family drop-down menu: Lets you display all devices (Tera1 devices or Tera2).
Peerings drop-down menu: Lets you display all devices (peered devices or unpeered).
Groups drop-down menu: Lets you display all devices (grouped, ungrouped, and devices
in individual groups).
Status drop-down menu: Lets you display all devices (online, offline, with an active
session, and without an active session).
l
l
l
l
l
l
5.2.5
Configuring a Device Group
You should add all devices that are managed by the MC to a group. If a device is not in a
group, you cannot perform the following actions:
l
l
l
l
l
Apply a profile to the device.
Peer the device.
Send power management commands to the device.
Update firmware on the device.
Edit the device name.
See section 2.3.1 "Groups and Profiles" for details about MC groups.
To add or reassign one or more devices to a group:
1. Select the device or devices to be added to the group. To select multiple zero client or
host devices, hold down the Shift key while you select the devices.
2. Select the group to add the devices to using the Destination Group drop-down menu.
3. Enter the device password in the Password field.
4. Click Add. The selected devices are added to the specified group if the device password
is correct. The Group field for each device successfully added to the group is updated to
that of the new group.
Figure 5-9 shows the Device Management webpage when adding two zero clients
(“Discovered 131202-100” and “Discovered 131202-102”) to the Marketing group.
TER0812002 Issue 14
53
Teradici PCoIP® Management Console User Manual
Figure 5-9: Adding Devices to a Group
5.2.6
Linking Devices
You can link together individual host and zero client devices. After two devices are linked, the
zero client always establishes a PCoIP session with the linked host when you initiate a
connection. The host only accepts connections from the linked zero client.
Note: The devices must belong to a group before you can link them.
To link a host and zero client:
1. Hold the Ctrl key and select the host and zero client devices to be linked.
2. Click the Link Devices button that appears below the Device Discovery command.
After two devices are linked, a green line appears. This indicates the devices are linked
in the MC database. Figure 5-10 shows the zero client 10.0.4.46 now connects to the
host 10.0.4.95 when you select Connect on the zero client OSD. See section 5.2.2
"Legend" for the meaning of the lines that connect devices.
TER0812002 Issue 14
54
Teradici PCoIP® Management Console User Manual
Figure 5-10: Peering a Pair of Devices
Note: After two devices are linked by the MC, the MC updates the zero client device session
configuration data if it detects a change in a peered host device’s IP address. When the MC
detects that a host’s IP address has changed, it looks up the host’s peer in the database and
tries to write the new IP address into the zero client session settings. It keeps trying to
update the zero client until it succeeds. This feature only works if both endpoints are
discoverable by SLP, or they advertise themselves to the MC through DNS SRV, or the device
PCoIP MC DNS-Based Discovery Prefix configuration field is set to the address of the MC
managing the device.
Note: This feature is disabled when the Brokered setting is set to Yes. See section 5.8.2
"Environment Settings" for more details.
5.2.7
Access Device Webpage
All PCoIP devices have an embedded web server that provides you with access to device
configuration settings and status. You can access this web server using a standard web
browser. The MC provides multiple quick links that access the device’s webpage. See
"PCoIP® Zero Client and Host Administrator Guide" (TER1206003) for details.
TER0812002 Issue 14
55
Teradici PCoIP® Management Console User Manual
To access a device’s webpage from the Device Management webpage, select the symbol to
the left of the Device field.
Host symbols are either
client symbols are either
5.2.8
or
or
based on whether or not the device is linked, and zero
.
Deleting Devices
You can delete one, many, or all PCoIP devices by clicking the Delete button.
l
l
l
Single Device Delete: Select a device from the list of HOSTS or ZERO CLIENTS, and then
click the Delete Device button.
Multiple Devices Delete: Select multiple devices by Shift-clicking from the list of HOSTS or
ZERO CLIENTS, and then click the Delete Devices button.
All Devices Delete: Deselect devices if already selected, and then click the Delete All
button.
Once a device is deleted, its information no longer exists in the database. To manage the
deleted device, it should be rediscovered by the MC. Rediscovered devices act the same as
newly discovered devices.
5.2.9
Summary Device Information
You can view summary information about each device by clicking on the Device field in the
list of HOSTS or ZERO CLIENT devices. A dialog box appears that provides information about
the device. Figure 5-11 displays a summary information dialog box.
Figure 5-11: Summary Device Information Dialog Box
The dialog box also lets you configure the device name, view additional device details, delete
the device from the MC database, and view the device event log.
TER0812002 Issue 14
56
Teradici PCoIP® Management Console User Manual
5.2.10 Configure Device Name
You should configure the name of each device in the system. The device names must be
unique. The Name field is a string that you can set to whatever you want. Consider including
location information in the name to simplify locating the device, but this is up to you to
decide.
When a device is first discovered, the MC sets the Name to a string containing a timestamp
and a unique number.
To modify the device name:
1. Click the device to display the Summary Device Information dialog box.
2. Click the Summary Device dialog box again. This opens a text editing field that shows
the current device name.
3. Enter the new device name.
4. Click Save to update the device name. Figure 5-12 displays the summary information
dialog box while the device name is being edited.
Figure 5-12: Edit Device Name Using Summary Device Information Dialog Box
Note: The device must be part of a group before you can configure the name.
Note: The device name only supports English characters.
Access Device Details
The MC maintains additional device details not shown on the Device Management page. To
access these details for an individual device:
1. Click the device to display the Summary Device Information dialog box.
2. Click the Click to view Details link. See section 5.2.9 "Summary Device Information" for
details on Device Details webpage features.
Delete Device from Management Console Database
To delete a PCoIP device from the MC database:
TER0812002 Issue 14
57
Teradici PCoIP® Management Console User Manual
1. Click the device to display the Summary Device Information dialog box.
2. Click the Delete this Device link in the Summary Device window.
Note: Information maintained on the device by the MC is deleted. This includes the device
name, group, peering information, and other information.
View Device Event Log
PCoIP devices maintain a persistent event log containing messages that may be useful in
diagnosing problems. To view a device’s event log:
1. Click the device to display the Summary Device Information dialog box.
2. Click the View Device Log link in the Summary Device window.
5.2.11 Device Details
"Access Device Details" on page 57 describes how to access the Device Details webpage.
Figure 5-13 shows the Device Details webpage for a zero client.
The Device Details webpage lets you:
l
l
l
l
l
l
l
Display device configuration settings and status.
Refresh the MC device configuration settings by querying the device.
Write the current profile settings to the device.
Open the device’s profile.
Open a web browser connected to device’s webpage.
Open a web browser connected to device’s peer webpage.
View the device’s event log.
TER0812002 Issue 14
58
Teradici PCoIP® Management Console User Manual
Figure 5-13: Device Details Webpage for a Zero Client
Device Configuration and Status
The Device Details webpage displays device configuration and status data as well as device
profile data. When the webpage first appears, the device categories are collapsed.
l
l
l
To open individual categories, click the “+” symbol next to the category name. For
example, Figure 5-13 shows the Network Configuration category expanded.
To view all of the categories, click the Expand All link.
To collapse the categories, click the Collapse All link.
The following is a list of the possible values assigned to each Profile Value and a description
of the meaning.
l
l
l
l
<value>: The parameter is specified in the profile and defined to equal <value>.
Not in profile: The parameter is not specified in the profile.
Read only: The parameter cannot be specified in the profile.
Not valid for current session configuration: The parameter is not specified in the profile
because the currently selected session connection type does not support this parameter.
TER0812002 Issue 14
59
Teradici PCoIP® Management Console User Manual
The following is a list of the possible values assigned to each Device Value and a description
of the meaning.
l
l
l
l
<value>: The parameter is specified in the device and equal to <value>.
(Empty string): The parameter is not configured in the device. Some fields such as the
Connection Management System (CMS) address are set to this when the device is not
configured to use a CMS.
Not supported: Certain device parameters only apply to specific devices or device
models. This value appears for device parameters that are not supported by a device.
Not valid for current session configuration: The parameter is not specified in the profile
because the currently selected session connection type does not support this parameter.
Refresh Device Settings Stored in Management Console
The information shown in the Device Value column is a copy of the data stored in the device.
The MC tracks the last time it updated its internal copy of the device data. The Last Updated
field on the Device Details webpage displays this timestamp.
To force the MC to refresh its internal copy of the device values, click the Update link.
Write Profile Settings to Device
The Reapply Profile link lets you write the device profile settings to the device. This can be
useful in situations when you want to write the profile settings to a single device in a group.
Open Device Profile
The View Profile link opens the Profile Management webpage for the profile associated
with this device. You can use this link to quickly access and/or modify the profile settings.
Access Device & Peer Webpages
PCoIP devices have an embedded web server, known as the Administrative Web Interface
(AWI), that provides you with access to device configuration settings and status. You can
access the AWI using a standard web browser. The MC provides multiple quick links that you
can click to access the webpage:
l
l
Device’s AWI from the Device Details webpage: Click the IP Address link.
Peer device’s AWI from the Device Details webpage: Click the Peer IP Address link.
View Device Log
PCoIP devices maintain a persistent event log containing messages that may be useful in
diagnosing problems. To access this event log, click the View Device Log link. Figure 5-14
shows a Device Event Log webpage.
To save the event log to a file, click the Save File button. You can retrieve the most recent
event log data from the device using the Retrieve updated log data from device link.
TER0812002 Issue 14
60
Teradici PCoIP® Management Console User Manual
Figure 5-14: Device Event Log Webpage
5.3
Group Management
The Group Management webpage, shown in Figure 5-15, lets you view the currently defined
groups, view the number of devices in each group, manage AutoConfig rules, and view
profile application status information.
The Group Management web page lets you:
l
l
l
l
l
l
Create/Modify/Edit/Delete groups.
Apply a profile to all devices in a group.
View profile application status information.
Create/Modify/Edit/Delete AutoConfig rules.
Enable/Disable AutoConfig .
View AutoConfig status information.
TER0812002 Issue 14
61
Teradici PCoIP® Management Console User Manual
Figure 5-15: Group Management Webpage
5.3.1
Manage Groups
The Manage Groups subcategory lets you view, create, edit, and delete groups, and select a
profile to associate with each group. For groups with profiles, this page shows an application
status summary and provides a way to apply the profile settings to the entire group.
Create a Group
Click Add New to create a group. Enter the group name, description, and profile.
Note: When the MC is initially started, the Default group is created. This is done to simplify
the use of the MC by not forcing users to create a group. You can use this group or delete it.
Modify a Group
Click the Edit link to modify the group name, description, or profile.
Delete a Group
Click the Delete link to delete a group. You can only delete a group can if there are no devices
in the group. The Delete link is not active (i.e., is grayed out) when a group has one or more
devices in it.
Profile Application Status
The Profile Application Status column provides a summary of the state of profile application
to the devices in the group. When you click the Details link, the tool displays the Profile
Application Status page with the filter set to this group (see Figure 5-18).
The following is a description of each status category:
TER0812002 Issue 14
62
Teradici PCoIP® Management Console User Manual
l
l
l
l
Successful: The profile was successfully written to the device.
Scheduled: The MC has scheduled the profile to be written to the device.
Failed: The MC attempted but failed to write the profile to the device. This problem
typically occurs when devices are offline.
Unapplied: The profile was modified since it was last written to the device. This lets you
know when you need to reapply a profile to one or more devices in a group.
Apply a Profile to a Group
Click the Apply Profile link to write the device profile settings to every device in a group.
Profiles can contain properties that require a device reboot when the profile is applied. The
Apply Profile confirmation dialog displays radio buttons to select automatic or manual
device rebooting. Figure 5-16 shows the reboot behavior choices. The default behavior is to
automatically reboot the device.
Profiles can be scheduled to be applied in the future. Click in the Apply Profile at Date/Time
field to display a graphical date/time picker. Figure 5-17 shows the date/time picker.
To determine when the profile was written to devices in the group, watch the Group
Management webpage until the number of Scheduled updates is 0. At this point, the MC
has completed all attempts to write the profile to the devices in the group. If a device was
offline when the MC tried to write the profile the status is marked as Failed. To see the View
Profile Application status with the filter set to this group, click View Details.
Figure 5-16: Apply Profile Reboot Behavior Options
TER0812002 Issue 14
63
Teradici PCoIP® Management Console User Manual
Figure 5-17: Apply Profile Date/Time Picker
5.3.2
View Profile Application Status
The Profile Application Status subcategory, shown in Figure 5-18, provides detailed status
information that shows the current state of profile application for grouped devices.
The Profile column also displays icons that represent the expected reboot behavior of
devices when the profile is applied.
The following legend contains the description of each reboot icon:
Indicates that the profile includes a property that requires a device restart for the new
setting to take effect.
Indicates that the profile was scheduled by AutoConfig.
Indicates that on profile application, the device is automatically rebooted.
The following describes each status category:
TER0812002 Issue 14
64
Teradici PCoIP® Management Console User Manual
l
l
l
l
l
l
l
l
l
l
scheduled: The MC has scheduled the profile to be written to the device.
OSD logo scheduled: The MC has scheduled the profile’s included OSD logo to be written
to the device.
firmware scheduled: The MC has scheduled the profile’s selected firmware to be written
to the device.
complete: The profile along with any included OSD logo and firmware was successfully
written to the device.
failed: The MC attempted but failed to write the profile to the device. Typically this
problem occurs when devices are offline.
OSD logo done: The MC completed writing the OSD logo to the device.
firmware pending reboot: The MC completed writing the profile’s selected firmware to
the device and requires a reboot before the profile properties are written.
firmware done: The MC has completed writing the profile’s selected firmware to the
device which was also rebooted.
SCEP pending: The MC has completed writing the profile to the device and requires the
SCEP certificate installation to finish before completing the profile application.
unapplied: The profile was modified since it was last written to the device. This lets you
know when you must reapply a profile to one or more devices in a group.
Figure 5-18: Profile Application Status Webpage
TER0812002 Issue 14
65
Teradici PCoIP® Management Console User Manual
5.3.3
Manage AutoConfig
The Manage AutoConfig subcategory, shown in Figure 5-19, lets you enable or disable the
AutoConfig feature and configure the AutoConfig rules. By default, AutoConfig is disabled
and no AutoConfig rules are defined.
You can optionally create an AutoConfig rule for each group. Newly discovered zero client
devices are automatically added to a group and have that group's profile applied when
conditions 1, 2 and 3 are true.
l
l
l
Condition 1
l The AutoConfig feature is enabled.
Condition 2
l The group's AutoConfig rule has no IP address ranges.
OR
l The zero client's IP address is within one of the rule's IP ranges.
OR
l The DHCP Option Matching is on. The MC AutoConfig Group option is set to the
identical group name, and the MC AutoConfig Behavior option is not set to 2.
Condition 3
l The zero client has either a blank password, or password protection is disabled and
the AutoConfig rule has Add device with no password checked
OR
l The zero client's password is one of the rule's passwords.
The following examples show how AutoConfig rules are applied. The MC is configured with
AutoConfig enabled and has two AutoConfig rules.
Table 5-1: Example AutoConfig Rules
Group
Device Password Cdn3
IP Range Cdn2
Group A
[ ] Add device with no password
DHCP Option Matching OFF
PASSWORD
<Empty>
[x] Add device with no password
DHCP Option Matching ON
Group B
192.168.50.1 - 192.168.50.254
Table 5-2: Example AutoConfig Rule Application
Note: AutoConfig is enabled so condition 1 is always true.
TER0812002 Issue 14
66
Teradici PCoIP® Management Console User Manual
Zero Client
DHCP Vendor Options
Group A
Rule
Group B
Rule
MC
AutoConfig
Group
Cdn
2
Cdn
3
Cdn
2
Cdn
3
MC
AutoConfig
Behavior
AutoConfig
Result
IP
Password
192.168.60.10
PASSWORD
True
True
False
False
Added to Group
A
192.168.50.10
PASSWORD
True
True
True
False
Added to Group
A
True
False
False
True
Not added to
any group
2
True
False
True
True
Added to Group
B
Group A
0
False
True
False
False
Not added to
any group
192.168.60.30
Group B
0
False
False
True
True
Added to Group
B
192.168.50.30
Group B
2
False
False
False
True
Not added to
any group
192.168.60.20
192.168.50.20
192.168.60.30
PASSWORD
Note: When the MC AutoConfig Group is empty the MC AutoConfig Behavior is ignored.
When the MC AutoConfig Group is not empty the MC looks for the group with the identical
name and checks if the DHCP Option Matching is switched on. AutoConfig fails if the group
does not exist or the group’s DHCP Option Matching is switched off. Do not configure the
MC AutoConfig Group option if you want to use the IP address matching.
To create an AutoConfig rule:
1. Optionally disable AutoConfig before adding or editing rules. This is recommended
practice so interim rule configurations do not result in unexpected group
memberships.
2. Choose an existing group from the Choose Group select box, and then click Add rule
for group. When a rule is created, it has no IP ranges, DHCP Option Matching is off, no
specific passwords are set, and Add device with no password is checked. If AutoConfig
is enabled, this rule matches all zero clients with no password.
3. To restrict the rule's password matching, click Add Password, and then add one or
more specific passwords to the rule. Once the rule contains one or more specific
passwords, you can clear the Add devices with no password checkbox if desired.
There is no limit on the number of specific passwords a rule can have.
4. To restrict the rule's IP address matching, click Add IP Address Range, and then add
one or more IP address ranges. A rule can have an unlimited number of IP address
ranges.
5. To enable DHCP option matching, enable the DHCP Option Matching button. DHCP
option matching only works if the PCoIP DHCP Vendor Class Option is configured. (For
TER0812002 Issue 14
67
Teradici PCoIP® Management Console User Manual
details, see the section on adding MC AutoConfig Group and MC AutoConfig
Behavior options in the PCoIP Endpoint vendor class on page 22.)
6. If AutoConfig was disabled in step 1, enable it now to make the current rule
configuration active.
When two rules conflict, a warning appears on the Manage AutoConfig screen. Leaving rule
conflicts unresolved results in unexpected group memberships as the AutoConfig feature
randomly selects which rule gets applied to a zero client that satisfies more than one rule.
After creation, you can edit AutoConfig rules by adding and removing specific passwords and
IP address ranges, and changing the Add devices with no password checkbox. (Make sure
you disable AutoConfig before editing the rules and then re-enable it when done.)
Figure 5-19: Manage AutoConfig Webpage
5.3.4
Persistent AutoConfig
WARNING: ENABLING THIS FEATURE MAY RESULT IN DEVICES BEING RESET WHILE USERS ARE
IN SESSION.
The Manage AutoConfig subcategory, shown in Figure 5-19, also lets you enable or disable
the Persistent AutoConfig feature. By default, Persistent AutoConfig is disabled. You can
enable it for each group by clicking the checkbox. When Persistent AutoConfig is enabled,
devices that qualify to be in the group periodically get the group’s profile applied if one or
more settings are different. Conditions 1, 2 and 3 must be true for Persistent AutoConfig to
work. The MC checks these conditions every hour to determine the action of Persistent
AutoConfig.
l
Condition 1
l The AutoConfig feature is enabled.
TER0812002 Issue 14
68
Teradici PCoIP® Management Console User Manual
l
l
Condition 2
l The Persistent AutoConfig feature is enabled.
Condition 3
l The MC AutoConfig Group option is empty, and the zero client is already in the same
group
OR
l The DHCP Option Matching is on, the MC AutoConfig Group option is set to the
identical group, the MC AutoConfig Behavior option is set to 0, and the zero client is
in the same group.
OR
l The DHCP Option Matching is on, the MC AutoConfig Group option is set to the
identical group, the MC AutoConfig Behavior option is set to 1, and the zero client is
in any group.
Note: Passwords and IP addresses are not compared during the Persistent AutoConfig
process.
The following examples show how AutoConfig rules are applied. The MC is configured with
AutoConfig enabled and has three AutoConfig rules.
Table 5-3: Example AutoConfig Rules
Group
IP Range Cdn3
Persistent AutoConfig Cdn2
Group A
DHCP Option Matching OFF
[]
<Empty>
Group B
DHCP Option Matching OFF
[x]
<Empty>
Group C
DHCP Option Matching ON
[x]
<Empty>
Table 5-4: Example AutoConfig Rule Application
Note: AutoConfig is enabled so condition 1 is always true.
Zero
Client
DHCP Vendor Options
Group A
Rule
Group B
Rule
Group C
Rule
Current
Group
MC
AutoConfig
Group
Cdn
2
Cdn
3
Cdn
2
Cdn
3
Cdn
2
Cdn
3
False
True
True
False
True
False
Group A
TER0812002 Issue 14
MC
AutoConfig
Behavior
Persistent
AutoConfig
Result
Profile not
applied
69
Teradici PCoIP® Management Console User Manual
Zero
Client
DHCP Vendor Options
Group A
Rule
Group B
Rule
Group C
Rule
Current
Group
MC
AutoConfig
Group
Cdn
2
Cdn
3
Cdn
2
Cdn
3
Cdn
2
Cdn
3
False
False
True
True
True
False
Group B profile
applied
MC
AutoConfig
Behavior
Group B
5.3.5
Persistent
AutoConfig
Result
Group B
Group B
1
False
False
True
False
True
False
Profile not
applied
Group B
Group C
0
False
False
True
False
True
False
Profile not
applied
Group B
Group C
1
False
False
True
False
True
True
Moved to Group
C and Group C
profile applied
Group B
Group C
2
False
False
True
False
True
False
Profile not
applied
View AutoConfig Status
The View AutoConfig Status subcategory, shown in Figure 5-20, lets administrators view
status information, retry AutoConfig to failed devices, and apply AutoConfig to devices that
were discovered while AutoConfig was disabled.
Figure 5-20: View AutoConfig Status Webpage
4.3.5.1 View Status Information
The status information shows if devices were discovered and whether they matched the
criteria of existing AutoConfig rules. It also shows the profile application status.
TER0812002 Issue 14
70
Teradici PCoIP® Management Console User Manual
The following describes each status category:
l
l
l
l
l
l
l
l
l
l
l
l
l
l
not started: The MC has not yet checked this device for AutoConfig rule compatibility.
failed error: The device failed to be added to this group for a reason other than
AutoConfig criteria.
failed offline: The device could not be reached for verification of AutoConfig rule criteria.
failed IP range check: The device does not match the AutoConfig rule IP range criteria.
failed password check (no password): The device does not match the no password setting
for the rules that matched the device’s IP address.
failed password check (no match): The device does not match the password criteria for
the rules that matched the device’s IP address.
added to group: The MC finished adding the device to this group and applies the profile.
AutoConfig disabled: The device was discovered while AutoConfig was disabled on the
Manage AutoConfig webpage.
failed DHCP option group name check: The device failed to be added to a group because
the group specified in the MC AutoConfig Group could not be found.
failed AutoConfig (DHCP option matching off): The device failed to be added to this group
because the DHCP Option Matching was disabled.
failed AutoConfig (disabled by DHCP option): The device failed to be added to this group
because the MC AutoConfig Behavior option was set to 2 - Do not AutoConfig.
Persistent AutoConfig Pending: The MC has not yet checked this device for Persistent
AutoConfig rule compatibility.
Persistent AutoConfig Success: The MC finished checking the compatibility and moved
the device to this group if needed. The profile is applied.
Persistent AutoConfig disabled: The device was found to have the settings different from
the group’s profile, but Persistent AutoConfig was disabled on the Manage AutoConfig
webpage.
Note: A device with a status of not started shows an AC Pending label in the Device
Management page. While a device is in this state, you cannot manually add it to a group.
Once the device is completed with AutoConfig, its assigned group name is shown.
Retry AutoConfig
Click Retry to re-apply AutoConfig to devices that had previously failed AutoConfig. The total
number of failed devices is displayed in the same box.
Apply AutoConfig
Click Apply AutoConfig to apply AutoConfig to ungrouped devices that were discovered
while AutoConfig was turned off. The total number of devices being applied appears in the
same box.
TER0812002 Issue 14
71
Teradici PCoIP® Management Console User Manual
5.4
Profile Management
The Profile Management webpage, shown in Figure 5-21, lets you view the currently defined
profiles along with the time each profile was last modified/updated.
The Profile Management webpage lets you:
l
l
l
l
l
l
l
Create new profiles.
Duplicate profiles.
Delete profiles.
Modify the profile name and description.
Modify the profile properties (device configuration settings).
Import profiles.
Export profiles.
Figure 5-21: Profile Management Webpage
5.4.1
Create a Profile
The Add New button lets you create a new profile. After you click Add New, enter the profile
name and description.
5.4.2
Duplicate a Profile
Click the Duplicate Profile link to create a new profile with the same profile properties as the
selected profile. Click the Edit link to configure the profile name and description after you
copy a profile.
Note: You may find it useful to create an initial profile containing the settings that are
common across all devices in the deployment. After the initial profile is set up, you can copy
the profile and then configure the unique profile settings.
TER0812002 Issue 14
72
Teradici PCoIP® Management Console User Manual
5.4.3
Delete a Profile
Click the Delete link to delete a profile. The Delete link does not work if a profile is associated
with one or more groups. To delete a profile assigned to one or more groups, use the Group
Management webpage to first assign a different profile to the group(s) currently using the
profile.
5.4.4
Modify Profile Name and Description
Click Edit to configure the profile name and description.
5.4.5
Modify Profile Properties
Click the Set Properties link to configure the properties of a profile. Figure 5-22 shows the
Profile Management Set Properties webpage.
Figure 5-22: Profile Management – Set Properties Webpage
Each group of devices managed by the MC can have a profile assigned to it. The concepts
associated with an MC profile are explained in section 2.3.1 "Groups and Profiles".
TER0812002 Issue 14
73
Teradici PCoIP® Management Console User Manual
To define individual profile settings, expand the profile property category. The Encryption
Configuration category is expanded in the previous figure. When a category is expanded,
you can access the Edit Properties link. Click this link to open a dialog box that specifies the
category property settings. Figure 5-23 shows the Encryption Configuration Settings dialog
box. There are five columns in the configuration settings dialog box.
l
l
l
l
l
Set in Profile: Each checkbox in this column determines if a setting is included in the
profile. Profile application skips the settings that are not included in the profile and does
not change the device settings.
Device Family: This column shows the device family type to which each property setting
applies. Figure 5-23 shows one encryption property for all devices, two for Tera1 device
family and two for Tera2 device family. Setting Tera1 property values has no effect on the
Tera2 devices and vice versa.
Property Name: This column shows the name of the property.
Value: The fields in this column determine the value of each profile setting.
Description: This column provides a description of the property.
Figure 5-23: Encryption Configuration Settings Dialog Box
OSD Logo in a Profile
To upload a logo for the OSD into a profile:
1. Prepare an image file that is a 24bpp bitmap that does not exceed 256 pixels by 64
pixels.
2. Choose Profile OSD Logo, and then Set OSD Logo.
3. Click Browse to locate your image file.
4. Click Upload to import the file to the MC.
The logo is then applied to the devices' groups with that profile.
TER0812002 Issue 14
74
Teradici PCoIP® Management Console User Manual
Figure 5-24: Add OSD Logo Property
Firmware in a Profile
You can assign a firmware file in a profile along with upgrade criteria that must be met before
the firmware is pushed to each device.
To associate firmware with a profile:
1. Make sure the firmware file is imported into the MC (see section 5.6.1 "Import
Firmware").
2. Choose Profile Firmware, and then Set Firmware in the profile properties.
3. Choose the firmware version from the existing firmware versions in the select box.
Figure 5-25 shows the Link to Imported Firmware dialog.
4. Choose the firmware replacement criteria from these options:
l Different: Firmware is overwritten on the device if its version is different from the
firmware version listed in the select box.
l Less than: Firmware is overwritten on the device if its version is less than the x.y.z
firmware version you enter in the text entry field.
Figure 5-25: Link to Imported Firmware Property
Note: All supported device family types are indicated in the sqaure brackets. Devices that do
not match the device family type are ignored during the profile application.
Certificates in a Profile
You can upload up to 16 certificate files into a profile and set their usages. The available
storage indicates the remaining number of certificates and how much space is left in the
certificate store.
TER0812002 Issue 14
75
Teradici PCoIP® Management Console User Manual
Note: When the Simple Certificate Enrollment Protocol (SCEP) setting is configured, only 14
additional certificate files can be uploaded since two slots are reserved for SCEP server
certificates.
Important! A device's certificate store will be replaced with the certificate(s) you add to a
profile if at least one certificate is set in the profile. For example, if a device has eight
certificates already in its store, and you apply a profile with only one certificate, all eight
previous certificates will be erased and replaced with the one certificate applied by the
profile. If a profile has no certificates, you are given the option to replace the device's
certificate store (causing it to empty) or to leave the certificate store untouched.
To upload a certificate file into a profile:
1.
2.
3.
4.
Prepare a valid certificate file.
Choose Certificate Store, and then Add New
Click Browse to locate your certificate file.
Click Add.
Once you upload the certificate file, you can assign an usage using the drop-down menu in
the Certificate Store tab.
Figure 5-26: Profile Management – Certificate Store
5.4.6
Import a Profile
On the Profile Management webpage (see Figure 5-21), click Import to create a new profile
by importing a profile from a file. You must then locate the file in the file system. Figure 5-27
shows the Import Profile dialog.
TER0812002 Issue 14
76
Teradici PCoIP® Management Console User Manual
Figure 5-27: Import Profile Dialog
If the imported profile contains a firmware file, the import process adds a new firmware file
to the Update Devices webpage.
5.4.7
Export a Profile
Click Export to export a selected profile into a file. You must then confirm the download to
start the export process.
Note: You may find it useful to export a profile and share it with other MCs if multiple
instances of MCs are deployed.
5.5
Power Management
The Power Management webpage lets you :
l
l
l
l
l
l
l
5.5.1
Send reset commands to PCoIP host and zero client devices.
Send power off commands (hard-S5 and soft-S5) to host PCs/workstations.
Schedule reset and power off commands to be sent in the future.
Display the current power state of host PCs/workstations.
Display status information on the last or next scheduled reset and power off commands
for each PCoIP device.
Schedule remote power down for zero client devices.
Display status information on the device that received the remote power down.
Sending Reset and Power off Commands
Click the Set Device State link on the Power Management webpage to schedule reset and
power off commands to be sent to PCoIP devices. The webpage shown in Figure 5-28
appears.
TER0812002 Issue 14
77
Teradici PCoIP® Management Console User Manual
Figure 5-28: Send Device State Change Command Webpage
In the Set Device State webpage, reset commands can be sent to both host and zero client
devices, while power off commands can only be sent to host devices. To power off zero client
devices, see the Set Remote Power Down webpage (see section 5.5.3 "Schedule Remote
Power Down").
Reset Commands
l
l
A PCoIP zero client resets immediately when it receives a reset command.
A PCoIP host device schedules a deferred reset when it receives a reset command. A
deferred reset is a reset that occurs the next time the host PC/workstation is powered off
or restarted.
Power Off Commands
l
l
Soft power off commands sent to host PCoIP devices trigger the same action that occurs
when you click the host PC/workstation Power button for less than four seconds. The
action taken by the host depends on how the operating system is configured. It may
initiate a software controlled shutdown or cause the host to enter the Standby state.
Hard power off commands sent to host PCoIP devices trigger the same action that occurs
when you press the host PC/workstation Power button for more than four seconds. This
immediately shuts down the PC/workstation by turning off its power.
Note: You must configure the host workstation to support power-state transitions initiated
by the PCoIP host card. Some systems do not support this feature or it may be optional. See
your PCoIP system supplier documentation to determine if this feature is supported.
To send a reset or power off command to a device:
TER0812002 Issue 14
78
Teradici PCoIP® Management Console User Manual
1. Select the command type by selecting one of the radio buttons shown in Figure 5-28.
2. Filter the devices the command may be sent to using the Group drop-down menu.
3. Click the View Devices to Change button to display a new webpage. Figure 5-29 shows
the webpage that supports sending the PCoIP Processor Reset command.
Figure 5-29: Schedule Device State Change Command Webpage
You can send the commands immediately or in the future by specifying the date and time
the command is sent. The command is sent immediately if the specified date/time is less
than or equal to the current time.
You must choose which devices the command is sent to by selecting the checkbox next to
each target.
To schedule the command(s), click the Schedule PCoIP Processor Resets button after
configuring the date/time and selecting the devices to send the command to.
After scheduling the command(s), click the View Status link on the left side of the screen to
view the status of the command(s).
5.5.2
Power Management Status
Click the View Status link on the Power Management webpage to view status information
on commands sent to PCoIP devices, as well as pending commands that have not yet been
sent to PCoIP devices. This webpage also displays the current power state of host
PCs/workstations. Figure 5-30 shows an example of the Power Management Status
webpage.
TER0812002 Issue 14
79
Teradici PCoIP® Management Console User Manual
Figure 5-30: Power Management Status Webpage
In addition to providing status information, you can cancel commands scheduled to be sent
in the future from this webpage.
5.5.3
Schedule Remote Power Down
Click the Set Remote Power Down link on the Power Management webpage to schedule
remote power down commands to be sent to zero client devices. When you click this link,
the webpage shown in Figure 5-31 appears.
TER0812002 Issue 14
80
Teradici PCoIP® Management Console User Manual
Figure 5-31: Set Remote Power Down Webpage
You can schedule remote power down by specifying day(s) of a week and time of a day. Ctrlclick on the day-selector to select multiple days in a single schedule. You can schedule
different times for each day by adding more schedules.
Select the Power Down in Session Devices checkbox to set the schedule to force power
down devices that are in session.
To enable the schedule, click the Enable button after configuring the day(s) and time.
Remote power down only applies to zero client devices with both hardware and firmware
support. Hardware support for remote power down is available with firmware version 3.2.0
or higher.
The four device counters include:
l
l
l
l
Black: The total number of devices.
Green: The number of devices with both hardware and firmware support.
Red: The number of devices without hardware support.
Gray: The number of devices without firmware support. The MC requires firmware 3.2.0
or higher to determine if the device can perform a remote power down.
After scheduling the power down, click the View Remote Power Down link on the left side of
the screen to view the status of power down commands sent to zero client devices.
Note: The MC cannot power on the zero clients. Once the MC successfully powers off the
zero clients, you (or your users) should manually power on the devices to respond to the MC
again.
TER0812002 Issue 14
81
Teradici PCoIP® Management Console User Manual
5.5.4
View Remote Power Down Status
The View Remote Power Down Status subcategory, shown in Figure 5-32, provides status
information that shows if devices have been powered down.
The status categories include:
l
l
l
l
l
l
success: The device was successfully powered down by MC.
failed error: The device failed for a reason other than listed next.
failed offline: The device could not be reached for power down.
failed no hardware support: The device did not have hardware support.
failed no firmware support: The device did not have firmware support.
failed in session: The device was in session and the Power Down in Session Devices
checkbox was turned off.
Figure 5-32: View Remote Power Down Status Webpage
5.6
Update Firmware
The Update Firmware webpage, shown in Figure 5-33, lets you update the firmware running
on PCoIP devices.
The Update Firmware webpage lets you:
l
l
l
l
Upload new firmware images to the MC VM.
Schedule firmware updates for one or more PCoIP devices.
View the status of scheduled firmware updates.
Delete firmware from the MC.
Note: the Delete link for a firmware file is not active (i.e., is grayed out) whenever the
firmware is associated with a profile.
TER0812002 Issue 14
82
Teradici PCoIP® Management Console User Manual
Figure 5-33: Update Firmware Webpage
5.6.1
Import Firmware
Click the Import Firmware link to transfer a firmware release file from the host machine to
the MC VM. When prompted, locate the file containing the firmware release on the host
machine file system, and assign a description to the firmware release.
Note: Only firmware files containing both Tera1 and Tera2 firmware (.pcoip files) can be
imported.
The MC supports storing a maximum of 10 firmware images. Delete old firmware releases if
this limit is reached and you need to import additional firmware releases.
5.6.2
Update Device Firmware
Click the Update Devices link next to an imported firmware release to specify the devices to
update and the time the update takes place. This lets you schedule firmware updates to take
place at night. Figure 5-34 shows the Update Devices webpage.
This webpage displays:
l
l
The firmware version and the device family type to download, shown under the Selected
Firmware Version text
A table with summary information about the firmware versions running on the Current
Devices managed by the MC
Use the Version Number and Group Name drop-down menus to update specific groups of
devices and/or devices loaded with specific versions of firmware.
TER0812002 Issue 14
83
Teradici PCoIP® Management Console User Manual
Figure 5-34: Initial Update Devices Webpage
Click the View Devices to Update button to display the second update devices webpage
that lists the devices that match the specified version number and group name. This new
page is shown in Figure 5-35.
This webpage lets you specify the time the update occurs with the fields under the Begin
updating targets at text.
You can specify the reset options you want to use:
l
l
Zero client devices can be commanded to reset when the firmware update completes.
Host devices can be commanded to schedule a deferred reset, which triggers a reset the
next time the host operating systems shuts down.
You must also specify the devices to update by checking the boxes next to the devices you
want to update. After the options are configured, click the Schedule Update link to initiate
the firmware update.
TER0812002 Issue 14
84
Teradici PCoIP® Management Console User Manual
Figure 5-35: Second Update Devices Webpage
5.6.3
View Status
Click the View Status link to view the current status of all scheduled and completed firmware
updates. Figure 5-36 shows the Firmware Update Status webpage.
Figure 5-36: Firmware Update Status Webpage
TER0812002 Issue 14
85
Teradici PCoIP® Management Console User Manual
5.6.4
Delete Firmware from the MC
If the Delete link for a firmware file is grayed out in the Update Firmware webpage, this
indicates that the firmware file is associated with one or more profiles (see Figure 5-33 for an
example). Before you can delete the firmware, you must first remove it from each profile with
which it is associated.
1. From the Profile Management webpage (see Figure 5-21), click the Set Properties link
for the profile that is associated with the firmware you want to remove.
2. Click the "+" symbol next to Profile Firmware to expand this property.
3. Click the Delete link next to the firmware file to remove it from the profile, and then
confirm the deletion.
4. Check the Delete link in the Update Firmware webpage. If it remains grayed out, the
firmware is still associated with another profile. Repeat the above procedure to remove
the firmware from each profile that includes it.
5. In the Update Firmware webpage, click the Delete link next to the firmware file you
want to remove from the MC, and then confirm the deletion.
5.7
Device Log Monitoring
The Device Log Monitoring webpage, shown in Figure 5-37, lets you collect logs over time
from a selection of PCoIP devices.
The Device Log Monitoring webpage lets you:
l
l
l
l
l
Choose devices to be monitored.
Start and stop log monitoring of the chosen devices.
Download a .tar.gz archive of collected logs.
View status of log monitoring.
View individual device logs.
TER0812002 Issue 14
86
Teradici PCoIP® Management Console User Manual
Figure 5-37: Device Log Monitoring Webpage
5.7.1
Device Tree
The device tree displays grouped devices and lets you select which devices are monitored.
When you use the checkboxes for individual devices, you can select all zero clients or hosts
within a group, an entire group, or all grouped devices for monitoring. Once log monitoring
is started, you cannot change the selection until it is stopped. The same display filters that
appear in the Devices page are included here.
You can enable up to 200 devices for log monitoring at a time.
5.7.2
Logging Controls
After you select the devices using the device tree, you can set the event log filter mode to
verbose or terse. This setting overrides profile settings and settings made directly on the
device. If the device is set to a different event log filter mode during log monitoring, it is
overwritten to the setting made here the next time logs are retrieved by the log monitoring
process.
To begin monitoring logs, click Start. This empties the MC’s storage of any previously
collected logs and starts the log monitoring process. You cannot change the selection of
devices being monitored and the event log filter mode until log monitoring is stopped. An
attempt to collect logs is made every 300 seconds.
Click the Download Collected Logs button to format the logs collected into individual .txt
files per device, archive the logs into .tar.gz format, and present them as a downloadable file.
TER0812002 Issue 14
87
Teradici PCoIP® Management Console User Manual
When log monitoring is no longer needed, click Stop to end the log monitoring service and
enable the device tree and event log filter mode controls. The logs collected from the last
time the Start button was clicked remain available for download until you click Start again.
5.7.3
Status
Localized date/time stamps appear when log monitoring was started and stopped. Log
monitoring in the MC has a finite storage limit which appears as Free Log Space. This amount
is shown as a percentage, where 100% is empty and 0% is full. When Free Log Space becomes
full, the oldest log data are overwritten with new log data. It is a good idea to check this
display periodically.
5.8
Manage Settings
The Settings webpage, shown in Figure 5-38, lets you:
l
l
l
l
Upload and download MC database archive files.
Configure MC environment settings.
Manage device naming.
Set an inactivity session timeout option for the web UI.
Figure 5-38: Settings Webpage
TER0812002 Issue 14
88
Teradici PCoIP® Management Console User Manual
5.8.1
Database Management
Click the Manage Database link to upload and download database files from the MC VM.
When you click this link, the webpage shown in Figure 5-39 appears.
Figure 5-39: Database Management Webpage
Uploading a Database
Click Browse and Upload to transfer a database archive from the host PC running the web
browser to the MC VM. Click Browse, and then select the database archive to upload. Click
Upload to start the transfer of the database file into the VM.
After a database is uploaded to the VM, you must restore the database from the imported
file to begin using it. This process is performed using the MC VM console. See section 4.5.2
"Restore Database" for information on how to restore the MC database.
Downloading a Database
Click the Download link to transfer a database archive from the MC VM to the host PC
running the web browser. When you click this link, you must select the destination directory
to download the archive to.
Database archives can be created using the MC VM console backup database command. See
section 4.5.1 "Back Up Database" for information on backing up the MC database.
5.8.2
Environment Settings
Set the Brokered configuration setting shown in Figure 5-38 to:
l
l
Yes: If the deployment is using a connection broker to manage host and zero client
peerings.
No: If the deployment uses the MC to manage the host and zero client peerings.
TER0812002 Issue 14
89
Teradici PCoIP® Management Console User Manual
Note: The Link devices button on the Device Management page is disabled when this setting
is set to Yes. This prevents the MC from manipulating device peering information. In a
brokered environment, the device peering information is maintained by the connection
broker.
Note: When the Brokered configuration setting is changed from No to Yes, the MC deletes
peering information from its database. If you later change the setting to No, you must link
the host and zero clients again. When re-enabling the old peerings, back up the database
before you change the setting to Yes.
5.8.3
Manage Device Naming
The device labels used as default device names in the PCoIP MC configuration setting, lets
you name newly discovered devices with their labels. By default this setting is disabled and
devices are named as “Discovered YYMMDD-XXXX” where XXXX is a unique value. Figure 540 shows the confirmation dialog that appears once the setting is enabled.
Figure 5-40: Manage Device Naming Dialog
5.8.4
Web Interface Session Timeout
Select an inactivity session timeout period for the web UI from the Web Interface Session
Timeout drop-down list. If no activity occurs during this timeout period, the MC session
times out, and the user is returned to the login page. When the timeout is set to Disabled,
the web UI will not time out.
The timeout options are:
l
l
l
l
5.9
15 Minutes
1 Hour
2 Hours
Disabled
Site Status
The right side of the Home webpage displays summary information on the PCoIP devices
discovered by the MC.
TER0812002 Issue 14
90
Teradici PCoIP® Management Console User Manual
Figure 5-41: Home Webpage
The following status information appears:
l
l
l
l
l
l
l
Number of online and offline PCoIP zero clients discovered by the MC.
Number of online and offline PCoIP hosts discovered by the MC.
Number of active PCoIP sessions.
FQDN of the MC found in the MC DNS SRV record if one exists.
FQDN of the connection broker found in the PCoIP Connection Broker DNS SRV record if
one exists.
Current state of the MC.
Disk usage information for the MC. The MC uses up to 4 GB of disk space. When the
usage begins to approach this limit, the status turns red indicating that you must clean
up the MC database. Options to reduce memory usage include limiting the number of
firmware images stored in the database along with the number of database backups
stored in the VM.
Note: A device is considered offline when the last attempt to rediscover the device failed.
Rediscovery attempts are performed when:
TER0812002 Issue 14
91
Teradici PCoIP® Management Console User Manual
l
l
l
l
l
You click Update on the Device Details webpage.
Once an hour if the device is online.
Once every 15 minutes if the device if offline.
After a firmware update if the deployment has a MC DNS SRV record. If the record does
not exist, the device is rediscovered by one of the other mechanisms listed here.
After a profile is applied (or the application fails).
Note: The MC considers sessions to be active only when the host PC/workstation is powered
on (in the S0 state) and a session is active between the host and zero client. If the host
PC/workstation is in a low power state (S3, S4 or S5), the session is considered inactive.
Note: Site status information is updated when you reload the Home webpage. The MC
checks the DNS SRV records every five minutes or when you click the Update DNS SRV
Records button on the Home webpage.
5.10 Online Help
MC webpages include a HELP link in the upper right-hand corner. When you click this link, a
help screen appears, as shown in Figure 5-42. This webpage has two links that provide access
to the following information:
l
l
View Help File: Opens a copy of this document.
Online Support: Opens a new browser window at the Teradici MC support website. To
access this site, go to http://www.teradici.com and click the Support Login link.
Note: You can also access the online support link by clicking the Support link at the bottom
of any of the MC webpages.
Figure 5-42: Help Webpage
TER0812002 Issue 14
92
Teradici PCoIP® Management Console User Manual
6
Getting Started
This section provides instructions on how to begin using the MC. After completing the
following steps, you can establish a PCoIP session using a pair of PCoIP host and zero client
devices.
6.1
Start the Management Console
Follow the instructions described in sections 3.3 "Installing the Management Console into
Your Existing VMware ESXi™ Server" or 3.4 "Installing the Management Console Using
VMware Player" to install the MC, and then read section 3.5 "Running the Management
Console" to start using it. Performing these steps will activate the MC VM on the MC host
machine.
Follow the instructions described in section 5.1 "Accessing the Management Console Web
User Interface" to open a web-browser and log in to the MC web interface.
6.2
Discover Devices
Open the MC Device Management webpage. Verify the MC has discovered the devices you
want to link (peer). If the devices are not discovered, use the Manual Device Discovery
feature to discover the devices. The Manual Device Discovery feature is described in
"Manual Device Discovery" on page 24.
6.3
Adding Devices to a Group
Once the PCoIP devices are discovered, you must add them to a group through the Device
Management webpage (see Figure 6-1). The following process is an example of the steps you
would take to add two zero clients to the Engineering group.
To add two zero clients to the Engineering group:
1. Open the MC Device Management webpage.
2. While pressing the Shift key, click the devices you want to add to a group. The selected
devices are highlighted.
3. From the Destination Group drop-down menu on the right-hand side of the screen,
select the group you want to add the devices to. In this example, the Engineering
group was selected.
4. Enter the device password in the Password field on the right-hand side of the screen. In
this example, the devices are assigned the same password. It’s a good idea to assign
the same password to all devices in your deployment.
5. Click Add. The MC adds the selected devices to the Engineering group.
TER0812002 Issue 14
93
Teradici PCoIP® Management Console User Manual
Figure 6-1: Adding Devices to a Group
Note: After a device is successfully added to a group, the group name appears in the Group
column for each device.
6.4
Peering Devices
You can peer (or link together) each pair of host and zero client devices. After a host and zero
client are peered, a PCoIP session can be started from the zero client. To start a PCoIP
session, the end user must click the Connect button on the zero client OSD.
Note: Devices must belong to a group before you can link them.
To peer (link) pairs of host and zero client devices:
1. Open the MC Device Management webpage.
2. Select the host and zero client devices to be peered. In Figure 6-2 the devices 10.0.4.23
and 10.0.4.10 are selected.
3. Click the Link Devices button to peer the devices. The zero client connects to the host
10.0.4.23 when the end user clicks Connect on the zero client OSD.
TER0812002 Issue 14
94
Teradici PCoIP® Management Console User Manual
Figure 6-2: Peering a Pair of Devices
6.5
Configuring Zero Clients for VMware View
You can configure zero clients for VMware View. After a zero client is configured, a PCoIP
session can be started from the zero client. To start a PCoIP session, the end user must click
the Connect button on the zero client OSD.
To configure zero clients for VMware View:
1.
2.
3.
4.
Open the MC Profile Management webpage.
Click the Add New button to create a new profile.
After creating a new profile click the Set Properties link to configure the properties.
Click on the Session Configuration tab to expand it, and then click on Edit Properties
to display the Set Properties dialog.
5. Click and enable the Set in Profile checkbox for Session Connection Type.
6. Select View Connection Server in the Session Connection Type drop-down menu.
Now you will see all the settings for the VMware View connection server.
7. Click and enable the Set in Profile checkbox for View Connection Server Address, and
then type in the server address in the value field.
TER0812002 Issue 14
95
Teradici PCoIP® Management Console User Manual
8. Optionally you can also set the Certification Check Mode.
9. Scroll to the bottom of the dialog and click the Save button.
10. Depending on the Certification Check Mode and the server configuration, a valid
certificate must be presented by the zero client. Click the Add New button in the
Certificate Store tab to upload and assign a certificate file to the profile.
Note: See Knowledge Base 15134-1020 for details on downloading the View Connection
Server trusted root certificate.
11. Go to the Group Management webpage by clicking the GROUPS tab.
12. Click the Edit link for the Default group and select the profile in the drop-down menu.
13. Once you assign the profile to the Default group click the Apply Profile link to change
settings on all devices in the Default group.
6.6
Familiarizing Yourself with the MC
To become more familiar with the MC:
1. Review section 2 "Overview" of this document to become familiar with the different
components in a PCoIP deployment. This section also describes some fundamental
concepts to be aware of to use the MC.
2. Update the time zone of the MC using the VM Console interface. See section 4.6
"Change Time Zone".
3. Create a profile and set one or more properties within the profile. A good parameter to
use to try this out on is the Language field in the Language Configuration settings. See
section 5.4 "Profile Management" for details.
4. Create a group and assign the profile created in the previous step to the new group.
See section 5.3 "Group Management".
5. Assign some devices to the new group. See section 5.2.5 "Configuring a Device Group".
6. Write the profile settings to the devices in the group and verify the settings were
written to the devices. See "Apply a Profile to a Group" on page 63 and section "View
Profile Application Status" on page 64.
7. Create an AutoConfig rule matching the criteria of an undiscovered zero client. Choose
a group for this AutoConfig rule that uses a profile with a relatively simple parameter.
See sections 5.3.3 "Manage AutoConfig" and 5.3.5 "View AutoConfig Status".
8. Query and view the current device settings. See section 5.2.9 "Summary Device
Information".
9. Query and view the data stored in the device event log. Section 5.2.9 "Summary Device
Information" and "View Device Log" on page 60 describe two different ways of doing
this.
10. Download new firmware to a device. See section 5.6 "Update Firmware".
11. Send reset commands to a device, and then view power management status
information. See section 5.5 "Power Management".
TER0812002 Issue 14
96
Teradici PCoIP® Management Console User Manual
12. Back up the MC database, and then download it from the MC VM to an external server.
See sections 4.5.1 "Back Up Database" and 5.8.1 "Database Management".
13. Upload a backed up copy of the MC database to the MC VM, and then restore the
active database from the uploaded file. See sections 4.5.2 "Restore Database" and 5.8.1
"Database Management".
TER0812002 Issue 14
97
Teradici PCoIP® Management Console User Manual
presented by the zero client OSD (On
Screen Display).
Glossary of Definitions
AWI
Administrative Web Interface
HPDET
Hot Plug Detect
MC
CA
PCoIP Management Console
Certificate Authorities
MTU
CMI
Connection Management Interface. Interface provided by the zero client or host
that is used to communicate with an
external connection management
server.
Maximum Transmission Unit
NTP
Network Time Protocol
OS
Operating System
CMS
Connection Management Server. An
external management entity (3rd party)
that manages and controls the zero client/host through the CMI interface.
DDC
OSD
On Screen Display
PCoIP
Personal Computer over Internet Protocol (PC-over-IP)
Display Data Channel
PCoIP host
Host side of the PCoIP system
DHCP
Dynamic Host Configuration Protocol
DNS
Domain Name System
DNS SRV
Domain Name System Service Record
PCoIP zero client
Desktop, or client, side of the PCoIP system
PC-over-IP
Personal Computer over Internet Protocol
EDID
Extended Display Identification Data
SLP
Service Location Protocol
FQDN
Fully Qualified Domain Name
SSL
Secure Socket Layer (security protocol)
GPU
Graphics Processing Unit
GUI
Graphical User Interface. When not operating in a PCoIP session, this interface is
TER0812002 Issue 14
VPD
Vital Product Data. Factory-provisioned
information to uniquely identify a zero client or host.
98
Teradici PCoIP® Management Console User Manual
VPN
Virtual Private Network
TER0812002 Issue 14
99