1
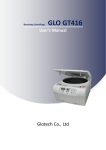
INTRODUCTION
Welcome to your Shift-I™ quick start guide. Please take the time to
read this first page. It provides a good overview to the philosophy
behind using a progressive shift indicator. For those who cannot wait
to play, skip to the next page and return here at your leisure.
Philosophy
Knowing the optimal RPM range can be particularly useful for both circuit work and
on the street. It can provide a reference for shifting down, by indicating if your RPM
is below the start of the power curve, and will also indicate if your RPM is getting too
high to accelerate out of the turn. In addition, the Shift-I can be used to optimize
launch control by keeping the RPM within the ideal range. By indicating the section
of RPM your most interested in, it allows you to break out of old habits and form new
ones. This can increase both performance, control and engine life. Importantly, this
is achieved without taking your eyes off the road!
Shift-I™
Shift-I™ is a progressive gear shift and RPM range indicator. The lights are user
programmable to indicate a required section of your RPM, the first light illuminating
at the RPM you have programmed, usually this will be the start of the power band,
and depending on the display mode selected will terminate with all lights flashing at
your programmed shift point. The lights in-between are automatically set at equal
RPM divisions.
Why seven lights? Extensive testing determined that within your peripheral vision
you can instantly and easily recognize how many of the seven lights are illuminated.
Any more and you need to concentrate, removing your attention from the road. Any
less and RPM trend information is lost. As you accelerate, you will see each light
come on, providing a predictable lead up to when the ideal shift point occurs.
Installation, Setup & the User Manual
The good news is that despite the large number of user defined settings you can
tweak on your Shift-I™, there are only two that need to be set before the unit can be
used correctly. This guide will cover these two settings after the installation section.
The “User Manual” (other booklet) provides the specific details on all the features
and how to configure them. One feature in the User Manual that you should be
aware of, is the brightness control (page 8). Please make sure to adjust the
brightness before using the Shift-I™, particularly if it is too bright.
INSTALLATION
SHIFT-I™ WIRES
Shift-I requires only three wires to be connected, Ground, Ignition and Tacho.
Ground and ignition are commonly found at the back of the main instrument. The
tacho can be connected to either a digital signal from the engine controller unit
(ECU) to the instruments tacho (if available), or by connecting to the low side of the
ignition coil. Connecting to the coil is possible for transistor type ignition. If in doubt,
please contact Ecliptech.
The diagrams below show the different ways the “Shift-I Tacho Wire” can be
connected.
Black = Ground Wire
Black/Red = Ignition Wire
Black/Blue = Tacho Wire
You cannot damage Shift-I™ by connecting the wires around the wrong way,
however it is strongly recommended not to incorrectly make wire connections to
avoid blowing fuses and/or damaging the electrics. If you are not keen on installing
it, or if you don’t have the required skills and/or tools, obtain help from an auto
electrician. Failure to install and mount the unit correctly could result in making the
vehicle unsafe to use.
The easiest method for installation is to know what wire colours to look for and
where to find them. A wiring diagram is the best option, alternatively you can search
the internet or contact Ecliptech.
Connect one wire at a time! This avoids confusion and the possibility of accidentally
shorting the wires together. The wires must be correctly crimped or soldered to
ensure proper and trouble free operation.
When testing the wires, if possible find the connector in the wiring harness and
gently probe the connector terminals. Sometimes it is easier to probe from the rear
of the connector. Otherwise you will need to remove a small amount of insulation to
test the wire.
If you feel inclined and can’t wait to see it light up… put the black wire on the
negative terminal of your battery, and the black/red wire on the positive. You won’t
damage it if you get them round the wrong way.
Motorbike manufacturers keep some level of consistency with their wiring colours, as
show in the table below. Ecliptech may have your specific make/model/year on file.
Manufacturer Ground
Ignition
Tacho
Ducati
Honda
Kawasaki
Suzuki
Triumph
Yamaha
Violet or Light Blue
Black/Brown or White/Green
Brown/White
Orange/Green or Red/Yellow
Green/Red
Light Brown or Red/Yellow
Green/Yellow or Green/Grey
Yellow/Green
Light Blue
Yel/Blue, Yel/Black or Black/Blue
Red
Yellow/Black
Black
Green
Black/Yellow
Black/White
Black
Black
Car wiring is significantly more diverse. If you don’t have a wiring diagram of the
cars electrics, the following sections may be of use.
VERIFYING OPERATION
Finding Ground
Step 1 – Verify power is connected
To verify a wire is connected to ground, you need to measure it’s resistance with a
multimeter to the negative terminal of the battery (or good earth point). Set the
multimeter to resistance or ohms ( ) setting, put one lead on the negative battery
terminal and the other on the wire. The reading should be less the 1 , even if
ignition is turned on.
The lights should light up successively as soon as ignition is turned on, then shortly
after you’ll see a few lights turn on (usually 3 or 4). If so, go to step 2.
NOTE: Do not connect Shift-I’s ground wire to the frame! Connect it though the
wiring to ensure the unit gets a good clean ground signal, which is needed to
accurately read the tacho signal.
2. Does everything else work… if not, you may have accidentally shorted some
wires during installation. Check all fuses. Don’t forget there may be a
separate main fuse located near the battery.
Finding Ignition
4. Check the ignition and ground wire to make sure you got the right ones.
With ignition on, measure the voltage at the Shift-I™ to ensure power is
there.
Troubleshooting
1. Make sure you have plugged all connectors back together after wiring.
To verify a wire is connected to ignition, you need to measure the voltage with a
multimeter. Set the multimeter to voltage (V), put the black lead on the negative
battery terminal and the other on the Shift-I’s black/red wire. With ignition off, the
voltage should be less than 0.5V. With ignition on, it should read ~12V, or almost
identical to that measured by placing the red multimeter lead on the positive battery
terminal. If the engine is running, the voltage will most likely be ~13 to ~15V.
Step 2 – Verify Tacho is Connected
When you first turn on ignition, it will show battery voltage. As the Shift-i™ is not yet
calibrated to the vehicle, press either button to exit this mode. Start the engine. In
the majority of installations, the first light will come on at either 500, 1000, 2000 or
4000 RPM. The second light would then come on at twice this value. If this is the
case, skip to the next page.
NOTE:
Do not connect this wire straight to battery, as it must be connected to the ignition to
access the programming options.
If the RPM is not being registered, first reset the Shift-I to default settings by holding
down both buttons, turn ignition on and keep holding. After about 5 seconds, the
display will flash rapidly indicating a successful reset. Release buttons and try
again.
TIP:
Although not specifically required, if you later intend on calibrating the voltage (refer
to advanced feature section of user manual), then now is a good time to write down
the measurements…
Make sure the tacho wire is properly connected to the correct wire on the vehicle.
Battery voltage at battery (measure directly across battery terminals) =
Battery voltage at Shift-I (measure directly at Shift-I wires) =
If necessary, try increasing the calibration value (page 4 of the user manual) and
later increase the input sensitivity (page 17 of the user manual).
Finding Tacho Signal
To verify a wire is connected to the tacho signal, you need to measure the frequency
(Hz) with a multimeter. Set the multimeter to frequency, put the multimeter’s black
lead on the negative battery terminal and the multimeter’s red lead on the Shift-I’s
black/blue wire. With ignition on and the engine running, the frequency should vary
with RPM. Some multimeters may have trouble reading the tacho signal.
!
CONFIGURING THE SHIFT-I™
RPM Set-Points
The two settings that need be set are the calibration value and the RPM set-points.
You can set when the first light turns on, and also when they flash (given the default
display mode). The lights in between are automatically calculated. This section
shows how to change it.
Calibration Value
When ignition is turned on, the display will first show the rpm display mode, then
shortly after the battery voltage display. Press either button to exit battery mode
(this makes things less confusing) and the display will go blank.
Setting the correct calibration value ensures your Shift-I™ is synchronized with the
vehicle it is fitted to. The RPM signal sent to the Tachometer, usually a series of
pulses, varies greatly between different manufacturers and models. Some will use
two pulses per revolution, some more, some less, therefore a “calibration value”
setting is provided.
Press and hold the down button, after a couple of seconds the display will change.
The five lights on the left are used to represent the value of the lower RPM set-point
(first light). To read the value, just count how many times each light flashes, which
represents the number. For example, a value of 12,500rpm would flash the left most
light once (1), the next one twice (12), the third one 5 times (125) and the remain two
remain solid (12500rpm). Press up or down to increase or decrease the value, then
press both buttons at once to save (or rev the engine over 2,200rpm to save).
Setting the upper RPM set-point is similar, except press and hold the UP button
instead. The five lights are now also on the right hand side.
Using the correct setting is VERY important, as many of the units functions are
dependant on the RPM value as seen by the unit. For example, most functions are
locked out if the RPM is above 2,200. With the wrong calibration, functions may be
locked out at idle!
The easiest way to determine the correct calibration setting is simply to just try it!
The unit is pre-programmed for the first light on the left to illuminate when it believes
the RPM is 1,000 (using the default calibration of 2).
You can change these settings while the engine is running (and vehicle stationary),
however if over 2,200rpm, the menu will be locked out. See page 5 of the “User
Manual” for more detail.
Start the engine and increase the RPM slowly to check if the first light comes on at
1,000 RPM, the second at 2,000 RPM, third at 3,000 RPM etc. If the first light does
indeed come on at or near 1,000 RPM, then the default calibration value is correct.
If not, consult the table below to determine what the calibration setting should be
(typically 0.5, 1, 2 and 4). Please note: If the first light comes on at 950 RPM (tacho
inaccuracy), this is still the 1,000 RPM point to be used in the table below.
MOUNTING THE DISPLAY
Two high performance acrylic adhesive foam pads are included, which have
excellent resistance to ageing, water, most solvents and UV light. They stick really
well to plastic, but not to vinyl (particularly those with protective waxes applied).
They can be safely removed, however if in doubt, first test an area with a small piece
in an appropriate place. Clean the surfaces before applying the adhesive pads.
To change the calibration, you need to enter the calibration setting mode. With the
ignition off, press and hold both buttons, turn the ignition on and then release the
buttons. If it is the first time you have entered this mode, you will see the first two
lights are illuminated, indicating the default value of 2. Press up or down to change
the settings, and then press both buttons to save. You can re-enter the calibration
mode to verify your setting if you wish. Test the new setting.
1st
Light
4,000
2,000
1,333
1,000
800
667
500
400
333
250
2nd
Light
8,000
4,000
2,667
2,000
1,600
1,333
1,000
800
667
500
3rd
Light
4th
Light
5th
Light
12,000
6,000
4,000
3,000
2,400
2,000
1,500
1,200
1,000
750
16,000
8,000
5,333
4,000
3,200
2,667
2,000
1,600
1,333
1,000
20,000
10,000
6,667
5,000
4,000
3,333
2,500
2,000
1,667
1,250
Immediately after application, they can be removed or re-positioned without great
effort. The pads take a couple of days to achieve the maximum bond strength, after
which, they will most likely tear apart before coming off. Usually the remains can be
rubbed off (without leaving a residue), and without any chemicals.
CALIBRATION
ACTION
DISPLAY AFTER
VALUE
REQUIRED
ACTION
REQUIRED
0.5
Press Down 3 Times
1 Light flashing
1
Press Down 2 Times
1 Light On
1.5
Press Down Once
1 Light On, 1 flashing
2
DEFAULT - No Action
2 Lights On
2.5
Press Up Once
2 Lights On, 1 flashing
3
Press Up 2 Times
3 Lights On
4
Press Up 3 Times
4 Lights On
5
Press Up 4 Times
5 Lights On
6
Press Up 5 Times
6 Lights On
8
Press Up 6 Times
All Lights On
The Shift-I™ must be mounted behind a windscreen, where it is not subjected to the
wind pressure or rain. Choose a place to mount the unit where the lights are clearly
visible and it do not interfere or obstruct the drivers view. Do not place it in a
location where the headlights from another vehicle are incident on the display, as the
light sensor will assume it is daylight and automatically increase the brightness.
Test the brightness level is suitable in both light and dark conditions, and adjust as
required (see User Manual, page 8).
"
#