1
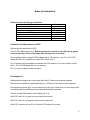
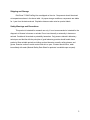
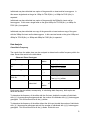
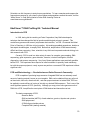
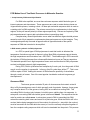
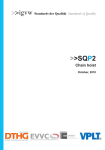
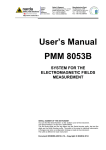
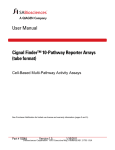
GenoSensor Corporation EduPrimer™ DNA Profiling Kit Catalog #’s 3001-3002 Version C September 2012 User Manual EduPrimer™ DNA Profiling Kit Table of Contents Note for Instructors .......................................................................................................... 2 Kit Storage and Safety Instruction ................................................................................... 3 EduPrimer™ DNA Profiling Protocol ............................................................................... 4 Kit Components and Additional Required Materials ........................................................ 4 EduPrimer™ DNA Profiling Kit: Protocol ......................................................................... 5 EduPrimer™ DNA Profiling Kit: Technical Manual ........................................................ 10 Troubleshooting ............................................................................................................ 15 Technical Service .......................................................................................................... 16 Literature Citation When describing a procedure for publication using these products, we would appreciate that you refer to them as the EduPrimer™ DNA Profiling Kit. Trademarks EduPrimer™ is a trademark of GenoSensor. 1 Notes for Instructors Kit Components and Storage Conditions: Component Solution A Solution B Cotton Swabs 2X PCR Master Mix Positive Control DNA (Heterozygous) Negative Control (DNase- RNase-free H2O) DNA ladder Storage Room temp. Room temp. Room temp. -20ºC -20ºC -20ºC -20ºC Preparation for DNA isolation and PCR Set heat block or water bath to 95ºC Thaw 2x PCR Master Mix on ice. Before opening tube, spin 10 sec at 6,000 rpm or greater in microcentrifuge. Vortex 10 seconds, then spin again for 10 seconds. Each package contains enough PCR 2X Master Mix for 30 reactions. Use 10 ul of 2X PCR Master Mix with 10 ul template for a final PCR volume of 20 ul. Up to 3 positive control materials are available for PCR reactions (10 ul from Positive Control tube + 10 ul 2X PCR Master Mix for one reaction). Run 1 or up to 3 negative control reactions. Electrophoresis Electrophoresis reagents are not provided from the kit. Please refer required materials. Best results are obtained by adding DNA dye (i.e. Gel Red or Sybr Safe) to molten agarose. Avoid agarose gel from light. You can store and run the gel in a dark room, or cover the gel with a box during gel polymerization and the whole electrophoresis process. There is enough DNA ladder to load 3 lanes with 10 ul. After PCR, load 10 ul of positive control reaction each lane. After PCR, load 10 ul of negative control reaction each lane. After PCR, load as much as 20 ul of student PCR reaction into a lane. 2 Shipping and Storage EduPrimer™ DNA Profiling kits are shipped on blue ice. Components should be stored at temperatures shown in the above table. At proper storage conditions, components are stable for 1 year from the date received. Expiration dates are also noted on product labels. Safety Warnings and Precautions This product is intended for research use only. It is not recommended or intended for the diagnosis of disease in humans or animals. Do not use internally or externally in humans or animals. Consider all chemicals as potentially hazardous. Only persons trained in laboratory techniques and familiar with the principles of good laboratory practice should handle these products. Wear suitable protective clothing such as laboratory overalls, safety glasses, and gloves. Exercise caution to avoid contact with skin or eyes: if contact should occur, wash immediately with water (Material Safety Data Sheet for products is available upon request). 3 EduPrimer™ DNA Profiling Kit Overview The EduPrimer™ DNA Profiling Kit introduces Polymerase Chain Reaction (PCR) techniques to students, or anyone wishing to learn PCR and its uses. It contains all reagents necessary for DNA isolation and PCR. PCR is an extremely important and valuable skill to have in contemporary biological and related sciences. In this particular kit, the experiment generates varying results from person to person, demonstrating the basis for the process of creating DNA profiles that are used to differentiate one person from another. After completing this experiment, one should be able to proficiently perform PCR and understand the concepts behind it. Kit Components and Storage Conditions (for a lab of 24 students) Component Solution A Solution B Cotton Swabs 2X PCR Master Mix Positive Control DNA (Heterozygous) Negative Control Amount (30 rxn’s) 6 mL 0.6 mL 28 300 µL 30 µL Storage Room temp. Room temp. Room temp. -20ºC -20ºC 30 µL 30 µL -20ºC -20ºC DNA ladder Additional Required Materials Thermal Cycler Heat Block or (heat plate, Beaker with de-ionized water; water bath, Tube floater; Thermometer) Microcentrifuge Microcentrifuge tubes Vortex Micropipettes (p10, p200, p1000) Pipette tips PCR tubes Tube Racks Ethanol or ethanol wipes Electrophoresis equipment Electrophoresis supplies: agarose, TBE, DNA loading buffer, running buffer, gel dye (eg. Sybr safe, Gel Red) Scissors and tweezers UV light box or “Gel Doc” equipment and program 4 EduPrimer™ DNA Profiling Kit: Protocol Preparation 1. Set heat block or water bath to 95ºC. For a heat block, it is recommended to add water or sand to ensure proper heat transfer. For a water bath, be sure tubes are tightly sealed and not fully submerged to avoid contamination. 2. Thaw 2x PCR Master Mix on ice. Before opening tube, spin 10 sec at 6,000 rpm or greater in microcentrifuge. Vortex 10 seconds, then spin again for 10 seconds. DNA Preparation *Do not eat or brush teeth one hour prior to cheek cell collection. Wear gloves and handle solutions carefully* 1. Add 200µl of Solution A (red label) to a marked microcentrifuge tube. 2. Collect cheek cells with provided swab. Thoroughly roll and swab inside cheek for 10 seconds. 3. Place swab into marked tube with Solution A. 4. Cut swab above tube to a length that will fit inside the tube. Make certain the cap will shut tightly. 5. Press the tube against the vortex machine to thoroughly mix the sample, for at least 10 seconds. Solution A contains components which chemically disrupt cell membranes and begin to unravel proteins. Under these conditions, the cheek cells will begin to lyse or break open, spilling cell contents into the solution in the tube. 6. Place sample in heat block to incubate at 95°C for 5 minutes. Immediately place tube in ice until ready for next step.This process continues to destroy proteins, particularly, those that damage DNA. 7. Load sample into microcentrifuge (mini centrifuge works as well), taking care that there is another sample directly across from your sample to keep the centrifuge in balance as it spins. Close internal and external centrifuge lids. 8. Spin briefly (~10 seconds) to pool condensation that has collected on the cap. 9. Remove swab with tweezers (tweezers should be rinsed with ethanol between samples to prevent contamination). 10. Add 20 µl Solution B (green label) to the sample tube. Solution B neutralizes the harsh conditions needed for lysis, preparing the solution for DNA isolation and PCR to follow. 11. Close the tube lid tightly and vortex to mix for at least 10 seconds. 12. Load sample into microcentrifuge with the tube hinge pointing out, balancing out your sample tube, and closing the lids. 13. Spin sample for 1 minute at 12,000 rpm. 14. Look for a small clear round pellet near the bottom of the tube under the hinge. This pellet contains cellular debris. The aqueous solution (supernatant) that has not precipitated into the pellet contains cellular DNA. 5 PCR Reaction Mixture *Wear gloves and handle solutions carefully* 1. Prepare and label a small PCR tube with student’s name. Label both the top and side of the PCR tube to ensure clarity. 2. Ensure that the “2x PCR Master Mix” is on ice and has been spun at 6,000 RPM or greater in a microcentrifuge for 10 seconds, vortexed for 10 seconds, then spun again for 10 seconds before opening the Master Mix tube. 3. (optional or based on instructor) Label and prepare PCR tubes for controls: 1-3 positive and 1-3 negative. Follow below procedures, replacing student template DNA with controls in their respective PCR tubes. 4. Add 10 µ l of “2X PCR Master Mix” and 10 µ l of supernatant (avoid the pellet) from the 1.5 mL tube with the student “genomic DNA template” to the labeled PCR tube for at total of 20 µ l as indicated in the table below. (Note: It is preferred that the PCR reaction mix preparation is done on ice). 5. Mix the 20 µ l PCR reaction mixture by pipetting in and out with the pipette, and the close the lid tightly. 6. Store the sample on ice until it is ready to be loaded into the thermal cycler. PCR reaction mixture table 2x PCR Master Mix 10 µl Genomic DNA Template 10 µl ____________________________________________ Volume total 20 µl 7. For positive and negative control tubes, below is the control PCR reaction mixture table. Control PCR reaction mixture table Positive control Negative control 2x PCR Master Mix 10 µl 2x PCR Master Mix 10 µl Positive control DNA 10 µl Negative control 10 µl _______________________________ _______________________________ Volume total Volume total 20 µl 20 µl 6 Positive and negative controls give guidelines or boundaries to the experimental results. Negative control show the result if no DNA is present for the PCR. Positive control shows the result of PCR with purified DNA with a heterozygous genotype. PCR products for the TPA-25 gene are 136 and 436 base pairs in length, for PV-92 180 and 480 base pairs. DNA ladder is a standard which is used like a ruler to show how DNA of a certain length will migrate through a gel during electrophoresis. (+)- Each class will prepare 3 positive control reactions and 1 negative control reaction. Use 10 µl of provided positive control DNA (purple-red label) in 10 µl Master Mix (blue label.) (-)-Substitute 10 µl of DNase free water (black label) for the template in a negative control PCR. PCR Parameters Program your thermal cycler as follows: 1. 2. 3. 4. 5. 6. 94ºC – 2 minutes 94ºC denaturing – 20 seconds} 58ºC annealing – 20 seconds} repeat steps 2, 3, & 4 for 40 cycles 72ºC extension – 20 seconds} 72ºC – 5 minutes 4ºC – finished / hold Agarose Gel Electrophoresis General Procedure, detailed directions as given by instructor Pour 1% agarose gel For staining, use a DNA dye which is added directly to the liquefied agarose. Use at least10 µL of PCR product to visualize results by electrophoresis on agarose gel. If gel well volume will accommodate more than 10 ul, a higher volume is preferred. Loading dye is added to the sample to ensure that the sample will sink to the bottom of the well and properly enter the agarose gel. Mix sample with loading dye according to instructor directions before carefully pipetting into a well in the gel. Be sure to record which well holds your sample. Run at ~100V for ~20 minutes and stop before loading dye has run off gel. Depending on the DNA dye used, caution may need to be taken to reduce exposure of gel to light. Visualize under UV and record the results manually or by photography Compare individual experimental bands to positive control DNA. 7 Results and Discussion The TPA-25 gene, as well as PV92, is in the Alu family of genes. Genes in this group may contain a 300 base pair sequence that has inserted itself into an unexpressed (intron) portion of the gene. This does not change the original flanking sequence of the gene so the same primers will allow replication of either or both the longer or shorter version of the gene (see Figure below). 8 Individuals may have inherited two copies of the gene with no insert and be homozygous. In this case a single band on the gel at 136bp for TPA-25(Alu-), or 180bp for PV92 (Alu-) is expected. Individuals may have inherited two copies of the gene with the 300bp Alu insert and be homozygous. In this case a single band on the gel at 436bp for TPA-25(Alu+), or 480bp for PV92 (Alu+) is expected. Individuals may have inherited one copy of the gene with no insert and one copy of the gene with the 300bp Alu insert and be heterozygous. In this case two bands on the gel at 136bp and 436bp for TPA-25(Alu), or 180bp and 480bp for PV92 (Alu) is expected. Data Analysis Class Allele Frequency The results from the whole class can be analyzed to determine the allele frequency within the class. Record the results in the table below. Observed Class Genotypes Genotypes # of individuals # alleles of frequency (+)/(+) homozygous w/ Alu # of (+) alleles . Total (+) & (-) alleles (+)/(-) heterozygous (+) (-) (-)/(-) homozygous w/out Alu # of (-) alleles . Total (+) & (-) alleles Sum= Sum= class total # alleles Sum = 1.00 of Each person has two alleles, consequently, in calculating allele frequency, both copies are taken into account. To determine the frequency of the allele with the Alu insert, double the number of individuals with (+)/(+) homozygous genotypes and add the number of individuals with (+)/(-) heterozygous genotypes. This sum accounts for all the (+) alleles. To determine the frequency of the allele without the Alu insert, double the number of individuals with (-)/(-) homozygous genotypes and add the number of individuals with (+)/(-) heterozygous genotypes. This sum accounts for all the (-) alleles. Divide this sum 9 Scientists use Alu frequency to study human populations. To learn examples and compare the frequencies measured in your class to other classes and populations around the world, visit the “Allele Server” in Cold Spring Harbor’s Dolan DNA Learning Center at www.bioservers.org/bioserver/. EduPrimer™ DNA Profiling Kit: Technical Manual Introduction to PCR In 1983, during his time working at Cetus Corporation, Kary Mullis developed a technique that has changed the field of genetics and biological science in general. This revolutionary process was termed “polymerase chain reaction,” or PCR. He earned the Nobel Prize in Chemistry in 1993 due to his innovation. His technique enabled researchers, besides a few expert microbiologists, to amplify DNA. Before that, amplification of DNA was extremely difficult and time consuming. Now, scientists in any field can incorporate molecular biology into their research with PCR. Currently, PCR is used in a wide variety of areas, for example, gene mapping, DNA sequencing, gene expression, gene detection, forensics, criminal investigation, medical diagnostics, and genome sequencing. Very few of these applications were practically possible before PCR. The experiment does require an initial investment in specially made machinery, but with the proper equipment, nearly anyone can perform a successful PCR experiment without significant cost. PCR and Biotechnology — Revolutionizes an Entire Research Community PCR is capable of producing large amounts of targeted DNA from an extremely small amount of starting material, known as your template. DNA can be obtained from any cell such as blood cells, hair cells, cheek cells etc., and after proper treatment to isolate DNA, PCR can be applied to create millions of copies of virtually any desired DNA sequence. That is one of the most significant powers of PCR, specificity. Although you may put an entire genome worth of DNA into a PCR, it amplifies the exact piece of DNA desired and leaves the rest out. The basic components of PCR: - Reaction Buffer - DNA nucleotides (dNTP’s) of each adenine, guanine, thymine and cytosine - DNA polymerase - 2 DNA oligonucleotide primers - Template DNA (starting material) 10 PCR Makes Use of Two Basic Processes in Molecular Genetics 1. Complementary DNA strand hybridization For DNA to be amplified, one must have a known sequence which flanks the gene of interest upstream and downstream. These sequences are used to create what are known as ‘oligonucleotide primers,’ meaning a short ~20 base pair nucleotide sequence which is used as a starting point for DNA replication. The primers are said to be complementary to their target regions, so they will anneal (attach) to those regions specifically. Primers are required by DNA polymerase because it cannot add nucleotides without a preexisting chain. Complementary Strand Hybridization occurs when two different oligonucleotide primers anneal to each of their respective complementary base pair sequences on the template. They are designed specifically to anneal at opposite ends of opposite strands of the specific sequence of DNA that is desired to be amplified. 2. DNA strand synthesis via DNA polymerase In a PCR, a special type of DNA polymerase is used that is able to withstand the temperature fluctuations required for thermal cycling. Most DNA polymerases cannot tolerate the high temperatures and fluctuations from ~60ºC-94ºC. The breakthrough in PCR came with the isolation of DNA polymerase from a thermophilic bacterium known as Thermus aquaticus. This bacterial species lives in high temperature steam vents and therefore its DNA polymerase evolved to withstand extremely high temperatures. During PCR, DNA is synthesized and multiplies by 2 each cycle, thus the growth of DNA copy # over the reaction is exponential. In theory, after 30 cycles there will be 230. This is over a billion copies of DNA. Yielding this amount of DNA allows the possibility of visualization through a variety of means. One of the most popular visualization methods is agarose gel electrophoresis. Genes and DNA The human genome contains 23 pairs of chromosomes that contain a total of thirty to fifty thousand genes, most of which generally code for proteins. However, those genes only comprise about 5% of the genome, leaving 95% as so-called non-coding DNA. This noncoding DNA is found not only between, but within genes, splitting them into segments. In eukaryotes, non-coding DNA found within genes is known as introns. The sequences that do code for proteins are called exons. In eukaryotes, genomic DNA is transcribed into RNA molecules containing both introns and exons for a particular gene. While the RNA is still in the nucleus (before being transported out of the nucleus), the introns (in = stay within the nucleus) must be removed from the RNA while the exons (ex = exit the nucleus) are spliced together to form the complete coding sequence which will soon be translated into the protein. This process 11 is called RNA splicing. Some genes may contain a few introns, others may contain dozens. Interestingly, it is the non-coding ‘junk’ DNA that is useful to us when considering a DNA profile of an individual, instead of the DNA that actually codes for life. As discussed, functional segments of genes (exons) code for proteins. Proteins are molecules that carry out most cellular functions. Exon sequences are therefore very similar among individuals, because even slight difference can change the function of the protein in a potentially harmful way (many diseases are caused by mutated proteins). Introns, however, often vary in size and number among individuals. Intron sequences are thought to be the result of the differential accumulation of mutations throughout evolution that are silently passed to descendants through the hereditary code. It is this difference in intron sequences that allows us to determine human genetic diversity. The identification of these distinctive characteristics in DNA represents the molecular basis for human identification and population genetics. Throughout evolution, intron sequences have been the target of random insertions by short repetitive interspersed elements, also known as SINEs. SINEs have become randomly inserted within our introns over millions of years. One such repetitive element is called the Alu element (Figure 1). The Alu element is a DNA sequence about 300 base pairs long that is repeated; one copy at a time, almost 500,000 times within the human genome. The origin and function of such randomly repeated sequences is not yet known. The Alu name comes from the Alu I restriction enzyme (enzymes that cut DNA at specific sequences) recognition site that is found in this sequence. The following section reviews the Alu element in more detail. PCR Stages The machinery required to perform PCR is known as a thermal cycler. The thermal cycler enables the steps of PCR to be automated. The reaction involves a repetitive series of cycles, each of which consists of template denaturation, primer annealing, and extension of the annealed primer by Taq DNA polymerase. Before beginning DNA amplification, genomic DNA is prepared from students' cells. The students’ DNA is then added to a mixture of the necessary reagents: oligonucleotide primers, thermostable DNA polymerase (Taq), the four deoxynucleotides (A, T, G, C), and reaction buffer. These reagents are pre-mixed as a 2X PCR Master Mix in the EduPrimer™ DNA profiling kit. The tubes are placed into the thermal cycler. These thermal cyclers contain an aluminum block that holds the samples and can be rapidly heated and cooled across extreme temperature differences. The rapid heating and cooling of this thermal block is called temperature cycling or thermal cycling. The first step of the PCR temperature cycling procedure involves heating the sample to 94°C. At this high temperature, the template strands separate. This is called the denaturation step. The thermal cycler then rapidly cools to 60°C to allow the primers to anneal to the separated template strands. This is called the annealing step. The two original template strands 12 may reanneal to each other or compete with the primers for the primers complementary binding sites. However, the primers are added in excess such that the primers actually out-compete the original DNA strands for the primers’ complementary binding sites. Lastly, the thermal cycler heats the sample to 72°C for Taq DNA polymerase to extend the primers and make complete copies of each template DNA strand. This is called the extension step. Taq polymerase works most efficiently at this temperature. Two new copies of each complementary strand are created. There are now two sets of double-stranded DNA (dsDNA). These two sets of dsDNA can now be used for another cycle and subsequent strand synthesis. At this stage, a complete temperature cycle (thermal cycle) has been completed. Each step takes about 30 seconds to 1 minute, and this process continues for roughly 30-40 cycles depending on how the user has programmed the thermal cycler. Each step is repeated in that order each cycle until it is completed. At the end, the product is put on hold at a low temperature, generally 4°C, until the user is ready to proceed to the analysis of the product. 13 Figure 3. Experiment flowchart from start to finish 14 Troubleshooting Symptom Possible causes Solutions No amplification product Questionable template quality Analyze starting material Inhibitory Substance in reaction Decrease sample volume Insufficient cycle # Run additional cycles Incorrect thermal cycler program Verify times and temperatures Errors in heat block incubation Calibrate heating block, use sand or water to maximize contact with tube for proper heat transfer Contaminated tubes/solutions Autoclave tubes and use filter tips Lower annealing temperature in 2º increments Mix solutions on ice, place rxn directly to 94º thermal cycler Raise annealing temperature in 2º increments Mix solutions thoroughly before beginning the reaction -Wear gloves -Use dedicated area for sample preparation -Use non-aerosol tips Primer annealing temperature too high Non-specific amplification product Premature Taq-polymerase replication Primer annealing temperature too low Insufficient mixing of reaction solution Exogenous DNA contamination 15 Technical Service For more information or technical assistance, please call, write, fax, or email. GenoSensor Corporation 4665 S. Ash Avenue Suite G-18 Tempe, Arizona 85282 Tel: 1-480-598-5378 Fax: 1-480-755-3319 Email: [email protected] Web: www.genosensorcorp.com Limited Warranty GenoSensor is committed to providing our customers with high-quality goods and services. Our goal is to ensure that every customer is 100% satisfied with our products and our service. If you should have any questions or concerns about a GenoSensor product or service, please contact our Technical Service at [email protected]. GenoSensor warrants that all of its products will perform according to the specifications stated on the certificate of analysis. This warranty limits GenoSensor Corporation’s liability only to the cost of the product. No warranty is granted for products beyond their listed expiration date. No warranty is applicable unless all product components are stored in accordance with instructions. GenoSensor reserves the right to select the method(s) used to analyze a product unless GenoSensor agrees to a specified method in writing prior to acceptance of the order. GenoSensor makes every effort to ensure the accuracy of its publications, but realizes that the occasional typographical or other error is inevitable. Therefore GenoSensor makes no warranty of any kind regarding the contents of any publications or documentation. If you discover an error in any of our publications, please report it to our Technical Service. GenoSensor assumes no responsibility or liability for any special, incidental, indirect or consequential loss or damage whatsoever. The above limited warranty is sole and exclusive. No other warranty is made, whether expressed or implied, including any warranty of merchantability or fitness for a particular purpose 16