1
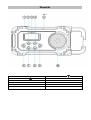
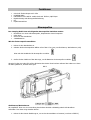
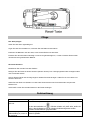
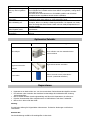
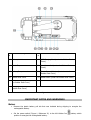
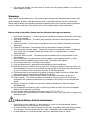
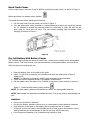
Duramaxx Solar-Camping-Radio 10026849 10026850 Warnung Zur Reduzierung der Gefahr von Brand, elektrischem Schlag und Beschädigung: Setzen Sie dieses Gerät nicht dem Regen aus. Stellen Sie keine mit Flüssigkeiten gefüllten Gefäße, wie Vasen, auf dieses Gerät. Ausschließlich das empfohlene Zubehör verwenden. Reparieren Sie dieses Gerät nicht selbst. Wenden Sie sich zur Wartung an qualifiziertes Kundendienstpersonal. Lassen Sie keine Gegenstände aus Metall in dieses Gerät fallen. Stellen Sie keine schweren Gegenstände auf dieses Gerät. Netzkabel/Netzteil Zur Reduzierung der Gefahr von Brand, elektrischem Schlag und Beschädigung: Gewährleisten Sie, dass die Spannung der Stromversorgung dem auf diesem Gerät angegebenen Wert entspricht. Stecken Sie den Netzstecker vollständig in die Steckdose ein. Ziehen Sie nicht am Kabel, knicken Sie es nicht und stellen Sie keine schweren Gegenstände darauf. Fassen Sie den Stecker nicht mit nassen Händen an. Fassen Sie den Stecker beim Herausziehen an seinem Korpus an. Verwenden Sie keinen beschädigten Netzstecker oder eine beschädigte Steckdose. Installieren Sie dieses Gerät so, dass das Netzkabel sofort aus der Steckdose gezogen werden kann, wenn Störungen auftreten. Kleine Objekte/Verpackungsteile (Plastikbeutel, Karton, etc.) Bewahren Sie kleine Objekte (z.B. Schrauben und anderes Montagematerial, Speicherkarten) und Verpackungsteile außerhalb der Reichweite von Kindern auf, damit sie nicht von diesen verschluckt werden können. Lassen Sie kleine Kinder nicht mit Folie spielen. Es besteht Erstickungsgefahr! Achtung Gerät Stellen Sie keine Quellen offener Flammen, z.B. brennende Kerzen, auf das Gerät. Transport des Gerätes Bitte bewahren Sie die Originalverpackung auf. Um einen ausreichender Schutz beim Transport des Gerätes zu erreichen, verpacken Sie das Gerät in der Originalverpackung. Reinigung der äußeren Oberfläche Verwenden Sie keine flüchtigen Flüssigkeiten, wie Insektensprays. Durch zu starken Druck beim Abwischen können die Oberflächen beschädigt werden. Gummi- oder Plastikteile sollten nicht über einen längeren Zeitraum mit dem Gerät in Kontakt sein. Sicherheitshinweise 1. 2. 3. 4. 5. 6. Lesen Sie sich diese Anleitung durch, heben Sie sie auf und befolgen Sie die Anweisungen darin. Verwenden Sie das Gerät nicht in der Nähe von Wasser. Reinigen Sie es nur mit einem trockenen Tuch. Halten Sie es von Wasser und Feuchtigkeit fern. Trennen Sie die Stromverbindung sofort, wenn Wasser in das Gehäuse gelangt ist. Halten Sie das Gerät von Hitzequellen wie Heizungen, Öfen oder Feuer fern. Ein überhitzter Akku kann explodieren. Verwenden Sie nur vom Hersteller empfohlenes Zubehör. Versuchen Sie nicht das Gerät eigenhändig zu reparieren oder zu öffnen. Verwenden Sie das Gerät nur in der angegeben Betriebs-Umgebungstemperatur. Hinweise zum Akku: Öffnen Sie niemals den Akku. Werfen Sie ihn nicht in Feuer. Recyclen Sie ihn Ordnungsgemäß Hinweise zur Kurbel: Um Schäden am Dynamo und anderen Bauteilen zu vermeiden, kurbeln Sie niemals schneller als 2 Umdrehungen pro Sekunde. Kurbeln Sie nicht länger als 2 Minuten am Stück. Lassen Sie das Gerät nach 2 Minuten Kurbeln für weitere 2 Minuten ruhen, bevor Sie weiter kurbeln. ACHTUNG: Kurbeln Sie niemals, wenn die Plastik-Lasche noch nicht herausgezogen wurde. Kurbeln Sie niemals, wenn der Akku nicht eingesetzt ist. Beides kann das Gerät schwer beschädigen. Übersicht Bild 1 1. Taschenlampe An/Aus 2. 3. 4. 5. 6. Uhr/Sendersuche hoch LCD-Display Lautstärke hoch + Solar-Panel Ein/Aus-Schalter 7. Uhr/Sendersuche runter 8. Lautstärke runter 9. Radio-Modus wählen und Uhr einstellen 10. Lautsprecher Bild 2 13. 14. 15. 16. 17. 18. Teleskop-Antenne Metall-Klammer Batterie-Fach Gummi-Staubabdeckung Mini-USB-Anschluss (unter der Abdeckung) Lade-Leuchte (unter der Abdeckung) 19. 20. 21. 22. 23. USB-Ladeanschluss (unter der Abdeckung) Kopfhörer-Anschluss (unter der Abdeckung) Stromquellen-Wähler (unter der Abdeckung) Zurücksetzen-Taste (unter der Abdeckung) Kurbel Funktionen Sehr helle Taschenlampe mit 3 LEDs UKW/MW-Radio Ladefunktion über USB für mobile Gerät wie Telefone, Mp3-Player Digitale Anzeige mit Hintergrundbeleuchtung Uhr Kopfhöreranschluss Stromquellen Das Camping-Radio kann mit folgenden Stromquellen betrieben werden. Gleichstrom von einer USB-Stromquelle, beispielsweise einem Computers Solar-Strom Strom von der Handkrubel 3-AAA-Batterien Wie Sie die Stromquelle auswählen: 1. Heben Sie den Staubschutz an. 2. Schalten Sie den Stromquellen-Wähler auf auf das Li-Ion-Logo, um Gleichstrom, Wechselstrom, USB, Solar oder die Handkurbel als Stromquelle zu wählen. 3. Stellen Sie den Wähler auf das AAA-Logo, um die Batterien als Stromquelle zu wählen. Hinweis: Es gibt eine Lade-LED auf der Rückseite des Geräts. Diese leuchtet während des Ladens rot. Wenn der Akku geladen ist, leuchtet diese grün. Bild 3 Gleichstrom/Wechselstrom Wir empfehlen Ihnen vor der Verwendung des Gerätes den Akku vollständig mittels USB-Anschluss aufzuladen. Dies kann einige Stunden dauern. 1. Heben Sie die Gummi-Abdeckung an, um an den Stromschalter zu kommen (zu sehen auf Bild 2). 2. Wählen Sie das Li-Ion-Akku-Logo. 3. Verbinden Sie ein USB-Stromkabel (nicht im Lieferumfang enthalten) mit dem Mini-USB-Eingang und mit der USB-Stromquelle. Die rote Lade-LED leuchtet beim Aufladen auf. Laden Sie das Gerät für einige Stunden, bis das Licht auf Grün wechselt. Hinweis: Verwenden Sie eine 5.0 V USB-Stromquelle zum Aufladen (beispielsweise von einem Computer oder einem geeigneten Adapter). Das Verwenden anderer Spannungen kann zur Beschädigung des Gerätes führen. Solar-Strom 1. Heben Sie die Gummi-Abdeckung an, um an den Stromschalter zu kommen (zu sehen auf Bild 2). 2. Wählen Sie das Li-Ion-Akku-Logo. 3. Platzieren Sie das Gerät in direktem (oder indirektem) Sonnenlicht. Richten Sie das Solar-Panel zu Sonne. Das grüne Licht leuchtet beim Laden. Hinweis: Das Display kann verblassen, wenn sich das Gerät zu sehr aufheizt. Stellen Sie das Gerät in diesem Fall in indirektes Sonnenlicht. Bild4 Strom von der Handkurbel 1. Heben Sie die Gummi-Abdeckung an, um an den Stromschalter zu kommen (zu sehen auf Bild 2). 2. Wählen Sie das Li-Ion-Akku-Logo. Heben Sie die Kurbel aus der Einbuchtung. 3. Drehen Sie nun die Kurbel im oder gegen den Uhrzeigersinn mit 2 Umdrehungen pro Sekunde für ca. 3-5 Minuten, um das Gerät benutzen zu können bzw. wenn das Gerät über 60 Tage nicht verwendet wurde. Stromversorgung via Batterien 1. Dieses Gerät kann aternativ auch mit 3 AAA-Batterien betrieben werden. Das kann sehr nützlich sein, wenn der Akku alle ist, die Sonne nicht scheint und Sie es vermeiden möchten die Kurbel zu benutzen. 2. Öffnen Sie das Batteriefach auf der Rückseite des Gerätes. 3. Setzen Sie 3 x AAA-Batterien (UM-4) in das Gerät ein und schließen Sie das Fach. 4. Heben Sie die Gummi-Abdeckung an, um an den Stromschalter zu kommen (zu sehen auf Bild 2). 5. Wählen Sie das AAA-Logo. Hinweis: Das Wählen dieser Option deaktiviert den Akku. Hinweis: Achten Sie darauf, die Batterien richtig einzusetzen. Achten Sie auf die Polarität. Ansonsten könnte das Gerät beschädigt werden. Warnung: Vermischen Sie keine neuen Batterien mit alten. Vermischen Sie keine Standard-Batterien (Alkaline, Carbon-Zink) mit aufladbaren Akkus (NickelKadmium). Verwenden Sie nur Batterien des gleichen Typs. Entfernen Sie die Batterien wenn Sie das Gerät für längere Zeit nicht verwenden. Setzen Sie die Batterien niemals hohen Temperaturen oder Feuer aus. Sie könnten auslaufen oder explodieren. Stromverbrauch Das Gerät verfügt über einen aufladbaren 3,7 V Lithium-Ion Akku mit einer Kapazität von 600 mAh als primären Energiespeicher. Unterschiedliche Verwendungen resultieren in unterschiedliche Verbrauchsgrößen. Hier ist ein kleiner Überblick über die Modi und die Energiebeanspruchung. Modus Taschenlampe Typische Verwendung Ausgedehnte Dauer Stromverbrauch Niedrig Empfohlene Stromquelle Solar, Kurbel, AAA-Batterien Radio Ausgedehnte Dauer Niedrig Solar, Kurbel, AAA-Batterien Handy-Akku laden Kurze Dauer Hoch USB (vom Computer), Kurbel, AAA-Batterien Bedienung Taschenlampe: Schalten Sie das Licht mit dem Schalter auf der Oberseite des Gerätes ein (Bild 1). Radio: Das Gerät verfügt ein LCD-Display mit Hintergrundbeleuchtung (Bild 6) und folgenden Funktionstasten: Power : Schaltet das Radio ein und aus. Wechselt von der Uhren- zur Radio-Anzeige. Mode: Wechselt das Radio-Band : Erhöht die Radio-Frequenz : Verringert die Radio-Frequenz VOL +: Erhöht die Radio-Lautstärke VOL -: Verringert die Radio-Lautstärke Hinweis: Der Empfang wird stark beeinträchtigt, wenn via USB aufgeladen wird. Trennen Sie die USB Verbindung wenn Sie Radio hören möchten. Hinweis: Die Hintergrundbeleuchtung schaltet sich nach 20 Sekunden ohne Eingabe ab. Bild 6 Uhr: Beim ersten Einschalten ist die Uhr auf 12:00 gestellt. 12/24-StundenModus einstellen: Drücken und halten Sie die Mode-Taste für ca. 2 Sekunden, um in den Einstellungsmodus zu gelangen. 12Hr blinkt auf dem Display. Drücken Sie , um zwischen der 12-Stunden- und der 24-Stunden-Anzeige zu wechseln. Drücken Sie Mode, um zum nächsten Schritt zu gelangen. Die Stunde einstellen: Drücken Sie / , um die Stunde einzustellen. Halten Sie die Taste für einen schnellen Durchlauf. Drücken Sie Mode, um zum nächsten Schritt zu gelangen. Die Minute einstellen: Drücken Sie / , um die Minute einzustellen. Halten Sie die Taste für einen schnellen Durchlauf. Drücken Sie Mode, um die Einstellung zu beenden. Handy und Mp3-Player aufladen: Hinweis: Dieses Gerät sollte nur in Notfällen dazu verwendet werden, Handys aufzuladen. Es ist nicht dazu konzipiert einen Handy-Akku vollständig aufzuladen. Dieses Gerät ist nur in der Lage, ein Handy zu einem bestimmten Prozentsatz aufzuladen. Hinweis: Sie können ein Handy mit beiden Stromquellen aufladen. 1. Schalten Sie Radio und Taschenlampe aus, um Strom zu sparen. 2. Heben Sie die Gummi-Abdeckung an, um an die Anschlüsse zu gelangen. 3. Stecken Sie ein geeignetes USB-Kabel (nicht im Lieferumfang enthalten) in den USBStromausgang und in den Ladeanschluss Ihres Handys. 4. Kurbeln Sie, falls das Handy keine Ladung anzeigt. Kurbeln Sie dabei wenigstens 2 Umdrehungen pro Sekunde. Tun Sie das solange, bis Ihr Handy ausreichend aufgeladen ist. 5. Hinweis: Selbst wenn Sie eine Lade-Fehlermeldung von Ihrem Handy erhalten wird es weiter aufgeladen. Es wird dadurch nicht beschädigt. Niedriger Akkustand: Wenn die Spannung des Akkus unter 3,0 V fällt, blinkt dieses Logo auf dem Display: AUX/Kopfhörer-Ausgang Das Gerät verfügt über einen Audio-Ausgang, der es Ihnen erlaubt, Musik über Kopfhörer oder externe Lautsprecher zu hören. ACHTUNG: Stellen Sie zuerst die Lautstärke auf das niedrigste Niveau, bevor Sie Kopfhörer oder andere Lautsprecher verbinden und erhöhen Sie erst dann die Lautstärke schrittweise. Das Gerät zurücksetzen: Sollte das Gerät nicht auf die Eingaben reagieren, muss es zurückgesetzt werden. Verwenden Sie zum Drücken der Reset-Taste auf der Rückseite des Gerätes eine aufgebogene Büroklammer, einen Zahnstocher oder ähnliches. Dies setzt das Gerät auf die Werkseinstellungen zurück und Voreinstellungen werden gelöscht. Pflege Den Akku pflegen: Laden Sie den Akku regelmäßig auf. Legen Sie den Stromschalter um, nachdem Sie das Radio benutzt haben. Entfernen Sie Batterien und den Akku, wenn Sie das Gerät nicht benutzen. Ersetzen Sie den Akku falls notwendig nur mit einem gleichwertigen 3,7 V Akku. Ersetzen Sie den Akku niemals mit einer gewöhnlichen Batterie. Generelle Hinweise: Modifizieren Sie niemals Teile des Gerätes Reinigen Sie das Gerät mit einem feuchten (keinem nassen) Tuch. Reinigungsmittel oder sonstiges sollten nicht verwendet werden. Lassen Sie das Gerät nicht unnötig lange im direkten Sonnenlicht liegen. Halten Sie es von heißen und feuchten Orten fern. Halten Sie das Gerät von Quellen von Hitze oder Stromrauschen wie fluoreszierenden Lampen oder Motoren fern. ACHTUNG: Lassen Sie niemals Wasser in das Gerät eindringen. Problemlösung Problem Das Gerät schaltet sich nicht ein. Das Handy zeigt eine Fehlermeldung an, wenn es an das Gerät Lösung Stellen Sie sicher, dass der Lithium-Ion-Akku ordentlich eingesetzt ist. Stellen Sie den Stromschalter auf . Falls der Schalter auf „AAA“ steht, stellen Sie sicher, dass die Batterien mit der richtigen Polarität eingesetzt wurden. Ersetzen Sie die Batterien gegebenenfalls. Eine niedrige Spannung kann zu Fehlermeldungen führen. Das Handy wird dennoch geladen. angeschlossen wurde. Mein iPod/iPhone zeigt nicht an, dass es geladen wird. Das Gerät lässt sich nicht mehr laden. Das Gerät lädt mein Handy nicht vollständig auf. Das Gerät reagiert auf keine Eingaben mehr. Das Display verblasst im Sonnenlicht. Die Ausgangsspannung dieses Gerätes ist niedriger als die Betriebsspannung von iPods/iPhones. Deshalb werden deren Akkus nicht geladen, solange diese nicht völlig leer sind. Das Laden über dieses Gerät ist nur für Notfälle gedacht und nicht dazu konzipiert bereits vorgeladene Geräte weiter aufzuladen. Ersetzen Sie den Akku mit einem des gleichen Typs (ICR16340). Für gewöhnlich halten diese Akkus ca. 2000 Ladezyklen stand. Das Laden über dieses Gerät ist nur für Notfälle gedacht und nicht dazu konzipiert, Akkus von Handys vollständig aufzuladen. Die Kapazät von HandyAkkus übersteigt die dieses Geräts. Daher wird ein Handy beispielsweise nur teilweise geladen. Entfernen Sie den Akku und drücken Sie den Reset-Knopf mit einer Büroklammer. Nehmen Sie das Gerät aus dem direkten Sonnenlicht, wenn es sich zu sehr aufheizt. Optionales Zubehör Zubehör Netzadapter ZigarettenanzünderAdapter Ersatz-Akku Bild Beschreibung Zum Aufladen mit dem USB-Kabel über eine Steckdose Zum Aufladen mit dem USB-Kabel über Zigarettenanzünder-Anschluss Zum Ersetzen des Original-Akkus, wenn dieser das Ende seiner Lebensdauer erreicht (ICR16340 aufladbar). Reparaturen Reparaturen am Gerät sollten nur von einer autorisierten Fachwerkstatt durchgeführt werden. Ein Umbauen oder Verändern des Produktes beeinträchtigt die Produktsicherheit. Achtung Verletzungsgefahr! Öffnen Sie das Produkt niemals eigenmächtig und führen Sie Reparaturen nie selber aus! Falscher Zusammenbau führt möglicherweise zu Fehlfunktionen oder dem Totalausfall. Öffnen Sie in keinem Fall das Gerät. Achtung: Es wird keine Haftung für Folgeschäden übernommen. Technische Änderungen und Irrtümer vorbehalten! Beachten Sie: Die Gewährleistung verfällt bei Fremdeingriffen in das Gerät. Technische Daten Akku: Batterien: Radio-Bänder: Taschenlampe: Abmessungen: Gewicht: Betriebs-Umgebungstemperatur: Lagerungs- Umgebungstemperatur: 3,7 V / 600 mAh Lithium-Ion Akku 3 x AAA (UM-4) UKW: 88-108 MHz / MW: 525 – 1710 KHz 3 LEDS 19,7x 9,5x5cm ca. 0,45kg 0°C – 55°C -10°C – 60°C Der Hersteller dieses Produktes ist die CHAL-TEC Vertriebs- + Handels GmbH, Wallstraße 16, 10179 Berlin. Konformitätserklärung Dieses Produkt entspricht den folgenden Europäischen Richtlinien: 2004/108/EG (EMV) 2006/95/EG (Niederspannung) 2011/65/EG (RoHS) Elektroaltgeräte Befindet sich die obige Abbildung (durchgestrichene Mülltonne auf Rädern) auf dem Produkt, gilt die Europäische Richtlinie 2002/96/EG. Diese Produkte dürfen nicht mit dem normalen Hausmüll entsorgt werden. Informieren Sie sich über die örtlichen Regelungen zur getrennten Sammlung elektrischer und elektronischer Gerätschaften. Richten Sie sich nach den örtlichen Regelungen und entsorgen Sie Altgeräte nicht über den Hausmüll. Durch die regelkonforme Entsorgung der Altgeräte werden Umwelt und die Gesundheit ihrer Mitmenschen vor möglichen negativen Konsequenzen geschützt. Materialrecycling hilft, den Verbrauch von Rohstoffen zu verringern. IMPORTANT SAFETY INSTRUCTIONS 1. Read all instructions before using. 2. Before connecting the device to the power supply, check that the voltage indicated on the appliance (underside the device) corresponds with the voltage in your home. If this is not the case, contact your dealer and do not use the device. 3. Do not let the cord hang over edge of table counter or touch hot surface. 4. Do not place on or near a hot gas or electric burner or in a heated oven. 5. To protect against a fire, electric shock or personal injury, do not immerse cord, electric plugs or device in water or other liquids. 6. To avoid all risk of electrocution, do not open the cover. Repairs to this appliance should only be carried out by qualified persons. 7. If liquid penetrates inside the cover, unplug the appliance and have it checked by a qualified technician before it is used again. 8. Do not place the appliance in full sunlight, close to heating equipment or any heat source, or in a location subjected to excessive dust or mechanical shocks. 9. Do not expose the appliance to extreme temperatures. The appliance shall be used in moderate climates. 10. Do not place any object that produces heat (candle, ash tray, etc.) close to the appliance. 11. Place the appliance on a surface that is flat, rigid and stable. 12. Install the appliance in a location with sufficient ventilation to avoid internal overheating. Avoid restricted spaces such as bookcases, cabinets, etc. 13. Do not obstruct the appliance's ventilation openings. Do not install the appliance on a soft surface, such as a carpet or blanket that might block the ventilation openings. 14. Disconnect the appliance from the power source if it is not going to be used for a long time, if there is a thunderstorm or if it isn't working properly. 15. The use of attachments that are not recommended by the appliance manufacturer may result in fire, electric shock or personal injury. 16. If the supply cord is damaged, it must be replaced by the manufacturer or its service agent or a similarly qualified person in order to avoid a hazard. 17. This appliance is not intended for use by persons (including children) with reduced physical, sensory or mental capabilities, or lack of experience and knowledge, unless they have been given supervision or instruction concerning use of the appliances by a person responsible for their safety. 18. Children should be supervised to ensure that they do not play with the appliance. 19. The appliance is not a toy. Do not let the children play it. Never let children insert foreign objects into the appliance. 20. Do not use the appliance for other than intended use. This appliance has been designed solely for domestic use; the manufacturer's liability shall not be engaged in the event of any professional use, by any misuse or by any use not complying with the operating instructions. 21. Save these instructions. CONTROLS N o Description N o Description 1 Flashlight ON/OFF button 7 Clock/Radio Tune Down ( 2 LCD Display 8 Volume Down (-) button 3 Clock/Radio Tune Up ( button ) 4 Volume Up (+) button 9 Radio Mode Select and Clock Set button 10 Speaker 5 Solar Panel 6 Power On/Standby ( ) button ) Figure 1 N o Description N o Description 13 Telescopic Antenna 19 USB Charging Port (under the Rubber Dust Cover) 14 Metal Clasp 20 Headphone Jack (under the Rubber Dust Cover) 15 Battery Compartment 21 Power Source Selector (located under the Rubber Dust Cover) 16 Rubber Dust Cover 22 Reset button (under the Rubber Dust Cover) 17 Mini USB DC Input Port (under the Rubber Dust Cover) 23 Crank Handle 18 Charging Indicator (under the Rubber Dust Cover) Figure 2 IMPORTANT NOTES AND WARNINGS Notes: Remove the plastic battery pull tab that was included during shipping to energize the rechargeable battery. Set the power switch (Figure 1, Reference 21) to the left Lithium Ion position to energize the rechargeable battery. battery switch For long term storage, you may want to remove the fully charged battery or re-insert the plastic battery pull tab. Warnings: When used in the directed manner, this unit has been designed and manufactured to ensure your personal safety. However, improper use can result in potential electrical shock or fire hazards. Please read all safety and operating instructions carefully before use, and keep these instructions handy for future reference. Take special note of all warnings listed in these instructions. Before using this product, please read the following warning and cautions: 1. Read these instructions – All the safety and operating instructions should be read before the unit is operated. 2. Keep these instructions – The safety and operating instructions should be kept for future reference. 3. Heed all warnings – All warnings on the device and in the operating instructions should be adhered to. 4. Follow all instructions – All operation and use instructions should be followed 5. Do not use this item near water – The device should not be used near water; for example, near a bath tub, washbowl, kitchen sink, laundry tub, in a wet basement, or near a swimming pool. 6. Clean only with dry cloth – The device should be cleaned only as recommended by the manufacturer. 7. Do not install near any heat sources such as radiators, heat registers, stoves, or other device (including amplifiers) that produce heat. The battery can explode. 8. Do not place near a fire. The battery can explode. 9. Only use attachments / accessories recommended by the manufacturer. 10. Refer all servicing to qualified service personnel. Servicing is required when the device has been damaged in any way, such as liquid has been spilled or the device has been exposed to rain or moisture, does not operate normally, or has been dropped. 11. This device shall not be exposed to dripping or splashing water and that no object filled with liquids such as vases shall be placed on the device. 12. Unplug immediately if liquid has been spilled or any object has fallen into the unit. 13. Power Sources – The device should be connected to a power supply only of the type described in the operating instructions or as marked on the device. Do not overload wall outlet. 14. Danger of explosion if battery is incorrectly replaced. Replace only with the same or equivalent type. 15. Do not attempt to dismantle, open or repair this product yourself. Only the rechargeable battery can be replaced or serviced. 16. Only operate within specified temperature range (32 °F to 131 °F). 17. Do not store the AAA batteries for extend periods of time. They may leak or rupture and damage the unit. Lithium Battery Safety Instructions Do not burn or bury batteries. Do not puncture or crush. Do not disassemble. Recycle Lithium batteries. Do not dispose of in the trash. If the electrolyte in the cells should get on your skin, thoroughly wash with soap and water. If in the eyes, rinse thoroughly with cool water. Immediately seek medical attention. Charge batteries on a fireproof surface away from flammable items or liquids. FEATURES The TK-669D includes the following features: Super bright 3 LED flashlight AM/FM Band Feature Emergency smart phone/mp3/mp4/USB charger Backlight digital display Clock Audio output (headphones) POWER SOURCES The TK-669D can be powered from the following sources: DC power from a USB power source, such as a computer AC power by adding a USB to AC adaptor (optional) DC car charger by adding a USB to DC car adaptor (optional) Solar power Hand crank power Three AAA batteries (optional) To select the power source, lift the rubber tab on the back of the TK-669D to expose the connectors, as shown in Figure 2. For AC, DC, USB, solar power and hand crank power source operation, choose the Lithium Ion battery switch position: For AAA dry cell battery power operation, choose the AAA battery switch operation: NOTE: There is a charging LED on the back of the unit (Figure 3, reference 18). The LED lights RED during charging. When fully charged, the LED turns GREEN. Figure 3 DC and AC Power Prior to using the TK-669D, we recommend you fully charge the rechargeable battery through the USB Power Input (Figure 2). This may take up to four hours. Lift the rubber tab on the back of the TK-669D to expose the power switch, as shown in Figure 2. Select the Lithium Ion battery switch position: Connect the DC power input cable (not included) to the USB mini jack, and the other end to the USB power source. The red battery charge indicator light will illuminate when charging (Figure 2). Continue to charge the TK-669D for several hours or until the charging light turns from red to green. The TK-669D is now ready for use. NOTE: Use 5.0V USB power source (not included) (from a computer or appropriate AC or DC adaptor). Over-voltage may result in damaging the TK-669D. Solar Power Lift the rubber tab on the back of the TK-669D to expose the power switch, as shown in Figure 2. Select the Lithium Ion battery switch position: Place the TK-669D in direct (or indirect) sunlight with the solar panel facing upwards. The green battery charging light may illuminate when charging, as shown in Figure 1. NOTE: There is not enough solar energy to turn on the red charging light. Thus, no light or a faint green light (which consumes less energy) may be present during solar charging. NOTE: If the display heats up outside the operational range, the display will fade. For solar charging, partial sunlight or shade is sufficient. Figure 4 Hand Crank Power Lift the rubber tab on the back of the TK-669D to expose the power switch, as shown in Figure 2. Select the Lithium Ion battery switch position: To operate the hand crank, perform the following: 1. Lift the hand crank from the cradle, as shown in Figure 2. 2. Turn the hand crank either clockwise or counterclockwise at about two cranks per second for 3-5 minutes to activate the internal battery for initial use, or when the unit has not been used for more than 60 days. The red battery charging light illuminates when charging, as shown in Figure 1. Figure 5 Dry Cell Battery AAA Battery Power The TK-669D also includes the option to power from 3 x AAA power instead of the rechargeable battery source. This is convenient if you have drained the rechargeable battery source and you wish to avoid hand cranking the unit. 1. Open the Battery Door on the back of the radio. 2. Insert 3 x AAA (UM-4) batteries (not included) and close the battery door (Figure 2, reference 15). NOTE: For optimum performance, alkaline-type batteries are recommended. 3. Follow the polarity diagrams shown in the battery compartment. 4. Lift the rubber tab on the back of the TK-669D to expose the power switch, as shown in Figure 2. Select the AAA battery switch position: . NOTE: The AAA battery selection will disable the Lithium Ion rechargeable batteries. NOTE: Make certain the batteries are installed correctly. The wrong polarity may damage the unit. WARNING: Do not mix old and new batteries. Do not mix alkaline, standard (carbon-zinc) or rechargeable (nickel-cadmium) batteries. Only batteries of the same or equivalent type as recommend are to be used. If the unit is not to be used for an extended period of time, remove the batteries. Old or leaking batteries can cause damage to the unit and may void the warranty. Do not dispose of batteries in fire, batteries may explode or leak. POWER CONSUMPTION The TK-669D includes a 3.7 DC rechargeable Lithium Ion large battery capacity (600 mAh) as the primary energy storage, but different operational modes result in significantly varying power consumption requirements. Here is a general guide on power consumption, typical user operation and recommend power sources. Mode Typical User Operation Power Recommend Power Consumpti Source on Flashlight Emergency or remote use Low Solar, Hand Crank, AAA Batteries AM/FM Band Emergency or remote use Low Solar, Hand Crank, AAA Radio Batteries Smart phone Short term emergency use High AC, USB (from computer), charging Hand Crank, AAA Batteries OPERATION Flashlight Operation Turn the light on and off with the light switch on the top of the unit (Figure 1). Radio Operation The TK-669D includes a digital LCD display (Figure) with backlighting, with the following push button controls: POWER . Turns on and off the radio. Transitions from clock display to radio tuner display. MODE. Switches the radio band between AM, FM mode. TUN : Adjusts the radio frequency up TUN : Adjusts the radio frequency down VOL+: Adjusts the radio volume up VOL-: Adjusts the radio volume down NOTE: The backlight will automatically turn off if no buttons are pressed for 20 seconds. Figure 6 Time When first powered up, the time will default to 12:00 AM. 1. Set 12Hr/24Hr Mode. Press and hold the MODE button for two seconds to enter the time setting mode. 12 Hr will begin flashing. Press the TUN+ button to switch between 12 hour and 24 hour time mode. Press the MODE button to proceed to the next step. 2. Set Hour. Press the TUN or TUN to adjust the hour up or down. Hold the TUN button to change rapidly. Press the MODE button to proceed to the next step. 3. Set Minute. Press the TUN or TUN to adjust the minute up or down. Hold the TUN button to change rapidly. Press the MODE button to exit the time setting mode. Radio Band Mode NOTE: Radio reception is dramatically reduced when charging from USB. Disconnect USB power when listening to the radio. Press the POWER button to turn the radio on and transition from the time mode. The radio will default to FM band (or the last radio band since power up). Press the MODE button to change to the AM band. Figure 7 NOTE: Radio interference will be present while charging the TK-669D. For best reception, there is a telescoping antenna. Extend the antenna and change the position if the reception is weak. AM/FM Radio Tuning When the radio is turned on, press the TUN TUN button to increase the frequency and press the button to decrease the frequency. To auto scan, press and hold the TUN ( or ) key for at least one second and the radio will automatically tune to next radio station with sufficient reception. Cell Phone and mp3/mp4 Operation Because smart phone batteries vary in their current ratings, we cannot specify charging rates or usage time. 10 to 15 minutes of cranking may result in 1 or more minute of talk-time, but your results may vary. NOTE: Charging a smart phone through the Phone Charger Jack is intended for emergency purpose only. It is not intended for recharging fully a discharged smart phone battery. Smart phone battery capacity significantly exceeds the battery capacity of the TK-669D. Therefore, a fully charged TK-669D will only partially charge a smart phone or PDA. After the battery stops charging the device, begin cranking if a DC power source is not available to continue recharging the smart phone. NOTE: You can charge a smart phone in either battery mode (Lithium Ion or AAA ). To charge the smart phone or PDA: 1. Turn off the radio and flashlight to conserve power. 2. Lift the rubber tab on the back of the TK-669D to expose the connectors, as shown in Figure 2. 3. Plug the smart phone charging cable (not includied) into the TK-669D charge USB output (Figure 3 reference 19). Connect the appropriate smart phone tip (not included) into the other end of the smart phone charging cable (not included). Plug other end of the smart phone tip (not included) into the smart phone’s charging connector. 4. If the phone does not begin charging, begin cranking. When charging a smart phone via the smart phone charger, it is important to turn the crank at least two revolutions per second, or until you see the charging LED turn on. This is an indication that the phone is receiving enough power from the radio. Continue to crank at this rate until you are satisfied that an appropriate level of charge has been received by your smart phone. If you decide to stop cranking for whatever reason, please wait at least 5 seconds before cranking the radio again. NOTE: You may receive a charging compatibility error on your smart phone, but your device may still charge and it will not harm your device. CAUTION: Before charging, please refer to the user manual of the device you wish to charge to make sure the charging current required does not exceed 1Amp (1,000 mA) of charging current. Overloading the charge circuit may damage the WR-111 and void the warranty. Low Battery Indication When the battery voltage is less than 3.0V, the low battery indication will flash: The radio will not operate in a low battery condition. AUDIO OUTPUT/HEAD PHONES The TK-669D includes an audio output jack. This allows you to listen with headphones or connect to an auxiliary input source, such as an amplifier. CAUTION: Guard your ears against hearing damage. When listening with headphones, start at the lowest volume and gradually increase until you can hear it comfortably and clearly. Read this Important Information before Using Your Earbuds: Avoid extended play at very high volume as it may impair your hearing. If you experience ringing in your ears, reduce the volume or shut off the unit. Keep the volume at a reasonable level even if your headset is an open-air type designed to allow you to hear outside sounds. Please note that excessively high volume may still block outside sounds. RESETTING THE UNIT If the unit experiences a power surge or electric shock, it is possible that the internal microcontroller may lock up and the unit will not respond to any commands from the panel controls. In this event, use a straightened paper clip, toothpick or similar objects to press the RESET button located on the back of the unit (see Figure ). The reset operation clears the system memory to factory default, and all of your previous settings will be erased. CAUTION: Do not use a sharp or pointed object to press the reset button. It may damage the reset switch inside the unit. Figure 8 CARE AND MAINTENANCE Battery Maintenance To maintain the battery: Periodically charge the battery to extend battery life Switch off power after radio use to extend battery life Remove the battery or reinsert the plastic battery pull tab for extended storage Remove the AAA batteries for extended storage to prevent battery leakage The battery is a rechargeable 3.7V / 600 mAh lithium ion battery. To replace the battery, open the battery compartment cover (Figure 2) by squeezing the tab. NOTE: Only replace with rechargeable 3.7V lithium ion battery. Replacing the battery with a nonrechargeable battery may damage the unit. General Care and Maintenance Do not tamper the internal components of the unit. Clean your unit with a damp (never wet) cloth. Solvent or detergent should never be used. Avoid leaving your unit in direct sunlight or in hot, humid or dusty places. Keep your unit away from heating appliances and sources of electrical noise such as fluorescent lamps or motors CAUTION: Never allow any water to enter the unit while cleaning. TROUBLESHOOTING Solution Problem The unit will not power up. Make sure the Lithium Ion battery is properly installed and the switch is in the proper position . If the switch is in the AAA position , make sure batteries are installed with the proper polarity. Replace the batteries if low battery voltage. Phone generates an error message when plugged into the TK-669D. A lower voltage output may result in error messages on the phone but should still charge the phone. My Ipod / IPhone does not display the charge signal. The output voltage of the TK-669D is lower than the operating voltage of the IPod / IPhone, and will not charge these devices until the battery is fully discharged. The device is only intended for emergency charges and not for topping off already charged devices. The TK-669D will no longer hold a charge. Replace the 3V lithium ion rechargeable battery (ICR16340). Typically, this battery will hold 2000 charge cycles. The TK-669D will not fully charge my smart phone. Charging a smart phone through the Phone Charger Jack is intended for emergency purpose only. It is not intended for recharging fully a discharged battery. Smart phone battery capacity significantly exceeds the battery capacity of the TK-669D. Therefore, a fully charged TK-669D will only partially charge a smart phone or mp3/mp4 device. After the battery stops charging the device, disconnect the device and begin cranking if a DC power source is not available. Solution Problem The TK-669D is locked up and will not respond to commands. How do I reset it? Remove the battery. Press the reset button with a paperclip. The red charging light does not illuminate during solar charging. There is not enough solar energy to drive the red charging light. For solar charging, you will see a faint green light. The brighter the sunlight, the brighter the green charging light. The display fades when placed in direct sunlight. If the display heats up outside the operational range, the display will fade. For solar charging, partial sunlight or shade is sufficient. OPTIONAL ACCESSORIES The following software and hardware accessories (not included) are available for the TK-669D Accessory Image Description Converts USB cable to AC power. Converts USB cable to DC car charger. Replaces rechargeable battery after end of life (ICR16340 rechargeable). SPECIFICATION Battery Power: 3.7V / 600 mAh lithium ion rechargeable battery (replaceable) or 3 x AAA (UM-4) batteries Radio Bands: AM: 525 KHz to 1710 KHz FM: 88 MHz to 108 MHz Flashlight: 3-LED Flashlight Size and Dimensions: Dimensions: 7.75" x 3.75" x 2.0" Weight: about 1 lb. Temperature Range: Working temperature range: 32 to 131 °F (0 to 55 °C) Storage temperature range: 14 to 140 °F (-10 to 60 °C) LIABILITY DISCLAIMER Please help in the preservation of the environment and return used batteries to an authorized depot. The electrical and electronic wastes contain hazardous substances. Disposal of electronic waste in wild country and/or in unauthorized grounds strongly damages the environment. Reading the “User manual” is highly recommended. The specifications of this product may change without prior notice. This product is not a toy. Keep out of the reach of children. No part of this manual may be reproduced without written authorization of the manufacturer. Electric and electronic equipment and included batteries contains materials, componentsans substances that can be hazardous to your health and the enviroment, if the waste material (discarded electric and electronic equipment and batteries) is not handled correctly. Electric and electronic equipment and batteries is marked with the crossed ou trash can symbol, seen here. This symbol signifies that electric and electronic equipment and batteries should not be disposed of with other household waste, but should be disposed of separately. As the end user it is important that you submit your used batteries to the appropriate and designated facility. In this manner you make sure that the batteries are recycled in accordance with legislature and will not harm the enviroment. All cities have established collection points, where electric and electronic equipment and batteries can either be submitted free of charge at recycling stations and other collection sites, or be collected from the households. Additional information is available at the technical department of your city.