1
Word Processing Supervisor
v.2007
Content and Format Checking
for
Word 2007
Microsoft Office 2007
for
Windows XP/Vista/7
USER'S MANUAL
S.E. Warner Software, Inc.
P.O. Box 95525
South Jordan, UT 84095
Technical Assistance: 1-801-277-9444
Sales & Orders: 1-888-278-8155
Fax: 1-801-938-1210
[email protected]
11/23/11
WORD PROCESSING SUPERVISOR for Word 2007 v.2007
Word Processing Control Software
User's Manual
Word 2007 (September 13, 2011)
Published by:
S. E. Warner Software Inc.
P.O. Box 95525
South Jordan 84095
Phone
(801) 277-9444
S. E. Warner Software, Inc. holds copyrights on this manual and on Word Processing Supervisor Software.
All rights reserved. Permission is hereby granted to schools holding a valid and current license for the use
of Word Processing Supervisor Software to duplicate this manual as needed for use within the licensed
school. Other duplication, reproduction, storage in a retrieval system, or transmission, in part or in total,
in any form or by any means, electronic, mechanical, photocopying, recording, or otherwise without the
prior written permission of the publisher is prohibited.
(c) Copyright S. E. Warner Software, Inc. (1990-2011)
Microsoft Word is a trademark of Microsoft Corporation
Windows is a trademark of Microsoft Corporation
Windows XP is a trademark of Microsoft Corporation
Windows Vista is a trademark of Microsoft Corporation
Windows 7 is a trademark of Microsoft Corporation
i
Table of Contents
CHAPTER 1 – FEATURES OF WORD PROCESSING SUPERVISOR .............................................................................................. 1
DOCUMENT DUPLICATION.................................................................................................................................................. 1
EDIT COUNTER .................................................................................................................................................................... 1
TOTAL WORDS AND WORD PER MINUTE RATES ................................................................................................................ 1
TIMED ACTIVITIES (COUNT-DOWN TIMER)......................................................................................................................... 1
CORRECTION ON/OFF ......................................................................................................................................................... 2
PASTE/INSERT AVAILABLE ................................................................................................................................................... 2
VOICE/SPEECH RECOGNITION INPUT USED ........................................................................................................................ 2
ERROR CHECKING OF STUDENT DOCUMENTS .................................................................................................................... 2
STUDENT RECORDS ............................................................................................................................................................. 3
CHAPTER 2 – GENERAL INFORMATION................................................................................................................................... 4
HARDWARE REQUIREMENTS .............................................................................................................................................. 4
SOFTWARE REQUIREMENTS ............................................................................................................................................... 4
NETWORK NOTES ................................................................................................................................................................ 5
CHAPTER 3 – INSTALLATION OF WORD PROCESSING SUPERVISOR ....................................................................................... 6
HARD DRIVE & NETWORK INSTALLATION........................................................................................................................... 6
USER ACCOUNT CONTROL (UAC) ........................................................................................................................................ 6
INSTALL PREREQUISTES ...................................................................................................................................................... 7
BEGINNING THE INSTALLATION ........................................................................................................................................ 11
CHOOSE WPS REMOTE DIRECTORY .................................................................................................................................. 12
CHOOSE WPS PROGRAM PATH......................................................................................................................................... 13
UNINSTALLING WORD PROCESSING SUPERVISOR............................................................................................................ 15
CHAPTER 4 – FIRST TIME WALK THROUGH THE SOFTWARE ................................................................................................ 16
CHAPTER 5 – GUIDE TO USING THE WORD PROCESSING SUPERVISOR ............................................................................... 26
OPTIONS AVAILIABLE FROM THE WPS MENU .................................................................................................................. 30
Ending or Suspending a Word Processing Supervisor Document ..................................................................................... 31
Beginning a New Word Processing Supervisor Document ............................................................................................... 33
Supplementary Materials Chooser ................................................................................................................................... 35
Custom Key Selector ......................................................................................................................................................... 36
Customizing the Default Settings (Font, Pitch, etc.) of WPS Documents ......................................................................... 36
To customize a new template file for WPS Documents: .................................................................................................. 37
Editing a Word Processing Supervisor Document ............................................................................................................ 37
ii
Printing a Word Processing Supervisor Document ........................................................................................................... 38
Deleting a Word Processing Supervisor Document .......................................................................................................... 39
Error Checking a Word Processing Supervisor Document ................................................................................................ 40
Accessing Student Records (as a student) ........................................................................................................................ 41
Accessing Class Instructor Utilities.................................................................................................................................... 41
CHAPTER 6 – TEACHER UTILITIES .......................................................................................................................................... 42
The Teacher Menu ............................................................................................................................................................ 42
Entering the Class Password ............................................................................................................................................. 43
Changing the Class Password ............................................................................................................................................ 43
Restricting Access to the Teacher Utilities ........................................................................................................................ 43
The Class Setup ................................................................................................................................................................. 44
Logon Procedures ............................................................................................................................................................. 45
Document Preparation ..................................................................................................................................................... 45
Record Keeping and Class Standards ................................................................................................................................ 46
Paths.................................................................................................................................................................................. 47
Document Verification ...................................................................................................................................................... 49
Creating Key Files .............................................................................................................................................................. 50
Deleting Key Documents ................................................................................................................................................... 50
Importing Documents ....................................................................................................................................................... 51
Using the Database Manager............................................................................................................................................ 51
CHAPTER 7 – ERRORCHECKER & KEY BUILDER ..................................................................................................................... 52
Selecting Key Documents and Student Exercises ............................................................................................................. 52
The Error Check Report Window ...................................................................................................................................... 53
Steps Required to Build Key Documents........................................................................................................................... 54
The following outlines the steps required to build key documents:................................................................................. 54
Selecting the type of source document ............................................................................................................................ 55
Methods for Creating Source Documents ........................................................................................................................ 55
Selecting Key Type and Record Type ................................................................................................................................ 56
Selecting an Appropriate Key Type ................................................................................................................................... 56
DRILLS ................................................................................................................................................................................ 56
PRODUCTION EXERCISES................................................................................................................................................... 57
Selecting an Appropriate Record Type ............................................................................................................................. 58
Special Error Checker Instructions .................................................................................................................................... 59
iii
How to Mark and Designate Variable Text ....................................................................................................................... 60
Available Types of Variable Text ....................................................................................................................................... 61
Marking text for MULTIPLE SPACING Check ..................................................................................................................... 62
Marking text for LINE BY LINE Check ................................................................................................................................ 63
Set Document Format Variations...................................................................................................................................... 64
Sample Keys ...................................................................................................................................................................... 65
CHAPTER 8 – STUDENT RECORD KEEPING ............................................................................................................................ 68
General Overview ............................................................................................................................................................. 68
The Three Sections of the Data Base Manager ................................................................................................................. 69
Adding a Student............................................................................................................................................................... 71
Editing a Student Name .................................................................................................................................................... 71
Deleting a Student ............................................................................................................................................................ 72
Restoring a Student........................................................................................................................................................... 72
Resetting Student Data Files ............................................................................................................................................. 73
Resetting the Class Roll ..................................................................................................................................................... 73
Print Options ..................................................................................................................................................................... 74
Passwords ......................................................................................................................................................................... 75
Adding a Score to a Student Data File............................................................................................................................... 77
Editing a Score in a Student Data File ............................................................................................................................... 79
Deleting a Score from a Student Data File ........................................................................................................................ 79
Merge / Transfer Options ................................................................................................................................................. 80
Backup / Restore Options ................................................................................................................................................. 81
Changing the Current Class Roll ........................................................................................................................................ 82
Changing the Current Student .......................................................................................................................................... 82
The Score Display Window................................................................................................................................................ 82
The Sort Order................................................................................................................................................................... 84
Qualifying Scores............................................................................................................................................................... 85
Selecting Scores ................................................................................................................................................................ 85
Exam Summaries ............................................................................................................................................................... 85
CHAPTER 9 – SECURITY ......................................................................................................................................................... 88
Edit Counts ........................................................................................................................................................................ 88
Check Count ...................................................................................................................................................................... 88
Verification Formulas ........................................................................................................................................................ 88
iv
Modified Exercise Names.................................................................................................................................................. 88
APPENDIX A – SPECIAL NETWORK CONSIDERATIONS .......................................................................................................... 90
Remote Directory .............................................................................................................................................................. 90
User Access Rights ............................................................................................................................................................ 90
File Attributes.................................................................................................................................................................... 92
SITE LICENSE DISKS............................................................................................................................................................ 93
GENERAL STATEMENT....................................................................................................................................................... 93
v
CHAPTER 1 – FEATURES OF WORD PROCESSING
SUPERVISOR
Word Processing Supervisor is a companion to your word processing software. Word Processing
Supervisor is designed to provide educational control over student use of word processing features.
Educational control is provided in the following areas:
DOCUMENT DUPLICATION
Word Processing Supervisor will attach the name of the student originating the document to the data file
in coded form and will print that student's name each time the document is printed. Ownership of the
document always remains with the student who creates the document. Additional security is available
through optional logon passwords.
EDIT COUNTER
Word Processing Supervisor will keep track of the number of times a document has been reloaded after
the initial creation of the document. The number of edits will be printed each time the document is
printed.
TOTAL WORDS AND WORD PER MINUTE RATES
Word Processing Supervisor will keep track of the number of words typed, either typing words (five
keystrokes per word) or actual words and will print the number of words each time the document is
printed. If typing words are designated, Word Processing Supervisor will also calculate and print the
gross word per minute rate. The error count, net word per minute rate, cutoff word per minute rate, and
checks counter will also be printed for those documents which have been error checked and are using
typing words for the word count. If you choose to track actual words, Word Processing Supervisor will
not maintain student records since it depends on word per minute rates to sort the scores it saves.
TIMED ACTIVITIES (COUNT-DOWN TIMER)
Word Processing Supervisor includes a stopwatch for timed activities. The stopwatch is set when the
student chooses to begin a WPS document and starts when he/she types the first keystroke. When the
designated time expires, the computer will beep and Word Processing Supervisor will display statistics
relevant to the finished exercise. The document may then be checked or printed, but no further editing of
the document will be possible.
1
For extended timing periods, it is possible to exit the document before the timing expires and return to
the document at a later time with Word Processing Supervisor allowing the use of the balance of the
timing period.
CORRECTION ON/OFF
Word Processing Supervisor allows for the correction features of a word processing package to be either
on or off. If correction is set to OFF, the students will not be able to backspace, or otherwise edit a
document, and will not be permitted to reload a document for future editing sessions.
PASTE/INSERT AVAILABLE
Checking the Paste/Insert Available for the Document box permits the use of Paste and Insert. All
documents prepared with this feature check will have a PI- OK label at the right side of the student
information footer. NOTE: Any document with the PI-OK label that is error-checked with a Drill key
(Timed Writing, Paragraph Drill, or Line Drill) will not be recorded in the student record. Production
documents will have the document's filename preceded by an asterisk (*) in the student record.
VOICE/SPEECH RECOGNITION INPUT USED
If a voice/speech recognition feature is used with Word 2007 for inputting data, checking this box will
by-pass the starting of the timer with the first keystroke. The timer will begin as soon as the OK button is
clicked on the New Document screen.
ERROR CHECKING OF STUDENT DOCUMENTS
When a document is error checked, Word Processing Supervisor will mark content and format errors in a
student's document. The software includes a Key Building Utility that allows the instructor to provide an
error-free copy of the documents that the students will create, and allows the teacher to designate
acceptable variations in students’ documents from the instructor provided key.
The software will identify the following types of content errors:
SPELLING
EXTRA WORDS
UNDERLINE/BOLD
SPACING BETWEEN WORDS
PUNCTUATION
CAPITALIZATION
BROKEN WORDS
NEW LINE ERRORS
OMITTED WORDS
TRANSPOSED WORDS
RUN TOGETHER WORDS
The software will identify the following types of format errors:
LEFT MARGIN
BOTTOM MARGIN
RIGHT MARGIN
LEFT OFFSET
TOP MARGIN
RIGHT OFFSET
2
INDENTION
FONT
HARD RETURN COUNT
HORIZ ALIGNMENT
POINTS
LINE SPACING
VERTICAL ALIGNMENT
TAB COUNT
WIDOW/ORPHAN
Word Processing Supervisor will check documents up to six pages in length and will report and mark the
first twenty content errors and the first twenty format errors in the document. The printed document
information will also include an error count, words per minute rate, cutoff word per minute, and checks
counter.
STUDENT RECORDS
Word Processing Supervisor maintains a database of student records. This database will track the best
drill scores, and all production scores, and all exam scores for each student. There are several options
that you can set to specify how these scores will be recorded and ranked. The DBase Utility in the Teacher
menu is used to select these options.
Students have read access to their records. They may review their progress at any time. Teachers have
read and write access to all student records -- they may modify data records, backup/restore data
records, modify class lists, transfer student records to other classes, display/print records and
passwords, and generate class summary reports. See Chapter 8 - Record Keeping.
3
CHAPTER 2 – GENERAL INFORMATION
HARDWARE REQUIREMENTS
The hardware requirements for using Word Processing Supervisor for Word 2007 are the same as those
required by the Word 2007. In addition you will need:
100 megabytes of hard disk drive or network disk drive space for the software.
~500k of disk space per student for storing student records.
SOFTWARE REQUIREMENTS
Your version of Word Processing Supervisor supports only the following word processor:
Word 2007
Microsoft Word 2007 (Microsoft Office 2007) with service pack 2 (SP2)
The operating system on your workstation must be Windows XP, Windows Vista, or Windows 7. (The
server may be Windows XP, Windows Vista, Windows 7, Novell, or other compatible network.)
Before installing Word Processing Supervisor, Word 2007 (Office 2007) must be installed and fully
operational. See the reference materials for Word 2007 for instructions on installation. Carefully test
your word processing package installation before proceeding to install Word Processing Supervisor.
4
NETWORK NOTES
You may install Word Processing Supervisor on the following network systems:
Windows XP, Windows Vista, or Windows 7 Networks
NOVELL Networks
Other Windows Compatible Networks
The workstation operating system must be Windows XP with Service Pack 2 (SP2), Windows Vista, or
Windows 7.
WPS must be installed locally on each computer that you intend to use it on.
If you are installing WPS from a download, make a backup copy of the download installation folder and
save it in a safe place.
5
CHAPTER 3 – INSTALLATION OF WORD PROCESSING
SUPERVISOR
HARD DRIVE & NETWORK INSTALLATION
1. Make sure that Word 2007 is correctly installed and fully functional.
2. Download Word Processing Supervisor from http://www.sewarner.com.
3. Open the folder where you have downloaded the setup file.
4. Double click on: WPS2007_Setup.exe
5. Install the software.
6. If you have purchased a site license, extract and copy the site license file (WPSWRD2007) into the
remote directory that is specified during the installation process (both teachers and students only
need read access to this file). By default, the directory is:
Windows Vista and Windows 7: C:\ProgramData\SE Warner Software\Word Processing
Supervisor for Word 2007\
Windows XP: C:\Documents and Settings\All Users\Application Data\SE Warner Software\Word
Processing Supervisor for Word 2007\
THE INSTALLATION PROGRAM
USER ACCOUNT CONTROL (UAC)
When the installation program begins, a dialog appears that asks for permission for the installation
program to have access to the computer. Click “Yes” to continue with the installation program.
6
INSTALL PREREQUISTES
The installation will start by installing some prerequisites necessary for the operation of WPS. To
continue with the installation click either Accept or Install on the following dialogs.
Depending on the software that is currently installed on the computer, some of the prerequisites may
already be present on the computer. If they are already present, you will not be prompted to install them.
Click Accept to continue.
7
Click Accept to continue.
8
Click Install to continue.
9
If you encounter this dialog box after installing the prerequisites, the installation program has
encountered an error. Try uninstalling any existing installations of WPS 2007. If the problem persists,
please contact Technical Assistance at the number listed at the beginning of the manual.
10
BEGINNING THE INSTALLATION
Click Next > to continue with the installation.
11
CHOOSE WPS REMOTE DIRECTORY
Enter in the path where you wish to store the class rolls and student records. By default the path is set to
be a folder on the current computer’s hard drive, however, if you wish to share a location for a network
installation, specify the path associated with the network drive here. Double-check that you have entered
the path correctly (for more information on creating the remote directory in a network location, please
refer to Appendix A. – Remote Directory). Click Next > to continue.
12
CHOOSE WPS PROGRAM PATH
Select the path where you wish to install WPS. Click Next > to continue with the installation program.
13
Click Next > to continue with the installation.
14
The installation is now complete; click Close to continue. If the check box labeled “Launch Word
Processing Supervisor for Word 2007” is checked, Word will start upon the closing of the installation
program.
After the installation program is complete you may access Word Processing Supervisor by starting Word
and selecting the WPS 2007 tab which now appears on Word's ribbon.
UNINSTALLING WORD PROCESSING SUPERVISOR
If it is desired to uninstall Word Processing Supervisor Software, you may use Programs and Features
from the Windows Control Panel (Start->Control Panel->Programs and Features).
15
CHAPTER 4 – FIRST TIME WALK THROUGH THE
SOFTWARE
The objective of this chapter is to walk you through the basic operations of the Word Processing
Supervisor. This is meant to be used as a quick run-through of WPS’ functionality. You must be a
privileged user to follow this walk through because the proper User Access Rights have not been
correctly setup yet. If you do not have the correct permissions or have issues when following this chapter,
please refer to Chapter 5 – GUIDE TO USING THE WORD PROCESSING SUPERVISOR in order to set the
correct User Access Rights and for a more detailed overview of WPS.
Following the installation of Word Processing Supervisor, the WPS 2007 menu item will be available to
the right of the View tab when you start Word:
This new ribbon tab, WPS 2007, is used to provide all the Word Processing Supervisor’s functionality. To
use the software, you must first initialize WPS using your class code and name. From the new WPS 2007
tab on Word’s ribbon, click Initialize Word Processing Supervisor, and the following window will
appear:
16
You may leave the class code as 1.
To use this software you must assign each individual class a class code. Word Processing Supervisor will
keep separate class rolls according to the class codes you assign. When a student initializes the software,
he/she will have to type his/her name and class code in this box. Word Processing Supervisor will make
sure that the name he/she types in is found in the class roll designated by the class code. Since this is the
first time using the Word Processing Supervisor, we'll just use class 1. For more information concerning
class codes, see Chapter 6 - TEACHER UTILITIES and Chapter 8 - RECORD KEEPING.
To enter, type INSTRUCTOR in all capital letters in the field labeled “Student Name”. Don't worry about
entering a password or a personal storage location. Passwords and personal storage locations are only
necessary when you, the teacher, designate that students must use them. See Chapter 6 - TEACHER
UTILITIES.
When all the information is entered, click OK. Whenever you start up Word, you have the option to use
(or not use) the Word Processing Supervisor. If you do not wish to use the Word Processing Supervisor,
do not activate it with the “Initialize Word Processing Supervisor” button from the WPS 2007 tab. When
you press OK, Word Processing Supervisor will require you to provide the information necessary to
create class 1. Since the creation and modification of class settings is a privilege only granted to the class
instructor, you will first be prompted to enter in the class password. Be very careful to guard this
password - it prevents students from accessing teacher utilities, and if forgotten will prevent you from
doing the same. The following window will appear:
Since this is the first time the software is being used, the password is defaulted to the word, “Default”.
Enter “Default” (without the quotes) in the text box labeled “Enter Your Password.” When you press OK, a
new “Change Password” dialog will pop up and prompt you to change the password from the default
password.
When you've entered and changed the password, press OK to begin providing the information necessary
for Word Processing Supervisor configure class 1.
17
Once the password has been successfully entered, the following window will appear:
This window is used to set the configuration options for class 1. You can always modify the information
stored in this window by using “Edit Class” via the DBase Utility -- see Chapter 6 - TEACHER UTILITIES.
If you are installing to a hard drive with no server available, you can just use the default values shown in
this window. However, a network installation requires that you enter paths on this screen that can be
read and written by all students to archive their student records, ErrorChecker Keys, and where the
students will be saving their documents. (See Appendix A for more information.)
Press OK and Word Processing Supervisor will notify you if any of the directories do not exist on the
system. If they do not exist, either change the path to the correct location or create a new directory in the
appropriate location. Word Processing Supervisor will automatically create a Class Roll File for class 1.
18
The Class Roll File will store the names of the students enrolled in class 1. Using the DBase Utility (see
Chapter 8 – Student Record Keeping) you can add/delete/modify the names stored in the class roll file.
Now you can return to Word and you can begin to use the software.
When you return to Word, notice that the WPS 2007 tab contains the following new items:
All use of the Word Processing Supervisor is done through this menu.
We will now create a test student to use the software with. To create a student, click DBase Utility in the
Teacher Menu. This window will pop up:
19
Make sure class 1 is selected in the list of classes in the top left corner of the window. To add a student,
click on the “Add Student” button next to the class roll, below the list of classes. You will be prompted for
the student’s name:
We will use John Q. Student as this test student’s name. Press OK and you will see that the student’s name
will now appear in the class roll. Exit out of the DBase Utility. Now press Close WPS, and we’ll re-initialize
WPS, but this time using the name of our test student, John Q. Student. Press Initialize Word Processing
Supervisor 2007 and this dialog will appear as before:
This time, type in John Q. Student (or whichever name you gave the test student) in the field labeled
“Student Name” and press OK.
Now you are logged in as a student and can continue with exploring the software.
20
Select New Document from the WPS 2007 tab to create a new Word Processing Supervisor document.
Word Processing Supervisor documents automatically have their word counts, word per minute rates,
and other kinds of relevant information calculated. Word Processing Supervisor documents can be
created with a stopwatch (count-down) timer that allows a limited amount of time for editing or with a
correction blocker that prevents the backspace, cut -copy-paste, and other correction features from
taking effect when typing the document.
When you select New Document, the following window will appear:
To learn to use this window see Chapter 5 - ORIENTATION TO THE SOFTWARE. Type test1 in the text
box labeled “Save As”. Check the box labeled “Display Key”, and click on the “Custom” button. You will be
presented with a file dialog. Choose “tw1” and press Open.
Once you pressed OK in the “New Document” window, you may begin typing a sample Word Processing
Supervisor Document. Word will reposition itself and display the key “tw1” underneath. Type the
following into the word document:
This is a sample timed, writing that you may practice on to test the error-checking capabilities of
Word Processing Supervisor Software. this timed writing is a short thre paragraphs long.
21
Notice that there has been an extra comma placed after the word "timed", the word, "thre," has been
spelled incorrectly (it should be "three"), and the word "this" is not capitalized. These are deliberate
errors that will be caught by the Word Processing Supervisor during the error check.
After you've typed the above sentences, select the End Document option from the WPS 2007 menu. This
will cause Word Processing Supervisor to save and close the current document and perform calculations
on what has been typed. The following window will appear:
Refer to Chapter 5 - GUIDE TO USING THE WORD PROCESSING SUPERVISOR to learn how to interpret
the information displayed in this window. For now, you can notice that on the third line, the Gross Word
per Minute rate (Gross WPM) is displayed. On this example, the typist achieved a Gross Word per Minute
rate of 50. Press OK to dismiss this “Document Summary” window.
At this point, we're ready to error-check the document. Your Word Processing Supervisor package came
with five sample keys that you can use to test the software. The lines you typed above can be checked
against one of these keys. The name of the key is tw1 (which stands for timed writing 1.)
To error-check the document against this key, select the Check Document option from the WPS menu.
The following window will appear:
22
Enter the name of the document, test1, in the “Document” text box. Click Custom, choose “tw1”, and
press Open, just as during the “New Document” window. Then click OK. This will invoke the Error
Checker.
The Error Checker will display the following window:
See Chapter 7 - ERRORCHECKER & KEY BUILDER to learn how to use the “Error Check Report”
window. For now, you can notice that the key file is displayed in the bottom half of the window and the
23
document you typed is displayed in the top half. There is a red highlight by the word "timed" in both
portions of the window. This indicates the position of the first error - a punctuation error (the extra
comma).
If you press the Exit button, Word Processing Supervisor will again display the “WPS Document
Summary” window. This time, the information that could not previously be displayed (the Error count,
and Gross Words per Minute, for example) in the WPS Document Summary window will be displayed.
Now that a document has been error checked, we can examine the student record to see the scores that
the error-checker reported and saved in the student data file. (See Chapter 8 - RECORD KEEPING)
24
Select the Student Record option from the WPS menu. It will take a moment to load. The following
window will appear:
Refer to Chapter 8 - RECORD KEEPING to learn how to use the Word Processing Supervisor Student
Records Menu System. For now, you will notice that the exercise you just typed and checked, tw1, has
been recorded in the student record. Press the Exit button to return to Word.
This concludes the first time walk through the software. To exit Word, select the Exit option from the File
menu.
25
CHAPTER 5 – GUIDE TO USING THE WORD PROCESSING
SUPERVISOR
The following pages will be a guided tour through the windows of the Word Processing Supervisor.
Notice that some of the windows shown in this manual may appear differently depending on the settings
selected in the installation/setup of the software.
After installing Word Processing Supervisor, when you start Word, you will see an additional tab, WPS
2007, available in the Word ribbon.
Before beginning to use Word Processing Supervisor, you should first check that the access rights are set
correctly. Follow these procedures to check the User Access Rights:
INSTRUCTOR TO VERIFY USER ACCESSS RIGHTS:
If you are not logged on as a Teacher, log off and log on as a Teacher (you must not be logged on as an
Administrator). To repeat this check for a student’s access rights, log on as a Student and repeat these
steps.
If you are in WPS, exit Word 2007 at this time.
Launch Word 2007.
In the WPS 2007 tab, click Check Permissions.
If you have previously created classes, you can choose which class you wish to check User Access Rights
for. You will be presented with this dialog to select the class:
26
Otherwise, you will be notified that you are checking User Access Rights for the default class settings:
Click OK to continue. You will be prompted with this window:
If you have logged on to the network as a Teacher, click on the Yes button. If you are checking when
logged on as on Student, click on the No button.
27
If you clicked on Yes, the following message box will appear (If you clicked on No, a slight variation
adjusted for the student’s User Access Rights will appear):
If you tested the Teacher’s User Access Rights, you will get the above message box. If you were testing the
Student User Access Rights, a similar message box would appear. If “OK” appears after each path, the User
Access Rights have been set appropriately. If they indicate an “ERROR”, the nature of the error in the
permissions will also be indicated.
If an error occurs, please contact your systems administrator and provide Appendix A for the
appropriate permission and network settings.
28
After insuring that both the student and teacher User Access Rights are correct, we can initialize WPS. If
the User Access Rights are not correct, some of the functionality of WPS may be impaired.
Selecting Initialize Word Processing Supervisor from the WPS 2007 tab brings up the following
window:
Type "INSTRUCTOR" in the field labeled “Student Name” to log in as the instructor. When the correct
class code and student name are entered (skip the student password and Subfolder fields), press the OK
button. The Password field only needs to be filled in if the password option was selected in the setup (see
Chapter 6 - The Teacher Utilities -- The Class Setup).
Note: If you need to perform actions that only a teacher can perform while a student is logged in, simply
click on the “Teacher Menu” button in the WPS for Word 2007 menu. You will be prompted for the same
password you use as you do to log in using INSTRUCTOR as a student name. Once you enter the
password, the Teacher Menu will open and the student will temporarily gain instructor privileges. To
remove the temporary privileges, click the “Close Teacher” button in the Teacher Menu. This is a very
useful feature if a student is having trouble and you need to quickly perform an administrative task on
some of their scores or need to edit one of their documents. However, you may not be able to perform
some teacher operations such as deleting a student because the User Access Rights for a student account
does not permit it for security reasons.
29
After a successful login, you will notice that additional menu items are available from the WPS menu. It is
from these menu options that all the features of Word Processing Supervisor are accessed.
OPTIONS AVAILIABLE FROM THE WPS MENU
Selecting the WPS 2007 activates the following tab:
Here is an explanation of what each of the menu selections offer:
New Document
Begins a new Word Processing Supervisor Document. Selecting this option brings up
a window that allows the document name, timer, correction feature, and document
codes to be set. (See 5-4)
End Document
Saves and Closes the current Word Processing Supervisor Document. It is only
enabled when there is a Word Processing Supervisor Document currently being
keyed/edited. (See 5-3)
Edit Document
Allows the editing of a Word Processing Supervisor Document. If the correction
feature was off, or the document's timer had expired, the document may not be
edited. (See 5-6)
Print Document
This option prints a Word Processing Supervisor Document. Information concerning
the word/minute rates, errors, time, etc. is included in the printed document. (See 57)
Check Document
Error-checks a Word Processing Supervisor Document against an error-free key that
the class instructor will need to provide. (See 5-8, Chap. 7)
Delete Document
Deletes a Word Processing Supervisor Document from disk. (See 5-7)
Student Record
Allows students to view, print, and backup their student records. See (5-8)
30
Teacher Menu
Allows class Instructors to modify class settings, build/delete error-free key files,
and make modifications to student data / class roll files. This option is protected by
a password. (See Chapter 6 and Chapter 8)
Close WPS
Closes out the current WPS session allowing another student to log in.
Ending or Suspending a Word Processing Supervisor Document
Selecting End Document from the WPS menu brings up the following window
This window displays statistics relevant to the current Word Processing Supervisor document.
Here is an explanation of what is displayed in this window (top to bottom, left to right):
Document Name:
Above, it is "test1.wps"; it is the name under which the document was saved on disk.
Correction:
Whether the correction features (backspacing, etc) were on or off.
Edits:
The edit counter -- how many times the document has been reloaded for editing.
(see Chapter 9 - Security)
31
Total Words:
The total amount of words in the document. (Note that the calculation is dependent
on a class-specific setting)
Elapsed Time:
Time used. The total elapsed time spent editing the document
(hours:minutes:seconds).
Gross WPM:
The Gross Words Per Minute rate
(Net WPM:
The Net Words Per Minute rate)
(Cutoff WPM:
The Cutoff Words Per Minute rate)
Content Errors:
The number of content errors.
Format Errors:
The number of format errors (Only for production documents).
Student Name:
Above, it is "John Q. Student"
Student Number:
Number assigned to each student by the instructor.
Class Code:
Number assigned to this class by the instructor.
Assignment Code:
Number assigned to this assignment by the instructor.
Checks:
The check counter -- how many times the document has been error-checked. (see
Chapter 9 - Security)
Creation:
Creation Date.
Edited:
Editing Date.
Printed:
Printing Date.
If a document is ended before its stopwatch finishes or if the stopwatch was set to off and correction was
set on, the document could be reopened later for editing. To reopen a document for editing, choose Edit
Document from the WPS menu. Reopening a document for further editing increases the document's edit
count by one.
The information displayed in the “WPS Document Summary” window is printed as a footer at the bottom
of every document printed with the Word Processing Supervisor and is recorded in the student's record.
32
Beginning a New Word Processing Supervisor Document
Word Processing Supervisor Documents are different from regular word processing documents. WPS
documents carry additional information with them such as the amount of time used preparing the
document, the word per minute rates, the number of errors, etc. In order to use the features of Word
Processing Supervisor, you need to work with Word Processing Supervisor Documents as opposed to
regular word processing documents. Beginning a new Word Processing Supervisor Document is done by
selecting New Document from the WPS menu. Selecting New Document from the WPS menu brings up
the following window:
Using the mouse/tab/shift-tab keys, you can move from field to field in this window. Fill in the document
name of the file you wish to begin.
Check the Correction checkbox to select whether you will allow correction features. Correction features
include the backspace key and any cut-copy-paste combination including moving the mouse to a previous
location in the document.
Check the Stopwatch checkbox to select to use the count-down stopwatch. If it is enabled, you must set
the amount of time in the timing period text box. Any valid time will work, for instance, you may type “3
minutes, 5 seconds”. After the time you set elapses, the Word Processing Supervisor will block further
33
editing of a document and automatically select the End Document option. If the stopwatch is not enabled,
the amount of time used to prepare the document will still be recorded, but will not be limited. (see
"Ending a Word Processor Supervisor Document").
Set the codes field. Information concerning which codes are selected will appear on the printed
document. If you check the box labeled Paste/Insert Available the document will be labeled as "PI-OK"
and will be flagged in the bottom line of the student information footer. If the document is later errorchecked as a DRILL document (Timed Writings, Paragraph Drills, or Line Drills), the error-checking
results WILL NOT be recorded in the Student Record. If the document is later error-checked as a
PRODUCTION document, the results in the Student Record will have an asterisk (*) precede the file name.
If the checkbox labeled Voice Recognition Input Used is checked, the document will be labeled as “VROK” and will be flagged in the bottom line of the student information footer. If both the boxes labeled
Paste/Insert Available and Voice Recognition Input Used are checked, the document will be labeled as
“VR-PI” and will be flagged in the bottom line of the student information footer.
The timing for documents checks the time with every key stroke. If you take some time to select the menu
option to end a document, it will not be counted in the final elapsed time calculations.
If the Display Key checkbox is checked, the student can select a key from either a list of supplementary
materials included with the software, or from a list of custom keys created by the teacher. The key that is
selected will be displayed at the bottom of word, so the student may type the key without a need for a
hard-copy. See “Supplementary Materials Chooser” and “Custom Key Selector” in this chapter.
When all the fields are entered correctly, press OK to begin writing the WPS document. If the stopwatch
option was selected, it will begin to count down as soon as the first key is typed. If the correction feature
is not enabled, no correcting of the document will be allowed. If the Paste/Insert box is not checked,
copying and pasting will not be allowed. To complete the document, select the End Document option
from the WPS menu. This will cause the software to stop the timer, if appropriate, and display statistics
concerning the document. See "Ending a Word Processing Supervisor Document" in this chapter.
34
Supplementary Materials Chooser
If you click on the button labeled “Supplementary”, you will be presented with the supplementary
materials chooser window:
On the left side of the window is a list that is labeled “Key Type”. This list contains the various types of
keys that are available as supplementary keys. On the right side of the window is a list of the individual
keys in the selected key type. To use a key, simply select the key type from the left, and then choose the
desired key from the right and press OK.
If you check the box labeled “Exam”, the exam key will be used instead of the practice key. If selected, it
will cause the key to be recorded in the students’ exam scores.
35
Note: The names of these keys are related to those in the blacklines files. There is a blacklines file
associated with each key type listed on the left. These blacklines files give formatting and stylistic
guidance concerning each key type. The blacklines files are available in the Programs menu under SE
Warner Software, then Word Processing Supervisor.
Custom Key Selector
If you click on the button labeled “Custom”, you will be presented with this file selection window:
This dialog allows the student to select any key to be used for display or error-checking. Simply select a
file and press Open in order to choose a key.
In the image above, the four keys that are listed are sample keys included with the software. However,
more keys can be created by the teacher (See Chapter 7 – ERRORCHECKER & KEY BUILDER for more
information).
Customizing the Default Settings (Font, Pitch, etc.) of WPS Documents
36
It is possible to customize the default settings of Word Processing Supervisor Documents. Possible
default settings include: font, point size, spacing, zoom, justification, margins and many others. After
setting these defaults, they will automatically apply to every document you create using the New
Document button from the WPS menu.
One motivation for customizing these default settings is to cause student exercises to appear in the Error
Check Report window (see Chapter 7) with the same spacing and line breaks that appeared when typing
the exercise in Word. The Error Checker displays lines that are at most eighty characters long. If you use a
font in Word that allows more than eighty characters to fit on a line, the Error Checker will wrap the
words that exceed the eighty character limit when displaying the WPS document. This will cause the
document to appear differently in the Error Check Report Window than it did in Word (although it
doesn't affect the correctness of the error-check). To overcome this, you can set the default font, point
size, and margins for WPS documents so that eighty characters fit on each line. Using the font Courier or
Courier New with a point size of 10 and 1" margins would accomplish this.
To customize a new template file for WPS Documents:
Select New from the File menu.
Change any settings available in Word (such as the font, point size, justification, spacing, zoom etc.) to the
values you want to have automatically apply to all WPS documents. Type a single space in the document.
Select Set Document as Default from the Teacher Menu, and accept the prompt.
Word Processing Supervisor will use the file you save through this process to initialize each new WPS
Document.
Editing a Word Processing Supervisor Document
Selecting Edit Document from the WPS menu brings up the following window:
37
Select the file and press Open to begin editing the document. If the document's stopwatch has expired, or
if its correction feature was turned off, you will not be allowed to edit the document. If the stopwatch is
set, only the time that remains on the document's stopwatch will be granted for editing a document.
Printing a Word Processing Supervisor Document
Selecting Print Document from the WPS 2007 menu brings up the following window:
38
Select the Word Processing Supervisor Document that you wish to print and press Open to print the
document. Word will prompt you to select a printer before it prints.
Deleting a Word Processing Supervisor Document
Selecting Delete Document from the WPS 2007 menu brings up the following window.
39
Select the Word Processing Supervisor Document that you wish to delete and press Open to delete the
document.
NOTE: Only Word Processing Supervisor documents may be deleted using this option.
Error Checking a Word Processing Supervisor Document
Selecting Check Document from the WPS 2007 menu brings up the following window.
40
This window contains two fields: Document and Key.
Enter the name of the document in the Document field. You may select this document name from a list of
files by pressing the “Browse” button to the right of the respective field.
Fill in the Key field by pressing either the “Supplementary” or “Custom” button from the section labeled
“Key”. These two buttons have the same behavior as the buttons of the same name in the “New
Document” window (See “Supplementary Materials Chooser” and “Custom Key Selector” from earlier in
the chapter).
When the correct names appear in the above fields, press OK to begin error-checking the document. See
Chapter 7 - ERRORCHECKER & KEY BUILDER, to learn to use the error-checker.
Accessing Student Records (as a student)
Selecting Student Record from the WPS 2007 menu brings up the Word Processing Supervisor Student
Records Menu System. See Chapter 8 -- RECORD KEEPING, under the heading Word Processing
Supervisor Student Records Menu System, to learn to use the student records menu system.
Accessing Class Instructor Utilities
See Chapter 6, "TEACHER UTILITIES," to learn to use the Teacher Menu option from the WPS menu.
41
CHAPTER 6 – TEACHER UTILITIES
The Teacher Menu
Selecting the Teacher Menu option from the WPS menu gives the class instructor access to the following
utilities:
DBase Utility
Allows configuration of Word Processing Supervisor for your hardware and
software. Also allows you to set the standards (maximum errors, minimum
time for timed drills, etc.) for record keeping for any particular class.
Import Document
Allows the class instructor to turn a word processing RTF document into a
Word Processing Supervisor Document. This utility is particularly useful for
rescuing backup files when the power goes out in the middle of creating or
editing a document.
Build Key
Allows the teacher to create key documents that may be used to error-check
the documents that students create. This option allows you to build a new
key from an existing key or a source document type (.rtf, .txt, .wps). It also
allows you to edit existing keys.
Delete Key
Allows the class instructor to delete previously created "key" documents.
Verify Document
This option protects you from a student falsifying the footer that appears at
the bottom of a printed WPS document. It also protects you from a student
copying another student's data files. Whenever you suspect that a student
has attempted either of these two methods of cheating, you can use this
Verify option to discover whether he/she has cheated. See Chapter 9 Security.
Set Document as Default
Allows the class instructor to view, edit, and print the information in the class
roll, student data, and backup files. See Chapter 8 - Record Keeping.
Close Teacher
Restricts access to the teacher utilities until the password is entered again.
42
Entering the Class Password
Selecting the Teacher Menu option in the WPS menu brings up the following window.
The teacher utilities are guarded by a password. You enter the password in the text box labeled Enter
Your Password. If the password you enter is correct, pressing OK will enable access to all teacher
utilities in the WPS menu.
Changing the Class Password
When you enter the correct password in the password entry window, click on the Change Password
button at the bottom left. It will present you with a new dialog:
Enter your new password twice, once in each textbox and press the OK button to save the new
passwords. It is highly recommended that you change the passwords from their initial values the first
time that you use the software. (The initial value for the password is the word Default).
Restricting Access to the Teacher Utilities
When the word processor is started, access to the teacher utilities is automatically restricted. However,
once the class passwords have been correctly entered (see figure above), the computer (station) on
43
which the passwords were entered will have full access to the teacher utilities until access to these
utilities has been "closed out." To close out access to the teacher utilities, restricting their access until the
class passwords are entered again, select the Exit Teacher Menu option from the WPS menu.
The Class Setup
Selecting Edit Class in the DBase Utility after activating the Teacher Menu in the WPS menu brings up
the following window.
44
Settings Available on the Class Setup Window
Logon Procedures
Password
Specifies whether students will have to enter passwords when they logon to the
software. If you set this option, Word Processing Supervisor can generate the
passwords for each member of the class. Use the Word Processing Supervisor
Database Manager to generate and view the student passwords. The Class Setup -Settings Available on the Class Setup Window (continued) (see Chapter 8)
Auto Logon
Specifies whether a student can automatically add his/her name to the class roll
when he/she logs in. It is suggested that this option is not enabled. When it is set not
enabled, a student must log in using the same spelling of his/her name contained in
the class roll file. This avoids the possibility of two student records being
maintained for the same student. However, when this option is not enabled, the
teacher must manually add each student to the class roll through the Word
Processing Supervisor Database Manager described in Chapter 8. One way to get
the most from this option is to enable it on the first day of class so that each student
adds himself/herself to the class roll, and then disabling it thereafter preventing the
students from further modifying the class roll file.
Document Preparation
Typing/Actual Wds Specifies whether typing words (five keystrokes per word) or actual words are
used to calculate the total words of a document. Typing words are recommended for
this setting as they allow the accurate calculation of the gross, net, and cutoff word
per minute rates. If actual words are chosen, Word Processing Supervisor will not
keep student records.
Correction
Specifies whether correction features are enabled. When this option is set to OFF, no
student in this class will be able to use the backspace, mouse positioning, or
cut/copy/paste features of the word processor when creating/editing a Word
Processing Supervisor Document. Alternatives are to always enable correction
feature (ON) or to allow the student to specify correction features with every new
Word Processing Supervisor Document that he/she creates (MANUAL). The option,
MANUAL, is the most flexible and is therefore recommended. The correction status
of every Word Processing Supervisor Document is always printed with that
document. You can view the correction status of any recorded score with the Word
Processing Supervisor Database Manager (see Chapter 8).
45
Stopwatch
If checked, the stopwatch feature will be available to the students, and if not
checked, never available. The stopwatch feature prevents a student from further
editing/keying a document after the time expires. This time is set when the
document is created using the New Document option in the WPS menu.
Record Keeping and Class Standards
Rank By
Specifies whether the gross, net, or cutoff words/minute rates are used to rank drill
scores in the student data files (see Chapter 8).
Record
Specifies how the software deals with multiple drill exercises being saved with the
same exercise name in a student data file (see Chapter 8 - Qualifying Scores). If
this is set to BEST, then only the best score (of all scores with the same exercise
name) could be considered to "qualify." If it is set to FIRST, then only the first score
could "qualify." If it is set to LAST, only the most recent score could "qualify." If it is
set to ALL, all scores could "qualify."
Backup
Directs the software backup file generation policy (see Chapter 8). NO means that
backup files will not be automatically maintained -- although the class instructor,
under this option, would still be able to generate backup files through the Word
Processing Supervisor Database Manager (see Chapter 8). MANUAL means that
students backup their data files at their discretion through the Word Processing
Supervisor Student Records Menu System described in Chapter 8. AUTO means that
student data files will automatically be backed up each time the student logs on. It
also means that class roll files will be automatically backed up every time they are
modified just before the modification takes place. AUTO is the recommended
setting.
46
Words Subtracted / error This is the number of words which will be subtracted from the total
for NWPM Calculation
words typed for each error. The resulting number of words and the total
time used will be used to calculate the Net Words per Minute.
Cutoff Error Number
This is the maximum number of errors that are acceptable in a document for
the Cutoff Word Per Minute (COWPM) calculation. Keystrokes up to the error
indicated will be counted; this number of keystrokes and the total time used
will be used to calculate the Cutoff Word /Minute rate. If you do not use a
Cutoff Word Per Minute rate for grading purposes, leave the number at 20.
Max. Errors / Minute
Selects the maximum number of errors per minute that will be permitted for
a timed writing or paragraph drill to be considered as "qualifying" in the
student record (see Chapter 8 – Qualifying Scores).
Num of Scores to Average The number of scores that you wish to have used in calculating the totals and
averages for timed writings, paragraph drills, and line drills (see Chapter 8).
The software will use up to 10 scores.
Minimum Time
Sets the minimum time standard for timed writings and paragraph drills in
the student data file. See Chapter 8. Timed writings and paragraph drills that
do not meet the set time length will not qualify and thus will not be included
in the totals and averages given in the timed writing and paragraph drill
summaries (see Chapter 8).
Paths
Student Records Path
Specifies the disk or network location in which to store student records, class
roll, and backup files (see Chapter 8). See appendix A for network
information.
ErrorChecker Key Path
Specifies the disk or network location in which to store key documents. Key
documents are error-free copies of documents that the class instructor
creates, and the students use to error-check their work. See appendix A for
network information.
Document Storage Path
Specifies the disk or network location in which to store student Word
Processing Supervisor Documents. The student's work is saved here.
Student Selects Subfolder If checked, each student will need to designate their own sub-folder from the
specified location. (If the student needs to designate a sub-folder, they will
47
type it in on the same screen where they designate their class code and name
when they select Initialize Word Processing Supervisor). If not checked, the
Document Storage Path is mapped directly to the student's storage location.
Voice Recognition
Available
If this box is checked, the Voice Recognition Input Used check box item
will be activated on the New Document screen. When the Voice Recognition
Input Used box is checked, the timer is started once the OK button is selected
on the New Document screen. With the box not checked, the timer will begin
with the first key stroke in the new document.
Class Code
Specifies the particular class whose settings are being modified. Use this
setting to keep different classes (and periods) separate from each other by
assigning them their own class codes. For example, period 1 could be
assigned class code 1, period 2 could be assigned class code 2, and so on. If
there are multiple teachers using the software, then class codes 101, 102,
103, 201, 202, 203, 301, 302, 303. . . could be used with the first digit in the
class code designating the teacher, and the last digit in the class code
designating the period. Every individual class (specified by its class code)
has its own settings, class roll file, and student data files (see Chapter 8 for
information concerning class roll and student data files).
Formula
Pressing the Formula button in the Word Processing Supervisor Setup
Screen brings up the Formulation Information/Create window. Because this
window contains special information relevant to the security of the Word
Processing Supervisor, it is not shown in this manual (see Chapter 9 Security).
OK, Cancel
When you are finished modifying the settings, click Cancel to exit without
saving changes. Click OK to save the new settings for the current Class Code
and exit the Word Processing Supervisor Setup Screen.
48
Document Verification
Selecting the Verify Document after activating the Teacher Menu brings up the following window:
This verification option allows you to verify that a printed document was prepared with Word Processing
Supervisor using a Word Processing Supervisor Document stored on a student's data disk (or
subdirectory). This assures that the work is original and not duplicated from data files on another
student's disk.
To verify a document:
1. Fill in the name of the document in the Document Name box (or select it from a list by pressing
the button to the right).
2. Enter the name of the student of whom the document should belong in the Student Name box.
3. Enter the left code from the printed copy of the student's document that you are verifying in the
Enter the left code box (or use the increment/decrement buttons to the right). This code is found
at the left edge of the last line of the document information (the same line that contains the
student's name).
4. Enter the right code from the printed copy of the student's document that you are verifying in the
Enter the right code box (or use the increment/decrement buttons to the right) . This code is
found at the right edge of the last line of the document information (the same line that contains
the student's name).
5. When all this information is entered, press OK to bring up a window indicating whether or not the
document passes the verification test.
49
Creating Key Files
Selecting the Build Key button from the Teacher Menu brings up the key building system described in
Chapter 7 - ERRORCHECKER & KEYBUILDER.
Deleting Key Documents
Selecting the Delete Key button from the Teacher menu brings up the following window.
Choose the file and pressing Open removes the key from disk. Only Word Processing Supervisor keys
may be deleted using this option.
50
Importing Documents
Selecting the Import Document option from the Teacher Menu brings up the following window.
Fill out this form as you would any other window in Word Processing Supervisor and press OK to convert
the file in the Import File box to a Word Processing Supervisor Document. This utility is particularly
useful for rescuing backup files when the power goes out in the middle of creating or editing a document.
NOTE: The word processing file must be saved as an RTF file before it can be imported!
Using the Database Manager
Selecting the DBase Utility option from the WPS menu brings up the Word Processing Supervisor
Database Manager described in Chapter 8.
51
CHAPTER 7 – ERRORCHECKER & KEY BUILDER
Error Checker
Selecting Key Documents and Student Exercises
Selecting Check Document from the WPS menu brings up the following window:
To error check a student's Word Processing Supervisor Document:
1. Enter the name of the student Word Processing Supervisor Document in the text box labeled
“Document” or select it from a list of files by pressing the button to the right of the box.
2. Choose the error-free document, the "key" document. Choose a key from an included
supplementary material by pressing Supplementary, or choose a key prepared by the class
instructor by pressing Custom. The name of the key will be displayed next to the label “Key
Name:”.
3. Press OK to bring up the Error Check Report window
52
The Error Check Report Window
The bottom half of this window displays the key document used in the error-check. The top half shows
the student document used. Under the key document section is a one-line section that displays what type
of error occurred.
You can scroll through the errors using the Previous Error and Next Error buttons. Notice that red
highlight appears in both the key and student document sections indicating where the error occurred. In
the example above, you can see that the first error for the sample timed writing is a Punctuation error.
The comma following the word timed was not found in the error-free key.
To return to the word processor, click on the Exit button. This will cause the ErrorCheck window to
disappear and the results of the check to be saved to the student record.
If no errors are found in the student's document, the above window is replaced with a congratulatory
message indicating that no errors were found.
53
The Key Builder
Steps Required to Build Key Documents
Only special documents called key documents can be used to error-check student exercises. The Key
Builder Utility creates key documents by adding special codes to already existing documents (source
documents). The Error Checker uses the codes it reads in key documents to determine how the teacher
desires the student documents to be checked.
The following outlines the steps required to build key documents:
Obtain a source document either by having a student type it or by typing it yourself (see the section
below, "Methods for Creating Source Documents").
Start the Key Builder Utility (Teacher Menu -> Build Key) (The teacher menu must be active.)
Select the key type and record type, load the source document, and enter any (optional) special Error
Checking instructions from within the Key Builder Utility.
Save the newly created key document.
Exit the Key Builder Utility and ErrorCheck the source document. There should be no errors since the key
document was made from this source document. If errors occur, reenter the Key Builder Utility, load the
key document, and make corrections as needed.
Use the new key document to error-check a few test exercises that you type yourself. This will assure that
the special Error Checking instructions you entered in the Key Builder Utility are working as you desire.
You may use the Key Builder Utility to edit an existing key document until it works as desired.
The remainder of this chapter explains how to do steps 1-4. Steps 5 & 6 require that you know how to use the Error
Checker (explained in the first section of this chapter.)
54
Selecting the type of source document
Select the type of document that you wish to use in creating the key and click OK. Keys may be created
from Word Processing Supervisor Documents, Rich Text Format (RTF) files, ASCII text files, and
previously created keys (please see the following information on creating each type of source document).
A key can also be created without a source document.
Methods for Creating Source Documents
WPS Document:
Type a document using Word Processing Supervisor by selecting the New Document
option from the WPS menu. After typing the document, select End Document from the
WPS menu to save and close the document.
Rich Text Format:
Rich Text Format (RTF) files can be used by the Key Builder. (Use the File->Save As
option and change the file type to Rich Text Format before saving.) Documents created
in word processors other than Word can also be saved as RTF files and then be used to
create keys.
ASCII Text Files:
Standard ASCII text file with no embedded codes other than Carriage Returns and Line
Feeds can be used by the Key Builder. ASCII files can be created using most word
processors or an ASCII file editor such as Windows' Notepad.
Previously generated key:
Keys created by this version of Word Processing Supervisor may be reloaded for editing
of text and other modifications.
New Key:
A new key can be created with no source document. After choosing the key type, you
must click on the edit text button to enter in the initial text to the key. You will be
prompted to choose a file name for the new key.
55
Selecting Key Type and Record Type
Select the appropriate key type for this exercise and an appropriate record type. Click on OK.
Selecting an Appropriate Key Type
When building a key, you will be required to specify what "type" of key you wish to build. A key
document's type affects how it instructs the Error Checker to behave when using the key document to
check a student exercise. It also affects how the results of the error-check will be saved in the student's
record (see Chapter 8.) The following explains the various key document types:
DRILLS
Timed Writings:
Timed Writings consist of one or more paragraphs that must be typed in sequence
beginning with the first paragraph. If the timed writing consists of more than one
paragraph, the paragraphs cannot be typed out of sequence. However, if the entire
timed writing has been completely typed, the student may continue the timed
writing by returning to the first paragraph and repeating the timed writing. (The
56
key should contain only one copy of the material in the timed writing even though
the students may type the material more than once.)
Paragraph Drills:
Paragraph Drills consist of one or more paragraphs that may be typed
independently of each other. If the paragraph drill contains more than one
paragraph, the students may type the paragraphs any number of times and in any
order. (This is different from a Timed Writing where the paragraphs must be typed
in the same sequence as they appear in the key. The key should contain only one
copy of each paragraph.)
Line Drill:
Line Drills consist of several drill lines. Each drill line must be a single line of text.
Drill lines are error checked one line at a time, and the student may type the lines
any number of times and in any order. (The key should contain only one copy of
each line in the line drill even though the students may type the lines multiple
times.)
PRODUCTION EXERCISES
Outline:
The horizontal spacing in the student document must match the horizontal spacing
in the key exactly, unless the document has been marked by the teacher for
"MULTIPLE SPACING" checking. Lines in the outline will be checked one line at a
time with words placed on different lines marked as errors. If you wish the students
to be able to place words on a different line than the one in the key, you may select
the Manuscript Key Type.
Table/Financial:
The horizontal spacing in the student document must match the horizontal spacing
in the key exactly, unless the document has been marked by the teacher for
"MULTIPLE SPACING" checking.
Legal Document:
May contain headers, footers, tables, etc. Headers, footers and other material placed
in the document by the word processing software will not be checked. Endnotes
should be used rather than footnotes, and should be typed manually
Manuscript:
May contain headers, footers, tables, etc. Headers, footers, and other material
placed in the document by the word processing software will not be checked.
Endnotes should be used rather than footnotes, and should be typed manually.
(When in doubt about what key type to use, you may use the Manuscript key type.)
Letter:
May contain headers, footers, tables, etc. Headers, footers, and other material
placed in the document by the word processing software will not be checked.
Endnotes should be used rather than footnotes, and should be typed manually.
57
Memo:
May contain headers, footers, tables, etc. Headers, footers and other material placed
in the document by the word processing software will not be checked. Endnotes
should be used rather than footnotes, and should be typed manually.
Selecting an Appropriate Record Type
In addition to selecting the type of key to build, you must select the Record Type of the key document you
will build. The Record Type specifies whether to instruct the Error Checker to save the results of the
error-check in the student record and whether to consider the document that is being checked as
belonging to an Exam. The following are valid Record Types:
Write to record:
The Error Checker will save the results of the error-check in the standard
areas of the student's record (timed writings, paragraph drill, line drill, or
production.)
EXAM - Write to record:
The Error Checker will save the results of the error-check in the Exam
portion of the student's record. You can use the Word Processing Supervisor
Database Manager to obtain statistics relative to all Exam scores checked on
the same date. See Chapter 8, section titled, "Exam Summaries."
Don't write to record:
The Error Checker will NOT save the results of the error-check in the
student's record.
58
Special Error Checker Instructions
When you have successfully loaded a document into the Key Builder and specified its Key Type and
Record Type, you will be presented with the Special Errorchecker Settings dialog box. This allows you to
customize the checking of the documents to your personal preferences.
Each option is described below:
Edit Text button:
Use this option to make corrections to the text of the document, mark variable text,
mark text for multiple spacing, and for line by line.
59
OK button:
This option saves the current document as a Key Document. It also saves a Key
Master file that contains the variations that you are allowing in the checking of the
document. Both files are saved in the keys directory as specified in the Word
Processing Supervisor Setup.
Cancel button:
This option allows you to return to Word or to build another key. The current key
document will be removed from memory. Make sure to save the key document
before selecting this option.
Mark Variable Text:
Use this option to designate text that may change from student to student but that should not be marked
as incorrect. Such variable items include dates, reference initials, years, and personal names. (See “How
to Mark and Designate Variable Text” later in this chapter.)
Mark Text for MULTIPLE SPACING Check:
Use this option to designate text that may have a variable number of spaces between words such as tables
where students are allowed to choose their own inter-column spacing. (See “Marking text for MULTIPLE
SPACING check” later in this chapter.)
Mark Text for LINE BY LINE Check:
Use this option to designate text that should be checked line-by-line such as the dateline, address, and
salutation of a letter. (See “Marking text for LINE BY LINE check” later in this chapter.)
How to Mark and Designate Variable Text
After marking variable text you save the key by selecting End Key from the Key Builder menu.
For each of sections of text that you wish to mark:
Place the mouse pointer at the beginning of the text you wish to mark, and click and drag to the end of the
text you wish to mark then release the mouse.
Be careful not to mark hard returns, leading spaces, trailing spaces, etc.
Activate the appropriate type of variable text listed below. (These can be activated by either using the
appropriate speed key, or by pressing the button for the desired variable text in the Key Builder menu.)
60
Available Types of Variable Text
[date]
SpeedKey: Alt-e
Button: WPSDate
A full legal date must appear here
Example:
Original Text: "... on March 25, 1999 you will..."
Marked Text: "... on [date] you will ..."
[shortdate]
SpeedKey: Alt-s
Button: ShortDate
A date without a year must appear here (i.e. March 31 or 31 March)
Example:
Original Text: "... on March 25 you will ... "
Marked Text: "... on [shortdate] you will ... "
[anydate]
SpeedKey: Alt-a
Button: AnyDate
A date allowed by [date] or [shortdate] will be acceptable
Example:
Original Text: "... on March 25 you will ..."
Marked Text: "... on [anydate] you will ..."
[pnum^x]
SpeedKey: Alt-p
Button: PageNum
A page number appears here. Roman or Arabic numerals may be used.
Example:
Original Text: "... this is page 1 of this paper ..."
Marked Text: "... this is page [pnum^1] of this paper ..."
[ref]
SpeedKey: Alt-r
Button: Reference
Reference initials must appear here. (i.e. SEW, SEW:slf, DJ/sf, etc.)
Example:
Original Text: "SEW:slf"
Marked Text: "[ref]"
[variable^m^n]
SpeedKey: Alt-v
Button: Variable
Variable text consisting of a minimum of m words and a maximum of n
words must appear here. If the students place less that m words or more
than n words at this location, errors will be marked. Do not use two
adjacent [variable^m^n] markers in either horizontal or vertical
placement.
Example:
Original Text: "... meet John M. Brown Jr. at the airport ..."
Marked Text: "... meet [variable^2^6] at the airport ..."
[d^m^n]
SpeedKey: Alt-t
Button: Digits
61
Variable numeric digits consisting of a minimum of m digits and a maximum
of n digits must appear here. If the students place less than m digits or
more than n digits at this location, errors will be marked.
Example:
Original Text: "... I will be 29 years old on ..."
Marked Text: "... I will be [d^1^3] years old on ..."
[year]
SpeedKey: Alt-y
Button: Year
A 4 digit number beginning with 19 or 20 must appear here.
Example:
Original Text: "... I will retire in the year 2001 ..."
Marked Text: "... I will retire in the year [year] ..."
[l^m^n]
SpeedKey: Alt-l
Button: Letters
Variable alphabetic letters consisting of a minimum of m letters and a
maximum of n letters must appear here. If the students place less than m
letters or more than n letters at this location, errors will be marked.
Example:
Original Text: "... My first name is Royce ..."
Marked Text: "... My first name is [l^2^20] ..."
Marking text for MULTIPLE SPACING Check
Use this option to designate text that may have a variable number of spaces between words. (Such as a
table or financial statement which was created without the use of Word's table feature.) Multiple areas in
a single document may be marked for a multiple spacing check; however, you should always mark the
largest contiguous block of text and not mark adjacent areas separately. Place the mouse pointer at the
left margin of the first line to be marked and click and drag to the last character of the last line to be
marked. Once the text has been marked, click on the Multiple Spacing button from the Key Builder menu.
Example:
...and the following table illustrates this point:
Cash
$25,000.00
Equipment $22,500.00
62
We hope this will assist you in your decision
Marking text for LINE BY LINE Check
Use this option to designate text that should be checked line-by-line. Examples that should be checked
line-by-line are: The dateline, inside address, salutation, closing, closing notations, and reference initials
of a letter; and headings and subheadings of manuscripts and legal documents. Multiple areas in a single
document may be marked for a line-by-line check; however, you should always mark the largest
contiguous block of text and not mark adjacent areas separately. Place the mouse pointer at the left
margin of the first line to be marked and click and drag to the last character of the last line to be marked.
Once the text has been marked, click on the Line By Line button from the Key Builder menu.
Example:
May 27, 1999
Ms. Julia A. Jones
3578 Southern Avenue
Salt Lake City, UT 84109
Dear Ms. Jones
We were happy to learn that you will arrive on June 15 as scheduled...
63
Set Document Format Variations
Word Processing Supervisor allows the instructor to designate how precisely the format of the document
will be checked. Each item of format that is checked can be marked to be checked for an exact match with
the key, or not checked at all. Most format items can also be checked within a designated range of
variation.
For each format item, select the appropriate precision by entering the desired value into the
corresponding field. When a variance is allowed the student's document may vary from the key in either
direction from that value. For example: If the key is prepared with a 1" left margin, and a tolerance for left
margin is set at .2", then a student's document with a left margin anywhere between .8" and 1.2" will be
considered correct.
Format Items Checked:
Variation Allowed
How Word Sets This Parameter
Left Margin
Exact, No Check, Up to 2"
File->Page Setup
(Margins)
Right Margin
Exact, No Check, Up to 2"
File->Page Setup
(Margins)
Top Margin
Exact, No Check, Up to 2"
File->Page Setup
(Margins)
Bottom Margin
Exact, No Check, Up to 2"
File->Page Setup
(Margins)
Left Offset
Exact, No Check, Up to 2"
L indicator on Ruler Bar (lower)
Right Offset
Exact, No Check, Up to 2"
R indicator on Ruler Bar
Indention
Exact, No Check, Up to 2"
L indicator on Ruler Bar (upper)
Horiz Align
Exact, No Check
Format->Paragraph (Indent/space)
Vert Align
Exact, No Check
File->Page Setup (Layout)
Font
Exact, No Check
Format->Font
Points
Exact, No Check, Up to 20 pts
Format->Font
Tab Count
Exact, No Check, Up to 20 tabs
Pressing the Tab Key
64
Line Spacing
Exact, No Check, Up to 6 lines
Format->Paragraph (Indent/space)
Hard Returns
Exact, No Check, Up to 6 lines
Pressing the Enter key
Widow/Orphan
Exact, No Check
Format->Paragraph (Line & Page)
Sample Keys
Your Word Processing Supervisor package came with four sample key documents to help you gain
experience with the software. We recommend that you experiment with these four key documents to
familiarize yourself with Word Processing Supervisor. For an example of how to experiment with one of
these sample key documents, please read Chapter 4 - FIRST TIME WALK THROUGH THE SOFTWARE.
The file names of the four sample keys are as follows:
TW1
- a timed writing key document.
PARDR1
- a paragraph drill key document
LINEDR1
- a line drill key document
LETTER1
- a production key document
The content of the four sample keys follows:
TIMED WRITING (TW1)
Directions: Type a 1' and 3' timing.
This is a sample timed writing that you may practice on to test the error-checking capabilities of Word
Processing Supervisor Software. This timed writing is a short three paragraphs long.
As you test the error-checking of this timed writing you may want to deliberately make several errors to
ensure that the error checker will catch the errors properly.
Remember, a timed writing must be typed in sequence beginning with the first line of the first paragraph.
If you finish the timed writing before the time period is complete, repeat the material starting with the
first paragraph.
PARAGRAPH DRILL (PARDR1):
Directions: Type each paragraph for 1'; type both paragraphs for 2'.
65
Remember, a paragraph drill may contain one or more paragraphs. Each paragraph may be typed
independent of the other paragraphs in the drill.
If you desire to type this second paragraph as a three-minute timing you may do so. You may also type
the paragraphs in any sequence you desire.
LINE DRILL (LINEDR1):
Directions: 1. Type each line twice; DS between lines.
2. Type lines 1 and 3 twice; DS; type lines 2 and 4 once.
The typing screen will display a document currently in memory.
The drill line must be a single line that ends in punctuation.
Drill lines are error checked a line at a time from the start.
A paragraph drill may consist of one or more short paragraphs.
LETTER (LETTER1):
Directions: Type the following letter as a modified block letter with paragraphs indented; use mixed
punctuation. Use 1" top and bottom margins, 1.25" left and right margins, Times New Roman Font 12
point, standard tab settings with no vertical or horizontal centering. Use 10 tabs before typing the
dateline. The formatting for the letter is specified in the blacklines documentation for letters under the SE
Warner/Word Processing Supervisor directory in Programs.
[use current date] | Ms. Jane R. Sullivan | 3945 East Thunder Ridge Court | Cedar Falls, IA 50613 | Dear
Ms. Sullivan:
Thank you for your recent inquiry about our new product line. We are sending you our most recent
catalog published [use the last day of the previous month -- for example May 31, 1999].
If you place an order by December 31, [use current year], you will receive a 20 percent discount in
addition to the free promotional gift mentioned in the catalog.
To rush your order, call our toll-free number 1-800-555-3345. Operators are standing by 24 hours a day
to take your order.
Sincerely, | [Use your name here] | Vice President of Marketing | [reference initials]
66
67
CHAPTER 8 – STUDENT RECORD KEEPING
General Overview
Your Word Processing Supervisor package comes with a built-in database to track the progress of classes
of students. This data base consists of three types of files: class roll files, student data files, and backup
files. These files are created through the Word Processing Supervisor Setup. Using the database manager,
you can manipulate the information stored in these three types of files.
Here is an explanation of what is stored in each of the three file types:
Class Roll Files:
Class Roll Files are used to store lists of student names currently enrolled in, deleted
from, and transferred from a particular class. These files, found in the records path,
are named “set.<ext>”, where “<ext>” is a digit representation of the class code. For
instance, the class roll file for class 1 is named “set.1”.
Student Data Files: Student Data Files record the results (words/minute, total words etc.) of a
particular student's Timed Writings, Line Drills, Paragraph Drills, Productions, and
Exams. Score results are added to student data files when a student error-checks
his/her document. The file extension is again determined by the class code. For
example, the student data file for Royce S. Shelley enrolled in class 1 would be
named “ROYCE_S_SHELLEY.001”. These files are kept in the records path.
Backup Files:
Backup files are copies of Class Roll and Student Data files. They can be used to
restore information should it ever become lost. They use the same name as the files
they back up except that they use a different file extension. For example, the backup
file for “1.set” would be named “1.set.backup”. The backup for "shelroyv.020" would
be named “shelroyv.020.backup”.
The Word Processing Supervisor Database Manager and Word Processing Supervisor Student Records
Menu System described in this chapter manipulate the information stored in the above files.
68
The Word Processing Supervisor Database Manager
You can manipulate any of the information in the class roll and student data files using the database
manager utility. The remainder of this chapter explains the basics of the operation of the database utility.
The database manager is split into three sections. An explanation of each section is described below.
Once you are familiar with the layout and purpose of the above views, you can teach yourself to use the
database manager. Try pressing some of the buttons. Ten to fifteen minutes of experimentation will be
worth the entire rest of this chapter.
The Three Sections of the Data Base Manager
Classes (Upper-left section of the window)
69
This section allows you to switch between managing different classes. You can add new classes, change
the configuration of already existing classes, delete classes, and view scores.
Pressing Add Class allows you to create a new class. First select a class code and press OK. Then, the Class
Setup Screen will be shown for your new class.
Pressing Edit Class shows the Class Setup Screen for the selected class.
Pressing Delete Class button deletes all student data files and backup files and deletes the selected class
roll file as well.
Pressing the View Scores button allows you to work with scores for the current class in detail, similar to
viewing Student Records.
Class Roll (Lower-left section of the window)
The purpose of this section is to select the kind of operation you wish to perform on the class roll. You
can select a student you wish to view the scores of by clicking on their name. Here you can add students,
70
edit their names, delete students from the roll, and restore students back into the roll. You can also reset
the roll and reset the scores of all of the students in the class roll. In addition, you can print the scores of
one student, or print the scores of all of the students in the roll by pressing the Print Summary button.
The passwords button lets you generate, view, and print the optional passwords your students have for
logging in. If you wish to use this feature, remember to enable it in the class setup.
Adding a Student
Clicking on the Add Student button causes the following form to appear:
If you click inside the box to the right of the Student Name: prompt, you can enter in a new student name.
Clicking OK (or pressing Enter) then saves this name in the current class roll file. The current class roll is
displayed in the Class Roll section.
Editing a Student Name
Clicking on the Edit Student button edits the name of the currently selected student in the Class Roll list.
It causes the following dialog to appear:
Click on the field labeled “Student Name”, this will allow you to enter the new spelling for the selected
student.
71
When you have finished entering the name, press the OK button to make the new spelling take effect in
the Class Roll.
Deleting a Student
Clicking on the Delete Student button deletes the currently selected student from the Class Roll list:
If you now click on the Restore Student button, you will see your deleted student listed.
Restoring a Student
Clicking on the Restore Student button in the Class Roll section causes the following dialog to appear:
72
All currently deleted students will appear. To select a student name to restore, scroll through this box
until the name you want to restore appears and click on the name with the mouse. You will know that you
selected the name because it will appear highlighted in blue.
To restore this name, press the Restore Student button.
You will see that the student you restored has been moved to the Class Roll list.
*NOTE: Restoring a student is different from restoring his/her data file. "Restoring a student" re-enrolls
him/her in a class roll file from which he/she has presumably been deleted. "Restoring a student data
file" replaces the information in a student data file with the information contained in that data file's
backup file. For information on "Restoring a student data file", see "Backup options" in this chapter.
Resetting Student Data Files
Clicking on the Reset Scores button in the Class Roll section causes the following dialog to appear:
Although these options are very useful, they are potentially dangerous. They erase all the information
saved in student data files. This is useful when you start a new term with the same class and wish to start
recording scores from scratch.
Press yes to reset the data file of every student enrolled in the current class roll file.
*NOTE: It is strongly recommended that you backup the class (see backup options) before using these
options. This will allow you to reverse the effects of using these options if you choose to later.
Resetting the Class Roll
Clicking on the Reset Roll button in the Class Roll section causes the following dialog to appear:
73
As the dialog warns, this option, although very useful, is potentially dangerous. You should only use them
to clean up your disk(s) when a term ends. They erase all the information in the class roll, student data,
and backup files. Pressing Reset Roll button deletes all student data and backup files and sets the class
roll file to empty.
You should use Reset the Class Roll at the end of a term if you want to "start fresh" at the beginning of
the next term. Using this option requires you to re-enter all student names into the class roll file (using
the Add Student button). This is what you want if enrollment changes from one term to another. If,
however, you want to reset all the student data files in the current roll file without removing all names
from the current roll file, use the Reset Scores button in the Class Roll section.
Print Options
Clicking on the Print Scores button in the Class Roll section prints the scores of the currently selected
student.
Clicking on the Print Summary button in the Class Roll section prints a list of the students and the
scores of all of the students in the Class Roll.
74
Passwords
Clicking on the Passwords button in the Class Roll section causes the following dialog to appear:
The students will have their passwords displayed along with their names.
To generate a password for one student, select the student and click on the Generate Password button.
75
To generate passwords for all students, click on the Regenerate All Passwords button.
To print a list of all of the students along with their associated passwords, click on the Print button.
Student Information (Right section of the window)
The purpose of this section is to view the score information associated with each student. This displays
the scores of the current selected student in the class roll. It allows you to add new scores, edit existing
scores, and delete scores.
76
Adding a Score to a Student Data File
Clicking on the Add Score button in the Student Information section causes the following dialog to
appear:
The Words, Checks, Gross WPM, Net WPM, Cut-Off WPM, Format Errors, Content Errors, and Edits
fields can be edited by clicking the mouse in the box to their immediate right and typing in the values to
which they should be set or they can by edited by pressing the corresponding increment and decrement
buttons. Set the Date by either typing the correct date into the appropriate sections, or by selecting the
date from the drop down calendar which can be accessed by pressing the button to the right of the Date.
Set the Time by clicking on the portion of the time that you wish to edit and either typing the number you
wish to change it to or pressing the increment or decrement buttons until the correct time is displayed.
Set the elapsed time by typing the time that has been elapsed, for example, “3 minutes, 2 seconds”. Select
the score type of the score you will add by choosing from the combo box next to Exercise Type.
77
When you have the desired values entered for all fields, press the OK button. This will add the score that
currently appears to the current student's data file (the current student is displayed in the Class Roll).
The following table describes the meaning of each field:
Key:
The key name (the name of key used by the Error Checker).
Document:
The document name (as saved on disk).
Words:
The total number of words.
Errors:
The total number of errors.
Date:
The error-check date.
Checks:
The number of times the exercise was error-checked.
Edits:
The number of times the exercise was edited.
Time:
The time of day the exercise was error-checked. (For exams, the time of day the
exercise was originally saved.)
Gross WPM:
The Gross Words per Minute rate.
Net WPM:
The Net Words per Minute rate.
Cut-Off WPM:
The Cut-off Words per Minute rate.
Elapsed Time:
The total elapsed time taken for the exercise.
Correction:
Whether the correction feature was ON or OFF.
Exam Score:
Whether the score is counted as an exam or not.
78
Exercise Type:
The type of exercise
Editing a Score in a Student Data File
Clicking on the Edit Score button in Student Information section causes the following dialog to appear:
This dialog will allow you to edit the score that you selected from the Student Information section. Once
you have the score you wish to edit displayed in the fields of this form, use the mouse and keyboard to
edit any of the various fields to the new values you desire. Then press the OK button to commit the
changes to the student data file.
Deleting a Score from a Student Data File
Clicking on the Delete Score button in the Student Information section causes the following form to
appear:
79
Press Yes to remove it from the current student data file
Merge / Transfer Options
Clicking on the Merge / Transfer button (located at the bottom-left corner of the DBase Utility) causes
the following form to appear in the Function Input View:
To transfer a student from one class to another:
Select the class you wish to transfer from on the left. Select the class you wish to transfer to on the right.
Select a student who you wish to transfer on the left side and click the Transfer >> button to transfer the
student to the class on the right.
To merge two student records:
80
Select the student you wish to be merged on the left. The student on the right is the student that will be
merged into. The student on the left will have their records erased after their records are merged with
the student on the right.
Press the Merge >> button to complete this action.
Backup / Restore Options
Clicking on the Backup / Restore button (located at the bottom-left of the DBase Utility) causes the
following form to appear:
The following explains the function of each button:
Backup Class: Updates the backup files for the current class roll file and the student data files for each
currently enrolled student.
Backup Roll: Updates the backup file for the current class roll file.
Backup Student Data: Updates the backup file for the current student's data file.
Restore Class: Replaces the information in the current class roll file and the student data file of each
student enrolled in the backup class roll file with the information found in their respective backup files.
Restore Roll: Replaces the information in the current class roll file with the information found in its
backup file.
Restore Student Data File: Replaces the information in the current student's data file with the
information contained in his/her backup file.
81
A Message Box will display to confirm the success of your action.
Changing the Current Class Roll
In order to change the current class roll, click on the desired class code in the classes list box.
Changing the Current Student
In order to change the current student, click on the desired student’s name in the class roll list box.
The Score Display Window
Clicking on the View Scores button in the classes section causes the following window to appear.
82
The text at the top of the window shows the name and class code of the current student
At the bottom right of the window, the drop down box labeled “Score Type” changes the type of scores
displayed (exams, line drills etc.). Below the “Score Type” drop down is the “Sort” drop down box. For
certain types of score types, this drop down box allows you to select how the scores are sorted.
At the bottom left of the window, the settings for the current class and the averages of the displayed
scores are shown.
Pressing Next Student displays the scores of the next student enrolled in the current roll file.
Pressing Backup backups the data for the current student to the Records directory.
Pressing Print sends a report of the scores which are currently displayed to the printer.
Pressing Print All sends a report of all recorded scores in the student data file
Pressing Exit closes the “Score Display” window.
The following explains the information that appears in the columns of the table that lists the scores:
83
Key
Document
Date
Done At
Cor
ERc/fm
GWPM
NWPM
CWPM
Time
Wrd
Edits
Checks
The key name (the name of key used by the Error Checker).
The document name (as saved on disk).
The error-check date.
The time of day the exercise was error-checked.
Whether the correction feature was ON or OFF.
The number of content errors / the number of format errors.
The Gross Words per Minute rate.
The Net Words per Minute rate.
The Cut-off Words per Minute rate.
The total elapsed time taken for the exercise. (For exams, the time of day the
exercise was originally saved.)
The total number of words.
The number of times the exercise was edited.
The number of times the exercise was error-checked.
When the score is a qualifying score, the score is highlighted in an amber color.
The Sort Order
Line Drills, Paragraph Drills, and Timed Writings are always displayed in order of rank where qualifying
scores with higher word/minute rates and fewer errors rank highest. Scores that do not qualify (see
"Qualifying Scores") are either placed at the bottom of the list or are not recorded if the list is full of
qualifying scores. The Database Manager records only the best ten scores of these types and displays only
as many of these ten as you specify in the Word Processing Supervisor Setup.
The Sort Order Selector is only enabled when the current score type is either Exams or Productions. It is
used to select the order in which exams and productions are listed in the Score Display Box. By choosing
a sort order from the Sort Order combo box, you select one of the following sort orders:
Save
Lists the scores in the order in which they were saved (error-checked).
Name
Lists all scores with a given exercise name. You are prompted for the name when you click
on the check box.
Date
Lists the scores by order of their recorded dates.
Recent
Lists all scores whose recorded date falls after a date that you are prompted for when you
click on the check box.
84
Grouped
Lists the scores in alphabetical order using the exercise name.
Unique
Lists the scores in alphabetical order using the exercise name such that scores with the
same exercise name are listed only once. When you use this sort order, the "Ch" column in
the "Score Display Box" is changed to "#" to indicate that the number of occurrences of a
particular exercise name are displayed in that column.
Qualifying Scores
A score "qualifies" if it is a Line Drill, Paragraph Drill, or Timed Writing and if it has fewer than the
"maximum errors standard" for the current class. Timed Writings and Paragraph Drills must also meet
the "minimum time standard" for the current class to qualify. If multiple saves of the same exercise name
are not permitted (as designated in the Setup), then only the first, last, or best score saved will be
considered to qualify as designated in Word Processing Supervisor Setup..
The bottom left part of the window displays how many scores qualify (if applicable) as well as whether
the number of scores that qualify meets the number of scores that the class requires as designated in the
Word Processing Supervisor Setup.
Selecting Scores
Whenever a list of scores appears in the Score Display Box you can point to any of the listed scores and
click the left mouse button. This will "select" the score. When a score is selected, it is highlighted in blue
and additional relevant information concerning the score is displayed in the footer section.
Exam Summaries
When you display exam scores by date (by choosing date from the Sort Order combo box), you can bring
up the "Exam Summary" window by selecting a score in the Score Display Box:
85
This window calculates the total time elapsed, average errors, and word/minute rates for every exam
score recorded with the same date as the score you selected.
The Word Processing Supervisor Student Record Menu System
86
You'll notice that the layout of the Student Records Menu System looks almost identical to that of the
"Score Display Window" under the Database Manager. In fact, they operate in exactly the same manner.
Here is a summary of the buttons for the student menu system:
Choosing an item from the Score Type combo box changes the type of the scores displayed ("Timed
Writings" etc.).
Pressing Backup backs up the current student data file. This button is only enabled if the backup option
in the Word Processing Supervisor Setup was designated as Backup MANUAL.
Pressing Print sends a report of the currently displayed scores to the printer.
Pressing Print All sends a report of all recorded scores in the student data file to the printer.
Pressing Exit closes the Student Menu System Window.
87
CHAPTER 9 – SECURITY
Word Processing Supervisor provides several means to assure that students do not falsify the results of
their work and do not copy from other students. These means include the following:
Edit Counts
Each Word Processing Supervisor Document stores the number of times it was edited. By requiring
students to hand in only documents that have a zero edit count, you insure that they have not corrected
mistakes from a previous document.
Check Count
In addition to edit counts, each Word Processing Supervisor Document stores the number of times a
particular exercise is error-checked. Documents that have been checked only once and never edited have
legitimate scores that have not been falsified.
Verification Formulas
The Formula button on the Class Setup Window provides additional information to allow the teacher to
be certain that any given document was prepared using the Word Processing Supervisor. Please take
time to read the additional information provided.
Modified Exercise Names
Documents that have been created by editing a Word Processing Supervisor Document and then saving it
under a different name have a lowercase "x" appended to them in the printout. For example, if a student
saves an exercise named "job1," and then edits it and specifies the Document file name to be "job2," the
name "job2x" will appear in the footer of the document when printed. This will allow you to verify the
source of a document.
Notice that for best security, the edit count must be 0, the check count must be 1, and the error count,
net word per minute rate, cutoff word per minute rate showing in the footer for any given document.
88
89
APPENDIX A – SPECIAL NETWORK CONSIDERATIONS
Remote Directory
If you are installing WPS in a network environment, you must specify a “Remote Directory” that is located
on a server that is accessible to all of the computers. In this remote directory, you must create three
directories: “Documents”, “Records”, and “Keys”. This will allow the students to work on any computer
that is connected to the server. The “Data” directory is created on each individual computer that WPS is
installed on. It is used to store frequently accessed resources such as the supplementary materials and a
log file. Setting the correct permissions on all of these directories is essential for the correct operation of
WPS and should be carried out by the network administrator. The relevant permissions are listed in a
table in the next section.
If you need to change the remote directory for a particular computer, press the “Configure Paths” button
in the WPS 2007 tab. This file modifies the WPSConfig file located in the Data directory (See notes in
section below for location). If you wish to propagate this change to several computers, modify the path on
one computer and copy the WPSConfig file to the Data directories of the other computers.
User Access Rights
The data directory will be in the following folders:
Windows Vista and Windows 7: C:\ProgramData\SE Warner Software\Word Processing Supervisor for
Word 2007\
Windows XP: C:\Documents and Settings\All Users\Application Data\SE Warner Software\Word
Processing Supervisor for Word 2007\
The remote directory is the same directory is the same as the data directory unless changed in the
installer or configuration files.
The Supplementary Materials and Diagnostic subfolders reside in the data directory.
The Keys, Records, and Documents subfolders reside in the remote directory.
90
The following table describes the file attributes and user access rights:
Directory
User Group
User Access – Windows NT
User Access – Novell
Data
Students:
Teachers:
Read / Execute
Read / Write / Delete / Execute
Read / File Scan
Read / Write / Create / Delete /
File Scan
Read / Execute
Read / Execute
Read / File Scan
Read / File Scan
Students:
Read / Write / Delete / Execute
Teachers:
Read / Write / Delete / Execute
Read / Write / Create / Delete /
File Scan
Read / Write / Create / Delete /
File Scan
Remote
Students:
Teachers:
Read / Execute
Read / Write / Delete / Execute
Read / File Scan
Read / Write / Create / Delete /
File Scan
Keys
Students:
Teachers:
Read / Execute
Read / Write / Delete / Execute
Read / File Scan
Read / Write / Create / Delete /
File Scan
Records
Students:
Teachers:
Read / Write / Execute
Read / Write / Delete / Execute
Read / Write / Create / File Scan
Read / Write / Create / Delete /
File Scan
Students:
Read / Write / <Delete> /
Execute (See Notes)
Read / Write / Delete / Execute
Read / Write / Create / <Delete>
/ File Scan
Read / Write / Create / Delete /
File Scan
Supplementary Students:
Materials
Teachers:
Diagnostic
Documents
Teachers:
91
NOTE: For the documents directory “Write” only needs to be set for the owner of the files if using
individual student accounts and the subfolder setting (more secure).
NOTE: For the documents directory, the “Delete” permission should only be set if the students each only
have control over their own personal directory. Otherwise, while students won’t be able to delete each
other’s documents from within WPS, they would still be able to within the file system.
NOTE: Storage should be a network drive letter mapped to the individual's home directory. (There
would be no subdirectory indicated in the setup.) Each individual should have all rights to his/her
storage drive.
NOTE: When granting access rights on NT servers, use the "Special Access Privileges to grant the rights
listed above to both the directories and to the files in the folders. (For some reason on NT Server 4.0 the
use of "All Rights" sometimes does not actually grant any rights.)
NOTE: The four sample keys that are included with WPS are by default installed on the local hard drive. If
you wish to access these keys on a server, simply copy the key files from the “keys” subdirectory of the
data directory of any installation and copy them to the “keys” subdirectory of the remote directory on the
server.
File Attributes
All files in all of the above directories should have the file attributes of Read and Write. Novell users
should also set all files in all of the above directories as Shareable.
92
WARRANTY STATEMENT
SITE LICENSE DISKS
Use the software for 90 days and then if not completely satisfied, return it for a refund. If a purchaser
receives an unprotected master disk that is defective, please return it immediately for a replacement.
GENERAL STATEMENT
There are no warranties beyond those described on the face hereof and all implied warranties, including
implied warranties of fitness and merchantability, are hereby excluded.
ORDERS: 1-800-722-5185
TECHNICAL ASSISTANCE: 1-801-277-9444
93


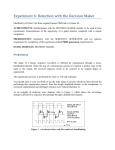


![Multi Input Module for OverView D user`s manual [v07]](http://vs1.manualzilla.com/store/data/005713215_1-e2d53d24a0a93d32e9e353f3f6c133cd-150x150.png)