1
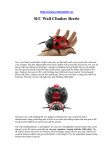
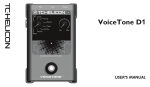
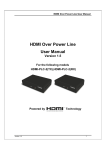
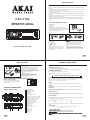
INSTALLATION
PRECAUT ION S
Choo se the mount ing loc at ion wher e the un it wi ll no t int er fer e wi th the no rmal dr ivi ng fun ct ion of
the dr ive r.
Bef ore final ly inst alling the uni t, connec t the wir ing tempor arily and make sur e it is all connected up
prope rly and the unit and the system work prope rly.
Use onl y the par ts incl uded wi th the uni t to ensur e pr oper inst al lat ion. The use of unauthorized
parts ca n ca use mal functions.
Consult wit h your nearest dealer if instal lati on requi res the dri lling of holes or other modificat ions of
the vehicl e.
Install the un it wh ere it does no t get in the dr iver's wa y an d ca nnot injure the passenger if there is
a su dden st op. Like an eme rgency st op.
CAU-7160
Avoid installing the un it wh ere it wo uld be su bject to hi gh temp erature, such as from di rect
sunlight, or from hot air, form the heater, or where it would be subject to dust, dirt or excessive
vibration.
DI N FRON T-MOU NT (Me thod A)
2
1
Installing the un it
1. Da shboard
2. Ho lder
Af ter inserting the ho lder into the da shboard,
select the appropriate tab ac cording to the thickness
of the da shboard ma terial and be nd them inwa rds to
secure the ho lder in place. (Fig. 1)
3
(Fi g. 1)
CAU-7160
3. Sc rew
1
Removing the unit
5
6
3
1
BND
7
4
AMS
2
2
3
( Fig . 2 )
USB / SD / MMC / PLAYER
( Fig . 3 )
1. Dashboard
2. Nut (5mm)
3. Spring Washer
4. Screw (5 x 25mm)
5. Screw
6. Strap
Be sure to use the strap to secure the
back of the unit in place. The strap can
be bent by hand to the desired angle.
7. Plain Washer.
2 . Insert fingers into the groove in the front of
frame and pull out to remo ve t he frame .
(Wh en reattaching the frame ,point the
side wi th a gr oove dow nw ards and att ach It.)
3.Leve r
Insert the levers supp lied with the unit into the
grooves at both sides of the unit and show n in
figure unti l they click. Pulling the levers makes
possibl e to rem ove the unit from the dash board.
02
INSTALLATION
Fastening the unit to the factory radio
mounting bracket:
1. Select a position where the screw holes
of the bracket and the screw holes of the
main unit become aligned (are fitted), and
tighten the screws at 2 places on each side.
Use either truss screws (5 x 5mm) or flush
surface screws (4 x 5mm).
2. Screw
3. Dashboard or Console
2
3
2
DIN REAR-MOUNT (Method B)
Installation using the screw holes on the
sides of the unit.
GENERAL OPERATIONS
GENERAL OPERATIONS
POWER /MOD conversion
2.Under power off status,short press is power on,
Under power on status,short press is switching mode,long press is power off.
SOUND ADJUSTMENT
Turn on (2) can adjust the desired volume quality.
Press SEL button (2) will change in the following order.
Option:
BAS
TRE
BAL
FAD
VOL
(Volume)
( Bass)
( Treble) (Balance)
LOUD
EQ
(Fader)
VOLUME
Adjust volume level by using VOL/SEL (2) knob. Turn the VOL knob to left to decrease
the sound level, turn the VOL knob to right to increase the sound level.
Note: The unit is initially set to volume mode.
INPUT THE SD CARD
The SD oblique angle keeps Rightward
exposure , put into the SD slot and press
it again to eject .
BASS
Press VOL/SEL button(2) one time. Adjust bass level by u sing VOL/SEL(2) Knob.
TREBLE
Press VOL/SEL button(2) two times. Adjust treble level by using VOL/SEL(2) Knob .
GENERAL OPERATIONS
BALANCE
FRONT PANEL LAYOUT
2 12 1 17
16
1 Power / MOD Button
2 Volume/Sel Button
3 Display/Mute Button
4
11
CA U-7160
10
19
13
BN D
AM S
4
5
6
7
8
9
10
14
15 3
8
7
6
9
18
11
12
13
14
15
16
17
18
20
5
21
19
20
21
03
LCD Display
Reset Button
Band switch/ID3 select
Tune Seek & Track forward Button
Tune Seek & Track reverse Button
Automatically memory storing
Play/pause & Preset Button 1
Intro & Preset Button 2
Repeat & Preset Button 3
Random & Preset Button 4
Preset Button 5
Preset Button 6
Release Button
Remote Control sensor
AUX IN JACK
USB connecter
SD/MMC slot
Flashing LED
Press VOL/SEL button(2) three times. Adjust sound balance between left and right
speakers by using VOL/SEL(2)Knob .
FADER (optional)
Press SEL button(2) four times. Adjust sound balance between front and rear speakers
by using VOL/SEL(2)Knob.
SELECT MENU
Press VOL/SEL button for several seconds, selecting menu is activated as cyclical mode
of following function for use's selection:
VOL
BAS
TRE BAL
FAD
STEREO/MONO
LOUD OFF/ON
EQ
DX/LOC
Press VOL/SEL button shortly and turn VOL button to right or left to select different menu
mode.
EQ OFF/ON
Select “EQ ON ” POP
CLASS
ROCK
EQ OFF menu male.
04
GENERAL OPERATIONS
Note:
RADIO OPERATIONS
AUTOMATICALLY MEMORY STORING & PROGRAM SCANNING
AREA SETUP
In Radio mode. Press SEL button for several seconds. LCD will be show from BEEP ON
AREA USA/EUR. At AREA USA/EUR. You can use VOL +/- to select the AREA
frequency.
On Remote Control
Short press “DISP” button to turn on the mute, Press “DISP” again to turn
off the mute.
Long press “DISP”, LCD screen shows clock “00:00”. Short press “DISP”,
the hour flashes, rotate “VOL +/-“to adjust hour. Press “SEL” button, minute
- Automatically Memory Storing
Press AMS(MP3) button (9) for several seconds, the radio searches from the current
frequency and checks the signal strength until one cycle search is finished.
And then 6 strongest stations are stored into the corresponding preset number button.
- Program Scanning
Press AMS(MP3) button (9) shortly to scan preset station. When the AMS mode is carry out,
“INT” appear on LCD display, the unit scan each stored station for 5 seconds, you also can press
the corresponding number button or AMS button. Your desired station will start playing.
STATION STORING
Press preset button (11~16)
RADIO MODE.
M1 ~ M6
- PRESET MEMORY is loaded when key is pressed for less than 1 second.
- PRESET MEMORY is saved when key is pressed for longer than 1 sec.
flashes, rotate “VOL +/-“ to adjust the minute. If there is no operation within
USB/SD FLASH MP3 Playing:
RESET
USB/SD OPERATIONS
5 seconds, the unit will memorize the current time and return to current mode.
RESET button (5) is placed on the housing and must be activated with either a ball point
pen or thin metal object. (Do not use sharp object to avoid damaging the unit.) The RESET
button (5) is to be activated for the following reasons:
- Initial installation of the unit when all wiring is completed.
- All the function buttons do not operate.
- Error symbol on the display.
RADIO OPERATIONS
BAND SELECTION
At tuner mode, press BAND button (6) to select the desired band. The reception band will
change in the following order:
STATION SELECTION
During radio mode, Press “SEEK
” or “SEEK
”buttons shortly to automatically search
a station, Press “SEEK
” or “SEEK
” buttons more than 1 second is operated as
manual turning mode.
PLAY / PAUSE
Press button (10) pause function is activated. Music track play time INDICATOR flashes.
Press it again to resum palying, press it more than 1 second is TOP function.
INT
Press button (11): During INTRO ON, INT indicator comes on and begins
Playing the first 10sec of each song, until the last song is played. It begins playing the entire
track from where INT started
RPT
Press preset button (12) : Flash play mode : REPEAT ON / OFF is activated.
When REPEAT ON, RPT INDICATOR comes on and repeats the current music track.
RDM
Press preset button (13) : During RANDOM ON, RDM INDICATOR is turned on and each
track of disc is played in ramdom instead of normal order .
SELECT TRACKS
During USB/SD operation, press SEEK " " (8) button or SEEK " " (7) button to move
to the previous track or the following track, Track number shows on display. During USB / SD ,
hold SEEK " " (8) button or SEEK " "(7) to fast reverse or fast forward. Music play
starts from when you release the button.
Press preset button (15 - 16) :
- MP3 MODE : 10 TRACK UP / DOWN is activated.
When the total track is 10 or less, KEY is inactivated.
06
05
SPECIFICATION
General
Power Supply Requirements:
Load Impedance :
Maximum Output Power:
Chassis Dimensions:
Current Drain:
DC 14 . 4V
, Negative Ground
4 ohms
4 x 25W
178 x 130x 50mm (W x D x H)
5A
Tone Controls
Bass (at 100Hz):
Treble (at 10K):
+10dB / -10dB
+10dB / -10dB
USB/SD MUSIC Player
Signal to Noise Ratio:
Channel Separation:
Frequency Response:
More than 60dB
More than 60dB
20Hz - 20KHz
FM Radio
520 - 1620 KHz
450KHz
42dBu
Frequency Coverage (KHz):
:
IF
Sensitivity (S/N-20dB):
87 . 5 - 108MHz
10.7MHz
12dBu
>30dB
Frequency Coverage (MHz):
:
IF
Sensitivity (S/N-30dB):
Stereo Separation:
AM Radio
Remarks :
Specifications subject to change without notice
ADDITIONAL INFORMATION
REAR Rch LINE OUT
5
RED
REAR Lch LINE OUT
YELLOW
BLACK
BLUE
GREY
WHITE
GREY/BLACK
WHITE/BLACK
VIOLET
GREEN
GREEN/BLACK
VIOLET/BLACK
07