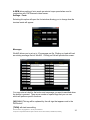
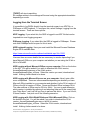
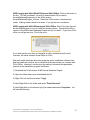
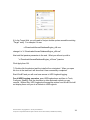
1
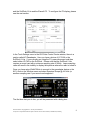
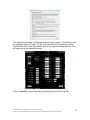
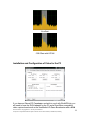
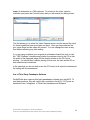
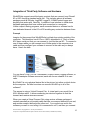
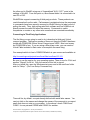
Win4K3 Suite Documentation V1.748
April 2015
Thank you for buying Win4K3 Suite. The Suite supports the Elecraft K3 and KX3
transceivers, the KPA500 Amplifier, the KXPA100, the KAT500 Antenna tuner,
the P3 Panadapter and external logging programs and third party hardware. It
also provides a software based Spectrum Scope for the KX3 requiring nothing
more than a suitable sound card for your computer. NAP3's LPPAN with the K3
is also supported.
Support is just an email away at [email protected]. Release notes at
available at http://va2fsq.com/?page_id=373
This document is Copyright 2013 - 2014 by Tom Blahovici.
It may not be reproduced without express written consent of the author, Tom Blahovici, VA2FSQ
1
Table of Contents
Part 1: Installation and Configuration
Setup of the Elecraft K3 and KX3 Radios
Installation of the Software
Setup of Comports
Setup of the KX3 Spectrum Scope and K3 with LPPAN
Installation Steps
Configuring Win4K3Suite for the Spectral Display
Spectrum Setup
IQ Balance
Use of Third Party Panadapter Software
Installation and Configuration of Video for the P3
Integration of Third Party Software and Hardware
Concept
Connecting to Third Party Applications
Example: DXCommander from DXLabs Suite
Connecting to Ham Radio Deluxe Logbook and DM780
Using MicroHam Routers
New!! Integration with CW Skimmer
Settings Menu in Depth
P3 / K3-X Settings
P3Macros and Spectrum Scope Macros
Third Party SW / HW Tab
User Preferences
Limitations of the Software and Elecraft API
This document is Copyright 2013 - 2014 by Tom Blahovici.
It may not be reproduced without express written consent of the author, Tom Blahovici, VA2FSQ
2
Part 2: User Interface and Functionality
Radio Control Screens
VFO A and VFO B Tuning
Hidden Controls Accessed with a Right Click
Receive and Transmit Equalizers
Filters and Passband Tuning
Band Stack Registers
The Win4K3Suite Spectrum Scope
Zooming and Panning
QSY to Signal
Waterfall Settings
Signal Averaging
Other Controls
Spectrum Control Panel
Spectrum Spots
Function Buttons
Using the P3 Control Screen
K3-X Frequency Memories
CW - FSK-D - PSK Terminal
Controls
Settings - Fonts
Messages
Logging to ADIF, DXKeeper or HRD Logbook
ClubLog Spotting Window
How it Works
Setup
Part 3: Advanced Topics
Programmable Macros
K3- KX3 Macros
P3 and Spectrum Scope Macros
KPA500 Macros
KAT500 Macros
Radio Menu Items (K3 and KX3)
Saving the Settings to a File
Loading the Settings
Errors
This document is Copyright 2013 - 2014 by Tom Blahovici.
It may not be reproduced without express written consent of the author, Tom Blahovici, VA2FSQ
3
Part 1: Installation and Configuration
Setup of the Elecraft K3 and KX3 Radios
There is very little setup required. You will need a serial connection to the K3 or
KX3, and additional serial connections to the KPA500, and the KAT500 if
present. The P3 connects through the K3 so no separate connection is required.
The P3 is not used with the KX3. The baudrate should also be set on the
equipment prior to connecting with Win4K3Suite. By default, the connection is
usually 38400 and this is the initial default for Win4K3Suite. If you wish to use
the P3 with a hardware video capture board or a Webcam, you must also set the
external P3 SVGA resolution to match.
Win4K3Suite will update its display automatically when the radio equipment is
adjusted manually with a few exceptions, limited by the K3 serial API. One of
these is the coarse / fine tune buttons. Please leave these in the fine tune
mode of 1Hz increments on the K3 and KX3. Win4K3Suite has its own control
of this, independent of the radio. Also please read the section on the receive and
transmitter equalizers here: Receive and Transmit Equalizers.
If you plan on using the KAT500 auto-tuner you must first go into the Elecraft
KAT500 utility and turn off "Sleep mode" otherwise you will not be able to
connect to the KAT500.
Installation of the Software
Once you have downloaded the software (va2fsq.com), double click on the zip
file, extract the files, and then double click on Setup.exe. This will install the
software to your computer and install an Icon on your desktop. The software
allows a 30 day free trial with full functionality to see if it meets your needs.
If you wish to use the P3 Control interface, you will need a hardware video
capture board and the SVGA board for the P3. Currently the best choice is the
Avermedia HD Game Broadcaster with a VGA input. There are others available
but they are expensive (over $500) and have not been tested.
In addition, if you would like to capture real time video of the P3 display to disk,
you will need to download the free FDDSHOW compression codec available from
http://sourceforge.net/projects/ffdshow/ .
You only need to install this and there is no configuration required. This utility
allows compression of the video to a reasonable value of about 20 Mbytes per
minute. Without this, the video storage requires about 30 Mbytes per second!
This document is Copyright 2013 - 2014 by Tom Blahovici.
It may not be reproduced without express written consent of the author, Tom Blahovici, VA2FSQ
4
Setup of Comports
The first time you launch Win4K3Suite, you will be taken to the setup menu
automatically. You must connect to at least the Elecraft K3 or K3X in order to
use the software. You will see the following menu:
The menu has several different tabs which will be covered shortly. In order to
continue you must connect to the K3 or KX3 Port first. Make sure that the K3 is
on, and pick the comport for the K3 from the drop down menu if the baudrate is
different than 38400, then press the connect button. If successful, the button will
change to “Disconnect”. If the connection to the K3 is not successful, you will be
informed to check that you have the right port. If you cannot connect, then the
program will not allow you to continue. You must have at least a connection to
the K3 or K3X before continuing. If you cannot get a connection close the
Window and the program will close. If you are having issues, it is advisable to
use the Elecraft K3 or KX3 utility to determine why. Once this is operating you
are good to go.
When you have connected to the K3, you may then pick the comports for the
KPA500 and / or the KAT500, clicking on the connect buttons as appropriate. If
you connect to the KX3, you can use the KAT500 as your tuner if you do not
have the KX3100ATU. Please note that to use the KAT500, you must first open
the KAT500 utility from Elecraft and turn off sleep mode. Otherwise Win4K3 will
not connect.
This document is Copyright 2013 - 2014 by Tom Blahovici.
It may not be reproduced without express written consent of the author, Tom Blahovici, VA2FSQ
5
Once the K3 is connected, you can exit the setup menu by clicking the Save
button. All other setup functions can be done later if you wish by selecting the K3
Control Window and Tools Settings…
If you wish to change comports for the K3-X, KPA500 or KAT500 and you have
already connected and saved the initial settings, you will need to click one of the
“Disconnect” buttons. This will reset the ports and close Win4K3Suite and on the
subsequent start will prompt you to connect the radio again. All other settings
will remain the same.
The software will auto-determine if you have a K3 or K3X connected. If you use
both radios, it is recommended to install the software in different folders where
you can have dedicated settings for each radio. To do this, first do a normal
installation of one copy. Create a new Folder and copy all of the software from
the normal install folder to this new folder. You can then create a shortcut to the
"Windows4P3.exe" file in this folder on your desktop.
Setup of the KX3 Spectrum Scope and K3 with LPPAN
Installation Steps
The KX3 IQ output, the output from LP-Pan and the SoftRock II Lite, require a
stereo audio adapter to be installed on your system. Many laptops do not have
a stereo input. If you attempt to use the spectrum scope with a non-stereo input,
then you will not get correct results. Most motherboard based audio devices and
outboard USB audio devices do have stereo inputs. Unfortunately, Windows
This document is Copyright 2013 - 2014 by Tom Blahovici.
It may not be reproduced without express written consent of the author, Tom Blahovici, VA2FSQ
6
does not always tell you if the audio device is stereo in a straight forward
manner.
The first step before trying to install the spectrum scope is to check which
devices are installed on your system and make sure they are configured
correctly.
Vista, Windows 7 and 8 Sound Device Setup
Step 1: Open the Control Panel and select "Sound"
Step 2: Select the "Recording" tab as shown in the following figure:
In this figure you can see that there are a number of devices shown. In this
example, the Microphone Input for the E-MU 0404 device is the one that will be
selected. Please note that Windows enumerates this as a Microphone which it is
NOT. It actually is stereo input. Please also note that there is a motherboard
Line In connection available. However, you cannot select this device since there
is no cable plugged in. Many devices will only become active when a cable is
actually plugged in.
Step 3: Select the device you wish to use and click the "Properties" button.
Step 4: Click on the Levels Tab and increase the volume to maximum. In some
cases you will also see a balance button. Set both channels to maximum. You
can adjust this later if the levels seem to be too high.
This document is Copyright 2013 - 2014 by Tom Blahovici.
It may not be reproduced without express written consent of the author, Tom Blahovici, VA2FSQ
7
Step 5: Next on the "Advanced" tab:
Here you will see a list of formats that your device supports. However in some
cases the list will be incorrect and Windows will actually try and up sample the
data stream which is not appropriate. When in doubt, refer to the manufacturer
of your sound card and use that setting in Win4K3Suite. You must set this to
your planned maximum sample rate usage.
Please note that some devices such as the IMic, require you to set this entry or
they will not work in stereo. So for the IMic, make sure to set the format to 2
channel 48000 Hz.
Configuring Win4K3Suite for the Spectral Display
Both the K3 and KX3 are supported with the Spectrum Display. In the case of
the KX3, nothing needs to be selected in the Setup menu. In the case of the K3,
there are several hardware devices that are supported. These include LP-Pan
This document is Copyright 2013 - 2014 by Tom Blahovici.
It may not be reproduced without express written consent of the author, Tom Blahovici, VA2FSQ
8
and the SoftRock II Lite and the Elecraft P3. To configure the P3 display, please
see the next section.
In the Tools Settings menu in the KX3 Suite Control Center window, there is a
section called K3 Panadapter. Here you have a choice of LP-PAN or the
SoftRock II Lite. If you currently are using the P3, press disconnect and then
select either LP-PAN or the SoftRock. Please note that the SoftRock II Lite
requires a sound card with a minimum sampling rate of 96kHz. Lower sampling
rates will result in the inability to display the spectrum where the radio is tuned to.
Once you have setup Win4K3Suite to connect to the panadapter device or the
KX3, click on the Window menu and select Spectrum Scope @ 44.1kHz (or
another sampling rate if your sound card supports it.
The first time that you do this, you will be presented with a dialog box:
This document is Copyright 2013 - 2014 by Tom Blahovici.
It may not be reproduced without express written consent of the author, Tom Blahovici, VA2FSQ
9
This dialog box presents a condensed version of this manual. Click OK and then
the spectrum scope will open. At this point you will have to press the Control
Panel button in the lower right hand corner of the spectrum scope window. This
will open the control panel as follows:
Click on Connect and you will see the following device selection dialog:
This document is Copyright 2013 - 2014 by Tom Blahovici.
It may not be reproduced without express written consent of the author, Tom Blahovici, VA2FSQ
10
Here you will need to select an appropriate driver. Once that is done the
spectrum should display. (An example of this is the Microphone (E-MU-0404 |
USB)
Spectrum Setup
Software based spectrum scopes take the quadrature signal (IQ out) from a
software defined radio such as the Elecraft KX3, and processes the two signals (I
= In phase, and Q = Quadrature phase) by digitizing the signal using an audio
capture device. From here, the two signals are fed into a fast Fourier transform
which translates the signal from the time domain to the frequency domain which
is then plotted.
There are a few things that must be done to set up the spectrum scope
appropriately. One of these is to make sure that the two signals are equal in
amplitude and at 90 degrees out of phase with each other. The other is to make
sure that the signals are connected to the right channels of your sound card.
To do this, first set up your sound card as above and then tune the KX3 to
signals in the AM broadcast band (nice solid signals here). Zoom in a bit (see
usage below).
Once you have some signals displayed, turn the VFO A dial clockwise. If you
see the stronger signal on the spectrum scope display moving to the left, the
signals are fed into the sound card correctly. If you see the strongest peak
moving to the right, you will need to click on the "Swap IQ" in the control panel of
the spectrum display. In most cases you will need to check the SWAP IQ
checkbox. During initial development, the code was set up this way and as it
turned out, most people need to check the swap IQ box.
The settings will be saved. If you change sound cards in the future, you may
have to change this again.
This document is Copyright 2013 - 2014 by Tom Blahovici.
It may not be reproduced without express written consent of the author, Tom Blahovici, VA2FSQ
11
The next thing you will need to do is to set the balance of the IQ channels. Click
the IQ Balance button.
Setting the IQ balance can be done for each band separately. If you do not set
this for a particular band, it will use the settings that were used for the last
calibration. Please note, that for the KX3 it is best if you do this for all bands. On
the K3 with LPPan it is not that critical.
The best way is to use a signal generator such as the XG3 from Elecraft. Another
method is to use another transceiver into a dummy load, or have a fellow ham
nearby that can generate a constant carrier for you. Lacking these, you can use
strong signals such as WWV, or find a LID who is placing a carrier on a DX :).
Turn the VFO dial around a bit and you will notice that the image of the main
signal moves towards or away from the main signal as you tune. If the signal
moves in the same direction it is a signal not an image.
To adjust the balance, move the IQ Gain control until the image peak is
minimized. The value should be close to 1.0 +- 0.1. As you get close, it is better
to use the up and down arrows on the keyboard. Next adjust the Phase control,
using the keyboard when you get close. Alternate back and forth until the image
is completely in the noise and press OK. You can now do this for another band,
by changing bands on the radio and repeating the procedure.
Changing sound cards will require a rebalance.
One thing you may notice is lots of artifacts in the signal. Peaks at the center
frequency, spikes at various points on the display. What you are seeing is noise
pickup on the IQ wires. You will need to either isolate the KX3 IQ signals
electrically in some way or wrap some ferrites or change grounding configuration.
If you Google "minimizing SDR IQ noise" there are a lot of helpful hints.
Global Offset: Due to variances in electronics, the spectrum scope may not
precisely display the signal at the exact point it should be. There can be small
differences between devices. The Global Offset allows the spectrum display to
be tuned so that the frequency peaks line up with the cursors as they should.
The following is an example of an USB signal first at 0 Hz offset and then at -300
Hz offset. With the K3 and LPPAN2, the usual observed offset is minus 350 (350). Other versions of the LPPAN can have ranges from -6000 to -1200. You
will need to experiment a bit with this until you find the correct offset. It is easiest
to adjust this on a signal such as WWV or a strong AM signal.
For the KX3 it is zero. Once this is set it will be correct for all modes.
This document is Copyright 2013 - 2014 by Tom Blahovici.
It may not be reproduced without express written consent of the author, Tom Blahovici, VA2FSQ
12
No offset
-350 Offset with LPPAN
Installation and Configuration of Video for the P3
If you have an Elecraft P3 Panadapter and wish to use it with Win4K3Suite, you
will need to have the SVGA adapter for the P3 and a DirectShow compatible
video capture board such as the AverMedia HD Game Broadcaster with a VGA
This document is Copyright 2013 - 2014 by Tom Blahovici.
It may not be reproduced without express written consent of the author, Tom Blahovici, VA2FSQ
13
input. An alternative is a 720p webcam. To connect to the video, select a
resolution and press the Connect button and you will receive two dialog boxes.
The first allows you to select the Video Capture device, and the second the input
for those boards that have more than one input. Once you have selected the
port, press Save and the video will connect. You can change the video at any
time without affecting any other setting.
If you are using a webcam (not as good as a hardware board!) be sure to click
the “720P Webcam” checkbox and position the webcam close to the P3 so that
the width of the displayed image fills the display window in the P3 Control
window. You should also consider placing a cover over the cam and the P3 so
that reflections are minimized.
In the case that you do not wish to use the P3 Control at all close the window and
the setting will be remembered.
Use of Third Party Panadapter Software
Win4K3Suite also supports third party panadapter software such as NAP3. To
use these products, they will need to be connected to the AUX / CAT ports as
described in the "Integration of Third Party Hardware and Software"
This document is Copyright 2013 - 2014 by Tom Blahovici.
It may not be reproduced without express written consent of the author, Tom Blahovici, VA2FSQ
14
Integration of Third Party Software and Hardware
Win4K3Suite supports most third party products that can connect to an Elecraft
K3 or KX3 through a standard serial port. This includes almost all software
packages such as DXLabs, Log4OM, Logger32, N1MM Contest logger and
anything that works with OmniRig. In addition it can interface to stand alone
hardware packages that have a serial port connection to a computer.
Unlike comport sharing programs, each connected device or software has its
own dedicated channel to the K3 or KX3 avoiding any contention between them.
Concept
Imagine for the moment that Win4K3Suite is a black box existing outside of the
computer. This black box has 4 K3's or 4 KX3's imbedded in it. Each of these
K3's has a serial port that you can connect to, just like the real K3. To connect to
one of these radios you just connect one of these ports to the computer via a
cable and then configure your software to connect to the radio as you always
have. Here's the idea:
You can have FLDigi, DX Lbs Commander, N1MM Contest Logging software, or
NAP3 Panadapter software connected, each with its own channel to its own
radio.
But Win4K3 is not a physical device like in the picture, but rather a virtual device
in the computer. So then how does one connect Win4K3 up to all of the
software?
The answer is using a Virtual Comport Pair. A virtual pair is very much like a
NULL Modem cable. It allows connecting two devices together so that the
transmit and receive wires are crossed.
When you create a Virtual Comport Pair using various software packages it
creates essentially a null modem cable that has one comport defined at one end,
and another comport defined at the other end. You connect one end to the
software you want to use, telling it it is connected to a K3, and then you connect
This document is Copyright 2013 - 2014 by Tom Blahovici.
It may not be reproduced without express written consent of the author, Tom Blahovici, VA2FSQ
15
the other end to Win4K3 using one of 4 specialized "AUX / CAT " ports in the
settings of Win4K3. From this point on, the software thinks it is connected to its
own K3 or KX3.
Win4K3Suite supports connecting 4 third party products. These products can
read information from the radio. Performance is maintained since the responses
to commands have been saved in memory by Win4K3 during its latest round of
polling the radio. Thus, high polling rates from software such as N1MM do not
directly access the radio but rather the memory. Commands to switch
frequencies or modes or any other write commands are executed immediately.
Connecting to Third Party Applications
The first thing you are going to need to do is download a third party Virtual
comport program. There are a number of these out there but Win4K3 has been
tested with COM0COM, Eltima Virtual Comports and VSPE. Most cost money
but COM0COM is free. If you are using a MicroHam router, you can create a
Virtual Cable included in their router to accomplish the same thing.
One example which is free is COM0COM which is open source and available at:
http://sourceforge.net/projects/com0com/files/com0com/2.2.2.0/
Be sure to use the version for your operating system. There is one for 32 bit and
another “Signed” for 64 bit. Only the version at this link is signed.
After you install this, open the Windows start menu and in the com0com folder
and run “Setup.” (Don’t run Setup Command line).
There will be, by default, one pair already defined with weird letter names. You
can just click on the names and change the names of the comports to a comport
name that does not exist on your system. In the above I chose COM18 and
COM11 for one pair and COM20 and COM21 for another.
This document is Copyright 2013 - 2014 by Tom Blahovici.
It may not be reproduced without express written consent of the author, Tom Blahovici, VA2FSQ
16
Once the comport pair is created, start up Win4K3Suite and select Tools,
Settings, and the 3rd Party SW/HW tab. You will see the following screen:
In this screen there are 4 AUX/CAT ports. Each one can connect to a comport of
a virtual comport pair. In this example, AUX/CAT Port 1 is connected to comport
18. The others are currently not connected to other virtual port pairs.
All you need to do now is save the settings and then configure your third party
product to connect to comport 11 which is the second comport of the COM11COM18 pair telling it you have a K3 or KX3 connected to that port.
Example: DXCommander from DXLab Suite
Select Config from the main DX Commander screen:
This document is Copyright 2013 - 2014 by Tom Blahovici.
It may not be reproduced without express written consent of the author, Tom Blahovici, VA2FSQ
17
You will then see the following screen. Select the K3 or KX3.
Next click on the Ports tab and enter Port# 11 corresponding to the serial port of
the virtual comport pair you created above.
Make sure that DTR and RTS are set to OFF. Win4K3 Suite does not support
hardware hand shaking at this time.
This document is Copyright 2013 - 2014 by Tom Blahovici.
It may not be reproduced without express written consent of the author, Tom Blahovici, VA2FSQ
18
Exit out and you should be connected to DXCommander. From the point of view
of DXCommander, all it sees is a K3 connected to its comport. Therefore
everything that is supported in DXLabs Suite also works.
You can use the same principle for any other third party software such as N1MM,
DX4Win and so on.
Some packages such as FLDigi and LOG4OM use OmniRig. You apply exactly
the same principle as above.
Connecting to Ham Radio Deluxe Logbook and DM780
Win4K3Suite has a Ham Radio Deluxe compatible TCP server that can connect
with the log book and DM780. In order to use this and track the radio modes you
must first connect the HRD Radio Control program to your radio and run the
HRD logbook. You must do this for the K3 or KX3 or if you have both radios you
must do it for both.
Once you are connected open the radio pane in HRD Logbook (View Radio
Pane). You will see something like this:
There may be other buttons displayed but Win4K3Suite only supports the default
buttons and drop downs at this time. For the K3, these are Mode A, Mode B, and
Message. For the KX3, they are Mode A and Mode B. If you have other drop
downs defined you MUST remove them from the radio pane.
To change the drop downs, click on the Options Tab in the Radio Pane. At that
point you will see the following.
This document is Copyright 2013 - 2014 by Tom Blahovici.
It may not be reproduced without express written consent of the author, Tom Blahovici, VA2FSQ
19
If there are any other buttons than this you must remove them. If any are
missing, you must add them. The result MUST be exactly as shown.
Click OK and if all is well you will see Mode A and B showing the mode of the
radio. If you cannot get the Radio Pane to show just the fore mentioned buttons
then you will not be able to connect with Win4K3Suite. If you cannot change the
buttons as happens in some cases please contact [email protected]. This is
solvable just a little more work is involved.
Once you are successful, close HRD Control and HRD Logbook. Start
Win4K3Suite and start HRDLogbook.exe (In the HRD software directory).
To make things simple you will want to create a shortcut on your desktop from
the executable in the HRD folder or make an entry in Settings, Third Party
HW/SW Auto Launch. This way the logbook will start immediately when you start
Win4K3Suite.
Using MicroHam Routers
Win4K3Suite will work with the MicroHam routers. Please see detailed
instructions here: http://va2fsq.com/?page_id=798
Integration with CW Skimmer
CW Skimmer is an extremely useful tool for decoding CW transmissions over a
wide range of frequencies. It is especially useful for working DX pileups, where
you can see where the DX last worked a QSO.
By default CW Skimmer will QSY to a spot using VFO A. However, when you
are working DX you are usually in SPLIT mode. So if you click on a spot with
This document is Copyright 2013 - 2014 by Tom Blahovici.
It may not be reproduced without express written consent of the author, Tom Blahovici, VA2FSQ
20
CW Skimmer, you will lose the DX transmitting frequency. Win4K3 provides a
way to translate all QSY's from VFO A to VFO B. To enable this function, connect
CW Skimmer to AUX/CAT port 4 and click the CW Skimmer check box. This will
inform Win4K3 that CW Skimmer is connected and it will enable the VFO A to
VFO B QSY's. By default, it will use VFO A but in the Tools menu of the radio
control screens there is a toggle called...
Settings Menu in Depth
P3 / K3-X Settings
Here you may select averaging for the P3. Also you can select a file for use with
the Frequency Memory Window.
Spectrum Macros
Here you can specify macros for the P3 and the spectrum scope window such as
Span etc. You can change the labels as well. These will appear on the P3 and
spectrum scope windows window in the lower left. You can use any macros you
wish. They are not limited to the P3. Please see the section on Programmable
Macros for more details.
This document is Copyright 2013 - 2014 by Tom Blahovici.
It may not be reproduced without express written consent of the author, Tom Blahovici, VA2FSQ
21
Third Party SW / HW Tab
In this section you can specify the settings for the AUX / CAT ports as described
in Connecting to Third Party Applications.
The Win4K3Suite Compatible HRD Server provides the address and port of the
HRD Logbook server. If you are using an old version of HRD, uncheck the check
box shown.
This document is Copyright 2013 - 2014 by Tom Blahovici.
It may not be reproduced without express written consent of the author, Tom Blahovici, VA2FSQ
22
Auto Launch: This provides a facility to automatically launch up to 4 third party
programs when you start Win4K3. You can check or uncheck the check boxes to
enable a particular Launch as you deem necessary.
QRZ Account: This is for lookup of call signs in the CW - FSK-D - PSK terminal.
User Preferences: This tab allows you to select Mini Control screens as well as
the color of the buttons that appear in Win4K3Suite.
Limitations of the Software and the Elecraft API
There are a few limitations in Win4K3Suite due to some missing functionality in
the Elecraft API. In particular, it is not possible to physically change the receive
or transmit equalization at the radio and have it updated on the K3 Control
Window. The necessary commands to obtain this information directly are not
present in the K3 serial programming interface and the work around requires a
large amount of communications with the K3. It would be detrimental to
performance to always keep this updated. Due to this, the equalizer is reset to 0
across all audio bands when the software is started. As long as changes are
made only in the K3 Control window, the equalizer display will remain correct.
The same limitation also applies to the coarse / fine-tuning control.
The other limitation concerns obtaining the shift of the subreceiver IF. Currently,
this functionality is missing so it is not possible at the present time to change this
for the subreceiver independently. If you wish to have different filter settings for
the subreceiver, set them up on the main receiver and then double click on the
A>B button. This will transfer all settings from the main to the sub. You will then
need to subsequently change the main receiver settings. This behavior has been
reported to Elecraft and hopefully there will be an update to the API soon
Finally, command for turning on Text Mode for CW, FSK and PSK and adjusting
threshold for the built in decoder are not available on the KX3.
This document is Copyright 2013 - 2014 by Tom Blahovici.
It may not be reproduced without express written consent of the author, Tom Blahovici, VA2FSQ
23
Part 2: User Interface and Functionality
Radio Control Screens
Win4K3Suite provides an easy to use interface to the Elecraft K3 and KX3
radios, integrating almost all functionality including that of the KPA500, the
KAT500 and the KXPA100. There are two possible radio control screens: the full
sized interface and the Mini-Screen. Switching between them is accomplished
by going into Tools Settings User Preferences and checking or un-checking the
"Use Mini Control Screens box. A restart is required.
Most of the buttons are self-explanatory but there are a few sets of controls that
can use further explanation.
Full Sized Control for the K3
Mini-Screen Controls for the K3
This document is Copyright 2013 - 2014 by Tom Blahovici.
It may not be reproduced without express written consent of the author, Tom Blahovici, VA2FSQ
24
Full Sized Control for the KX3
Mini-Screen Controls for the K3
VFO A and VFO B Tuning
The radio may be tuned by sliding the slider to the left or right and then releasing
the mouse. Tuning rate is governed by the buttons of Fine, Med, or Coarse. If
you use the mouse wheel after selecting the slider, the wheel can be
continuously turned to change the frequency.
By default Fine tuning changes the frequency by one Hz if you use the keyboard
to slide the slider. If you use the mouse wheel each "tick" will increase the value
by three times the slider increment.
This document is Copyright 2013 - 2014 by Tom Blahovici.
It may not be reproduced without express written consent of the author, Tom Blahovici, VA2FSQ
25
Medium tuning will change the frequency in 10 Hz increments and Coarse by
100 Hz increments. In all cases the mouse wheel will increase this by three
times.
Double Clicking the VFO windows will pop up a direct frequency keypad as
shown here:
You can use the keyboard or the mouse to enter a frequency. Note that the
frequency is in kHz.
You may also click in the VFO A or B frequency digits directly and use the arrow
keys or mouse wheel to individually change the values of the digits. Note, click
slightly to the left of a digit.
Right Clicking in the VFO B frequency display allows you to select various "Up"
and "Down" split frequencies automatically.
Hidden Controls Accessed with a Right Click of the Mouse or Double
Clicking
There are several controls in Win4K3 that can have a dual function. For
example, the Equalizer can be toggled between receive and transmit equalization
by right clicking the equalizer
This document is Copyright 2013 - 2014 by Tom Blahovici.
It may not be reproduced without express written consent of the author, Tom Blahovici, VA2FSQ
26
Another example is Right Clicking the Noise blanker section in the K3 Control
screen
Some of the others include right clicking on VFO B to select a split frequency
which will also automatically copy settings from VFO A to VFO B and enter Split
mode.
For the KPA500 and KXPA100 double clicking the Temperature box will cycle
through Temperature, Voltage, and Current.
In addition, right clicking anywhere in the KPA500 control will allow you to set the
fan settings on the amp.
Receive and Transmit Equalizers
Win4K3Suite provides access to the receive and transmit equalizers built into the
K3 and KX3. Unlike many other controls however, the setting of this functionality
at the radio itself is NOT reflected in the program. Only setting the equalizer in
the program is supported since there are no commands in the Elecraft
programming language to read the values. However you can dial in a setting for
the TX equalizer and RX Equalizer and save these settings. When you exit
Win4K3 the settings remain in the radio. The next time you start Win4K3, it will
first reset the equalizer settings on the radio to zero but then load the values
which were set when you exited the program.
You can save up to 3 equalizer settings for each of the equalizers in Win4K3.
This document is Copyright 2013 - 2014 by Tom Blahovici.
It may not be reproduced without express written consent of the author, Tom Blahovici, VA2FSQ
27
Save Button
For example, if you usually have a TX equalizer setting for your particular
microphone, first write down the settings. Then start Win4K3. When the
program starts, the equalizers will be reset to zero. Next right click in the RX
Equalizer section to select TX equalizer and dial in your settings. Press the little
bar under one of the presets and this will save the settings in the Win4K3Suite
settings file and the preset button will highlight.
This setting will remain in the radio upon exit of Win4K3. The next time you
connect, Win4K3 will reset the equalizers but then load the last Preset used for
both the TX and RX equalizers automatically.
If you only use your TX equalizer to set a permanent equalization, you will never
need to worry about this again. It will always be loaded when you start Win4K3
Suite.
Filters and Passband Tuning
Win4K3Suite allows full control of the filters in the radio. In the case of the KX3,
there is more functionality than in the radio itself since it does not consider the
Tech Mode settings for Passband, instead providing all functionality irrespective
of this setting.
Band Stack Registers
New to version 1.748 are Band Stack Registers. By default the K3 or KX3 will
remember the previous frequency and mode when you change the band. Band
stack registers are per band memories that allow you to store up to 4 different
frequency / mode pairs per band.
To use this feature, clicking the Band button that you are currently on, will store
the frequency and mode you are currently using, and then cycle through up to 3
additional frequency / mode pairs. The first time you use this on a particular
band, a press of the band button will store the current frequency and mode. If
you then tune to a different frequency and mode on that band, and then press the
Band button again, it will store the new pair and then go back to the previous
pair. Up to 4 pairs are available per band.
You can also right click in the Band section and then select a frequency / mode
pair from the popup menu.
This document is Copyright 2013 - 2014 by Tom Blahovici.
It may not be reproduced without express written consent of the author, Tom Blahovici, VA2FSQ
28
The Win4K3Suite Spectrum Scope
The Win4K3Suite spectrum scope offers an easy to use spectrum scope with no
need to worry about many of the technical aspects of Digital Signal Processing.
The display for the KX3 and LPPAN automatically takes into account all offsets
for the various modes, including the Weaver Shift in the KX3.
Control Layout
Split Screen
*** Note: In version 1.736 the Pre-defined span settings are replaced with programmable macros. These can be set in
Tools, Settings, Spectrum Macros.
When you first start the spectrum scope you may see something like the
following picture. If not press the "Reset" button.
This document is Copyright 2013 - 2014 by Tom Blahovici.
It may not be reproduced without express written consent of the author, Tom Blahovici, VA2FSQ
29
Zooming and Panning
The spectrum scope has two modes for the mouse: Zoom and Pan. The Zoom
button will allow you to zoom into parts of the spectrum using the mouse.
For example you can use the mouse to draw a box around the area you wish to
look at as shown below:
It is useful to make a selection across the whole spectrum so that peaks are
closer to full scale as has been done in the above picture. You can also select a
small section to really zoom into the signals.
You can use the mouse in this fashion at any time as long as the Mouse Mode
Zoom button is active. If you make a mistake, you can press the "Undo" button
which will revert back to the previous zoom ratio.
Clicking Zoom + and Zoom -, will zoom in the X Axis, increasing or decreasing
the span of the display.
In addition to the Zoom, there is a Pan button. This allows you to move the
spectrum up and down by clicking and holding the mouse button in the spectrum
display. In addition, you can use the mouse to grab the Frequency scale at the
top of the spectrum and move it left to right to pan the spectrum over the whole
frequency range.
QSY to Signal
Double clicking in the spectrum window will QSY to the signal of interest. This is
possible for both VFO A and B by selecting either the MRK A or MRK B buttons.
The VFO Passbands reflect the actual bandwidth and shift settings on the radio.
This document is Copyright 2013 - 2014 by Tom Blahovici.
It may not be reproduced without express written consent of the author, Tom Blahovici, VA2FSQ
30
Right clicking on the spectrum allows you to set a tuning rate for the radio using
the mouse wheel and also allows you to "Jump Up" or "Jump Down" to even 500
Hz settings. You can also set a "Snap" which will always QSY to even 100 Hz
boundaries.
Waterfall Settings
The WF Hi setting adjusts the colors for the signal peaks, while the WF Low
adjusts the colors for the background. The WF Spd adjusts the waterfall scrolling
speed. All settings are saved by band.
Signal Averaging
The AVG box allows setting the averaging rate for the spectrum from 1 to 16.
The higher the value the slower the spectrum becomes but the noise is reduced
in the process. A good value is either 4 or 8. A value of 16 can be used to dig
out very weak signals using the waterfall. In this case adjust the waterfall Low
setting to just bring up the background until the noise starts to show.
Other Controls
The Split Screen control allows you to resize the relative sizes of the spectrum
and waterfall.
Peaks will display the highest signal level in the display and hold them until is is
turned off.
Fill fills the spectrum for a more pleasing display.
Spectrum Control Panel
Most of the control in this screen are self-explanatory.
This document is Copyright 2013 - 2014 by Tom Blahovici.
It may not be reproduced without express written consent of the author, Tom Blahovici, VA2FSQ
31
Spectrum Spots
In version 1.720 spots from the ClubLog screen now appear as triangles beneath
the waterfall. Hovering the mouse above the triangle will display the call sign or
call sign DE Spotter depending on the setting in the spectrum control panel.
Clicking on the triangle (64 bit version) will QSY to the spot. In the 32 bit version
double click above the spot in the waterfall.
Using the P3 Control Screen
Win4K3Suite offers a unique point and click interface to the Elecraft P3
Panadapter if you install a hardware video capture board.
The P3 Control Window supports recording of real time spectra to disk and has 8
configurable macros usable for the P3 or the K3. This will be found in the Tools Settings - P3 / K3 Macros tab.
Tracking and Fixed modes are available. Operation is very similar to the P3
itself.
This document is Copyright 2013 - 2014 by Tom Blahovici.
It may not be reproduced without express written consent of the author, Tom Blahovici, VA2FSQ
32
K3-X Frequency Memories
Win4K3Suite provides an interface to the K3 and KX3 frequency memories. This
is accessed via Window – Frequency Memories.
When the window is displayed, pressing a button will do a QSY for both VFO A
and B and set the appropriate mode. Filter settings will be those set as a default
for the mode in question or the current settings.
In order to use this feature, you must use the Elecraft K3 Frequency editor that
can be downloaded at the Elecraft site. One you have setup your memories,
save them to the radio, and then save them to a file and specify this file in the
Settings menu as indicated below. Win4K3Suite always accesses the memories
directly from the radio.
This document is Copyright 2013 - 2014 by Tom Blahovici.
It may not be reproduced without express written consent of the author, Tom Blahovici, VA2FSQ
33
CW - FSK-D - PSK Terminal
The Elecraft K3 and KX3 have a built in decoding function for CW, FSK-D, and
PSK digital modes. Win4K3Suite provides this functionality in the program by
selecting Window then CW - FSK-D - PSK Terminal. By default, the basic
screen shown below will open.
Clicking on Expand will reveal various controls as follows:
The "Settings (K3)" section allows you to turn on text decode, and set the
threshold for decoding of signals. Please note that this is only available in the
K3. In addition, if you are using a MicroHam router, the controls are slow to
operate.
A-SPOT allows spotting of CW, FSK (manual) and PSK signals. You can toggle
Auto spot or Manual spot by right clicking on the button.
APF/DPB allows settings of audio peaking filter or dual pass band filters.
CW CPM sets the keyer speed
This document is Copyright 2013 - 2014 by Tom Blahovici.
It may not be reproduced without express written consent of the author, Tom Blahovici, VA2FSQ
34
A-WPM allows setting of auto words per minute keyer speed when used in
conjunction with CW Skimmer's telnet server.
Settings - Fonts
Selecting this option will open the font window allowing you to change how the
terminal mode will appear.
Messages
Win4K3 allows you to set up to 10 messages per file. Clicking on Load will load
an existing message file into Win4K3. Clicking on Edit will provide this screen:
You may enter a Label for the button and a message you want transmitted when
the button is pressed. There are a number of special tags that you can use
which will perform specific functions.
[HIS CALL] This tag will be replaced by the call sign that appears next to the
QRZ button.
[TXON] will start transmitting.
This document is Copyright 2013 - 2014 by Tom Blahovici.
It may not be reproduced without express written consent of the author, Tom Blahovici, VA2FSQ
35
[TXOFF] will stop transmitting.
All carriage returns in the message will be sent using the appropriate translation
depending on mode.
Logging from the Terminal Screen
It is possible to log QSO's directly from the terminal screen to an ADIF file, or
DXKeeper or HRD Logbook. To configure this, select Settings, Logging from the
terminal screen. There are three options:
ADIF Logging: If you select this, the QSO is logged to an ADIF file that can be
imported into most logging programs.
DXKeeper Logging: If you select this, the QSO is logged to DXKeeper. Please
note that DXKeeper must be open for this to work.
HRD Logbook Logging: Here you must install the Microsoft Access Database
Engine 2010 available here:
https://www.microsoft.com/en-ca/download/details.aspx?id=13255
However there are some details that are necessary to resolve depending if you
have Microsoft Office on your computer and whether you are using the 32 bit or
64 bit of Win4K3.
HRD Logging without Microsoft Office on your computer: Click on the button
in the link. You will be asked if you wish to download the 32 bit version,
AccessDatabaseEngine.exe or the 64 bit version,
AccessDatabaseEngine_x64.exe. Select the version you need, download and
install. Nothing further needs to be done.
HRD Logging with Microsoft Access on your computer: Here it gets a little
more complicated. There are a few scenarios depending on whether you have
Microsoft Office installed on your computer and whether it is the 32 bit version of
Office or the 64 bit version of Office. Home and Student Office is always 32 bit.
The other editions of Office may be 32 bit or 64 bit. You can try and determine
which version is installed by opening it and selecting Help and in the search field
type "Help About" and it will tell you how to perform this action. If you can't find it,
it doesn't matter. Just pick one of the following scenarios:
HRD Logging with 32 bit Win4K3Suite and 32 bit Microsoft Office: Click on
the button in the link. You will be asked if you wish to download the 32 bit
version, AccessDatabaseEngine.exe or the 64 bit version,
AccessDatabaseEngine_x64.exe. Select the 32 bit version, download and
install. Nothing further needs to be done.
This document is Copyright 2013 - 2014 by Tom Blahovici.
It may not be reproduced without express written consent of the author, Tom Blahovici, VA2FSQ
36
HRD Logging with 64 bit Win4K3Suite and 64 bit Office: Click on the button in
the link. You will be asked if you wish to download the 32 bit version,
AccessDatabaseEngine.exe or the 64 bit version,
AccessDatabaseEngine_x64.exe. Select the 64 bit version, download and
install. Nothing further needs to be done. If you get an error see below.
HRD Logging with 64 bit Windows and 32 bit Office: Most of the time this will
be the situation when you try to install the Access drivers. Download the 64 bit
version of the MS Access Database Engine and try to install it. If you have 32 bit
office you will get an error. This is the error:
If you don't get an error then you have 64 bit office installed and all is well.
However, the usual situation is that Office is 32 bit.
Microsoft made a blunder when they wrote the driver installation software here
and the install will not allow you to install 64 bit Access drivers on a system with
32 bit Office. However it can be done by adding a command line parameter:
/passive to the installation program as follows:
1) Download the 64 bit version of MS Access Database Engine.
2) Open the folder where you downloaded the file.
3) Right Click on the file and select "Copy"
4) Next Right Click in the folder and select "Paste Shortcut"
5) Next Right click on the shortcut you just created and select Properties. You
will see the following:
This document is Copyright 2013 - 2014 by Tom Blahovici.
It may not be reproduced without express written consent of the author, Tom Blahovici, VA2FSQ
37
6) In the Target field, you will need to first put double quotes around the existing
"Target" entry. For example if it was
c:\Downloads\AccessDatabaseEngine_x64.exe
change it to "c:\Downloads\AccessDatabaseEngine_x64.exe"
Next add the /passive parameter to the end. What you will end up with is
"c:\Downloads\AccessDatabaseEngine_x64.exe" /passive
Click Apply then OK.
7) Double click the shortcut and the install will run minimized. When you open
the Icon in the task bar it will show that it has successfully completed.
Start Win4K3 and you will now have access to HRD Logbook logging.
For all HRD Logging scenarios, open HRDLogbook.exe and then in Tools,
Configure, Sharing, click the checkbox to allow automatic refresh on new
records. Without this, HRD Logbook will accept the entries from Win4K3 but will
not display them until you do a Refresh in HRDLogbook.
This document is Copyright 2013 - 2014 by Tom Blahovici.
It may not be reproduced without express written consent of the author, Tom Blahovici, VA2FSQ
38
ClubLog Spotting Window
I'm a big fan of Club Log. It's easy to use, you don't have to mess with
complicated filters and it just works. What was missing though, is a way to just
point and click on the spots and have your radio tune to the DX. Thus when
Michael Well announced that he was making available a means to obtain your
DXCC Matrix of worked and new spots via a programming interface, I know I
needed this. So CLSpotter was born. Full QSY capabilities are integrated into
Win4K3Suite as well.
How it Works
CLSpotter works by downloading your DXCC matrix from Club Log using your
user id, password and email address. Once this is downloaded, it connects to a
DX Cluster and then does a lookup in your matrix to see if an incoming spot is
new, worked, confirmed or verified. According to some simple filters, it will
display these spots in a table.
Clicking any spot in the table will immediately do a QSY to the frequency of the
spot. In addition if you are using the LP-Pan or KX3 spectrum scope, then
moving the mouse slowly over the waterfall will show any spots that are in the
frequency range of the panadapter. if the CW - FSK-D -PSK Terminal is open,
the call sign of the spot is entered into the QRZ field.
Setup
The first time you use Club Log Spots ( found in the Windows menu from any
control screen), it will bring you directly into the Control Panel. There are 4 main
sections to the control panel.
This document is Copyright 2013 - 2014 by Tom Blahovici.
It may not be reproduced without express written consent of the author, Tom Blahovici, VA2FSQ
39
Club Log Account: This is where you must put your Club Log credentials that
you are currently using. If this is not correct, then there will be no spots
available.
DX Cluster: Here you must provide your call sign and pick one of the DX
Clusters. In addition to the pre-defined clusters, you can add your own cluster by
specifying the ip address and port of the cluster.
Entity List: The entity list is a list of DXCC's. This is used to provide the name
of the country in the spot window. This table is automatically updated once a
month and the first time you run the program. If you wish to update this sooner,
press the Update button.
Highlighting Preferences: Here you can select the colors you would like to use
for the different spots.
This document is Copyright 2013 - 2014 by Tom Blahovici.
It may not be reproduced without express written consent of the author, Tom Blahovici, VA2FSQ
40
Part 3: Advanced Topics
Programmable Macros
Win4K3Suite supports 20 programmable macro buttons.
Each button can be programmed with a mix of K3, KX3, KPA500, P3 and
KAT500 commands. Sets of macros can also be saved to a file and loaded
allowing different sets depending on needs.
Macros are setup in the Tools Settings menu under the K3/P3/KPA/KAT Macros
tab.
Macros in Win4K3Suite can use almost any SET commands for the K3, P3,
KPA500 and KAT500. They can be mixed together in the same macro according
to the following rules:
K3- KX3 Macros:
You can use K3 macros using the normal K3 commands such as
FA00014100000; i.e SET frequency of VFO A to 14100000 Hz.
This document is Copyright 2013 - 2014 by Tom Blahovici.
It may not be reproduced without express written consent of the author, Tom Blahovici, VA2FSQ
41
The software uses the K31 and K22 extended modes. If this is changed be sure
to set it back.
Use of AI1, AI2 and AI3 modes are not permitted.
P3 Macros:
You can use P3 macros using the normal P3 commands such as
#SPN000500; which sets the span of the P3 to 50kHz
KPA500 Macros:
You can use KPA500 macros using the normal KPA commands such as
^FC4; which sets the minimum fan speed to 4. Please note that bootloader
commands are not supported and if the KPA500 is off the commands are
ignored.
KAT500 Macros:
To use the KAT500 macros, you must proceed each command with a &. For
example, &AN1; sets the antenna to antenna 1. Please note that bootloader
commands are not supported and if the KAT500 is off the commands are
ignored.
This document is Copyright 2013 - 2014 by Tom Blahovici.
It may not be reproduced without express written consent of the author, Tom Blahovici, VA2FSQ
42
Radio Menu Items (K3 and KX3)
From the "Tools" menu, select "Radio Menu Items". This will open the following
screen:
When this window is opened, all values shown are the default values as
described in the Elecraft K3 and KX3 manuals. During the development it
became apparent that displaying the current state of all menu items would take
too much time when you open the window (30 seconds + on the KX3) so I have
provided a way to quickly get the status of any given menu item by pressing one
of the GET buttons. You may also change a value and then press the SET
button.
It is however, possible to get all of the settings by pressing GET ALL. This will
take upwards of 20 seconds on the K3 and 30+ seconds on the KX3. Polling of
the radio is suspended during this process but polling by the AUX/CAT ports is
not. It is advisable to close any third party products as well as any other Win4K3
windows before doing a GET ALL or SET ALL.
This document is Copyright 2013 - 2014 by Tom Blahovici.
It may not be reproduced without express written consent of the author, Tom Blahovici, VA2FSQ
43
Saving the Settings to a File
Clicking on the "Save File" button will first do a "GET ALL" as shown by the GET
ALL button being illuminated. You will then be prompted for a file name. You
also have the choice to save the operating settings as well by checking or unchecking the "Save operating settings" checkbox.
One thing you must be aware of here: If you wish to save certain settings that
only apply to a specific mode, such as CW, then the radio should be in CW mode
to allow access to the radio menu items. For example, if you want to save the
status of the DUAL PB, if you are not in CW mode then the value will not be
correct.
Loading the Settings
Clicking on the "Load File" button will retrieve a previously saved file and then set
all of the radio operating parameters if they were included in the save, and then
set all menu items to correspond to the ones saved. This can take up to 45
seconds or so.
Errors
Much attention was given to minimizing any errors that can occur from reading
the menu items. The software will retry up to three times. If a valid response did
not occur during these attempts an error message will be displayed and then the
corresponding menu item's GET or SET button will remain illuminated.
This is particularly important when doing a GET ALL or SET ALL. During these
activities, polling of the radio is temporarily suspended until the commands
complete. This prevents the majority of any errors you will encounter. However,
if you are using devices connected to the AUX / CAT ports, it is best to close
them temporarily while you do the GET ALL and SET ALL commands.
This document is Copyright 2013 - 2014 by Tom Blahovici.
It may not be reproduced without express written consent of the author, Tom Blahovici, VA2FSQ
44