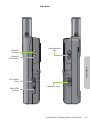
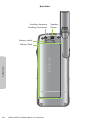
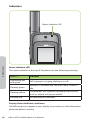
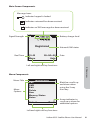
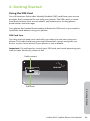
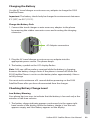
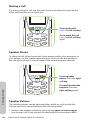
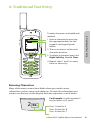
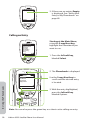
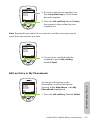
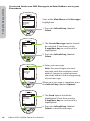
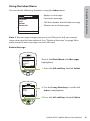
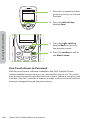
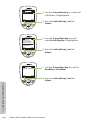
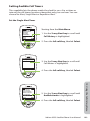
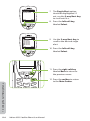
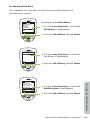
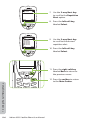
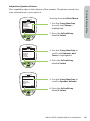
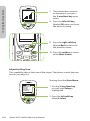
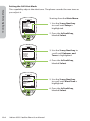
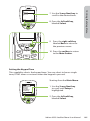
1
Iridium 9555
Satellite Phone
User Manual
9555 Satellite Phone
User’s Manual
web: www.iridium.com
email: [email protected]
toll free: +1.866.947.4348
phone: +1.480.752.5155
© Copyright 2009 Iridium Communications, Inc. All rights reserved. (version H2UG1002)
ii
Iridium 9555 Satellite Phone User Manual
Legal Notices
This User Manual provides user information and is provided “as is.” Iridium and its affiliated
companies, directors, officers, employees, agents, trustees or consultants (“Iridium”) assume no
responsibility for any typographical, technical, content or other inaccuracies in this User Manual.
Iridium reserves the right to revise this User Manual or withdraw it at any time without prior
notice. You can find the current version of this 9555 Satellite Phone User Guide at
www.iridium9555.com.
IRIDIUM MAKES NO REPRESENTATIONS, GUARANTEES, CONDITIONS OR WARRANTIES, EITHER
EXPRESS OR IMPLIED, INCLUDING WITHOUT LIMITATION, ANY IMPLIED REPRESENTATIONS,
GUARANTEES, CONDITIONS OR WARRANTIES OF MERCHANTABILITY AND FITNESS FOR A
PARTICULAR PURPOSE, NON-INFRINGEMENT, SATISFACTORY QUALITY, NON-INTERFERENCE,
ACCURACY OF INFORMATIONAL CONTENT, OR ARISING FROM A COURSE OF DEALING, LAW,
USAGE, OR TRADE PRACTICE, USE, OR RELATED TO THE PERFORMANCE OR NONPERFORMANCE
OF ANY PRODUCTS, ACCESSORIES, FACILITIES, SERVICES OR USER INFORMATION, EXCEPT
AS EXPRESSLY STATED IN THIS USER MANUAL. ANY OTHER STANDARDS OF PERFORMANCE,
GUARANTEES, CONDITIONS AND WARRANTIES ARE HEREBY EXPRESSLY EXCLUDED AND
DISCLAIMED TO THE FULLEST EXTENT PERMITTED BY LAW. THIS DISCLAIMER AND EXCLUSION
SHALL APPLY EVEN IF THE EXPRESS LIMITED WARRANTY CONTAINED IN THIS USER MANUAL
FAILS OF ITS ESSENTIAL PURPOSE. FURTHER, THIS LIMITED WARRANTY COVERS THE 9555
SATELLITE PHONE (INCLUDING HARDWARE, SOFTWARE AND/OR FIRMWARE, BUT EXCLUDING
LEATHER CASE) AND ACCESSORIES ONLY, AND NO WARRANTY IS MADE AS TO USER
INFORMATION AND/OR COVERAGE, AVAILABILITY OR GRADE OF SERVICE PROVIDED BY IRIDIUM
SEPARATELY FOR IRIDIUM SATELLITE SERVICES.
IN NO EVENT SHALL IRIDIUM BE LIABLE, WHETHER IN CONTRACT OR TORT OR ANY OTHER
LEGAL THEORY, INCLUDING WITHOUT LIMITATION STRICT LIABILITY, GROSS NEGLIGENCE OR
NEGLIGENCE, FOR ANY DAMAGES IN EXCESS OF THE PURCHASE PRICE OF THE 9555 SATELLITE
PHONE (INCLUDING HARDWARE, SOFTWARE AND/OR FIRMWARE) AND/OR ACCESSORIES AND/
OR THE COST OF IRIDIUM SATELLITE SERVICES PROVIDED, INCLUDING ANY DIRECT, INDIRECT,
INCIDENTAL, SPECIAL OR CONSEQUENTIAL DAMAGES OF ANY KIND, OR LOSS OF REVENUE OR
PROFITS, LOSS OF BUSINESS, LOSS OF PRIVACY, LOSS OF USE, LOSS OF TIME OR INCONVENIENCE,
LOSS OF INFORMATION OR DATA, SOFTWARE OR APPLICATIONS OR OTHER FINANCIAL
LOSS CAUSED BY THE 9555 SATELLITE PHONE (INCLUDING HARDWARE, SOFTWARE AND/OR
FIRMWARE) AND/OR ACCESSORIES AND/OR THE IRIDIUM SATELLITE SERVICES, OR ARISING OUT
OF OR IN CONNECTION WITH THE ABILITY OR INABILITY TO USE THE 9555 SATELLITE PHONE
(INCLUDING HARDWARE, SOFTWARE AND/OR FIRMWARE) AND/OR ACCESSORIES AND/OR THE
IRIDIUM SATELLITE SERVICES TO THE FULLEST EXTENT THESE DAMAGES MAY BE DISCLAIMED BY
LAW AND WHETHER ADVISED OF THE POSSIBILITIES OF SUCH DAMAGES.
Please refer to Chapter 17 of this User Manual for Limited Warranty, Product and Satellite Service
Terms and Warranty Support, Conditions of Use and Software License.
Third Party Information
This User Manual might refer to third party sources of information, hardware or software,
products or services and/or third party web sites (“third party information”). Iridium does not
control, and is not responsible for, any third party information, including without limitation the
content, accuracy, copyright compliance, compatibility, performance, trustworthiness, legality,
decency, links, or any other aspect of third party information. The inclusion of such third party
information does not imply endorsement by Iridium of the third party information. ANY THIRD
PARTY INFORMATION THAT IS PROVIDED WITH IRIDIUM’S FACILITIES, SERVICES, PRODUCTS OR
USER INFORMATION IS PROVIDED “AS IS.’’ IRIDIUM MAKES NO REPRESENTATIONS, GUARANTEES
OR WARRANTIES IN RELATION TO THIRD PARTY INFORMATION AND IRIDIUM SHALL NOT BE
LIABLE FOR ANY LOSSES, DAMAGES, LIABILITIES, JUDGMENTS, FINES, AMOUNTS PAID IN
SETTLEMENT, EXPENSES OR COSTS OF DEFENSE SUSTAINED IN RELATION TO ANY SUCH THIRD
PARTY INFORMATION.
Iridium 9555 Satellite Phone User Manual
iii
Intellectual Property, Trade Secret, Proprietary or Copyrighted Information
To protect Iridium proprietary and confidential information and/or trade secrets, this User
Manual may describe some aspects of Iridium technology in generalized terms. Iridium
products may include copyrighted Iridium and third party software. Any such copyrighted
software contained in Iridium products may not be modified, reverse engineered, distributed or
reproduced in any manner to the extent provided by law. The purchase of any Iridium products
shall not be deemed to grant either directly or by implication or otherwise, any license under
copyrights, patents, or patent applications of Iridium or any third party software provider,
except for the normal, nonexclusive, royalty free license to use that arises by operation of law
in the sale of a product. Please refer to Chapter 18 of this User Manual for Limited Warranty,
Product and Satellite Service Terms and Warranty Support, Conditions of Use and Software
License.
Content Copyright
You are exclusively responsible for the use of the 9555 Satellite Phone, including proper use
of third party copyrighted materials. If you violate these terms you agree to defend, indemnify
and hold Iridium harmless with respect to any claims or actions by third parties related to your
improper use of copyrighted materials and to pay all costs, damages, fines and other amounts
incurred by Iridium, or on its behalf, in the defense of any such claims or actions.
iv
Iridium 9555 Satellite Phone User Manual
Contents
1: Introduction ...........................................................................................1
2: Important Safety Information ..............................................................3
Safety and Warning Icons ...........................................................................................3
Exposure to Radio Frequency Signals ....................................................................4
Specific Absorption Rate Data ..................................................................................4
Batteries ............................................................................................................................5
Battery Charging .......................................................................................................6
Battery Disposal ........................................................................................................7
Emergency Calling ........................................................................................................7
Antenna Care ..................................................................................................................8
Driving and Operation of Other Motor Vehicles ................................................8
Posted Facilities .........................................................................................................8
Blasting Areas .................................................................................................................9
Potential Explosive Atmospheres ............................................................................9
Electronic Devices .........................................................................................................9
Product Operation....................................................................................................9
Radio Interference ................................................................................................. 10
Implantable Medical Devices ............................................................................ 10
Persons with pacemakers: .................................................................................. 10
Hearing Aids ............................................................................................................ 11
Other Medical Devices ......................................................................................... 11
Aircraft .......................................................................................................................... 11
Vehicles .......................................................................................................................... 11
Vehicles Equipped with an Air Bag.................................................................. 11
Adult Use Only ............................................................................................................. 12
Glass Parts ..................................................................................................................... 12
Extended Exposure to Loud Noise ....................................................................... 12
Seizures and Blackouts ............................................................................................. 12
Repetitive Motion ....................................................................................................... 12
3: 9555 Satellite Phone Overview ..........................................................13
Guide Overview .......................................................................................................... 13
Phone Overview ......................................................................................................... 14
Front View................................................................................................................. 14
Side View................................................................................................................... 15
Back View .................................................................................................................. 16
Accessories.................................................................................................................... 17
AC Travel Charger and International Plug Kit .............................................. 17
Iridium 9555 Satellite Phone User Manual
v
Headset ..................................................................................................................... 18
Auto Accessory Adaptor...................................................................................... 18
To install the Antenna Adaptor......................................................................... 19
Auxiliary Antenna Adaptor................................................................................. 19
Indicators ....................................................................................................................... 20
Status Indicator LED.............................................................................................. 20
Display Status Indicators & Icons ..................................................................... 20
Main Screen Components ....................................................................................... 21
Menu Components .................................................................................................... 21
4: Getting Started ....................................................................................23
Using the SIM Card..................................................................................................... 23
SIM Card Care .......................................................................................................... 23
Insert the SIM Card ................................................................................................ 24
Remove the SIM Card ........................................................................................... 24
Battery Pack Information ......................................................................................... 25
Battery Charging .................................................................................................... 26
Battery Disposal ..................................................................................................... 26
Remove and Install the Battery Pack ................................................................... 27
To Remove the Battery Pack .............................................................................. 27
To Install the Battery Pack................................................................................... 28
Charging the Battery ................................................................................................. 29
Charge the Battery Pack ...................................................................................... 29
Checking Battery Charge Level ............................................................................. 29
Low Battery Warning ............................................................................................ 29
Start-up Procedure..................................................................................................... 30
Power on Message ..................................................................................................... 30
Phone Operation ........................................................................................................ 31
Normal Operation.................................................................................................. 31
Tips on Efficient Operation................................................................................. 31
Placing a Call ................................................................................................................ 32
Before you place a call: ........................................................................................ 32
Dial the Number ..................................................................................................... 32
End a Call .................................................................................................................. 35
Re-dial Last Number Called ............................................................................... 35
Receiving a Call ........................................................................................................... 35
Before you receive a call: ..................................................................................... 35
Receiving a call with the Antenna Extended ............................................... 36
Answering the call with the Antenna Extended......................................... 37
Receiving a Call with the Antenna Stowed .................................................. 38
Muting a Call ................................................................................................................ 40
Speaker Phone............................................................................................................. 40
vi
Iridium 9555 Satellite Phone User Manual
Speaker Volume .......................................................................................................... 40
Ringer Volume ............................................................................................................. 41
Unanswered Calls ....................................................................................................... 42
Messages from Missed Calls .............................................................................. 42
Locking and Unlocking the Keypad..................................................................... 43
Unlocking the Keypad ......................................................................................... 44
5: Using Menus and Keys.........................................................................45
Using the Keys ............................................................................................................. 45
The Soft Keys ........................................................................................................... 45
The 2-way Navi-key ............................................................................................... 45
The Keypad .............................................................................................................. 46
Using the Menus ......................................................................................................... 46
To Access the Main Menu ................................................................................... 46
To Access Main Menu Options .......................................................................... 47
To Return to a Menu ............................................................................................. 48
Entering Characters ................................................................................................... 48
6: Traditional Text Entry ..........................................................................51
Entering Characters ................................................................................................... 51
Keypad Guide.......................................................................................................... 52
Entering Punctuation ........................................................................................... 53
Entering Numbers and Symbols into Text .................................................... 54
7: Predictive Text Entry ...........................................................................57
LetterWise Text mode........................................................................................... 60
WordWise Text mode............................................................................................ 62
Digit mode (123) .................................................................................................... 64
Punctuation mode (#?@)..................................................................................... 64
8: Using the Phonebooks ........................................................................67
Organizing My Phonebook ..................................................................................... 67
Locating My Phonebook .......................................................................................... 67
About the My Phonebook Menu .......................................................................... 68
Add a New Entry to My Phonebook .................................................................... 69
Locating Entries........................................................................................................... 71
Calling an Entry ........................................................................................................... 72
Using the Short Message Service (SMS) Menu ................................................ 74
Sending an SMS Message........................................................................................ 75
Adding an SMS Message.......................................................................................... 76
Edit an Entry in My Phonebook ............................................................................. 77
Delete an Entry ............................................................................................................ 79
Viewing Memory Status ........................................................................................... 81
Iridium 9555 Satellite Phone User Manual
vii
Adding Notes to a Phonebook Entry................................................................... 82
Restricted Phonebook .............................................................................................. 83
9: Using the Messages Menu ..................................................................85
Locating the Messages Menu ................................................................................ 85
Create and Send a new SMS Message
to an Email Address not in your Phonebook ............................................... 86
Create and Send a new SMS Message
to an Email Address in My Phonebook .......................................................... 88
About SMS Messaging .............................................................................................. 90
Using the Inbox Menu .............................................................................................. 91
Read a Message ...................................................................................................... 91
Reply to Sender ...................................................................................................... 92
Forward a Received Message ............................................................................ 93
Call a Number from a Received Message ...................................................... 96
Delete a Message................................................................................................... 96
Using the Drafts Menu.............................................................................................. 98
Using the Settings Menu .......................................................................................101
Enter Service Center Number..........................................................................101
Set Expiry Period ..................................................................................................102
Select Delivery Reports .....................................................................................104
10: Using the Voicemail Menu ............................................................. 105
Locating the Voicemail Menu ..............................................................................105
About the Voicemail Menu ...................................................................................105
Voicemail Notification.............................................................................................106
Check Your Voicemail ..............................................................................................106
Store Your Voicemail Number ..............................................................................107
One-Touch Access to Voicemail...........................................................................108
11: Using the Data Modem Menu ........................................................ 109
Locating the Data Modem Menu........................................................................109
12: Using the Call History Menu .......................................................... 111
Locating the Call History Menu ...........................................................................111
About the Call History Menu ................................................................................111
Using the Call Log Menu ........................................................................................112
View Most Recent Received Calls...................................................................112
View Missed Calls .................................................................................................113
View Most Recent Dialed Calls ........................................................................114
Using the Call Meters Menu..................................................................................116
Show the Time of Last Call................................................................................116
Show Total Time for All Calls ............................................................................117
viii
Iridium 9555 Satellite Phone User Manual
Reset all Timers .....................................................................................................118
Showing the Lifetime Call Timer ....................................................................120
Showing the In-call Display .............................................................................121
Setting Audible Call Timers ...................................................................................123
Set the Single Alert Timer .................................................................................123
Set the Repetitive Alert......................................................................................125
13: Using the Setup Menu .................................................................... 127
Locating the Setup Menu ......................................................................................127
About the Setup Menu ...........................................................................................127
Setting Call Options.................................................................................................128
Setting Volumes and Tones...................................................................................129
Adjust the Ringer Volume .................................................................................129
Adjust the Speaker Volume ..............................................................................131
Adjust the Ring Tone ..........................................................................................132
Setting the Call Alert Mode..............................................................................134
Setting the Keypad Tone ...................................................................................135
Set the Phone to Ring and /or Vibrate .........................................................137
Time and Date Settings ..........................................................................................138
Select the Time Zone ..........................................................................................138
Select the Time Format ......................................................................................140
Select the Date Format ......................................................................................141
Selecting the Display Language .........................................................................142
Setting Backlights.....................................................................................................144
Setting Contrast ........................................................................................................145
Using the Key Setup Menu....................................................................................146
Setup the Convenience Key Function ..........................................................146
Setup the Right Soft Key Function ................................................................147
Set Number Entry Prefix ....................................................................................148
View Phone Information ...................................................................................149
Reset Phone Options to Factory Defaults ...................................................150
14: Using the Security Menu ................................................................ 153
Locating the Security Menu..................................................................................153
About the Security Menu ......................................................................................154
Locking and Unlocking Your Phone ..................................................................154
Enable or Disable the SIM lock ............................................................................155
Using the Change PIN Menu ................................................................................157
Change the Phone PIN Code ...........................................................................157
Change the SIM PIN Code.................................................................................159
Change the SIM Card PIN2 Code ....................................................................161
Call Barring PIN .....................................................................................................163
Iridium 9555 Satellite Phone User Manual
ix
15: Troubleshooting ............................................................................. 165
16: Certification and Compliance Information ................................... 169
Export Compliance ..................................................................................................169
Standards Compliance Information...................................................................169
FCC Compliance ...................................................................................................169
EU Regulatory Conformity................................................................................169
Canada Regulatory Conformity ......................................................................169
17: Limited Warranty, Product and Satellite Service Terms, Warranty
Support, and Software License ........................................................... 171
Exclusions ...............................................................................................................172
Limitations of Warranty/Local Laws ..............................................................173
Conditions of Use and Limitations of Liability. .........................................174
Warranty Claim Process .....................................................................................176
SOFTWARE LICENSE ............................................................................................177
x
Iridium 9555 Satellite Phone User Manual
1: Introduction
Thank you for purchasing the state of the art Iridium 9555 Satellite Phone.
Important: Read this entire manual, including the safety information in
Chapter 2 before using the 9555 Satellite Phone.
1: Introduction
This User Manual contains the procedures for the safe operation of the
satellite phone and the available facilities.
Related Documents
The following Iridium product documentation is available to help you:
• Iridium 9555 Satellite Phone Specification Sheet
• Iridium 9555 Satellite Phone Quick Start Guide
Refer to www.iridium9555.com for your copies.
Iridium 9555 Satellite Phone User Manual
1
1: Introduction
2
Iridium 9555 Satellite Phone User Manual
2: Important Safety Information
Important: Read this entire chapter, before using the 9555 Satellite Phone.
Safety and Warning Icons
The following conventions are used in this User Manual.
Caution!
Care must be taken. Failure to follow directions carefully
could result in damage to equipment.
Before doing this task, be sure to familiarize yourself
with appropriate safety practices, personal protective
equipment and have a plan in case of accident.
2: Safety
Warning!
Failure to comply with this warning could result in
serious damage to life, limb or property.
Do not let your battery, charger, or satellite phone come
in contact with water.
Risk of explosion.
High heat source. Burn risk.
Do not dispose in trash.
Do not dispose of your battery in a fire.
Iridium 9555 Satellite Phone User Manual
3
Harmful noise.
Exposure to Radio Frequency Signals
Your Iridium 9555 Satellite Phone is a low power radio transmitter and
receiver. When it is ON, it receives and also sends out radio frequency
(RF) signals. Your 9555 Satellite Phone is designed to comply with local
regulatory requirements in your country concerning the exposure of
human beings to RF frequency.
2: Safety
International agencies have set standards and recommendations for the
protection of public exposure to RF electromagnetic energy.
• International Commission on Non- Ionizing Radiation Protection
(ICNIRP)
• Verband Deutscher Elektrotechniker (VDE)
• United States Federal Communications Commission (FCC), Radio
Frequency Exposure Guidelines
• National Radiological Protection Board of the United Kingdom
• American National Standards Institute (ANSI) IEEE. C95. 1-1992
• National Council on Radiation Protection and Measurements (NCRP).
Report 86
• Department of Health and Welfare Canada. Safety Code 6
The design of your phone complies with these standards when used as
described under “Phone Operation” on page 31.
This product is compliant with Industry Canada RSS-102 for RF Exposure.
Refer to “Specific Absorption Rate Data” on pages 4-5.
Specific Absorption Rate Data
This Iridium 9555 Satellite Phone meets international standards for exposure
to radio waves.
Your satellite phone is designed and manufactured not to exceed limits
for exposure to radio frequency (RF) energy. These limits are part of
comprehensive guidelines and established permitted levels of RF energy
for the general population. The guidelines are based on standards that
were developed by independent scientific organizations through periodic
4
Iridium 9555 Satellite Phone User Manual
and thorough evaluation of scientific studies. The guidelines include a
substantial safety margin designed to assure the safety of all persons,
regardless of age and health.
The highest SAR level recorded from this product was .576 W/Kg which
was below the uncontrolled (i.e., general population) limit. While there
may be differences between the SAR levels of various phones and at
various positions, they all meet the governmental requirements.
2: Safety
The exposure standard for mobile phones employs a unit of measurement
known as the Specific Absorption Rate, or SAR. Under the guidelines
for this model, the SAR limit is 1.6 W/Kg. Tests for SAR were conducted
in accordance with the European Committee for Electrotechnical
Standardization (CENELEC) and FCC testing procedures using standard
operating positions with the phone transmitting at its highest certified
power level in all tested frequency bands. Although the SAR is determined
at the highest certified power level, the actual SAR of the phone while
operating can be below the maximum value. Before a phone model is
available for sale to the public, it is tested to confirm compliance with
the guidelines. The tests are performed in positions and locations (e.g.,
at the ear and worn on the body) that conform to a uniform testing
methodology determined by an expert standards body.
PLEASE NOTE THAT MODIFICATIONS TO THIS PRODUCT MODEL COULD
CAUSE DIFFERENCES IN THE SAR VALUE FOR LATER PRODUCTS; IN ALL
CASES, PRODUCTS ARE DESIGNED TO BE WITHIN THE GUIDELINES.
Batteries
All batteries may cause serious injury or property damage, particularly if
handled improperly or used after damage.
Warning!
Improper treatment or use of batteries may present a danger of
fire, explosion, leakage, or other hazard.
Make sure to follow all of the following safety guidelines:
• Do not disassemble, crush, puncture, shred or otherwise attempt to
change the form of the battery.
• Do not let the phone or battery come in contact with water.
Water can lead to corrosion of the phone’s circuits.
Iridium 9555 Satellite Phone User Manual
5
• Do not allow the battery to touch metal objects. Contact
with metal objects can cause the battery to heat and possibly
explode.
• Do not place your battery near a heat source. Excessive heat can
damage the phone or battery by causing it to swell, leak or malfunction.
Do not dry a wet or damp battery with an appliance or heat source,
such as a hair dryer or microwave oven. Do not leave your phone in an
automobile or other vehicle with high temperatures.
• Do not drop the battery or the phone because the impact can damage
them.
2: Safety
• Do not dispose of batteries in a fire, because they may
explode.
• Contact your service provider or Iridium if your phone or battery has
been damaged from dropping or high temperatures.
WARNING!
Use of non-Iridium batteries or chargers may present a risk
of fire, explosion, leakage or other hazard.
Important
Use only Iridium original products for safety and quality
assurance. Iridium’s warranty does not cover damage
caused by use of non-Iridium batteries.
Battery Charging
Batteries may be charged and discharged many times, but eventually they
wear out.
Important: Follow these guidelines when charging your battery:
• Keep the battery at room temperature. Never expose batteries to
temperatures below 0°C (32°F) or above 45°C (113°F) when charging.
• New batteries are not fully charged and may take more time to charge.
6
Iridium 9555 Satellite Phone User Manual
Battery Disposal
Proper battery disposal is not only important for safety but
also benefits the environment. Consumers should recycle
used batteries and telephones in accordance with applicable
national, state or local laws and regulations.
Under EU requirements, all electrical and electronic products
must be taken to separate collection at the end of their working
life and must not be disposed of as unsorted municipal waste.
Do not dispose of your battery in a fire.
Emergency Calling
2: Safety
CHECK WITH YOUR SERVICE PROVIDER FOR LOCAL EMERGENCY
NUMBERS (full international access code, country code, and phone
number) for all locations outside the United States and mainland Australia.
Iridium currently only supports in-country emergency call routing to 911
within the United States and to Triple Zero (000) or 112 within mainland
Australia. Outside of the United States and mainland Australia, calls to
emergency access numbers such as 999, are not able to be made on
the Iridium system. When placing a call to an emergency operator or
local public safety answering point, always verbally report your location
to assist first responders with indentifying your location to provide
assistance. Caller location identification is not automatically transmitted
on the Iridium system.
Iridium does not guarantee network availability at all times due to
situations where the network is unavailable due to satellite availability,
terrain, weather, or other conditions that may prevent an emergency call
from being placed.
EMERGENCY CALLS WITHIN THE UNITED STATES: Power on the 9555
Satellite Phone, extend the antenna towards the open sky, confirm proper
registration & signal strength on the display, dial 911 and press the green
send key. Verbally report the situation and your location to the operator
for assistance. The Iridium service does not provide enhanced 911 service
which automatically identifies the caller location.
EMERGENCY CALLS WITH MAINLAND AUSTRALIA: Power on the 9555
Satellite Phone, extend the antenna towards the open sky, confirm proper
registration & signal strength on display, dial Triple Zero (000) or 112
depending upon your service provider’s instructions, and press the green
send key. Verbally report the situation and your location to the operator
Iridium 9555 Satellite Phone User Manual
7
for assistance. The Iridium service does not provide enhanced emergency
calling service which automatically identifies the caller location.
EMERGENCY CALLS IN ALL OTHER LOCATIONS: You will need to obtain
and dial the full international access code, country code, and phone
number for the local fire, police, or ambulance depending upon the nature
of the emergency. Power on the 9555 Satellite Phone, extend the antenna
toward the open sky, confirm proper registration & signal strength on
the display, dial the local emergency number obtained from your service
provider or local advisor and press the green send key. Verbally report
the situation and your location to the operator for assistance. The Iridium
service does not provide enhanced emergency calling service which
automatically identifies the caller location.
2: Safety
Antenna Care
Use only the supplied or an approved replacement antenna. Unauthorized
antennas, modifications, or attachments could damage the phone and
may violate government regulations. When using remote mount antenna,
mount antenna at least 20 cm away from the user. Also when using a
remote mount antenna in order to reduce potential radio interference to
other users, the antenna type and its gain should be so chosen such that
the equivalent isotropically radiated power (EIRP) is not more than that
permitted for successful communication.
Driving and Operation of Other Motor Vehicles
The use of any wireless device, including a satellite telephone, may cause
distraction. Discontinue a call if you cannot concentrate on driving. Check
the laws and regulations on the use of wireless telephones in the areas
where you drive. Always obey them. Many local governments prohibit the
use of mobile telephones while driving. Observe the following guidelines
when using your phone while driving:
• Give full attention to driving—driving safely is your first responsibility.
• Use hands-free phone operation, if available.
• Pull off the road and park safely before making or answering a call.
Posted Facilities
Turn your phone OFF in any facility where posted notices so require.
8
Iridium 9555 Satellite Phone User Manual
Blasting Areas
To avoid interfering with blasting operations, turn your phone OFF when
in a “blasting area” or in areas posted: “Turn off two-way radio.” Obey all
signs and instructions.
Potential Explosive Atmospheres
Turn your phone OFF and do not remove, install or charge your
battery when you are in any area with a potentially explosive
atmosphere. Obey all signs and instructions. Sparks from your
battery in such areas could cause an explosion or fire resulting
in bodily injury or even death.
2: Safety
Areas with a potentially explosive atmosphere are often but
not always clearly marked. They include, but are not limited to:
fueling areas such as gasoline stations; below deck on boats;
fuel or chemical transfer or storage facilities; areas where fuel
odors are present (for example, if a gas/propane leak occurs in
an automobile or home); areas where the air contains chemicals
or particles, such as grain, dust, or metal powders; and any
other area where you normally would be advised to turn off
your vehicle engine.
Electronic Devices
Most electronic equipment is subject to interference from RF energy from
external sources if inadequately shielded. In some circumstances your
mobile device may cause interference with other devices. Turn off your
phone in any location where posted notices instruct you to do so.
For optimal performance and to be sure that exposure to RF energy does
not exceed guidelines set forth in the relevant standards (discussed in
“Exposure to Radio Frequency Signals” on page 4 and “Specific Absorption
Rate Data” on page 4), always follow the instructions and precautions.
Product Operation
If you wear the satellite phone on your body, always place it in an Iridium
leather case. Refer to www.iridium.com.
Using accessories not supplied by Iridium may cause your satellite phone
to exceed RF energy exposure guidelines.
Iridium 9555 Satellite Phone User Manual
9
Radio Interference
2: Safety
Your satellite phone contains digital circuits for the display of data and
connection to a personal computer. Emissions from these circuits can
cause radio interference. With respect to such circuits, this device complies
with part 15 of the FCC Rules. Operation is subject to the following two
conditions: (1) This device may not cause harmful interference, and (2) this
device must accept any interference received, including interference that
may cause undesired operation. This statement does not apply to digital
circuits used only to enable the operation of the transmitter in this satellite
phone. The receiver in this phone is subject to the condition that radio
emissions from it not cause harmful interference.
This equipment has been tested and found to comply with the limits for a
Class B digital device, pursuant to Part 15 of the FCC Rules. These limits are
designed to provide reasonable protection against harmful interference in
a residential installation. This equipment generates, uses and can radiate
radio frequency energy and, if not installed and used in accordance with
the instructions, may cause harmful interference to radio communications.
However, there is no guarantee that interference will not occur in a
particular installation. If this equipment does cause harmful interference
to radio or television reception, which can be determined by turning
the equipment off and on, the user is encouraged to try to correct the
interference by one or more of the following measures:
• Reorient or relocate the receiving antenna.
• Increase the separation between the equipment and receiver.
• Connect the equipment into an outlet on a circuit different from that to
which the receiver is connected.
• Consult the dealer or an experienced radio/TV technician for help.
Implantable Medical Devices
If you have an implantable medical device such as a pacemaker or
defibrillator, the Health Industry Manufacturers Association recommends
that a minimum separation of six inches (6”) be maintained between a
handheld wireless phone and a pacemaker to avoid potential interference
with the pacemaker. These recommendations are consistent with the
independent research by and recommendations of Wireless Technology
Research.
Persons with pacemakers:
• should ALWAYS keep the phone more than six inches from their
pacemaker when the phone is turned ON.
• should not carry the phone in a breast pocket.
10
Iridium 9555 Satellite Phone User Manual
• should use the ear opposite the pacemaker to minimize the potential
for interference.
• should turn the phone OFF immediately if there is any reason to suspect
that interference is taking place.
Hearing Aids
Some digital wireless phones may interfere with some hearing aids. In
the event of such interference, you may want to consult your hearing aid
manufacturer to discuss alternatives.
Other Medical Devices
Turn your phone OFF in health care facilities when any regulations posted
in these areas instruct you to do so. Hospitals or health care facilities may
be using equipment that could be sensitive to external RF energy.
2: Safety
If you use any other personal medical device, consult the manufacturer
of your device to determine if it is adequately shielded from external
RF energy. Consult your physician to determine compatibility with your
medical device.
Aircraft
Airline regulations prohibit using your phone while in the air. Check and
comply with the policy of your airline regarding the use of your phone
while the aircraft is on the ground.
Switch OFF your phone before boarding an aircraft.
Vehicles
RF signals may affect improperly installed or inadequately shielded
electronic systems in motor vehicles. Check with the manufacturer or
its representative regarding your vehicle. You should also consult the
manufacturer of any equipment that has been added to your vehicle.
Vehicles Equipped with an Air Bag
An air bag inflates with great force. Do NOT place objects, including
installed or portable wireless equipment, in the area over the air bag or in
the air bag deployment area. If in-vehicle wireless equipment is improperly
installed, serious injury could result.
Iridium 9555 Satellite Phone User Manual
11
Adult Use Only
Keep your phone and accessories away from children. These products are
not toys and may be hazardous to small children. For example:
• A choking hazard may exist for small, detachable parts.
• Improper use could result in loud sounds, causing hearing injury.
• Improperly handled batteries could over heat and cause a burn.
Glass Parts
2: Safety
Some parts of your satellite phone may be made of glass. This glass could
break if the product is dropped on a hard surface or receives a substantial
impact. If glass breaks do not touch or attempt to remove. Stop using the
phone until the glass is replaced by a qualified service center.
Extended Exposure to Loud Noise
Exposure to loud noise from any source for extended periods
of time may affect your hearing. The louder the volume sound
level, the less exposure is required to affect your hearing. To
protect your hearing:
• Limit the amount of time you use headsets or headphones at high
volume.
• Avoiding turning up the volume to block out noisy surroundings.
• Turn the volume down if you cannot hear people speaking near you.
Seizures and Blackouts
Some people may be susceptible to epileptic seizures or blackouts when
exposed to flashing lights, such as when playing video games. If you or
your family members have a history of such seizures or blackouts, please
consult your physician before enabling a flashing lights feature on your
phone. Discontinue use or consult a physician if any of the following
symptoms occur: convulsion, eye or muscle twitching, loss of awareness,
involuntary movements or disorientation.
Repetitive Motion
When you repeatedly perform actions such as pressing keys or entering
finger-written characters, you may experience occasional discomfort
in your hands, arms, shoulders, neck or other parts of your body. If you
continue to have discomfort during or after such use, stop use and see a
physician.
12
Iridium 9555 Satellite Phone User Manual
3: 9555 Satellite Phone Overview
Guide Overview
This chapter provides a complete tour of the 9555 Satellite Phone. You will
discover all the features and components that you need to operate your
phone to its full potential.
For ease of use, the chapters in this manual are divided by menu options.
Each section of the chapter is then divided by the same sub-menu options
as your phone. Just follow the sequence of menus on your phone, the
manual will follow along, making the startup process a simple one.
3: Overview
1
4 GHI
7 PQRS
*
2 ABC
5 JKL
8 TUV
0+
3 DEF
6 MNO
9 WXYZ
#
Iridium 9555 Satellite Phone User Manual
13
Phone Overview
Front View
Earpiece
On/Off Button
Status Indicator
LED
Convenience
Key
3: Overview
Volume Keys
Display
Left Soft Key
Right Soft Key
2-way Navi-key
Red Key
Green Key
1
2 ABC
4 GHI
7 PQRS
5 JKL
8 TUV
*
0+
3 DEF
6 MNO
Key pad
9 WXYZ
#
Microphone
14
Iridium 9555 Satellite Phone User Manual
Side View
Volume
Up Key
Convenience
Key
Volume
Down Key
3: Overview
DC Power
Jack
Headset Jack
Mini USB
Socket
Iridium 9555 Satellite Phone User Manual
15
Back View
Auxiliary Antenna
Docking Connector
Battery Latch
3: Overview
Battery Pack
16
Iridium 9555 Satellite Phone User Manual
Speaker
Phone
Accessories
AC Travel Charger and International Plug Kit
The AC Travel Charger and International Plug Kit provides rapid charge for
optimal performance.
• The battery must be installed when using the charger to power the
phone.
• Includes five international plug adapters for use in many countries
around the world.
3: Overview
• Can be used to power the phone when the battery is depleted.
• Allows you to use the 9555 Satellite Phone while recharging the battery.
The battery should not be allowed to discharge fully.
Iridium 9555 Satellite Phone User Manual
17
Headset
The convenient headset provides both an earphone and microphone
in one small piece for simple hands-free and private telephone
conversations. The headset plugs directly into the jack on the right side of
your phone.
3: Overview
Headset port
Auto Accessory Adaptor
The AC Travel Charger and International Plug Kit provide rapid charge for
optimal performance.
IRIDIUM
Accessory connector port
18
Iridium 9555 Satellite Phone User Manual
To install the Antenna Adaptor
1. Slide the phone into the
antenna adaptor.
2. Rotate until the back of the
phone meets the adaptor.
Press here
to snap
into place
Align
prong with
antenna
docking
connector
Auxiliary Antenna Adaptor
The Antenna Adapter allows you to connect your Iridium 9555
Satellite Phone to an external antenna. The adapter uses a
TNC female connector to attach to an antenna cable with
a TNC male connector. For a list of available accessory
options, visit www.iridium.com.
Iridium 9555 Satellite Phone User Manual
3: Overview
Note: Your phone was shipped with a plug protector for the antenna
connector. You must remove this prior to using the Antenna Adaptor.
19
Indicators
3: Overview
Status Indicator LED
Status Indicator LED
The status indicator at the top of the phone has the following meanings:
LED is ...
Indicates
Alternating red
and green
Call in progress; ringing, dialing or in call.
Flashing green
Network is available and SIM status okay. Phone is
idle.
Flashing yellow
SIM problem; this signifies a problem with the SIM,
such as; locked, missing or invalid.
Flashing red
No connection to network.
Display Status Indicators and Icons
The following icons appear in your display to provide you with information
about the phone’s activity.
20
Iridium 9555 Satellite Phone User Manual
Main Screen Components
Message Icons:
Indicates keypad is locked
Indicates voicemail has been received
Indicates an SMS message has been received
T
Signal Strength
Battery charge-level
Registered
15:40
Menu
Real Time
09-JUL-08
Help
Network/SIM status
Date
Left and right soft key functions
3: Overview
Menu Components
Menu Title
Menu
Options
Phonebook
Black bar scrolls up
and down when
using the 2-way
Navi-key
Call
SMS
Edit
Delete
New
Memory Status
Notes
Select
Back
Arrow indicates to
scroll up or down for
additional options
Left and right soft key functions
Iridium 9555 Satellite Phone User Manual
21
3: Overview
22
Iridium 9555 Satellite Phone User Manual
4: Getting Started
Using the SIM Card
You will receive a Subscriber Identity Module (SIM) card from your service
provider that is required for use with your phone. The SIM card is a smart
card that contains your service details and memory for storing phone
book entries and messages.
Your phone has limited functionality without the SIM card, so you want to
install the card before using your phone.
SIM Card Care
You may want to keep your card with you when you are not using your
phone. This helps keep your personal information secure and gives you
access to your service even if your phone is not available.
Important: Do not bend or scratch your SIM card, and avoid exposing your
card to static electricity, water or dirt.
Gold contact
IRIDIUM
SIM card
4: Getting Started
Iridium 9555 Satellite Phone User Manual
23
Insert the SIM Card
1. Remove the SIM card from the larger card.
2. Remove the battery as shown on page 27.
3. Slide the SIM card into the SIM card slot.
Follow the card orientation shown on the
decal. Be sure the gold contact is facing
down.
The card is held in place by a small retaining
clip.
SIM Decal
Retaining Clip
89881
69312
00249
4528
SIM Card
4: Getting Started
IR
24
Remove the SIM Card
Press down on the retaining clip and slide the SIM card out of the slot.
Iridium 9555 Satellite Phone User Manual
Battery Pack Information
All batteries may cause serious injury or property damage, particularly if
handled improperly or used after damage.
Warning!
Improper treatment or use of batteries may present a danger of
fire, explosion, leakage, or other hazard.
Make sure to follow all of the following safety guidelines:
• Do not disassemble, crush, puncture, shred or otherwise attempt to
change the form of the battery.
• Do not let the phone or battery come in contact with water.
Water can lead to corrosion of the phone’s circuits.
• Do not allow the battery to touch metal objects. Contact
with metal objects can cause the battery to heat and possibly
explode.
• Do not place your battery near a heat source. Excessive heat
can damage the phone or battery by causing it to swell, leak
or malfunction. Do not dry a wet or damp battery with an
appliance or heat source, such as a hair dryer or microwave
oven. Do not leave your phone in an automobile or other
vehicle with high temperatures.
• Do not drop the battery or the phone because the impact
can damage them.
• Do not dispose of batteries in a fire, because they may
explode.
• Contact your service provider or Iridium if your phone
or battery has been damaged from dropping or high
temperatures.
Use of non-Iridium batteries or chargers may present a risk
of fire, explosion, leakage or other hazard.
Important
Use only Iridium original products for safety and quality
assurance. Iridium’s warranty does not cover damage
caused by use of non-Iridium batteries.
Iridium 9555 Satellite Phone User Manual
4: Getting Started
WARNING!
25
Battery Charging
Batteries may be charged and discharged many times, but eventually they
wear out.
Important: Follow these guidelines when charging your battery:
• Keep your battery near room temperature. Never expose batteries to
temperatures below 0°C (32°F) or above 45°C (113°F) when charging.
• New batteries are not fully charged and may take more time to charge.
Battery Disposal
Proper battery disposal is not only important for safety but
also benefits the environment. Consumers should recycle
used batteries and telephones in accordance with applicable
national, state or local laws and regulations.
Under EU requirements, all electrical and electronic products
must be taken to separate collection at the end of their working
life and must not be disposed of as unsorted municipal waste.
4: Getting Started
Do not dispose of your battery in a fire.
26
Iridium 9555 Satellite Phone User Manual
Remove and Install the Battery Pack
The back panel of the phone is the battery pack. You need to remove the
battery pack to insert the SIM card or replace the battery.
To Remove the Battery Pack
1. Push the battery latch up.
The battery pack will release.
2. Lift the battery pack away from
the phone by pulling from the
side notch.
4: Getting Started
Iridium 9555 Satellite Phone User Manual
27
To Install the Battery Pack
1. Align the battery pack pegs
with the slots on the bottom
of the battery compartment.
2. Rotate the top end of the
battery pack into the 9555
Satellite Phone. Press the
battery until it is flush with
the case.
Note: The battery should click
into place and held securely by
the battery latch.
4: Getting Started
Battery pack pegs
28
Iridium 9555 Satellite Phone User Manual
Charging the Battery
Use the AC travel charger or auto accessory adapter to charge the 9555
Satellite Phone.
Important: The battery should only be charged in environments between
0°C (32°F) to 45°C (113°F).
Charge the Battery Pack
1. Connect the travel charger or auto accessory adapter to the phone
by removing the rubber connector cover and inserting the charging
connector.
AC Adapter connection
2. Plug the AC travel charger or auto accessory adapter into the
appropriate power source. The phone beeps.
3. The battery symbol on the LCD display flashes.
Note: Calls can still be made or received while the battery is charging;
however the battery charges faster if the phone is turned off. When the
9555 Satellite Phone is not in use the battery takes approximately 4 hours
to fully charge.
You must wait a minimum of 5 seconds before powering on the 9555
Satellite Phone after you have disconnected from the charger.
Low Battery Warning
Your phone has two ways to indicate that the battery is low and only a few
minutes of talk time remains:
1. The battery charge indicator appears continuously in the upper right
hand corner of the display. When the battery charge is low the icon
appears empty, and Low Battery appears on the display.
Iridium 9555 Satellite Phone User Manual
4: Getting Started
Checking Battery Charge Level
29
Battery icon
T
Low Battery
15:40
Menu
09-JUL-08
Help
2. A warning tone (two double beeps) sounds.
Note: To help maintain the best battery and phone performance, recharge
your battery as soon as possible after you receive the low battery warning.
Start-up Procedure
1. Insert your SIM card if necessary.
2. Turn the phone on by pressing
and holding the On/Off button
for 5 seconds.
4: Getting Started
When you turn your phone’s
power on, the display screen
goes through a short animated
sequence.
30
Power on Message
Once your phone is on, one of the following messages may appear.
Message
Directive
Bad Card
See Supplier. Your SIM card has been damaged or
incorrectly issued. Contact your service provider for
information.
Iridium 9555 Satellite Phone User Manual
Message
Directive
Check Card
The SIM card is damaged or inserted the wrong
way.
Denied
Your phone has seen a network, but has been
denied access.
SIM PIN
Enter the four- to eight-digit SIM card PIN code
provided by your service provider and press OK to
proceed. See “Using the Security Menu” on page
153, for more information about your SIM.
Invalid Account
Contact your service provider.
Phone PIN
The phone has been locked. To unlock the phone,
you must enter the correct Phone PIN number.
PIN Blocked
When the PIN number has been entered incorrectly
three times in a row, the phone automatically
blocks the PIN. To unblock the pin, enter the PUK1
code for the phone by entering **05* from the
main screen.
PIN 2 Blocked
When the PIN2 number has been entered
incorrectly three times in a row, the phone
automatically blocks the PIN.
To unblock the PIN2 enter the PUK2 code for the
phone by entering **052* from the main screen.
Registered
Your phone is now registered with the network.
Searching for
network...
The phone is attempting to establish
communications with the satellite network. This
message appears while your phone searches for a
network connection.
Phone Operation
Hold the phone as you would any other telephone. Fully extend the
antenna then rotate the antenna to either the left or right detent. The
antenna should be vertical to the ground and have a clear unobstructed
view of the sky.
4: Getting Started
Normal Operation
Tips on Efficient Operation
For your phone to operate most efficiently:
Iridium 9555 Satellite Phone User Manual
31
1. Keep your phone battery charged to ensure that the phone is ready for
use when needed.
2. Fully extend your antenna then rotate into position.
3. Make sure the antenna has a clear unobstructed view of the sky.
4. Do not touch the antenna unnecessarily when the phone is in use.
5. Contact with the antenna affects call quality and may cause the phone
to operate at a higher power level than otherwise needed.
6. Do not wear the phone on your body while making calls with the
headset accessory. Wearing the phone on the body can interfere
with proper phone operation, since the antenna requires a clear
unobstructed view of the sky to access the Iridium® satellite network.
7. Once you complete your call and are finished with the phone, return the
antenna to the center upright position and gently retract the antenna
before carrying or storing the phone between uses.
8. For backup, keep a written record of all important information stored on
your phone.
Placing a Call
Before you place a call:
1. The phone must be powered on.
2. SIM card inserted.
3. Phone is unlocked.
4. Have a clear direct view of the sky to be in contact with the network.
5. Antenna should be extended and pointed up towards the sky.
Dial the Number
4: Getting Started
As you enter a phone number, the digits are displayed on a single line that
scrolls across the display.
32
1. Enter the number using the key pad. As you begin entering digits, you
see Options displayed above the left soft key and Clear displayed
above the right soft key.
Iridium 9555 Satellite Phone User Manual
T
+ 1 888 555 1212
Options
Country code
Phone number
including area code
Clear
The phone number must be entered in international format: 00 or +
[country code] [phone number].
Note: All Iridium subscriber numbers begin with county code of 8816
unless an alternative access number has been issued by your service
provider.
T
Number:
+ 1 888 555 1212
Options
Clear
2. Press the green key.
Deploy the antenna
and make sure it is
oriented towards
the sky
Note: You receive this
message when the
antenna is not fully
extended from the
9555 Satellite Phone.
Iridium 9555 Satellite Phone User Manual
4: Getting Started
Alert
33
Calling
+18885551212
Mute
3. Calling followed
by the number
you dialed
appears in the
display.
Speaker
If the call does not connect, one of the following messages appears.
Message
Directive
Busy Try Later Or
Please Try Later
The phone is unable to access the network. Try
again in a few minutes
Could not
place call. No
connection to
the network
The phone is unable to access the network.
Restricted Area
The phone is unable to access the network. Move
to an area where calls are allowed.
Note: If you have disabled the timer, Connected display.
4. A timer keeps track
of the duration of
each call.
4: Getting Started
00:00:01
34
Select
Iridium 9555 Satellite Phone User Manual
Back
End a Call
T
Call ended
Press the red key.
Re-dial Last Number Called
T
Number:
+ 1 888 555 1212
Options
Clear
Press the green key
twice.
4: Getting Started
Receiving a Call
Before you receive a call:
1. The phone must be powered on.
2. A valid SIM card must be inserted.
3. Phone is unlocked.
4. The phone must be connected with the network.
Iridium 9555 Satellite Phone User Manual
35
There are two scenarios for receiving calls depending on the antenna
position:
1. Antenna extended
2. Antenna stowed; that is, in the down position.
Receiving a call with the Antenna Extended
1. Phone sounds
or vibrates.
2. Status indicator
alternates red
and green.
T
3. Phone displays
incoming call.
Incoming Call
Accept
Reject
Right soft key
Left soft key
Red key
4: Getting Started
1
36
4 GHI
7 PQRS
*∆
Iridium 9555 Satellite Phone User Manual
2 ABC
5 JKL
8 TUV
0+
3 DEF
6 MNO
9 WXYZ
#
«
Green key
Answering the call with the Antenna Extended
1. Extend the antenna directly up prior to
rotating left or right. When the antenna
is fully extended you see two lines at the
base of the antenna.
Antenna lines
T
3. Phone displays
Connected.
Connected
Speaker
Mute
1
4 GHI
7 PQRS
*∆
2 ABC
5 JKL
8 TUV
0+
3 DEF
6 MNO
9 WXYZ
#
«
2. Press the left
soft key or the
green key.
Mute is displayed
above the left soft
key and Speaker
is displayed above
the right soft key.
Message
Directive
Call Failed
The antenna is not properly positioned or the
network signal is not strong enough.
Iridium 9555 Satellite Phone User Manual
4: Getting Started
If the call does not connect properly, the following message appears:
37
Receiving a Call with the Antenna Stowed
1. The phone displays
the alert – or you’re
prompted to extend
the antenna.
T
2. The phone displays
Call Attempt.
Call Attempt
Antenna
lines
3. Extend the antenna
directly up prior to
rotating left or right.
When the antenna
is fully extended
you see two lines
at the base of the
antenna.
T
Incoming Call
4: Getting Started
Accept
1
4 GHI
7 PQRS
*∆
38
Reject
2 ABC
5 JKL
8 TUV
0+
Iridium 9555 Satellite Phone User Manual
3 DEF
6 MNO
9 WXYZ
#
«
4. After several
seconds, your
phone rings or
vibrates, and
displays Incoming
Call. Select
Accept, located
above the left soft
key, or Reject,
located above the
right soft key.
T
5. The phone displays
Connected.
Connected
Speaker
Mute
1
4 GHI
7 PQRS
*∆
2 ABC
5 JKL
8 TUV
0+
3 DEF
6 MNO
9 WXYZ
#
«
If the call does not connect properly, the following message appears:
Directive
Call Failed
The antenna is not properly positioned or the
network signal is not strong enough.
Iridium 9555 Satellite Phone User Manual
4: Getting Started
Message
39
Muting a Call
For privacy during a call, use the mute feature. You hear the party on the
other end, but they do not hear you.
To mute the call:
Press the left soft key.
1
4 GHI
2 ABC
5 JKL
3 DEF
To un-mute the call:
Press the left soft key
again.
6 MNO
Speaker Phone
To allow the call to be shared with other people within close proximity to
your phone, use the speaker phone feature. In this mode the speaker in
the rear of the phone is used instead of the normal earpiece/receiver.
To use speaker
phone: Press the right
soft key.
4: Getting Started
1
4 GHI
2 ABC
5 JKL
3 DEF
6 MNO
To switch back to the
earpiece: Press the
right soft key again.
Speaker Volume
The speaker volume can be adjusted either while on a call or with the
Volume and Tones menu located under the Setup menu.
1. Increase the speaker volume by pressing the upper volume control
key, during a call. Once you are satisfied with the volume press OK. If
40
Iridium 9555 Satellite Phone User Manual
you would like to cancel the change to the volume press Back.
2. Decrease the speaker volume by pressing the lower volume control
key, during a call.
As you press the keys, you hear the new volume level. The bar graph on
the display indicates the volume level; the higher the graph, the louder the
volume.
Bar graph for
speaker volume
Upper volume
control increases
speaker volume
Volume
Lower volume
control increases
speaker volume
OK
1
4 GHI
7 PQR
*∆
Back
2 ABC
5 KL
8 UVW
0+
3 DEF
6 MNO
9 XYZ
#
«
The ringer volume may be adjusted with the Volume and Tones menu
located under the Setup menu.
• Increase the ringer volume by pressing the upper volume control key.
4: Getting Started
Ringer Volume
• Decrease the ringer volume by pressing the lower volume control key.
Iridium 9555 Satellite Phone User Manual
41
• As you press the keys, you hear the new volume level. The bar graph on
the display indicates the volume level; the higher the graph, the louder
the volume.
Bar graph for
ringer volume
Upper volume
control increases
ringer volume
Volume
Lower volume
control increases
ringer volume
OK
1
2 ABC
4 GHI
7 PQR
*
Back
∆
5 KL
8 UVW
0+
3 DEF
6 MNO
9 XYZ
#
«
4: Getting Started
Unanswered Calls
If you are away from your phone or choose not to answer a call the screen
displays the number of missed calls.
Messages from Missed Calls
If you are not able to answer your phone, or are not connected to the
network, callers can leave you a voice message which can be accessed
from the voicemail system. When connected to the network, a message
icon appears on your screen indicating a new voicemail message.
For more information on retrieving messages, see “Using the Voicemail
Menu” on page 105.
42
Iridium 9555 Satellite Phone User Manual
Locking and Unlocking the Keypad
Keypad locked
Keypad locked
To prevent accidental phone usage
you can lock the keypad by:
1. Press the left soft key, labeled
Menu.
1
2 ABC
4 GHI
7 PQRS
*∆
5 JKL
8 TUV
0+
3 DEF
6 MNO
2. Press the * key to lock the
keypad. A message will flash
indicating the keypad is locked.
9 WXYZ
#
«
3. The Main Screen will now have a
lock symbol.
T
14-May-08
Menu
Help
4: Getting Started
16:28
Note: All keys with the exception of the power key are locked. You can
still answer an incoming call by pressing the green key or the left soft key
when the keypad is locked.
Iridium 9555 Satellite Phone User Manual
43
Unlocking the Keypad
Keypad Unlocked
Keypad Unlocked
Unlock
Help
1. Press the left soft key labeled
Unlock.
1
4 GHI
7 PQRS
5 JKL
8 TUV
0+
6 MNO
9 WXYZ
#
«
4: Getting Started
*∆
2 ABC
3 DEF
44
Iridium 9555 Satellite Phone User Manual
2. Press the * key. A message
flashes indicating the keypad is
unlocked, and the lock symbol
no longer appears on the main
screen.
5: Using Menus and Keys
Using the Keys
The Soft Keys
When you press the soft keys the function appears above the key on the
display screen. The function varies depending on the menu.
5: Using Menus and Keys
Many of the phones features are organized into lists of options called
menus. Use the phone keys to navigate these menus.
T
16:28
14-May-08
Menu
Help
Left soft key
Right soft key
The 2-way Navi-key
Press the 2-way Navi-key up to step through the options on a menu screen.
Menu
Securityk
Menu
My Phonebook
SIM Phonebook
Messages
Voicemail
Data Modem
Call History
Setup
Select
Back
Select
Back
2-way Navi-key
Important: When an arrow appears on the bottom of any menu screen it
indicates more options to follow. To see all options, you must continue to
press the 2-way Navi-key.
Iridium 9555 Satellite Phone User Manual
45
5: Using Menus and Keys
The Keypad
1
2 ABC
4 GHI
5 JKL
7 PQRS
8 TUV
*∆
0+
3 DEF
6 MNO
9 WXYZ
#
«
The numbered and
alphabetized keys
make up the Keypad.
Use the keys to enter
text, numbers and
punctuation marks
into various fields in
display screens. See
entering characters
on page 48 for more
information.
Using the Menus
To Access the Main Menu
T
16:28
14-May-08
Menu
Help
Starting from the
Main Screen:
Press the Left soft key,
labeled Menu.
Menu
My Phonebook
SIM Phonebook
Messages
Voicemail
Data Modem
Call History
Setup
Select
Back
The Main Menu appears. The Main
Menu consists of:
• My Phonebook
• SIM Phonebook
• Messages
• Voicemail
• Data Modem
• Call History
• Setup
• Security
Note: You cannot access the Menus during a call.
46
Iridium 9555 Satellite Phone User Manual
To Access Main Menu Options
Select
Back
Starting from the Main Menu,
use the 2-way Navi-key to scroll to
the desired menu option until it is
highlighted.
Press the left soft key, labeled Select.
The option you selected appears.
Continue this procedure for each
sub-menu.
5: Using Menus and Keys
Menu
My Phonebook
Phonebook
My
SIM Phonebook
Phonebook
SIM
Messages
Messages
Voicemail
Voicemail
Data Modem
Modem
Data
Call History
History
Call
Setup
Setup
My Phonebook
New Entry
Status
Select
Back
Iridium 9555 Satellite Phone User Manual
47
5: Using Menus and Keys
To Return to a Menu
Phonebook Status
Space on SIM:
Used 0 out of 5
Space on phone:
Used 0 out of 100
OK
1
4 GHI
7 PQRS
*∆
Back
2 ABC
5 JKL
8 TUV
0+
When the right soft key is labeled
Back, the key will take you to the
previous screen.
3 DEF
When the key is not labeled Back
use the red key to return to the
previous screen.
6 MNO
9 WXYZ
#
«
Note: In all other instances the red key will return you to the Main Screen.
Entering Characters
Many of the menu screens have fields where you need to enter
information such as names and addresses. To enter this information you
need to use the keys on the keypad. Entry of text with the keys on the
keypad is discussed in detail in “Traditional Text Entry” on page 51 and
“Predictive Text Entry” on page 57.
48
Iridium 9555 Satellite Phone User Manual
The up volume key takes you backwards
through text when you are editing a phone
book entry. If you are editing a message, it
moves you up a line of text. Choosing Up
on the 2-way Navi-key moves backwards
through message text.
5: Using Menus and Keys
When creating phonebook entries and/or composing text messages; you
can use both the side volume keys and the navigation key to help navigate
between characters or lines of text without deleting.
The down volume key takes you forward
through text when you are editing a phone
book entry. If you are editing a message, it
moves you down a line of text. Choosing
Down on the 2-way Navi-key moves
forward through message text.
Iridium 9555 Satellite Phone User Manual
49
5: Using Menus and Keys
50
Iridium 9555 Satellite Phone User Manual
6: Traditional Text Entry
1. Enter a character by pressing
the appropriate keys on the
keypad. See keypad guide
below.
New Entry
Bob
@
Save
Clear
2. The cursor moves to the next
character position.
3. To delete a character press the
Right Soft Key, labeled Clear.
1
4 GHI
7 PQRS
*∆
2 ABC
5 JKL
8 TUV
0+
3 DEF
6: Traditional Text Entry
To enter characters via traditional
method:
4. Repeat steps 1 and 2 as many
times as necessary.
6 MNO
9 WXYZ
#
«
Entering Characters
Many of the menu screens have fields where you need to enter
information such as names and addresses. To enter this information you
need to use the keys on the keypad. Each key represents a set of letters.
2 ABC
For Example: Use the number 2
key for letters A, B, and C.
Press 1 time for A
Press 2 times for B
Press 3 times for C
Iridium 9555 Satellite Phone User Manual
51
Note: Press the # key to toggle between caps, lowercase, first letter
capitalization, and digits. The mode currently selected is displayed in the
top left corner of the screen; the modes are indicated as ABC, abc, Abc,
123.
6: Traditional Text Entry
Keypad Guide
52
Key
Available Characters
1
. (period) /1
2
A/B/C/2
3
D/E/F/3
4
G/H/I/4
5
J/K/L/5
6
M/N/O/6
7
P/Q/R/S/7
8
T/U/V/8
9
W/X/Y/Z/9
0
_ (space)
*
next character
#
shift up
Right Soft Key
backspace / exit
Iridium 9555 Satellite Phone User Manual
Entering Punctuation
Pressing * (star) key takes you to a symbols menu with a list of the most
commonly used punctuation marks and symbols.
&
(
)
[
]
{
Edit
} : “
˜ #
- I
\ <
Select
>
+
=
à
á
ç
è
ė
ê
ë
ò
ó
ö
ù
ú
6: Traditional Text Entry
. ;
@ʻ
/ $
,
?
!
*
? %
Using the 2-way Navi key,
cycle through the screen
until you reach the desired
symbol.
Back
Press the Left Soft Key
labeled Select.
1
4 GHI
7 PQRS
*∆
2 ABC
5 JKL
8 TUV
0+
3 DEF
6 MNO
Press the Star key to open
the symbols menu.
9 WXYZ
#
«
Iridium 9555 Satellite Phone User Manual
53
Entering Numbers and Symbols into Text
There may be times when you need to add numbers into a message that
you are writing. For example, to send someone a phone number as part of
a text message.
New
abc
145
You can reach me
at
Starting from a text entry field:
6: Traditional Text Entry
Options
Clear
1. Press the left soft key labeled
Options.
2. The Options screen appears.
Using the 2-way Navi-key scroll
until Enter digits is highlighted.
Options
Send
Insert symbol
Enter digits
Save as draft
Exit
Select
3. Press the left soft key labeled
Select.
Back
New
123
145
You can reach me
at 111-222-3333
Options
4. The original text now appears,
but you are in the number entry
mode.
Clear
5. Press the left soft key labeled
Options.
54
Iridium 9555 Satellite Phone User Manual
Options
Send
Insert symbol
Enter letters
Save as draft
Exit
Select
Back
6. The Options screen appears.
Using the 2-way Navi-key scroll
until Enter letters is highlighted.
7. Press the left soft key labeled
Options.
Options
8. The original text screen now
appears and you can continue to
enter text in the letter entry mode.
Clear
6: Traditional Text Entry
New
abc
145
You can reach me
at 111-222-3333
tomorrow morning
Note: Use this same procedure for entering symbols into text by choosing
Insert symbol in the Options menu. You can also press the * key as a
shortcut for accessing the symbol menu (see “Entering Punctuation” on
page 53).
Iridium 9555 Satellite Phone User Manual
55
6: Traditional Text Entry
56
Iridium 9555 Satellite Phone User Manual
7: Predictive Text Entry
Predictive text is implemented on the 9555 Satellite Phone and affects the
following areas:
• Creating an SMS/Email
• Adding Notes to an existing Phonebook entry
• Entering the Name field for a Phonebook entry (LetterWise only)
Predictive text is not set on a new phone by default, it must be enabled. To
do so, start at the main screen and:
1. Press the Menu softkey
2. Select “Setup” (6 clicks down)
3. In the Setup menu, select “Language” (3 clicks down)
4. In the Language menu, select “Text entry”
In the Text entry menu, Multi-tap is the default selection. Multi-tap has no
language sensitivity, other than the fact that it provides standard Western
characters. To choose predictive text, select one of:
• English
• Français
Once you have made this change, all SMS entry and entry of contacts
incorporate Predictive Text capabilities specific to the selected language.
Once selected, select the “Back” option twice, then scroll up to “Messages”
to use Predictive Text entry for messaging. To change back to “Multi-Tap” in
the future, you need to adjust this setting.
Predictive text entry has the following modes:
7: Predictive Text Entry
• Español
• WordWise (Ww) which provides word prediction for users who like
dictionary-based methods
• LetterWise (Lw) for letter-by-letter prediction for situations where wordbased prediction doesn’t afford the flexibility that may be required in
some situations.
Special character entry has the following modes:
• Punctuation (#?@) for entry of punctuation and special symbols
• Digit (123) for entry of numbers
Iridium 9555 Satellite Phone User Manual
57
For all alphabetic languages:
1
2 ABC
4 GHI
7 PQRS
*
∆
5 JKL
8 TUV
0+
3 DEF
6 MNO
9 WXYZ
#
«
The 1 key can be used for entering
punctuation, however for full and
efficient punctuation entry you
can switch to Punctuation mode
(123).
Pressing the Pound key (#)
switches between lower and
upper case, indicated by the ( )
symbol. This is the Shift key.
Pressing the Zero key (0) enters
a space, indicated by the ( )
symbol. This is the Space key.
7: Predictive Text Entry
Pressing the Asterisk key (*)
enters the next word or letter,
indicated by the ( ) symbol. This
is the Next key.
To complete a message, you may need to switch between these four main
modes of text entry during message creation:
• WordWise (Ww) - word predictive text entry
• LetterWise (Lw) - letter-by-letter predictive text entry
• Numbers (123) - number entry (non-predictive)
• Punctuation (#?@) - punctuation entry (non-predictive)
The appropriate text entry mode can be selected by pressing the
Convenience key on the side of the 9555 Satellite Phone. The active text
entry mode will be displayed on the screen as indicated in the illustrations
on the following page.
58
Iridium 9555 Satellite Phone User Manual
WordWise
ww
New
Options
LetterWise
lw
1000
Clear
New
Options
1000
Clear
Convenience
key
Digit
New
Options
Punctuation
#?@
Options
1000
Clear
New
7: Predictive Text Entry
123
1000
Clear
Iridium 9555 Satellite Phone User Manual
59
LetterWise Text mode
Press the Convenience key until you are in LetterWise (Lw) text mode.
Press the key with the desired letter. If it doesn’t appear, press the Next
key ( ) until it does. Use the Right Soft key (Clear) for backspace and
Space key ( ) for space. Press the Shift key ( ) to switch between lower
and upper case.
Note: Apostrophe (‘) for English entry and hyphen (-) for Russian entry are
treated as letters (that is, can be predicted by LetterWise) and are found on
key 5.
Example: Entering “don’t”
f
Clear
Options
7: Predictive Text Entry
1
2 ABC
4 GHI
5 JKL
3 DEF
1. Press key 3.
6 MNO
Desired letter did not come up.
d
Clear
Options
1
4 GHI
7 PQRS
*∆
2 ABC
5 JKL
8 TUV
0+
3 DEF
6 MNO
9 WXYZ
#
«
2. Press Next key ( ) for desired
letter. Proceed to next letter of
the word.
Desired letter appears.
60
Iridium 9555 Satellite Phone User Manual
do
Clear
Options
3. Press key 6.
1
2 ABC
4 GHI
5 JKL
3 DEF
6 MNO
Desired letter appears.
don
Clear
Options
4. Press key 6 again.
1
2 ABC
5 JKL
6 MNO
Desired letter appears.
don’
Clear
Options
7: Predictive Text Entry
4 GHI
3 DEF
5. Press key 5 for apostrophe.
1
4 GHI
2 ABC
5 JKL
3 DEF
6 MNO
Apostrophe is predicted along
with letters in English.
Iridium 9555 Satellite Phone User Manual
61
don’t
Clear
Options
1
4 GHI
7 PQRS
2 ABC
5 JKL
8 TUV
3 DEF
6. Press key 8 for “t” and complete
word.
6 MNO
9 WXYZ
Desired letter appears.
7: Predictive Text Entry
WordWise Text mode
Press the Convenience key until the “ww” symbol appears in the top left
corner of the screen indicating that you have entered WordWise text entry
mode. To enter text in WordWise, press the key containing the first letter
you want to type ONLY ONCE.
If the correct letter does not appear at first, continue by pressing the key
that corresponds to the next letter in your text, and so on.
After pressing the last key in the sequence, the word should appear.
However, if the word is underlined (or highlighted), it is possible that an
alternate word (which happens to require the same key presses) appeared
instead. Just press Next key () until the desired word appears.
If the word you are entering is not found in any dictionary you can switch
to LetterWise mode by pressing the convenience key and viewing the top
left corner of the screen.
During use of WordWise, the 1 key can be used to insert punctuation
without changing text entry modes. To insert punctuation, press the 1 key
and then add the appropriate punctuation by using the Next key ( ). As
an alternative, you may also use the left option key either “Insert symbol”
or “Enter digits” during WordWise use. This also applies to LetterWise use.
62
Iridium 9555 Satellite Phone User Manual
Example: Entering “red”
s
Clear
Options
1. Press key 7.
1
2 ABC
4 GHI
7 PQRS
5 JKL
8 TUV
3 DEF
6 MNO
9 WXYZ
Even if the correct letter “r” has not
appeared, proceed with the next
letter in the word.
see
Clear
Options
2. Press key 3 twice for the next
two letters “c & d”.
2 ABC
3 DEF
The word “see” comes up which
is more common than “red”. The
underline indicates there are other
words to choose from.
red
Clear
Options
1
4 GHI
7 PQRS
*∆
2 ABC
5 JKL
8 TUV
0+
7: Predictive Text Entry
1
3 DEF
3. Press Next Key ( ).
6 MNO
9 WXYZ
#
«
The word “red” appears.
Iridium 9555 Satellite Phone User Manual
63
Digit mode (123)
There may be times when you need to add numbers into a message
that you are composing. Digit mode allows you to use the number keys
to enter digits, similar to dialing a phone call. To enter digit mode, press
the Convenience key until the 123 indicator appears on the upper left
corner of the screen. Enter the numbers required for your message and
then use the Convenience key to return to the desired text entry mode to
complete the rest of the message.
Digit mode may be entered either by pressing the Convenience key on
the side of the phone, or with the Options menu in the Create Message
editor to “Enter digits”. During use of WordWise, the 1 key can be used to
insert punctuation without changing text entry modes.
Punctuation mode (#?@)
Punctuation mode may be entered either by pressing the Convenience
key on the side of the phone, or with the Options menu in the Create
Message editor to “Insert symbol”. During use of WordWise, the 1 key can
be used to insert punctuation without changing text entry modes.
7: Predictive Text Entry
In Punctuation mode, symbols are spread across all keys based on their
shape to help you remember which symbol is on each key (see table on
following page). For example: ! is on 1 key, ? is on key 2
If there is more than one symbol on a key, press the Next key ( ) to get
the others.
Key
English/French/Russian/Spanish*
0
.,@°
1
!
2
?
3
%$€£
4
_~
5
- + =“ ^
6
([{<
7
/\
8
:;&
9
)]}>
* Spanish includes inverted versions of ! and ?.
64
Iridium 9555 Satellite Phone User Manual
Once you have selected the appropriate symbol for your message,
you may return to your preferred text entry mode by pressing the side
convenience key and viewing the top left corner of the screen.
7: Predictive Text Entry
Iridium 9555 Satellite Phone User Manual
65
7: Predictive Text Entry
66
Iridium 9555 Satellite Phone User Manual
8: Using the Phonebooks
Organizing My Phonebook
Your satellite phone has two primary phonebooks: My Phonebook and SIM
Phonebook.
My Phonebook can store up to 100 names and numbers and is completely
editable by you. This information is stored directly on your phone. The
SIM Phonebook is provided to you by your service provider and/or
organization. The entries for the SIM Phonebook are stored directly on the
SIM card used with your phone and you cannot create them or edit them
from your phone.
Phone Memory
SIM Card Memory
Personal Numbers
100 entries
155 entries
Fixed Dial Numbers
No entries
40 entries
Phone Number Digits
24
20
Name Characters
24
16
Note: SIM card capacity varies depending upon the card issued by your
service provider.
Locating My Phonebook
T
Registered
14-May-08
Menu
Help
Starting from the Main Screen:
1. Press the left soft key, labeled Menu.
Iridium 9555 Satellite Phone User Manual
8: Using the Phonebooks
16:28
67
Note: All instructions for My Phonebook start from the Main Menu as
shown.
Menu
My Phonebook
SIM Phonebook
Messages
Voicemail
Data Modem
Call History
Setup
Select
2. The Main Menu is now displayed,
with My Phonebook highlighted
press the left soft key, labeled
Select to enter the Phonebook
menu.
Back
Note: To open the SIM Phonebook, use the 2-way Navi-key to scroll until
the SIM Phonebook is highlighted.
About the My Phonebook Menu
You can do the following functions using the Phonebook menu:
• Call an entry
Bob Smith
• Create and send a text message
(SMS).
Call
SMS
Edit
Delete
New
Memory Status
Notes
Select
• Edit an entry
• Delete an entry
Back
• Add an entry
• Check the memory status of your
Phonebook
8: Using the Phonebooks
• Add notes regarding entries
68
Iridium 9555 Satellite Phone User Manual
Add a New Entry to My Phonebook
Menu
My Phonebook
SIM Phonebook
Messages
Voicemail
Data Modem
Call History
Setup
Select
To add information to the Phonebook,
use the New option. Start at the Main
Menu, with My Phonebook highlighted:
Back
1. Press the left soft key, labeled Select.
Phonebook
Ada Adams
Bob Smith
Cat Steven
Davy Jones
Eddy Fisher
Select
2. The Phonebook is displayed.
Back
3. Press the left soft key, labeled
Options.
Note: If there are no entries Empty will be displayed on this screen. If
entries are present press the left soft key while highlighting any contact.
Bob Smith
Select
4. Use the 2-way Navi-key until the New
option is highlighted.
Back
5. Press the left soft key, labeled Select
to proceed.
Iridium 9555 Satellite Phone User Manual
8: Using the Phonebooks
Call
SMS
Edit
Delete
New
Memory Status
Notes
69
Abc
New Entry
6. The New Entry screen is displayed
with a list of icons that represent:
24
Name
@
Save
Home phone
Clear
Work phone
1st cell phone
2nd cell phone
@
New Entry
Mary Smith
+9373354415
+9373321234
+123456789
email address
7. Use the 2-way Navi-key to scroll to
each field and the keypad to enter
information into the fields.
+1112223333
@ [email protected]
Save
Clear
8: Using the Phonebooks
Note: While entering or editing contact information the side volume keys
allow you to move backwards and forwards without deleting.
70
New Entry
Mary Smith
+9373354415
+9373321234
+123456789
+1112223333
@ [email protected]
Save
Clear
8. Press the left soft key, labeled
Save.
Iridium 9555 Satellite Phone User Manual
Success
9. A message briefly appears
to indicate the contact was
entered successfully. The
screen reverts to the main
Phonebook menu.
Entry Added
Successfully
1
3 DEF
2 ABC
Press the red key to return to
the Main Screen.
Locating Entries
Starting at the Main Menu,
using the 2-way Navi-key,
highlight the Phonebook you
want to use.
Menu
My Phonebook
SIM Phonebook
Messages
Voicemail
Data Modem
Call History
Setup
Select
Back
1. Press the left soft key,
labeled Select.
Select
2. The Phonebook entries are
now displayed in alphabetical
order.
Back
Iridium 9555 Satellite Phone User Manual
8: Using the Phonebooks
Phonebook
Ada Adams
Bob Smith
Cat Steven
Davy Jones
Eddy Fisher
71
My Phonebook
(Empty)
Options
Back
3. If there are no entries Empty
is displayed. See “Add a New
Entry to My Phonebook” on
page 69.
Calling an Entry
Starting at the Main Menu,
using the 2-way Navi-key,
highlight the Phonebook you
want to use.
Menu
My Phonebook
SIM Phonebook
Messages
Voicemail
Data Modem
Call History
Setup
Select
Back
1. Press the left soft key,
labeled Select.
2. The Phonebook is displayed.
Phonebook
8: Using the Phonebooks
Ada Adams
Bob Smith
Cat Steven
Dan Jones
Eddy Fisher
72
Options
Use the 2-way Navi-key to
scroll until the desired entry
is located.
Back
3. With the entry highlighted,
press the left soft key
labeled Options.
1
2 ABC
3 DEF
Note: You can also press the green key as a short-cut to calling an entry.
Iridium 9555 Satellite Phone User Manual
4. The Phonebook options are displayed.
Bob Smith
5. With the Call option highlighted,
press the left soft key labeled Select.
Call
SMS
Edit
Delete
New
Memory Status
Notes
Select
Back
Note: If an entry has more than one
number, for example, Home, Work and
Mobile, then all numbers are displayed.
Using the 2-way Navi-key, highlight the
number to be called and press Select.
Alert
Deploy the antenna
and make sure it is
oriented toward the
sky
Calling
+18885551212
Mute
Speaker
Note: If your antenna is not extended
you receive an alert message telling you
to extend the antenna.
6. Calling followed by the number you
dialed is displayed. The call is then
connected.
8: Using the Phonebooks
Iridium 9555 Satellite Phone User Manual
73
Using the Short Message Service (SMS) Menu
The Short Message Service (SMS) is a text messaging system.
To send a text message Start at the
Main Menu, using the 2-way Navi-key,
highlight the Phonebook you want to
use.
Menu
My Phonebook
SIM Phonebook
Messages
Voicemail
Data Modem
Call History
Setup
Select
Back
1. Press the left soft key, labeled
Select.
Phonebook
Ada Adams
Bob Smith
Cat Steven
Davy Jones
Eddy Fisher
Select
2. The Phonebook is displayed. Use
the 2-way Navi-key to scroll until
the desired entry is located.
Back
3. Press the left soft key, labeled
Options.
Bob Smith
Call
SMS
Edit
Delete
New
Memory Status
Notes
8: Using the Phonebooks
Select
74
4. Use the 2-way Navi-key until SMS is
highlighted.
Back
5. Press the left soft key, labeled
Select.
Note: If an entry has more than one number, for example, Home, Work
and Mobile, then all numbers are displayed. Using the 2-way Navi-key,
highlight the number to be called and press Select.
Iridium 9555 Satellite Phone User Manual
abc
New
Options
1000
6. The SMS Screen now appears. You
can enter up to 1,000 characters.
Clear
7. Press the left soft key, labeled
Options.
8. The SMS Options menu appears.
From here you can:
Options
Send
Insert symbol
Enter digits
Save as draft
Exit
Select
• Send a SMS message
Back
• Insert symbols into your message
• Enter digits
• Save as a draft to send later
• Exit the menu
Sending an SMS Message
Starting at the SMS Options Menu:
Options
Send
Insert symbol
Enter digits
Save as draft
Exit
Select
Back
Iridium 9555 Satellite Phone User Manual
8: Using the Phonebooks
1. While Send is highlighted press the
left soft key, labeled Select.
75
Options
Send
Insert symbol
Enter digits
Save as draft
Exit
Select
2. A Send To screen appears with the
entry name and number.
Back
3. Press the left soft key, labeled Send.
Note: At this time you may elect
to send the message to additional
recipients by highlighting New
Recipient and pressing the right soft
key, labeled Add.
Note: At this time you may elect to send the message to additional
recipients by highlighting New Recipient and pressing the right soft key,
labeled Add.
Adding an SMS Message
Starting at the SMS Options menu:
Options
Send
Insert symbol
Enter digits
Save as draft
Exit
Select
Back
8: Using the Phonebooks
1. While Send is highlighted press the
left soft key, labeled Select.
76
Send To
New Recipient
+111222333444
Send
2. A Send To screen appears with New
Recipient and the entry number.
Add
3. Press the right soft key, labeled
Add.
Iridium 9555 Satellite Phone User Manual
Phonebook
Ada Adams
Bob Smith
Cat Steven
Davy Jones
Eddy Fisher
Select
4. A list of contacts now appears. Use
the 2-way Navi-key to scroll to the
desired recipient.
Back
5. Press the left soft key labeled Select,
the contact is then added to your
recipient list.
Note: Repeat this procedure if you want to send the same message to
more than one contact at a time.
Phonebook
Ada Adams
Bob Smith
Cat Steven
Davy Jones
Eddy Fisher
Select
Back
6. Once you are satisfied with the
recipient(s) press left soft key,
labeled Send.
Edit an Entry in My Phonebook
Select
Back
1. Press the left soft key, labeled Select.
Iridium 9555 Satellite Phone User Manual
8: Using the Phonebooks
To change information in the
Phonebook, use the Edit Option.
Starting at the Main Menu, with My
Phonebook highlighted:
Menu
My Phonebook
SIM Phonebook
Messages
Voicemail
Data Modem
Call History
Setup
77
Phonebook
Ada Adams
Bob Smith
Cat Steven
Davy Jones
Eddy Fisher
Select
2. The Phonebook is displayed. Use the
2-way Navi-key to scroll until the
desired entry is highlighted.
Back
3. Press the left soft key, labeled
Options.
Phonebook
Call
SMS
Edit
Delete
New
Memory Status
Notes
Select
4. Use the 2-way Navi-key until the
Edit option is highlighted.
Back
5. Press the left soft key, labeled
Select to proceed.
Edit
Bob Smith
+9373354415
+9373321234
+123456789
+1112223333
8: Using the Phonebooks
@ [email protected]
Save
Clear
78
6. The Edit Screen appears. Edit the
entry as needed using the 2-way
Navi-key to scroll to the required
field(s). Use the side volume keys
to navigate backwards (up key)
and forwards (down key) without
deleting and the right soft key,
labeled Clear to delete characters.
Use the keypad to enter new
characters.
7. Press the left soft key, labeled Save.
Iridium 9555 Satellite Phone User Manual
Success
8. A message briefly appears
to indicate the entry was
updated. The screen
then returns to the main
Phonebook menu.
Entry updated
1
9. Press the red key to return to
the Main Screen.
3 DEF
2 ABC
Delete an Entry
To remove an entry in the
Phonebook, use the Delete
option. Start at the Main Menu:
Menu
My Phonebook
SIM Phonebook
Messages
Voicemail
Data Modem
Call History
Setup
Select
Back
1. Press the left soft key,
labeled Select.
Select
Back
2. The Phonebook is displayed.
Use the 2-way Navi-key to
scroll until the desired entry
is highlighted.
3. Press the left soft key,
labeled Options.
Iridium 9555 Satellite Phone User Manual
8: Using the Phonebooks
Phonebook
Ada Adams
Bob Smith
Cat Steven
Davy Jones
Eddy Fisher
79
Phonebook
Call
SMS
Edit
Delete
New
Memory Status
Notes
Select
Back
4. Use the 2-way Navi-key
until the Delete option is
highlighted.
5. Press the left soft key,
labeled Select to proceed.
Delete Entry
Are you sure you
want to delete
Bob Smith?
Yes
No
6. You receive a message asking
if you want to delete the
entry. Press the left soft key,
labeled Yes. If you press No,
the screen reverts to the
previous menu.
Success
8: Using the Phonebooks
Entry Bob Smith
deleted
80
1
7. A message briefly appears
to indicate the entry
was deleted. The main
Phonebook menu then
appears.
8. Press the red key to return to
the Main Screen.
2 ABC
3 DEF
Iridium 9555 Satellite Phone User Manual
Viewing Memory Status
Use this capability to see how many
Phonebook memory locations are
available in the SIM card memory and
phone memory. Start at the Main Menu:
Menu
My Phonebook
SIM Phonebook
Messages
Voicemail
Data Modem
Call History
Setup
Select
Back
1. Press the left soft key, labeled Select.
Phonebook
Ada Adams
Bob Smith
Cat Steven
Davy Jones
Eddy Fisher
Select
2. The Phonebook is displayed. Use the
2-way Navi-key to scroll until the
desired entry is highlighted.
Back
3. Press the left soft key, labeled
Options.
Bob Smith
Call
SMS
Edit
Delete
New
Memory Status
Notes
Select
Back
4. Use the 2-way Navi-key until
Memory Status is highlighted.
Iridium 9555 Satellite Phone User Manual
8: Using the Phonebooks
5. Press the left soft key, labeled Select
to proceed.
81
Phonebook Status
Space on SIM:
Used 0 out of 5
Space on phone:
Used 0 out of 100
OK
6. The Phonebook Status is
displayed, showing the space
on the SIM and the phone
memory.
Back
7. Press the left soft key,
labeled OK or the right soft
key labeled Back to return to
the previous screen.
1
3 DEF
2 ABC
Press the red key to return to
the Main Screen.
Adding Notes to a Phonebook Entry
Use this capability to add
information regarding an entry.
Menu
My Phonebook
SIM Phonebook
Messages
Voicemail
Data Modem
Call History
Setup
Select
Back
Start at the Main Menu:
8: Using the Phonebooks
1. Press the left soft key,
labeled Select.
82
Phonebook
Ada Adams
Bob Smith
Cat Steven
Davy Jones
Eddy Fisher
Select
Back
2. The Phonebook is displayed.
Use the 2-way Navi-key to
scroll until the desired entry
is highlighted.
3. Press the left soft key,
labeled Options.
Iridium 9555 Satellite Phone User Manual
Bob Smith
Call
SMS
Edit
Delete
New
Memory Status
Notes
Select
Back
4. Use the 2-way Navi-key until Notes is
highlighted.
5. Press the left soft key, labeled Select
to proceed.
Abc
45
Best time to reach
is in the am
Options
Clear
6. A text screen appears. Use the
Keypad to enter your text.
Note: you can enter up to 64 characters.
The character count in the top right
corner counts down as you enter text.
7. Press the left soft key, labeled
Options.
My Phonebook
Save
Cancel
Select
8. A My Phonebook screen appears with
Save highlighted.
Back
9. Press the left soft key, labeled
Options.
Restricted Phonebook
When the Phonebook is restricted, My Phonebook and SIM Phonebook
do not appear. The main menu displays Fixed Phonebook only. The Fixed
Phonebook cannot be edited.
Iridium 9555 Satellite Phone User Manual
8: Using the Phonebooks
Note: The text you entered is now
stored in the Note option for this entry.
83
8: Using the Phonebooks
84
Iridium 9555 Satellite Phone User Manual
Locating the Messages Menu
T
Registered
Starting from the Main Screen:
16:28
14-May-08
Menu
Help
1. Press the left soft key, labeled Menu.
Menu
My Phonebook
SIM Phonebook
Messages
Voicemail
Data Modem
Call History
Setup
Select
9: Using the Messages Menu
9: Using the Messages Menu
2. The Main Menu is displayed. Use
the 2-way Navi-key to scroll until
Messages is highlighted.
Back
3. Press the left soft key, labeled Select.
Note: All instructions for the Messages menu start from the Main Menu
as shown.
You can perform the following
functions using the Messages menu:
Messages
Create Message
Inbox
Drafts
Outbox
Settings
• Create messages
• Read, reply, delete, call and forward
messages
• Edit stored messages and send
Select
Back
• Enter service center number, set
expiry period and enable or disable
delivery reports.
Iridium 9555 Satellite Phone User Manual
85
9: Using the Messages Menu
Create and Send a new SMS Message to an Email Address not in your
Phonebook
Menu
My Phonebook
SIM Phonebook
Messages
Voicemail
Data Modem
Call History
Setup
Select
Start at the Main Menu with Messages
highlighted:
Back
1. Press the left soft key, labeled
Select.
Messages
Create Message
Inbox (1 unread)
Drafts
Settings
Select
Back
2. The Create Message option should
be selected. If not then use the
2-way Navi-key to scroll until it is
highlighted.
3. Press the left soft key, labeled
Select.
4. Enter your message.
abc
New
Note: You must begin your text
message with the recipients email
address, leaving a space between
the email address and the beginning
of your message.
120
your email
message will
appear here
Options
Clear
When your message is complete, press
the left soft key, labeled Options.
Options
Send
Insert symbol
Enter digits
Save as draft
Exit
Select
Back
5. The Send option should be
highlighted. If not then use the
2-way Navi-key to scroll until it is
highlighted.
6. Press the left soft key, labeled
Select to send the message.
86
Iridium 9555 Satellite Phone User Manual
Add
8. Press the right soft key, labeled
Add.
Select Recipient
Enter Number
Ada Adams
Bob Smith
Cat Steven
Davy Jones
Eddy Fisher
Select
Back
9: Using the Messages Menu
7. A Send To screen appears.
Send To
New Recipient
9. The Enter Number option should
be highlighted. If not use the
2-way Navi-key to scroll until it is
highlighted.
10. Press the left soft key, labeled
Select.
Send To
Number:
11. In the Number field, after the prefix
of 00 or +, enter *2.
+*2
OK
Clear
12. Press the left soft key, labeled OK.
Send To
Number:
+*2
Send
Add
13. Press the left soft key, labeled Send
to send the message.
Iridium 9555 Satellite Phone User Manual
87
9: Using the Messages Menu
Create and Send a new SMS Message to an Email Address in My
Phonebook
Menu
My Phonebook
SIM Phonebook
Messages
Voicemail
Data Modem
Call History
Setup
Select
Start at the Main Menu with Messages
highlighted:
Back
1. Press the left soft key, labeled
Select.
Messages
Create Message
Inbox (1 unread)
Drafts
Settings
Select
Back
2. The Create Message option should
be selected. If not then use the
2-way Navi-key to scroll until it is
highlighted.
3. Press the left soft key, labeled
Select.
abc
New
120
4. Enter your message.
your email
message will
appear here
Options
Clear
5. When your message is complete,
press the left soft key, labeled
Options.
Options
Send
Insert symbol
Enter digits
Save as draft
Exit
Select
Back
6. The Send option should be
highlighted. If not then use the
2-way Navi-key to scroll until it is
highlighted.
7. Press the left soft key, labeled
Select to send the message.
88
Iridium 9555 Satellite Phone User Manual
Add
9. Press the right soft key, labeled
Add.
Select Recipient
Enter Number
Ada Adams
Bob Smith
Cat Steven
Davy Jones
Eddy Fisher
Select
9: Using the Messages Menu
8. A Send To screen appears.
Send To
New Recipient
10. Use the 2-way Navi-key to highlight
your selection.
Back
11. Press the left soft key, labeled
Select.
Note: If the Contact’s email address is
the only information listed, the screen
returns you to the Send To screen.
Bob
+9373354415
+9373321234
+123456789
+1112223333
@ [email protected]
Select
Clear
Select Recipient
Enter Number
Ada Adams
Bob Smith
Cat Steven
Davy Jones
Eddy Fisher
Select
Back
12. If the Contact has an email address
as well as a phone number listed,
you are presented with their
phonebook entry. Use the 2-way
Navi-key to highlight their email
address and press the left soft key,
labeled Select.
13. The Phonebook screen appears
with the recipient’s name
highlighted. To add another
recipient, use the 2-way Navi-key
to highlight the next recipient and
repeat step 10.
14. Once all recipients have been
selected, press the right soft key,
labeled Back.
Iridium 9555 Satellite Phone User Manual
89
9: Using the Messages Menu
Menu
My Phonebook
SIM Phonebook
Messages
Voicemail
Data Modem
Call History
Setup
Select
Back
15. Press the left soft key, labeled
Send.
About SMS Messaging
Message Notification
If your phone is powered ON, it notifies you of received messages in the
following ways:
• An alert sounds and/or the phone vibrates.
• The message indicator is displayed
• The message New SMS. Read Now? is displayed.
How Messages are Stored
Your phone stores all messages on the SIM card. If the message indicator
is flashing, your SIM card is full. See “Delete a Message” on page 96 to
make room for the new message.
What Messages Contain
You can receive short text or numeric messages in your Personal Mailbox.
Text messages may contain up to 1,000 characters. Numeric messages,
typically phone numbers, may contain up to 20 digits.
Standard SMS messages are up to 160 characters. Long SMS messages
up to 1000 characters are divided into smaller 160 character messages
and may be billed at the standard 160 character SMS rate. For example,
an SMS message with 320 characters may be billed as two standard SMS
messages. Contact your service provider for additional information.
Your personal mailbox works with Call Forwarding. For more information
see “Forward a Received Message” on page 93.
90
Iridium 9555 Satellite Phone User Manual
Using the Inbox Menu
• Reply to a message
Message
Reply
Forward
Call
Delete
Delete All
Select
• Forward a message
• Call the number that left the message
• Delete one or all messages
Back
9: Using the Messages Menu
You can do the following functions using the Inbox menu:
Note: If the message storage space on your SIM card is full, you cannot
store a message for later retrieval. See “Delete a Message” on page 96 to
make room for new messages on your SIM card.
Read a Message
Menu
My Phonebook
SIM Phonebook
Messages
Voicemail
Data Modem
Call History
Setup
Select
Start at the Main Menu with Messages
highlighted:
Back
1. Press the left soft key, labeled Select.
Messages
Create Message
Inbox (1 unread)
Drafts
Outbox
Settings
Select
2. Use the 2-way Navi-key to scroll until
Inbox is highlighted.
Back
3. Press the left soft key, labeled Select.
Iridium 9555 Satellite Phone User Manual
91
9: Using the Messages Menu
Inbox
Text message
Text message
Text message
4. Use the 2-way Navi-key to highlight
a message.
5. Press the left soft key, labeled Read
to view the selected message.
Read
Back
6. Press the right soft key, labeled
Back to return to the previous menu.
Reply to Sender
While reading the Message Screen:
Message
+18665551212
Options
Back
Message
Reply
Forward
Call
Delete
Delete All
Select
1. Press the left soft key, labeled
Options.
2. Use the 2-way Navi-key to scroll
until Reply is highlighted.
Back
3. Press the left soft key, labeled
Select.
92
Iridium 9555 Satellite Phone User Manual
Options
4. Enter your reply.
Back
5. Press the left soft key, labeled
Options.
Options
Send
Insert symbol
Enter digits
Save as draft
Exit
Select
Back
9: Using the Messages Menu
Message
+18665551212
6. The Send option should be
highlighted. If not use the 2-way
Navi-key to scroll until Send is
highlighted.
7. Press the left soft key, labeled Select
to send the message.
Note: If the sender’s phone number is not part of your phonebook, select
New Recipient to add the number.
Forward a Received Message
Message
Text message will
appear here.
While reading the Message:
1. Press the left soft key, labeled
Options.
Options
Back
Iridium 9555 Satellite Phone User Manual
93
9: Using the Messages Menu
Message
Reply
Forward
Call
Save number
Delete
Delete All
Select
2. Use the 2-way Navi-key to scroll
until Forward is highlighted.
Back
3. Press the left soft key, labeled
Select.
Options
Send
Insert symbol
Enter digits
Save as draft
Exit
Select
Back
4. The Send option should be
highlighted. If not use the 2-way
Navi-key to scroll until Send is
highlighted.
5. Press the left soft key, labeled
Select to send the message.
6. A Send To screen appears.
Send To
New Recipient
Add
7. Press the right soft key, labeled
Add.
Select Recipient
Enter Number
Ada Adams
Bob Smith
Cat Steven
Davy Jones
Eddy Fisher
Select
8. Use the 2-way Navi-key until
the desired recipient from your
phonebook is highlighted.
Back
9. Press the left soft key, labeled
Options.
94
Iridium 9555 Satellite Phone User Manual
+9373321234
+123456789
+1112223333
@ [email protected]
Select
Clear
11. Press the left soft key, labeled
Select. The number is added to a
recipient list.
Select Recipient
Enter Number
Ada Adams
Bob Smith
Cat Steven
Davy Jones
Eddy Fisher
Select
Back
12. The Phonebook screen appears
with the recipient’s name
highlighted. To add another
recipient, use the 2-way Navi-key,
highlight the next recipient and
repeat step 8.
9: Using the Messages Menu
Bob
+9373354415
10. If the recipient has more then
one number listed, the recipient’s
information screen appears. Use
the 2-way Navi-key to scroll to the
number you would like to forward to.
13. Once all recipients have been
selected, press the right soft key,
labeled Back.
Send To
New Recipient
Bob
Send
Add
14. Press the left soft key, labeled Send.
Iridium 9555 Satellite Phone User Manual
95
9: Using the Messages Menu
Call a Number from a Received Message
Message
+18665551212
Options
While reading the Message Screen:
Back
1. Press the left soft key, labeled
Options.
Message
Reply
Forward
Call
Save number
Delete
Delete All
Select
2. Use the 2-way Navi-key to scroll
until Call is highlighted.
Back
3. Press the left soft key, labeled
Select.
Delete a Message
Menu
My Phonebook
SIM Phonebook
Messages
Voicemail
Data Modem
Call History
Setup
Select
Start at the Main Menu with Messages
highlighted:
Back
1. Press the left soft key, labeled
Select.
96
Iridium 9555 Satellite Phone User Manual
Select
2. Use the 2-way Navi-key to scroll until
Inbox is highlighted.
Back
3. Press the left soft key, labeled Select.
Inbox
Text message
Text message
Text message
Read
9: Using the Messages Menu
Messages
Create Message
Inbox (1 unread)
Drafts
Outbox
Settings
4. Use the 2-way Navi-key to scroll to
the message.
Back
5. Press the left soft key, labeled Read
to view the selected message.
Message
+18665551212
6. Press the left soft key, labeled
Options.
Options
Back
7. Use the 2-way Navi-key to scroll until
Delete is highlighted. To delete all
messages highlight Delete All.
Message
Reply
Forward
Call
Save number
Delete
Delete All
Select
Back
8. Press the left soft key, labeled Select.
Iridium 9555 Satellite Phone User Manual
97
9: Using the Messages Menu
Message
Delete message?
Yes
No
9. The Satellite Phone prompts you to
ensure you want to proceed. Press
the left soft key, labeled Yes to
delete the message.
The screen flashes Message
Deleted, and automatically returns
to the Message mailbox.
Using the Drafts Menu
To edit and send a stored message,
use the Draft menu. Start at the Main
Menu with Messages highlighted:
Menu
My Phonebook
SIM Phonebook
Messages
Voicemail
Data Modem
Call History
Setup
Select
Back
1. Press the left soft key, labeled
Select.
Messages
Create Message
Inbox (1 unread)
Drafts
Settings
Select
2. Use the 2-way Navi-key to
scroll until the Drafts option is
highlighted.
Back
3. Press the left soft key, labeled
Select.
98
Iridium 9555 Satellite Phone User Manual
Options
4. Use the 2-way Navi-key to scroll until
the draft message you want to send is
highlighted.
Back
5. Press the left soft key, labeled
Options.
Message
Edit
Delete
Delete All
Select
abc
6. Highlight Edit and press the left soft
key, labeled Select.
Back
Edit
120
Edit your message
here
Options
7. When you are finished editing press
the left soft key, labeled Options.
Clear
Options
Send
Insert symbol
Enter digits
Save as draft
Exit
Select
9: Using the Messages Menu
Drafts
Draft message
Draft message
Draft message
Back
8. The Send option should be
highlighted. If not use the 2-way
Navi-key to scroll until Send is
highlighted.
9. Press the left soft key, labeled Select
to send the message.
Iridium 9555 Satellite Phone User Manual
99
9: Using the Messages Menu
10. A Send To screen appears with the
entry name and number.
Send To
New Recipient
Add
11. Press the right soft key, labeled
Add.
Select Recipient
Enter Number
Ada Adams
Bob Smith
Cat Steven
Davy Jones
Eddy Fisher
Select
12. Use the 2-way Navi-key until
the desired recipient from your
phonebook is highlighted.
Back
13. Press the left soft key, labeled
Options.
Bob
+9373354415
+9373321234
+123456789
+1112223333
@ [email protected]
Select
Clear
14. If the recipient has more then
one number listed, the recipient’s
information screen appears. Use
the 2-way Navi-key to scroll to the
number you would like to forward
to.
15. Press the left soft key, labeled
Select. The number is added to a
recipient list.
Select Recipient
Enter Number
Ada Adams
Bob Smith
Cat Steven
Davy Jones
Eddy Fisher
Select
Back
16. The Phonebook screen appears
with the recipient’s name
highlighted. To add another
recipient, use the 2-way Navi-key,
highlight the next recipient and
repeat step 12.
17. Once all recipients have been
selected, press the right soft key,
labeled Back.
100
Iridium 9555 Satellite Phone User Manual
Add
Send
18. Press the left soft key, labeled
Send.
Using the Settings Menu
9: Using the Messages Menu
Send To
New Recipient
Bob
Enter Service Center Number
Use this capability to enter the number for the service center to which you
wish to forward your outgoing messages. The 9555 Satellite Phone will
use Iridium’s Service Center number by default if none has been explicitly
configured.
Menu
My Phonebook
SIM Phonebook
Messages
Voicemail
Data Modem
Call History
Setup
Select
Start at the Main Menu with Messages
highlighted:
Back
1. Press the left soft key, labeled Select.
Messages
Create Message
Inbox (1 unread)
Drafts
Settings
Select
2. Use the 2-way Navi-key to scroll until
the Settings option is highlighted.
Back
3. Press the left soft key, labeled Select.
Iridium 9555 Satellite Phone User Manual
101
9: Using the Messages Menu
Settings
Service Center
Expiry Period
Delivery Reports
Select
Back
4. The Service Center option should
be highlighted. If not use the
2-way Navi-key to scroll until it is
highlighted.
5. Press the left soft key, labeled
Select.
Service Center
Number:
+881662900005
OK
6. Enter the service number.
Clear
7. Press the left soft key, labeled OK.
The screen returns to the Settings
menu.
Set Expiry Period
Use this capability to specify the amount of time your un-delivered
messages should wait before auto-expiring.
Menu
My Phonebook
SIM Phonebook
Messages
Voicemail
Data Modem
Call History
Setup
Select
Start at the Main Menu with Messages
highlighted:
Back
1. Press the left soft key, labeled
Select.
102
Iridium 9555 Satellite Phone User Manual
Select
2. Use the 2-way Navi-key to scroll until
the Settings option is highlighted.
Back
3. Press the left soft key, labeled Select.
Settings
Service Center
Expiry Period
Delivery Reports
Select
9: Using the Messages Menu
Messages
Create Message
Inbox (1 unread)
Drafts
Settings
4. Use the 2-way Navi-key to scroll
until the Expiry Period option is
highlighted.
Back
5. Press the left soft key, labeled Select.
Expiry Period
1 hour
2 hours
4 hours
1 day
2 days
1 week
Select
6. Use the 2-way Navi-key to scroll
until the desired period of time is
highlighted.
Back
7. Press the left soft key, labeled Select.
The screen returns to the Settings
menu.
Iridium 9555 Satellite Phone User Manual
103
9: Using the Messages Menu
Select Delivery Reports
Use this capability to enable or disable message delivery reports.
Menu
My Phonebook
SIM Phonebook
Messages
Voicemail
Data Modem
Call History
Setup
Select
Start at the Main Menu with Messages
highlighted:
Back
1. Press the left soft key, labeled
Select.
Messages
Create Message
Inbox (1 unread)
Drafts
Settings
Select
2. Use the 2-way Navi-key to scroll until
the Settings option is highlighted.
Back
3. Press the left soft key, labeled
Select.
Settings
Service Center
Expiry Period
Delivery Reports
Select
4. Use the 2-way Navi-key to scroll
until the Delivery Reports option is
highlighted.
Back
5. Press the left soft key, labeled
Select.
Delivery Report
Off
On
Select
6. Use the 2-way Navi-key to turn the
Delivery Report OFF or ON.
Back
7. Press the left soft key, labeled
Select. The screen returns to the
Settings menu.
104
Iridium 9555 Satellite Phone User Manual
10: Using the Voicemail Menu
Locating the Voicemail Menu
Starting from the Main Screen:
T
Registered
16:28
14-May-08
Menu
Help
Menu
My Phonebook
SIM Phonebook
Messages
Voicemail
Data Modem
Call History
Setup
Select
Back
2. The Main Menu is displayed. Use the
2-way Navi-key to scroll until the
Voicemail is highlighted.
10: Using the Voicemail Menu
1. Press the left soft key, labeled Menu.
3. Press the left soft key, labeled Select.
Note: All instructions for the Voicemail menu start from the Main Menu
as shown.
About the Voicemail Menu
You can do the following functions using the Inbox menu:
Voicemail
Call Voicemail
Voicemail Settings
• Listen to your voicemail
• Reply to a voicemail
• Store voicemail numbers
• Access and configure your voicemail
Select
Back
Iridium 9555 Satellite Phone User Manual
105
Voicemail Notification
When you receive a voicemail, an incoming voicemail notification message
automatically appears on your screen.
Press the left soft key, labeled Call to
call and retrieve voicemail.
Voicemail
New Voicemail. Call
Voicemail?
10: Using the Voicemail Menu
Call
OR
Cancel
Press the right soft key, labeled
Cancel.
Check Your Voicemail
To listen to a voicemail that has been saved:
Menu
My Phonebook
SIM Phonebook
Messages
Voicemail
Data Modem
Call History
Setup
Select
1. Use the 2-way Navi-key to scroll
until the Voicemail is highlighted.
Back
2. Press the left soft key, labeled
Select.
Voicemail
Call Voicemail
Voicemail Settings
Select
3. Call Voicemail is highlighted.
Back
4. Press the left soft key, labeled
Select.
Follow the audio prompts for
additional capabilities.
106
Iridium 9555 Satellite Phone User Manual
Store Your Voicemail Number
If you have not previously stored a voicemail number, then you see No
Number Available on the display. You must store a voicemail number
before you can access the service for the first time.
Menu
My Phonebook
SIM Phonebook
Messages
Voicemail
Data Modem
Call History
Setup
Back
2. Press the left soft key, labeled Select.
Voicemail
Call Voicemail
Voicemail Settings
Select
3. Use the 2-way Navi-key to scroll
until Voicemail Settings option is
highlighted.
10: Using the Voicemail Menu
Select
1. Use the 2-way Navi-key to scroll until
the Voicemail is highlighted.
Back
4. Press the left soft key, labeled Select.
Voicemail Settings
Number
Voicemail Settings
Select
5. The Number option is highlighted.
Back
6. Press the left soft key, labeled Select.
Iridium 9555 Satellite Phone User Manual
107
Voicemail Number
+881662990000gs
Save
7. Enter the voicemail number
given to you by your Service
Provider.
Clear
10: Using the Voicemail Menu
8. Press the left soft key,
labeled Save.
Select
Back
9. Press the right soft key,
labeled Back to return to
the previous menu.
1
4
10. Press the red key to exit to
the Main Screen.
2 ABC
3 DEF
6 MNO
One-Touch Access to Voicemail
With the most recent software available to the 9555 Satellite Phone,
Iridium enabled one-touch access to voicemail for ease of use. To use this
new feature, ensure that you have the most recent software and press and
hold the 1 key for 2 seconds in order to prompt a call to voicemail without
having to navigate through the phone menu.
108
Iridium 9555 Satellite Phone User Manual
11: Using the Data Modem Menu
In order to use the 9555 Satellite Phone as a modem for your computer,
you must first follow the installation instructions provided on the CDROM included with your phone or use the instructions provided by your
service provider. The data modem menu is not required to initiate or use
the phone as a modem for data services, it only reports the connection
status of the USB. The instructions provided are optional and are to be
followed if desired prior to plugging in the USB cable to the phone and to
your computer.
Locating the Data Modem Menu
Starting from the Main Screen:
T
Registered
16:28
14-May-08
Menu
Help
1. Press the left soft key, labeled Menu.
Select
2. The Main Menu is displayed. Use the
2-way Navi-key to scroll until Data
Modem is highlighted.
Back
3. Press the left soft key, labeled Select.
11: Using the Data Modem Menu
Menu
My Phonebook
SIM Phonebook
Messages
Voicemail
Data Modem
Call History
Setup
Note: All instructions for the Data Modem menu start from the Main
Menu as shown.
Iridium 9555 Satellite Phone User Manual
109
Data Modem
Connect USB cable
If you need to remove the battery, first
disconnect from the USB cable, power
down the 9555 Satellite Phone and
then remove the battery.
11: Using the Data Modem Menu
Cancel
Note: If you are not connected to
the USB cable you are prompted to
connect. While connected to the USB
cable it is important to not remove the
battery.
110
Iridium 9555 Satellite Phone User Manual
12: Using the Call History Menu
Locating the Call History Menu
Starting from the Main Screen:
T
Registered
16:28
14-May-08
Menu
Help
1. Press the left soft key, labeled Menu.
Menu
My Phonebook
SIM Phonebook
Messages
Voicemail
Data Modem
Call History
Setup
Select
Back
2. The Main Menu is displayed. Use the
2-way Navi-key to scroll until Call
History is highlighted.
3. Press the left soft key, labeled Select.
Note: All instructions for the Call History menu start from the Main Menu
as shown.
You can perform the following functions using the Call History menu:
Call History
Call Log
Call Meters
• View the amount of time spent
talking on your phone
• View your most recent dialed, missed
and received calls
• Set phone alerts
Select
Back
Iridium 9555 Satellite Phone User Manual
12: Using the Call History Menu
About the Call History Menu
111
Using the Call Log Menu
View Most Recent Received Calls
Your phone saves received calls. Use the Call Log menu to view those
numbers.
Menu
My Phonebook
SIM Phonebook
Messages
Voicemail
Data Modem
Call History
Setup
Select
Starting from the Main Menu:
1. Use the 2-way Navi-key to scroll
until Call History is highlighted.
Back
2. Press the left soft key, labeled
Select.
Call History
Call Log
Call Meters
Select
3. The Call History menu is displayed
with Call Log highlighted.
Back
12: Using the Call History Menu
4. Press the left soft key, labeled
Select.
112
Call Log
Received Calls
Missed Calls
Dialed Calls
Select
5. The Call Log menu is displayed with
Received Calls highlighted.
Back
6. Press the left soft key, labeled
Select.
Iridium 9555 Satellite Phone User Manual
Received Calls
+881225551212
+011225551212
+881425551212
+881765551212
+991445551212
+651225551212
+331225551212
+321225551212
Select
Back
7. The Received Calls screen
is displayed with a list of
your last ten calls. Inbound
Caller ID to provide specific
numbers is not currently
supported by the network.
This feature may be enabled
in the future.
Press the right soft key labeled
Back to go back one level, or
the red key to return the Main
Screen.
View Missed Calls
Your phone saves a list of calls you’ve missed when the phone is busy or
were not able to get to it. The phone does not show calls that you missed
when the phone is turned OFF or not registered on the network.
Starting from the Main Menu:
Menu
My Phonebook
SIM Phonebook
Messages
Voicemail
Data Modem
Call History
Setup
Select
1. Use the 2-way Navi-key to
scroll until Call History is
highlighted.
Back
2. Press the left soft key,
labeled Select.
Select
3. The Call History menu is
displayed with Call Log
highlighted.
Back
4. Press the left soft key,
labeled Select.
Iridium 9555 Satellite Phone User Manual
12: Using the Call History Menu
Call History
Call Log
Call Meters
113
Call Log
Received Calls
Missed Calls
Dialed Calls
Select
5. Using the 2-way Navi-key
scroll until Missed Calls is
highlighted.
Back
6. Press the left soft key,
labeled Select.
Missed Calls
10:20
30-Sep-08
00:37:45
+881655512121
08:54
29-Sep-08
00:12:32
+2405551212
Select
Back
7. The Missed Calls screen is
displayed with a list of your
last missed calls. Inbound
Caller ID to provide specific
numbers is not currently
supported by the network.
This feature may be enabled
in the future
Press the right soft key labeled
Back to go back one level, or
the red key to return the Main
Screen.
View Most Recent Dialed Calls
12: Using the Call History Menu
Your phone saves the last ten calls dialed. Use the Call Log menu to view
those numbers.
114
Starting from the Main Menu:
Menu
My Phonebook
SIM Phonebook
Messages
Voicemail
Data Modem
Call History
Setup
Select
1. Use the 2-way Navi-key to
scroll until Call History is
highlighted.
Back
2. Press the left soft key,
labeled Select.
Iridium 9555 Satellite Phone User Manual
Call History
Call Log
Call Meters
Select
3. The Call History menu is
displayed with Call Log
highlighted.
Back
4. Press the left soft key,
labeled Select.
Call Log
Received Calls
Missed Calls
Dialed Calls
Select
5. Using the 2-way Navi-key
scroll until Dialed Calls is
highlighted.
Back
6. Press the left soft key,
labeled Select.
Dialed Calls
+881225551212
+011225551212
+881425551212
+881765551212
+991445551212
+651225551212
+331225551212
+321225551212
Select
7. The Dialed Calls screen is
displayed with a list of your
last ten calls.
Back
Iridium 9555 Satellite Phone User Manual
12: Using the Call History Menu
Press the right soft key labeled
Back to go back one level, or
the red key to return the Main
Screen.
115
Using the Call Meters Menu
Call meters help you track your airtime, keep a running tab of your
monthly usage or view the air time of your most recent calls.
Show the Time of Last Call
Menu
My Phonebook
SIM Phonebook
Messages
Voicemail
Data Modem
Call History
Setup
Select
Starting from the Main Menu:
1. Use the 2-way Navi-key to scroll
until Call History is highlighted.
Back
2. Press the left soft key, labeled
Select.
Call History
Call Log
Call Meters
Select
3. Use the 2-way Navi-key to scroll until
Call Meters is highlighted.
Back
12: Using the Call History Menu
4. Press the left soft key, labeled
Select.
116
Call Meters
Last call time
Total call time
Reset call timer
Lifetime call time
In-call display
Audible timers
Select
5. Last call time is highlighted. If not,
use the 2-way Navi-key until it is.
Back
6. Press the left soft key, labeled
Select.
Iridium 9555 Satellite Phone User Manual
The duration of the last call is
displayed.
Call Time
02:56:15
Back
7. Press the right soft key
labeled Back to return to the
previous menu.
8. Press the red key to return to
the Main Screen.
Note: The last call timer shows the elapsed time of the most recent call
made since your phone was turned on. This information is not saved
when you turn off the phone.
Show Total Time for All Calls
This capability displays your total airtime since you last reset the call timer.
Starting from the Main Menu:
Menu
My Phonebook
SIM Phonebook
Messages
Voicemail
Data Modem
Call History
Setup
Select
1. Use the 2-way Navi-key to
scroll until Call History is
highlighted.
Back
Call History
Call Log
Call Meters
Select
3. Use the 2-way Navi-key
to scroll until Call Meters is
highlighted.
Back
4. Press the left soft key,
labeled Select.
Iridium 9555 Satellite Phone User Manual
12: Using the Call History Menu
2. Press the left soft key,
labeled Select.
117
Call Meters
Last call time
Total call time
Reset call timer
Lifetime call time
In-call display
Audible timers
Select
5. Use the 2-way Navi-key to
scroll until Total call time is
highlighted.
Back
6. Press the left soft key,
labeled Select.
Call Time
The airtime accumulation
since the timer was last reset is
displayed on the screen.
02:56:15
Back
7. Press the right soft key
labeled Back to return to the
previous menu.
8. Press the red key to return to
the Main Screen.
Reset all Timers
12: Using the Call History Menu
Reset your timers at the beginning of each billing cycle to keep track of
your spending.
118
Starting from the Main Menu:
Menu
My Phonebook
SIM Phonebook
Messages
Voicemail
Data Modem
Call History
Setup
Select
1. Use the 2-way Navi-key to
scroll until Call History is
highlighted.
Back
2. Press the left soft key,
labeled Select.
Iridium 9555 Satellite Phone User Manual
Call History
Call Log
Call Meters
Select
3. Use the 2-way Navi-key to scroll until
Call Meters is highlighted.
Back
4. Press the left soft key, labeled Select.
Call Meters
Last call time
Total call time
Reset call timer
Lifetime call time
In-call display
Audible timers
Select
5. Use the 2-way Navi-key to scroll until
Reset call timer is highlighted.
Back
6. Press the left soft key, labeled Select.
Reset
Reset call timers?
Yes
The screen displays: Reset call timers?
No
7. Press the left soft key for Yes or the
right soft key for No.
Call meters reset.
8. If you press Yes, the display reads Call
meters reset.
Iridium 9555 Satellite Phone User Manual
12: Using the Call History Menu
Reset
119
Select
Back
9. Press the right soft key
labeled Back to return to
the previous menu.
1
3 DEF
2 ABC
4
10. Press the red key to return
to the Main Screen.
6 MNO
Showing the Lifetime Call Timer
This capability displays a running clock of the total call time for the phone
since being activated.
Starting from the Main Menu:
Menu
My Phonebook
SIM Phonebook
Messages
Voicemail
Data Modem
Call History
Setup
Select
1. Use the 2-way Navi-key to
scroll until Call History is
highlighted.
Back
12: Using the Call History Menu
2. Press the left soft key,
labeled Select.
120
Call History
Call Log
Call Meters
Select
3. Use the 2-way Navi-key
to scroll until Call Meters is
highlighted.
Back
4. Press the left soft key,
labeled Select.
Iridium 9555 Satellite Phone User Manual
Call Meters
Last call time
Total call time
Reset call meter. . .
Lifetime call time
In-call display
Audible timers
Select
3. Use the 2-way Navi-key to
scroll until Call Meters is
highlighted.
Back
4. Press the left soft key,
labeled Select.
Call Time
The total time of all calls is
displayed.
02:56:15
Back
7. Press the right soft key
labeled Back to return to the
previous menu.
8. Press the red key to return to
the Main Screen.
Note: The Lifetime timer can not be reset.
Showing the In-call Display
Starting from the Main Menu:
Menu
My Phonebook
SIM Phonebook
Messages
Voicemail
Data Modem
Call History
Setup
Select
1. Use the 2-way Navi-key to
scroll until Call History is
highlighted.
Back
2. Press the left soft key,
labeled Select.
Iridium 9555 Satellite Phone User Manual
12: Using the Call History Menu
This capability enables or disables the call timer that displays the amount
of time that has passed since placing a specific call.
121
Call History
Call Log
Call Meters
Select
3. Use the 2-way Navi-key to scroll until
Call Meters is highlighted.
Back
4. Press the left soft key, labeled
Select.
Call Meters
Last call time
Total call time
Reset call meter. . .
Lifetime call time
In-call display
Audible timers
Select
5. Use the 2-way Navi-key to scroll
until In-call display is highlighted.
Back
6. Press the left soft key, labeled
Select.
Call Timer
Enabled
Disabled
Select
7. Use the 2-way Navi-key to scroll to
Enabled or Disabled.
Back
12: Using the Call History Menu
8. Press the left soft key, labeled
Select.
122
Iridium 9555 Satellite Phone User Manual
Setting Audible Call Timers
This capability lets the phone watch the clock for you. At a set time or
interval, the call timers produce a beep that only you can hear. You can
choose No Alert, Single Alert or Repetitive Alert.
Set the Single Alert Timer
Menu
My Phonebook
SIM Phonebook
Messages
Voicemail
Data Modem
Call History
Setup
Select
Starting from the Main Menu:
1. Use the 2-way Navi-key to scroll until
Call History is highlighted.
Back
2. Press the left soft key, labeled Select.
Call History
Call Log
Call Meters
Select
3. Use the 2-way Navi-key to scroll until
Call Meters is highlighted.
Back
4. Press the left soft key, labeled Select.
Select
5. Use the 2-way Navi-key to scroll until
Audible timers is highlighted.
Back
6. Press the left soft key, labeled Select.
Iridium 9555 Satellite Phone User Manual
12: Using the Call History Menu
Call Meters
Last call time
Total call time
Reset call meter. . .
Lifetime call time
In-call display
Audible timers
123
Audible Timers
Single Alert
Repetitive Alert
Select
Back
7. The Single Alert option
should be highlighted. If
not, use the 2-way Navi-key
to scroll until it is.
8. Press the left soft key,
labeled Select.
Single Alert
Off
1 minute
5 minutes
10 minutes
15 minutes
30 minutes
60 minutes
Select
9. Use the 2-way Navi-key to
scroll to the desired single
alert.
Back
10. Press the left soft key,
labeled Select.
Select
Back
12: Using the Call History Menu
11. Press the right soft key
labeled Back to return to
the previous menu.
124
1
4
2 ABC
3 DEF
6 MNO
Iridium 9555 Satellite Phone User Manual
12. Press the red key to return
to the Main Screen.
Set the Repetitive Alert
This capability sets your phone to alert you at specific intervals, for
example every minute.
Menu
My Phonebook
SIM Phonebook
Messages
Voicemail
Data Modem
Call History
Setup
Select
Starting from the Main Menu:
1. Use the 2-way Navi-key to scroll until
Call History is highlighted.
Back
2. Press the left soft key, labeled Select.
Call History
Call Log
Call Meters
Select
3. Use the 2-way Navi-key to scroll until
Call Meters is highlighted.
Back
4. Press the left soft key, labeled Select.
Select
5. Use the 2-way Navi-key to scroll until
Audible timers is highlighted.
Back
6. Press the left soft key, labeled Select.
Iridium 9555 Satellite Phone User Manual
12: Using the Call History Menu
Call Meters
Last call time
Total call time
Reset call meter. . .
Lifetime call time
In-call display
Audible timers
125
Audible Timers
Single Alert
Repetitive Alert
Select
7. Use the 2-way Navi-key
to scroll to the Repetitive
Alert option.
Back
8. Press the left soft key,
labeled Select.
Repetitive Alert
Off
1 minute
5 minutes
10 minutes
15 minutes
30 minutes
60 minutes
Select
9. Use the 2-way Navi-key
to scroll to the desired
repetitive alert.
Back
10. Press the left soft key,
labeled Select.
Select
Back
12: Using the Call History Menu
11. Press the right soft key
labeled Back to return to
the previous menu.
126
1
4
2 ABC
3 DEF
6 MNO
Iridium 9555 Satellite Phone User Manual
12. Press the red key to return
to the Main Screen.
13: Using the Setup Menu
Starting from the Main Screen:
T
Registered
16:28
14-May-08
Menu
Help
1. Press the left soft key, labeled Menu.
Menu
My Phonebook
SIM Phonebook
Messages
Voicemail
Data Modem
Call History
Setup
Select
Back
13: Using the Setup Menu
Locating the Setup Menu
2. The Main Menu is displayed. Use the
2-way Navi-key to scroll until Setup
is highlighted.
3. Press the left soft key, labeled Select.
Note: All instructions for the Setup menu start from the Main Menu as
shown.
About the Setup Menu
You can perform the following functions using the Setup menu:
Setup
Call Options
Volumes and Tones
Time & Date
Language
Backlight
Contrast
Key Setup
Select
Back
• Set call options
• Set volumes and tones for your ringer
speaker and alert
• Set time zone, time and date format
• Set language
• Set your phone lighting preferences
• Set the contrast on the display screen
Iridium 9555 Satellite Phone User Manual
127
13: Using the Setup Menu
Setup
Number Entry
Phone Information
Reset to defaults
• Set preference for the convenience
key and right soft key
• Set your prefix preference for
entering phone numbers
• View phone information
Select
Back
• Reset phone settings to default
Note: The Setup menu consists of two screens. Scroll past the Key Setup
option for more menu options.
Setting Call Options
The Call Options menu allows you to enable or disable various call
capabilities.
Starting from the Main Menu:
Menu
My Phonebook
SIM Phonebook
Messages
Voicemail
Data Modem
Call History
Setup
Select
1. Use the 2-way Navi-key to scroll
until Setup is highlighted.
Back
2. Press the left soft key, labeled
Select.
Setup
Call Options
Volumes and Tones
Time & Date
Language
Backlight
Contrast
Key Setup
Select
Back
3. Call Options is already displayed.
4. Press the left soft key, labeled
Select.
128
Iridium 9555 Satellite Phone User Manual
Select
5. Highlight the call capability
you would like to enable.
Back
6. Press the left soft key
labeled Select to return to
the previous menu.
13: Using the Setup Menu
Call Options
Call Drop Alert
Call Waiting
Call Forwarding
Call Barring
Fixed Dialing
7. Press the red key to return to
the Main Screen.
Setting Volumes and Tones
Adjust the Ringer Volume
The Volumes and Tones menu allows you to adjust your phone’s ringer
volume and tone, and set the phone to ring or vibrate to notify you of
incoming calls.
Starting from the Main Menu:
Menu
My Phonebook
SIM Phonebook
Messages
Voicemail
Data Modem
Call History
Setup
Select
1. Use the 2-way Navi-key
to scroll until Setup is
highlighted.
Back
2. Press the left soft key,
labeled Select.
Setup
Call Options
Volumes and Tones
Time & Date
Language
Backlight
Contrast
Key Setup
Select
Back
3. Use the 2-way Navi-key to
scroll until Volumes and
Tones is highlighted.
4. Press the left soft key,
labeled Select.
Iridium 9555 Satellite Phone User Manual
129
13: Using the Setup Menu
Volumes and Tones
Ringer Volume
Speaker Volume
Ring Tone
Alert Tone
Keypad Tone
Vibrate
Select
Back
5. Ringer Volume is
highlighted. If not, use the
2-way Navi-key to scroll to
it.
6. Press the left soft key,
labeled Select.
Volume
OK
7. The volume bars increase
or decrease as you press
the 2-way Navi-key up or
down.
Back
8. Press the left soft key,
labeled OK when you have
the desired setting.
Select
Back
9. Press the right soft key
labeled Back to return to
the previous menu.
1
4
130
2 ABC
3 DEF
6 MNO
Iridium 9555 Satellite Phone User Manual
10. Press the red key to return
to the Main Screen.
Adjust the Speaker Volume
Starting from the Main Menu:
Menu
My Phonebook
SIM Phonebook
Messages
Voicemail
Data Modem
Call History
Setup
Select
1. Use the 2-way Navi-key
to scroll until Setup is
highlighted.
Back
2. Press the left soft key,
labeled Select.
Setup
Call Options
Volumes and Tones
Time & Date
Language
Backlight
Contrast
Key Setup
Select
Back
13: Using the Setup Menu
This capability adjusts the volume of the speaker. The phone sounds the
new volume level as you adjust it.
3. Use the 2-way Navi-key to
scroll until Volumes and
Tones is highlighted.
4. Press the left soft key,
labeled Select.
Volumes and Tones
Ringer Volume
Speaker Volume
Ring Tone
Alert Tone
Keypad Tone
Vibrate
Select
5. Use the 2-way Navi-key to
scroll to Speaker Volume.
Back
6. Press the left soft key,
labeled Select.
Iridium 9555 Satellite Phone User Manual
131
13: Using the Setup Menu
Volume
OK
Back
7. The volume bars increase
or decrease as you press
the 2-way Navi-key up or
down.
8. Press the left soft key,
labeled OK when you have
the desired setting.
Select
Back
9. Press the right soft key
labeled Back to return to
the previous menu.
1
3 DEF
2 ABC
4
10. Press the red key to return
to the Main Screen.
6 MNO
Adjust the Ring Tone
This capability adjusts the tone of the ringer. The phone sounds the new
tone as you adjust it.
Starting from the Main Menu:
Menu
My Phonebook
SIM Phonebook
Messages
Voicemail
Data Modem
Call History
Setup
Select
1. Use the 2-way Navi-key
to scroll until Setup is
highlighted.
Back
2. Press the left soft key,
labeled Select.
132
Iridium 9555 Satellite Phone User Manual
3. Use the 2-way Navi-key to
scroll until Volumes and
Tones is highlighted.
4. Press the left soft key,
labeled Select.
Volumes and Tones
Ringer Volume
Speaker Volume
Ring Tone
Alert Tone
Keypad Tone
Vibrate
Select
13: Using the Setup Menu
Setup
Call Options
Volumes and Tones
Time & Date
Language
Backlight
Contrast
Key Setup
Select
Back
5. Use the 2-way Navi-key to
scroll to Speaker Volume.
Back
6. Press the left soft key,
labeled Select.
Ring tone
Tone 1
Tone 2
Tone 3
Tone 4
Select
7. Use the 2-way Navi-key to
scroll to the desired tone
Back
8. Press the left soft key,
labeled Select.
Select
Back
9. Press the right soft key
labeled Back to return to
the previous menu.
1
4
2 ABC
3 DEF
10. Press the red key to return
to the Main Screen.
6 MNO
Iridium 9555 Satellite Phone User Manual
133
13: Using the Setup Menu
Setting the Call Alert Mode
This capability adjusts the alert tone. The phone sounds the new tone as
you adjust it.
Starting from the Main Menu:
Menu
My Phonebook
SIM Phonebook
Messages
Voicemail
Data Modem
Call History
Setup
Select
1. Use the 2-way Navi-key
to scroll until Setup is
highlighted.
Back
2. Press the left soft key,
labeled Select.
Setup
Call Options
Volumes and Tones
Time & Date
Language
Backlight
Contrast
Key Setup
Select
Back
3. Use the 2-way Navi-key to
scroll until Volumes and
Tones is highlighted.
4. Press the left soft key,
labeled Select.
Volumes and Tones
Ringer Volume
Speaker Volume
Ring Tone
Alert Tone
Keypad Tone
Vibrate
Select
5. Use the 2-way Navi-key
to scroll until Alert Tone is
highlighted.
Back
6. Press the left soft key,
labeled Select.
134
Iridium 9555 Satellite Phone User Manual
Select
7. Use the 2-way Navi-key to
scroll to the desired tone.
Back
8. Press the left soft key,
labeled Select.
Select
13: Using the Setup Menu
Alert tone
Tone 1
Tone 2
Tone 3
Tone 4
Back
9. Press the right soft key
labeled Back to return to
the previous menu.
1
3 DEF
2 ABC
4
10. Press the red key to return
to the Main Screen.
6 MNO
Setting the Keypad Tone
This capability selects the keypad tone. You can select to have a single
tone, DTMF tones or no tones when the keypad is pressed.
Starting from the Main Menu:
Menu
My Phonebook
SIM Phonebook
Messages
Voicemail
Data Modem
Call History
Setup
Select
1. Use the 2-way Navi-key
to scroll until Setup is
highlighted.
Back
2. Press the left soft key,
labeled Select.
Iridium 9555 Satellite Phone User Manual
135
13: Using the Setup Menu
Setup
Call Options
Volumes and Tones
Time & Date
Language
Backlight
Contrast
Key Setup
Select
Back
3. Use the 2-way Navi-key to
scroll until Volumes and
Tones is highlighted.
4. Press the left soft key,
labeled Select.
Volumes and Tones
Ringer Volume
Speaker Volume
Ring Tone
Alert Tone
Keypad Tone
Vibrate
Select
5. Use the 2-way Navi-key to
scroll until keypad Tone is
highlighted.
Back
6. Press the left soft key,
labeled Select.
Alert tone
DTMF Tones
Single Tone
No Tone
Select
7. Use the 2-way Navi-key to
scroll to the desired tone.
Back
8. Press the left soft key,
labeled Select.
Select
1
4
136
Back
2 ABC
3 DEF
6 MNO
Iridium 9555 Satellite Phone User Manual
9. Press the right soft key
labeled Back to return to the
Main Screen.
Set the Phone to Ring and /or Vibrate
Starting from the Main Menu:
Menu
My Phonebook
SIM Phonebook
Messages
Voicemail
Data Modem
Call History
Setup
Select
1. Use the 2-way Navi-key
to scroll until Setup is
highlighted.
Back
13: Using the Setup Menu
This capability is ideal for situations where a ringing phone is
inappropriate or in a loud environment. The vibrate function notifies you
of incoming calls with discreet vibrations.
2. Press the left soft key,
labeled Select.
Setup
Call Options
Volumes and Tones
Time & Date
Language
Backlight
Contrast
Key Setup
Select
Back
3. Use the 2-way Navi-key to
scroll until Volumes and
Tones is highlighted.
4. Press the left soft key,
labeled Select.
Volumes and Tones
Ringer Volume
Speaker Volume
Ring Tone
Alert Tone
Keypad Tone
Vibrate
Select
5. Use the 2-way Navi-key
to scroll until Vibrate is
highlighted.
Back
6. Press the left soft key,
labeled Select.
Iridium 9555 Satellite Phone User Manual
137
13: Using the Setup Menu
Vibrate Options
Ring Only
Vibrate Only
Vibrate then Ring
No Ring or Vibrate
Select
7. Use the 2-way Navi-key to
scroll to the desired Vibrate
Option.
Back
8. Press the left soft key,
labeled Select.
9. Press the right soft key
labeled Back to return to the
Main Screen.
Time and Date Settings
Select the Time Zone
Your phone uses the satellite network to obtain the time and date
information. However, you need to select the time zone in which you are
located.
Starting from the Main Menu:
Menu
My Phonebook
SIM Phonebook
Messages
Voicemail
Data Modem
Call History
Setup
Select
1. Use the 2-way Navi-key
to scroll until Setup is
highlighted.
Back
2. Press the left soft key,
labeled Select.
138
Iridium 9555 Satellite Phone User Manual
Select
3. Use the 2-way Navi-key to
scroll until Time & Date is
highlighted.
Back
4. Press the left soft key,
labeled Select.
Time and Date
Select Time Zone
Time format
Date format
Select
13: Using the Setup Menu
Setup
Call Options
Volume and Tones
Time & Date
Language
Backlight
Contrast
Key Setup
5. Use the 2-way Navi-key
to scroll until Time Zone is
highlighted.
Back
6. Press the left soft key,
labeled Select.
Time Zone
UTC
UTC + 0.5
UTC + 1
UTC + 1.5
UTC + 2.0
UTC + 2.5
UTC + 3.0
Select
7. Use the 2-way Navi-key until
the required time zone is
highlighted.
Back
8. Press the left soft key,
labeled Select.
9. Press the right soft key
labeled Back to return to the
Main Screen.
Iridium 9555 Satellite Phone User Manual
139
13: Using the Setup Menu
Select the Time Format
Starting from the Main Menu:
Menu
My Phonebook
SIM Phonebook
Messages
Voicemail
Data Modem
Call History
Setup
Select
Back
Setup
Call Options
Volume and Tones
Time & Date
Language
Backlight
Contrast
Key Setup
Select
1. Use the 2-way Navi-key to scroll
until Setup is highlighted.
2. Press the left soft key, labeled
Select.
3. Use the 2-way Navi-key to scroll
until Time & Date is highlighted.
Back
4. Press the left soft key, labeled
Select.
Time and Date
Select time zone
Time format
Date format
Select
5. Use the 2-way Navi-key to scroll
until Time Zone is highlighted.
Back
6. Press the left soft key, labeled
Select.
140
Iridium 9555 Satellite Phone User Manual
Select
7. Use the 2-way Navi-key
until the required time zone
is highlighted.
Back
8. Press the left soft key,
labeled Select.
13: Using the Setup Menu
Time Zone
UTC
UTC + 0.5
UTC + 1
UTC + 1.5
UTC + 2.0
UTC + 2.5
UTC + 3.0
9. Press the right soft key
labeled Back to return to
the Main Screen.
Select the Date Format
Starting from the Main Menu:
Menu
My Phonebook
SIM Phonebook
Messages
Voicemail
Data Modem
Call History
Setup
Select
1. Use the 2-way Navi-key
to scroll until Setup is
highlighted.
Back
2. Press the left soft key,
labeled Select.
Setup
Call Options
Volume and Tones
Time & Date
Language
Backlight
Contrast
Key Setup
Select
3. Use the 2-way Navi-key to
scroll until Time & Date is
highlighted.
Back
4. Press the left soft key,
labeled Select.
Iridium 9555 Satellite Phone User Manual
141
13: Using the Setup Menu
Time and Date
Select time zone
Time format
Date format
Select
5. Use the 2-way Navi-key to
scroll until Date Format is
highlighted.
Back
6. Press the left soft key,
labeled Select.
Date Format
01-Jan-08
DD/MM/YY
DD-MM-YY
DD.MM.YY
MM/DD/YY
YY-DD-MM
Select
7. Use the 2-way Navi-key until
the required date format is
highlighted.
Back
8. Press the left soft key,
labeled Select.
9. Press the right soft key
labeled Back to return to the
Main Screen.
Selecting the Display Language
Your phone contains 21 languages. Use this capability to select the
language in which your phone displays menus and messages.
Starting from the Main Menu:
Menu
My Phonebook
SIM Phonebook
Messages
Voicemail
Data Modem
Call History
Setup
Select
1. Use the 2-way Navi-key
to scroll until Setup is
highlighted.
Back
2. Press the left soft key,
labeled Select.
142
Iridium 9555 Satellite Phone User Manual
Select
3. Use the 2-way Navi-key
to scroll until Language is
highlighted.
Back
4. Press the left soft key,
labeled Select.
Language
English
Czech (Cestina)
Danish
Dutch
Finnish (Suomi)
French
German
Select
13: Using the Setup Menu
Setup
Call Options
Volume and Tones
Time & Date
Language
Backlight
Contrast
Key Setup
5. Use the 2-way Navi-key
to scroll until the required
Language is highlighted.
Back
6. Press the left soft key,
labeled Select.
7. Press the right soft key
labeled Back to return to the
Main Screen.
Tip: If you accidentally select a language other than English and are
unable to reset your phone, follow these steps:
1. Press the left soft key.
2. Scroll down six times.
3. Press the left soft key again.
4. Scroll down three times
5. Press the left soft key, the English option is at the top.
Iridium 9555 Satellite Phone User Manual
143
13: Using the Setup Menu
Setting Backlights
Enable, disable or adjust the length of time the backlight stays on after a
key press.
Starting from the Main Menu:
Menu
My Phonebook
SIM Phonebook
Messages
Voicemail
Data Modem
Call History
Setup
Select
1. Use the 2-way Navi-key
to scroll until Setup is
highlighted.
Back
2. Press the left soft key,
labeled Select.
Setup
Call Options
Volume and Tones
Time & Date
Language
Backlight
Contrast
Key Setup
Select
3. Use the 2-way Navi-key
to scroll until Backlight is
highlighted.
Back
4. Press the left soft key,
labeled Select.
Backlight
Off
5 Seconds
10 Seconds
15 Seconds
20 Seconds
30 Seconds
Select
5. Use the 2-way Navi-key
to scroll until the required
Backlight is highlighted.
Back
6. Press the left soft key,
labeled Select.
7. Press the right soft key
labeled Back to return to the
Main Screen.
144
Iridium 9555 Satellite Phone User Manual
Setting Contrast
Starting from the Main Menu:
Menu
My Phonebook
SIM Phonebook
Messages
Voicemail
Data Modem
Call History
Setup
Select
1. Use the 2-way Navi-key
to scroll until Setup is
highlighted.
Back
2. Press the left soft key,
labeled Select.
Setup
Call Options
Volume and Tones
Time & Date
Language
Backlight
Contrast
Key Setup
Select
13: Using the Setup Menu
This capability allows you to adjust the contrast on the display screen.
3. Use the 2-way Navi-key
to scroll until Contrast is
highlighted.
Back
4. Press the left soft key,
labeled Select.
Contrast
5. Use the 2-way Navi-key to
scroll until to increase or
decrease the contrast.
OK
Back
6. Press the left soft key,
labeled Select.
7. Press the right soft key
labeled Back to return to the
Main Screen.
Iridium 9555 Satellite Phone User Manual
145
13: Using the Setup Menu
Using the Key Setup Menu
This capability selects the function of the convenience key and the
right soft key when the Main Screen is displayed. The default function
is to display the Help screen which is useful for new users; however the
function can be changed to access the phonebook.
Setup the Convenience Key Function
Starting from the Main Menu:
Menu
My Phonebook
SIM Phonebook
Messages
Voicemail
Data Modem
Call History
Setup
Select
1. Use the 2-way Navi-key to scroll
until Setup is highlighted.
Back
2. Press the left soft key, labeled
Select.
Setup
Call Options
Volume and Tones
Time & Date
Language
Backlight
Contrast
Key Setup
Select
3. Use the 2-way Navi-key to scroll
until Key Setup is highlighted.
Back
4. Press the left soft key, labeled
Select.
Setup
Convenience Key
Right Soft Key
Select
5. Convenience Key is highlighted.
Back
6. Press the left soft key, labeled
Select.
146
Iridium 9555 Satellite Phone User Manual
Select
7. Use the 2-way Navi-key to
scroll until the desired action
is highlighted.
Back
8. Press the left soft key,
labeled Select.
13: Using the Setup Menu
Convenience Key
No Action
Start Call
End Call
Redial
9. Press the right soft key
labeled Back to return to the
Main Screen.
Setup the Right Soft Key Function
Starting from the Main Menu:
Menu
My Phonebook
SIM Phonebook
Messages
Voicemail
Data Modem
Call History
Setup
Select
1. Use the 2-way Navi-key
to scroll until Setup is
highlighted.
Back
2. Press the left soft key,
labeled Select.
Setup
Call Options
Volume and Tones
Time & Date
Language
Backlight
Contrast
Key Setup
Select
3. Use the 2-way Navi-key
to scroll until Key Setup is
highlighted.
Back
4. Press the left soft key,
labeled Select.
Iridium 9555 Satellite Phone User Manual
147
13: Using the Setup Menu
Setup
Convenience Key
Right Soft Key
Select
5. Use the 2-way Navi-key until
Right Soft Key is highlighted.
Back
6. Press the left soft key,
labeled Select.
Right key action
Show Help
SIM Phonebook
My Phonebook
Select
7. Use the 2-way Navi-key to
scroll until the desired action
is highlighted.
Back
8. Press the left soft key,
labeled Select.
9. Press the right soft key
labeled Back to return to the
Main Screen.
Set Number Entry Prefix
This capability allows you to set your preferred international access code
and can automatically attach (00) or (+) to any phone number you enter.
Starting from the Main Menu:
Menu
My Phonebook
SIM Phonebook
Messages
Voicemail
Data Modem
Call History
Setup
Select
1. Use the 2-way Navi-key
to scroll until Setup is
highlighted.
Back
2. Press the left soft key,
labeled Select.
148
Iridium 9555 Satellite Phone User Manual
Select
Back
3. Use the 2-way Navi-key to
scroll past the Key Setup
option until Number Entry is
highlighted.
4. Press the left soft key,
labeled Select.
Number Entry
Prefix with +
Prefix with 00
Do not prefix
Select
13: Using the Setup Menu
Setup
Number Entry
Phone Information
Reset to defaults
5. Use the 2-way Navi-key to
scroll until the desired action
is highlighted.
Back
6. Press the left soft key,
labeled Select.
7. Press the right soft key
labeled Back to return to the
Main Screen.
View Phone Information
This capability allows you to view technical information about the 9555
Satellite Phone software, hardware versions and the IMEI number.
Starting from the Main Menu:
Menu
My Phonebook
SIM Phonebook
Messages
Voicemail
Data Modem
Call History
Setup
Select
1. Use the 2-way Navi-key
to scroll until Setup is
highlighted.
Back
2. Press the left soft key,
labeled Select.
Iridium 9555 Satellite Phone User Manual
149
13: Using the Setup Menu
Setup
Number Entry
Phone Information
Reset to defaults
Select
3. Use the 2-way Navi-key
to scroll past the Key
Setup option until Phone
Information is highlighted.
Back
4. Press the left soft key,
labeled Select.
Phone Information
F/w:HT08001
Information regarding your
phone appears on the display.
IMEI:399999999999999
Back
5. Press the right soft key,
labeled Back to return to the
Setup menu.
Reset Phone Options to Factory Defaults
This capability resets all settings to their original default settings.
Starting from the Main Menu:
Menu
My Phonebook
SIM Phonebook
Messages
Voicemail
Data Modem
Call History
Setup
Select
1. Use the 2-way Navi-key
to scroll until Setup is
highlighted.
Back
2. Press the left soft key,
labeled Select.
150
Iridium 9555 Satellite Phone User Manual
Select
3. Use the 2-way Navi-key to
scroll past the Key Setup
option until Reset to
defaults is highlighted.
Back
4. Press the left soft key,
labeled Select.
13: Using the Setup Menu
Setup
Number Entry
Phone Information
Reset to defaults
Reset
Reset all phone
settings?
Yes
No
5. Press the left soft key,
labeled Select.
Reset
Phone settings reset
6. A message appears briefly
indicating the phone settings
have been reset.
7. Press the red key to return to
the Main Screen.
Iridium 9555 Satellite Phone User Manual
151
13: Using the Setup Menu
152
Iridium 9555 Satellite Phone User Manual
14: Using the Security Menu
Important: Do not change the PIN/PUK/SIM settings unless you have your
original settings available. Your phone and/or SIM card may be disabled if
you don’t know the correct code and enter it incorrectly three times. If a
PIN becomes blocked, you must enter a Personal Unblocking Key (PUK) to
restore the SIM to service which is obtained from your service provider.
Locating the Security Menu
Registered
16:28
14-May-08
Menu
Help
1. Press the left soft key, labeled Menu.
Menu
My Phonebook
SIM Phonebook
Messages
Voicemail
Data Modem
Call History
Setup
Select
Back
14: Using the Security Menu
Starting from the Main Screen:
T
2. The Main Menu is displayed. Use
the 2-way Navi-key to scroll until
Security is highlighted.
Note: All instructions for the Security menu start from the Main Menu as
shown.
Menu
Security
Select
Note: Scroll one down from Setup to
view the Security option.
Back
3. Press the left soft key, labeled Select.
Iridium 9555 Satellite Phone User Manual
153
About the Security Menu
You can perform the following
functions using the Security menu:
Security
Phone Lock
Sim lock
Change PINs
• Lock and unlock the phone
• Enable and disable the SIM lock
14: Using the Security Menu
Select
Back
• Change PIN and block PIN codes
Locking and Unlocking Your Phone
This capability helps prevent unwanted use of your phone.
Starting from the Main Menu:
Menu
Security
Select
1. Use the 2-way Navi-key to scroll
until Security is highlighted.
Back
Note: Scroll one down from Setup to
view the Security option.
2. Press the left soft key, labeled
Select.
Security
Phone lock
Sim lock
Change PINs
Select
3. The Phone lock option is
highlighted. If not, use the 2-way
Navi-key to scroll until it is.
Back
4. Press the left soft key, labeled
Select.
154
Iridium 9555 Satellite Phone User Manual
Phone Lock
Enable phone lock
Disable phone lock
Select
5. The Enable phone lock option is
highlighted. If not, use the 2-way
Navi-key to scroll until it is.
Back
6. Press the left soft key, labeled Select.
****
Select
Clear
8. Press the left soft key, labeled Select.
The Phone lock capability takes effect
when you turn OFF your 9555 Satellite
Phone. Each time you restart the phone,
you are prompted to enter your Phone
PIN. Once you do, the phone is fully
operational.
14: Using the Security Menu
7. The Enter PIN screen appears. Using
the keypad enter the PIN number.
Enter PIN
Phone PIN
Enable or Disable the SIM lock
When you activate the SIM lock capability, your phone requests your SIM
PIN whenever your phone is powered on. To change this setting, you
need to enter the SIM PIN code that your service provider gave you.
Starting from the Main Menu:
Menu
Security
Select
1. Use the 2-way Navi-key to scroll until
Security is highlighted.
Back
Note: Scroll one down from Setup to
view the Security option.
2. Press the left soft key, labeled Select.
Iridium 9555 Satellite Phone User Manual
155
Security
Phone Lock
SIM lock
Change PINs
Select
3. Use the 2-way Navi-key to scroll
until SIM lock is highlighted.
Back
14: Using the Security Menu
4. Press the left soft key, labeled
Select.
SIM Lock
Enable SIM lock
Disable SIM lock
Select
Back
6. The Enter PIN screen appears. Using
the keypad enter the PIN number.
Enter PIN
Phone PIN
****
Select
5. Use the 2-way Navi-key until the
action you prefer is highlighted.
Clear
7. Press the left soft key, labeled
Select.
The message SIM lock disabled briefly
appears, then returns to the SIM Lock
menu.
156
Iridium 9555 Satellite Phone User Manual
Using the Change PIN Menu
Change the Phone PIN Code
This capability allows you to modify the default PIN associated with your
phone.
Starting from the Main Menu:
Menu
Security
Back
Note: Scroll one down from Setup to
view the Security option.
2. Press the left soft key, labeled Select.
Security
Phone lock
Sim lock
Change PIN
Select
3. Use the 2-way Navi-key to scroll until
Change PIN is highlighted.
14: Using the Security Menu
Select
1. Use the 2-way Navi-key to scroll until
Security is highlighted.
Back
4. Press the left soft key, labeled Select.
Change PIN
Phone PIN
SIM PIN
SIM PIN 2
Call barring PIN
Select
5. The Change PIN menu appears.
Phone PIN is highlighted.
Back
6. Press the left soft key, labeled Select.
Iridium 9555 Satellite Phone User Manual
157
Change PIN
Old PIN
New PIN
Verify PIN
14: Using the Security Menu
OK
Clear
7. Enter your current PIN in the Old PIN
field (the default PIN is 1234). Use
the 2-way Navi-key to move to the
next field and enter your new PIN
into the New PIN field. Move to the
Verify PIN field and enter the new
PIN again.
Change PIN
Old PIN
****
New PIN
****
Verify PIN
****
OK
Clear
8. When all fields are complete, press
the left soft key, labeled OK.
Change PIN
PIN changed OK
Yes
158
No
9. The screen displays PIN changed
OK then returns to the Change PIN
menu.
Iridium 9555 Satellite Phone User Manual
Change the SIM PIN Code
This capability allows you to modify the default PIN associated with your
SIM card.
Starting from the Main Menu:
Menu
Security
Select
1. Use the 2-way Navi-key to scroll until
Security is highlighted.
Back
Note: Scroll one down from Setup to
view the Security option.
Security
Phone lock
Sim lock
Change PIN
Select
3. Use the 2-way Navi-key to scroll until
Change PIN is highlighted.
14: Using the Security Menu
2. Press the left soft key, labeled Select.
Back
4. Press the left soft key, labeled Select.
Change PIN
Phone PIN
SIM PIN
SIM PIN 2
Call barring PIN
Select
5. Use the 2-way Navi-key to scroll until
SIM PIN is highlighted.
Back
6. Press the left soft key, labeled Select.
Iridium 9555 Satellite Phone User Manual
159
Change PIN
Old PIN
New PIN
Verify PIN
14: Using the Security Menu
OK
Clear
7. Enter your current PIN in the Old PIN
field (the default PIN is 1111). Use the
2-way Navi-key to move to the next
field and enter your new PIN into the
New PIN field. Move to the Verify
PIN field and enter the new PIN
again.
Change PIN
Old PIN
****
New PIN
****
Verify PIN
****
OK
Clear
8. When all fields are complete, press
the left soft key, labeled OK.
Change PIN
PIN changed OK
Yes
160
No
9. The screen displays PIN changed
OK then returns to the Change PIN
menu.
Iridium 9555 Satellite Phone User Manual
Change the SIM Card PIN2 Code
Your SIM card PIN2 code is used to access fixed dialing settings. This fourto eight-digit code is issued to you when you subscribe to the capability.
Starting from the Main Menu:
Menu
Security
Select
1. Use the 2-way Navi-key to scroll until
Security is highlighted.
Back
Note: Scroll one down from Setup to
view the Security option.
Security
Phone lock
Sim lock
Change PIN
Select
3. Use the 2-way Navi-key to scroll until
Change PIN is highlighted.
14: Using the Security Menu
2. Press the left soft key, labeled Select.
Back
4. Press the left soft key, labeled Select.
Change PIN
Phone PIN
SIM PIN
SIM PIN 2
Call barring PIN
Select
5. Use the 2-way Navi-key to scroll until
SIM PIN 2 is highlighted.
Back
6. Press the left soft key, labeled Select.
Iridium 9555 Satellite Phone User Manual
161
Change PIN
Old PIN
New PIN
Verify PIN
14: Using the Security Menu
OK
Clear
7. Enter your current PIN in the Old
PIN field. Use the 2-way Navi-key
to move to the next field and enter
your new PIN into the New PIN field.
Move to the Verify PIN field and
enter the new PIN again.
Change PIN
Old PIN
****
New PIN
****
Verify PIN
****
OK
Clear
8. When all fields are complete, press
the left soft key, labeled OK.
Change PIN
PIN changed OK
Yes
162
No
9. The screen displays PIN changed
OK then returns to the Change PIN
menu.
Iridium 9555 Satellite Phone User Manual
Call Barring PIN
Call Barring may be enabled for incoming and/or outgoing calls in
the Setup, Call Options menu. When you enable Call Barring, you are
prompted for a PIN. The Call Barring PIN may be changed as follows.
Starting from the Main Menu:
Menu
Security
Back
Note: Scroll one down from Setup to
view the Security option.
2. Press the left soft key, labeled Select.
Security
Phone lock
Sim lock
Change PIN
Select
3. Use the 2-way Navi-key to scroll until
Change PIN is highlighted.
14: Using the Security Menu
Select
1. Use the 2-way Navi-key to scroll until
Security is highlighted.
Back
4. Press the left soft key, labeled Select.
Change PIN
Phone PIN
SIM PIN
SIM PIN 2
Call barring PIN
Select
5. Use the 2-way Navi-key to scroll until
Call barring PIN is highlighted.
Back
6. Press the left soft key, labeled Select.
Iridium 9555 Satellite Phone User Manual
163
Change PIN
Old PIN
New PIN
Verify PIN
14: Using the Security Menu
OK
Clear
7. Enter your current PIN in the Old
PIN field. Use the 2-way Navi-key
to move to the next field and enter
your new PIN into the New PIN field.
Move to the Verify PIN field and
enter the new PIN again.
Change PIN
Old PIN
****
New PIN
****
Verify PIN
****
OK
Clear
8. When all fields are complete, press
the left soft key, labeled OK.
Change PIN
PIN changed OK
Yes
164
No
9. The screen displays PIN changed
OK then returns to the Change PIN
menu.
Iridium 9555 Satellite Phone User Manual
15: Troubleshooting
Problem
Solution
Phone won’t power
on.
• Did you press and hold the power button
for a minimum of three seconds to turn the
phone’s power on?
• Check the battery. Is it charged, properly
fitted, and are the contacts clean and dry?
You can’t make calls.
• Check the antenna. Is it fully extended
and correctly angled? Do you have a clear
unobstructed view of the sky?
• Did you enter the number in international
format? All calls made from the Iridium
satellite system must be in international
format. See “Placing a Call” on page 32.
• Check the signal strength indicator. If the
signal is weak, ensure that you have a clear
line of sight to the sky and there are no
buildings, trees, or other objects interfering.
• Is Restricted displayed? Check the Call
Barring setting.
• Check to see if your fixed dialing list is
enabled. If so, you can only make calls to
numbers or prefixes that are on the list.
You can’t receive
calls.
• Check to see that your phone is powered on.
15: Troubleshooting
• Has a new SIM card been inserted? Check
that no new restrictions have been imposed.
• Check the antenna. Is it fully extended
and correctly angled? Do you have a clear
unobstructed view of the sky?
• Check the signal strength indicator. If the
signal is weak, ensure that you have a clear
line of sight to the sky and there are no
buildings, trees, or other objects around.
• Check the Call Forwarding and Call Barring
settings.
• Check the Ringer setting. If it is off, there is no
audible ringer.
• Check to see if your fixed dialing list is enabled.
Iridium 9555 Satellite Phone User Manual
165
You can’t make
international calls.
• Have you included the relevant codes? Enter
00 or + followed by the appropriate country
code and the phone number.
Your phone will not
unlock.
• Have you inserted a new SIM card? Enter the
new PIN code the default PIN is 1111).
• Enter the default phone unlock code: 1234
• Have you forgotten the unlock code?
Your PIN is blocked.
• Enter the PIN unblocking code or contact
your service provider. See “Using the Security
Menu” on page 153 for more information.
Your PIN2 is blocked.
• Enter the PIN2 unblocking code or contact
your service provider. See “Using the Security
Menu” on p.153 for more information.
Your SIM card will not • Is the SIM card inserted the correct way?
work.
• Is the card visibly damaged or scratched?
Return the card to your service provider.
15: Troubleshooting
• Check the SIM and card contacts. If they are
dirty, clean them with an antistatic cloth.
You can’t cancel Call
Forwarding or Call
Barring.
Wait until you are in an area with good network
coverage and try again.
The message
indicator is flashing.
There is not enough memory available to store
another message. Use the messages menu to
delete one or more messages.
The battery won’t
charge.
• Check the charger. Is it properly connected?
Are its contacts clean and dry?
• Check the battery contacts. Are they clean
and dry?
• Check the battery temperature. If it is warm,
let it cool before charging.
• Is it an old battery? Battery performance
declines after several years of use. Replace
the battery.
• Make sure you have an Iridium approved
battery installed. If you see ? on the display
near the charging icon, you cannot charge
this battery.
166
Iridium 9555 Satellite Phone User Manual
The battery drains
faster than normal.
• Are you in an area of variable coverage? This
uses extra battery power.
• Is your antenna fully extended and correctly
angled? Do you have a clear unobstructed
view of the sky? This helps use less battery
power.
• Is it a new battery? A new battery needs two
to three charge/discharge cycles to attain
normal performance
• Is it an old battery? Battery performance
declines after several years of use. Replace
the battery.
• Is it a battery that hasn’t been completely
discharged? Allow the battery to fully
discharge (until the phone turns itself off)
and then charge the battery overnight.
• Are you using your phone in extreme
temperatures? At extreme hot or cold
temperatures, battery performance is
significantly reduced.
You may notice this during long calls or
during charging. The heat is produced by the
electronic components within your phone and
is quite normal.
Phone is not
responding to user
controls including
the power keys.
Remove the battery from the phone and then
reattach it to cycle power and reset.
15: Troubleshooting
You find your phone
becoming warm
during use.
Your SIM card is
Check Card or Insert Card
inserted in the phone
Check that the SIM card has been inserted
but the display says:
correctly. The contacts of the SIM card may be
Check Card or
dirty. Turn the phone off, remove the SIM card
Insert Card or
and rub the contacts with a clean cloth. Replace
Blocked
the card in the phone.
Blocked
Enter the PIN unblocking key or contact your
service provider. See “Call Barring PIN” on page
163 for additional information.
Iridium 9555 Satellite Phone User Manual
167
Your phone is
displaying an
unknown foreign
language and you
would like to restore
it to its original
setting.
• Power on the phone.
• Power on the phone. Press left soft key for
menu.
• Power on the phone. Press down six times
for Setup, then left soft key for Select.
• Power on the phone. Press down three times
for Languages, then left soft key for Select.
• Power on the phone. Press left soft key for
Select.
Phone states
“Searching for
Network”
• Ensure you are in an area with an open view
of the sky
15: Troubleshooting
• Extend the antenna and point upright
towards the sky directly above in order to
receive a signal
168
• If your phone was powered on inside of a
building or area with an obstructed view
of the sky just prior to attempting a call
outside, the phone may be temporarily in a
power saving mode to conserve battery life.
You may either wait for it to automatically
exit the power saving mode within a minute
or two on its scheduled interval or just
simply turn off your phone and turn it on
again to accelerate the registration process.
Iridium 9555 Satellite Phone User Manual
16: Certification and Compliance
Information
Export Compliance
The 9555 Satellite Phone is controlled by the export laws and regulations
of the United States of America. The U.S. Government may restrict
the export or re-export of this phone to certain individuals and/or
destinations. For further information, contact the U.S. Department of
Commerce, Bureau of Industry and Security or visit www.bis.doc.gov
Standards Compliance Information
The 9555 Satellite Phone is designed to comply with the standards for
Radio Emissions Compliance, Electromagnetic Compatibility, and AC
Safety in the United States, European Union, Canada and Mexico.
FCC Compliance
The 9555 Satellite Phone is certified under 47 CFR Part 25 as FCC ID:
Q639555A. It also complies with Part 15 of the FCC Regulations. Operation
is subject to the condition that this device does not cause harmful
interference. Any unauthorized antennas, modifications or attachments
could damage the 9555 Satellite Phone and may violate FCC regulations
and void your authority to operate the phone.
EU Regulatory Conformity
The 9555 Satellite Phone complies with the essential requirements and
other relevant provisions of the EU Directive 1999/5/EC.
Canada Regulatory Conformity
Iridium 9555 Satellite Phone User Manual
16: Certification and Compliance
The 9555 Satellite Phone complies with Industry Canada RSS-170.
Certification Number IC 4629A-9555.
169
16: Certification and Compliance
170
Iridium 9555 Satellite Phone User Manual
This Limited Warranty applies only to the Iridium branded 9555 Satellite
Phone (including hardware, software and firmware but excluding
leather case) and the Accessories listed in Chapter 3 of this User Manual
(collectively, “Product”) sold by Iridium or its authorized resellers and
distributors (collectively, “Service Providers”). This Limited Warranty
extends only to the first purchaser of the Product and is not assignable or
transferable.
17: Warranty, Service and Support
17: Limited Warranty, Product and
Satellite Service Terms, Warranty
Support, and Software License
Subject to the Exclusions contained below, Iridium warrants to you that
the Product will be free from defects in materials and workmanship under
normal usage for a period of one year from your date of purchase. You are
required to provide proof of purchase as a condition of receiving warranty
service as more fully described in “Warranty Claim Process” on page 176.
Any replacement products or parts may contain new and used materials
equivalent to new in performance and reliability. Any replacement
product or part will also have functionality at least equal to that of the
product or part being replaced. Replacement products and parts are
warranted to be free from defects in material or workmanship under
normal usage for the remainder of the applicable warranty period of the
original Product for which a replacement product or part is provided
under this Limited Warranty. A returned Product for which a replacement
has been provided shall become Iridium’s property.
If Iridium receives, during the warranty period and in accordance with
the instructions set out in this Limited Warranty, notice of a defect in the
Product covered by this Limited Warranty, Iridium will repair or replace
the Product or refund the purchase price of the Product, at Iridium’s sole
option. Iridium shall have no obligation to repair, replace, or refund unless
the defective Product is returned in accordance with the instructions set
out in this Limited Warranty and within the warranty period.
IRIDIUM DOES AND MAY CONTINUE, AT ITS SOLE DISCRETION, TO
SUBCONTRACT TO AND ENGAGE A THIRD PARTY TO PROVIDE THE
WARRANTY SERVICES PROVIDED FOR IN THIS USER MANUAL.
Iridium 9555 Satellite Phone User Manual
171
17: Warranty, Service and Support
Exclusions
This Limited Warranty does not apply in the following circumstances:
Normal wear and tear. Periodic maintenance, repair or replacement of
parts due to normal wear and tear are excluded from coverage.
Batteries. Only batteries whose fully charged capacity falls below 80%
of rated capacity and batteries that leak are covered by this Limited
Warranty. Batteries that are charged by other than an Iridium-approved
battery charger; having seals that are broken or show evidence of
tampering; are used in equipment other than the Product; or are charged
and stored at temperatures greater than 60 degrees centigrade, are not
covered by this Limited Warranty.
Abuse and Misuse. Defects or damage that result from improper
operation or storage, misuse or abuse, accident or neglect; exposure to or
contact with liquid, water, rain, extreme humidity or heavy perspiration,
sand, dirt or the like, extreme heat or spills of food; use of the Product for
abnormal purposes; stretching coil cords or breaking coil cord modular
tabs; breakage or damage to antennas or scratches or other damage to
plastic surfaces or other externally exposed parts caused by your use; or
other acts which are not the fault of Iridium, are excluded from coverage.
Use of Non-Iridium Products and Accessories. Defects or damage that
result from the use of non-Iridium branded products (other than the
antenna supplied with your Product), accessories or software or other
ancillary or peripheral equipment are excluded from coverage.
Unauthorized Service or Modifications. Defects or damage resulting
from any service, testing, adjustment, integration, installation, operation,
maintenance, service, alteration, modification or integration with any
non-Iridium product in any manner other than in accordance with
Product user documentation and instructions and/or by someone other
than Iridium or a Service Provider are excluded from coverage.
Altered Products. Products that have been tampered with, altered, have
non-Iridium housings or parts, or have had the serial numbers or date
tags removed, altered or obliterated are excluded from coverage.
Communication Services. Defects, damages or failure of the Product
due to any non-Iridium communication service or signal or use of a
non-Iridium branded communication service or signal are excluded from
coverage.
Software Embodied in Physical Media. No warranty is made that any
software will meet your requirements or will work in combination with
any hardware or software applications provided by third parties, that the
172
Iridium 9555 Satellite Phone User Manual
Privacy and Data Security. Privacy and data security are important
to everyone. Some features of your Product may affect your privacy
or data security. Therefore, it is important to monitor access to your
Product and not to leave it where others might have unmonitored access.
Lock your satellite phone’s keypad when not in use. Erase all personal
information or data before disposing of the satellite phone or recycling
it. See Chapter 8 of this User Manual for instructions on how to delete all
personal information. The satellite phone uses network-based positioning
technology, which may be used to obtain a user’s approximate location
and thereby affect a user’s privacy.
17: Warranty, Service and Support
operation of the software will be uninterrupted or error free, or that all
defects in the software will be corrected.
Limitations of Warranty/Local Laws
IRIDIUM MAKES NO REPRESENTATIONS, GUARANTEES, CONDITIONS
OR WARRANTIES, EITHER EXPRESS OR IMPLIED, INCLUDING
WITHOUT LIMITATION, ANY IMPLIED REPRESENTATIONS,
GUARANTEES, CONDITIONS OR WARRANTIES OF MERCHANTABILITY
AND FITNESS FOR A PARTICULAR PURPOSE, NON-INFRINGEMENT,
SATISFACTORY QUALITY, NON-INTERFERENCE, ACCURACY OF
INFORMATIONAL CONTENT, OR ARISING FROM A COURSE OF
DEALING, LAW, USAGE, OR TRADE PRACTICE, USE, OR RELATED TO
THE PERFORMANCE OR NONPERFORMANCE OF ANY PRODUCTS,
ACCESSORIES, FACILITIES OR SERVICES OR USER INFORMATION,
EXCEPT AS EXPRESSLY STATED IN THIS USER MANUAL. ANY OTHER
STANDARDS OF PERFORMANCE, GUARANTEES, CONDITIONS AND
WARRANTIES ARE HEREBY EXPRESSLY EXCLUDED AND DISCLAIMED
TO THE FULLEST EXTENT PERMITTED BY LAW. THIS DISCLAIMER AND
EXCLUSION SHALL APPLY EVEN IF THE EXPRESS LIMITED WARRANTY
CONTAINED HEREIN FAILS OF ITS ESSENTIAL PURPOSE. FURTHER,
THIS LIMITED WARRANTY COVERS THE PRODUCT ONLY, AND NO
WARRANTY IS MADE AS TO USER INFORMATION AND/OR COVERAGE,
AVAILABILITY OR GRADE OF SERVICE PROVIDED BY IRIDIUM
SEPARATELY FOR IRIDIUM SATELLITE SERVICES.
This Product is covered by a U.S.A. warranty. This Limited Warranty
is applicable in all countries and is enforceable in any country or region
where Iridium or its Service Provider offer warranty service for the
Product. Outside of the U.S.A., any different warranty terms, liabilities
and/or legal requirements of the country in which the Product is sold
are specifically disclaimed by Iridium. Warranty service availability and
response times may vary from country to country and may be subject to
registration requirements in the country of purchase. Your Iridium Service
Provider can provide details.
Iridium 9555 Satellite Phone User Manual
173
17: Warranty, Service and Support
This Limited Warranty gives you specific legal rights. You may also have
other rights that may vary from state to state/country to country. Some
states/countries do not allow or acknowledge the existence, limitation
or exclusion of incidental or consequential damages, or limitation on
the length of an implied warranty, so some limitations or exclusions of
this Limited Warranty may not apply to you. You are advised to consult
applicable state/country laws for a full determination of your rights.
Conditions of Use and Limitations of Liability.
This Limited Warranty is your sole and exclusive remedy. These terms and
conditions supersede any prior agreements or representations, including
those made in Iridium sales literature or advice given to you by or on
behalf of Iridium in connection with your purchase.
ANY IMPLIED WARRANTIES THAT MAY BE IMPOSED BY LAW,
INCLUDING, WITHOUT LIMITATION, THE IMPLIED WARRANTIES OF
MERCHANTABILITY AND FITNESS FOR A PARTICULAR PURPOSE,
SHALL BE LIMITED TO THE DURATION OF THIS LIMITED WARRANTY.
OTHERWISE THE REPAIR, REPLACEMENT, OR REFUND AS PROVIDED
UNDER THIS EXPRESS LIMITED WARRANTY IS PROVIDED IN LIEU OF
ALL OTHER WARRANTIES, EXPRESS OR IMPLIED. IN NO EVENT SHALL
IRIDIUM BE LIABLE, WHETHER IN CONTRACT OR TORT OR ANY OTHER
LEGAL THEORY, INCLUDING WITHOUT LIMITATION STRICT LIABILITY,
GROSS NEGLIGENCE OR NEGLIGENCE, FOR ANY DAMAGES IN EXCESS
OF THE PURCHASE PRICE OF THE PRODUCT AND/OR THE COST OF
IRIDIUM SATELLITE SERVICES PROVIDED, INCLUDING ANY DIRECT,
INDIRECT, INCIDENTAL, SPECIAL OR CONSEQUENTIAL DAMAGES OF
ANY KIND, OR LOSS OF REVENUE OR PROFITS, LOSS OF BUSINESS,
LOSS OF PRIVACY, LOSS OF USE, LOSS OF TIME OR INCONVENIENCE,
LOSS OF INFORMATION OR DATA, SOFTWARE OR APPLICATIONS
OR OTHER FINANCIAL LOSS CAUSED BY THE PRODUCT AND/OR
THE IRIDIUM SATELLITE SERVICES , OR ARISING OUT OF OR IN
CONNECTION WITH THE ABILITY OR INABILITY TO USE THE PRODUCT
AND/OR THE IRIDIUM SATELLITE SERVICES TO THE FULLEST EXTENT
THESE DAMAGES MAY BE DISCLAIMED BY LAW AND WHETHER
ADVISED OF THE POSSIBILITIES OF SUCH DAMAGES. IRIDIUM IS NOT
LIABLE FOR ANY CLAIM MADE BY A THIRD PARTY OR MADE BY YOU
FOR A THIRD PARTY.
USERS OF THE IRIDIUM SATELLITE PHONE SERVICES AND RELATED
EQUIPMENT, INCLUDING WITHOUT LIMITATION THOSE USING
THE PHONE SERVICE AND THE PRODUCT IN ANY MANNER IN
CONJUNCTION WITH EMERGENCY 911 (U.S.), EMERGENCY TRIPLE
ZERO (000)/ 112 (AUSTRALIA) OR ANY OTHER DISTRESS CALLING
OR EMERGENCY SERVICES, BOTH PUBLIC OR PRIVATELY OPERATED,
174
Iridium 9555 Satellite Phone User Manual
17: Warranty, Service and Support
ACKNOWLEDGE AND AGREE AS A CONDITION OF THE PROVISION
OF PHONE SERVICE AND PRODUCT BY IRIDIUM THAT THEY WILL
MAKE NO CLAIM, WHETHER IN CONTRACT, TORT OR OTHERWISE,
AGAINST IRIDIUM FOR BODILY INJURY, LOSS OF LIFE, DAMAGE
TO PROPERTY OR FOR ANY OTHER LOSS WHATSOEVER, OR FOR
SPECIAL, INCIDENTAL, INDIRECT, CONSEQUENTIAL OR PUNITIVE
DAMAGES, BY REASON OF ANY UNAVAILABILITY, DELAY, FAULTINESS
OR FAILURES OF THE IRIDIUM FACILITIES OR PHONE SERVICE OR
EQUIPMENT OR FOR INACCURACIES OR FAILURES WITH REGARD TO
ANY USER INFORMATION PROVIDED. THIS IS A WAIVER AND RELEASE
AND DISCLAIMER OF LIABILITY TO THE FULLEST EXTENT PERMITTED
BY APPLICABLE LAW AND APPLIES REGARDLESS OF THE CAUSE OF
ANY LIABILITY, INCLUDING WITHOUT LIMITATIONS, TO WRONGFUL
CONDUCT, OMISSION OR FAULT OF EMPLOYEES OR AGENTS OF
IRIDIUM.
By your use of the Product and Iridium Satellite Services you consent to
Iridium’s disclosure of user information, including but not limited to name,
address, telephone number and location information, including, where
available, the geographic coordinates of equipment, to governmental and
quasi-governmental agencies where Iridium deems it necessary in its sole
discretion to respond to an exigent circumstance. These governmental
and quasi-governmental agencies shall be deemed “users” for all
purposes of this Limited Warranty.
You are permitted to use the Product only as described and specified in
this Limited Warranty. By using the Product, you are indicating that you
agree to comply with the terms of this Limited Warranty, including this
section describing permitted use of the Product (the “Conditions of Use”).
If you fail to comply with this Limited Warranty and the Conditions of Use,
Iridium may void certain protections offered under the Limited Warranty
and Iridium reserves the right to terminate your right to use the Product
on the Iridium system. If you do not accept the terms of this Limited
Warranty, do not use the Product on the Iridium system.
You are permitted to use the Product only in connection with service on
the Iridium system using airtime purchased from your Service Provider.
You are required to comply with this Limited Warranty and the Conditions
of Use and Limitations of Liability, as well as all terms and conditions
that are provided separately by your Service Provider, as such terms and
conditions may change from time to time. Iridium or your Service Provider
may also establish additional terms and conditions from time to time. In
the event any Iridium term or condition conflicts with any Service Provider
term or condition, the Iridium term or condition shall govern. Service
provider will be provided with notice of any new terms and conditions or
any changes in these terms and conditions. All terms and conditions will
Iridium 9555 Satellite Phone User Manual
175
17: Warranty, Service and Support
be effective as of your receipt of the notices of new or modified terms and
conditions, and your continued use of the Product after such receipt shall
constitute your acceptance of such new or modified terms.
You may not use the Product in connection with any third-party devices,
including but not limited to computers, cameras, batteries, GPS devices,
recorders or other devices which alter the information sent or received
by the Product, except to the extent that Iridium has tested those devices
and confirmed that their use will have no adverse effect on the Iridium
system. All devices approved by Iridium will be advertised and labeled
as being approved by Iridium and you may use only “Iridium-Approved
Devices” with this Product and with the Iridium system.
You may not modify the Product or any component of the Product. You
may not reverse-engineer, or attempt to reverse-engineer, the Product,
any component of any Product or the manner in which the Product
connects to, sends information to, receives information from, or otherwise
interacts with the Iridium system.
You are required to comply with all applicable laws and regulations in
your use of the Product. To the extent that you: (i) violate this Limited
Warranty, the terms and conditions applicable to the Iridium system or
other agreements between you and Iridium, or between you and your
Service Provider; (ii) utilize a product other than an Iridium-Approved
Device on the Iridium system; (iii) modify the Product or any Product
component, reverse-engineer the Product or any Product component
or attempt to do so; or (iv) violate any applicable laws or regulations
(collectively “Unauthorized Use”), you agree to defend, indemnify and
hold Iridium and your Service Provider harmless with respect to any
claims or actions by governmental entities or other third parties related
to your Unauthorized Use and to pay all costs, damages, fines and other
amounts incurred by us, or on our behalf, in the defense of any such
claims or actions. Further, we specifically disallow any liability and will not
credit back airtime charges related to any Unauthorized Use.
In addition to Iridium’s express reservation of other remedies available to
us, we reserve the right to discontinue providing Iridium Satellite Services
to you and/or to disable your Product’s access to the Iridium system. If
Iridium reasonably believes that you are in engaged in any Unauthorized
Use, we may seek equitable relief to prevent such Unauthorized Use
without having to wait to see if damage to the Iridium system occurs.
Warranty Claim Process
Should your Product require service within the warranty period or for
warranty questions, repairs or for the return of the Product, please
contact your Service Provider or any other Service Provider in your
176
Iridium 9555 Satellite Phone User Manual
Refer to www.iridium.com for a list of Service Providers or contact your
Service Provider for warranty information.
17: Warranty, Service and Support
country. Do not contact Iridium. For warranty claims, you will be
required to provide the following proof of purchase documentation:
your dated bill of sale or delivery receipt (including your name, address
and telephone number; the name and address of the Service Provider
who sold you the Product; the model number and International
Mobile Identification Number (IMEI); and the sale price of the Product),
together with a written description of the problem. You are responsible
for shipping the Product to the authorized warranty service center
designated by your Service Provider with freight and insurance prepaid.
Product that is repaired or replaced under this Limited Warranty shall be
returned to you at no expense for the freight and insurance, and at your
expense for any applicable duties or other charges.
SOFTWARE LICENSE
The following terms govern your access and use of the Iridium or
Iridium-supplied software (“Software”) contained on the Product you
purchased.
License. Conditioned upon compliance with the terms and conditions
of this Limited Warranty, Iridium grants to you a nonexclusive and
nontransferable license to use for your internal purposes the Software
and the Documentation. “Documentation” means written information
(whether contained in user or technical manuals, training materials,
specifications or otherwise) pertaining to the Software and made
available by Iridium with the Software in any manner. You shall use the
Software solely as embedded in (or, if downloaded, as provided via
download), for execution on, and for communication via the Iridium
system.
No other licenses are granted by implication, estoppel or otherwise.
General Limitations. This is a license, not a transfer of title, to the
Software and Documentation, and Iridium retains ownership of all copies
of the Software and Documentation. You acknowledge that the Software
and Documentation contain trade secrets of Iridium or its suppliers or
licensors, including but not limited to the specific internal design and
structure of individual programs and associated interface information.
Except as otherwise expressly provided, you shall have no right, and you
specifically agree not to:
(i) transfer, assign or sublicense your license rights to any other person
or entity (other than in compliance with any Iridium relicensing/
transfer policy then in force), or use the Software on unauthorized
Iridium 9555 Satellite Phone User Manual
177
17: Warranty, Service and Support
or secondhand Iridium equipment, and you acknowledge that any
attempted transfer, assignment, sublicense or use shall be void;
(ii) make error corrections to or otherwise modify or adapt the Software
or create derivative works based upon the Software, or permit third
parties to do the same;
(iii) reverse engineer or decompile, decrypt, disassemble or otherwise
reduce the Software to human-readable form, except to the extent
otherwise expressly permitted under applicable law notwithstanding
this restriction;
(iv) use or permit the Software to be on a service bureau or time sharing
basis or otherwise, without the express written authorization of
Iridium; or
(v) disclose, provide, or otherwise make available trade secrets contained
within the Software and Documentation in any form to any third party
without the prior written consent of Iridium. You shall implement
reasonable security measures to protect such trade secrets.
To the extent required by law, and at your written request, Iridium
shall provide you with the interface information needed to achieve
interoperability between the Software and another independently
created program, on payment of Iridium’s applicable fee, if any. You
shall observe strict obligations of confidentiality with respect to such
information and shall use such information in compliance with any
applicable terms and conditions upon which Iridium makes such
information available.
Software, Upgrades and Additional Copies. “Software” shall include
computer programs, including firmware, as provided to you by Iridium
or a Service Provider, and any upgrades, updates, bug fixes or modified
versions thereto (collectively, “Upgrades”) or backup copies of any of
the foregoing. NOTWITHSTANDING ANY OTHER PROVISION OF THE
AGREEMENT: (1) UNLESS AUTHORIZED BY IRIDIUM, YOU HAVE NO LICENSE
OR RIGHT TO MAKE OR USE ANY ADDITIONAL COPIES OR UPGRADES.
IRIDIUM MAY MAKE SOFTWARE AVAILABLE BASED ON ADDITIONAL
TERMS; (2) USE OF UPGRADES IS LIMITED TO IRIDIUM EQUIPMENT FOR
WHICH YOU ARE THE ORIGINAL END USER PURCHASER OR OTHERWISE
HOLD A VALID LICENSE TO USE THE SOFTWARE WHICH IS BEING
UPGRADED; AND (3) THE MAKING AND USE OF ADDITIONAL COPIES IS
LIMITED TO NECESSARY BACKUP PURPOSES ONLY.
Proprietary Notices. You agree to maintain and reproduce all copyright
and other proprietary notices on all copies, in any form, of the Software
in the same form and manner that such copyright and other proprietary
notices are included on the Software. Except as expressly authorized, you
178
Iridium 9555 Satellite Phone User Manual
Term and Termination. The license granted herein shall remain effective
until terminated. You may terminate the license at any time by destroying
all copies of Software and any Documentation. Your rights under the
license will terminate immediately without notice from Iridium if you fail
to comply with any provision of the license and Limited Warranty. Upon
termination, you shall destroy all copies of Software and Documentation
in your possession or control. All of your confidentiality obligations and
all limitations of liability and disclaimers and restrictions of warranty shall
survive termination.
Export, Re-Export, Transfer and Use Controls. The Software,
Documentation and technology or direct products thereof (hereafter
referred to as Software and Technology), supplied by Iridium are subject
to export controls under the laws and regulations of the United States
(U.S.). You shall comply with such laws and regulations governing export,
re-export, transfer and use of Iridium Software and Technology and will
obtain all required U.S. and local authorizations, permits, or licenses.
Iridium and you each agree to provide the other information, support
documents, and assistance as may reasonably be required by the other in
connection with securing authorizations or licenses.
17: Warranty, Service and Support
shall not make any copies or duplicates of any Software without the prior
written permission of Iridium.
U.S. Government End User Purchasers. The Software and
Documentation qualify as “commercial items,” as that term is defined
at Federal Acquisition Regulation (“FAR”) (48 C.F.R.) 2.101, consisting of
“commercial computer software” and “commercial computer software
documentation” as such terms are used in FAR 12.212. Consistent with
FAR 12.212 and DoD FAR Supp. 227.7202-1 through 227.7202-4, and
notwithstanding any other FAR or other contractual clause to the contrary
in any agreement into which this Limited Warranty may be incorporated,
you may provide to Government end user or Government end user will
acquire, as applicable, the Software and Documentation with only those
rights set forth in this Limited Warranty. Use of either the Software or
Documentation or both constitutes agreement by the Government that
the Software and Documentation are “commercial computer software”
and “commercial computer software documentation,” and constitutes
acceptance of the rights and restrictions herein.
Iridium 9555 Satellite Phone User Manual
179
17: Warranty, Service and Support
180
Iridium 9555 Satellite Phone User Manual
web: www.iridium.com
email: [email protected]
toll free: 1.866.947.4348
phone: +1.480.752.5155
H2UG1002