1
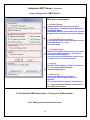
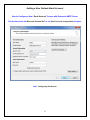
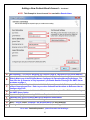
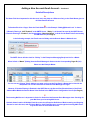
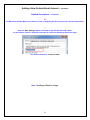
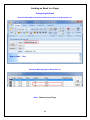
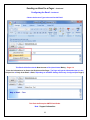
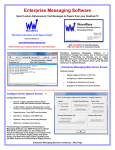
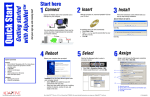
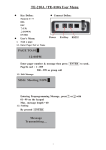
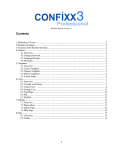
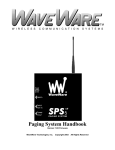
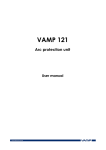
WaveWare Technologies, Inc. “We Deliver Information at the Speed of Light” Enterprise Messaging Software WaveWare Enterprise SMTP Email Server “How-to Send an Email to a Pager” Please Note This “How to Guide” is only for Explaining How to Setup and Configure Enterprise Messaging for use with the Enterprise SMTP Email Server Option and How to Create the Email Account(s) Required in Order to send an Email Message to a Pager. WaveWare Assumes that the Enterprise Messaging Software has already been Installed and Configured and is Sending Messages to Pagers. If Enterprise Messaging Software has Not been Previously Installed and Configured, Please Refer to the Enterprise User Manual for Complete Setup and Configuration Information. This Guide will be working with Microsoft Outlook 2007 as our Email Account Configuration Examples. Quick Overview What you need to get Started: Purchase and Install the “Unlimited Clients” Version of Enterprise Messaging Software Purchase and Install the Enterprise Messaging “SMTP Email Server” Option Register to Activate Both the Enterprise Messaging Server and the SMTP Email Server In Order to Send an Email to a Pager: Configure the Enterprise Messaging Server Recipients (The Pagers and the Associated Names) Configure the Enterprise Messaging SMTP Email Server (Recipient Message Formatting and Domain) Configure the Email Account(s) to be used with the Enterprise SMTP Email Server and Recipients Options of what can be seen on the Display of the Pager: Identifying the Sender of the Email Message Use the Subject Line of the Email Message Use the Body of the Email Message All of the Above 1 WaveWare Technologies, Inc. “We Deliver Information at the Speed of Light” Enterprise Messaging Software Getting Started Configuring the Enterprise Messaging Server “Recipients” The Recipients should have been “Configured” Previously, from when Enterprise was “Originally” Setup. If Not, Please do so before Proceeding any further. Please refer to the Enterprise User Manual. For use with SMTP, we will be Referring to the “Address” and the “Name” Fields of this Screen. Address and Name Fields: The “Address Field” is where you Enter the Pager ID Assigned to the Name The “Name Field” is where you Enter the Name that will be Associated with the Pager ID We will be Sending an Email Message to the “Name” Associated with the “Pager ID”. In this example, only Email Messages Addressed to Bob, Curtis, Bobby, or Dick will be Successfully Processed by the SMTP Server. Examples of Successful “Email To: Addresses” are [email protected] and [email protected] Note: As you can see in this Screen, you can also Enter the Email Address to be Associated with a Name. This is used within the Enterprise “Client” itself so that a User can Send a Custom Message to an Email Address instead of a Pager Directly from the Enterprise Client. 2 Enterprise SMTP Server Configuring the Enterprise Client “SMTP Server” Note: The SMTP Server function runs in one instance of the Enterprise Messaging Client Windows Application. From the Client Main Screen’s Menu Bar, Click on the “Configure” Text and from the Drop-Down Menu, Click on “Mail Server” Click on “Mail Server” Next: SMTP Server Configuration 3 Enterprise SMTP Server – Continued How to Configure the “SMTP Server” SMTP Server Configuration A – Domain Filtering: If Enabled, SMTP Server only Processes Email Messages whose “To: Address Domain” Matches the entered Domain Name. If not Enabled, SMTP Server does NOT Filter out Email Messages Based on Domain Name in the To: Address. B – Recipient Message Formatting: For allowing the Choice of what Information is Sent to an Email Recipient or to a Pager. Check all the Apply. C – Group Messaging: If Enabled, will Compare the Email Name in the Client Groups List and Send a Message to all the Names Associated to that Group Name. If not, then only the Client Recipient List will be used for Comparison to Incoming Email Names. D – Logging: If Enabled, Allows Logging of all SMTP Transactions. Note: This should only be Enabled for Troubleshooting Purposes. E – Registration: Tells you if the SMTP Server is Enabled. If not Enabled, then this Option needs to be Registered. This is a Separate Feature Option to be Purchased. Note: Please see the User Manual for Instructions on How to Register this Option. To Purchase the SMTP Email Option - Contact your Software Dealer. Next: Adding a New Outlook Email Account 4 Adding a New Outlook Email Account How to Configure a New “Email Account” for use with Enterprise SMTP Server This Section works with Microsoft Outlook 2007 as our Email Account Configuration Examples. Next: Configuring this Screen 5 Adding a New Outlook Email Account – Continued NOTE: This Example is for an Account Not used with a Domain Name A B C D E F G H I Not Important – This Can be Anything, but Could be used as a Reference to the Email Address Important – This is the Outgoing Email “To: address”. The Part Before the @ Character should Exactly Match one of the Recipient Names Configured in Enterprise Messaging Software. The Part After the @ Character is Only Important if you Enable Domain Filtering in the SMTP Server as shown on page 4. Important – Outlook Requires this to be Valid in Order to Successfully Retrieve your Email without Generating an Error. Refer to your other Outlook Email Accounts to Reference How to Configure this Field. Important – This needs to be Set to the IP Address of the Enterprise Client PC that is Running the SMTP Server Option Important Only if your Incoming Mail Server Requires Authorization Important Only if your Incoming Mail Server Requires Authorization Test – Click to Test the New Account Settings Next – Click to Finish “Complete” this Account Setup (To Save Settings) Naming – Click to be able to “Name” this New Account, see: Page 9 For a more “Detailed Explanation”, please Proceed to the Next Page… 6 Adding a New Account Email Account – Continued Detailed Descriptions A The Name Field isn’t Important for this Account, but it may help as a Reference Only, to the Email Name given to this Non-Domain Account B To Send an Email to a Pager, Enter the Email Address. In this Example “[email protected]” is shown. If Domain Filtering is “NOT Enabled” in the SMTP Server, “Bobby” is all that will be used by the SMTP Server. If Domain Filtering is “Enabled”, the Domain Name “Must also Match” in Order for the Email to be Processed by the SMTP Server (See Page 4). In the following example, the E-mail name is Bobby and the Domain Name is Webmail.com The SMTP Server will then look for “Bobby” in the Enterprise Messaging Recipient List for a Match. When it finds a “Match” (Bobby) then the Email Message is Sent out to the Corresponding Pager ID (101). Please see the Example Below: You can use any “Bogus” Email Address you want, as long as the First Part is a Name that is Listed in the Recipients List in order to be able to Send an Email Message to a Pager. However, if Domain Filtering is Enabled in the SMTP Server, the Second Part (Domain Name) of the Email Address Must Match the Domain Name Value Defined in the SMTP Server Configuration Screen (See Page 4). C The Incoming Mail Server is Important in Order for Outlook to Not Generate Error Messages when Checking for your Mail from your Incoming Mail Server. Outlook allows Creation of Multiple Email Accounts, but it Requires Definition of Both Incoming and Outgoing Servers for each Account, and will Check Mail for each Email Account, even though the Incoming Mail Server may be the same for each Email Account. 7 Adding a New Email Account – Continued Detailed Descriptions - Continued D The Outgoing Mail Server Field has to be Correct so that Outlook can Communicate to the Enterprise SMTP Server and Deliver Email messages. The IP Address that you should Enter is the IP Address of the PC that is Running Enterprise Messaging Client with the SMTP Server Option Enabled. That PC Must have a “Static IP Address” in Order for the Email Connection to Remain Stable. E and F The Software doesn’t care what Name is in this Field and also the Password can be left Blank, unless the “Outgoing Mail Server” Requires Authentication. Refer to your other Outlook Email Accounts to Reference How to Configure these Fields. G This is to Test the Non-Domain Account. Click the “Test Account Settings” Button. All Tests should Pass Before you can Continue. 8 Adding a New Outlook Email Account – Continued Detailed Descriptions – Continued H You Must Click the Next Button to be able to “Finish” Configuring this Account (Save this Account Information). I Click the “More Settings” Button, to be able to give this New Account a Name. You will need to “Choose” the Email Account to be used when Sending an Email to a Pager. This Account is Named: Enterprise SMTP Next: Sending an Email to a Pager 9 Sending an Email to a Pager Configuring the Email Enter the Email Address that Starts with a Name that is in the Recipients List. Enterprise Messaging Server Recipients List Next: Choose Account Type 10 Sending an Email to a Pager - Continued Configuring the Email - Continued Choose the Account Type to be used for this Email. This Email will be Sent via the New Account to Recipient Named Bobby – Pager 101 Enter the Information to be Sent to the Recipient of the Pager. The Pager will get the Information that is in the Subject Line or Body of the Email or Both, Depending on the SMTP Settings Previously Configured (See Page 4). This Ends the Enterprise SMTP Email Guide. Next: Support Information 11 Support Information Users, Contact your Software Dealer for Support Dealers Contact WaveWare for Support WaveWare Technical Support: [email protected] or 1.800.373.1466 x216 Software Developed by WaveWare Technologies, Inc. Copyright © 2013