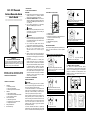
1
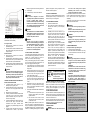
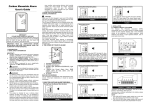
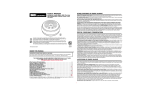
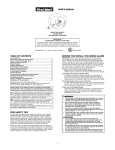
D.C. 12V Powered
Carbon Monoxide Alarm
User’s Guide
1. INTRODUCTION
1.1 BASIC SAFETY INFORMATION
IMPORTANT!
l
Dangers, Warnings, and Cautions alert you to important
operating instructions or to potentially hazardous
situations. Pay special attention to these items.
l
THIS IS NOT A SMOKE ALARM! This CO Alarm is
designed to detect carbon monoxide from ANY source
of combustion. It is NOT designed to detect smoke, fire,
or any other gas.
l
This CO Alarm is approved for use in single-family
residences. It is NOT designed for marine use.
!
l
IMPORTANT!
PLEASE READ CAREFULLY AND SAVE.
This user’s manual contains important information about
your Carbon Monoxide (CO) Alarm’s operation. If you are
installing this CO Alarm for use by others, you must leave
this manual—or a copy of it—with the end user.
IMPORTANT! READ ALL INSTRUCTIONS BEFORE
INSTALLATION AND KEEP THIS MANUAL NEAR THE
ALARM FOR FUTURE REFERENCE.
CONTENTS OF THIS MANUAL
1.
2.
3.
4.
5.
Introduction
l Basic Safety Information
l How Your CO Alarm Works
l What the Lights and Alarm Tones Mean
Installation
l Where to Install CO Alarms
l Where CO Alarms Should NOT Be Installed
l How to Install Your CO Alarm
If Your CO Alarm Sounds
l If the Alarm Signal Sounds
l Finding the Source of CO After an Alarm
l Using the Silence Feature
Testing and Maintenance
Service and Warranty
! CAUTION!
This CO Alarm will only indicate the presence of carbon
monoxide gas at the sensor. Carbon monoxide gas
may be present in other areas.
! ! WARNING!
l
The Silence Feature is for your convenience only and
will not correct a CO problem. Always check your home
for a potential problem after any alarm. Failure to do so
can result in injury or death.
l
This CO Alarm cannot operate without continuous
electricity. It does not operate during a power failure.
l
NEVER ignore your Carbon Monoxide Alarm if it alarms.
Refer to “If Your CO Alarm Sounds” for more
information. Failure to do so can result in injury or
death.
l
Test the CO Alarm once a week. If the CO Alarm ever
fails to test correctly, have it replaced immediately! If
the CO Alarm is not working properly, it cannot alert you
to a problem.
l
This product is intended for use in ordinary indoor
locations of family living units. It is not designed to
measure CO levels in compliance with Occupational
Safety and Health Administration (OSHA) commercial
or industrial standards. Individuals with medical
conditions that may make them more sensitive to
carbon monoxide may consider using warning devices
which provide audible and visual signals for carbon
monoxide concentrations under 30 ppm. For additional
information on carbon monoxide and your medical
condition contact your physician.
1.2 HOW YOUR CO ALARM WORKS
GENERAL INFORMATION
!
CAUTION!
Leave your CO Alarm plugged in year-round. CO problems
can occur any time during the year, and this Alarm can only
alert you if it is plugged in and receiving power.
This CO Alarm is intended for use in a standard DC12V
power supply. It is not intended for use in extension cords,
power strips, or outlets controlled by a switch or dimmer.
These may not provide continuous power to the unit.
When fully powered, it samples the air and takes a new
reading about every second. A microchip inside the unit
stores each reading, and remembers the levels of CO it has
been exposed to over time. The unit goes into alarm mode
when it has been exposed to a “critical” level of CO
(measured in parts per million or “ppm”) within a specified
time (measured in minutes).
This Carbon Monoxide Alarm features a permanently
installed sensor, three colored indicator lights, and an 85dB
alarm horn. It also has a Silence Feature to temporarily quiet
the alarm horn.
During an Alarm
THE COVER OF YOUR CO ALARM
4
1
Green light ON, Yellow light OFF, Red light
FLASHES. Horn ON. Relay output
FIGURE 4
2
5
3
During an Fault(Alarm Malfunction)
6
1.
2.
3.
4.
5.
6.
POWER Light (Green)
Test/Silence Button
(Behind the Cover) Alarm Horn: 85dB audible alarm for
test, alarm, and unit malfunction warning.
ALARM Light (Red)
FAULT(SERVICE) Light (Yellow)
Air Vents
MALFUNCTION WARNING
This unit performs self-diagnostic tests approximately every
second. If the Alarm malfunctions, it should be replaced
immediately.
Green light ON. Red light OFF. Yellow light ON.
Horn chirp once per two seconds
FIGURE 5
Using the Silence Feature in Alarm
1.3 WHAT THE LIGHTS AND ALARM TONES MEAN
During Power Up (Sensor Warm Up time)
Green light ON, Yellow light OFF, Red light
FLASHES. Horn OFF. Relay output
Green light ON & red lights OFF. Yellow Flashes
Horn “chirps” once when power up, and “chirp” twice
at the end of Warm Up time.
FIGURE 1
FIGURE 6
2. INSTALLATION
2.1 WHERE TO INSTALL CO ALARMS
The National Fire Protection Association (NFPA)
recommends that a CO Alarm should be centrally located
outside of each separate sleeping area in the immediate
vicinity of the bedrooms. For added protection, install
additional CO Alarms in each separate bedroom, and on
every level of your home.
During Normal Operating status
BEDROOM
LIVING ROOM
BEDROOM
BEDROOM
HALL
KITCHEN
GARAGE
BASEMENT
Green light ON & Yellow OFF. Horn silent.
Red lights flashes once per 8 to 10 seconds.
FIGURE 2
REQUIRED TO MEET NFPA RECOMMENDATIONS
SUGGESTED AREAS FOR INSTALLING ADDITIONAL CO ALARMS
FIGURE 7
During Normal Test
All three lights ON. Horn ON
FIGURE 3
FIGURE 8 UNIT & INSTALLATION BRACKET
l
l
! !
! !
FIGURE 9 TERMINAL WIRING
If your bedroom hallway is longer than 40 feet, install a CO
Alarm at BOTH ends of the hallway.
In a Single-level Home:
l
Install at least one CO Alarm near or within each
separate sleeping area.
l
For added protection, install an additional CO Alarm at
least 20 feet (6 meters) away from the furnace or fuel
burning heat source.
In a Multi-level Home:
l
Install at least one CO Alarm near or within each
separate sleeping area.
l
For added protection, install at least one CO Alarm on
each level of the home. If you have a basement, install
that CO Alarm at the top of the basement stairs.
l
For added protection, install an additional CO Alarm at
least 20 feet (6 meters) away from the furnace or fuel
burning heat source.
! !
WARNING!
This unit does not work without power. Choose an
outlet where it can’t be accidentally unplugged or
switched off by children. Keep small children away
from the unit. Teach them not to play with it or
unplug it. Explain what the alarms mean.
2.2 WHERE CO ALARMS SHOULD NOT BE INSTALLED
DO NOT LOCATE THIS CO ALARM:
l
In garages, kitchens, furnace rooms, or in any
extremely dusty, dirty or greasy areas.
l
Closer than 20 feet from a furnace or other fuel burning
heat source, or fuel burning appliances like a water
heater.
l
Within 5 feet of any cooking appliance.
l
In extremely humid areas. This alarm should be at least
10 feet from a bath or shower, sauna, humidifier,
vaporizer, dishwasher, laundry room, utility room or
other source of high humidity.
l
In areas where temperature is colder than 40°F (4°C) or
hotter than 100°F (38°C). These areas include
unconditioned crawl spaces, unfinished attics,
uninsulated or poorly insulated ceilings, porches, and
garages.
l
In turbulent air, like near ceiling fans, heat vents, air
conditioners, fresh air returns, or open windows.
! !
Blowing air may prevent CO from reaching the sensors.
In direct sunlight.
In outlets covered by curtains or other obstruction.
WARNING!
This CO Alarm is designed for use inside a
single-family home or apartment. It is not meant to
be used in common lobbies, hallways, or
basements of multi-family buildings unless working
CO Alarms are also installed in each family living
unit. CO Alarms in common areas may not be heard
from inside individual family living units.
WARNING!
This CO Alarm alone is not a suitable substitute for
complete detection systems in places which house
many people, like hotels or dormitories, unless a
CO Alarm is also placed in each unit.
WARNING!
DO NOT use this CO Alarm in warehouses,
industrial or commercial buildings, special-purpose
non-residential buildings, RVs, boats, or airplanes.
This CO Alarm is specifically designed for
residential use, and may not provide adequate
protection in non-residential applications.
2.3 HOW TO INSTALL YOUR CO ALARM
This CO Alarm cannot operate without continuous electricity.
It does not operate during a power failure. Do not use in an
extension cord, or outlet controlled by a dimmer or
switch—unit must have a constant power supply.
Leave your CO Alarm plugged in year-round. CO problems
can occur any time during the year, and this alarm can only
alert you if it is plugged in and receiving power.
1.
Connect DC12V to the unit. In horizontally or vertically
positioned wall outlets, mount unit with Test button
facing upward.
2.
Make sure green light shines when you plug in the unit.
It will shine continuously when unit is receiving power.
The horn will “chirp” once during power up, or when
power is restored after an outage.
3.
Test by pressing the Test button firmly until the unit
sounds. The sound would sound. During testing, the
green, yellow, and red lights ON or flash. This is
normal.
4.
While testing the unit, have a family member check
that the horn can be easily heard from the sleeping
areas. The unit should be located where it can wake
you if it alarms at night.
5.
Find the pair of self-adhesive labels included with this
CO Alarm.
l
On each label write in the phone number of your
emergency responder (like 911) and a qualified
appliance technician.
l
Place one label near the CO Alarm, and the
other label in the “fresh air” location you plan to
go if the alarm sounds.
NOTE: A qualified appliance technician is defined as “a
person, firm, corporation, or company that either in person or
through a representative, is engaged in and responsible for
the installation, testing, servicing, or replacement of heating,
ventilation, air conditioning (HVAC) equipment, combustion
appliances and equipment, and/or gas fireplaces or other
decorative combustion equipment.”
3. IF YOUR CO ALARM SOUNDS
Actuation of your CO alarm indicates the presence of carbon
monoxide (CO) which can kill you. In other words, when your
CO Alarm sounds, you must not ignore it!
3.1 IF THE ALARM SIGNAL SOUNDS:
1.
Operate the Test/Silence button.
2.
Call your emergency services, fire department or 911.
Write down the number of your local emergency
service here:
________________________________________
3.
Immediately move to fresh air—outdoors or by an
open door or window. Do a head count to check that
all persons are accounted for. Do not reenter the
premises, or move away from the open door or
window until the emergency services responder has
arrived, the premises have been aired out, and your
CO Alarm remains in its normal condition.
4.
After following steps 1-3, if your CO Alarm reactivates
within a 24-hour period, repeat steps 1-3 and call a
qualified appliance technician to investigate for
sources of CO from fuel-burning equipment and
appliances, and inspect for proper operation of this
equipment. If problems are identified during this
inspection have the equipment serviced immediately.
Note any combustion equipment not inspected by the
technician,
and
consult
the
manufacturers’
instructions, or contact the manufacturers directly, for
more information about CO safety and this equipment.
Make sure that motor vehicles are not, and have not,
been operating in an attached garage or adjacent to
the residence. Write down the number of a qualified
appliance technician here:
______________________________
“ALARM-MOVE TO FRESH AIR”
If you hear the alarm horn and the
red light is on, move everyone to
a source of fresh air.
DO NOT unplug the CO Alarm!
3.2 FINDING THE SOURCE OF CO AFTER AN ALARM
Because CO may dissipate by the time an investigator
arrives, it may be difficult to locate the source of CO. See
“What You Need to Know About CO.” Convoy Security
Technology shall not be obligated to pay for any carbon
monoxide investigation or service call.
3.3 USING THE SILENCE FEATURE
The Silence Feature is intended to temporarily silence your
CO Alarm’s alarm horn while you correct the problem—it will
not correct a CO problem. While the alarm is silenced, it will
continue to monitor the air for CO.
When CO reaches alarm levels, the alarm will sound. Press
and hold the Test/Silence button until the horn is silent. The
initial Silence cycle will last approximately 4 minutes.
4. TESTING AND MAINTENANCE
4.1 WEEKLY TESTING
!
WARNING!
! Test the CO Alarm once a week. If the CO Alarm
ever fails to test correctly, have it replaced
immediately! If the CO Alarm is not working
properly, it cannot alert you to a problem.
Push and hold the Test button on the cover until a loud alarm
sounds. The alarm sequence should last for 5-6 seconds. If
the CO Alarm ever fails to test properly, replace it
immediately.
If the CO Alarm is not working properly, refer to the “Limited
Warranty” at the end of this manual.
! !
! !
WARNING!
The Test button is the only proper way to test the
CO Alarm.
NEVER use vehicle exhaust! Exhaust may cause
permanent damage and voids your warranty.
WARNING!
DO NOT stand close to the CO Alarm when the horn
is sounding.
Exposure at close range may be harmful to your
hearing. When testing, step away when horn starts
sounding.
4.2 REGULAR MAINTENANCE
To keep the CO Alarm in good working order:
l
Test it every week using the Test button.
l
Vacuum the CO Alarm cover at least twice a year, using
the soft brush attachment. Test the CO Alarm again
after vacuuming.
! !
CAUTION!
DO NOT spray cleaning chemicals or insect sprays
directly on or near the CO Alarm. DO NOT paint
over the CO Alarm. Doing so may cause permanent
damage.
IMPORTANT!
Household cleaners, aerosol chemicals and other
contaminants can affect the sensor. When using
any of these materials near the CO Alarm, make
sure the room is well ventilated.
IMPORTANT!
If your home is being fumigated, unplug the unit
temporarily and put it where it will not be exposed
to chemicals or fumes. When fumigation is
complete and all traces of fumes clear, plug the unit
back in and retest it.
5. SERVICE and WARRANTY
l
Install and adjust according to this guide book.
l
Check the detector once a week; please keep contact
with the service provider immediately if you get some
problems.
l
Do not tear down or sling the detector randomly.
l
Do not use chemicals to clean the detector directly, or
wash with water.
l
The detector is designed with automatic detection, if the
gas sensor or unit in error, do not disassemble the unit
yourself, but get advice from professional company or
service provider.
l
The manufacturer guarantees to take the responsibility
for free repair and exchange for one year from the date
of purchase if there is quality problem, and only charge
for capital cost beyond one year.