1
User Manual Thermo Scientific Orion Dual Star pH/ISE Dual Channel Benchtop Meter 255100-001 • Revision C • June 2015 Important Note Please read this user guide thoroughly before using your meter. Any use outside of these instructions may invalidate your warranty and cause permanent damage to the meter. Contact Information For assistance with Thermo Scientific™ Orion™ products, contact Technical Support by email at [email protected] or by phone – within the United States call 1-800-225-1480 and outside the United States call +1-978-232-6000 or fax +1-978-232-6031. For additional product information, contact your local authorized dealer, local Thermo Scientific Orion technical sales representative or contact us using the Water and Laboratory Products (WLP) information on the page back of this manual. Applications and Technical Resources Visit www.thermoscientific.com/water to view Thermo Scientific Orion products and download product literature, user guides and manuals, software updates, and the latest application and technical resources including the Thermo Scientific™ Orion™ Dual Star™ meter technical notes for Ammonia in Water and Wastewater, Fluoride in Water and Wastewater, Nitrate in Water and Wastewater, and pH of Water and Wastewater. These technical notes provide step-by-step illustrated instructions for performing common measurements on the Orion Dual Star meter. Table of Contents Section 1 ....................................................................................................................... 6 Meter Introduction ........................................................................................................ 6 Meter Overview............................................................................................................................ 6 Redesigned Orion Dual Star Meters .................................................................................. 7 Meter Packing List ....................................................................................................................... 7 Intended Use ............................................................................................................................... 7 Section 2 ....................................................................................................................... 8 Meter Basics ................................................................................................................. 8 Using the Universal Power Adapter ............................................................................................. 8 Attaching the Electrode Stand and Holder ................................................................................... 9 Using the Electrode Holder .............................................................................................. 10 Powering the Meter On and Off ................................................................................................. 10 Meter Maintenance .................................................................................................................... 10 Meter Components .................................................................................................................... 11 Meter Connections ........................................................................................................... 12 Channel 1 and Channel 2 Inputs ...................................................................................... 13 Connecting Electrodes and Cables to the Meter .............................................................. 13 Meter Keypad ................................................................................................................... 14 Alphanumeric Keypad ...................................................................................................... 15 Meter Display ................................................................................................................... 16 Section 3 ..................................................................................................................... 18 Meter Setup ................................................................................................................. 18 EZ Startup Menu........................................................................................................................ 18 Setup Menu ............................................................................................................................... 22 Navigating the Setup Menu .............................................................................................. 22 Channel 1 and Channel 2 Setup Menus .......................................................................... 23 Instrument Parameters Setup Menu ................................................................................ 28 Autosampler Setup Menu ................................................................................................. 33 Incremental Techniques Setup Menu............................................................................... 33 GLP Setup Menu.............................................................................................................. 33 EZ Startup Setup Menu .................................................................................................... 33 Section 4 ..................................................................................................................... 34 Calibration and Measurement ................................................................................... 34 pH Calibration and Measurement .............................................................................................. 34 pH Calibration Hints ......................................................................................................... 34 pH Calibration Procedure (1 to 6 points) .......................................................................... 35 pH Measurement Procedure ............................................................................................ 36 ISE Calibration and Measurement ............................................................................................. 37 ISE Calibration Hints ........................................................................................................ 37 ISE Calibration Procedure (2 to 6 points) ......................................................................... 37 ISE Measurement Procedure ........................................................................................... 39 mV Measurement and RmV and ORP Calibration and Measurement ....................................... 40 mV Measurement Procedure ........................................................................................... 40 RmV Calibration Hints ...................................................................................................... 41 RmV Calibration Procedure.............................................................................................. 41 RmV Measurement Procedure ......................................................................................... 42 ORP Calibration Hints ...................................................................................................... 42 ORP Calibration Procedure .............................................................................................. 43 ORP Measurement Procedure ......................................................................................... 44 Temperature Calibration and Measurement .............................................................................. 45 Temperature Calibration Procedure ................................................................................. 45 Section 5 ..................................................................................................................... 46 Methods ....................................................................................................................... 46 Saving the Current Meter Settings as a New Method ................................................................ 47 Loading an Existing Method ...................................................................................................... 47 Editing or Printing an Existing Method ....................................................................................... 48 Coping an Existing Method ........................................................................................................ 48 Deleting an Existing Method ...................................................................................................... 49 Section 6 ..................................................................................................................... 50 Incremental Techniques............................................................................................. 50 Electrode ID and Slope for Incremental Techniques ................................................................. 51 Single Known Addition ............................................................................................................... 52 Single Known Addition Procedure .................................................................................... 52 Double Known Addition ............................................................................................................. 54 Double Known Addition Procedure .................................................................................. 54 Single Known Subtraction.......................................................................................................... 56 Single Known Subtraction Procedure............................................................................... 56 Double Known Subtraction ........................................................................................................ 58 Double Known Subtraction Procedure ............................................................................. 58 Section 7 ..................................................................................................................... 60 Data Storage and Retrieval ........................................................................................ 60 Data Storage Settings................................................................................................................ 60 Viewing the Calibration Log and Data Log................................................................................. 62 Viewing the Calibration Log.............................................................................................. 62 Viewing the Data Log ....................................................................................................... 62 Interfacing a Printer ................................................................................................................... 64 Interfacing a Computer .............................................................................................................. 64 Meter Software Upgrade............................................................................................................ 65 Section 8 ..................................................................................................................... 66 Autosampler Operation .............................................................................................. 66 Interfacing the Meter and Autosampler ...................................................................................... 66 Autosampler Setup Menu .......................................................................................................... 68 Running the Autosampler .......................................................................................................... 70 Autosampler Error Messages ........................................................................................... 71 Section 9 ..................................................................................................................... 72 Customer Services ..................................................................................................... 72 Troubleshooting Guide .............................................................................................................. 72 Electrode Stability Test..................................................................................................... 72 Meter Self Test and Checkout .......................................................................................... 73 User Reset ....................................................................................................................... 74 Factory Configuration ....................................................................................................... 74 About Meter...................................................................................................................... 74 Electrode Condition Icon .................................................................................................. 75 Assistance ................................................................................................................................. 75 Warranty .................................................................................................................................... 75 Meter Error Codes ..................................................................................................................... 76 Over Range Measurements ............................................................................................. 76 Notice of Compliance................................................................................................................. 78 WEEE Compliance .................................................................................................................... 78 Declaration of Conformity .......................................................................................................... 79 Real Time Clock Battery Maintenance....................................................................................... 80 Replacing and Disposing of the Battery ........................................................................... 80 Ordering Information .................................................................................................................. 81 Meter Specifications .................................................................................................................. 84 Section 10.................................................................................................................... 86 Advanced Meter Features .......................................................................................... 86 Multipoint Calibration Curve Feature ......................................................................................... 86 Automatic Blank Correction Feature .......................................................................................... 87 Error Code E306 .............................................................................................................. 88 Isopotential Point Feature .......................................................................................................... 89 Determining an Isopotential Point .................................................................................... 89 Automatic pH Buffer Recognition Feature ................................................................................. 90 Testing a pH Electrode for Automatic Buffer Recognition ................................................ 90 SECTION 1 1 Meter Introduction Meter Overview This user manual contains information on the preparation, operation and maintenance of the Thermo Scientific Orion Dual Star pH/ISE benchtop meter. The Orion Dual Star meter has two measuring channels and is capable of measuring pH, ion concentration (ISE), raw millivolts (mV), relative millivolts (RmV), oxidation-reduction potential (ORP) and temperature. Display Features The large, backlit LCD display on the Orion Dual Star meter shows both measuring channels simultaneously or each measuring channel separately. Step-by-step instructions and prompts are shown on the meter to assist operators with the setup, calibration and autosampler menus. A calibration graph, which includes the electrode slope between points and the average slope, can be viewed in the calibration mode. Data Features The Orion Dual Star meter can save up to 10 calibrations per channel and 1000 data points in the meter data log. A graph of the calibration points with slope can be viewed on the meter display and printed. Calibration and measurement data can be exported from the meter to a printer or computer. The meter saves up to 10 methods per channel, so switching the meter to different testing methods is fast and simple. Troubleshooting Features Troubleshooting procedures are available in the meter setup menu and include a meter stability test, meter self-test and meter reset functions. 6 | Orion Dual Star pH/ISE Benchtop Meter User Manual Thermo Scientific Meter Introduction | Section 1 Redesigned Orion Dual Star Meters Redesigned Orion Dual Star pH/ISE benchtop meters will be available beginning in late June 2015. These Orion Dual Star meters offer a redesigned housing that matches the appearance of our Thermo Scientific™ Orion Star™ A series benchtop meters and Thermo Scientific™ Orion™ Versa Star™ benchtop meters. Additional benefits of redesigned Orion Dual Star meters include the new housing that is compatible with the meter-attachable electrode stand (Cat. No. STARA-BEA) and this stand will be included with all redesigned Orion Dual Star meters and new Dual Star Com communication software. The Orion Dual Star meter operation workflows, functions, user interface, specifications and catalog numbers are the same between current and redesigned Orion Dual Star meters. Meter Packing List Thermo Scientific Orion Dual Star pH/ISE benchtop meters include: • Orion Dual Star meter with two BNC shorting caps (Cat. No. 090045) • Meter-attachable electrode stand and holder, Cat. No. STARA-BEA • Universal power adapter, Cat. No. 1010003 • Literature CD • Printed quick start guide • Computer interface cable • Meter test certificate Each Orion Dual Star meter is fully tested and certified by Thermo Fisher Scientific and a certificate of calibration is included with each meter. For specific meter and kit contents, refer to the Ordering Information section of this user manual and select from meter kits that include Thermo Scientific™ Orion™ ROSS Ultra™ pH electrodes, Thermo Scientific™ Orion™ ROSS Ultra™ Triode™ pH/ATC electrodes Thermo Scientific™ Orion™ ROSS™ Sure-Flow™ pH electrodes and Thermo Scientific™ Orion™ ROSS™ solutions. To download free Orion Dual Star Com data transfer computer software and the Dual Star USB driver, please visit our website at www.thermoscientific.com/OrionMeters. Intended Use Please read this reference guide thoroughly. Any use outside of these instructions may invalidate the meter warranty and cause permanent damage to the meter. Thermo Scientific Orion Dual Star pH/ISE Benchtop Meter User Manual | 7 SECTION 2 2 Meter Basics Using the Universal Power Adapter A universal power adapter (Catalog Number 1010003) with US, EU, UK and China plug plates is included with the Orion Dual Star pH/ISE benchtop meters. This universal power adapter is specifically for use with Orion Dual Star benchtop meters. Use of other power adapters can damage the meter and void the warranty. 1. Select the appropriate plug plate for the power outlet that will be used. 2. Remove the clear plastic cover from the groove on the back of the power adapter. 3. Slide the appropriate plug plate into the groove on the back of the power adapter. 4. Connect the assembled power adapter to a power outlet and the meter input labeled Power. A surge protector or uninterrupted power supply (UPS) is also recommended. 8 | Orion Dual Star pH/ISE Benchtop Meter User Manual Thermo Scientific Meter Basics | Section 2 Attaching the Electrode Stand and Holder Redesigned Orion Dual Star meters are compatible with the meter-attachable electrode stand (Cat. No. STARA-BEA) shown below. The electrode stand can be attached to either side of the meter and up to two stands can be attached to each meter. A weighted base (Catalog Number STARA-HB) is also available to support the stand without attachment to the meter. Older style Orion Dual Star meters can be used with this electrode stand, but require additional purchase of the weighted base (Catalog Number STARA-HB). 1. Open the box containing the electrode stand. The box will include a base plate, electrode arm, pivot pin, electrode holder, ATC spacer and RDO clip. 2. Turn the meter over, with the meter display facing down, on a clean dry surface. 3. Identify the side of the meter that the stand will be installed on and remove the screw between the circles on that side of the meter. 4. Align the base plate of the stand with the circles on the meter. 5. Replace the screw from step 3 to attach the base plate to the meter. 6. Turn the meter over, with the meter display facing up. 7. Insert the electrode arm into the metal post on the base plate. 8. Connect the electrode holder to the electrode arm using the pivot pin. Thermo Scientific Orion Dual Star pH/ISE Benchtop Meter User Manual | 9 Section 2 | Meter Basics Using the Electrode Holder Place electrodes in the stand for easy movement in and out of containers during calibration, sample measurement and storage. Recommended electrode positions are shown below. 15 mm holder for conductivity and dissolved oxygen sensors Holder with 20° angle for gas sensing ion selective electrodes 12 mm flexible holder for pH, ORP and ion selective electrodes Stirrer probe holder 12 mm holder with optional ATC probe insert Optional RDO optical dissolved oxygen sensor holder Powering the Meter On and Off 1. If the meter is not connected to a wall outlet via the universal power adapter, select the appropriate wall outlet plug and slide the plug plate it into the groove on the power adapter. Connect the power adapter to the meter and wall outlet. 2. Press and hold the power key for about three seconds to turn on the meter. 3. When the meter is on, press and release the power key to turn the display backlight off or to vary the intensity of the backlight. There are five levels of intensity that the power key can be used to select. 4. To turn off the meter, press and hold the power key for about three seconds, until the meter display is blank. Meter Maintenance For routine meter maintenance, dust and wipe the meter with a damp cloth. If necessary, warm water or a mild water-based detergent can be used. Meter maintenance can be performed on a daily, weekly or monthly basis, as required by the environment in which the meter is operated. Immediately remove any spilled substance from the meter using the proper cleaning procedure for the type of spill. 10 | Orion Dual Star pH/ISE Benchtop Meter User Manual Thermo Scientific Meter Basics | Section 2 Meter Components BNC Inputs Channel Number Designations Dual Channel Display Keypad Thermo Scientific Orion Dual Star pH/ISE Benchtop Meter User Manual | 11 Section 2 | Meter Basics Meter Connections BNC – Input for pH electrode, ion selective electrode (ISE) or ORP/redox electrode with BNC or waterproof BNC connectors. Ref. – Input for reference electrodes with standard 2.5 mm pin-tip connectors. ATC – Input for ATC probes with 8 pin MiniDIN connectors. Stirrer – Input for the Thermo Scientific™ Orion Star™ series stirrer probe, Catalog Number 096019. The stirrer probe can be purchased separately as a meter accessory. USB – Input for the USB cable, used to connect the meter to a computer. RS232 – Input for the RS232 cable, used to connect the meter to a printer or computer. Ground – Input for a ground wire with a standard pin-tip connector. Power – Input for the universal power adapter that is included with the meter. 12 | Orion Dual Star pH/ISE Benchtop Meter User Manual Thermo Scientific Meter Basics | Section 2 Channel 1 and Channel 2 Inputs The BNC, Ref., and ATC connections are labeled as Channel 1 or Channel 2 on the ridge above the connections. Using the meter orientation shown below, the channel 2 connections are on the left and the channel 1 connections are on the right. Channel 2 BNC Input Channel 1 BNC Input Channel 2 Ref. Input Channel 2 ATC Input Channel 1 ATC Input Channel 1 Ref. Input Connecting Electrodes and Cables to the Meter 1. Connect the pH electrode, ion selective electrode (ISE) and/or ORP/redox electrodes to the BNC inputs on the meter. Attach a BNC connector to the meter input by sliding the connector onto the input, pushing down on the connector and turning the connector clockwise to lock it into position. 2. Connect the reference electrodes to the reference inputs on the meter. Note: If a combination electrode is used, a reference electrode is not needed. 3. Connect the ATC probes to the 8 pin MiniDIN inputs on the meter. The ATC connector has a clip that locks the connection and prevents it from detaching from the meter. 4. Connect the stirrer probe, Catalog Number 096019, to the stirrer input on the meter. 5. To connect a printer to the meter, connect an RS232 printer cable to the RS232 inputs on the meter and printer. The Orion Star series printer, Catalog Number 1010006, is recommended for use with this meter and includes the appropriate RS232 printer cable. 6. To connect a computer to the meter, connect the USB computer cable to the USB inputs on the meter and computer or connect the RS232 computer cable, Catalog Number 1010053, to the RS232 inputs on the meter and computer. Thermo Scientific Orion Dual Star pH/ISE Benchtop Meter User Manual | 13 Section 2 | Meter Basics Meter Keypad Press the shortcut keys in the measurement mode to move quickly to different meter menus. Press the or key to scroll through a list of options on the display. The or key will loop through a list, so the meter returns to the first item on the list after scrolling past the last item on the list. Use the numeric keypad, decimal key and +/- key when entering a number. Key Description To turn the meter on, press and hold down the power key for about three seconds until the meter turns on. When the meter is on, press and quickly release the power key to turn the display backlight off or to vary the intensity of the backlight. To turn the meter off, press and hold down the power key for about three seconds until the meter turns off. Press the f1, f2 and f3 function keys to perform the action shown above each key on the display. The f1, f2 and f3 keys have menudependent functions. Press the channel key to display channel 1 only, channel 2 only or a split screen with channel 1 (top) and channel 2 (bottom). Press the measure (esc) key to return to the meter to the measurement mode. The measure (esc) key can be used as an escape key in most meter menus. Press to enter a value of one (1) when using the numeric keypad. Press the key to scroll up through lists of items on the display. The key will to loop through a list, so the meter will go to the last item on the list after scrolling past the first item on the list. Press to enter a value of two (2) when using the numeric keypad. Press the key to scroll down through lists of items on the display. The key will loop through a list, so the meter will go to the first item on the list after scrolling past the last item on the list. Press to enter a value of three (3) when using the numeric keypad. 14 | Orion Dual Star pH/ISE Benchtop Meter User Manual Thermo Scientific Meter Basics | Section 2 Press the log/print key to manually log, print or log and print a measurement. Press to enter a decimal place (.) when using the numeric keypad. Press the cal key to enter the calibration mode. Press to enter a value of four (4) when using the numeric keypad. Press the mode key to change the measurement mode for channel 1 or channel 2. Press to enter a value of five (5) when using the numeric keypad. Press the method key to access the methods list for each channel, existing methods can be selected and run from the list. Press to enter a value of six (6) when using the numeric keypad. Press the log view key to view the data log and calibration log. Press to make a value positive or negative (+/-) when using the numeric keypad. Press the setup key to enter the setup menu. Press to enter a value of seven (7) when using the numeric keypad. Press the res key to change the displayed measurement resolution for channel 1 or channel 2. Press to enter a value of eight (8) when using the numeric keypad. Press the auto key to access the autosampler setup menu. Press to enter a value of nine (9) when using the numeric keypad. Press the stirrer key to turn on and off the stirrer probe. Press to enter a value of zero (0) when using the numeric keypad. Alphanumeric Keypad Use the alphanumeric keypad when entering the electrode serial number, sample ID number and passwords. The alphanumeric keypad works in the same way as a cell phone keypad. For example, press the 2 key to enter 2, A, B or C. Enter the letter B by pressing the 2 key three times (2 → A → B). Uppercase or lowercase letters can be entered by pressing the same key. For example, enter the letter a by pressing the 2 key five times (2 → A → B → C → a). The meter will automatically advance to the next digit when no keys are pressed for three seconds. Thermo Scientific Orion Dual Star pH/ISE Benchtop Meter User Manual | 15 Section 2 | Meter Basics Meter Display Dual Channel Meter Display Single Channel Meter Display Display Icon Description Channel Number – Indicates that channel number that corresponds with the displayed measurement. Press the channel key to scroll through a dual channel display for channel 1 and 2, single display for channel 1 and a single display for channel 2. Electrode ID – Specifies that type of electrode that was selected by the operator. To change the electrode ID, refer to the Setup Menu section. Electrode Serial Number (Single Channel Display Only) – Shows the operator assigned electrode serial number. To change the electrode serial number, refer to the Setup Menu section. Measurement Value – Displays the current electrode reading based on the last saved calibration. 16 | Orion Dual Star pH/ISE Benchtop Meter User Manual Thermo Scientific Meter Basics | Section 2 Display Icon Description Calibration Warning – Indicates that the electrode is calibrated. If the icon is flashing, it indicates that the electrode needs to be calibrated. Calibrate the electrode at least every twelve hours to prevent the icon from flashing. Electrode Condition – Represents the performance of the electrode, based on the last saved calibration and electrode measurement stability. If the electrode icon has two lines, the electrode condition is good. If the electrode icon has one line, the electrode condition is fair. If the electrode icon has a slash through it, the electrode condition is bad. Refer to the Troubleshooting Guide section for more information. Method Number – Shows the method that is currently being used on that channel. To change the method number, refer to the Methods section. Auto-Read (AR) Read Type Indicator – If Auto-Read was selected as the read type, the AR icon will appear when the reading is stable and the display has been locked. To change the read type, refer to the Setup Menu section. Stabilizing/Ready Read Type Indicator – Specifies the measurement stability of the electrode. To change the read type, refer to the Setup Menu section. Measurement Mode – Indicates the unit of measurement for the measurement value and determines the type of calibration that will be performed. To change the measurement mode, refer to the Setup Menu section. If the ISE measurement mode is changed, the electrode must be re-calibrated with new standards that have the same measurement unit as the measurement mode. Temperature Measurement – Displays the current temperature based on the selected ATC probe reading or entered temperature value. To change the temperature display to Celsius or Fahrenheit, refer to the Setup Menu section. Temperature Source – Shows the origin of the current temperature measurement. To change the source of the temperature measurement, refer to the Setup Menu section. mV Measurement – Shows the raw millivolt reading of the electrode. Printer Interface – Indicates if a printer is interfaced with the meter. Computer Interface – Indicates if a computer is interfaced with the meter. The USB icon will only be shown when the meter is connected to a computer via USB input. Timed Interval Read Type Indicator – Indicates when a timed reading is being taken by the meter. To change the read type, refer to the Setup Menu section. Autosampler Interface – Indicates if the meter is running the autosampler. Time and Date (Single Channel Display Only) – Displays the current time and date settings. To change the time and date, refer to the Setup Menu section. Sample ID (Single Channel Display Only) – Shows the operator assigned sample ID number. To change the sample ID number, refer to the Setup Menu section. f1 Function – Displays the action that will be done when the f1 key is pressed. f2 Function – Displays the action that will be done when the f2 key is pressed. f3 Function – Displays the action that will be done when the f3 key is pressed. Thermo Scientific Orion Dual Star pH/ISE Benchtop Meter User Manual | 17 SECTION 3 3 Meter Setup EZ Startup Menu It is highly recommended that the EZ Startup menu be completed the first time that the meter is used. The EZ Startup menu sets important meter parameters, such as the displayed language, date and time, measurement mode and read type for each channel and data output settings. To access the EZ Startup menu from the measurement mode, press the setup key, press the ▲ / ▼ keys to highlight EZ Startup and press the f2 (select) key. 1. Press the ▲ / ▼ keys to highlight English, Español, Deutsch, Français or Italiano as the language that will be displayed on the meter. Press the f2 (select) key to save the setting and proceed to the next EZ Startup menu. 2. Set the time, date and date format. a. To set the time, press the ▲ / ▼ keys to highlight Time and press the f2 (select) key. Use the numeric keypad to set the time in 24 hour format and press the f2 (accept) key. b. To set the date, press the ▲ / ▼ keys to highlight Date and press the f2 (select) key. Use the numeric keypad to set the date (the date format is shown below the date setting) and press the f2 (accept) key. c. To set the date format, press the ▲ / ▼ keys to highlight Date Format and press the f2 (select) key. Press the ▲ / ▼ keys to highlight MM/DD/YYYY to display the date as month/day/year or DD/MM/YYYY to display the date as day/month/year and press the f2 (accept) key. d. Once all of the time and date settings are entered, press the f3 (next) key to save the settings and proceed to the next EZ Startup menu. 18 | Orion Dual Star pH/ISE Benchtop Meter User Manual Thermo Scientific Meter Setup | Section 3 3. Press the ▲ / ▼ keys to highlight pH, ISE (ion concentration), mV (raw millivolts), RmV (relative millivolts) or ORP (oxidation-reduction potential) as the measurement mode for channel 1 and press the f2 (accept) key. The meter will request information based on the selected measurement mode. If channel 1 will not be used, press the f3 (no) key to skip to the next EZ Startup menu. a. ISE only: Press the ▲ / ▼ keys to highlight the displayed ISE units as ppm (parts per million), mg/L (milligrams per liter, % (percent), M (moles per liter) or unitless (no units) and press the f2 (accept) key. b. ISE, RmV and mV only: Press the ▲ / ▼ keys to highlight the electrode ID and press the f2 (accept) key. The electrode ID can be set as pH, ORP, fluoride (F-), ammonia (NH3), ammonium (NH4+), nitrate (NO3-), nitrite (NO2-), sulfide (S-2), chloride (Cl-), chlorine (Cl2), bromide (Br-), iodide (I-), cyanide (CN-), sodium (Na+), potassium (K+), calcium (Ca+2), silver (Ag+), copper (Cu+2), lead (Pb+2), cadmium (Cd+2), perchlorate (ClO4-), fluoroborate (BF4-), thiocyanate (SCN-), nitrogen oxide (NOX), carbon dioxide (CO2), oxygen (O2), monovalent cation (X+), divalent cation (X+2), monovalent anion (X) or divalent anion (X-2). Some of the electrode ID options may not be accessible, depending on the measurement mode that was selected for the channel. c. Press the f2 (yes) key to enter an electrode serial number or press the f3 (no) key to skip this step. To enter an electrode serial number, use the alphanumeric keypad to enter letters and/or numbers. The meter will automatically advance to the next digit when no keys are pressed for three seconds. Press the f3 (clear) key to delete any of the digits. Once the serial number is entered, press the f2 (accept) key. Refer to the meter pullout guide for the location of the letter keys on the numeric keypad. d. pH and ISE only: Press the ▲ / ▼ keys to highlight the measurement resolution and press the f2 (accept) key to save the setting. e. To change the displayed temperature unit to degree Celsius (°C) or degree Fahrenheit (°F), press the ▲ / ▼ keys to highlight Temperature Unit and press the f2 (accept) key. Press the ▲ / ▼ keys to highlight the desired temperature units and press the f2 (accept) key. f. Press the ▲ / ▼ keys to highlight ATC1, ATC2 or Manual as the source of the temperature compensation that will be used for measurements and press the f2 (accept) key to save the setting. Automatic temperature compensation can be performed by connecting an ATC probe to ATC input 1 (ATC1) or ATC input 2 (ATC2) on the meter. If manual temperature compensation is selected, enter the temperature using the numeric keypad and the decimal key. Once the temperature value has been entered, press the f2 (accept) key. g. Press the ▲ / ▼ keys to highlight Auto-Read, On Ready, At Time Intervals, Continuous, Value Change In Measurement or Timed Reading as the read type and press the f2 (accept) key to save the setting. Thermo Scientific Orion Dual Star pH/ISE Benchtop Meter User Manual | 19 Section 3 | Meter Setup i. Auto-Read – The meter will display the measurement as it stabilizes and lock and hold the measurement when it is stable. Once a measurement is locked, press the measure key to take a new measurement. Once the measurement is locked, the meter will automatically export the measurement to the data log, if the data log is enabled in the setup menu, and to a printer or computer, if a printer or computer is connected to the meter and enabled in the setup menu. ii. On Ready – The meter will show stabilizing on the display until the measurement is stable. When the measurement is stable, the meter will show ready on the display. The display will automatically update if the measurement changes and the measurement will not lock. Once ready is shown on the display, the meter will automatically export the measurement to the data log, if the data log is enabled in the setup menu, and to a printer or computer, if a printer or computer is connected to the meter and enabled in the setup menu. iii. At Time Intervals – The meter will read and display a measurement at the set time interval that is programmed by the operator. At the set time interval, the meter will automatically export the measurement to the data log, if the data log is enabled in the setup menu, and to a printer or computer, if a printer or computer is connected to the meter and enabled in the setup menu. If At Time Intervals is selected, enter the time interval value in a hours : minutes : seconds format using the numeric keypad and press the f2 (accept) key. iv. Continuous – The meter will continuously measure and update the display. No indicator will be shown on the display. This read type is useful when performing an experiment that requires continuous measurements to be taken, regardless of the measurement stability. Press the log/print key to export the measurement to the data log, if the data log is enabled in the setup menu, and to a printer or computer, if a printer or computer is connected to the meter and enabled in the setup menu. v. Value Change In Measurement – The meter will display the measurement when the reading reaches or exceeds the set high or low value that is programmed by the operator. When the reading reaches or exceeds the set high or low value, the meter will automatically export the measurement to the data log, if the data log is enabled in the setup menu, and to a printer or computer, if a printer or computer is connected to the meter and enabled in the setup menu. If Value Change In Measurement is selected, press the ▲ / ▼ keys to highlight Min Value, enter the minimum measurement value using the numeric keypad and the decimal key, press the ▲ / ▼ keys to highlight Max Value, enter the maximum measurement value using the numeric keypad and the decimal key and press the f3 (next) key. vi. Timed Reading – The meter will display a measurement after a set time delay and lock and hold the measurement after the time delay is reached. To start another time delay cycle, press the measure key. Once the measurement is locked, the meter will automatically export the measurement to the data log, if the data log is enabled in the setup menu, and to a printer or computer, if a printer or computer is 20 | Orion Dual Star pH/ISE Benchtop Meter User Manual Thermo Scientific Meter Setup | Section 3 connected to the meter and enabled in the setup menu. If Timed Reading is selected, enter the time delay value in a minutes : seconds format using the numeric keypad and press the f2 (accept) key. 4. Repeat step 3 for channel 2. 5. Press the ▲ / ▼ keys to highlight Printer, Computer or None as where the meter will export the measurement and calibration data and press the f2 (accept) key. If Printer or Computer is selected, the meter will prompt the operator to set the baud rate. Press the ▲ / ▼ keys to highlight 1200, 2400, 4800, 9600, 19200 or 38400 as the baud rate and press the f2 (accept) key. 6. Press the f2 (yes) key to enable the exporting of the measurement data to the data log or press the f3 (no) key to disable the exporting of the measurement data to the data log. 7. Press the f2 (measure) key to save the EZ Startup menu settings and proceed to the measurement mode or press the f1 (back) key to edit any of the EZ Startup settings. Thermo Scientific Orion Dual Star pH/ISE Benchtop Meter User Manual | 21 Section 3 | Meter Setup Setup Menu The setup menu can be accessed in the measurement mode by pressing the setup key or by pressing the f3 (setup) key in the dual channel display mode. The setup menu contains seven submenus: Channel 1, Channel 2, Instrument Parameters, Autosampler, Incremental Techniques, GLP and EZ Startup. Settings for each menu can be selected and saved in the setup menu. Navigating the Setup Menu 1. In the setup menu, press the ▲ / ▼ keys to highlight the desired submenu and press the f2 (select) key to view the menu options. 2. Press the ▲ / ▼ keys to highlight the desired menu option and press the f2 (select) key to view the current setting and change the selected setting, if required. 3. If a new setting must be selected from a list of options, press the ▲ / ▼ keys to highlight the desired setting and press the f2 (accept) key. If a new numeric value must be entered, use the numeric keypad, decimal key and +/- key as required and press the f2 (accept) key. 4. Press the f1 (back) key to return to the list of setup submenus. 5. Press the f1 (back) key to return to the measurement mode. 22 | Orion Dual Star pH/ISE Benchtop Meter User Manual Thermo Scientific Meter Setup | Section 3 Channel 1 and Channel 2 Setup Menus Note: Channel 1 and Channel 2 have the same options. However, the options must be set separately for each channel. In the measurement mode, press the setup key to enter the setup menu. Press the ▲ / ▼ keys to highlight Channel 1 or Channel 2 and press the f2 (select) key. Perform the following actions, as required. Measure Mode Press the ▲ / ▼ keys to highlight Measure Mode and press the f2 (select) key. Press the ▲ / ▼ keys to highlight pH, ISE, mV, RmV or ORP as the measurement mode and press the f2 (accept) key. If ISE is selected, press the ▲ / ▼ keys to highlight ppm (parts per million), mg/L (milligrams per liter, % (percent), M (moles per liter) or unitless (no units) as the ISE measurement unit that will be displayed and press the f2 (accept) key. Electrode ID Press the ▲ / ▼ keys to highlight Electrode ID and press the f2 (select) key. Press the ▲ / ▼ keys to highlight the type of electrode and press the f2 (accept) key. The type of electrode can be set as pH, ORP, fluoride (F-), ammonia (NH3), ammonium (NH4+), nitrate (NO3-), nitrite (NO2-), sulfide (S-2), chloride (Cl-), chlorine (Cl2), bromide (Br-), iodide (I-), cyanide (CN-), sodium (Na+), potassium (K+), calcium (Ca+2), silver (Ag+), copper (Cu+2), lead (Pb+2), cadmium (Cd+2), perchlorate (ClO4-), fluoroborate (BF4-), thiocyanate (SCN-), nitrogen oxide (NOX), carbon dioxide (CO2), oxygen (O2), monovalent cation (X+), divalent cation (X+2), monovalent anion (X-) or divalent anion (X-2). Some or all of the electrode ID options may not be accessible, depending on the selected measurement mode for the channel. Electrode Serial Number Press the ▲ / ▼ keys to highlight Electrode Serial Number and press the f2 (select) key. Use the alphanumeric keys to enter a unique number and letter combination for the electrode. The meter will automatically advance to the next digit when no keys are pressed for three seconds. Press the f3 (clear) key to delete any of the numbers or letters. Once the serial number is entered, press the f2 (accept) key. Refer to the meter pullout guide for the location of the letter keys on the numeric keypad. Thermo Scientific Orion Dual Star pH/ISE Benchtop Meter User Manual | 23 Section 3 | Meter Setup Resolution Press the ▲ / ▼ keys to highlight Resolution and press the f2 (select) key. Press the ▲ / ▼ keys to highlight the desired measurement display resolution and press the f2 (accept) key. This menu may not be accessible, depending on the measurement mode that was selected for the channel. Temperature Calibration Note: The meter ATC temperature display has a relative accuracy of ± 0.1 °C. ATC probes have varying temperature accuracies, usually ± 0.5 °C to ± 2 °C. Use this function only if it is necessary to calibrate the temperature readings. Since the temperature offset calculated during the calibration is applied to all future temperature measurements, recalibrate if a different ATC probe is used. Press the ▲ / ▼ keys to highlight Temperature Calibration and press the f2 (select) key. Press the ▲ / ▼ keys to highlight ATC1, ATC2 or ATC1 & ATC2 to select the ATC probe(s) that will be calibrated and press the f2 (select) key. Place the ATC probe(s) and thermometers into a solution with a known, stable temperature. It is recommended that two NIST traceable thermometers be used to measure and verify the temperature of the solution. Wait for the readings of the ATC probe(s) and thermometers to stabilize (about five to ten minutes); use the numeric keypad, decimal key and +/- key to enter the temperature value read by the thermometer in the Reference Temperature: ____°C field and press the f2 (accept) key. The meter will display the original temperature read by the ATC probe (i.e. ATC1: 24.2°C) and the temperature offset value that will be applied to all future temperature readings (i.e. ATC1 Offset: -0.8°C). Press the f3 (log/print) key to save and end the calibration, export the data to the calibration log, export the data to a printer or computer if one is connected to the meter and enabled in the setup menu, and proceed to the measurement mode or press the f1 (escape) key to return to the measurement mode without saving the calibration. Temperature Input Press the ▲ / ▼ keys to highlight Temperature Input and press the f2 (select) key. Select the source of the temperature measurement and the display units of the temperature measurement. • ATC1, ATC2 or Manual – To select the temperature source, press the ▲ / ▼ keys to highlight ATC1, ATC2 or Manual and press the f2 (accept) key. Channel 1 and 2 are able to receive temperature readings from an ATC probe connected to the channel 1 input (ATC1) or the channel 2 input (ATC2). If Manual is selected, enter the temperature using the numeric keypad, decimal key and +/- key and press the f2 (accept) key. • Temperature Unit – To select the temperature units as Celsius or Fahrenheit, press the ▲ / ▼ keys to highlight Temperature Unit, press the f2 (accept) key, press the ▲ / ▼ keys to highlight Celsius or Fahrenheit and press the f2 (accept) key. Once all of the temperature settings are entered, press the f1 (back) key. 24 | Orion Dual Star pH/ISE Benchtop Meter User Manual Thermo Scientific Meter Setup | Section 3 Calibration Setup Press the ▲ / ▼ keys to highlight Calibration Setup and press the f2 (select) key. View and change the pH or ISE calibration settings, depending on the measurement mode that was selected for the channel. • pH Calibration Settings – Entering the Calibration Setup menu will access the Buffer Set and ISO settings. • Buffer Set – Press the ▲ / ▼ keys to highlight Buffer Set and press the f2 (select) key. Press the ▲ / ▼ keys to select US or EURO as the calibration buffer set and press the f2 (accept) key. The meter will automatically recognize pH 1.68, 4.01, 7.00, 10.01 and 12.46 buffers if US is selected and pH 1.68, 4.01, 6.86 and 9.18 buffers if EURO is selected. • ISO – Press the ▲ / ▼ keys to highlight ISO and press the f2 (select) key. To enter the pH isopotential point, use the numeric keypad and decimal key to enter the value and press the f2 (accept) key. Once all of the pH calibration settings are entered, press the f1 (back) key. • ISE calibration settings – Entering the Calibration Setup menu will access the Autoblank, Low Level Stability and Isopotential settings. o Autoblank – Press the ▲ / ▼ keys to highlight Autoblank and press the f2 (select) key. Press the ▲ / ▼ keys to highlight Off or On and press the f2 (accept) key. o Low Level Stability – Press the ▲ / ▼ keys to highlight Low Level Stability and press the f2 (select) key. Press the ▲ / ▼ keys to highlight Off or On and press the f2 (accept) key. o Isopotential – Press the ▲ / ▼ keys to highlight Isopotential and press the f2 (select) key. o To turn off or on temperature compensation for ISE measurements, press the ▲ / ▼ keys to highlight ISO On/Off and press the f2 (select) key. Press the ▲ / ▼ keys to highlight Off or On and press the f2 (accept) key. o To enter the ISE isopotential point, press the ▲ / ▼ keys to highlight ISO Value and press the f2 (select) key. Use the numeric keypad and decimal key to enter the value and press the f2 (accept) key. o Once all of the ISE isopotential settings are entered, press the f1 (back) key. Once all of the ISE calibration settings are entered, press the f1 (back) key. Read Type Press the ▲ / ▼ keys to highlight Read Type and press the f2 (select) key. Press the ▲ / ▼ keys to highlight Auto-Read, On Ready, At Time Intervals, Continuous, Value Change In Thermo Scientific Orion Dual Star pH/ISE Benchtop Meter User Manual | 25 Section 3 | Meter Setup Measurement or Timed Reading as the read type that will be used to display the measurements for the selected channel and press the f2 (select) key. • Auto-Read – The meter will display the measurement as it stabilizes and lock and hold the measurement when it is stable. Once a measurement is locked, press the measure key to take a new measurement. Once the measurement is locked, the meter will automatically export the measurement to the data log, if the data log is enabled in the setup menu, and to a printer or computer, if a printer or computer is connected to the meter and enabled in the setup menu. • On Ready – The meter will show stabilizing on the display until the measurement is stable. When the measurement is stable, the meter will show ready on the display. The display will automatically update if the measurement changes and the measurement will not lock. Once ready is shown on the display, the meter will automatically export the measurement to the data log, if the data log is enabled in the setup menu, and to a printer or computer, if a printer or computer is connected to the meter and enabled in the setup menu. • At Time Intervals – The meter will read and display a measurement at the set time interval that is programmed by the operator. At the set time interval, the meter will automatically export the measurement to the data log, if the data log is enabled in the setup menu, and to a printer or computer, if a printer or computer is connected to the meter and enabled in the setup menu. If At Time Intervals is selected, enter the time interval value in a hours : minutes : seconds format using the numeric keypad and press the f2 (accept) key. • Continuous – The meter will continuously measure and update the display. No indicator will be shown on the display. This read type is useful when performing an experiment that requires continuous measurements to be taken, regardless of the measurement stability. Press the log/print key to export the measurement to the data log, if the data log is enabled in the setup menu, and to a printer or computer, if a printer or computer is connected to the meter and enabled in the setup menu. • Value Change In Measurement – The meter will display the measurement when the reading reaches or exceeds the set high or low value that is programmed by the operator. When the reading reaches or exceeds the set high or low value, the meter will automatically export the measurement to the data log, if the data log is enabled in the setup menu, and to a printer or computer, if a printer or computer is connected to the meter and enabled in the setup menu. If Value Change In Measurement is selected, press the ▲ / ▼ keys to highlight Min Value, enter the minimum measurement value using the numeric keypad and the decimal key, press the ▲ / ▼ keys to highlight Max Value, enter the maximum measurement value using the numeric keypad and the decimal key and press the f3 (next) key. • Timed Reading – The meter will display a measurement after a set time delay and lock and hold the measurement after the time delay is reached. To start another time delay cycle, press the measure key. Once the measurement is locked, the meter will automatically export the measurement to the data log, if the data log is enabled in the setup menu, and 26 | Orion Dual Star pH/ISE Benchtop Meter User Manual Thermo Scientific Meter Setup | Section 3 to a printer or computer, if a printer or computer is connected to the meter and enabled in the setup menu. If Timed Reading is selected, enter the time delay value in a minutes : seconds format using the numeric keypad and press the f2 (accept) key. Alarm Press the ▲ / ▼ keys to highlight Alarm and press the f2 (select) key. View and change the alarm settings, if required. • Alarm – Press the ▲ / ▼ keys to highlight Alarm and press the f2 (select) key. Press the ▲ / ▼ keys to highlight Off, Low Limit, High Limit or Both Low/High and press the f2 (select) key. • Parameter – Press the ▲ / ▼ keys to highlight Parameter and press the f2 (select) key. Press the ▲ / ▼ keys to highlight pH, ISE-ppm, ISE-mg/L, ISE-%, ISE-M, ISE-unitless, mV, RmV, ORP or °C (°F will be shown instead of °C if it is the selected temperature unit) and press the f2 (accept) key. • Low Limit – Press the ▲ / ▼ keys to highlight Low Limit and press the f2 (select) key. To enter a low limit alarm value, use the numeric keypad and decimal key to enter the low value and press the f2 (accept) key. • High Limit – Press the ▲ / ▼ keys to highlight High Limit and press the f2 (select) key. To enter a high limit alarm value, use the numeric keypad and decimal key to enter the high value and press the f2 (accept) key. Note: The read type must be set to continuous to use the alarm settings. Sample ID Press the ▲ / ▼ keys to highlight Sample ID and press the f2 (select) key. Press the ▲ / ▼ keys to highlight Off, Manual or Auto Incremental and press the f2 (accept) key. If Auto Incremental is selected, use the alphanumeric keypad to enter the initial sample ID and press the f2 (accept) key. The meter will save the entered sample ID and add a sequential number after it. Method Press the ▲ / ▼ keys to highlight Method and press the f2 (select) key. Press the ▲ / ▼ keys to highlight the desired method number, press the f2 (load) key and press the f2 (yes) key. To view a method, edit a method, copy an existing method to a new method, delete a method, print a method or save the current meter settings as a new method, refer to Chapter 5 Methods. Thermo Scientific Orion Dual Star pH/ISE Benchtop Meter User Manual | 27 Section 3 | Meter Setup Instrument Parameters Setup Menu In the measurement mode, press the setup key to enter the setup menu. Press the ▲ / ▼ keys to highlight Instrument Parameters and press the f2 (select) key. Perform the following actions, as required. Export Data (PC/Printer/Log) Press the ▲ / ▼ keys to highlight Export Data (PC/Printer/Log) and press the f2 (select) key. View and change the data exporting settings, if required. • Export Trigger – Press the ▲ / ▼ keys to highlight Export Trigger and press the f2 (select) key. Press the ▲ / ▼ keys to highlight Channel 1, Channel 2 or Channel 1 & 2 and press the f2 (accept) key. The read type of the selected channel(s) will determine when the meter sends the measurement data to the data log, if the data log is enabled in the setup menu, and to a printer or computer, if a printer or computer is connected to the meter and enabled in the setup menu. • PC – Press the ▲ / ▼ keys to highlight PC and press the f2 (select) key. View and change the PC settings, if required. • o PC On/Off – Press the ▲ / ▼ keys to highlight PC On/Off and press the f2 (select) key. To enable communication to a computer, press the ▲ / ▼ keys to highlight On and press the f2 (accept) key. The meter will send the data to a computer in a comma delimited format. To disable communication to a computer, press the ▲ / ▼ keys to highlight Off and press the f2 (select) key. o Baud Rate – Press the ▲ / ▼ keys to highlight Baud Rate and press the f2 (select) key. Press the ▲ / ▼ keys to highlight a baud rate of 1200, 2400, 4800, 9600, 19200 or 38400 and press the f2 (accept) key. o Once all of the PC settings are entered, press the f1 (back) key. Printer – Press the ▲ / ▼ keys to highlight Printer and press the f2 (select) key. View and change the printer settings, if required. o 28 | Orion Dual Star pH/ISE Benchtop Meter User Manual Printer On/Off – Press the ▲ / ▼ keys to highlight Printer On/Off and press the f2 (select) key. To enable communication to a printer, press the ▲ / ▼ keys to Thermo Scientific Meter Setup | Section 3 highlight On and press the f2 (accept) key. To disable communication to a printer, press the ▲ / ▼ keys to highlight Off and press the f2 (accept) key. • • o Baud Rate – Press the ▲ / ▼ keys to highlight Baud Rate and press the f2 (select) key. Press the ▲ / ▼ keys to highlight a baud rate of 1200, 2400, 4800, 9600, 19200 or 38400 and press the f2 (accept) key. o Once all of the printer settings are entered, press the f1 (back) key. Data Log – Press the ▲ / ▼ keys to highlight Data Log and press the f2 (select) key. View and change the data log settings, if required. o Data Log On/Off – Press the ▲ / ▼ keys to highlight Data Log On/Off and press the f2 (select) key. To enable the data log, press the ▲ / ▼ keys to highlight On and press the f2 (accept) key. To disable the data log, press the ▲ / ▼ keys to highlight Off and press the f2 (accept) key. o Ring Buffer – Press the ▲ / ▼ keys to highlight Ring Buffer and press the f2 (select) key. Press the ▲ / ▼ keys to highlight Off or On and press the f2 (accept) key. If Off is selected, an error message will be displayed when all 1000 data log points are filled and the data log must be emptied to clear the error message. If On is selected, the oldest data log point will be overwritten with the new data log point when all 1000 data log points are filled. o Once all of the data log settings are entered, press the f1 (back) key. Once all of the exporting settings are entered, press the f1 (back) key. Stirrer Speed Press the ▲ / ▼ keys to highlight Stirrer Speed and press the f2 (select) key. Press the ▲ / ▼ keys to set the default stirrer speed to 1 (slowest speed), 2, 3, 4 or 5 (fastest speed) and press the f2 (accept) key. The default stirrer speed will be used whenever the stirrer key is pressed in the measurement mode. Log View Press the ▲ / ▼ keys to highlight Log View and press the f2 (select) key. Select Data Log or Calibration Log to view, export or clear the selected log. • Thermo Scientific Data Log – Press the ▲ / ▼ keys to highlight Data Log and press the f2 (accept) key. The meter will display a list of the data points. The list shows the sequential number of the data point (D0001), the date that the data point was saved (07/05/2008) and the time that the data point was saved (14:05). To view the measurement information for an individual data point, press the ▲ / ▼ keys to highlight the data point and press the f2 (select) key. Press the f2 (print) key to print the data point or press the f1 (back) key to return to the list of data points. To export the data log to a computer or printer or to clear the data log, press the f3 (options) key and select Log Export or Log Clear. Orion Dual Star pH/ISE Benchtop Meter User Manual | 29 Section 3 | Meter Setup • o Log Export – Press the ▲ / ▼ keys to highlight Log Export and press the f2 (accept) key. Press the ▲ / ▼ keys to highlight Today, Last 10, Range or All as the data log points to be exported and press the f2 (accept) key. If Today, Last 10 or All is selected, press the f2 (yes) key to export the data. If Range is selected, use the numeric keypad to enter the number of the first data point to be exported, press the f2 (accept) key, use the numeric keypad to enter the number of the last data point to be exported, press the log/print key and press the f2 (yes) key to export the data. o Log Clear – Press the ▲ / ▼ keys to highlight Log Clear and press the f2 (accept) key. Press the f2 (yes) key to clear the entire data log. Enter the password using the alphanumeric keypad and press the f2 (accept) key. The default password is 111111111. Press the f1 (back) key to return to the list of data points. o Press the f1 (back) key to return to the log view settings. o Calibration Log – Press the ▲ / ▼ keys to highlight Calibration Log and press the f2 (accept) key. Press the ▲ / ▼ keys to highlight Channel 1 Cal or Channel 2 Cal and press the f2 (select) key. Press the ▲ / ▼ keys to highlight pH, ISE, RmV, ORP or Temperature as the calibration type and press the f2 (select) key. The meter will display a list of calibrations for the selected channel and calibration type. The list shows the sequential number of the calibration (Cal_101), the date that the point was saved (07/05/2008) and the time that the point was saved (12:05). To view the calibration data, press the ▲ / ▼ keys to highlight the calibration point and press the f2 (select) key. Press the f2 (print) key to print the calibration point, press the f3 (graph) key to view the calibration graph or press the f1 (back) key to return to the list of calibration points. o Press the f1 (back) key to return to the log view settings. Once all of the log view settings are entered, press the f1 (back) key. Note: When a data point is exported to a computer or printer, the time stamp will include the hour, minutes and seconds. Display Press the ▲ / ▼ keys to highlight Display and press the f2 (select) key. View and change the Display View, Backlight and Contrast settings, if required. • Display View – Press the ▲ / ▼ keys to highlight Display View and press the f2 (select) key. Press the ▲ / ▼ keys to highlight Channel 1, Channel 2 or Channel 1 & 2 and press the f2 (accept) key. • Backlight – Press the ▲ / ▼ keys to highlight Backlight and press the f2 (select) key. Press the ▲ / ▼ keys to set the backlight to Off, 1 (lowest setting), 2, 3, 4 or 5 (highest setting) and press the f2 (accept) key. 30 | Orion Dual Star pH/ISE Benchtop Meter User Manual Thermo Scientific Meter Setup | Section 3 • Contrast – Press the ▲ / ▼ keys to highlight Contrast and press the f2 (select) key. Press the ▲ / ▼ keys to set the contrast to 1 (least contrast), 2, 3, 4 or 5 (most contrast) and press the f2 (accept) key. • Once all of the display settings are entered, press the f1 (back) key. Calendar Press the ▲ / ▼ keys to highlight Calendar and press the f2 (select) key. View and change the Time, Date and Date Format settings, if required. • Time – Press the ▲ / ▼ keys to highlight Time and press the f2 (select) key. Use the numeric keypad to set the time in 24 hour format and press the f2 (accept) key. • Date – Press the ▲ / ▼ keys to highlight Date and press the f2 (select) key. Use the numeric keypad to set the date (the date format is shown below the date setting) and press the f2 (accept) key. • Date Format – Press the ▲ / ▼ keys to highlight Date Format and press the f2 (select) key. Press the ▲ / ▼ keys to highlight MM/DD/YYYY to display the date as month/day/year or DD/MM/YYYY to display the date as day/month/year and press the f2 (accept) key. • Once all of the date settings are entered, press the f1 (back) key. Troubleshooting Press the ▲ / ▼ keys to highlight Troubleshooting and press the f2 (select) key to access the stability test, self test, user reset, factory configuration or general meter information. Refer to the Troubleshooting Guide section for details. Thermo Scientific • Stability Test – Press the ▲ / ▼ keys to highlight Stability Test and press the f2 (accept) key. Press the ▲ / ▼ keys to highlight Channel 1 or Channel 2 and press the f2 (accept) key. Make sure that the electrode or probe to be tested is connected to the channel that was selected in the previous step and press the f2 (yes) key. Place the electrode or probe in an appropriate solution with a stable temperature (a pH 7 buffer is recommended for a pH electrode, a calibration standard with a moderate concentration of the ion of interest is recommended for an ISE and an ORP standard is recommended for an ORP electrode) and press the f2 (yes) key. The meter will perform the stability test and show the mV per minute drift and noise on the display. Press the f1 (escape) key to return to the measurement mode. • Self Test – Press the ▲ / ▼ keys to highlight Self Test and press the f2 (accept) key. Disconnect all of the electrodes and probes from the meter, attach both BNC shorting caps to the two BNC inputs and press the f2 (yes) key. Press the f2 (yes) key to start the self test. The meter will perform an accuracy test. When the meter displays Accuracy Test Passed, press the f2 (next) key. The meter will perform an EPROM test. When the meter displays E2Prom Test Passed, press the f2 (next) key. The meter will perform a keypad test. Press each of the blinking keys shown on the display in the order that they are shown. Orion Dual Star pH/ISE Benchtop Meter User Manual | 31 Section 3 | Meter Setup When the meter displays Keypad Test Passed, press the f2 (next) key. The meter will display Self Test Passed. Press the f1 (escape) key to return to the measurement mode. • User Reset – Press the ▲ / ▼ keys to highlight User Reset and press the f2 (accept) key. If the user reset is performed, all of the current meter settings will be deleted and reset to the default settings. The data log, calibration log and methods will not be deleted with the user reset. Press the f2 (yes) key to perform the reset or press the f3 (no) key to abort the reset. The meter will enter the EZ Startup menu and then proceed to the measurement mode. • Factory Config – Press the ▲ / ▼ keys to highlight Factory Config and press the f2 (accept) key. If the factory configuration is performed, all of the current meter settings will be deleted and reset to the default settings and the data log, calibration log and methods will be deleted. Press the f2 (yes) key to perform the reset or press the f3 (no) key to abort the reset. Use the alphanumeric keypad to enter the PIN number and press the f2 (accept) key to perform the reset. The default PIN number is 111111111. Press the f1 (measure) key, the meter will enter the EZ Startup menu and then proceed to the measurement mode. • About Meter – Press the ▲ / ▼ keys to highlight About Meter and press the f2 (accept) key. The meter serial number and software version will be displayed. Press the f1 (back) key to return to the troubleshooting settings and press the f1 (back) key to return to the instrument parameter settings. Beeper Volume Press the ▲ / ▼ keys to highlight Beeper Volume and press the f2 (select) key. Press the ▲ / ▼ keys to highlight Off, Low or High and press the f2 (accept) key. Language Press the ▲ / ▼ keys to highlight Language and press the f2 (select) key. Press the ▲ / ▼ keys to highlight English, Español, Deutsch, Français or Italiano and press the f2 (accept) key. 32 | Orion Dual Star pH/ISE Benchtop Meter User Manual Thermo Scientific Meter Setup | Section 3 Autosampler Setup Menu The autosampler menu contains a list of meter parameters and settings that are used when the meter runs the autosampler and the command to turn the autosampler on or off. For instructions on navigating this menu, refer to Section 8 Autosampler Operation. Incremental Techniques Setup Menu The incremental techniques menu allows the operator to access the single known addition, single known subtraction, double known addition and double known subtraction meter programs. For instructions on navigating this menu, refer to Chapter 6 Incremental Techniques. GLP Setup Menu 1. In the measurement mode, press the setup key to enter the setup menu. 2. Press the ▲ / ▼ keys to highlight GLP and press the f2 (select) key. 3. The meter will prompt for the old password. Enter the current password and press the f2 (accept) key. The default password is 111111111. 4. The meter will prompt for the new password. Enter a new password using the alphanumeric keypad and press the f2 (accept) key. EZ Startup Setup Menu For instructions on navigating this menu, refer to the EZ Startup Menu section. Thermo Scientific Orion Dual Star pH/ISE Benchtop Meter User Manual | 33 SECTION 4 4 Calibration and Measurement The Orion Dual Star meter can perform a one to six point pH calibration, a two to six point ISE (concentration) calibration, a one point ORP calibration and a one point temperature calibration. Step-by-step instructions and prompts are displayed on the meter to assist operators with the calibration menus. A calibration graph, which includes the electrode slope between points and the average slope, can be viewed in the calibration mode for pH and ISE (concentration) calibrations. The meter can save up to 10 calibrations per channel in the log and calibration data can be exported from the meter to a printer or computer. pH Calibration and Measurement pH Calibration Hints • The measurement mode (displayed to the right of the measurement value) determines the type of calibration that the meter will perform. Set the measurement mode to pH for the channel that will be calibrated. Refer to the Setup Menu section for instructions on setting the measurement mode. • Prepare and condition the pH electrode per the instructions in the electrode user guide. • Make sure that the pH electrode, ATC probe and reference electrode (if applicable) are connected to the meter inputs that correspond with the channel that will be calibrated. • Always use fresh pH buffers for calibration. Choose buffers that are 1 to 4 pH units apart. • The meter will automatically recognize the US buffer set (pH 1.68, 4.01, 7.00, 10.01 and 12.46 buffers) or the EURO buffer set (pH 1.68, 4.01, 6.86 and 9.18 buffers). The default meter setting is the US buffer set. 34 | Orion Dual Star pH/ISE Benchtop Meter User Manual Thermo Scientific Calibration and Measurement | Section 4 pH Calibration Procedure (1 to 6 points) Note: In most calibration screens, press the f1 (escape) key to return to the measurement mode without saving the calibration. 1. In the measurement mode, press the cal key. 2. Dual channel display only: Press the ▲ / ▼ keys to select the channel to be calibrated and press the f2 (accept) key. 3. Rinse the pH electrode (ATC probe, stirrer probe and reference electrode, if applicable) with distilled water, blot dry with a lint-free tissue and place the electrode(s) into the buffer. 4. When the electrode and buffer are ready, press the f3 (start) key. 5. Wait for the pH value on the meter to stop flashing and perform one of the following actions: a. Press the f2 (accept) key to accept the pH value. b. Use the numeric keypad and decimal key to enter the value of the buffer at the measured temperature. Press the f3 (clear) key to delete any of the digits. Once the buffer value is correct, press the f2 (accept) key. 6. Press the f2 (next) key to proceed to the next buffer and repeat steps 3 through 5 or press the f3 (cal done) key to end the calibration. If a one point calibration is performed, enter the electrode slope using the numeric keypad and decimal key and press the f2 (accept) key. 7. Once the f3 (cal done) key is pressed, the meter will display a calibration summary including the average slope. Perform one of the following actions: Important Note: The f2 (log/print) key must be pressed to save the calibration. Only pressing the f3 (cal done) key without pressing the f2 (log/print) key will not save the calibration. a. Press the f2 (log/print) key to save and end the calibration, export the calibration data to the calibration log and export the calibration data to a printer or computer, if a printer or computer is connected to the meter and enabled in the setup menu. The meter will automatically proceed to the measurement mode. b. Press the f3 (graph) key to view a point-by-point graph of the calibration. After viewing the graph, press the f1 (back) key to return to the calibration summary, press the f3 (log/print) key to save and end the calibration, export the calibration data to the calibration log, export the calibration data to a printer or computer (if applicable) and automatically proceed to the measurement mode or press the f2 (escape) key to return to the measurement mode without saving the calibration. c. Press the f1 (cal edit) key to edit the calibration points. Press the ▲ / ▼ keys to highlight the calibration point to be edited and press the f2 (select) key. Press the ▲ / ▼ keys to highlight Remeasure, Edit or Delete and press the f2 (select) key. Thermo Scientific Orion Dual Star pH/ISE Benchtop Meter User Manual | 35 Section 4 | Calibration and Measurement i. If Remeasure is selected, repeat steps 3 through 5. If a one point calibration is performed, enter the electrode slope using the numeric keypad and decimal key and press the f2 (accept) key. Press the ▲ / ▼ keys to highlight another calibration point to be edited and press the f2 (select) key or press the f1 (back) key to return to the calibration summary. ii. If Edit is selected, use the numeric keypad and decimal key to enter a new buffer value and press the f2 (accept) key. Press the ▲ / ▼ keys to highlight another calibration point to be edited and press the f2 (select) key or press the f1 (back) key to return to the calibration summary. iii. If Delete is selected, press the f2 (yes) key to delete the selected calibration point. If deleting the calibration point changes the calibration to a one point calibration, enter the electrode slope using the numeric keypad and decimal key and press the f2 (accept) key. Press the ▲ / ▼ keys to highlight another calibration point to be edited and press the f2 (select) key or press the f1 (back) key to return to the calibration summary. 8. Proceed to the pH Measurement Procedure section. pH Measurement Procedure 1. Rinse the pH electrode (ATC probe, stirrer probe and reference electrode, if applicable) with distilled water, blot dry with a lint-free tissue and place the electrode(s) into the sample. 2. If the stirrer probe is in use, press the stirrer key to turn on the stirrer probe. Press the ▲ / ▼ keys to adjust the speed of the stirrer probe. 3. Wait for the measurement to stabilize and record the pH and temperature of the sample when the meter indicates that the measurement is stable. The read type selected in the EZ Startup menu or setup menu will determine how the pH measurements are displayed by the meter. The available read types are Auto-Read, on ready, at time intervals, continuous, value change in measurement and timed reading. To review or change the available read type, refer to the Setup Menu section. 4. If the stirrer probe is in use, press the stirrer key to turn off the stirrer probe. 5. Remove the electrode(s) from the sample, rinse with distilled water, blot dry, place the electrode(s) into the next sample. 6. Repeat steps 2 through 5 for all of the samples. 7. When all of the samples have been measured, store the electrode(s) according to the instructions in the electrode user guides. 36 | Orion Dual Star pH/ISE Benchtop Meter User Manual Thermo Scientific Calibration and Measurement | Section 4 ISE Calibration and Measurement ISE Calibration Hints • The measurement mode (displayed to the right of the measurement value) determines the type of calibration that the meter will perform. Set the measurement mode to ISE for the channel that will be calibrated and set the displayed ISE units as ppm, mg/L, %, M, or unitless. Refer to the Setup Menu section for instructions on setting the measurement mode and displayed units. • Prepare and condition the ISE electrode per the instructions in the electrode user guide. • Make sure that the ISE electrode, ATC probe and reference electrode (if applicable) are connected to the meter inputs that correspond with the channel that will be calibrated. • Prepare at least two standards that bracket the expected sample range and differ in concentration by a factor of ten. • Always use freshly prepared standards for calibration. • Allow all standards and samples to reach the same temperature for precise measurements. • Stir all standards and samples at a uniform, moderate rate. Place a piece of insulating material, such as Styrofoam or cardboard, between the magnetic stir plate and beaker to prevent measurement errors from the transfer of heat to the sample. • Always rinse the electrode with distilled water between measurements and blot or shake the electrode to remove the water and prevent sample carryover. Do not wipe or rub the electrode sensing element. ISE Calibration Procedure (2 to 6 points) Note: In most calibration screens, press the f1 (escape) key to return to the measurement mode without saving the calibration. 1. In the measurement mode, press the cal key. 2. Dual channel display only: Press the ▲ / ▼ keys to select the channel to be calibrated and press the f2 (accept) key. 3. Rinse the ISE electrode (ATC probe, stirrer probe and reference electrode, if applicable) with distilled water, blot dry with a lint-free tissue and place the electrode(s) into the standard. 4. When the electrode and standard are ready, press the f3 (start) key. 5. Wait for the concentration value to stop flashing. Use the numeric keypad and decimal key to enter the concentration of the standard at the measured temperature. Press the f3 (clear) key to delete any digits. Once the concentration value is correct, press the f2 (accept) key. Thermo Scientific Orion Dual Star pH/ISE Benchtop Meter User Manual | 37 Section 4 | Calibration and Measurement 6. Press the f2 (next) key to proceed to the next standard and repeat steps 3 through 5 or press the f3 (cal done) key to end the calibration. 7. Once the f3 (cal done) key is pressed, the meter will display a calibration summary including the average slope. Perform one of the following actions: Important Note: The f2 (log/print) key must be pressed to save the calibration. Only pressing the f3 (cal done) key without pressing the f2 (log/print) key will not save the calibration. a. Press the f2 (log/print) key to save and end the calibration, export the calibration data to the calibration log and export the calibration data to a printer or computer, if a printer or computer is connected to the meter and enabled in the setup menu. The meter will automatically proceed to the measurement mode. b. Press the f3 (graph) key to view a point-by-point graph of the calibration. After viewing the graph, press the f1 (back) key to return to the calibration summary, press the f3 (log/print) key to save and end the calibration, export the calibration data to the calibration log, export the calibration data to a printer or computer (if applicable) and automatically proceed to the measurement mode or press the f2 (escape) key to return to the measurement mode without saving the calibration. c. Press the f1 (cal edit) key to edit the calibration points. Press the ▲ / ▼ keys to highlight the calibration point to be edited and press the f2 (select) key. Press the ▲ / ▼ keys to highlight Remeasure, Edit or Delete and press the f2 (select) key. i. If Remeasure is selected, repeat steps 3 through 5. Press the ▲ / ▼ keys to highlight another calibration point to be edited and press the f2 (select) key or press the f1 (back) key to return to the calibration summary. i. If Edit is selected, use the numeric keypad and decimal key to enter a new concentration value and press the f2 (accept) key. Press the ▲ / ▼ keys to highlight another calibration point to be edited and press the f2 (select) key or press the f1 (back) key to return to the calibration summary. ii. If Delete is selected, press the f2 (yes) key to delete the selected calibration point. If deleting the calibration point changes the calibration to a one point calibration, enter the electrode slope using the numeric keypad and decimal key and press the f2 (accept) key. Press the ▲ / ▼ keys to highlight another calibration point to be edited and press the f2 (select) key or press the f1 (back) key to return to the calibration summary. 8. Proceed to the ISE Measurement Procedure section. 38 | Orion Dual Star pH/ISE Benchtop Meter User Manual Thermo Scientific Calibration and Measurement | Section 4 ISE Measurement Procedure 1. Rinse the ISE electrode (ATC probe, stirrer probe and reference electrode, if applicable) with distilled water and place the electrode(s) into the sample. 2. If the stirrer probe is in use, press the stirrer key to turn on the stirrer probe. Press the ▲ / ▼ keys to adjust the speed of the stirrer probe. 3. Wait for the measurement to stabilize and record the concentration and temperature of the sample when the meter indicates that the measurement is stable. The read type selected in the EZ Startup menu or setup menu will determine how the ISE measurements are displayed by the meter. The available read types are Auto-Read, on ready, at time intervals, continuous, value change in measurement and timed reading. To review or change the available read type, refer to the Setup Menu section. 4. If the stirrer probe is in use, press the stirrer key to turn off the stirrer probe. 5. Remove the electrode(s) from the sample, rinse with distilled water, blot dry, place the electrode(s) into the next sample. 6. Repeat steps 2 through 5 for all of the samples. 7. When all of the samples have been measured, store the electrode(s) according to the instructions in the electrode user guides. Thermo Scientific Orion Dual Star pH/ISE Benchtop Meter User Manual | 39 Section 4 | Calibration and Measurement mV Measurement and RmV and ORP Calibration and Measurement mV Measurement Procedure Measure the raw millivolt (mV) values of an ORP, ISE or pH electrode in the mV mode. Oxidation-reduction potential (ORP) measurements are commonly reported as raw millivolts. The mV readings of an ISE electrode in standards can be used to draw a calibration curve on semi-logarithmic graph paper, which can be helpful for low level ISE measurements in the nonlinear range of the electrode. The millivolt readings of a pH electrode can be used to troubleshoot the electrode and verify it is reading the correct mV range of common pH buffers. 1. Set the measurement mode to mV in the setup menu. Prepare the electrode according to the instructions in the electrode user guide. Ensure that the electrode, ATC probe and reference electrode (if applicable) are connected to the meter inputs that correspond with the channel that will be measured. 2. Rinse the electrode (ATC probe, stirrer probe and reference electrode, if applicable) with distilled water, blot dry with a lint-free tissue and place the electrode(s) into the sample. 3. If the stirrer probe is in use, press the stirrer key to turn on the stirrer probe. 4. Wait for the measurement to stabilize and record the mV and temperature of the sample when the meter indicates that the measurement is stable. The read type selected in the EZ Startup menu or setup menu will determine how the mV measurements are displayed by the meter. The available read types are Auto-Read, on ready, at time intervals, continuous, value change in measurement and timed reading. To review or change the available read type, refer to the Setup Menu section. 5. If the stirrer probe is in use, press the stirrer key to turn off the stirrer probe. 6. Remove the electrode(s) from the sample. 7. Repeat steps 2 through 6 for all of the samples. 8. When all of the samples have been measured, store the electrode(s) according to the instructions in the electrode user guides. 40 | Orion Dual Star pH/ISE Benchtop Meter User Manual Thermo Scientific Calibration and Measurement | Section 4 RmV Calibration Hints • The measurement mode (displayed to the right of the measurement value) determines the type of calibration that the meter will perform. Set the measurement mode to RmV for the channel that will be calibrated. Refer to the Setup Menu section for instructions on setting the measurement mode. • Prepare and condition the electrode per the instructions in the electrode user guide. • Ensure that the electrode, ATC probe and reference electrode (if applicable) are connected to the meter inputs that correspond with the channel that will be calibrated. • Always use a freshly prepared standard for calibration. Allow the standard and samples to reach the same temperature for precise measurements. RmV Calibration Procedure Note: In most calibration screens, press the f1 (escape) key to return to the measurement mode without saving the calibration. 1. In the measurement mode, press the cal key. 2. Dual channel display only: Press the ▲ / ▼ keys to select the channel to be calibrated and press the f2 (accept) key. 3. Rinse the electrode (ATC probe, stirrer probe and reference electrode, if applicable) with distilled water, blot dry with a lint-free tissue and place the electrode(s) into the standard. 4. When the electrode(s) and standard are ready, press the f3 (start) key. 5. Wait for the value to stabilize and the meter to display ready next to the raw mV value. The raw mV value is the actual mV reading of the electrode. To enter a relative mV value, use the numeric keypad, decimal key and +/- key to enter the mV value of the standard. Press the f3 (clear) key to delete any digits. Once the value is correct, press the f2 (accept) key. 6. The meter will display the mV offset. Perform one of the following actions: Important Note: The f2 (log/print) key must be pressed to save the calibration. Only pressing the f3 (cal done) key without pressing the f2 (log/print) key will not save the calibration. a. Press the f2 (log/print) key to save and end the calibration, export the calibration data to the calibration log and export the calibration data to a printer or computer, if a printer or computer is connected to the meter and enabled in the setup menu. The meter will automatically proceed to the measurement mode. b. Press the f1 (escape) key to return to the measurement mode without saving the calibration. 7. Proceed to the RmV Measurement Procedure section. Thermo Scientific Orion Dual Star pH/ISE Benchtop Meter User Manual | 41 Section 4 | Calibration and Measurement RmV Measurement Procedure 1. Rinse the electrode (ATC probe, stirrer probe and reference electrode, if applicable) with distilled water, blot dry and place the electrode into the sample. 2. If the stirrer probe is in use, press the stirrer key to turn on the stirrer probe. Press the ▲ / ▼ keys to adjust the speed of the stirrer probe. 3. Wait for the measurement to stabilize and record the relative mV and temperature of the sample when the meter indicates that the measurement is stable. The read type selected in the EZ Startup menu or setup menu will determine how the relative mV measurements are displayed by the meter. The available read types are Auto-Read, on ready, at time intervals, continuous, value change in measurement and timed reading. To review or change the available read type, refer to the Setup Menu section. 4. If the stirrer probe is in use, press the stirrer key to turn off the stirrer probe. 5. Remove the electrode(s) from the sample, rinse with distilled water, blot dry, place the electrode(s) into the next sample. 6. Repeat steps 2 through 5 for all of the samples. 7. When all of the samples have been measured, store the electrode(s) according to the instructions in the electrode user guides. ORP Calibration Hints The millivolt reading of an ORP standard is dependent on the reference system, reference material and filling solution of the ORP electrode and the temperature of the ORP standard. The ORP electrode can be automatically calibrated to read 420 mV relative to the Standard Hydrogen Electrode (EH) at 25 °C when the Thermo Scientific Orion ORP standard (Cat. No. 967901 or Cat. No. 967961), Thermo Scientific Orion ORP electrode (Cat. No. 9678BNWP, 9778BNWP, 9180BNMD or 9179BNMD) and 4 M KCl filling solution (Cat. No. 900011) or 4 M KCl gel (in Cat. No. 9179BNMD) are used. The raw mV reading of an electrode with the same conditions is 220 mV at 25 °C. The Orion ORP standard is stable and will not change over time, so it is an ideal standard for any ORP measurement system. The Orion Dual Star meter offers a simple, automatic calibration to the EH value in the ORP mode when using Orion ORP electrodes and standard. Visit www.thermoscientific.com/water for ORP application notes that include a table of ORP standard values at different temperatures. • The measurement mode (displayed to the right of the measurement value) determines the type of calibration that the meter will perform. Set the measurement mode to ORP for the channel that will be calibrated. Refer to the Setup Menu section for instructions on setting the measurement mode. • Prepare and condition the ORP electrode per the instructions in the electrode user guide. 42 | Orion Dual Star pH/ISE Benchtop Meter User Manual Thermo Scientific Calibration and Measurement | Section 4 • Make sure that the ORP electrode, ATC probe and reference electrode (if applicable) are connected to the meter inputs that correspond with the channel that will be calibrated. • The meter will automatically recognize the Orion ORP standard during an ORP calibration. Always use a freshly prepared ORP standard for calibration. Allow the standard and samples to come to the same temperature for precise measurements. ORP Calibration Procedure Note: In most calibration screens, press the f1 (escape) key to return to the measurement mode without saving the calibration. 1. In the measurement mode, press the cal key. 2. Dual channel display only: Press the ▲ / ▼ keys to select the channel to be calibrated and press the f2 (accept) key. 3. Rinse the ORP electrode (ATC probe, stirrer probe and reference electrode, if applicable) with distilled water, blot dry with a lint free tissue and place the electrode(s) into the standard. 4. When the electrode and standard are ready, press the f3 (start) key. 5. Wait for the value to stabilize and the meter to display ready next to the EH value. If the raw mV reading of the electrode is 220 mV ± 60 mV, the meter will automatically calculate and display the EH value for the electrode at the measured temperature. Press the f2 (accept) key to accept the EH value. 6. The meter will display the mV offset. Perform one of the following actions: Important Note: The f2 (log/print) key must be pressed to save the calibration. Only pressing the f3 (cal done) key without pressing the f2 (log/print) key will not save the calibration. a. Press the f2 (log/print) key to save and end the calibration, export the calibration data to the calibration log and export the calibration data to a printer or computer, if a printer or computer is connected to the meter and enabled in the setup menu. The meter will automatically proceed to the measurement mode. b. Press the f1 (escape) key to return to the measurement mode without saving the calibration. 7. Proceed to the ORP Measurement Procedure section. Thermo Scientific Orion Dual Star pH/ISE Benchtop Meter User Manual | 43 Section 4 | Calibration and Measurement ORP Measurement Procedure 1. Rinse the ORP electrode (ATC probe, stirrer probe and reference electrode, if applicable) with distilled water, blot dry with a lint-free tissue and place the electrode(s) into the sample. 2. If the stirrer probe is in use, press the stirrer key to turn on the stirrer probe. Press the ▲ / ▼ keys to adjust the speed of the stirrer probe. 3. Wait for the measurement to stabilize and record the ORP and temperature of the sample when the meter indicates that the measurement is stable. The read type selected in the EZ Startup menu or setup menu will determine how the ORP measurements are displayed by the meter. The available read types are Auto-Read, on ready, at time intervals, continuous, value change in measurement and timed reading. To review or change the available read type, refer to the Setup Menu section. 4. If the stirrer probe is in use, press the stirrer key to turn off the stirrer probe. 5. Remove the electrode(s) from the sample, rinse with distilled water, blot dry, place the electrode(s) into the next sample. 6. Repeat steps 2 through 5 for all of the samples. 7. When all of the samples have been measured, store the electrode(s) according to the instructions in the electrode user guides. 44 | Orion Dual Star pH/ISE Benchtop Meter User Manual Thermo Scientific Calibration and Measurement | Section 4 Temperature Calibration and Measurement Temperature Calibration Procedure Note: The meter ATC temperature display has a relative accuracy of ± 0.1 °C. ATC probes have varying temperature accuracies, usually ± 0.5 °C to ± 2 °C. Use this function only if it is necessary to calibrate the temperature readings. Since the temperature offset calculated during the calibration is applied to all future temperature measurements, recalibrate if a different ATC probe is used. 1. In the measurement mode, press the setup key. 2. Press the ▲ / ▼ keys to highlight Channel 1 or Channel 2 and press the f2 (select) key. 3. Press the ▲ / ▼ keys to highlight Temperature Calibration and press the f2 (select) key. 4. Press the ▲ / ▼ keys to highlight ATC1, ATC2 or ATC1 & ATC2 to select the ATC probe(s) that will be calibrated and press the f2 (select) key. 5. Place the ATC probe(s) and thermometers into a solution with a known, stable temperature. It is recommended that two NIST traceable thermometers be used to measure and verify the temperature of the solution. 6. Wait for the readings of the ATC probe(s) and thermometers to stabilize (about five to ten minutes); use the numeric keypad, decimal key and +/- key to enter the temperature value read by the thermometer in the Reference Temperature: ____°C field and press the f2 (accept) key. 7. The meter will display the original temperature read by the ATC probe (i.e. ATC1: 24.2°C) and the temperature offset value that will be applied to all future temperature readings (i.e. ATC1 Offset: -0.8°C). 8. Press the f3 (log/print) key to save and end the calibration, export the data to the calibration log, export the data to a printer or computer, if a printer or computer is connected to the meter and enabled in the setup menu and proceed to the measurement mode or press the f1 (escape) key to return to the measurement mode without saving the calibration. Note: The Temperature Calibration menu is for the calibration of ATC probes only. If manual temperature compensation is being used and the display shows MAN as the temperature source icon, refer to the Temperature Input menu for instructions on how to set the manual temperature value. Do not use the Temperature Calibration menu. Thermo Scientific Orion Dual Star pH/ISE Benchtop Meter User Manual | 45 SECTION 5 5 Methods The Orion Dual Star meter can save up to ten methods on each channel and the corresponding calibration data for each method, for the fast and easy recollection of different meter setup parameters. The default meter setting is that no method will be used on either channel. The meter will not display a method number if no method is currently be used on the channel. The current meter settings can be saved by pressing the method key to access the methods list. Existing methods can be selected from the methods list and run on the meter. Methods can be viewed, edited, copied to a new method, deleted, printed or the current meter settings can be saved as a new method. 46 | Orion Dual Star pH/ISE Benchtop Meter User Manual Thermo Scientific Methods | Section 5 Saving the Current Meter Settings as a New Method 1. In the measurement mode, press the method key. 2. Dual channel display only: Press the ▲ / ▼ keys to select the channel that the method will be saved on and press the f2 (accept) key. 3. The meter will display Current Settings and a list of the saved methods. The list will show the sequential number of the methods (M101) and if any methods were previously saved, the list will show the date that the method was last saved (10/05/2008) and the electrode ID used in the method (pH). 4. Press the ▲ / ▼ keys to highlight Current Settings and press the f3 (save) key. 5. Press the ▲ / ▼ keys to highlight the method number that the current meter settings will be saved as and press the f2 (accept) key. 6. Enter the current password (default password is 111111111) and press the f2 (accept) key. 7. The meter will automatically proceed to the measurement mode. Loading an Existing Method 1. In the measurement mode, press the method key. 2. Dual channel display only: Press the ▲ / ▼ keys to select the channel that the method will be saved on and press the f2 (accept) key. 3. The meter will display Current Settings and a list of the saved methods. The list will show the sequential number of the methods (M101) and if any methods were previously saved, the list will show the date that the method was last saved (10/05/2008) and the electrode ID used in the method (pH). 4. Press the ▲ / ▼ keys to highlight the method that will be loaded on the channel and press the f2 (load) key. 5. Press the f2 (yes) key to load the method or press the f3 (no) key to retain the previous settings. 6. The meter will automatically proceed to the measurement mode. In the measurement mode, the meter will display the method number that was loaded (i.e. M102). Thermo Scientific Orion Dual Star pH/ISE Benchtop Meter User Manual | 47 Section 5 | Methods Editing or Printing an Existing Method 1. In the measurement mode, press the method key. 2. Dual channel display only: Press the ▲ / ▼ keys to select the channel that the method will be saved on and press the f2 (accept) key. 3. The meter will display Current Settings and a list of the saved methods. The list will show the sequential number of the methods (M101) and if any methods were previously saved, the list will show the date that the method was last saved (10/05/2008) and the electrode ID used in the method (pH). 4. Press the ▲ / ▼ keys to highlight the method that will be edited press the f3 (options) key. 5. Enter the current password (default password is 111111111) and press the f2 (accept) key. 6. Press the ▲ / ▼ keys to highlight Edit and press the f2 (accept) key. 7. To print the method, press the f3 (print) key. 8. To edit the method, press the ▲ / ▼ keys to highlight Measure Mode, Electrode ID, Electrode Serial Number, Resolution, Temperature Calibration, Calibration Setup, Temperature Input, Read Type, Alarm or Sample ID and press the f2 (select) key. 9. Review and change any of the method settings listed above. To select a setting from a list of options, press the ▲ / ▼ keys to highlight the desired option and press the f2 (accept) key. To enter a numeric value, use the numeric keypad, decimal key and +/- key as required and press the f2 (accept) key. See the Setup Menu section for details on each method setting. 10. Press the f1 (back) key to return to the list of methods. Press the f1 (back) key to return to the measurement mode. Coping an Existing Method 1. In the measurement mode, press the method key. 2. Dual channel display only: Press the ▲ / ▼ keys to select the channel that the method will be saved on and press the f2 (accept) key. 3. The meter will display Current Settings and a list of the saved methods. The list will show the sequential number of the methods (M101) and if any methods were previously saved, the list will show the date that the method was last saved (10/05/2008) and the electrode ID used in the method (pH). 4. Press the ▲ / ▼ keys to highlight the method that will be copied press the f3 (options) key. 5. Enter the current password (default password is 111111111) and press the f2 (accept) key. 6. Press the ▲ / ▼ keys to highlight Copy and press the f2 (accept) key. 48 | Orion Dual Star pH/ISE Benchtop Meter User Manual Thermo Scientific Methods | Section 5 7. Press the ▲ / ▼ keys to highlight the method number that the existing method will be copied to and press the f2 (accept) key. 8. The meter will automatically proceed to the measurement mode. Deleting an Existing Method 1. In the measurement mode, press the method key. 2. Dual channel display only: Press the ▲ / ▼ keys to select the channel that the method will be saved on and press the f2 (accept) key. 3. The meter will display Current Settings and a list of the saved methods. The list will show the sequential number of the methods (M101) and if any methods were previously saved, the list will show the date that the method was last saved (10/05/2008) and the electrode ID used in the method (pH). 4. Press the ▲ / ▼ keys to highlight the method that will be deleted press the f3 (options) key. 5. Enter the current password (default password is 111111111) and press the f2 (accept) key. 6. Press the ▲ / ▼ keys to highlight Delete and press the f2 (accept) key. 7. Press the f2 (yes) key to delete the method or press the f3 (no) key to retain the previous settings. 8. The meter will automatically proceed to the measurement mode. Thermo Scientific Orion Dual Star pH/ISE Benchtop Meter User Manual | 49 SECTION 6 6 Incremental Techniques The Orion Dual Star meter has preset methods for single known addition, single known subtraction, double known addition and double known subtraction. • When performing incremental techniques, the sample concentration must be known within an order of magnitude so the increment may be correctly chosen and the sample and standard must be volumetrically determined. • It is very important that any complexing agent is present in excess (at least 50 to 100 times) or not at all. The ratio of free to complexed ions must remain constant over the addition. An indication that a complexing agent is present, but not in great enough quantity to maintain a constant free ion to complexed ion ratio, is an abnormally high or low slope. If this is a suspected problem, add an excess amount of complexing or decomplexing agent to the original solution in the beaker. • Electrode interferences should be at a minimum, since the effect of the interference might change as the concentration of the ion of interest changes. This situation may also result in high or low electrode slopes. Consult the electrode user guide for information on reducing or eliminating some electrode interferences. • Known addition is a useful method for measuring dilute samples, occasional samples or samples that contain an excess of complexing agent. It can also be used to verify the results of a direct measurement. • Known subtraction is useful when measuring ions for which stable standards do not exist. It can also be used as a quick version of a titration. When performing a known subtraction, it is necessary to know the stoichiometric ratio between the standard and sample. • Double incremental techniques calculate the electrode slope and sample concentration simultaneously. The electrode slope is determined directly in the sample, which results in greater accuracy for samples with complex matrices and greater analysis speed. 50 | Orion Dual Star pH/ISE Benchtop Meter User Manual Thermo Scientific Incremental Techniques | Section 6 Electrode ID and Slope for Incremental Techniques The meter uses the electrode ID to determine the valence of the ion of interest and the theoretical slope of the electrode. The following table shows the electrode ID options and their corresponding valence and theoretical slope values. Thermo Scientific Electrode ID Valence Number Theoretical Slope Electrode ID Valence Number Theoretical Slope pH +1 +59.16 Calcium (Ca+2) +2 +29.58 Fluoride (F-) -1 -59.16 Silver (Ag+) +1 +59.16 Ammonia (NH3) -1 -59.16 Copper (Cu+2) +2 +29.58 Ammonium (NH4+) +1 +59.16 Lead (Pb+2) +2 +29.58 Nitrate (NO3-) -1 -59.16 Cadmium (Cd+2) +2 +29.58 Nitrite (NO2-) -1 -59.16 Perchlorate (ClO4-) -1 -59.16 Sulfide (S-2) -2 -29.58 Fluoroborate (BF4¯) -1 -59.16 Chloride (Cl-) -1 -59.16 Thiocyanate (SCN-) -1 -59.16 Chlorine (Cl2) +2 +29.58 Nitrogen Oxide (NOX) +1 +59.16 Bromide (Br-) -1 -59.16 Carbon Dioxide (CO2) +1 +59.16 Iodide (I-) -1 -59.16 Monovalent Cation (X+) +1 +59.16 Cyanide (CN-) -1 -59.16 Divalent Cation (X+2) +2 +29.58 Sodium (Na+) +1 +59.16 Monovalent Anion (X-) -1 -59.16 Potassium (K+) +1 +59.16 Divalent Anion (X-2) -2 -29.58 Orion Dual Star pH/ISE Benchtop Meter User Manual | 51 Section 6 | Incremental Techniques Single Known Addition A standard of known concentration is added to a sample of unknown concentration. The total concentration should approximately double upon the addition of the standard, therefore sample concentration should be known within an order of magnitude. Refer to the following table to choose the correct standard concentration and volume of addition. Amount of standard to be added per 100 mL of sample Standard concentration compared to expected sample concentration 1 mL 100 times more concentrated 5 mL 20 times more concentrated 10 mL 10 times more concentrated • Refer to the appropriate electrode user guide for instructions for preparing the electrode, required solutions (ionic strength adjusters, standards, etc) and any special requirements. Determine the electrode slope as directed in the electrode user guide. • Ensure that the electrode, ATC probe and reference electrode (if applicable) are connected to the meter inputs that correspond with the selected channel. Single Known Addition Procedure 1. Prepare the sample as directed in the electrode user guide. 2. In the measurement mode, press the setup key. Press the ▲ / ▼ keys to highlight Incremental Techniques and press the f2 (select) key. 3. Dual channel display only: Press the ▲ / ▼ keys to select the channel to perform the single known addition on and press the f2 (accept) key. 4. Press the ▲ / ▼ keys to highlight Single Known Addition and press the f2 (select) key. 5. Use the numeric keypad, decimal key and +/- key to enter the electrode slope and press the f2 (accept) key. Determine the electrode slope as directed in the electrode user guide or use the theoretical slope from the Electrode ID and Slope for Incremental Techniques section. 6. Use the numeric keypad and decimal key to enter the sample volume, in mL, and press the f2 (accept) key. 7. Use the numeric keypad and decimal key to enter the total volume, in mL, and press the f2 (accept) key. The total volume includes the sample volume, ISA volume and diluting agent volume, but not the standard volume. 8. Use the numeric keypad and decimal key to enter the concentration of the standard and press the f2 (accept) key. 52 | Orion Dual Star pH/ISE Benchtop Meter User Manual Thermo Scientific Incremental Techniques | Section 6 9. Rinse the electrode (ATC probe, stirrer probe and reference electrode, if applicable) with distilled water, blot dry with a lint-free tissue and place the electrode(s) into the sample. When the electrode and sample are ready, press the f2 (next) key. 10. Wait for the reading to stabilize. When the reading is stable, press the f2 (yes) key. 11. Use the numeric keypad and decimal key to enter the volume of the standard, in mL, to be added to the sample and press the f2 (accept) key. 12. Add the standard to the sample and press the f2 (yes) key. 13. Wait for the reading to stabilize. When the reading is stable, press the f2 (yes) key. 14. The meter will display the result of the single known addition. Press the f3 (log/print) key to save and end the single known addition, export the data to the data log and export the data to a printer or computer, if a printer or computer is connected to the meter and enabled in the setup menu. Note: Press the f1 (escape) key to return to the measurement mode without saving the single known addition. 15. Press the f2 (next) key. 16. To perform a single known addition using the values that were entered for the previous single known addition, press the f2 (yes) key. To perform a single known addition and enter new values, press the f3 (no) key. To end the incremental technique and return to the measurement mode, press the f1 (escape) key. Thermo Scientific Orion Dual Star pH/ISE Benchtop Meter User Manual | 53 Section 6 | Incremental Techniques Double Known Addition • For most double known addition analysis, it is recommended that: o The sample volume should be 100 mL. o The concentration of the standard added should be 100 times the expected sample concentration. o The volume of the first addition should be 1 mL and the volume of the second addition should be 10 mL. • Refer to the appropriate electrode user guide for instructions for preparing the electrode, required solutions (ionic strength adjusters, standards, etc) and any special requirements. • Ensure that the electrode, ATC probe and reference electrode (if applicable) are connected to the meter inputs that correspond with the selected channel. Double Known Addition Procedure 1. Prepare the sample as directed in the electrode user guide. 2. In the measurement mode, press the setup key. Press the ▲ / ▼ keys to highlight Incremental Techniques and press the f2 (select) key. 3. Dual channel display only: Press the ▲ / ▼ keys to select the channel to perform the double known addition on and press the f2 (accept) key. 4. Press the ▲ / ▼ keys to highlight Double Known Addition and press the f2 (select) key. 5. Use the numeric keypad and decimal key to enter the sample volume, in mL, and press the f2 (accept) key. 6. Use the numeric keypad and decimal key to enter the total volume, in mL, and press the f2 (accept) key. The total volume includes the sample volume, ISA volume and diluting agent volume, but not the standard volume. 7. Use the numeric keypad and decimal key to enter the concentration of the standard and press the f2 (accept) key. 8. Rinse the electrode (ATC probe, stirrer probe and reference electrode, if applicable) with distilled water, blot dry with a lint-free tissue and place the electrode(s) into the sample. When the electrode and sample are ready, press the f2 (next) key. 9. Wait for the reading to stabilize. When the reading is stable, press the f2 (yes) key. 10. Use the numeric keypad and decimal key to enter the volume of the first increment of standard, in mL, to be added to the sample and press the f2 (accept) key. 11. Add the first increment of standard to the sample and press the f2 (yes) key. 12. Wait for the reading to stabilize. When the reading is stable, press the f2 (yes) key. 54 | Orion Dual Star pH/ISE Benchtop Meter User Manual Thermo Scientific Incremental Techniques | Section 6 13. Use the numeric keypad and decimal key to enter the volume of the second increment of standard, in mL, to be added to the sample and press the f2 (accept) key. 14. Add the second increment of standard to the sample and press the f2 (yes) key. 15. Wait for the reading to stabilize. When the reading is stable, press the f2 (yes) key. 16. The meter will display the result of the double known addition. Press the f3 (log/print) key to save and end the double known addition, export the data to the data log and export the data to a printer or computer, if a printer or computer is connected to the meter and enabled in the setup menu. Note: Press the f1 (escape) key to return to the measurement mode without saving the double known addition. 17. Press the f2 (next) key. 18. To perform a double known addition using the values that were entered for the previous double known addition, press the f2 (yes) key. To perform a double known addition and enter new values, press the f3 (no) key. To end the incremental technique and return to the measurement mode, press the f1 (escape) key. Thermo Scientific Orion Dual Star pH/ISE Benchtop Meter User Manual | 55 Section 6 | Incremental Techniques Single Known Subtraction In known subtraction, each addition of standard subtracts an increment of the species to be measured. Enter the correct reaction ratio of the species to be measured with the standard to be added. For example, a sulfide (S-2) sample is to be subtracted by the addition of silver (Ag+). Two silver ions are required to subtract each sulfide ion and the reaction ratio is 0.5. Sample concentration should be known within an order of magnitude and the total sample concentration should be approximately halved upon addition of the standard. Refer to the following table to choose the correct standard concentration and volume of addition. Amount of standard to be added per 100 mL of sample Standard concentration compared to expected sample concentration 1 mL 50 times more concentrated 5 mL 10 times more concentrated 10 mL 5 times more concentrated • Refer to the appropriate electrode user guide for instructions for preparing the electrode, required solutions (ionic strength adjusters, standards, etc) and any special requirements. Determine the electrode slope as directed in the electrode user guide. • Ensure that the electrode, ATC probe and reference electrode (if applicable) are connected to the meter inputs that correspond with the selected channel. Single Known Subtraction Procedure 1. Prepare the sample as directed in the electrode user guide. 2. In the measurement mode, press the setup key. Press the ▲ / ▼ keys to highlight Incremental Techniques and press the f2 (select) key. 3. Dual channel display only: Press the ▲ / ▼ keys to select the channel to perform the single known subtraction on and press the f2 (accept) key. 4. Press the ▲ / ▼ keys to highlight Single Known Subtraction and press the f2 (select) key. 5. Use the numeric keypad, decimal key and +/- key to enter the electrode slope and press the f2 (accept) key. Determine the electrode slope as directed in the electrode user guide or use the theoretical slope from the table in the Electrode ID and Slope for Incremental Techniques section. 6. Use the numeric keypad and decimal key to enter the sample volume, in mL, and press the f2 (accept) key. 7. Use the numeric keypad and decimal key to enter the total volume, in mL, and press the f2 (accept) key. The total volume includes the sample volume, ISA volume and diluting agent volume, but not the standard volume. 56 | Orion Dual Star pH/ISE Benchtop Meter User Manual Thermo Scientific Incremental Techniques | Section 6 8. Use the numeric keypad and decimal key to enter the concentration of the standard and press the f2 (accept) key. 9. Use the numeric keypad and decimal key to enter the reaction ratio of sample to standard and press the f2 (accept) key. For example, if a sulfide (S-2) sample is to be subtracted by the addition of silver (Ag+), two silver ions are required to subtract each sulfide ion and the reaction ratio is 0.5. 10. Rinse the electrode (ATC probe, stirrer probe and reference electrode, if applicable) with distilled water, blot dry with a lint-free tissue and place the electrode(s) into the sample. When the electrode and sample are ready, press the f2 (next) key. 11. Wait for the reading to stabilize. When the reading is stable, press the f2 (yes) key. 12. Use the numeric keypad and decimal key to enter the volume of the standard, in mL, to be added to the sample and press the f2 (accept) key. 13. Add the standard to the sample and press the f2 (yes) key. 14. Wait for the reading to stabilize. When the reading is stable, press the f2 (yes) key. 15. The meter will display the result of the single known subtraction. Press the f3 (log/print) key to save and end the single known subtraction, export the data to the data log and export the data to a printer or computer, if a printer or computer is connected to the meter and enabled in the setup menu. Note: Press the f1 (escape) key to return to the measurement mode without saving the single known subtraction. 16. Press the f2 (next) key. 17. To perform a single known subtraction using the values that were entered for the previous single known subtraction, press the f2 (yes) key. To perform a single known subtraction and enter new values, press the f3 (no) key. To end the incremental technique and return to the measurement mode, press the f1 (escape) key. Thermo Scientific Orion Dual Star pH/ISE Benchtop Meter User Manual | 57 Section 6 | Incremental Techniques Double Known Subtraction • Ensure that the subtraction ability of the chosen standard concentration and volume added does not exceed the concentration of sample. o For most double known subtraction analysis, it is recommended that: o The sample volume should be 100 mL. o The concentration of the standard added should be 50 times the expected sample concentration. • The volume of the first addition of standard should be 1 mL and the volume of the second addition of standard should be 10 mL. • Refer to the appropriate electrode user guide for instructions for preparing the electrode, required solutions (ionic strength adjusters, standards, etc) and any special requirements. • Ensure that the electrode, ATC probe and reference electrode (if applicable) are connected to the meter inputs that correspond with the selected channel. Double Known Subtraction Procedure 1. Prepare the sample as directed in the electrode user guide. 2. In the measurement mode, press the setup key. Press the ▲ / ▼ keys to highlight Incremental Techniques and press the f2 (select) key. 3. Dual channel display only: Press the ▲ / ▼ keys to select the channel to perform the double known subtraction on and press the f2 (accept) key. 4. Press the ▲ / ▼ keys to highlight Double Known Subtraction and press the f2 (select) key. 5. Use the numeric keypad and decimal key to enter the sample volume, in mL, and press the f2 (accept) key. 6. Use the numeric keypad and decimal key to enter the total volume, in mL, and press the f2 (accept) key. The total volume includes the sample volume, ISA volume and diluting agent volume, but not the standard volume. 7. Use the numeric keypad and decimal key to enter the concentration of the standard and press the f2 (accept) key. 8. Use the numeric keypad and decimal key to enter the reaction ratio of sample to standard and press the f2 (accept) key. For example, if a sulfide (S-2) sample is to be subtracted by the addition of silver (Ag+), two silver ions are required to subtract each sulfide ion and the reaction ratio is 0.5. 9. Rinse the electrode (ATC probe, stirrer probe and reference electrode, if applicable) with distilled water, blot dry with a lint-free tissue and place the electrode(s) into the sample. When the electrode and sample are ready, press the f2 (next) key. 58 | Orion Dual Star pH/ISE Benchtop Meter User Manual Thermo Scientific Incremental Techniques | Section 6 10. Wait for the reading to stabilize. When the reading is stable, press the f2 (yes) key. 11. Use the numeric keypad and decimal key to enter the volume of the first increment of standard, in mL, to be added to the sample and press the f2 (accept) key. 12. Add the first increment of standard to the sample and press the f2 (yes) key. 13. Wait for the reading to stabilize. When the reading is stable, press the f2 (yes) key. 14. Use the numeric keypad and decimal key to enter the volume of the second increment of standard, in mL, to be added to the sample and press the f2 (accept) key. 15. Add the second increment of standard to the sample and press the f2 (yes) key. 16. Wait for the reading to stabilize. When the reading is stable, press the f2 (yes) key. 17. The meter will display the result of the double known subtraction. Press the f3 (log/print) key to save and end the double known subtraction, export the data to the data log and export the data to a printer or computer, if a printer or computer is connected to the meter and enabled in the setup menu. Note: Press the f1 (escape) key to return to the measurement mode without saving the double known subtraction. 18. Press the f2 (next) key. 19. To perform a double known subtraction using the values that were entered for the previous double known subtraction, press the f2 (yes) key. To perform a double known subtraction and enter new values, press the f3 (no) key. To end the incremental technique and return to the measurement mode, press the f1 (escape) key. Thermo Scientific Orion Dual Star pH/ISE Benchtop Meter User Manual | 59 SECTION 7 7 Data Storage and Retrieval Data Storage Settings The data storage settings include the export trigger, computer, printer and data log settings. The export trigger uses the read type of the selected channel or channels to determine when the meter sends the measurements to the data log, if the data log is enabled in the setup menu, and to a printer or computer, if a printer or computer is connected to the meter and enabled in the setup menu. The computer setting enables communication from the meter to a computer. The printer setting enables communication from the meter to a printer. The data log setting enables or disables the data log. 1. In the measurement mode, press the setup key. 2. Press the ▲ / ▼ keys to highlight Instrument Parameters and press the f2 (select) key. 3. Press the ▲ / ▼ keys to highlight Export Data (PC/Printer/Log) and press the f2 (select) key. 4. Press the ▲ / ▼ keys to highlight Export Trigger and press the f2 (select) key. Press the ▲ / ▼ keys to highlight Channel 1, Channel 2 or Channel 1 & 2 as the measurement export trigger and press the f2 (accept) key. 5. The Orion Dual Star meter can be connected to a computer or a printer, but not both at the same time. If communication to a printer is enabled in the setup menu, communication to a computer will automatically be disabled. If communication to a computer is enabled in the in the setup menu, communication to a printer will automatically be disabled. a. To enable communication to a computer, press the ▲ / ▼ keys to highlight PC and press the f2 (select) key. Press the ▲ / ▼ keys to highlight PC On/Off and press the 60 | Orion Dual Star pH/ISE Benchtop Meter User Manual Thermo Scientific Data Storage and Retrieval | Section 7 f2 (select) key. Press the ▲ / ▼ keys to highlight On and press the f2 (accept) key. Press the ▲ / ▼ keys to highlight Baud Rate and press the f2 (select) key. Press the ▲ / ▼ keys to highlight 1200, 2400, 4800, 9600, 19200 or 38400 as the baud rate and press the f2 (accept) key. Once computer settings are entered, press the f1 (back) key. b. To enable communication to a printer, press the ▲ / ▼ keys to highlight Printer and press the f2 (select) key. Press the ▲ / ▼ keys to highlight Printer On/Off and press the f2 (select) key. Press the ▲ / ▼ keys to highlight On and press the f2 (accept) key. Press the ▲ / ▼ keys to highlight Baud Rate and press the f2 (select) key. Press the ▲ / ▼ keys to highlight 1200, 2400, 4800, 9600, 19200 or 38400 as the baud rate and press the f2 (accept) key. Once the printer settings are entered, press the f1 (back) key. c. To disable communication to a computer, press the ▲ / ▼ keys to highlight PC and press the f2 (select) key. Press the ▲ / ▼ keys to highlight PC On/Off and press the f2 (select) key. Press the ▲ / ▼ keys to highlight Off and press the f2 (accept) key. Press the f1 (back) key. d. To disable communication to a printer, press the ▲ / ▼ keys to highlight Printer and press the f2 (select) key. Press the ▲ / ▼ keys to highlight Printer On/Off and press the f2 (select) key. Press the ▲ / ▼ keys to highlight Off and press the f2 (accept) key. Press the f1 (back) key. 6. Press the ▲ / ▼ keys to highlight Data Log and press the f2 (select) key. Press the ▲ / ▼ keys to highlight Data Log On/Off and press the f2 (select) key. Press the ▲ / ▼ keys to highlight On to enable the data log and press the f2 (accept) key or press the ▲ / ▼ keys to highlight Off to disable the data log and press the f2 (accept) key. Press the ▲ / ▼ keys to highlight Ring Buffer and press the f2 (select) key. Press the ▲ / ▼ keys to highlight Off or On and press the f2 (accept) key. If Off is selected, an error message will be displayed when all 1000 data log points are filled and the data log must be emptied to clear the error message. If On is selected, the oldest data log point will be overwritten with the new data log point when all 1000 data log points are filled. Once all of the data log settings are entered, press the f1 (back) key. 7. Once all of the exporting settings are entered, press the f1 (back) key until the meter returns to the measurement mode. Thermo Scientific Orion Dual Star pH/ISE Benchtop Meter User Manual | 61 Section 7 | Data Storage and Retrieval Viewing the Calibration Log and Data Log Viewing the Calibration Log The Orion Dual Star meter saves up to ten of the most recent calibrations on each channel. Each of the ten calibrations per channel is saved according to the calibration type (pH, ISE, RmV or ORP), so the meter will use the last calibration performed for the calibration type (as long as it is one of the last ten most recent calibrations) and pH, ISE, RmV and ORP electrodes can be interchanged without recalibrating every time the electrodes are switched. For example: 1. The channel one measurement mode is set to pH, a pH electrode is connected to the channel one input and a pH calibration is performed. 2. The channel one measurement mode is set to ORP, an ORP electrode is connected to the channel one input, an ORP calibration is performed. 3. The channel one measurement mode is set back to pH and the pH electrode is reconnected to the channel one input. In this scenario, the meter will use the pH calibration performed in step 1 for the pH measurements displayed after step 3. 1. In the measurement mode, press the log view key. 2. Press the ▲ / ▼ keys to highlight Calibration Log and press the f2 (accept) key. 3. Press the ▲ / ▼ keys to highlight Channel 1 Cal or Channel 2 Cal and press the f2 (select) key. 4. Press the ▲ / ▼ keys to highlight pH, ISE, RmV, ORP or Temperature as the calibration type and press the f2 (select) key. 5. The meter will display a list of calibrations for the selected channel and calibration type. The list shows the sequential number of the calibration (Cal_101), the date that the point was saved (07/05/2008) and the time that the point was saved (12:05). 6. To view the calibration data, press the ▲ / ▼ keys to highlight the calibration point and press the f2 (select) key. Press the f2 (print) key to print the calibration point, press the f3 (graph) key to view the calibration graph or press the f1 (back) key to return to the list of calibration points. 7. Press the f1 (back) key twice to return to the measurement mode. Viewing the Data Log The Orion Dual Star meter saves up to 1000 points of data and assigns a log number to each data point. The read type of the displayed channel or channels determines when measurements are exported to the data log. When the meter is in the dual channel display mode, the measurements from both channels will be saved as two separate data points. When a data point is exported to a computer or printer, the time stamp will include the hour, minutes and seconds. 62 | Orion Dual Star pH/ISE Benchtop Meter User Manual Thermo Scientific Data Storage and Retrieval | Section 7 1. In the measurement mode, press the log view key. 2. Press the ▲ / ▼ keys to highlight Data Log and press the f2 (accept) key. The meter will display a list of the data points. The list shows the sequential number of the data point (D0001), the date that the data point was saved (07/05/2008) and the time that the data point was saved (14:05). 3. To view the measurement information for an individual data point, press the ▲ / ▼ keys to highlight the data point and press the f2 (select) key. Press the f2 (print) key to print the data point or press the f1 (back) key to return to the list of data points. 4. To export the data log to a computer or printer, press the f3 (options) key, press the ▲ / ▼ keys to highlight Log Export and press the f2 (accept) key. Press the ▲ / ▼ keys to highlight Today, Last 10, Range or All as the data log points to be exported and press the f2 (accept) key. a. If Today, Last 10 or All is selected, press the f2 (yes) key to export the data. After exporting the data, the meter will automatically return to the measurement mode. b. If Range is selected, use the numeric keypad to enter the number of the first data point to be exported, press the f2 (accept) key, use the numeric keypad to enter the number of the last data point to be exported, press the log/print key and press the f2 (yes) key to export the data. After exporting the data, the meter will automatically return to the measurement mode. c. To clear the data log, press the f3 (options) key, press the ▲ / ▼ keys to highlight Log Clear and press the f2 (accept) key. Press the f2 (yes) key to clear the entire data log. Enter the password using the alphanumeric keypad and press the f2 (accept) key. The default password is 111111111. Press the f1 (back) key to return to the list of data points. 5. Press the f1 (back) key twice to return to the measurement mode. Thermo Scientific Orion Dual Star pH/ISE Benchtop Meter User Manual | 63 Section 7 | Data Storage and Retrieval Interfacing a Printer The Orion Star series printer, Cat. No. 1010006, is recommended for use with the Orion Dual Star meter. The Orion Star series printer has a 9600 baud rate and it is packaged with the RS232 printer cable, Cat. No. 250302-001, which is required to interface the Orion Dual Star meter to a printer. The Orion Star printer is also designed to print the calibration graphs and will show the data in the graph clearly with the best picture and detail. Other printers may print the calibration graphs as a bunch of information that looks like random text and numbers; however, the raw calibration data should print fine. The baud rate of the Orion Dual Star meter can be set to 1200, 2400, 4800, 9600, 19200 or 38400 for communication to different printers. The fixed meter settings are number of bits = 8, stop bits = 1 and parity = none. The flow control for the printer should be set to XON/XOFF. The meter will send measurements and calibration data to the printer if the printer option is turned on in the setup menu. Alternatively, measurements and calibration data can be sent to the data log and calibration log. From the data log and calibration log, the operator can chose to print a single data log point, a range of data log points or the entire data log. Interfacing a Computer The Orion Dual Star meter can send measurements and calibration data to a computer in a comma delimited format that is easy to parse in computer programs like Microsoft® Excel®. Connect the USB computer cable to the USB inputs on the meter and computer and install the Dual Star USB driver, downloadable on our website at www.thermoscientific.com/OrionMeters. Alternatively, connect the RS232 computer cable, Catalog Number 1010053, to the RS232 inputs on the meter and computer. The baud rate of the Orion Dual Star meter can be set to 1200, 2400, 4800, 9600, 19200 or 38400. The fixed meter settings are number of bits = 8, stop bits = 1 and parity = none. The flow control for the computer should be set to XON/XOFF. The meter will send measurements and calibration data to the computer if the computer option is turned on in the setup menu. Alternatively, measurements and calibration data can be sent to the data log and calibration log. From the data log and calibration log, the operator can chose to send a single data log point, a range of data log points or the entire data log to the computer. 64 | Orion Dual Star pH/ISE Benchtop Meter User Manual Thermo Scientific Data Storage and Retrieval | Section 7 Meter Software Upgrade The Orion Dual Star meter can be updated with the latest software, so the meter programs are always up-to-date. 1. Disconnect the power adapter from the meter. 2. Connect the USB cable that is packaged with the Orion Dual Star meter to the USB input on a computer. 3. Connect the other end of the USB cable to the USB input on the Orion Dual Star meter. 4. Press and hold down the power key and the f1 key on the meter keypad. 5. Connect the power adapter to the meter. 6. Release the power key and the f1 key when the meter powers up and beeps twice. 7. A window will open on the computer for the USB drive that the meter is connected to. Delete the software file in this window. 8. Go to our website at www.thermoscientific.com/OrionMeters and select the link for upgrading the Orion Dual Star meter software. Download the new software file, unzip/extract the file and then copy and paste the new software file into the window that used to contain the old software file. 9. Wait for the software file to paste completely into the window. 10. Disconnect the power adapter from the meter and then reconnect the power adapter to the meter. Wait for the new software to load. Note: After a new revision of meter software is loaded to the meter, all of the meter settings will be reset to the factory default settings and the data log, calibration log and methods will be cleared. Thermo Scientific Orion Dual Star pH/ISE Benchtop Meter User Manual | 65 SECTION 8 8 Autosampler Operation Interfacing the Meter and Autosampler Com 2 Port (to printer) Power Button Power Connector Com 1 Port (to Orion Dual Star meter) 1. Select a location for the system and unpack the autosampler and Orion Dual Star meter components. Prepare the autosampler according to the autosampler user guide. 2. Connect the meter to the autosampler using the RS232 interface cable. Connect the 2.5 mm stereo jack end of the cable to the RS232 input on the meter. Connect the 9 pin DIN end of the cable to the COM1 RS232 port on the autosampler. 3. If a printer will be used, use the autosampler to printer interface cable to connect the COM2 port on the autosampler to the 25 pin RS232 port on the printer. 66 | Orion Dual Star pH/ISE Benchtop Meter User Manual Thermo Scientific Autosampler Operation | Section 8 Note: The printer must have a 9600 baud rate to be connected to the autosampler. The Orion Star series printer, Catalog Number 1010006, is recommended for use with the Orion Dual Star meter and autosampler. 4. Prepare and install the electrodes. Prepare the electrodes according to the electrode user guides. Connect the electrodes to the meter using the extension cables and cable management system provided with the autosampler. Insert the electrodes into the electrode holder on the autosampler. If a stirrer probe will be used, connect the stirrer probe to the stirrer jack on the back of the meter and insert the stirrer probe into the electrode holder on the autosampler. Note: The minimum cable length required to connect electrodes to the autosampler is 6.25 feet (1.9 meters). Extension cables or electrodes with an appropriate cable length are needed. 5. Connect the meter, autosampler and printer (if applicable) to a power supply and turn on the power. The default Orion Dual Star meter baud rate is 9600 and the default autosampler baud rate for the COM 1 port is 1200, so the meter baud rate needs to be set to 1200 or the autosampler dip switches need to be adjusted to 9600 for the COM 1 port. Thermo Scientific Orion Dual Star pH/ISE Benchtop Meter User Manual | 67 Section 8 | Autosampler Operation Autosampler Setup Menu The autosampler setup menu can be accessed from the setup menu. The autosampler menu contains ten autosampler parameters: Autosampler, Ch.1 Method, Ch.2 Method, Calibration, Temperature, Tray Size, Rinse Beakers, Rinse Time, Stirrer Speed and Samples. In the measurement mode, press the setup key. Press the ▲ / ▼ keys to highlight Autosampler and press the f2 (select) key. • Autosampler – Press the ▲ / ▼ keys to highlight Autosampler and press the f2 (select) key. Press the ▲ / ▼ keys to highlight On or Off to turn communication between the meter and the autosampler on or off and press the f2 (accept) key. • Ch.1 Method – Press the ▲ / ▼ keys to highlight Ch.1 Method and press the f2 (select) key. To set the method that the autosampler will use for channel 1, press the ▲ / ▼ keys to highlight the method number and press the f2 (accept) key. Note: A method can be selected when the autosampler setup parameters are entered, but any method editing must be done from the methods list. Calibration values from the last calibration performed in the method are stored to the method, so calibrations can be performed on the autosampler. • Ch.2 Method – Press the ▲ / ▼ keys to highlight Ch.2 Method and press the f2 (select) key. To set the method that the autosampler will use for channel 2, press the ▲ / ▼ keys to highlight the method number and press the f2 (accept) key. Note: A method can be selected when the autosampler setup parameters are entered, but any method editing must be done from the method list. Calibration values from the last calibration performed in the method are stored to the method, so calibrations can be performed on the autosampler. • 68 | Orion Dual Star pH/ISE Benchtop Meter User Manual Calibration – Press the ▲ / ▼ keys to highlight Calibration and press the f2 (select) key. Press the ▲ / ▼ keys to highlight On or Off to turn the calibration function for the autosampler on or off and press the f2 (accept) key. Thermo Scientific Autosampler Operation | Section 8 • Temperature – Press the ▲ / ▼ keys to highlight Temperature and press the f2 (select) key. Press the ▲ / ▼ keys to highlight ATC1 or ATC2 as the temperature source of the ATC probe that will be used on the autosampler and press the f2 (accept) key. • Tray Size – Press the ▲ / ▼ keys to highlight Tray Size and press the f2 (select) key. Press the ▲ / ▼ keys to highlight 28 or 48 as the size of the tray that will be used on the autosampler and press the f2 (accept) key. • Rinse Beakers – Press the ▲ / ▼ keys to highlight Rinse Beakers and press the f2 (select) key. Press the ▲ / ▼ keys to highlight 0, 1, 2 or 3 as the number of the rinse beakers that will be used on the autosampler and press the f2 (accept) key. • Rinse Time – Press the ▲ / ▼ keys to highlight Rinse Time and press the f2 (select) key. Use the numeric keypad to enter the time (in seconds) that the electrodes will be rinsed in each rinse beaker and press the f2 (accept) key. The rinse time can be set from 1 to 59 seconds. • Stirrer Speed – Press the ▲ / ▼ keys to highlight Stirrer Speed and press the f2 (select) key. Press the ▲ / ▼ keys to highlight Off, 1, 2, 3, 4 or 5 as the stirrer speed of the stirrer probe and press the f2 (accept) key. • Samples – Press the ▲ / ▼ keys to highlight Samples and press the f2 (select) key. • Thermo Scientific o To enter the number of samples that will be run on the autosampler, press the ▲ / ▼ keys to highlight Number of Samples and press the f2 (accept) key. Use the numeric keypad to enter the number of samples and press the f2 (accept) key. o To set the sample ID, press the ▲ / ▼ keys to highlight Sample ID and press the f2 (accept) key. Press the ▲ / ▼ keys to highlight Off, Manual or Auto Incremental and press the f2 (accept) key. If Auto Incremental is selected, use the alphanumeric keypad to enter the initial sample ID and then press the f2 (accept) key. Refer to the meter pullout guide for the location of the letter keys on the numeric keypad. The meter will save the entered sample ID and add a sequential number after it. o Once all of the sample settings are entered, press the f1 (back) key. Once all of the autosampler settings are entered, press the f1 (back) key. Orion Dual Star pH/ISE Benchtop Meter User Manual | 69 Section 8 | Autosampler Operation Running the Autosampler 1. Set all of the autosampler parameters in the autosampler setup menu. Refer to the Autosampler Setup Menu section for detailed instructions. 2. Set the meter display so only the channel or channels that will be run on the autosampler are displayed. Press the channel key to select a dual channel display for running both channels on the autosampler, a single channel display for running channel 1 on the autosampler or a single channel display for running channel 2 on the autosampler. Note: The meter will log the data points for both channels during the autosampler run if the dual channel display is selected. The meter will log the data points for only one channel if the single channel display is selected. 3. Ensure that all of the electrodes are connected to the meter inputs that correspond with the channel(s) that will be run on the autosampler. If the stirrer probe, Cat. No. 096019, will be used with the autosampler, connect the stirrer probe to the stirrer input on the back of the autosampler. 4. Set the method(s) for the channel(s) that will be run on the autosampler. Methods must be assigned to the channel(s) that will be run on the autosampler before the autosampler can be run. Make sure to assign the measurement mode and electrode ID for the channel(s) that will be run on the autosampler. The operator may select Current Settings as the method and the meter will use the current meter settings to run on the autosampler. If Current Settings is selected as the method, calibrations cannot be run on the autosampler and the samples will be measured using the last saved calibration. Note: A method can be selected when the autosampler setup parameters are entered, but any method editing must be done from the method list. Calibration values from the last calibration performed in the method are stored to the method, so calibrations can be performed on the autosampler. 5. To begin an autosampler run, press the auto key, verify that all of the autosampler setup parameters are correct and press the f3 (start) key. a. During the autosampler run, press the f1 (pause) key to pause the run. Press the f1 (resume) key to continue the autosampler run at the point where it was paused, press the f2 (auto) key to access the autosampler setup parameters or press the f3 (end) key to cancel and end the autosampler run. b. Press the f3 (end) key to abort the autosampler run. The autosampler arm will return to home position and the meter will return to the measurement mode. 6. Once the autosampler run is complete, another autosampler run can be started or the meter can be used as normal. The method that was selected for the previous autosampler run will be used for the next run, unless the operator changes the method in the autosampler setup menu. 70 | Orion Dual Star pH/ISE Benchtop Meter User Manual Thermo Scientific Autosampler Operation | Section 8 Autosampler Error Messages Error Code E036 E200 E201 E202 E203 Description Bad Value Entered – The value that was entered into the meter was outside of the allowable range of values. Verify the value range and reenter the value. Communication Error – There is an error in communication between the meter and autosampler. Check cable connections, communication protocols and meter settings and then retry running the autosampler. The baud rate of the meter must be set to 1200 to run the autosampler. Autosampler Jam – The autosampler cannot properly move the arm assembly. Press the f1 (pause) key and clear any obstructions from the autosampler. If the jam does not clear, turn the autosampler off and wait a minute before turning it back on. The autosampler should return to the home position. Unstable Readings – The measurements taken while using the autosampler were unstable. Check the electrode for proper function and ensure that the electrode cables are properly connected. For assistance with Orion products, contact Technical Support by email at [email protected] or by phone – within the United States call 1-800-225-1480 and outside the United States call +1-978-232-6000 or fax +1-978-232-6031. For additional product information, contact your local authorized dealer, local Thermo Scientific Orion technical sales representative or contact us using the Water and Laboratory Products (WLP) information on the page back of this manual. Thermo Scientific Orion Dual Star pH/ISE Benchtop Meter User Manual | 71 SECTION 9 9 Customer Services Troubleshooting Guide Electrode Stability Test 1. In the measurement mode, press the setup key to enter the setup menu. Press the ▲ / ▼ keys to highlight Instrument Parameters and press the f2 (select) key. Press the ▲ / ▼ keys to highlight Troubleshooting and press the f2 (select) key. 2. Press the ▲ / ▼ keys to highlight Stability Test and press the f2 (accept) key. Press the ▲ / ▼ keys to highlight Channel 1 or Channel 2 and press the f2 (accept) key. 3. Make sure that the electrode or probe to be tested is connected to the channel that was selected in the previous step and press the f2 (yes) key. 4. Place the electrode or probe in an appropriate solution with a stable temperature and press the f2 (yes) key. • A pH 7 buffer is recommended for a pH electrode. • A calibration standard with a moderate concentration of the ion of interest is recommended for an ion selective electrode (ISE). • An ORP standard is recommended for an ORP electrode. 5. The meter will perform the stability test and show the mV per minute drift and noise on the display. 6. Press the f1 (escape) key to return to the measurement mode. 72 | Orion Dual Star pH/ISE Benchtop Meter User Manual Thermo Scientific Customer Services | Section 9 Meter Self Test and Checkout A meter self-diagnostic test is performed automatically when the meter is powered on and can be manually activated from the setup menu. The self test that is performed during the meter power up does not require any operator action. If the self test is activated from the setup menu, the operator must press the meter keys when prompted during the test. Meter Self Test 1. In the measurement mode, press the setup key to enter the setup menu. Press the ▲ / ▼ keys to highlight Instrument Parameters and press the f2 (select) key. Press the ▲ / ▼ keys to highlight Troubleshooting and press the f2 (select) key. 2. Press the ▲ / ▼ keys to highlight Self Test and press the f2 (accept) key. 3. Disconnect all of the electrodes and probes from the meter, attach both BNC shorting caps to the two BNC inputs and press the f2 (yes) key. 4. Press the f2 (yes) key to start the self test. 5. The meter will perform an accuracy test. When the meter displays Accuracy Test Passed, press the f2 (next) key. 6. The meter will perform an EPROM test. When the meter displays E2Prom Test Passed, press the f2 (next) key. 7. The meter will perform a keypad test. Press each of the blinking keys shown on the display in the order that they are shown. When the meter displays Keypad Test Passed, press the f2 (next) key. 8. The meter will display Self Test Passed. Press the f1 (escape) key to return to the measurement mode. Note: If any problems are found during the self test, refer to the Meter Error Codes section. Meter Checkout 1. After the self test is complete, the meter will return to the measurement mode. Keep all of the electrodes disconnected from the meter and keep the BNC shorting caps attached to the BNC inputs on the meter. 2. Set the measurement mode for both channels to pH. The meter should read a steady 7.000 pH ± 0.002 pH on both channels. If the meter does not read a steady 7.000 ± 0.002, perform a one point pH calibration with the BNC shorting caps attached to the BNC inputs. Set the pH value to 7.000 and the slope value to 100.0. Refer to the pH Calibration Procedure section for detailed instructions. 3. In the measurement mode, the meter should read a steady 0.0 mV ± 0.2 mV. If the meter does not read a steady 0.0 mV ± 0.2 mV with the BNC shorting caps attached to the BNC inputs, contact Technical Support. Thermo Scientific Orion Dual Star pH/ISE Benchtop Meter User Manual | 73 Section 9 | Customer Services User Reset If the user reset is performed, all of the meter settings will be deleted and reset to the default settings. The data log, calibration log and methods will not be deleted with the user reset. 1. In the measurement mode, press the setup key to enter the setup menu. Press the ▲ / ▼ keys to highlight Instrument Parameters and press the f2 (select) key. Press the ▲ / ▼ keys to highlight Troubleshooting and press the f2 (select) key. 2. Press the ▲ / ▼ keys to highlight User Reset and press the f2 (accept) key. 3. Press the f2 (yes) key to perform the reset. 4. After the user reset is done, the meter will enter the EZ Startup menu and then proceed to the measurement mode. Factory Configuration If the factory configuration is performed, all of the current meter settings will be deleted and reset to the default settings and the data log, calibration log and methods will be deleted. 1. In the measurement mode, press the setup key to enter the setup menu. Press the ▲ / ▼ keys to highlight Instrument Parameters and press the f2 (select) key. Press the ▲ / ▼ keys to highlight Troubleshooting and press the f2 (select) key. 2. Press the ▲ / ▼ keys to highlight Factory Config and press the f2 (accept) key. 3. Press the f2 (yes) key to perform the reset. 4. Use the alphanumeric keypad to enter the PIN number and press the f2 (accept) key to perform the reset. The default PIN number is 111111111. 5. Press the f1 (measure) key, the meter will enter the EZ Startup menu and then proceed to the measurement mode. About Meter 1. In the measurement mode, press the setup key to enter the setup menu. Press the ▲ / ▼ keys to highlight Instrument Parameters and press the f2 (select) key. Press the ▲ / ▼ keys to highlight Troubleshooting and press the f2 (select) key. 2. Press the ▲ / ▼ keys to highlight About Meter and press the f2 (accept) key. 3. The meter serial number and software version will be displayed. 4. Press the f1 (back) key to return to the troubleshooting settings, press the f1 (back) key to return to the instrument parameter settings and press the f1 (back) key to return to the measurement mode. 74 | Orion Dual Star pH/ISE Benchtop Meter User Manual Thermo Scientific Customer Services | Section 9 Electrode Condition Icon The electrode condition icon indicates the performance of the pH electrode or ion selective electrode (ISE), based on the last saved calibration and electrode measurement stability. Icon Definition of Icon – pH Electrode Definition of Icon – ISE Electrode Electrode condition is good and the electrode slope is 90 to 110 %. Electrode condition is good and the electrode slope is 0 to 199 mV/decade (cation) or 0 to -199 mV/decade (anion). Electrode condition is fair and the electrode slope is 80 to 120 %. N/A Electrode condition is bad and the electrode slope is less than 80 % or greater than 120 %. Consult the electrode user guide for instructions on how to clean, condition and troubleshoot the electrode. Electrode condition is bad and the electrode slope has the wrong sign or the value is wrong. Verify that the correct electrode ID was selected in the setup menu. Consult the electrode user guide for instructions on how to clean, condition and troubleshoot the electrode. Assistance For assistance with Orion products, contact Technical Support by email at [email protected] or by phone – within the United States call 1-800-225-1480 and outside the United States call +1-978-232-6000 or fax +1-978-232-6031. For additional product information, contact your local authorized dealer, local Thermo Scientific Orion technical sales representative or contact us using the Water and Laboratory Products (WLP) information on the page back of this manual. Warranty For the most current warranty information, visit www.thermoscientific.com/water. Thermo Scientific Orion Dual Star pH/ISE Benchtop Meter User Manual | 75 Section 9 | Customer Services Meter Error Codes Over Range Measurements If the measurement is flashing 9999 and over range, the measurement value is outside of the allowable measurement range. Make sure that the electrode is connected to the appropriate meter input and the electrode parameters are entered correctly in the setup menu. Clean the electrode according to the electrode user guide and re-calibrate the electrode with new buffers or standards. If the error persists, perform the meter self test. Error Code Description E001 Display Error – If this error occurs, contact Technical Support. E002 Hardware Error – If this error occurs, contact Technical Support. E003 E004 E005 E006 E007 Channel 1 Input Error – Disconnect all of the electrodes from the meter, connect the two BNC shorting caps to the channel 1 and channel 2 BNC inputs and repeat the self test. Channel 2 Input Error – Disconnect all of the electrodes from the meter, connect the two BNC shorting caps to the channel 1 and channel 2 BNC inputs and repeat the self test. Reference Input Error – Make sure that all of the electrodes are disconnected from the meter (including the reference input), connect the two BNC shorting caps to the channel 1 and channel 2 BNC inputs and repeat the self test. Ground Input Error – Make sure that all of the electrodes are disconnected from the meter (including the ground input), connect the two BNC shorting caps to the channel 1 and channel 2 BNC inputs and repeat the self test. Keypad Failure – Repeat the self test. When the meter prompts, press each of the keys one at a time, including the power key, within five seconds of the meter prompts. If the error persists, contact Technical Support. E008 Hardware Error – If this error occurs, contact Technical Support. E009 Hardware Error – If this error occurs, contact Technical Support. E020 E027 E028 E032 76 | Orion Dual Star pH/ISE Benchtop Meter User Manual Measurement Out of Range – Perform the meter self test, clean the electrode according to the electrode user guide and re-calibrate the electrode with new buffers or standards. Data Transfer Error – A communication error between the meter and computer occurred. Check the cable connections and communication protocols. Make sure that the meter is set to the correct baud rate and the computer function is enabled in the setup menu. Incremental Techniques Error – Make sure that the correct incremental technique was used and all of the parameters were entered correctly. The measured millivolt difference may not be great enough to permit the calculation of the unknown concentration. Increase the concentration of the standard or dilute the sample. The concentration of the unknown may have been calculated to be less than 0.0001. If the unknown was diluted, use a fresh aliquot of undiluted or less diluted unknown. The electrode ID may be incorrect or the electrode may not have been prepared correctly, filled with the proper filling solution or connected to the appropriate meter input. If the error persists, measure a standard with a known concentration and the same background as the sample. Adjust the standard concentration and volume until accurate results are obtained. Printer Communication Error – A communication error between the meter and printer occurred. Check the cable connections and communication protocols. Make sure that the meter is set to the correct baud rate for the printer and the printer function is enabled in the setup menu. The printer may be out of paper, the printer paper may be jammed or there may be another printer error causing the printer not to be ready. Thermo Scientific Customer Services | Section 9 Error Code E035 E036 E038 E039 E040 E041 E105 E107 E109 E306 E307 E309 E511 Thermo Scientific Description Incorrect Password Entered – The password that was entered into the meter was incorrect. Verify the password and reenter it. Bad Value Entered – The value that was entered into the meter was outside of the allowable range of values. Verify the value range and reenter the value. Calibration Log Full – The calibration log is full and must be cleared before any additional calibration data can be saved. Calibration Log Empty – There is no calibration saved in the calibration log and a calibration needs to be performed before any calibration data can be viewed. Data Log Full – The data log is full and must be cleared before any data points can be saved. Data Log Empty – There are no data points saved in the data log. The data log needs to be enabled in the setup menu and a measurement needs to be logged before any data points can be viewed. pH Auto Buffer Recognition Error – The millivolts measured for a pH buffer during calibration are outside of the required range for automatic buffer recognition. Review the pH calibration procedure and check that the correct buffer set was selected in the setup menu. Clean the electrode according to the electrode user guide. Re-calibrate the electrode with fresh buffers. pH Calibration Standard Error – The millivolts measured during calibration are the same for two buffers or the millivolts for the two buffers are too close together. There must be at least a 5 mV difference between the two buffers. Review the pH calibration procedure and verify that the electrode was placed in the proper buffers at the appropriate times. Clean the electrode according to the electrode user guide. Re-calibrate the electrode with fresh buffers. Bad pH Slope or Calibration Offset – Clean the electrode according to the electrode user guide. Re-calibrate the electrode with fresh buffers. ISE Automatic Blank Error – Review the ISE calibration procedure and verify that the electrode was placed in the proper standards at the appropriate times. Clean the electrode according to the electrode user guide. Re-calibrate the electrode with fresh standards. If the error persists, disable the autoblank feature in the setup menu and re-calibrate the meter without a zero standard. See the Automatic Blank Correction Feature section for more information. ISE Calibration Standard Error – The millivolts measured during calibration are the same for two standards or the millivolts for the two standards are too close together. There must be at least a 20% difference between the entered standard values. Review the ISE calibration procedure and verify that the electrode was placed in the proper standards at the appropriate times. Clean the electrode according to the electrode user guide. Re-calibrate the electrode with fresh standards. Bad ISE Slope – Verify that the correct electrode ID was selected in the setup menu. Clean the electrode per the electrode user guide. Re-calibrate the electrode with new standards. ORP Calibration Standard Error – The millivolts measured for the ORP standard during calibration are outside of the required range for an ORP calibration. Review the ORP calibration procedure and verify that the electrode was placed in the standard at the appropriate time and the Thermo Scientific ORP standard was used. Clean the electrode according to the electrode user guide. Re-calibrate the electrode with fresh ORP standard. Orion Dual Star pH/ISE Benchtop Meter User Manual | 77 Section 9 | Customer Services Notice of Compliance This equipment generates, uses, and can radiate radio frequency energy and if not installed and used in accordance with the instruction manual, may cause interference to radio communications. It has been tested and found to comply with the limits for a Class A computing device pursuant to Subpart J of Part 15 of FCC Rules, which are designed to provide reasonable protection against such interference when operated in a commercial environment. Operation of this equipment in a residential area is likely to cause interference, in which case the user, at his own expense, will be required to take whatever measures may be required to correct the interference. “This digital apparatus does not exceed the (Class A) limits for radio noise emissions from digital apparatus set out in the Radio Interference Regulations of the Canadian Department of Communications.” “Le présent appareil numérique n’ émet pas de bruits radioélectriques dépassant les limites applicables aux appareils numériques (de la class A) prescrites dans le Règlement sur le brouillage radioélectrique édicté par le ministère des Communications du Canada.” WEEE Compliance This product is required to comply with the European Union’s Waste Electrical & Electronic Equipment (WEEE) Directive 2002/96/EC. It is marked with the symbol shown here. Further information on compliance with these directives, the recyclers in your country, and information on Thermo Scientific Orion products that may assist the detection of substances subject to the RoHS Directive are available by contact us using the Water and Laboratory Products (WLP) information on the back page of this manual. 78 | Orion Dual Star pH/ISE Benchtop Meter User Manual Thermo Scientific Customer Services | Section 9 Declaration of Conformity Manufacturer: Thermo Fisher Scientific Inc Address: Ayer Rajah Crescent Blk 55 #04-16/24 Singapore 139949 Singapore Hereby declares that the following product: Orion Dual Star pH/ISE Benchtop Meter is rated 100 to 240 VAC, 50/60 Hz, 0.5A Equipment Class: Measurement, control and laboratory Orion Dual Star meters are EMC Class A Conforms with the following directives and standards: EN61326-1:2013 Electromagnetic Compatibility (EMC Directive) Electrical equipment for measurement, control and laboratory use EMC requirements EN61010-1:2010 Safety Standards UL61010-1:2012 Safety requirements for electrical equipment for measurement, CAN/CSA C22.2 No. 61010-1:2012 control and laboratory use - general requirements. Cheow Kwang Chan QA/Regulatory Manager Place and Date of Issue: 14 May 2015 Singapore Thermo Scientific Orion Dual Star pH/ISE Benchtop Meter User Manual | 79 Section 9 | Customer Services Real Time Clock Battery Maintenance The Orion Dual Star meter uses an internal BR-1225 type, 3 V lithium coin cell battery for real time clock operation. If the real time clock function is lost, the battery needs to be replaced. Since the battery is inside of the meter housing, only qualified technicians should attempt to replace the battery. Replacing and Disposing of the Battery 1. Disconnect the universal power adapter from the meter and the wall outlet. 2. Orientate the meter so the display is face down on a soft, nonmetallic, non-scratching surface. The bottom of the meter (with the pullout guide) should be closest to you and the top of the meter (with the electrode and cable inputs) should be farthest from you. 3. Use a medium size Phillips head screwdriver to unscrew the four screws on the back of the meter. Remove the back cover of the meter. Be careful not to spill any liquids, dust or other foreign matter onto the exposed circuit board. 4. Locate the battery holder. It is a round, small, coin size battery holder that is located in the left bottom corner of the circuit board and has a reference designator BAT41 marked in white on the circuit board. 5. Use a small flat screwdriver to pry out the battery from the holder. Slide the new battery, from the side, into the battery holder and be careful not to break the metal tab that holds the battery in place. 6. Place the back cover on the meter and fasten the screws. 7. Dispose of the used battery in safe and environmentally responsible way, following all applicable federal, state and local regulations. Important Note: Replace the battery only with a new BR-1225 type, 3 V lithium coin cell battery. Do not substitute any other battery type. Battery Recommendations: Use caution, lithium can cause fire, explosion and burns. Follow all applicable regulations for disposal of products containing lithium. Do not tamper with the batteries or try to open them. Do not crush, recharge, incinerate or heat the batteries above 212 °F (100 °C). Do not expose the batteries to heat sources. Burning the batteries will result in corrosive and toxic lithium hydroxide gas release. 80 | Orion Dual Star pH/ISE Benchtop Meter User Manual Thermo Scientific Customer Services | Section 9 Ordering Information Thermo Scientific Cat. No. Description 2115000 Orion Dual Star pH/ISE benchtop meter with 927007MD Orion stainless steel ATC probe, electrode stand, USB cable, universal power supply, literature & test certificate 2115001 Orion Dual Star pH/ISE benchtop meter kit with 8102BNUWP ROSS Ultra glass-body pH electrode, 927007MD Orion stainless steel ATC probe, 910104 Orion pH 4.01 buffer (475 mL), 910107 Orion pH 7.00 buffer (475 mL), 910110 Orion pH 10.01 buffer (475 mL), 810001 ROSS storage solution (475 mL), electrode stand, USB cable, universal power supply, literature & test certificate 2115101 Orion Dual Star pH/ISE benchtop meter & electrode set with 8102BNUWP ROSS Ultra glass-body pH electrode, 927007MD Orion stainless steel ATC probe, electrode stand, USB cable, universal power supply, literature & test certificate 2115102 Orion Dual Star pH/ISE benchtop meter & Triode set with 8157BNUMD ROSS Ultra Triode epoxy-body pH/ATC electrode, electrode stand, USB cable, universal power supply, literature & test certificate 2115201 Orion Dual Star pH/ISE benchtop meter pH & ammonia kit with 9512BNWP Orion ammonia ion selective electrode, 8172BNWP ROSS Sure-Flow glass-body pH electrode, 927007MD Orion stainless steel ATC probe, 096019 Orion Star series stirrer probe, 951207 Orion 100 ppm ammonia standard (475 mL), 951211 Orion ammonia ISA ionic strength adjuster (475 mL), 810199 ROSS pH buffer and solution kit, electrode stand, USB cable, universal power supply, literature & test certificate 2115202 Orion Dual Star pH/ISE benchtop meter pH & chloride kit with 9617BNWP Orion chloride ion selective electrode, 8172BNWP ROSS Sure-Flow glass-body pH electrode, 927007MD Orion stainless steel ATC probe, 096019 Orion Star series stirrer probe, 941708 Orion 1000 ppm chloride standard (475 mL), 940011 Orion chloride ISA ionic strength adjuster (475 mL), 810199 ROSS pH buffer and solution kit, electrode stand, USB cable, universal power supply, literature & test certificate 2115203 Orion Dual Star pH/ISE benchtop meter pH & fluoride kit with 9609BNWP Orion fluoride ion selective electrode, 8172BNWP ROSS Sure-Flow glass-body pH electrode, 927007MD Orion stainless steel ATC probe, 096019 Orion Star series stirrer probe, 040908 Orion 10 ppm fluoride standard premixed with TISAB II (475 mL), 040906 Orion 1 ppm fluoride standard premixed with TISAB II (475 mL), 940909 Orion TISAB II total ionic strength adjustment buffer (3.8 L), 810199 ROSS pH buffer and solution kit, electrode stand, USB cable, universal power supply, literature & test certificate 2115204 Orion Dual Star pH/ISE benchtop meter pH & nitrate kit with 9707BNWP Orion nitrate ion selective electrode, 8172BNWP ROSS Sure-Flow glass-body pH electrode, 927007MD Orion stainless steel ATC probe, 096019 Orion Star series stirrer probe, 930707 Orion 100 ppm nitrate standard (475 mL), 930711 Orion nitrate ISA ionic strength adjuster (475 mL), 810199 ROSS pH buffer and solution kit, electrode stand, USB cable, universal power supply, literature & test certificate 2115205 Orion Dual Star pH/ISE benchtop meter pH & sodium kit with 8611BNWP ROSS sodium ion selective electrode, 8172BNWP ROSS Sure-Flow glass-body pH electrode, 927007MD Orion stainless steel ATC probe, 096019 Orion Star series stirrer probe, 841108 Orion 1000 ppm sodium standard (475 mL), 841109 Orion KAP sodium standard & ISA solution (475 mL), 841111 Orion sodium ISA ionic strength adjuster (475 mL), 841113 Orion sodium electrode conditioning solution (475 mL), 841101 Orion sodium electrode storage solution (475 mL), 810199 ROSS pH buffer and solution kit, electrode stand, USB cable, universal power supply, literature & test certificate Orion Dual Star pH/ISE Benchtop Meter User Manual | 81 Section 9 | Customer Services Cat. No. Description STARA-BEA Meter-attachable electrode stand, includes electrode arm, holder & meter bracket STARA-HB Freestanding weighted base for use with meter-attachable electrode stand 090043 Swing arm electrode stand, includes electrode arm, holder & weighted base 810017 Storage sleeve and base for 12mm diameter electrodes 1010003 Universal power adapter for Star A series meters 1010004 RS232 computer interface cable and printer interface cable set 1010053 Star series RS232 computer cable 090045 BNC shorting cap 1010006 Orion Star series inkjet printer with RS232 printer interface cable 1010008 Ink cartridge for the Orion Star series inkjet printer 1010009 Replacement paper for the Orion Star series inkjet printer 096019 Orion Star stirrer probe, pin tip connector 810199 910199 Orion ROSS All-in-One pH buffer kit, includes 475 mL bottle each of pH 4.01, 7.00, 10.01 buffers; ROSS pH electrode storage solution (810001); 30 mL bottle of pH electrode cleaning solution D; and pH electrode storage bottle All-in-One pH buffer kit, includes 475 mL bottle each of pH 4.01, 7.00, 10.01 buffers; pH electrode storage solution (910001); and pH electrode storage bottle 927007MD Orion ATC temperature probe with stainless steel body, MiniDIN connector 927005MD Orion ATC temperature probe with epoxy body, MiniDIN connector 928007MD Orion micro ATC temperature probe with stainless steel tip, MiniDIN connector 8102BNUWP ROSS Ultra glass-body refillable pH electrode, BNC connector 8156BNUWP ROSS Ultra epoxy-body refillable pH electrode, BNC connector 8172BNWP ROSS Sure-Flow glass-body refillable pH electrode, BNC connector 8165BNWP ROSS Sure-Flow epoxy-body refillable pH electrode, BNC connector 8302BNUMD ROSS Ultra Triode glass-body refillable pH/ATC electrode, BNC & MiniDIN connectors 8157BNUMD ROSS Ultra Triode epoxy-body refillable pH/ATC electrode, BNC & MiniDIN connectors 8107BNUMD ROSS Ultra Triode epoxy-body gel-filled pH/ATC electrode, BNC & MiniDIN connectors 8135BNUWP ROSS Ultra epoxy-body refillable pH electrode with flat surface bulb, BNC connector 8163BNWP ROSS spear tip glass-body refillable pH electrode, BNC connector 8103BNUWP ROSS Ultra semi-micro glass-body refillable pH electrode, BNC connector 8115BNUWP ROSS Ultra semi-micro epoxy-body refillable pH electrode, BNC connector 8220BNWP ROSS micro glass-body refillable pH electrode, BNC connector 810199 ROSS All-in-One pH buffer and storage solution kit, includes pH 4, 7, 10 buffers; ROSS storage solution; pH electrode cleaning solution; pH electrode storage bottle 810001 ROSS pH electrode storage solution, 475 mL 910001 Standard pH electrode storage solution, 475 mL 910168 Orion pH 1.68 buffer, 475 mL 82 | Orion Dual Star pH/ISE Benchtop Meter User Manual Thermo Scientific Customer Services | Section 9 Cat. No. Description 910104 Orion pH 4.01 buffer, 475 mL 910105 Orion pH 5.00 buffer, 475 mL 910686 Orion pH 6.86 buffer, 475 mL 910107 Orion pH 7.00 buffer, 475 mL 910918 Orion pH 9.18 buffer, 475 mL 910110 Orion pH 10.01 buffer, 475 mL 910112 Orion pH 12.46 buffer, 475 mL 9678BNWP Orion Sure-Flow ORP epoxy-body refillable electrode, BNC connector 9180BNMD Orion Triode ORP/ATC epoxy-body refillable electrode, BNC & MiniDIN connectors 967901 Orion ORP standard solution, 475 mL 967961 Orion ORP standard solution, 5 x 60 mL 9512HPBNWP Orion high-performance ammonia ion selective electrode, BNC connector 9512BNWP Orion standard ammonia ion selective electrode, BNC connector 951007 Orion 1000 ppm ammonia standard, 475 mL 951211 Orion ammonia ionic strength adjuster (ISA) with pH-indicating blue dye, 475 mL 951210 Orion low level ammonia ISA with pH-indicating blue dye, 475 mL 9609BNWP Orion fluoride ion selective electrode, BNC connector 940907 Orion 100 ppm fluoride standard, 475 mL 940909 Orion TISAB II total ionic strength adjustment buffer for fluoride analysis, 3.8 L 040906 Orion 1 ppm fluoride standard premixed with TISAB II, 475 mL 040907 Orion 2 ppm fluoride standard premixed with TISAB II, 475 mL 040908 Orion 10 ppm fluoride standard premixed with TISAB II, 475 mL 9707BNWP Orion nitrate ion selective electrode, BNC connector 920707 Orion 1000 ppm nitrate standard, 475 mL 930711 Orion nitrate ionic strength adjuster (ISA), 475 mL 930710 Orion nitrate interference suppressor solution, 475 mL 8611BNWP ROSS sodium ion selective electrode, BNC connector 841108 Orion 1000 ppm sodium standard, 475 mL 841111 Orion sodium ionic strength adjuster (ISA), 475 mL Visit www.thermoscientific.com/water for a complete listing of all available Thermo Scientific Orion meters, electrodes, solutions and accessories. Thermo Scientific Orion Dual Star pH/ISE Benchtop Meter User Manual | 83 Section 9 | Customer Services Meter Specifications Orion Dual Star pH/ISE Benchtop Meter Operating Conditions Operating Ambient Temperature 5 to 45 °C Operating Relative Humidity 5 to 85%, non-condensing Storage Temperature -20 to 60 °C Storage Relative Humidity 5 to 85%, non-condensing Pollution Degree 2 Overvoltage Category II Meter Weight 1.15 kg (2.5 lb) Meter Dimensions (H x W x D) 10 cm x 18 cm x 23 cm (3.9” x 7.1” x 9.1”) Regulatory and Safety CE, TUV 3-1, FCC Class A Power Rating DC input: 9VDC, 1A Shock: drop test in packaging per ISTA #1A Shock and Vibration Vibration: shipping/handling per ISTA #1A Enclosure (designed to meet) IP54 Warranty 3 years Universal Power Adapter Operating Conditions Operating Ambient Temperature 0 to 50 °C Operating Relative Humidity 0 to 90%, non-condensing Storage Temperature -20 to 75 °C Storage Relative Humidity 0 to 90%, non-condensing Pollution Degree 2 Overvoltage Category II Orion Dual Star pH/ISE Benchtop Meter Specifications Measurement Channels 2 – pH, mV, RmV, ORP or ion concentration with temperature Display Graphic LCD with adjustable backlight (5 levels) View Options View 1 or 2 measurement channels simultaneously Measurement Modes Auto-Read, On Ready, At Time Intervals, Continuous, Value Change In Measurement and Timed Reading Data Log Memory 1000 data points with time and date stamp Data Log Functions Automatic data logging with Auto-Read, On Ready, At Time Intervals, Value Change In Measurement and Timed Reading; manual data logging with Continuous measurement mode Methods 20 (10 per channel with calibration data, password protection) Calibration Log 10 calibrations per channel with time and date stamp 84 | Orion Dual Star pH/ISE Benchtop Meter User Manual Thermo Scientific Customer Services | Section 9 Computer Software pH ISE (Ion Concentration) Range - 2.000 to 19.999 Resolution 0.1 / 0.01 / 0.001 Relative Accuracy ±0.002 Calibration Points 1 to 6 Auto-Buffer Recognition US/NIST (pH 1.68, 4.01, 7.00, 10.01, 12.46 buffers) EURO/DIN (pH 1.68, 4.01, 6.86, 9.18 buffers) Calibration Editing Yes Calibration Options Calibration graph with point to point slopes and average slope Input Impedance > 10^12 ohms Electrode Status Onscreen indicator for good, fair or bad electrode status Range 0.0001 to 19900 Resolution 0.0001 minimum, 1 to 3 significant digits (user selectable) Relative Accuracy ±0.2 mV or ±0.05% of reading, whichever is greater Units ppm, mg/L, %, M or unitless Calibration Points 2 to 6 Calibration Editing Yes Incremental Techniques Single known addition & subtraction, double known addition & subtraction Segmented (point-to-point) slope, non-linear selectable autoblank, low concentration range stability Advanced Features mV / RmV Temperature Sensor Inputs Outputs Thermo Scientific Orion Dual Star Com data transfer software Range ±1999.9 mV Resolution 0.1 mV Relative Accuracy ±0.2 mV or ±0.05% of reading, whichever is greater Relative mV Mode Yes EH ORP Mode Yes Range -5 to 105 °C, 22 to 221 °F Resolution 0.1 °C, 0.1 °F Relative Accuracy ±0.1 °C Offset Calibration 1 point Source Options Manual or automatic with ATC probe BNC (2) pH electrode, ORP electrode or ion selective electrode (ISE) Pin Tip (2) Reference electrode 8 pin MiniDIN (2) ATC temperature probe Stirrer Jack Orion Star series stirrer probe Ports USB, RS232 Orion Dual Star pH/ISE Benchtop Meter User Manual | 85 SECTION 10 10 Advanced Meter Features Multipoint Calibration Curve Feature The Orion Dual Star meter utilizes a point-to-point scheme for multipoint calibrations in both pH and concentration modes. In this technique, straight line segments are drawn between each successive pair of calibration points. Separate slope and Eo values are calculated using the adjacent pair of data points. For example, in a five point calibration, four slopes and five Eo values are calculated to correspond to the four line segments that connect the data. Concentration or pH values for samples are calculated according to the segment that their potential values fall into. Those above or below the range of calibration are calculated by extrapolation from the top or bottom most segment. The displayed slope is an average slope of the separate segments. The slope may be outside the range normally expected for an electrode. For example, if the slope of one segment is low, then the average will be lower than theoretical, even though the response may be Nernstian over most of the range. The following figure is an example of a typical calibration curve using this method. 86 | Orion Dual Star pH/ISE Benchtop Meter User Manual Thermo Scientific Advanced Meter Features | Section 10 Automatic Blank Correction Feature The Orion Dual Star meter has a feature known as automatic blank correction. In this technique, the meter decides whether blank correction is the best measurement strategy by analyzing the electrode response during a multipoint calibration. A separate blank does not have to be run. Graphically, automatic blank correction is equivalent to drawing a smooth curve through the lowest three points of the multipoint calibration and extrapolating to zero concentration based on the assumption of Nernstian electrode behavior. Multipoint calibrations at the lower limit of detection are desirable when the response of an ion selective electrode is non-linear and cannot be characterized with a one or two point calibration. This is usually seen as a low electrode slope. Generally, the electrode is behaving in a Nernstian manner but the effect of a blank is being observed. See the figure below. This blank may be a true reagent blank, traces of analyte ion in the reagents or it may be the “mud” value of the electrode. It could also be an interference in the reagents that becomes apparent at low levels of analyte ion, or it could be any combination of these effects. The expanded version of the Nernst equation traditionally used for blank correction is as follows: E = Eo + S x log (C + b) where b is the blank In a multi-point calibration, a set of equations is generated and the relationship between them evaluated. For example the equations generated in a three point calibration would be as follows: E1 = Eo + S x log (C1 + b) E2 = Eo + S x log (C2 + b) E3 = Eo + S x log (C3 + b) Thermo Scientific Orion Dual Star pH/ISE Benchtop Meter User Manual | 87 Section 10 | Advanced Meter Features The meter evaluates the relationships between the three potentials E1, E2 and E3 and the three concentrations C1, C2 and C3. If the relationships indicate that blank correction is desired, a blank will automatically be calculated and the non-linearity will be corrected for in a Nernstian manner. If the appropriate conditions are not met, the blank is set at zero and each segment of the multipoint calibration is treated independently. When all three of the following conditions are met, blank correction is invoked. 1. The concentration of the first standard is zero, or the slope of the electrode between the first and second standards is less than the slope between the second and third. 2. Potential differences between points are significant. For example, 3. E3 - E1 > 10 mV 4. The blank correction algorithm converges at reasonable blank and slope values. Conditions in steps 1 and 2 prevent failure to converge in most situations. However, the slope will attain any value necessary for convergence to a calculated blank value of 3 x C3. When blank correction is implemented, the slope value for the electrode may be outside the range of values normally considered acceptable during an ordinary calibration. For best results, calibration standards should be close in range to the expected sample concentrations and should bracket the expected sample concentration. When conditions 1, 2 and 3 are not met, the calibration data is handled by the multipoint calibration method described earlier. Note: When a calibration standard is defined as zero and the meter cannot calculate a blank, an error code E306 will be displayed. In calibrations with more than three points, a combination of methods are utilized. Automatic blank correction is used if the lowest three points satisfy the criteria and multipoint calibration is used for the other points. The slope displayed after calibration is an average of the slope calculated in the automatic blank correction algorithm and the slope(s) for each additional segment. Error Code E306 With the Autoblank Function On This error occurs during a three or more point calibration when one solution is defined as zero concentration and the actual concentration of the blank is substantially greater than the standard with the third highest concentration. Since the blank cannot be calculated, the meter cannot use the autoblank function and cannot use the zero concentration standard in the two point calibration segment. To clear the error, calibrate the meter without using a zero concentration standard. With the Autoblank Function Off This error occurs during a one or two point calibration if one standard is defined as zero concentration. To clear the error, calibrate the meter without using a zero concentration standard. 88 | Orion Dual Star pH/ISE Benchtop Meter User Manual Thermo Scientific Advanced Meter Features | Section 10 Isopotential Point Feature To take advantage of the temperature compensation feature for concentration measurements in the Orion Dual Star meter, it is necessary to experimentally determine the isopotential point of the electrode in use. The slope of all electrodes changes with temperature. This is due in fact to the slope term, S, in the Nernst equation. The slope is actually 2.3 RT/nF, where R and F are constants, n is the charge on the measured species and T is the temperature in degrees Kelvin. Examples of calibration curves at varying temperatures are shown in the figure below. These curves intersect at the isopotential point, which is the concentration at which the potential of the electrode does not vary with temperature. If the isopotential point is known or can be measured experimentally, and if the meter has the means of adjusting the isopotential point, temperature compensation for an ion selective electrode is possible. Temperature compensation can be performed for one and two point calibrations. Determining an Isopotential Point 1. Prepare several standards with concentration ranges over the measuring range of the electrode. 2. Measure the millivolt value of the standards at room temperature, about 20 to 25 °C. 3. Measure the millivolt value of each standard at 75 °C. 4. Measure the millivolt value of each standard at 10 °C. 5. On semi-logarithmic graph paper, plot the concentration values on the log axis versus the millivolt values on the linear axis, as any calibration curve would be drawn (see the figure on the previous page). 6. The lines will intersect at the isopotential point. Read the concentration off the graph for this point from the log axis. This value is the isopotential point. 7. See the Setup Menu section for instructions on how to adjust the isopotential point on the Orion Dual Star meter. Thermo Scientific Orion Dual Star pH/ISE Benchtop Meter User Manual | 89 Section 10 | Advanced Meter Features Automatic pH Buffer Recognition Feature The Orion Dual Star meter is capable of automatically recognizing pH 1.68, 4.01, 7.00, 10.01 and 12.46 buffers or pH 1.68, 4.01, 6.86, and 9.18 buffers during a pH calibration, depending on the pH buffer set that is selected in the setup menu. During a calibration, the meter uses the selected buffer set and the raw mV reading of the pH electrode in the buffer to recognize and display the buffer value at the measured temperature. The raw mV reading of the pH electrode in the buffer must be about ± 30 mV from the theoretical mV reading of the buffer in order for the meter to automatically recognize the buffer. USA pH Buffer Set EURO pH Buffer Set Buffer mV Range Buffer mV Range 1.68 +285 to +345 mV 1.68 +285 to +345 mV 4.01 +207 to +147 mV 4.01 +207 to +147 mV 7.00 - 30 to + 30 mV 6.86 +38 to -22 mV 10.01 -207 to -147 mV 9.18 -99 to -159 mV 12.46 -293 to -353 mV Testing a pH Electrode for Automatic Buffer Recognition To verify that the raw mV reading of the pH electrode in use is ± 30 mV from the theoretical mV reading of the buffer, and therefore verify that the pH electrode in use is capable of performing automatic buffer recognition, perform the following procedure. 1. Set the measurement mode to mV in the setup menu. Prepare the pH electrode according to the instructions in the pH electrode user guide. Ensure that the pH electrode is connected to the meter input that corresponds with the channel that will be measured. 2. Rinse the pH electrode with distilled water, blot it dry with a lint-free tissue and place the pH electrode into a pH 4.01 buffer at 25 °C. 3. Wait for the measurement to stabilize and record the mV value of the pH 4.01 buffer when the measurement is stable. The read type selected in the EZ Startup menu or setup menu will determine how the mV measurements are displayed by the meter. 4. Remove the pH electrode from the pH 4.01 buffer, rinse the pH electrode with distilled water, blot it dry with a lint-free tissue and place it into a pH 7.00 buffer at 25 °C. 5. Wait for the measurement to stabilize and record the mV value of the pH 7.00 buffer when the measurement is stable. 6. The mV reading of the pH electrode in pH 4.01 buffer should be +207 to +147 mV and the mV reading of the pH electrode in pH 7.00 buffer should be -30 to +30 mV. If the mV readings are in the correct ranges, the pH electrode is capable of performing automatic buffer recognition. If the mV readings of the pH electrode are not in the correct ranges, the values of the pH buffers will need to be manually entered during a pH calibration. 90 | Orion Dual Star pH/ISE Benchtop Meter User Manual Thermo Scientific thermoscientific.com/water © 2015 Thermo Fisher Scientific Inc. All rights reserved. Microsoft and Excel are either registered trademarks or trademarks of Microsoft Corporation. All other trademarks are the property of Thermo Fisher Scientific and its subsidiaries. Water and Lab Products North America Toll Free: 1-800-225-1480 Tel: 1-978-232-6000 [email protected] 255100-001 0615 RevC Germany Tel: (49) 6184-90-6000 [email protected] India Tel: (91) 22-4157-8800 [email protected] Japan Tel: (81) 045-453-9175 [email protected] China Tel: (86) 21-68654588 [email protected] Singapore Tel: (65) 6778-6876 [email protected] Australia Tel: (613) 9757-4300 In Australia (1300) 735-295 [email protected]


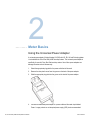

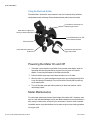


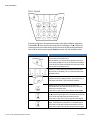
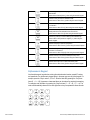


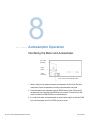
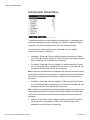


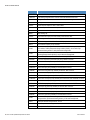
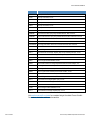
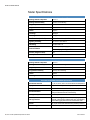

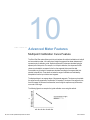


![Orion Dual Star Meter - Quick Start Guide [FR]](http://vs1.manualzilla.com/store/data/006397742_1-c5f0c81c8d03abe2c854cfa7d77645f9-150x150.png)