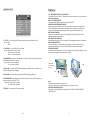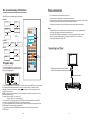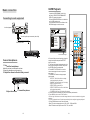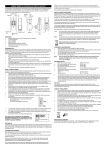
1
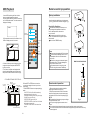
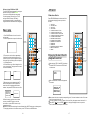
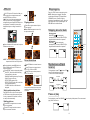
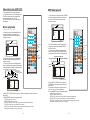
10.2” TFT LCD Swivel Screen Portable DVD
Player with USB/SD/MMC Inputs
MODEL :NPD-1002
USER MANUAL
Please read and keep these instructions
Troubleshooting (Continued)
Symptom [DVD ]
Pla y does not st art even
when title is selected.
Audio soundtrac k and/or sub title
lan guage is not the initial settings.
No subtitles.
Alternative audio soundtrac k
(or subtitle) languages fail to be
selected.
Angle cannot be changed.
The passw ord for rati ng level
has been forgotten.
Re medy
Confirm the region code setting is right.
If the audio soundtrack and/or subtitle langua ge does not
exist on the disc, the language s elected at the initial settin gs
will not be seen/hea rd.
Subtitles appear only with discs w hich contain them.
Subtitles are cleared from the TV monitor, Perf orm the
steps dis play the sub titles.
A n alterna tive langu age is no t selecte d with dis cs which
d o not con tain more than one languag e.
In the case of some discs, the alternat ive langu age can
n ot be sele cted by o perating the LANG UAGE o r
S UBTITLE button. Try select ing it from the DVD menu if
o ne is available.
This funct ion is dependent on softw are availability. Even if a
disc has a number of a ngles recorded, these angles may be
recorded for specific s cenes only.
Pleas e contact yo ur local sale s dealer.
Symptom [Video CD]
No men u play.
Remedy
This funct ion works only for Video C Ds with play back
control.
Region code setting
Regio n cod ing: Al l DVD discs a re cod ed by the sa les territory. Pleas e note the pla yer
is set to reg ion 1 codin g by the fac tory w hich canno t be c hang ed. Th is is in complianc e
with the DVD pate nt requireme nts.
Th e regio n num ber fo r this D VD pl ayer is
29
1
Safety information
Troubleshooting
Be fore requ esting servi ce fo r this player, che ck the chart belo w fo r a p ossi ble cause
of t he probl em y ou are experiencing. Som e simpl e ch ecks or an adjustment on your
part may el iminate t he problem and restore proper op erat ion.
S ympt om(Commo n)
No power.
Play fa ils to star t even when
PLAY is pressed.
Play st arts but then stops
immed iately.
No picture.
No sound.
Distorted sound.
Insert the A C adaptor se curely into t he power out let.
Condens ation has f ormed: wait about 1 to 2 hours
to allow t he player t o dry out.
This play er cannot play a disc other than DVD, VCD and
CD.
The disc may be dir ty and may require cle aning.
Ensure t hat the disc is installed with the l abel side up.
Ensure that the equipment is connected properly.
Ensure that the equipment is connected pr operly.
Ensure that the input setting f or the TV and stereo
system are correct.
Adjust the master volume to a suitable volume by rotati ng
the volume knob at the side of the player.
The picture will be somewhat di storted at times: this is
normal.
No r apid advance or rapid
reve rse play
Some dis cs may have sections wh ich prohibit rapid
advance (or rapid rev erse.)
S ympto m(Co mmon )
No key operation (by the main
unit and/or the remote control
unit) is effective.
DVD/V IDEO CD/CD PLAY ER IS A CLASS 1 LASER PRO DUCT. HOW EVER THIS DVD/
VIDEO ,CD/CD PLAYER USES A VISI BLE L ASER BEAM WHICH CO ULD C AUSE
HAZARDOUS RAD IATIO N EXP O SURE IF DIRECTED. BE SURE TO OPERATE THE
DVD/V IDEO CD/CD PLAY ER CORRE CTLY AS INSTRUCTED.
Remedy
Picture is disto rted during r apid
advance or rap id reverse.
No operations can be performed
with the remote control unit.
CAUTION:
Rem edy
Check the batteries are installed with the correct polarities.
The batteries are exhausted: replace them with new ones.
Point remote control at the remote control sensor and
operate.
Operate the remote control unit at a distance of not
more than 6 m from the remote control sensor.
Remove the obstacles between the remote control and
remote control sensor.
WHEN THIS DVD/VIDEO CD/CD PLAYER IS PLUGGED TO THE WALL OU TLET, DO
NOT P LACE YOUR EYES CLOSE TO THE O PENI NG OF THE DISC T RAY AND
O THER OPE NINGS TO L OOK I NTO T HE IN SIDE OF TH IS PLAYER.
USE O F CONTROLS OR ADJUSTMENTS O R PER FORMANCE OF P ROCE DURE S
O THERTHAN THO SE SP ECIFI ED HE REIN MAY RESULT IN HAZARDOUS
RADIATION EXPO SURE .
DO NO T OPE N CO VERS AND R EPAIR YOU RSEL F. REFER SERVIC ING T O QUALIFIE D
PERSO NNEL
T HIS DEVICE IS INTENDED FOR CONTINUOUS O PERATION!
TO R EDUC E THE RISK OF FIRE OR ELEC TRIC SHOC K, AND ANN OYIN G
INTE RFER ENCE , USE THE RECOM MEND ED ACCESSORIE S ONLY.
WARNING:
-TO PREVENT FIRE O R SHOCK H AZAR D. DO NOT USE T HIS PLUG W ITH AN
EXTENSION C ORD. RECE PTACLE OR OTHER OUTLET UNLE SS THE BLA DES CAN
BE FUL LY INS ERTE D TO PREVENT BLADE EXPO SURE .
-TO PREVENT FIRE O R SHOCK H AZAR D. DO NOT EXPO SE TH IS APPLIANCE TO RAIN
O R MOI STURE.
CAUTION - LAS ER RADIAT ION W HEN O PEN, DO NOT STARE INTO B EAM.
VENT ILATION WA RN ING - THE N ORMA L VENTILATION O F THE PRO DUCT SHAL L
N OT BE IMPEDED FOR IN TENDED U SE.
C A U T I O N
Disconnect the power adaptor and then reconnect it. (The
player may not be operating properly due to lightning, static
electricity or some other external factor.)
—To be con tinued
RISK OF ELECTRIC SHOCK
DO NOT OPEN
The lightning flash and
arrow head within the
triangle is a warning
sign alerting you of
“dangerous voltage”
inside the product.
CAUTION: TO REDUCE THE RISK
OF ELECTRIC SHOCK. DO NOT
REMOVE COVER (OR BACK).
NO USER SERVICEABLE PARTS
INSIDE. REFER SERVICING TO
QUALIFIED SERVICE
PERSONNEL.
The exclamation
point within the
triangle is a warning
sign alerting you of
important instructions
accompanying the
product.
Always fo llow b asic s afety preca utions when using elect rical p roducts, es pecia lly
whe n chil dren a re pre sent.
WARNING : To avoid th e risk o f elec trical s hock, make sure the pro duct is unplu gged f rom
the e lectric al out let bef ore rel ocatin g, serv icing, or clea ning i t.
28
1
Read all instructions before using
Specifications
Do not use this product near wate r.
Do not ceiling- or wall-mount the product.
Install th e product in accordance with the operatin g instruc tions.
Do not set the pr oduct ne ar heat s ources, such as radiator s, heat registers, stoves, or other
apparat us (including amplifiers) t hat produce heat.
Protect the powe r cord fr om being walked on or pinched, particular ly at plugs, convenience
receptac les, and the poin t where they exit the product.
Do not use attachments not recom mended or sold by the product m anufact urer as a risk of fire,
electrica l shock, or serious personal injur y may result.
Unplug t he product during lightning storms or when unused for long periods of time.
Do not expose th e product to dripping or s plashing water. D o not pl ace objects filled with liquid
(e.g., vases) on the product.
Do not place in or expose the product to direct sun light, extreme he at, hum id or dusty locatio ns.
Never operate th is product if it has a damaged pow er cord or plug, is not wo rking properly, has
been dropped, damaged, or exposed to moisture, water, or other li quids. Do not atte mpt to
examine or repair this product yourself; ta ke the product to a servic e centre for inspection and
repair.
Keep magne tic obj ects s uch as speak ers,at a dist ance from th e playe r.
LASER SAFE TY
This set emplo ys an optica l laser beam system in the CD m echan ism designe d
w ith built-in sa fegua rds. Do not a ttempt to dis assem ble. E xposu re to th is
in visible laser light b eam m ay be harmf ul to th e hum an eye . This is a Class-1
la ser product. Use of contr ols, ad justme nts or proce dures other than th ose
sp ecifie d here in may result in haz ardou s lase r light beam expos ure. Th is
co mpac t disc p layer should not b e adjus ted or repai red by anyon e exce pt
qu alified servi ce per sonne l. The laser m echan ism in the s et corr espon ds to the
st ylus (n eedle ) of a r ecord player. Altho ugh th is prod uct us es a la ser pi ck-up
le ns, it is comp letely safe w hen o perate d acco rding to dire ctions .
NO TE: The manufac turer is not respo nsible f or any ra dio or TV interfer ence ca used by unautho rized
mod ification s. Such m odifica tions cou ld void t he user's authori ty to ope rate the equipme nt.
1) O perate tu rning co ntrols an d switch es as in structed in the m anual.
2) B efore tur ning on t he powe r for the first time ,make s ure that the powe r cord is properl y
insta lled.
3) S tore you r discs in a cool a rea to av oid dam age from heat.
Power requirements:
AC 100 -240V~ 50/60Hz
Power consumption:
Signal system:
Resolution:
Dot pitch:
Active area:
Discs played:
≤ 18W
DC 12V
1.5A
NTSC/ PAL
8 00x3( RGB) X 480
0 .0925 (W) X 0.276( H)mm
2 22.0(W)X13 2.48(H)mm
(1) DVD-VI DEO d isc
1 2 cm s ingle- sided, single -layer
1 2 cm s ingle- sided, dual-la yer
1 2 cm d ouble -sided ,single -layer
8 cm single-s ided,s ingle-l ayer
8 cm single-s ided,d ual-lay er
8 cm do uble-s ided,s ingle- layer
(2) Co mpac t disc( VIDEO CD)
1 2 cm d isc
8 cm di sc
Video output level:
1V
1 .6V
Audio output level :
Earphone output level: (1KHz , 0dB, 250m W )
Pickup:
Wave l ength: 655nm
p-p
Measurement:
Weight:
L aser p ower: CLAS S-1
2 72(L) X 204( W)X 4 2.5(D) mm
A pprox .1292g
Specifications ar e subject to change wit hout n otice.
Battery Handling and Usage
NO TE: Th is styl e play er con tains recharg eable Li-ion batter y box . There is a CR 202 5
bat tery fo r remo te con trol.
1). Never throw batteries int o a fire . Do n ot exp ose ba tteries to fire or oth er hea t sour ces.
2). Battery Disp osal: Spent o r disc harge d batte ries m ust be prope rly dis posed of and
recyc led in c ompli ance w ith all applic able la ws. F or deta iled in forma tion, c ontact your
local s olid waste a uthori ty.
DISC handling and maintenance
Handling precautions
Hold th e disc by the edge s so th e surfa ce wil l not b e soile d with finger prints. Finge rprints ,
d irt and scrat ches c an cau se ski pping and di stortio n.
Do not write o n the label s ide with a ba ll-poin t pen o r othe r writing utensils.
2
27
Definition of terms
DVD
Th is refe rs to a high-density optic al disc on wh ich hig h-qua lity pic tures and so und h ave be en
ob tained by me ans o f digita l signa ls. Inc orpor ation a new v ideo c ompre ssion techno logy
(M PEG I I) and high-d ensity record ing te chnology, DVD ena bles a esthe ticall y pleasing
fu ll-moti on vide o to b e reco rded o ver lon g periods of time ( for ins tance, a who le mov ie can
be recor ded). DVD ha s a st ructure cons isting o f two 0.6 mm thin discs w hich a re adh ered
to each o ther. Since t he thin ner th e disc , the h igher t he den sity at which the in forma tion ca n
be recor ded, a DVD d isc ha s a gre ater c apacit y than a sing le 1.2 mm th ick dis c. Sinc e the
tw o thin discs a re adh ered to each other, there is the poten tial to achiev e double-sid ed pla y
so metim e in th e futur e for e ven lo nger d uratio n play.
Do not use recor d clea ning s prays, benzine, thinner, s tatic e lectric ity pre ventio n liqui ds.
Be c areful not to drop o r bend the d isc.
Do not ins tall mo re tha n 1 dis c on th e disc comp artment.
Do not try to clos e the disc co ver wh en the disc is not i nstalle d prop erly.
Be s ure to store the dis c in its exclu sive c ase wh en no t in use .
If the surface is soiled
Wipe gently wi th a so ft, dam p (wa ter only) clot h.
When wi ping discs, a lways move the clo th from the c entre hole to ward the outside, w hich
wi ll not c ause d istorti on. (If you wipe the discs using a circu lar mo tion, c ircular scrat ches a re
lik ely to occur, which will ca use di stortio n.)
If the disc is brought from a cold to a warm environment
moisture may form on the disc
Video CD
Wipe this m oistur e off w ith a s oft, dr y, lint- free cl oth be fore us ing th e disc.
Th is con tains r ecordi ngs of pictur es and soun d whos e qua lity is o n a pa r with that of video
ta pe. Th is play er also supp orts Vi deo CDs with playb ack co ntrol (versio n 2.0) .
Improper disc storage
Angle
Re corde d onto some DVD d iscs a re sce nes which ha ve be en sim ultane ously shot fr om
a n umbe r of different angle s (the same s cene is shot from t he front, from the left side , from
th e right side, e tc.). W ith su ch dis cs, the ANGL E button can be us ed to view th e scen e from
different angle s.
Subtitles
Th is is th e app earanc e of th e dialo gue a t the b ottom of the screen which are p rereco rded o n
so me DV D disc s.
Title number
Th ese nu mber s are r ecorde d on D VD di scs. W hen a disc c ontain s two o r more movi es, the se
mo vies a re num bered as tit le 1, title 2, e tc.
Chapter number
Th ese nu mber s are r ecorde d on D VD di scs. A title is sub- d ivided into m any sections, each
of which is num bered , and s pecifi c parts of vid eo pre senta tions c an be search ed qu ickly
us ing the se nu mbers .
Yo u can damag e disc s if you store them in the following pla ces:
Areas expos ed to d irect s unligh t
Humid or dus ty are as
Areas direct ly expo sed to a hea t outle t or he ating appliance
Maintenance
Discon nect th e AC a dapto r befo re mai ntainin g the player.
W ipe th e play er with a dry, soft c loth.
I f the s urface s are e xtrem ely dir ty ,wip e clea n with a cloth which has b een di pped
i n a we ak soa p-and -water soluti on and wrun g out thoroug hly, and then wipe again
with a d ry clo th.
Never use alc ohol, benzin e, thin ner, c leanin g fluid or other chemicals . And d o not use
c ompre ssed air to r emove dust
Accessories
Time number
Th is indi cates the pla y time which has e lapsed from the sta rt of a disc o r a title . It ca n be
us ed to f ind a s pecifi c scen e quic kly.(It m ay no t work with s ome d iscs.)
TFTM ODE INVERSION
1
2
5
6
OS D
7
8
9
GOT O
0
10+
ST O P
FR
Playback control (PBC)
FF
S LO W
S TE P
L /R
Track number
Th ese nu mber s are a ssigne d to th e trac ks whi ch are re- co rded o n Vide o CDs and CDs. Th ey
en able s pecific track s to be locate d quic kly.
P LAY / PAU SE
PR E V
NEXT
A- B
RE P E A T
P ROGRA M A NGL E
Th is is re corde d on a Video CD (v ersion 2.0). T he sc enes o r infor mation to be viewe d
(o r listen ed to) can be selec ted in teracti vely w ith the TV mo nitor b y look ing at the me nu
sh own o n the T V mon itor.
+
3
N /P
4
Z OOM
SET UP
E N TE R
T I TL E
SU B T I TL E L A N G U AG E V O L
ME N U
Remote con trol
......................1
Lit hium C ell
CR202 5
3V DZ
B attery for
r emote control
. ......... ........1
1 0 .2” T FT L CD Swi ve l Sc r e en Po r ta b le DVD
Pla ye r wi th U SB/SD /M M C In p u t s
M ODEL :NPD-10 02
U SER M AN UAL
V OL
Pleas e r ead a nd k eep th ese i nst ru ct ion s
USB/CARD/DVD
Inst ructio n
man ual
................1
MU T E
A C adaptor
....................1
Audi o/Vide o
cable ....... 1
C igare tte lig hter
. ......... ......... ....1
All th e pictures in the in structi on ma nual a re just for yo ur refe rence, speci ficatio n shou ld
refer to act ual ac cessor ies.
26
3
Table of contents
2. AUD IO SET UP
Getting Sta rted:
Safe ty inf ormat ion… … … … … … … … … … … … … … … … … … … … … … … … … … … 1 -2
Disc hand ing an d maintena nce… … … … …… … …… …… … …… …… … … … … …… … … 2 -3
Acc essories … … … … … … … … … … … … … … … … … … … … … … … … … … … … 3
Fea tures … … … … … … … … … … … … … … … … … … … … … … … … … … … … … … 5
Con trol re feren ce gui de… … … … … … … … … … … … … … … … … … … … … … … … … 6 -7
Bas ic con nectio n … … … … … … … … … … … … … … … … … … … … … … … … … … … 8-1 0
Rem ote c ontrol prepa ration … … … … … … … … … … … … … … … … … … … … … … … … 11
Basic Operatio n:
Stop ping play… ……… ……… …… … … … … … … …… ……… ……… …… … …… ……… … …1 3
Skip ping ahead or ba ck… … … … … … … … … … … … … … … … … … … … … … … … … … 1 3
Fas t forw ard or backw ard … …… …… … … … … … … … … … … … … … … … … … … … … 1 3
Pau se or play … … … … … … … … … … … … … … … … … … … … … … … … … … … 13
Slow -mot ion pla y [DV D/VCD]… … … … … … … … … … … … … … … … … … … … … … … 1 4
Mus ic pla yback …… … … … … … … … … … … … … … … … … … … … … … … … … … … … … 1 4
MP4 playb ack … … … … … … … … … … … … … … … … … … … … … … … … … … … … … 1 5
JPE G CD … …… ……… …… … …… …… … … … … … … … … … … … … … … … … … … .16,1 7
Enjo ying Video CD wi th pla yback control… … … … … … … … … … … … … … … … … … … 1 7
USB Pla y back ......... ........ ......... ........ ......... ......... ........ ......... ........ ......... ........ ........1 8
Card Pla yback ......... ......... ......... ......... ......... ......... ......... ......... ......... ..........................19
On s creen displ ay inf ormat ion … … … … … … … … … … … … … … … … … … … … … … 2 0
Advanced O peration:
Program p lay… … … … … … … … … … … … … … … … … … … … … … … … … … … … … … … 2 0
Rep eat pla y … … … … … … … … … … … … … … … … … … … … … … … … … … … … … … … 2 1
Repeat viewing … … … … … … … … … … … … … … … … … … … … … … … … … … … … … … … … … 21
A-B repeat play… … … … … … … … … … … … … … … … … … … … … … … … … … … … … … … … … 21
TFT MO DE........ … … … … … … … … … … … … … … … … … … … … … … … … … … … … 2 1
GO TO… … … … … … … … … … … … … … … … … … … … … … … … … … … … … … … … … … 2 1
Cha nging subti tle lan guag e(DVD only) … … … … … … … … … … … … … … … … … … … 2 2
Zo om... ......... ......... ......... ......... ......... ......... ......... ......... ......... ......... ......... ......... ......... ..22
Cha nging audio soun dtrack language[DVD/V CD dis c]. . . . . . . . . . . . . . . . . . . . . . . . . . . . . . . . . . . 2 2
View ing fr om di fferen t angl e(DVD only )…… … …… … …… …… … …… … …… …… … …… 2 3
- -AU DIO SETUP PAGE--
SPEAKER SETUP
EQUALIZER
GO TO AUDIO SETUP PAGE
2.1 SPEAKER SETUP - it is used to set th e spea ker Output lev els
Options: LT/RT-Left/Rig ht mix mode
STERE O - Select this option if you d on't Ha ve a 2. 1 channel amp lifier.
SURRO UND - It is use d to se t dumm y surro unding audio effectiv eness.
2.2 E QUAL IZER SETUP - It is used to com pensa te for freque ncy distortio n to im prove its
frequ ency r espon se in a udio s ystem s(not a pplica ble).
Op tions: SOUN D MO DE-It i s for s electin g the Equali zer Type, in t his un it, you can ch oose
Mono, Rock, Pop, L ive, D ance, Techn o, Clas sic or Soft.
BASS BOOS T- It is used to turn the B ass Bo ost O N or O FF.
SUPER BAS S- It is used to turn the S uper B ass O N or O FF.
TREBL E BO OST- I t is use d to tu rn the Treble Boos t ON o r OFF.
Initial S ettings:
Gen eral s etup… … … … … … … … … … … … … … … … … … … … … … … … … … … … … … … 2 4
Aud io set up… … … … … … … … … … … … … … … … … … … … … … … … … … … … … … … ...2 5
For Reference:
Defi nition of ter ms… … … … … … … … … … … … … … … … … … … … … … … … … … … … 2 6
Spe cifications… … … … … … … … … … … … … … … … … … … … … … … … … … … … … … 2 7
Trou blesh ootin g…… … … … …… … … … …… … …… … …… … … … … … … …… …… … 28-2 9
Reg ion co de se tting … … … … … … … … … … … … … … … … … … … … … … … … … … … 2 9
4
25
Features
1.GENERAL SET UP
--GENE RAL SE TUP PA GE-T V TYP E
PAL
TV DISPLAY
W IDE
ANGLE MA RK
ON
OSD LANG
E NG
CAPTIONS
OFF
SCREEN S AVER
ON
DEFAULT
GO TO GENERAL SETUP PAGE
1.1 TV TY PE - it is for s electi ng the Tvsys tem ac cordin g to th e colo ur sys tem of the TV.
O ptions :PAL
NTS C
1.2 TV DISPLAY - it is for sel ecting TV ou tput m ode.
O ptions : Norm al /PS : Pan & sca n mode
Normal/ L B: Letter box mode
Wid e : 16:9 wide scree n mod e
1.3 ANGL E MAR K - it is used to select wh ether or not the mu lti- an gle ico n is di splay o n scre en
whe n a Mu lti-angle DV D disc is play ing.
O ption s: On: Icon w ill be display ed
Off: Icon w ill be turned off
1.4 OSD L ANG - It is u sed to choos e the d esired langu age fo r diffe rent us er. In this pl ayer, y ou
can choos e Eng lish or other langua ges.
10.2” ROTATABLE DIGITAL TFT LCD SCREEN
This pla yer has a built - in 10.2 ” TFT display window, to provide cle ar vis ion, and low radiation.
Built-in Lithium bat tery
MULTI TV SYSTEM SUPPO RT
The play er can play discs with signal system of PAL and NTSC.
G RAPHICAL USER INTERFACE SCREEN
Si mply b y pres sing the OSD butto n on the remote control, inform ation on the player and
disc can be dis played on th e screen for easy identification, The p layer's operations and
se ttings can be performed by ope rating the remote control while monitoring s creen.
MULTI-AUDIO FUNCTION
The audio soundtrack can be hea rd in u p to 8 l anguages. (The number of audio sound
languages depends on the software.)
MULTI-SUBTITLES FUNCTION
Subtitles may be displayed in one of a m aximum of 32 lang uages depen ding on the softwa re.
MULTI-ANGLE FUNCTION
This function allows you to choose the viewing angle of sce nes which were shot from a
number of different a ngles. (Limit ed to DVD recorded with multip le camera angles.)
ROTATABLE SCREEN
The screen can be rotated from 0 ° to 18 0° clockwise , provi de mu lti-ang le of v iew(fig 1); Then
th e screen can be fol ded to lap over the main unit(fig 2).
O pen at 90°
then to rotate
at 180°
Fig2
Fig1
1.5 CAPT IONS - It is u sed to switch the ca ption ON/OF F whe n play ing DVD dis c.
1.6 SCRE EN SAVER - when the pla yer is not in use fo r 5 min utes, a runn ing DV D logo will m ove
acro ss the scree n to pr otect the TV CRT.
O ption s: On: Scree n save r is en abled
Off: Scree n sav er is di sabled
1.7 DEFAULT - I t is use d to re set to factory setti ngs.
24
Note:
Rotate the screen on ly when the player is off!
We will n ot res pond the situation that damage due to incorrect rotating .
USB /CARD READER FUNCTION
This pla yer can play USB /CARD containing fi les in VCD/ SVCD/ DVD/ WMA/ MPEG 4/
JPEG /CD format.
5
Control reference guide
Viewing from different angle (DVD only)
Main unit
S ome D VDs m ay contain s cenes which have
b een sh ot sim ultane ously from a numb er of
d ifferen t angles. For these discs, the sa me
scene c an be viewed from each o f thes e
d ifferen t angles usin g the ANGLE butto n.
P ress A NGLE during play, number of angle
b eing pl ayed will be displa yed in the sc reen,
p ress th e butt on to c hange to diff erent angles .
1
16
17
18
2
TF T MODE I NV ER SI O N
Initial Setti ngs
3
10
9
PRESS
19
15
14
12
11
13
8
27
4
5
6
22
23
24
25
26
20
21
1
2
3
4
5
6
7
8
9
0
10+
N/P
O nce th e initia l prog ramm ing is e ntered it is
re tained in me mory until changed, the playe r can
a lways be ope rated under the sa me condition s.
NUMERIC
BUTTONS
OSD
GOTO
P LAY/PA USE
STOP
PLAY/PAUSE
C ommo n pro cedur e for initial settings
FR
FF
PREV
NE XT
Z OOM
SLOW
A-B
REPEAT
1 .Press SETU P butt on.
ANGLE
7
1 TFT D isplay window- Display s all info rmation about DV D work scene.
2 Built -in Spea ker.
3 OPEN button - Press this button to ope n the di sc cover.
4. BATTERY indicator- It is red d uring be ing char ged ;it g ets green when c harging finished.
5.POW ER indic ator -It i s on in w ork mode.
6. IR -Remote co ntrol sensor.
7. Righ t naviga tion but ton -to m ove righ t.
8. Down naviga tion button -to m ove dow n.
9. Left navigati on butto n -to mo ve left.
10. ENTER butt on -to co nfirm a s election .
11. Up n avigati on button -to mo ve up.
12. LCD ON/OF F button -switch the scre en betwe en on and off(SAVE MOD E: no lig ht ,only sound)
mode.
13. PLAY/PAUS E button -to star t or paus e disc playing.
14. PRE V button -Press this but ton, play er will sk ip to the previou s chapte r or title (for DVD ) or
track (fo r CD).
15. LA NGUAG E BUTTO N- To select the soundtr ack lang uage(DV D).
16.STO P button -To sto p playing .
17.NEX T button -press it ,the pl ayer will skip to th e next c hapter o r title (D VD) or tr ack (for CD)
18. USB/CA RD/DVD BU TTON- T o s witch the uni t among USB ,CARD and DVD mode.
19.SET UP button - Pres s this bu tton to e nter initi al settings menu.
20. DC In Jack - Power i nput jac k.
21. Pow er Swit ch - Swi tch this k nob to tu rn on/of f the player.
22. USB slot -In sert USB 2.0 to play the fi les conta ined in i t.
23. Car d slot -in sert cards(MMC /SD) to p lay the files contained in those cards.
24. AV Ou t Jack - Conn ect to TV or other extern al AV equipm ent to use th e player as a signal sourc e.
25 . Pho ne 2 - C onnect h eadphone to this jack for share lis tening.
26. Pho ne 1 - C onnect h eadphon e to this jack for private l istening .
27. Volume - Ro tate this knob to adjust th e volum e to a su itable level.
6
2 . Use t he nav igatio n butto ns to select prefer red
item, and press EN TER b utton, each screen
for setting th e valu e is di splaye d. The n mov e
the na vigati on button to set the item a nd pre ss
ENTE R butt on to c onfirm the settings .
3 .Press SETU P butt on to c lose s etup m enu in
any m ode.
4 .Use le ft nav igation butto n to switch to anoth er
main setup i tems
23
SETUP
PROGRAM ANGLE
STEP
L/R
SETUP
EN TER
T ITLE
MENU
SUBTITLE LANGUAGE VOL
VOL
USB/CARD/ DVD
MUTE
ENTER
NAVIGATION
BUTTONS
Control reference guide
Changing subtitle language (DVD only)
Remote control
It is p ossibl e to ch ange t he sub title la nguag e to
a diffe rent langua ge from the o ne se lected at
the in itial se ttings .( This opera tion w orks only
with d iscs o n whic h mult iple su btitle
langu ages a re rec orded )
1.Pre ss SU BTITL E butto n duri ng pla y, the
scree n will display the c urrent langua ge.
2. Pre ss SU BTITL E butt on aga in to c hange
langu age or turn o ff.
TFT MODE INVERSION
1
2
3
4
5
6
7
8
9
0
10+
N/P
NO TE: W hen n o subtitles a re rec orded ,
press th is bu tton w ill not work.
OS D
GOTO
CH ANGING SU BTITLE LAN GUAGE
S UBT ITLE 01 /03 C HIN ES E
STOP
PLAY/PAU SE
S UBT ITL E 01 /0 3 ENG LISH
FR
FF
PRE V
NE XT
ZOOM
SLOW
A-B
RE PE AT
ZOOM
P ROGR AM ANGLE
ZOOM PLAY
S TE P
SET UP
ENTER
NAVIGAT ION
BUTTONS
ENTER
L/R
This f unctio n allows you to enj oy a m otion
picture.
Pre ss ZO OM bu tton w hen playing, the sc reen
shows:
2X
1/ 4
3X
1/3
L/R
TITLE
MENU
SUBTITLE
LANGUAGE
SU BTI TLE LANGU AGE V OL
VOL
USB/CARD/DVD
MU TE
4X
1/ 2
Pre ss NAVIGAT ION b utton t o scro ll acro ss the
enlar ged pi cture.
Changing audio soundtrack language (DVD/VCD/CD disc)
It is pos sible t o chan ge the audio sound track langua ge to a different languag e from the on e
se lected at the initia l settin gs (Th is ope ration works only w ith dis cs on which multip le aud io
so undtr ack lan guages are record ed).
Press LANG UAGE butto n whil e playing DVD disc the sc reen w ill dis play th e number of
cu rrent sound track l angua ges,pr essing the b utton a gain will cha nge th e lang uage.
Pre ssing L/R bu tton w hile pl aying VCD/C D disc will c hange audio outpu t mode : Mono Left,
Mo no Rig ht, Mix-mon o and S tereo sound track.
NOTE: Whe n no s ound track langu ages a re rec orded , pres sing t his bu tton w ill not
work .When the p ower i s turn ed on or the disc is rem oved, the la nguag e hea rd is the
one s electe d at t he init ial settings .
22
31
1 TFT MODE butto n- Press thi s butto n to select
TFT MODE IN V ER S IO N
BRIGH TNES S, CO NTRA ST, SH ARPN ESS,
1
SATUR ATIO N, HUE or 16 :9/4:3 scree n mod e
and then pre ss left or righ t butto n to a djust a s
15
1
2
3
you lik e.
N/P
2 NUM ERIC butto ns - Press th ese bu ttons to inpu t
16
2
5
4
6
OSD
numer ic informatio n, such as tra ck nu mber, chapte r
numbe r and so on.
7
8
9
17
GOTO
3 FR b utton - Pres s this b utton to play the d isc
18
0
10+
backw ard at speed s:x2,x 4,x8,x 16,x32 .
STOP PLAY/PAUSE
19
4 FF button - Pres s this button to pla y the d isc
3
20
forwar d at sp eeds: x2,x4, x8,x16 ,x32.
FR
FF
PRE V
NE XT
4
21
5 ZOO M but ton -P ress this button to enlarg e picture
22
5
size, m ax.to X 4 or to shri nk pict ure siz e, min . to X 1 /4.
Z OOM
SLOW
A -B
RE PE AT
23
6
6 SLO W but ton -P ress this button to play th e disc at
7
24
speeds:1/2,1 /4,1/8 ,1/16.
PR OGR AM A NGL E
SE TUP
8
25
7 PRO GRAM butt on -Pr ess this button to s etup the
26
9
memory orde r of ch apter or title (for D VD) or track s
STEP
EN TER
(for VC D/CD ).
27
10
8 ANG LE bu tton - Press this bu tton to displ ay the
L/ R
TIT LE
MENU
11
angle numbe r and c hange to different angles.
28
12
S UBTI TL E LA N GUA GE V OL
9 STEP butt on- Press th is butt on to p lay th e
VOL
29
13
file for ward s tep by step.
14
30
M UTE
USB/C ARD/DVD
10 L/R butto n- To c hange audio outpu t mod e: Left
Mono, Right Mono, Mix-m ono a nd Ste reo so undtra ck.
11 TIT LE bu tton -Press this bu tton to return to
title menu (fo r DVD).
12 SUBTITL E button-Pr ess th is butt on to d isplay and change subtitl e lang uage(For DV D only ).
13 LA NGUA GE BU TTON - To s elect t he sou ndtrac k lang uage( DVD).
1 4 USB /CAR D/DVD- T o switch the unit among U SB,CARD and DVD mod e.
15 N/P butto n - Pre ss thi s butto n to se lect N TSC o r PAL system (For DVD o nly).
16 OS D button -P ress O SD bu tton co ntinuo usly d uring playba ck, the scree n will displa y the
playing information , such as ela psed time, re maini ng tim e and so on.
17 GO TO button- Press this b utton t o set the player to p lay di sc star ting at a cert ain po int.
18 PL AY/PAUSE b utton - Pres s this button to sta rt or pa use p laying the dis c.
19 STOP bu tton -P ress t his bu tton to halt p laying .
20 NEXT bu tton -P ress t his bu tton to play t he nex t chap ter(for DVD) or trac k(for V CD/CD).
21 PREV bu tton -Press this bu tton to play t he pre vious c hapte r(for D VD) o r track (for VCD/CD).
22 REPEAT butto n -Pre ss this button to rep eat pl aying one ch apter or one title ( forDVD ) or
repea t playing the curren t trac k or the whole track s (for VCD/C D).
23 A-B button -Pr ess thi s butto n to re peat p laying sections be tween two sp ecific points (A-B) .
24 SE TUP b utton -Press this b utton to ente r initia l settin gs me nu.
25 ENTER b utton --Pres s this b utton to con firm w hat you have selec ted.
26 navigatio n buttons - Press this bu tton to move up,do wn,left or rig ht.
27 ME NU bu tton -Press this bu tton to retur n to the root m enu( for DV D) or t o turn on/off the
PBC (f or VCD ).
28 VO LUME + but ton- P ress t his bu tton to turn u p the v olume .
29 VO LUME - butt on- P ress th is but ton to turn do wn the volum e.
30 MU TE bu tton- Press t his bu tton to mute the sou nd.
31 INV ERSIO N- Pr ess th is button to rotate p icture clockwise(1 80° );p ress it again to res ume
to norm al.
7
Repeat play
Basic connection
E nsure all the cable s are d iscon nected from the ma in unit before conn ecting to AC power
s ource by AC power adapt or.
Read th rough the in structi ons be fore c onnec ting ot her eq uipme nt.
P ress R EPEAT butt on during pla y, it will
r epeat play o ne cha pter o r one t itle (fo r DVD
d isc), o r repe at play track (for VCD/CD).
TFT MODE INVERSION
DVD DISC
CHAPTER
Repeat chapter
Connecting to AC power source
1
2
3
4
5
6
7
8
9
N/P
OSD
TITLE
To power outlet
ALL
0
10+
STOP
PLAY/PAUSE
FR
FF
PR EV
NE XT
ZOOM
SLOW
A-B
REPEAT
PROG RAM ANGLE
N OTE:
Before connecting to AC po wer, push the
POWER ON/OFF s witch to OFF.
AC ad aptor
A-B
REPEAT
Repeat all
Main unit
GO TO
GOTO
Repeat title
SE TUP
ENTER
VCD/CD DISC (In the PBC OFF mode)
EN TER
ST EP
TRACK
L/R
T IT LE
ME NU
R epeat track
ALL
SUB TITLE LAN GUAGE VOL
VOL
USB/CARD/DVD
MUTE
R epeat disc
A-B repeat play
Rechargeable Battery Use
The player built-in a chargeable Lithiu m battery.
1.Charge the batte ry
-Connect the adapto r to the DC 12V IN jack, then set the unit in POWER ON mode for fully
charge( SLOW CHARGE).
-Set in POWER OFF mode for fu lly charge.(FAST CHARGE)
And the indic ator is red during chargin g; it gets green when charging completed.
2.Time to recharge the battery
Recharge and playback tim e depends on battery pack capacity and the temp erature condition.
G enerally speaking, The battery needs to be charged about 3 hours in FAST CHARGE mode
And about 12 hours in SLO W CHARGE mode.
3.Using and Maintaining Rechargeable Battery
-.The normal working cond ition temperature is: 0 ~45 ;
-.Always unplug AC/DC power supply for the unit whenever not p laying.
NOTE: A new battery pack which has n ot been used or one which has not been used for more
than a m onth, may appear to not recharged enough , this i s due to the characteristic of this
battery and is not a malfunction. In this case, recharge it two or t hree times before the first use,
and it n eeds more than 6 hours to recharge battery.
Noises may b e generated during recharging. In this case, use a more distant power sock et.
Do not recharge or d ischarge battery n ear a heatin g element such as a heater or direct sunlight.
8
Repeating sections between two spec ific
points(A-B repeat)
1. Press A-B REPEAT button during play at the point where repeat play is to be started(A).
2. Press A-B REPEAT button at th e point where repeat play is to be ended(B). Repeat play of
the selection between points A and B starts.
3. Press A-B REPEAT button once again to return to norma l play.
TFT MODE
Press TFT MO DE bu tton, the bottom at right o f
CON TRA ST IIIIIII III... ..... 00
sc reen will dis play as the p icture at righ t:
Press this butt on con tinuou sly to select
BRIGHTNESS, CONTRAST, SHARPNESS,SATURATION, HUE or scr een m ode(16:9/4:3 ).
Then press the LEFT or RIGHT n avigation button to adjust the le vel of the sel ected item.
N OTE: The lev el of BRIGHTNES S, CONTRAST, SHARPNESS,SATURATION and HUE can be
adjusted from -20 to +20. A nd the SCREEN MODE c an be switched be tween 16:9 a nd 4:3.
Press TFT MO DE bu tton again to exit the TFT MODE Menu Page .
GO TO
Press GO TO butto n, the scree n will d isplay a men u, the n you c an mo ve Up or Do wn Na vigatio n
button and enter di rectly a time, chapt er or track, th e disc will p lay fro m the selected poin t. Pre ss
GO TO butto n agai n to ex it the m enu.
21
Basic connection
On screen display information
It is recommended to connect a multi- system TV.
Disconnect t he AC adapt or befo re com menc ing co nnect ion.
Do no t block ventil ation h oles of equip ment and ar range them s o that air can circu late fr eely.
Read through the i nstructions b efore conne cting o ther equipm ent.
Ensure that you observe the color cod ing wh en co nnecti ng aud io and video cables.
Pre ss OS D butt on to d isplay playin g info rmatio n.
DV D disc
TIT L E ELA PSE D
T: 0 2/03 C : 07/28
TITL E REMA IN
T: 02/03 C: 07/28
0:19:20
1:17:00
Note:
CHA PTER E L APSED
T: 02/03 C: 07/28
0:01:53
CH APTER REMAIN
T: 0 2/03 C : 07/28
0:01:34
TFT MODE INVERSION
DI SPLAY OF F
1
2
3
4
5
6
7
8
9
0
10+
N/P
T = T IT LE N O.
C = CHAPTE R Nu mb er
NUMER IC
BUTTONS
OSD
OSD
VC D disc
S INGLE E LAPSE D
T RACK 02/03 0:19:20
SI NGL E REMAIN
TRACK 02/03 1:17:00
GOTO
DIS PLAY OFF
10+
CD disc
TOTA L ELAP SED
TRAC K 02/03 0:19 :20
During DVD play, t he TV volume may be at a lower level than d uring T V broadcast s, etc.
If this i s the c ase, adjust t he vol ume to the desired level.
If the D VD/VCD/CD playe r is co nnect ed to the TV throug h a video cassette record er,
the pic ture may not be pla yed back no rmally with s ome DVDs. If this i s the c ase,
do not conne ct the player via the VCR.
STOP
PLAY/PAUSE
FR
FF
PR EV
NE XT
Z OOM
SLOW
A-B
RE PEAT
Connecting to a TV set
TOTAL REMAI N
TRACK 02/03 1:17:0 0
PROGRAM
PR OGRAM ANGLE
SINGL E REMAIN
TRAC K 02/03 0:01 :34
SETUP
SINGL E ELAP SED
TRAC K 02/03 0:01:5 3
ENTER
ST EP
L/R
Program play
Th e play er play s the f iles in an des ired o rder.
1. Press PROG RAM b utton and th e scre en will
dis play th e program m enu.
T IT LE
TV set
ENTER
NAVIGATION
BUTTO NS
MEN U
SUBTITLE LAN GUAGE VOL
VO L
USB/CARD/DVD
MUTE
To vide o input/output conn ector (yellow)
To audio input/ output connectors (re d, white)
Video/audio cab le
2. Press navigation buttons to choose m emory index and then press ENTER button to sta rt input.
Enter d esired titles/chapters numbers by using the numeric buttons. The sele cted titles/
chapters are stored into the mem ory. Select
on the menu to see the next page. Up to 20
memories can be stored.
NOTE: Leading zero is not necessary. If the track number is more than 10, press the 10+ key
first and then the un it digit.
Example: Track 12, press "10+" and then "2"
Track 21, press "10+" twice and then "1"
3. Select START on the me nu an d pres s ENTER button to start program play or select EXIT
on the m enu and press ENTER button to exit without program play.
4. To clear programmed items, sc roll the navigation button to the item to be cleared and press
ENTER button, the selecte d item will be deleted.
5. To stop the program, press PROGRAM button select STOP on the menu, then press
ENTER button.
20
9
CARD Playback
Basic connection
Connecting to audio equipment
1.Ins ert the CARD (SD/M MC) contai ning
the f iles in VCD/S VCD/ DVD//WMA/M P4/
JPEG /CD format to be played .
2.Press US B/CARD/DV D butt on to s witch the
unit in CAR D reader mo de.
3.Aft er sev eral se conds , all th e folders in t he
CARD will display on m onitor screen :
Audio equip ment
TF T MODE IN VERSION
\BELLE\
To audio input/ output connector (red, white)
Video/a udio c able
ALAN
BUZZ
CANDY
DIANA
1
2
3
4
5
6
7
8
9
0
10+
N/P
NUMERIC
BUTT ONS
OSD
GOTO
FF
CARD
PLAY/PAUSE
STOP
PLAY/PAUSE
FR
Current media file type
Connect headphones
1. Con nect the headphones.
Adjust the volume to mini mize the volume.
Connect the head pho nes to phone jac ks .
2. Adju st the volume to the level that you want.
2. Adjust the volume 1. Connect the phones
10
FR
FF
P REV
NE XT
Z OOM
SLOW
A-B
RE PEAT
PR EV
NEXT
REPEAT
ZOOM
PR OGRAM ANGLE
SET UP
4. Sel ect a f older y ou wa nt to p lay by using the
ENTER
navig ation b uttons and p ress the ENT ER
NAVIGATION
ST EP
ENTER
BUTTONS
button to co nfirm.
MENU
5.The files in this f older d isplay and s elect t he
L/R
TITLE
MEN U
desire d file by nav igation butto ns, the n pres s
the ENTER button to sta rt play back.
SUBTIT LE LANGUAGE VOL
VOL
US B/CAR D/DVD
6. Pres s NEXT or PRE V butto n to turn the
MU TE
curren t menu p age to the nex t or prev ious
USB/CARD/DVD
menu p age.
7. Pres s REPE AT butt on to ch ange re peat
playing mode.
- SH UFFLE : All the files wi ll be ran domly
sorted and played by the order.
- RA NDOM : rando mly sele ct any file to pl ay.
- SINGLE: p lay one file only.
- RE PEAT O NE: re peat on e file.
- RE PEAT F OLDER: all the files in the fold er
will be played repeatedly.
- FO LDER: all the f iles in th e folde r will be played
8 . Pre ss STO P but ton wh en pla ying, then yo u will enter previe w mod e.
9.Pre ss MENU button to return files li st men u.
10.Pre ss right / left bu tton to r otate th e image clockw ise/ co unter-cl ockwise during photo
playba ck.
11.Pre ss up/ d own bu tton to f lip the im age ve rtically / horizo ntally during ph oto pla yback.
12. Pr ess ZO OM b utton t o ente r the z oom m ode:
- Pres s FF button t o enlarge pic ture to 100% , 125% , 150 % and 200%
- Pres s FR b utton t o shrin k pictu res to 50%, 75%, a nd 10 0%
19
USB Playback
Remote control preparation
2 OPEN
Battery installation
1.In sert U SB co ntainin g the files in Music ,
pic ture or movie forma t to be playe d.
2.P ress U SB/C ARD/D VD bu tton to switc h the
uni t in US B read er mo de. Th en the scree n will
dis play a s follow ing:
十
十
Insert the ba tteries while observ ing th e corre ct
(+) and (-) po laritie s as ill ustrate d at ri ght(Fi g 1).
TFT MO DE INVERSION
Service life of b atte ries
WAITING
1
2
3
N/P
NUMERIC
BUTTO NS
4
5
6
OS D
7
8
0
10+
9
GO TO
3.A fter se veral secon ds, all the fol ders in the
US B will displa y on m onitor scree n:
00:00 00:00
001/124
PLAY/PAUSE
S TOP
PLAY/PAUSE
FR
FF
P REV
NE XT
Z OOM
S LOW
A-B
RE PE AT
The batteries no rmally last fo r abou t one
year a lthoug h this depen ds on how of ten,
and fo r what opera tions, the rem ote
contro l is us ed.
If th e remo te con trol fa ils to work ev en
when it is op erated near the pla yer, re place
the ba tteries .
Use one s ize CR 2025 battery.
十
PREV
NEXT
MUSIC
P ROGR AM AN GL E
SE T UP
PH OTO
ST EP
L/R
T IT LE
ENTER
NAVIGATION
BU TTONS
ENTER
MEN U
USB
SU BTI TLE LAN GUAGE VOL
V OL
USB/CARD/DVD
MUT E
USB/CARD /DVD
4. Select a fo lder y ou want to pl ay using the
naviga tion b uttons and press th e ENT ER
button to con firm.
5.The files in this folder a re displayed and
select the de sired file by naviga tion buttons ,
then p ress th e ENT ER bu tton to start to play.
十
3
十
RE PEAT
LO VE
PUSH 1
十
4
Note :
Do not use rechargea ble (N i-Cd) batteri es.
Do not at tempt to rec harge, short- circuit ,
disas semb le, hea t or th row th e batte ries
into t he fire .
Do not dr op, step on or othe rwise impac t
the remote contro l. This may d amag e the
parts or lea d to m alfunc tion.
If t he remote co ntrol i s not g oing to be
used for a l ong tim e, rem ove the battery.
REMO TE CONTROL SEN SOR
6m
30 C
IF YO U SEL ECT M USIC FILE TO PLAY:
Cur rent song
/Total so ngs
USB bit rate
indi cato r
Vo lume leve l
ind icat or
Play time
Tot al tim e
Play back indicato r
01:5 3 04 0:36 65 kb
001/ 124
MUSIC
Mp 3
Mp 3
Mp 3
Mp 3
Mp 3
Mp 3
1
2
3
4
5
6
7
8
9
N/P
Equ alize r ind icato r
Curre nt folde r
30 C
T F T M OD E I N V ER S I O N
-- --- -1
-- --- --1
-- --- ~2
-- --- --1
-- --- ~2
-- --- ~2
USB
Cur re nt m e dia file ty pe
6 .Press N EXT o r PREV butt on to t urn the
cu rrent m enu p age to the next or p revious
menu pa ge.
7 .P ress REPEAT but ton to s et rep eat pl aying
mo de.
- SHUF FLE: A ll the files will be r andom ly
s orted and pl ayed b y the o rder.
- RAND OM : random ly se lect an y file t o play.
- SINGLE: play one file on ly.
- REPE AT ONE: rep eat on e file.
- REPE AT FO LDER: all th e files in the folder
w ill be played repea tedly.
- FOLDER: all the fi les in the fol der wil l be
p layed
18
Remote control operation
OSD
GOTO
0
10+
STOP PL AY /PAU SE
FR
FF
PR EV
NE XT
1. Remov e the p rotect ive pla stic ta b befo re
ope rating the re mote c ontrol(Fig 2 ).
2. Point th e rem ote co ntrol fr om no more than
abo ut 6 m from t he rem ote co ntrol sensor and
with in abo ut 60 o of the front o f the p layer( Fig 2).
NO TE:
T he operating distance ma y vary according to
Fi g 2
the bright ness o f the r oom.
Do not point b right l ights a t remo te con trol
sen sor.
Do not place o bjects betw een th e remo te con trol an d the remote contr ol sens or.
Do not use this remo te con trol w hile sim ultan eously opera ting th e rem ote co ntrol o f any
o ther e quipm ent.
ZOOM
SLOW
A-B
P ROGR AM AN GL E
STEP
L /R
11
REP EAT
SETUP
EN TE R
TITL E
MEN U
SUBTITLE LAN GUAGE VOL
VOL
USB/CAR D/D VD
MU TE
Before enjoying DVD/Video CD/CD
The O n-Screen menu languag e of yo ur player
has been factory p re-set on French.
If you want t o change the menu langu age
to oth er language, pleas e refer to "Initial
settin gs / General setup / OSD lang ” .
In the explanation below it is assume d that
English has been selected a s menu l angua ge.
JPEG CD
Slide show effects
Press PRO GRAM butt on to s elect o ne of the
effe cts wh en cha nging from o ne pic ture to
ano ther:
Basic play
TFT MODE INVERSION
1. Push POWER k nob on the unit to s witch
on the powe r.
2. Push the open b utton to ope n the d isc co ver.
1
2
3
N/P
NUMERIC
BUTTONS
OPEN
4
5
6
OSD
7
8
0
10+
9
GOTO
PLAY/PAUSE
STOP PLAY/PAUSE
3. Pl ace a d isc on to the disc c ompartment.
Hold the di sc with out to uching either of its
surfa ces, p osition it with the p rinted title si de
facin g up, a lign it with th e guid es, an d plac e it
in its prope r posi tion.
4. Clo se th e disc c over, after c losing the di sc
cove r , play begin s. The playe r starts to rea d
the d isc im media tely.
LOADING
FR
FF
PREV
NE XT
Z OOM
SLOW
A-B
REPEAT
PROGRAM ANGLE
STEP
SETUP
PREV
L/R
ENTE R
MENU
SU BTITLE LANGUAGE VOL
VOL
USB /CARD/DVD
MUTE
1
2
3
4
5
6
N/P
OSD
7
8
0
10+
9
G OTO
10+
PL AY/PAUSE
STOP
PLAY/PAUSE
NE XT
Enjoying Vi deo C D with
playback control
FR
FF
PREV
NEXT
Z OOM
SLOW
A-B
REPEAT
PREV
PROGRAM
PROGRAM ANGLE
STEP
Wh en pla ying V CD 2.0 with PBC, t he pla yer
wil l show the VC D version a nd PBC statu s
on the sc reen.
L/R
SETUP
NAVIGATION
BUTTONS
EN TER
TITLE
EN TER
MENU
SUBTITLE LANGUAGE VOL
VOL
USB/CARD/DVD
MUTE
VCD2.0
PBC ON
DVD-V IDE O
After a few secon ds, a m enu will app ear on
the s creen.
5. When a m enu sc reen appear s on the TV,
move the na vigatio n butt ons or press the
numeric butt ons to selec t prefe rred tr ack
number, then press ENTER but ton to confirm.
1 WHAT WILL I DO
2 HEAR ME CRY
3 WI THOUT YOU
4 M OVE CL OSER
TFT MODE IN VERSION
NAVI GATION
BUTT ONS
EN TER
TIT LE
WIPE TOP
WIPE BOTT OM
WIPE LEFT
WIPE RIGH T
DIAGONAL WIPE LEFT TOP
DIAGONAL WIPE RIGH T TOP
DIAGONAL WIPE LEFT BOTTOM
DIAGONAL WIPE RIGH T BOTTOM
EXTEND FR OM CENTR E H
EXTEND FR OM CENTR E V
COMPRESS TO CENTE R H
COMPRES S TO CENTE R V
WINDOW H
WINDOW V
WIPE FROM EDGE TO C ENTRE
MOVE IN FR OM TOP
NONE
NE XT
MENU
TITL E
1
2
3
4
5
6
7
8
9
10
11
12
13
14
15
16
17
1 WHAT WILL I DO
2 HEAR ME C RY
3 WITHOUT Y OU
4 MOVE CLO SER
WITHOUT YOU
6.W hen the men u conti nues o nto an other
scre en , pr ess NEXT bu tton to view the
next scree n, or p ress P REV b utton to skip
to pr eviou s scree n.
NOT E: Du e to th e diffe rent de sign o f some softw are tit les, NE XT bu tton m ay no t alway s wor k.
7.To stop p lay an d retu rn to th e men u scre en, pr ess TITLE bu tton, o r MEN U but ton.
12
Press numeric buttons to select corres ponding track, if the trac k number is under 10, choose
one of the nu meric buttons 0 ~ 9.
If the track number is exceed 10, press 10+ button firstly, then press n umeric butto ns 0 ~ 9.
Press NEXT
b utton or PREV
butto n, the player will p lay the next o r previous
track in the s cheduled sequence on the disc.
17
Stopping play
JPEG CD
ROT ATI NG
F or JPEG pic ture C D, select the folder you
wan t to pla y by th e nav igation butto ns and
pres s ENT ER bu tton to confir m.
T he file s in th is fold er are displa yed an d
sele ct you r pictu res by using the up /down
nav igation butto ns and press ENTE R butt on to
start playb ack. T humbn ail of picture will b e
disp layed while y ou sc rolling acros s the fi le
nam e.
Flipping pictures
Press the STOP button to sto p play ing a d isc.
NOTE : Wh en pla yer is s toppe d, the player
records the point where STOP was p ressed
(RES UME f unctio n). Pre ss PL AY aga in,
playb ack will resu me fro m this point . When the
tray is Open ed or STOP is pres sed a gain, t he
RESU ME fu nction will b e clear ed.
P ress UP nav igatio n butto n to fl ip the
pic ture ve rticall y.
P ress DOWN navig ation b utton to flip
the picture horiz ontall y.
Skipping ahead or back
TFT MODE IN VERSION
Be ll e
Skipping ahead
Pre ss NEX T
butto n durin g play
A ch apter (DVD) or a track (V ideo CD/CD) is
skip ped each tim e the button is pre ssed.
Skipping back
Pre ss PRE V
butto n during play
A ch apter( DVD) or a track (Vi deo C D/CD) is
skip ped each tim e the button is pre ssed.
DISC
O nce a folder and fil e is se lected , the p icture
is loa ded on to the scree n.
1
2
3
4
5
6
N/P
OSD
7
8
0
10+
9
GOTO
P LAY/PAUSE
STOP PLAY/PAUSE
FF
FR
FR
FF
PREV
NEXT
Z OOM
SLOW
A-B
REPEAT
PROGRAM ANGLE
SETUP
EN TER
STEP
NOT E: The time to load and d isplay pictur e
dep ends on the file siz e of th e pictu res.
PREV
NEXT
Picture Shrink/Zoom
L/R
Dur ing pla yback, pres s MENU button to
return to fold er sele ction or STOP button to
e nter p review mode.
Press REPEAT button to change p lay mode:
- SHU FFLE: All the files will be rando mly
sorte d and play b y the o rder.
- RAN DOM: random ly se lect an y file t o play.
- SING LE: p lay on e file o nly.
- REPEAT O NE: re peat o ne file .
- REPEAT FO LDER : all th e files in the folder
will b e play ed rep eatedl y.
- FOLDER: a ll the f iles in the fol der wi ll
be pl ayed.
Skip to next/previous picture
Pre ss NEX T but ton to skip to the ne xt pict ure
or P REV b utton to skip to the previo us pic ture.
If no key is press ed for 5 seco nds, i t will s kip
to n ext pic ture a utoma tically.
Pre ss ZOOM bu tton to enter the zo om
mode
Pre ss FF button to enlarge p icture to
100%, 125%, 150% and 200%
Pre ss FR button to shrink pi ctures to
100%, 75%, and 50%
ZOOM 150%
Rapid advance(Rapid
reverse)
TITLE
MENU
SUBTITLE LANGUAGE VOL
VOL
USB/CARD/DVD
MUTE
During play back, press FF
butto n or F R
butto n to fa st forw ard/re wind. Press
PLAY butto n to re sume norma l play.
Fast fo rward
ZOOM 50%
2X
FF 4X
F F 8X
FF
16 X
32 X
Fast b ackward
2X
FR 4 X
FR 8 X
FR 1 6 X
32 X
If th e pictu re is e nlarge d, you may p ress
nav igation butto ns to s ee oth er port ions
of th e picture.
Pause or play
Durin g play back, press PLAY /PAUS E
play, press PLAY butto n.
Rotating pictures
b utton , the p lay wi ll be p aused , To re sume norma l
Press RIG HT na vigation button to rotate
the picture clockwise.
Press LEF T navigation button to rotate
the picture counter-clockwise.
16
13
Slow-motion play (DVD/VCD)
MPEG4 playback
P ress th e SLO W but ton du ring pl aybac k.
1 ) Plays the d isc at a 1/2 of norma l spee d at
fir st. Each time the b utton i s press ed, th e
pl ay spe ed bec omes 1/4,1/ 8,1/16 .
2 ) Pres s PLAY butto n, the unit wi ll retur n to
no rmal p lay.
1 . Inser t the d isc con tainin g the f iles in MPEG 4
fo rmat t o be p layed and after a fe w sec onds,
th e scre en of the mo nitor will sho w all the
fo lders on the disc:
00 :00 0 0: 00
00 1/124
Music playback
TF T MO D E INVERSION
SW EA R
1. Insert the di sc con taining the M usic f iles
to be pl ayed a nd afte r a few seco nds,
th e scre en of t he mo nitor will sho w all th e
fo lders o n the disc:
1
2
LOV E
3
N/P
NUMER IC
BUTTONS
4
5
6
7
00:00 00:00
001/124
8
NUMERIC
BUTT ONS
DISC
9
10+
PLAY/PAUSE
STOP
MUSIC
PLA Y/PAU SE
SONGS
LOVE
SLOW
FR
FF
PREV
PREV
NEXT
NEXT
REPEAT
ZOOM
DISC
SLOW
A-B
PROGRAM ANGL E
2. Selec t the fo lder y ou want to pl ay by the
na vigati on but tons a nd pre ss the ENTE R
bu tton to confi rm.
3. The fi les in t his fol der are displ ayed a nd
se lect th e desired so ng by naviga tion b uttons ,
th en pre ss the PLAY button to sta rt play back.
STEP
L/R
RE PEAT
SETUP
SUBTI TL E LANGUAGE VOL
USB/CARD/DVD
4
5
6
7
8
0
10+
PLAY/PAUSE
FF
P REV
NEX T
ZOOM
SLOW
A-B
RE PEAT
PROGRAM ANGLE
SET UP
EN TER
L/R
T IT LE
AV
AV
AV
KING
FIGHT
PEACE
LIVE
LILY
SECRE T
SUBTITLE LAN GUAGE VOL
VOL
USB/CARD/DVD
MUTE
DISC
M USIC
Mp3
Mp3
Mp3
Mp3
Mp3
Mp3
C ur re n t me d ia file ty pe
A LAN
B UZZ
C ANDY
D IANA
M ANDY
S IMPSON
DISC
C ur rent m edia file ty pe
4. Press NEXT or PRE V but ton to turn th e curre nt me nu pag e to th e nex t or pre vious
me nu pa ge.
5. Press REPE AT but ton to chang e play mode.
- SING LE: p lay one file o nly.
- REPEAT O NE: re peat o ne file .
- REPEAT FO LDER: all th e files in the folde r will b e play ed rep eatedl y.
- FOLDER: a ll the f iles in the fo lder wi ll be p layed
- SHUFFLE: All the files w ill be random ly so rted an d play ed by the ord er.
- RANDOM : rando mly se lect an y file to play.
14
MENU
SWEAR
AV
01:53 04 0:36 160
001/124
PLAY/PAUSE
STOP
REPEAT
00:00 0 0:00
001/124
Current
folder
AV
Equalizer indicator
GO TO
PREV
NEXT
Volume level indicator
Playback indicator
MENU
MUTE
9
FR
ST EP
VOL
O SD
Current file/Total files
AV
Curre nt song/Tota l songs M P3 b it rat e ind icato r
Volume level indicator
Play t ime
Play back indicator
Total time
3
GOTO
2. Select the folder y ou want to play by the
navigation buttons and pre ss the ENTER
button to confirm.
3 . The files in this folder are displayed and
se lect the desired fire by navigation buttons,
then press the PLAY button to start playback.
ENTE R
NAVIG ATION
BUTTO NS
EN TER
TITLE
2
OSD
GOTO
0
1
N/P
OSD
C u rrent f older
TFT MODE INVERSION
STORY
4. Press NEXT or PREV bu tton, then press
ENTER button , the p layer will pla y the next or
pr evious file.
5. Press the SLOW b utton to play the di sc at
a1/2,1/4 ,1/8 o r 1/16 of normal speed.
6 . Press REPEAT bu tton to change play mode .
- SIN GLE: p lay on e file only.
- REPEAT O NE: re peat one file.
- REPEAT ALL: al l the fil es in t he folder will be pla yed re peate dly.
- REPEAT O FF: n o files in the folder will be playe d repe atedly.
- SHUFFLE : all th e files will be rando mly sorted a nd pla yed by the or der.
- RANDOM : rand omly s elect any file to pla y.
15
ENTER
NAVIGATION
BUTTONS