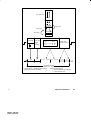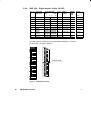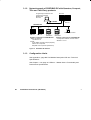
1
Modicon TSX Quantum PROFIBUS–DP under Modsoft User Manual 840 USE 468 00 33000240.02 01/99 Breite: 185 mm Höhe: 230 mm Data, Illustrations, Alterations Data and illustrations are not binding. We reserve the right to alter products in line with our policy of continuous product development. If you have any suggestions for improvements or amendments or have found errors in this publication, please notify us using the form on one of the last pages of this publication. Training Schneider Automation offers suitable further training on the system. Hotline See addresses for the Technical Support Centers at the end of this publication. Trademarks All terms used in this publication to denote Schneider Automation products are trademarks of Schneider Automation. All other terms used in this publication to denote products may be registered trademarks and/or trademarks of the corresponding Corporations. Microsoft and MS-DOS are registered trademarks of Microsoft Corporation, Windows is a brandname of Microsoft Corporation in the USA and other countries. IBM is a registered trademark of International Business Machines Corporation. Intel is a registered trademark of the Intel Corporation. Copyright All rights are reserved. No part of this document may be reproduced or transmitted in any form or by any means, electronic or mechanical, including copying, processing or by online file transfer, without permission in writing by Schneider Automation. You are not authorized to translate this document into any other language. 1999 Schneider Automation GmbH. All rights reserved Terminology Note This symbol emphasizes important facts. Caution STOP This symbol refers to a frequent source of error. Warning This symbol points to a source of danger that may cause financial or health damage or have other aggravating consequences. Expert This symbol is used when more detailed information, intended exclusively for experts, is given. To understand and apply it requires special training. Skipping this information will not interfere with understanding the document, no restrict standard application of the product. Tip This symbol is used for Tips & Tricks. Path This symbol identifies the use of paths in software menus. Figures are annotated in the spelling corresponding to international practice and approved by SI (Systéme International d’ Unités). An example of this is the space following the thousands and the decimal point in the number 12 345.67. Application Note Caution The relevant regulations must be observed for control applicatons involving safety requirements. For reasons of safety and to ensure compliance with documented system data, repairs to components should be performed only by the manufacturer. 41 Breite: 185 mm Höhe: 230 mm Preface III Objectives List of Abbreviations: ASIC Application Specific Integrated Circuit AWP User program BP BMFT C CC CCMP Bundesministerium für Forschung und Technik Client Coordination Channel Coordination Channel Communication Manager: Profile specific module CDS Configuration Data Download Server: local entity that controls the configuration process and distributes configuration data on a single CPU board, expert or communication adapter. CFB Communication Function Block CM Communication Manager CMI Computer Memory Interface CMP CRDR CRL CRP 811 CSRD Communication Manager Profilabhängig (physikalisch) Cyclic Request Data with Reply (zyklisches Empfangen mit Quittierung) Communication Relation List PROFIBUS-DP-Module for TSX Quantum Cyclic Send and Request Data with reply (zyklisches Senden und Empfangen mit Quittierung) DDB Development Data Base DDLM Direct Data Link Mapper DIP IV Backplane (Quantum) Preface Data Information Base 41 DP Decentrale Peripherie FCS Frame Check Sequenz FDL Fieldbus Data Link FMA Fieldbus MAnagement FMA7 FO GSD, DDB IC ICM Fieldbus MAnagement Schicht 7 Fiber Optic Device Data Base (PROFIBUS-DP) Information Channel Information Channel Manager ICMP Information Channel Communication Manager: Profile specific module ICOM Information Channel Communication Object Manager (linked with the ICMP for FMS). This module does all communication object and VD handling needed for conversions between real and virtual (open) object representations. IEC IEEE I/O ISO ISP LAN LLI International Electronic Commite Institute of Electric and Electronic Engineers Input/Output International Standardization Organization Interoperable System Project Local Area Network, Lokales Netz Lower Layer Interface (in Schicht 7) LLC Logical Link Control, logische Verbindungssteuerung LMS Large Modul System: Arbeitstitel für den Produktnamen Quantum (Working title for the Quantum controllers) MAP Manufacturing Automation Protocol, spezielles Kommunikationsprofil MAC Medium Access Control, Medium-Zugriffsverfahren 41 Breite: 185 mm Höhe: 230 mm Preface V MB+ Modbus+ MMI Man Machine Interface MMS MMSE MMS über Ethernet OS Operating System OSI Open System Interconnection, offene Kommunikation PC PCMS PCMCIA Programmable Controller, SPS Programmable Controller Message Specification Personal Computer Memory Card International Association (PC–Card): Arbeitstitel für das Quantum-Modul NHP 911 (Working title for the Quantum modul NHP 911) PDU Protocol Data Unit PHY Physical PLC Programmable Logical Control PLCC PNO PROFIBUS PUTE / PADT PV Quantum RDR RS 485 VI Manufacturing Message Specification Plastic Leadless Chip Carrier PROFIBUS User Organisation e.V. ProcessFieldBus Programm and Test Equipment ProcessVariable Product name Request Data with Reply (Daten empfangen mit Quittierung) PROFIBUS-Schnittstelle für kabelgebundene Übertragung (Recommended Standard for a Communication Interface) SAP Service Access Point (Dienstzugangspunkte für einzelne Softwareschichten) SDA Send Data with Acknowledge (Daten senden mit Quittierung) Preface 41 SDN Send Data with No acknowledge (Daten senden unquittiert) SOL Small Out-Line package SPS Speicher Programmierbare Steuerung SPU xxx SRAM SRD SS / IF TDC TIO UART VD VRTX 41 Breite: 185 mm Höhe: 230 mm Produktname für Programmiersoftware PROFIBUS Static RAM Send and Request Data with reply Interface Technical Design Center Terminal I/O Universal Asyncronous Receiver/Transmitter Virtual Devise Versatile Real-Time Executive Preface VII Arrangement of the Guide Chapter 1 describes the ISO–OSI–reference model and generally about PROFIBUS DP Chapter 2 describes the product overview and State RAM assignements PROFIBUS DP Chapter 3 describes the hardware installation of PROFIBUS DP Chapter 4 describes the global portions of software configuration from PROFIBUS DP Chapter 5 describes Diagnostic parameters and screens for CRP811 Appendix contains the module description Related Documents Modicon Ladder Logic Block Library, User Guide Best. Nr.:840 USE 101 00 Quantum Automation Series Hardware Reference Guide Best.Nr.: 840 USE 100 00 Installationsrichtlinien der PROFIBUS Nutzerorganisation Best. Nr.: 2.111 PROFIBUS Nutzerorganisation e.V. Haid– und Neu–Straße 7 D 76131 Karlsruhe EN 50170 Fieldbus Part 2 DIN 19429 Part1 and 3 TIO Benutzerhandbuch 890 USE 104 02 Modicon TSX Momentum E / A Einheiten Benutzerhandbuch 870 USE 002 02 TSX Momentum Bus–Adapter Profibus DP Benutzerhandbuch 870 USE 004 02 DEA 203 im Profibus DP Handbuch Handbuch A120 Komponenten VIII Preface 41 Validity Note The following tables contain the relationships between Modsoft and the neccessary software and firmware: Required Modsoft/Exec At Modsoft V 2.32 At Modsoft V 2.4 At Modsoft >=V 2.51 Modul package Module FW / SW FW / SW FW / SW Exec CPU x13 V2.00 (Q186V200.bin) V2.11 (Q186V211.bin) V2.14 (>=2.11) (Q186V214.bin) CPU 424 V2.00 (Q486V200.bin) V2.11 (Q486V211.bin) V2.12 (Q486V212.bin) At Modsoft V 2.32 At Modsoft V 2.4 At Modsoft >=V 2.51 For DP–Konfiguration: Modul– / SW– package Module FW / SW FW / SW FW / SW 140 CRP 811 00 CRP 811 V1.11D V2.05D >=V3.00D NHP811 V5.01A V5.02G >=V5.02I SPU 931 V1.10 V2.01 >=V3.00 GSD 931 V1.10 V2.00 >=V3.00 (GSD 831) V1.4 (EN / DE) >= V1.6 332 SPU 833 01 SPU 832 V1.2 (EN / DE) (KON–DP) Note The update of the new releases must be realized for all modules. A mixing from version 2.xx at CRP811/SPU931 with the old versions 1.xx at CRP811 / SPU931 is not allowed. Note A mixing from version 3.xx at CRP811/SPU931 with the old versions 2.xx at CRP811 / SPU931 is not allowed. Exclude: The modul CRP811 with FW V3.xx is installed in a plant, which is configured with SPU931 version 2.xx, is running together with CRP811 with FW version 2.xx. 41 Breite: 185 mm Höhe: 230 mm Preface IX X Preface 41 Contents Chapter 1 General . . . . . . . . . . . . . . . . . . . . . . . . . . . . . . . . . . . . . . . . . . . . . . . . 1 1.1 1.1.1 1.1.2 1.1.3 1.2 1.2.1 1.2.2 1.2.3 1.2.4 1.2.5 1.2.6 1.2.7 1.2.8 1.2.9 1.2.10 1.3 1.3.1 1.3.2 1.3.3 1.3.4 1.3.5 1.3.6 1.3.7 1.3.8 1.3.9 Introduction to the Reference Model . . . . . . . . . . . . . . . . . . . . . . . . . . . . . . . . . . . 3 Open communication . . . . . . . . . . . . . . . . . . . . . . . . . . . . . . . . . . . . . . . . . . . . . . . . 3 The ISO OSI Reference Model . . . . . . . . . . . . . . . . . . . . . . . . . . . . . . . . . . . . . . . 4 The Seven Layers in a Telephone Conversation (example) . . . . . . . . . . . . . . . 6 General Information about PROFIBUS–DP . . . . . . . . . . . . . . . . . . . . . . . . . . . . . 7 Layers for the PROFIBUS–DP . . . . . . . . . . . . . . . . . . . . . . . . . . . . . . . . . . . . . . . . 7 Basic Characteristics . . . . . . . . . . . . . . . . . . . . . . . . . . . . . . . . . . . . . . . . . . . . . . . . 9 System Configurations and Device Types . . . . . . . . . . . . . . . . . . . . . . . . . . . . . 10 System Behavior . . . . . . . . . . . . . . . . . . . . . . . . . . . . . . . . . . . . . . . . . . . . . . . . . . . 12 Data Transmission between the DP Master (class 1) and the DP Slaves . . 13 Sync and Freeze Mode (not supported by CRP 811) . . . . . . . . . . . . . . . . . . . 14 Data Transmission between DP Master and Configuration Devices . . . . . . . 15 Protection Mechanisms . . . . . . . . . . . . . . . . . . . . . . . . . . . . . . . . . . . . . . . . . . . . . 16 Device Database Files (GSD) Enable Open Configuration . . . . . . . . . . . . . . . 17 Ident Number . . . . . . . . . . . . . . . . . . . . . . . . . . . . . . . . . . . . . . . . . . . . . . . . . . . . . . 17 CRP 811 Functionality Master Class 1 and Performance Data . . . . . . . . . . . 18 DP Slave Reads Diagnostic Data and Files It in State RAM . . . . . . . . . . . . . 18 Send Parameterization Data to DP Slave . . . . . . . . . . . . . . . . . . . . . . . . . . . . . 19 Sending Configuration Data to the DP Slave . . . . . . . . . . . . . . . . . . . . . . . . . . 19 Cyclic Transmission of Input and Output Data from State RAM . . . . . . . . . . 20 Control Commands . . . . . . . . . . . . . . . . . . . . . . . . . . . . . . . . . . . . . . . . . . . . . . . . . 21 Auto–Clear . . . . . . . . . . . . . . . . . . . . . . . . . . . . . . . . . . . . . . . . . . . . . . . . . . . . . . . . 21 CRP811 Failure Behavior . . . . . . . . . . . . . . . . . . . . . . . . . . . . . . . . . . . . . . . . . . . 22 Performance . . . . . . . . . . . . . . . . . . . . . . . . . . . . . . . . . . . . . . . . . . . . . . . . . . . . . . . 24 CRP811 00 Operation in Decentralized I/O . . . . . . . . . . . . . . . . . . . . . . . . . . . . 26 Chapter 2 Overview PROFIBUS-DP . . . . . . . . . . . . . . . . . . . . . . . . . . . . . . . 27 2.1 2.1.1 2.1.2 2.2 2.2.1 2.2.2 2.2.3 2.2.4 2.2.5 2.2.6 00 Product Overview . . . . . . . . . . . . . . . . . . . . . . . . . . . . . . . . . . . . . . . . . . . . . . . . . . TSX–Quantum Components for PROFIBUS–DP . . . . . . . . . . . . . . . . . . . . . . . Slave Component Assignments (PROFIBUS-DP) . . . . . . . . . . . . . . . . . . . . . . TIO and Compact Slave Assignment Tables . . . . . . . . . . . . . . . . . . . . . . . . . . . BDO 354 – Digital output / 32 bits, 24 VDC . . . . . . . . . . . . . . . . . . . . . . . . . . . BDI 354 – Digital input / 32 bits, 24VDC . . . . . . . . . . . . . . . . . . . . . . . . . . . . . . BDM 344 – Digital input and output / per 16 bits, 24 VDC . . . . . . . . . . . . . . . DAP 204 – Digital output / 4 bits, 24 VDC . . . . . . . . . . . . . . . . . . . . . . . . . . . . . DAP216 – Digital output / 16 bits, 24VDC . . . . . . . . . . . . . . . . . . . . . . . . . . . . . DAP 220 – Digital input and output / per 8 bits, 24VDC . . . . . . . . . . . . . . . . . Contents 29 30 31 34 34 36 38 40 41 42 XI 2.2.7 DEP216 – Digital input / 16 bits, 24VDC . . . . . . . . . . . . . . . . . . . . . . . . . . . . . . 44 Chapter 3 Installation Guide (Hardware) . . . . . . . . . . . . . . . . . . . . . . . . . . 47 3.1 3.1.1 3.1.2 3.1.3 3.1.4 3.1.5 3.2 3.2.1 3.2.2 3.2.3 3.2.4 3.2.5 3.2.5.1 3.2.5.2 3.2.5.3 3.2.6 3.2.6.1 3.2.6.2 3.2.7 3.2.8 3.2.9 3.2.10 3.2.11 3.2.12 3.2.13 3.3 3.3.1 3.3.2 3.3.2.1 3.3.2.2 3.4 3.5 XII Contents General Information on Installing PROFIBUS . . . . . . . . . . . . . . . . . . . . . . . . . . Specific PROFIBUS–DP Requirements for Quantum/Modsoft . . . . . . . . . . . . Network sample of PROFIBUS DP with Quantum, Compact, TIOs and Third Party products . . . . . . . . . . . . . . . . . . . . . . . . . . . . . . . . . . . . . . . Configuration Limits . . . . . . . . . . . . . . . . . . . . . . . . . . . . . . . . . . . . . . . . . . . . . . . . Segmentation Sample of a PROFIBUS System with Repeaters . . . . . . . . . . Methods of Cabling and Bus Design for PROFIBUS DP . . . . . . . . . . . . . . . . Regulations for Installation . . . . . . . . . . . . . . . . . . . . . . . . . . . . . . . . . . . . . . . . . . Bus Segment Installation . . . . . . . . . . . . . . . . . . . . . . . . . . . . . . . . . . . . . . . . . . . . Cabinet Line Layout . . . . . . . . . . . . . . . . . . . . . . . . . . . . . . . . . . . . . . . . . . . . . . . . Line Layout Outside Cabinets . . . . . . . . . . . . . . . . . . . . . . . . . . . . . . . . . . . . . . . . Trailing Lines . . . . . . . . . . . . . . . . . . . . . . . . . . . . . . . . . . . . . . . . . . . . . . . . . . . . . . Outdoor Line Layout . . . . . . . . . . . . . . . . . . . . . . . . . . . . . . . . . . . . . . . . . . . . . . . . Surge protection for Bus Lines up to 500 kBaud (outdoor) . . . . . . . . . . . . . . Surge protection for Bus Lines over 500 kBaud to 1.5MBaud (outdoor) with optical fiber cables . . . . . . . . . . . . . . . . . . . . . . . . . . . . . . . . . . . . Additional Notes . . . . . . . . . . . . . . . . . . . . . . . . . . . . . . . . . . . . . . . . . . . . . . . . . . . Grounding, Potential Equalization and Shielding . . . . . . . . . . . . . . . . . . . . . . . Grounding and Shielding of Systems with Potential Equalization . . . . . . . . . Grounding and Shielding of Systems without Potential Equalization . . . . . . PROFIBUS–DP Repeaters . . . . . . . . . . . . . . . . . . . . . . . . . . . . . . . . . . . . . . . . . Backplane Grounding of the Quantum CPU . . . . . . . . . . . . . . . . . . . . . . . . . . . Grounding of Backplane DTA 200 of the Compact Periphery . . . . . . . . . . . . Grounding of TIO Components . . . . . . . . . . . . . . . . . . . . . . . . . . . . . . . . . . . . . . Additional Grounding Measures . . . . . . . . . . . . . . . . . . . . . . . . . . . . . . . . . . . . . . Example of an Indoor System ”with” Potential–Equalization Lines . . . . . . . . Example of an Indoor System ”without” Potential–Equalization Lines . . . . . Specifications . . . . . . . . . . . . . . . . . . . . . . . . . . . . . . . . . . . . . . . . . . . . . . . . . . . . . . Cable specifications . . . . . . . . . . . . . . . . . . . . . . . . . . . . . . . . . . . . . . . . . . . . . . . . Connector Specifications . . . . . . . . . . . . . . . . . . . . . . . . . . . . . . . . . . . . . . . . . . . . Pin Assignment NAD 911 . . . . . . . . . . . . . . . . . . . . . . . . . . . . . . . . . . . . . . . . . . . Cable installation on NAD911 02 . . . . . . . . . . . . . . . . . . . . . . . . . . . . . . . . . . . . . Schneider Automation Products for PROFIBUS Installation with Quantum . . . . . . . . . . . . . . . . . . . . . . . . . . . . . . . . . . . . . . . . . . . Example of PROFIBUS Test Certificate . . . . . . . . . . . . . . . . . . . . . . . . . . . . . . . 49 49 50 50 51 52 53 53 53 54 54 55 55 58 58 58 58 60 62 63 64 64 65 66 67 68 68 69 69 70 71 72 00 Chapter 4 4.1 4.1.1 4.1.2 4.2 4.3 4.4 4.4.1 4.4.2 4.4.3 4.4.4 00 Software Configuration . . . . . . . . . . . . . . . . . . . . . . . . . . . . . . . . 75 Information for PROFIBUS DP . . . . . . . . . . . . . . . . . . . . . . . . . . . . . . . . . . . . . . . General . . . . . . . . . . . . . . . . . . . . . . . . . . . . . . . . . . . . . . . . . . . . . . . . . . . . . . . . . . . Relationships between tools . . . . . . . . . . . . . . . . . . . . . . . . . . . . . . . . . . . . . . . . . Software Packages and their Features (DP Configuration) . . . . . . . . . . . . . . Directory Structure for Programs and Data . . . . . . . . . . . . . . . . . . . . . . . . . . . . Configuration Step by Step . . . . . . . . . . . . . . . . . . . . . . . . . . . . . . . . . . . . . . . . . . Modsoft Configuration Part (Step 1) . . . . . . . . . . . . . . . . . . . . . . . . . . . . . . . . . . Bus Topologie Configuration (Step 2) . . . . . . . . . . . . . . . . . . . . . . . . . . . . . . . . . Mapping of I/O and Bus Project (Step 3) . . . . . . . . . . . . . . . . . . . . . . . . . . . . . . Initiate Communication (Step 4) . . . . . . . . . . . . . . . . . . . . . . . . . . . . . . . . . . . . . . 77 77 78 80 82 83 83 85 87 89 Chapter 5 Diagnostic for CRP 811 . . . . . . . . . . . . . . . . . . . . . . . . . . . . . . . . 91 5.1 5.2 5.2.1 5.2.2 5.2.2.1 5.2.2.2 5.2.2.3 5.2.2.4 5.2.2.5 5.2.2.6 5.2.2.7 5.2.2.8 5.2.2.9 5.2.2.10 5.2.2.11 5.3 5.4 5.5 5.6 5.7 5.8 Scope . . . . . . . . . . . . . . . . . . . . . . . . . . . . . . . . . . . . . . . . . . . . . . . . . . . . . . . . . . . . 93 RS 232C Diagnostic Interface . . . . . . . . . . . . . . . . . . . . . . . . . . . . . . . . . . . . . . . 95 Print out Modus . . . . . . . . . . . . . . . . . . . . . . . . . . . . . . . . . . . . . . . . . . . . . . . . . . . . 96 Menu System . . . . . . . . . . . . . . . . . . . . . . . . . . . . . . . . . . . . . . . . . . . . . . . . . . . . . . 97 Main Menus . . . . . . . . . . . . . . . . . . . . . . . . . . . . . . . . . . . . . . . . . . . . . . . . . . . . . . . 97 Error Report menu (e) . . . . . . . . . . . . . . . . . . . . . . . . . . . . . . . . . . . . . . . . . . . . . . 97 DP Data Menu (d) . . . . . . . . . . . . . . . . . . . . . . . . . . . . . . . . . . . . . . . . . . . . . . . . . . 97 Global Data Menu (g) . . . . . . . . . . . . . . . . . . . . . . . . . . . . . . . . . . . . . . . . . . . . . . . 97 Firmware Update Menu (u) . . . . . . . . . . . . . . . . . . . . . . . . . . . . . . . . . . . . . . . . . . 98 Terminal Setup Menu (t) . . . . . . . . . . . . . . . . . . . . . . . . . . . . . . . . . . . . . . . . . . . . 98 Expert Mode Menu (x) . . . . . . . . . . . . . . . . . . . . . . . . . . . . . . . . . . . . . . . . . . . . . . 98 Board Reset Menu (r) . . . . . . . . . . . . . . . . . . . . . . . . . . . . . . . . . . . . . . . . . . . . . . . 98 Memory Browser Menu (b) . . . . . . . . . . . . . . . . . . . . . . . . . . . . . . . . . . . . . . . . . . 99 Task Information Menu (i) . . . . . . . . . . . . . . . . . . . . . . . . . . . . . . . . . . . . . . . . . . . 99 Debug Mask Menu (m) . . . . . . . . . . . . . . . . . . . . . . . . . . . . . . . . . . . . . . . . . . . . . 99 LED Diagnostic . . . . . . . . . . . . . . . . . . . . . . . . . . . . . . . . . . . . . . . . . . . . . . . . . . . 100 Diagnostics for the CDS task . . . . . . . . . . . . . . . . . . . . . . . . . . . . . . . . . . . . . . . 102 Diagnostics for the CCMP Task . . . . . . . . . . . . . . . . . . . . . . . . . . . . . . . . . . . . . 107 Diagnostics for the Backplane Handler Task . . . . . . . . . . . . . . . . . . . . . . . . . . 113 Diagnostics for the PC Card handler task . . . . . . . . . . . . . . . . . . . . . . . . . . . . 114 Textboxes for Terminal Menu Handler . . . . . . . . . . . . . . . . . . . . . . . . . . . . . . . . 115 Contents XIII Appendix AModule Discriptions . . . . . . . . . . . . . . . . . . . . . . . . . . . . . . . . . . . . . 137 140 CRP 811 00: Communication Module PROFIBUS–DP . . . . . . . . . . . . . . . . 139 AS–BDEA 203 PROFIBUS–DP Coupler . . . . . . . . . . . . . . . . . . . . . . . . . . . . . . . 151 XIV Contents 00 Chapter 1 General In this chapter you can read about: ISO–OSI–Referenzmodell Imaging of the model into PROFIBUS DP .00 Breite: 185 mm Höhe: 230 mm General 1 2 General .00 1.1 Introduction to the Reference Model The PROFIBUS is a proven fieldbus for communication between PCs, PLCs, control and observation units, sensors and actuators , in accordance with EN 501 70 (DIN 19245). It is: Open Vendor–independent Proven Certified Future–oriented In order to aid your general understanding, here are some key communication concepts relevant to PROFIBUS. 1.1.1 Open communication Open communication (OSI = Open System Interconnection ) refers to data exchange between stations by different manufacturers via a data network using standardized processes. In 1984 the ISO (International Standardization Organization) passed the international standard ISO 7498 as a basis for open communication, also known as the ISO OSI reference model. .00 Breite: 185 mm Höhe: 230 mm General Information 3 1.1.2 The ISO OSI Reference Model Layer Layer Meaning 7 Application, Processing 7 Application Provides useful communication services for the user. 6 Presentation 6 Presentation Determines the meaning of data exchanged between user programs in different stations. 5 Session, Communication Control 5 Session Provides the tools required for opening, carrying out and ending a communication session. Communication between layers is synchronized using these tools. 4 Transport 4 Transport Defines secure data transport for larger amounts of data via several transmission paths (buses) and stations. 3 Network 3 Network Defines the route for transmitting messages via several transmission paths (buses) and stations. 2 Data Link 2 Data Link Defines the bus access control functions, ensures data security, processes transmission protocols and telegrams. 1 Physical 1 Physical Chooses the transmission medium and the physical bus interface. As the table indicates, the reference model is made up of 7 layers. Each layer carries out a defined range of functions that will be described below. For each layer there are also a variety of national and international standards. Protocols are carried out between communication partners in the same layer. Communication between two devices only functions when both devices have the same standards (and thus, the same protocols) implemented on all existing layers. Some of these layers can be left empty. The sum of protocols used by the reference model is also referred to as communication profile. In order to exchange data via a common data network, devices must have the same communication profile, e.g. MAP, PROFIBUS, MMSE. User of service n User of service n User (operator) Remote user (operator) Service access points Service provider User of layer n User of service n–1 User of service n–1 Function of layer (n–1) Figure 1 Service model (left), recursive application of service model (right) 4 General Information .00 Each layer provides services for the next layer up at what is called the service access point (SAP) (Figure 1, left). Each service access point has an address in the reference model. The layer currently under observation in the reference model then becomes the user in relation to the layer below it (Figure 1, right). The advantage of the layer model is that the user only needs to master the functionality of the layer it deals with directly; the other layers remain hidden. Only layers 1 and 2 are required if, for example, data are only to be transferred over a point–to–point connection. The higher–level layers provide more comfort for more complex configurations. A setup that goes up to layer 7 frees the user (programmer) completely from all technical aspects of the communication, and he can use his application in a familiar environment. At the sending device, the data flows from top to bottom through the layers, and at the receiving device from bottom to top. In each layer other than layer 1, the sending end adds protocol information that is then used in the corresponding layer on the receiving end (Figure 2). System n Application process m 7 6 5 4 3 2 1 Message Å ÎÎ Å ÅÅ ÎÎ Å ÎÎ ÅÅ ÎÎ Å ÎÎ ÅÅ ÎÎ Å Å ÎÎ ÅÅ ÎÎ Å ÎÎ ÎÎ Å ÅÅ ÎÎ Å ÎÎ ÎÎ Å ÅÅ ÎÎ Å System x Application process y 7 6 5 4 3 2 1 Medium Figure 2 Information flow in the reference model .00 Breite: 185 mm Höhe: 230 mm General Information 5 1.1.3 The Seven Layers in a Telephone Conversation (example) Since the description of the OSI reference model is very abstract, we will try to explain what happens using a telephone conversation as our example. 6 Layer Meaning Example 7 Application Communication request from the application Boss asks secretary to communicate data by telephone from Frankfurt to Tokyo 6 Presentation Determine transfer syntax Language – English 5 Session Dialog management If the connection is lost for whatever reason, a new connection is established; where necessary, the session is spread out over several phone conversations; synchronization 4 Transport Segmentation, repe– tition, confirmation, flow control Adapt information flow to allow for breathing; confirm whether understood; adjust speaking speed 3 Network Routing Dialing protocol of the long–distance exchanges 2 Data Link Telegram composition error check Media access Compose sentences, if necessary spell out words (redundancy to prevent errors); who may speak? Special rules e.g. for conference calls 1 Physical Bit transmission; coupling to medium Sound transmission; conversion from sound waves to electrical signals General Information .00 1.2 General Information about PROFIBUS–DP PROFIBUS–DP (Decentralized Process Periphery) is a version of PROFIBUS that has been optimized for high–speed communication using the proven qualities of PROFIBUS transmission technology and bus access protocols, but supplemented with extended functions that meet the unique requirements posed by decentralized process periphery. PROFIBUS–DP has been designed to carry out high–speed data exchange on the sensor–actuator level. Here, central controllers (e.g., PLCs) communicate with their distributed input and output devices via a high–speed serial link. Most of the data communication with these distributed devices is done in a cyclic manner. The central controller (master) reads the input information from the slaves and writes the output information to the slave devices. This process requires the bus cycle time to be shorter than the central controller’s program cycle time, which in many applications is approximately 10 msec. 1.2.1 Layers for the PROFIBUS–DP The PROFIBUS–DP only uses the functions in layers 1 and 2 of the OSI reference model. Layers 3 through 7 are not defined. Layer 7 (application layer) is not used in order to achieve the required speed. The Direct Data Link Mapper (DDLM) provides the user interface with comfortable access to layer 2. The application functions for the user and the system and device behavior for the various PROFIBUS–DP device types are defined in the user interface. .00 Breite: 185 mm Höhe: 230 mm General Information 7 Fieldbus user User interface Direct Data Link Mapper (DDLM) acc. to draft DIN 19 245 Part 3 Layer 7 empty (Application) empty (Presentation) Layer 5 empty (Session) Layer 4 empty (Transport) Layer 3 empty (Network) Layer 2 Data Link Fieldbus Management Layer 6 FDL acc. to DIN 19 245 Part 1 Layer 1 Physical Phy acc. to DIN 19 245 Part 1 Figure 3 PROFIBUS–DP layers 8 General Information .00 1.2.2 Basic Characteristics The success of a bus system depends on more than on high data throughput rates. It must also be easy to install and service, provide good diagnostic capabilities and error–free, proven transfer technology in order to satisfy the user’s requirements. PROFIBUS–DP combines these characteristics in an optimized manner. Speed In order to transfer 2 bytes of input and 2 bytes of output data per device distributed over 32 stations, PROFIBUS–DP requires approx. 6 msec at 1.5 MBit/sec and approx. 2 msec at 12 MBit/sec. This fully satisfies the system reaction time requirement. Figure 4 displays PROFIBUS–DP’s transmission time relative to the number of devices and the transfer speed. DP’s high rate of data throughput can be traced to the fact that input and output data are transferred in a message cycle using layer 2’s Send and Receive Data service (SRD service). In addition, minimum requirements have been defined for protocol implementation efficiency and the transfer speed can be increased to up to 12 MBit/sec. Bus cycle time (ms) 18 14 500 kBit/sec 10 1.5 MBit/sec 6 2 12 MBit/sec 5 10 20 DP slaves 30 Test conditions: Each slave has 2 bytes of input data and 2 bytes of output data. The minimum slave interval time is 200 sec, TSDI = 37 bit times, TSDR = 11 bit times Figure 4 Bus cycle time of a PROFIBUS–DP Mono–master system .00 Breite: 185 mm Höhe: 230 mm General Information 9 Diagnostic functions The extensive diagnostic functions of PROFIBUS–DP enable fast location of errors. Diagnostic messages are transmitted over the bus and collected at the master. These messages are divided into three levels: Station–related diagnostics These messages concern the general operational status of the whole device, e.g. low voltage or excessively high temperature. Module–related diagnostics These messages indicate that a fault is present in a specific I/O range, e.g. 8–bit output module of a device. Channel–related diagnostics These messages indicate an error at an individual input/output bit (channel), e.g. short circuit on output 7. Handling and installation (see PNO guidelines) The RS 485 transfer technology is easy to use. The installation of the twisted–pair cable and the PROFIBUS devices must be carried out according to the PNO guidelines in 2.111. The bus structure permits addition and removal of stations or step–by–step commissioning of the system without influencing the other stations. Later expansions have no effect on stations which are already in operation. 1.2.3 System Configurations and Device Types PROFIBUS–DP can be used with Mono–master or Multi–master systems. This provides a high degree of flexibility during system configuration. Up to 126 devices (master or slaves) can be connected to one bus. The description of the system configuration consists of the number of stations, the assignment between the station address and the I/O addresses, I/O data format, diagnostic message format and the bus parameters used. Each PROFIBUS–DP system is made up of a variety of device types. There are three types of devices, each one used for carrying out different tasks: DP Master Class 1 (DPM1) This is a central controller that exchanges information with decentralized stations (DP slaves) within a specified message cycle. Typical devices include programmable controllers (PLCs), numerical controllers (CNC) or robotic controllers (RC). DP Master Class 2 (Third party) This type of device includes programming, configuration and diagnostic devices. They can be used during commissioning for configuration of the DP system. 10 General Information .00 DP Slave A DP slave is a peripheral device (sensor/actuator) that collects input information and sends output information to the periphery. There are also devices which supply only input information or only output information. Typical DP slave devices include those with binary I/Os for 24 V or 230 V, analog inputs, analog outputs, counters, etc. The amount of input and output information depends on the device type. A maximum of 246 bytes of input information and 246 bytes of output information is permitted. For reasons of expense and implementation, many of the devices available today work with a maximum user data length of 32 bytes. In Mono–master systems only one master is active on the bus during the operating phase of the bus system. Figure 5 shows the system configuration of a Mono–master system. The programmable controller is the central control component. The distributed DP slaves are linked to the central controller via the transfer medium. This system configuration achieves the shortest bus cycle time. DP master (Class 1) PLC PROFIBUS–DP Actuators, Sensors DP slaves Decentralized inputs and outputs DP slaves Figure 5 PROFIBUS–DP Mono–master system In Multi–master configurations several masters are connected to one bus. These masters are either independent subsystems each consisting of one DPM1 and its assigned slaves, or additional configuration and diagnostic devices (see Figure 6). The input and output images of the DP slaves can be read by all DP masters. However, only one DP master (the DPM1 assigned during configuration) may .00 Breite: 185 mm Höhe: 230 mm General Information 11 write–access the outputs. Multi–master systems achieve an intermediate bus cycle time. DP master (Class 1) PLC DP master (Class 2) PC DP master (Class 1) CNC PROFIBUS–DP Actuators, Sensors DP slaves Decentralized inputs and outputs DP slaves Figure 6 PROFIBUS–DP Multi–master system 1.2.4 System Behavior The system behavior for PROFIBUS–DP has been standardized in order to ensure device exchangeability. System behavior is determined primarily by the operating status of the DPM1. The DPM1 can either be controlled locally or via the bus by the configuration device. There are three main states: Stop No data transmission between the DPM1 and the DP slaves occurs in this state. Clear In this state, the DPM1 reads the input information of the DP slaves and holds their outputs in fail–safe status. Operate In this state, the DPM1 is in the data transfer phase. In a cyclic data communication, inputs of the DP slaves are read and output information is transferred to the DP slaves. The DPM1 sends its local status to all of its assigned slaves cyclically with a Multicast command at a configurable time interval. 12 General Information .00 The system reaction to an error during the transfer phase of the DPM1, e.g. a DP slave failure, is determined by the ”auto–clear” configuration parameter. If this parameter is set to ”true”, the DPM1 switches all outputs of all assigned DP slaves to the fail–safe state as soon as a DP slave is no longer ready for user data transmission. Then the DPM1 switches to the Clear state. If this parameter is set to ”false”, the DPM1 remains in the Operate state even when an error occurs, and the user can specify the system reaction himself. Caution: 1.2.5 CRP811 only supports auto–clear = false Data Transmission between the DP Master (class 1) and the DP Slaves Data transmission between the DPM1 and the slaves assigned to it is executed automatically by the DPM1 in a defined, recurring order. During configuration of the bus system, the user specifies the assignments of the DP slaves to the DPM1. Which DP slaves are to be included in or excluded from cyclic user data transmission is also defined during configuration. Data transmission between the DPM1 and the slaves is divided into three phases: parameterization, configuration and data transfer. Before a DP slave is included in the data transfer phase, the DPM1 checks in the parameterization and configuration phases to see if the expected configuration corresponds to the real device configuration. This means that the device type, format and length information and the number of inputs and outputs must correspond to the actual configuration. These tests provide the user with reliable protection against parameterization errors. In addition to the user data transfer which is executed automatically by the DPM1, new parameterization data can be sent to the slaves at the request of the user. .00 Breite: 185 mm Höhe: 230 mm General Information 13 Output data Header info Response telegram Header info Input data DP slave Footer info Immediate Response DP master Call–up telegram Footer info Telegram formats DA DAT UNIT ED FC FCS LE LEr SA SD SYN SYN SD2 LE LEr SD2 DA SA FC DAT FCS ED UNIT SRD request, variable information field length SD2 LE LEr SD2 DA SA FC DAT FCS ED UNIT DP slave DP master SRD request, variable information field length Destination Address, 22 bits Data field, max. 246 bytes End Delimiter, 11 bits Frame Control Frame Check Sequence, 11 bits Length, 11 bits Length, repeated, 11 bits Source Address Start Delimiter Synchronization bytes Figure 7 User Data Transmission Principle 1.2.6 Sync and Freeze Mode (not supported by CRP 811) In addition to station–related user data transfer, which is executed automatically by the DPM1, the master can send control commands to a single slave, a group of slaves or all slaves simultaneously. These control commands are transmitted as Multicast functions. They are used to set the sync and freeze modes for synchronizing the DP slaves. They permit event–controlled synchronization of the slaves. The DP slaves begin sync modewhen they receive a sync control command from their DP master. When this happens, the outputs of all addressed slaves are frozen in their current state. During subsequent user data transmission, the output data is stored at the slaves, but the output states remain unchanged. The stored output data is sent to the outputs when the next sync control command is 14 General Information .00 received from the master. The user can end sync mode with the unsync command. Similarly, a freeze control command causes the addressed DP slaves to assume freeze mode. In this operating mode the states of the inputs are frozen at their current values. The input data are not updated again until the DP master sends the next freeze command to the devices involved. Freeze mode is concluded using the unfreeze command. 1.2.7 Data Transmission between DP Master and Configuration Devices In addition to master–slave functions, master–master communication functions are also available. They enable configuration and diagnostic devices (DPM2) to initiate the following functions via the bus as shown in the table below. Function Meaning DPM1 DPM2 Get_Master_Diag Reads the diagnostic data of the DPM1 or the diagnostic summary of the DP slaves. P O Download / Upload Group (Start_Seq, Download / Upload, End_Seq) Downloads or uploads all configuration data of a DPM1 and its associated DP slaves. O O Act_Para_Brct Activates the bus parameters simultaneously for all DPM1 devices addressed. O O Act_Param Activates parameters or changes of operating status of the DPM1 device addressed. O O M = mandatory O = optional; not supported by CRP 811. In addition to the upload and download functions, master–master functions permit dynamic enabling or disabling of the user data transfer between the DPM1 and individual DP slaves. The operating state of the DPM1 can also be changed. .00 Breite: 185 mm Höhe: 230 mm General Information 15 1.2.8 Protection Mechanisms For reasons of security, it is important to equip decentralized systems with effective protection functions against parameterization errors or failure of the transmission equipment. PROFIBUS–DP uses monitoring mechanisms at the master and at the slaves. The type of mechanism used is time monitoring. The monitoring interval is specified during configuration of the DP system. At the DP master The DPM1 monitors the slaves’ data transmission with the Data_Control_Timer. A separate control timer is used for each slave. The time monitor reacts if no correct user data transfer occurs within the monitoring interval. The user is informed when this happens. If the automatic error reaction (Auto_Clear = True) has been enabled, the DPM1 leaves the Operate state, switches the outputs of the assigned DP slaves to fail–safe status, and changes to its Clear state. At the DP slave The slave uses the watchdog control to detect failures of the master or the transmission line. If no data communication with the assigned master takes place within the watchdog control interval, the slave switches its outputs to fail–safe status. In order to ensure that only the authorized master has direct access, access protection is required for the inputs and outputs of the slaves operating in Multi–master systems. For all other DP masters, the slaves offer an image of the inputs and outputs which can be read by any master, even without access rights. 16 General Information .00 1.2.9 Device Database Files (GSD) Enable Open Configuration PROFIBUS–DP devices have a wide range of performance characteristics that are documented in device data sheets and in device database files provided by the vendor and made available to the user. The structure, content and coding of these device database files (GSD) is standardized. This makes it easy to integrate a wide range of DP slaves with configuration devices from different vendors. The German PROFIBUS User Organization (PNO) archives the information from all vendors and will gladly provide further information concerning the GSD files. 1.2.10 Ident Number Each DP slave and each DPM1 must have an individual ident number. The DP master requires this number in order to identify the types of devices connected without creating significant protocol overhead. The master compares the ident numbers of the devices connected with the ident numbers specified by the DPM2 in the configuration data. Transfer of user data cannot begin until the correct device types with the correct station addresses have been connected on the bus. This provides a high degree of security against configuration errors. Manufacturers must apply to the PNO for an ident number for each DP slave and each DPM1. The PNO handles the administration of the ident numbers as well as the device database files. For further information, please contact your regional office. .00 Breite: 185 mm Höhe: 230 mm General Information 17 1.3 CRP 811 Functionality Master Class 1 and Performance Data 1.3.1 DP Slave Reads Diagnostic Data and Files It in State RAM V Diagnostic data are read automatically through CRP811 by the slaves. The Quantum PLC can either be in STOP or RUN mode. h After CRP811 Power Up h After CRP811 Hot Swap h After CRP811 Reset to RS232 h In the warm–up and initialization phases of the slaves h When the slave has new diagnostic data V Configuration of diagnostic data filing in State RAM with SPU931 per slave h Filing in range 3xxxx => REGISTER Inputs h n x INT8 configurable via SPU931 h n = 6 : Default value for the standard diagnosis acc. to standard h n = 1 : Minimum number of diagnostic data h n = max. Corresp. to max. number of diagnostic data per slave Max. number and description of diagnostic data – see DP slave vendor’s user manual. Table 1 18 Valid for Schneider Automation DP Slaves: DP slave type Max. number CLASSIC TIOS 13 MOMENTUM 19 DEA203 22 General Information Documentation Nr. see Related Documents .00 V Configuration of Diagnostic Data Filing in CRP811 with SPU931 (Buffer Resources) 1.3.2 Diagnostic buffer number 100 Default, 200 Max. Bytes per buffer 32 Default, slave specifies max. with the max. number of diagnostic data (see table on page 18) Send Parameterization Data to DP Slave h Parameterization data are sent automatically to the slaves in the warm–up and initialization phases, i.e. not when user data is being transferred h Defaults for bus–wide parameterization data are specified by the DP configurator and the device database files of the DP slave. h Defaults for DP slave–specific parameterization data from the vendor (user parameter data) are specified by the DP configurator and the device database files of the DP slave. Number and meaning of the user parameter data – see slave vendor’s user manual. 1.3.3 Sending Configuration Data to the DP Slave h Configuration data are sent automatically to the slaves in the warm–up and initialization phases, i.e. not when user data is being transferred. h Defaults for configuration data are specified by the DP configurator and the device database files of the DP slave. .00 Breite: 185 mm Höhe: 230 mm General Information 19 1.3.4 Cyclic Transmission of Input and Output Data from State RAM References Dial up in SPU931 Outputs from reference 0xxxx Boolean (see note 1) Outputs from reference 4xxxx Boolean (see note 2) Int8, Int16, Int32 (see note 2) RAW, String Inputs n reference 1xxxx Boolean (see note 1) Inputs n reference 3xxxx Boolean Int8, Int16, Int32 (see note 2) RAW, String (see note 2) Note: 1: Filing in references 0x/1x can also be carried out on 8–bit boundaries (byte boundaries) Note: 2: Transitions and forces with 0.xxx / 1.xxx are possible without restrictions Table 2 Maximum number of I/O data Max. number of I/O data Max. number of slaves Max. number of I or O data per compact slave or per modular slave with max. one module. Max. number of I or O data per modular slave with more than one module. Max. number of compact slaves or modular slaves with max. one module with max. number of I or O data. Max. number of modular slaves with more than one module with max. number I or O data. CPU x 13 (1) 64 words = 128 bytes 122 words = 244 bytes 16 slaves at 128 bytes 8 slaves at 244 bytes CPU 424 (2) 122 words = 244 bytes 122 words = 244 bytes 64 slaves at 244 bytes 64 slaves at 244 bytes (1) Backplane transfer with max. 16 buffers at 256 bytes (2) Backplane transfer with max. 16 buffers at 2048 bytes 20 General Information .00 1.3.5 Control Commands The following control commands for DP slaves are not supported 1.3.6 .00 Breite: 185 mm Höhe: 230 mm Sync Send outputs and freeze Unsync Enable outputs Freeze Read inputs and freeze Unfreeze Enable inputs Clear All outputs will be deleted Auto–Clear Auto–Clear = TRUE Is not supported If failure occurs at one DP slave, the outputs of all other slaves are set to ”0”. Auto–Clear = FALSE Is supported If failure occurs at one DP slave, the outputs of all other slaves retain their settings. General Information 21 1.3.7 CRP811 Failure Behavior Effect of setting slave output data and input data in Quantum State RAM to zero => 1xxxxx register und 3xxxxx register. Table 3 Effect on Sign of Life Register => 3xxxxx register Sign of Life Register 3xxxxx Cases PROFIBUS–DP slave outputs Quantum State RAM inputs 1xxxxx Bit 14 Bit 15 Bit 16 All configured DP slaves running error–free variable variable flashing flashing flashing One DP slave disconnected from bus Zero Zero flashing 0 or 1 flashing One DP slave switched off X Zero flashing 0 or 1 flashing One DP slave failure Zero Zero flashing 0 or 1 flashing All DP slaves switched off X Zero 0 or 1 0 or 1 flashing All DP slaves on CRP811 disconnected from bus Zero 1) Zero 0 or 1 0 or 1 flashing CRP811 disconnected from backplane Zero 1) Remain set 0 or 1 0 or 1 0 or 1 Firmware update to CRP811 RS232 activated Zero Zero 0 or 1 0 or 1 0 or 1 Reset via CRP811 RS232 after entering password Zero Remain set 0 or 1 0 or 1 0 or 1 Quantum from PLC Start to PLC Stop Zero Remain set 0 or 1 0 or 1 0 or 1 Quantum switched off Zero 1) X X X X Quantum CPU... disconnected from backplane Zero 1) X X X X Quantum network unit CPS ... disconnected from backplane Zero 1) X X X X 1) 1) 1) 1) Through DP slave, X undefined if ”Watchdog Timer” activated during configuration. 22 General Information .00 Overview I/O response time (worst case) Start PLC scan time End PLC–DPM CRP Bus–DPM asynchron Bus–Interf. Poll Cycle asynchron input/output Peripherie Input delay Input Time (slave –> master) 1xxx1 Output time (master–>slave) 0xx1 PLC Scan Time ~3ms 1) =< 1,6 ... 2,8 ms 1,6 ... 2,8 ms =< 1) 1) I/O Response Time Typical: 5,6 ... 11 ms 1) Slave Interval: >=Minimum Slave Interval; (depent from number of slaves) .00 Breite: 185 mm Höhe: 230 mm Minimum Slave Interval: = 2ms at Adaptable TIO / DEA 203 = 0,1ms at Classic TIO General Information 23 1.3.8 Performance I/O response time between DP slave input an DP slave output with QuantumPLC: Table 4 MOMENTUM Performance Number of DP slaves Words input Words output Typical PLC scan time –1) – – 0,54 msec – 1 16 4 1,7 msec 8,4 msec 2 32 8 1,8 msec 8,5 msec 3 48 12 2,0 msec 8,6 msec 4 64 16 2,2 msec 9,1 msec 5 80 20 2,3 msec 10 msec 6 96 24 2,5 msec 10,5 msec 7 112 28 2,7 msec 10,6 msec 8 128 32 2,8msec 11 msec Typical I/O Response time 1) No CRP811 on the backplane Quantum 12 MBit/sec CPU424 CRP811 8 slaves 11 2) 18 *) *) Momentum 16 Word In 4 Word Out Momentum 16 Word In 4 Word Out *) 170 DAT110 00 + 170 AAI140 00 2) Input delay ~3msec Figure 8 MOMENTUM Configuration Note: Bus addresses without meaning (order of address, gaps) 24 General Information .00 Table 5 TIO 170 BDM344 00 Performance ”TIO” Number of DP slaves Words input Words output Typical PLC scan time Typical I/O response time –1) – – 0,54 msec – 1 1 1 1,56 msec 5,6 msec 2 2 2 1,57 msec 5,7 msec 4 4 4 1,60 msec 5,8 msec 8 8 8 1,60 msec 6,8 msec 16 16 16 1,70 msec 8,0 msec 31 31 31 1,90 msec 11,0 msec 1) No CRP811 on the backplane Quantum 12 MBit/sec CPU424 CRP811 31 slaves 6 2) 36 *) *) TIO 16 bits In 16 bits Out TIO 16 bits In 16 bits Out *) 170 BDM344 00 2) Input delay ~3msec Figure 9 TIO Configuration Note: Bus addresses without meaning (order of address, gaps) .00 Breite: 185 mm Höhe: 230 mm General Information 25 Table 6 Performance of modular Slave DEA203 Number of DP slaves Words inputs Words output –1) Typical PLC scan time Typical I/O Response time 0.58 msec – 1 18 1,71 msec 6,0 msec 2 18 18 1,76 msec 6,6 msec 3 36 18 1,89 msec 7,5 msec 4 .6 36 1,97 msec 7,7 msec 5 54 36 2,08 msec 7,9 msec 6 54 54 2,16 msec 8,3 msec 7 72 54 2,27 msec 8,7 msec 8 72 72 2,36 msec 9,8 msec 1) No CRP811 on the backplane Quantum 12 MBit/sec CPU424 CRP811 8 slaves 1 *) 8 *) 2) DEA203 DEA203 *) DEP 116 / DAP 116 2) Input delay ~3msec Figure 10 DEA203 Configuration Note: Bus addresses without meaning (order of address, gaps) 1.3.9 CRP811 00 Operation in Decentralized I/O Operation of CRP in RIO (remote I/O) or DIO(distributed I/O) is not possible. 26 General Information .00 Chapter 2 Overview PROFIBUS-DP .00 Breite: 185 mm Höhe: 230 mm Overview PROFIBUS-DP 27 28 Overview PROFIBUS-DP .00 2.1 Product Overview The following is an overview of the devices that can communicate using PROFIBUS DP. 140 CPU 424 02 140 CRP 811 00 Modsoft 332 SPU 833 (DP) Quantum MB/MB+ KAB–PROFIB PROFIBUS–DP DP max 12 MBaud Max. 32 stations (DP stations + repeater) NAD 911 Max. 3 Repeater DEA 203 decentr. I/Os 00 Breite: 185 mm Höhe: 230 mm K–TIOs Third A–TIOs Party Momentum Third Party PROFIBUS Overview 29 2.1.1 TSX–Quantum Components for PROFIBUS–DP Table 7 Basic components Specifications Type / Explanation CPU 186 ––> 8 k words logical memory 140 CPU 113 02 CPU 186 ––> 16 k words logical memory 140 CPU 113 02 CPU 186 ––> 32/48 k words logical memory 140 CPU 213 04 CPU 486 ––> 64 k words logical memory 140 CPU 424 02 PROFIBUS–DP Option Module 140 CRP 811 00 PROFIBUS–DP Configuration packet (WINDOWS 3.11/95/NT) 140 SPU 833 01 English PROFIBUS–DP Configuration packet (WINDOWS 3.11/95) 140 SPU 833 02 German PROFIBUS connector 140 NAD 911 02 /03 /04 /05 PROFIBUS cable KAB PROFIB RS232–cable for CRP811 YDL52 Ring cable clamp Capacitive ground terminal clamp GND001 Number of CRP811 at 140 CPU 113 02 max. 2 Number of CRP811 at 140 CPU 213 03 max. 2 Number of CRP811 at 140 CPU 213 04 max. 2 Number of CRP811 at 140 CPU 424 02 max. 6 Slots for CRP811 on backplane (free choice) Table 8 30 Replacement parts Performance Type / Explanation TAP for CRP611 490 NAE911 00 PCMCIA card for CRP811 467 NAP811 00 CRP811 ”Hot Swap” on backplane yes Quantum CPU ”Hot Swap” with PROFIBUS no Quantum CPU ”Hot Stand By” with PROFIBUS no PROFIBUS Overview 00 2.1.2 Slave Component Assignments (PROFIBUS-DP) Master under Modsoft Slaves Network components Hardware/Software K–TIO – I/O DEA 203 Decentr. I/O Momentum I/O DP Master hardware up to 12 MBaud: Compact DP Slaves up to 12 MBaud: Modular DP slaves up to 12 MBaud: Modular DP slaves with COM–Module: Bus connector up to 12 MBaud: See page 32 See page 33 140 CRP811 00 170 BDI344 01 170 BDI354 01 170 BDM344 01 170 BDO354 00 490 NAD911 02 * 490 NAD911 03 490 NAD911 04 490 NAD911 05 –KAB–PROFIB – GND001 –Shielded cable clamp acc. toPNO (see page 59) Software: –332 SPU 833 01 –GSD file for master –GSD files for slaves –GSD file for slave –GSD files for slaves * = Run–out model up to 1.5 MBit/sec 00 Breite: 185 mm Höhe: 230 mm PROFIBUS Overview 31 Table 9 32 DEA 203 Module Modules Input/Output DEP208 8 bits input DEP209 8 bits input DEP210 8 bits input DEP211 8 bits input DEP214 16 bits input DEP215 16 bits input DEP216 16 bits input DEP217 16 bits input DEP218 16 bits input DEP220 16 bits input DEP296 16 bits input DEP297 16 bits input DEO216 16 bits input DEX216 16 bits input DAP204 4 bits output DAP208 8 bits output DAP209 8 bits output DAP210 8 bits output DAP216 16 bits output DAP217 16 bits output DAP218 16 bits output DAO216 16 bits output DAX216 16 bits output DAP212 8 bits input / 4 bits output DAP220 8 bits input / 8 bits output DAP252 8 bits input / 4 bits output DAP253 8 bits input / 4 bits output DAP292 8 bits input / 4 bits output DAU202 2 Words output DAU208 8 Words output ADU204 5 Words input ADU205 5 Words input ADU206 5 Words input / 1 Byte output ADU210 5 Words input / 4 Bytes output ADU214 9 Words input / 8 Bytes output ADU216 5 Words input / 1 Byte output ZAE201 3 Words input / 11 Words output PROFIBUS Overview 00 Table 10 00 Breite: 185 mm Höhe: 230 mm Adaptable TIO Module (Momentum) Module ID Hi/Lo In/Out Short description 170 ADI 350 00 0/1 2/0 32 inputs 24 VDC 170 ADI 340 00 0/2 1/0 16 inputs 24 VDC 170 ADI 640 50 0/3 1/0 16 inputs 120 VAC 170 ADI 740 50 0/4 1/0 16 inputs 240 VAC 170 ADO 340 00 0/5 0/1 16 outputs 24 VDC, 0.5A per output 170 ADO 350 00 0/6 0/2 32 outputs 24 VDC, 0.5A per output 2 power groups 170 ADO 830 50 0/7 0/1 8 outputs, 120 – 240 VAC 170 ADM 350 10 (170 ADM 350 00) 0/8 1/1 16 inputs 24 VDC 16 outputs 24 VDC, 0.5A per output 2 power groups 170 ADM 370 10 0 / 11 1/1 16 inputs 24 VDC 8 outputs 24 VDC, 2A per output 2 insulation groups 170 ADM 390 10 0 / 12 3/1 16 inputs 24 VDC monitored 12 outputs 24 VDC, 0.5A per output 2 power groups 170 ADM 390 30 0 / 10 1/1 10 inputs 24 VDC 8 outputs 24 VDC, 1 relay per output 2 Insulation groups 170 ADM 690 50 0/9 1/1 10 inputs 120 VAC 8 outputs 120 VAC, 0.5A per output 2 power groups 170 AAI 030 00 2 / 192 8/2 8 Differential channels 170 AAI 140 00 04 / 193 16 / 4 16 Individual channels 170 AAI 520 40 02 / 194 4/2 4 Differential channels 170 AAO 120 00 1 / 195 0/5 4 Output channels 170 AMM 090 00 02 / 224 5/5 analog: 4 inputs + 2 outputs digital: 4 inputs + 2 outputs24 VDC, 1A 170 AEC 920 00 0 / 160 8/8 High–speed counter 170 AEG 910 90 0 / 128 8/8 Stepping motor controller PROFIBUS Overview 33 2.2 TIO and Compact Slave Assignment Tables This section describes the data presentation between some typical DP Slave Modules TIO/DEA 203 and Quantum State RAM using the Option Board CRP 811. 2.2.1 BDO 354 – Digital output / 32 bits, 24 VDC out / in CRP811 State RAM Module 21 43 65 87 1–32 (*) 10000100 10100110 11000010 11100001 Bool 21 43 65 87 1–2 (*) 10000100 10100110 11000010 11100001 10000100 11000010 10100110 11100001 uint8 84 C2 A6 E1 1–4 (*) 00100001 01100101 01000011 10000111 00000000 00000000 00000000 00000000 10000100 11000010 10100110 11100001 int8 84 C2 A6 E1 1–4 (*) 00100001 01100101 01000011 10000111 400001 10000100 400002 10000100 11000010 11100001 uint16 84 C2 A6 E1 1–2 (*) out 00100001 01100101 01000011 10000111 400001 400002 10000100 10100110 11000010 11100001 int16 84 C2 A6 E1 1–2 (*) out 00100001 01100101 01000011 10000111 400001 400002 10000100 10100110 11000010 11100001 uint32 84 C2 A6 E1 1–2 (*) out 00100001 01100101 01000011 10000111 400001 400002 10000100 10100110 11000010 11100001 int32 84 C2 A6 E1 1–2 (*) out 00100001 01100101 01000011 10000111 400001 400002 10000100 10100110 11000010 11100001 raw C2 84 E1 A6 1–2 (*) out 01000011 10000111 00100001 01100101 400001 400002 10000100 10100110 11000010 11100001 string 84 C2 A6 E1 1–2 (*) out 00100001 01100101 01000011 10000111 out State RAM Addresses State RAM Data MSB LSB 000001 –16 000017 10000100 10100110 11000010 11100001 Bool 400001 400002 10000100 10100110 11000010 11100001 400001 400002 400003 400004 00000000 00000000 00000000 00000000 400001 400002 400003 400004 1 8 9 D–Type CRP811 I/O Data 16 1 17 8 9 24 25 16 32 –32 out out out (*) These entries correspond to the State RAM addresses in column 2. 34 PROFIBUS Overview 00 Output bits 1–16 Output bits 17–32 Figure 11 170 BDO 354 00 00 Breite: 185 mm Höhe: 230 mm PROFIBUS Overview 35 2.2.2 BDI 354 – Digital input / 32 bits, 24VDC out / in CRP811 State RAM Module 21 43 65 87 1–32 (*) 10000100 10100110 11000010 11100001 Bool 21 43 65 87 1–2 (*) 10000100 10100110 11000010 11100001 00000000 00100001 00000000 01000011 00000000 01100101 00000000 10000111 uint8 21 43 65 87 1–4 (*) 10000100 10100110 11000010 11100001 300001 300002 300003 300004 00000000 00000000 00000000 11111111 00100001 01000011 01100101 10000111 int8 21 43 65 87 1–4 (*) 10000100 10100110 11000010 11100001 300001 300002 300003 300004 11111111 11111111 11111111 11111111 10100001 11000011 11100101 10000111 int8 A1 C3 E5 87 1–4 (*) 10000101 10100111 11000011 11100001 300001 300002 00100001 01100101 01000011 10000111 uint16 21 43 65 87 1–2 (*) in 10000100 10100110 11000010 11100001 300001 300002 00100001 01100101 01000011 10000111 int16 21 43 65 87 1–2 (*) in 10000100 10100110 11000010 11100001 300001 300002 00100001 01100101 01000011 10000111 uint32 21 43 65 87 1–2 (*) in 10000100 10100110 11000010 11100001 300001 300002 00100001 01100101 01000011 10000111 int32 21 43 65 87 1–2 (*) in 10000100 10100110 11000010 11100001 300001 300002 01000011 10000111 00100001 01100101 raw 21 43 65 87 1–2 (*) in 10000100 10100110 11000010 11100001 300001 300002 00100001 01100101 01000011 10000111 string 21 43 65 87 1–2 (*) in 10000100 10100110 11000010 11100001 in in in in in State RAM Addresses State RAM Data MSB LSB 100001 –16 100017 –32 10000100 10100110 11000010 11100001 Bool 300001 300002 10000100 10100110 11000010 11100001 300001 300002 300003 300004 1 8 9 D–Type CRP811 I/O Data 16 1 17 8 9 24 25 16 32 (*) These entries correspond to the State RAM Addresses in column 2. 36 PROFIBUS Overview 00 Input 1–16 Input 17–32 Figure 12 170 BDI 354 00 00 Breite: 185 mm Höhe: 230 mm PROFIBUS Overview 37 2.2.3 BDM 344 – Digital input and output / per 16 bits, 24 VDC out / in State RAM Addresses State RAM Data MSB LSB CRP811 State RAM Module out 000001 –16 10000100 11000010 Bool 21 43 1–16 (*) 10000100 11000010 in 100001 –16 10000100 11000010 Bool 21 43 1–16 (*) 10000100 11000010 out 400001 10000100 in 300001 10000100 11000010 Bool 21 43 1 (*) 10000100 11000010 11000010 Bool 21 43 1 (*) 10000100 11000010 out 400001 400002 00000000 00000000 10000100 11000010 uint8 84 C2 1–2 (*) 00100001 01000011 in 300001 300002 00000000 00000000 00100001 01000011 uint8 21 43 1–2 (*) 10000100 11000010 out 400001 400002 00000000 00000000 10000100 11000010 int8 84 C2 1–2 (*) 00100001 01000011 in 300001 300002 00000000 00000000 00100001 01000011 int8 21 43 1–2 (*) 10000100 11000010 in 300001 300002 111111111 111111111 10100001 11000011 int8 A1 C3 1–2 (*) 10000101 11000011 out 400001 10000100 11000010 uint16 84 C2 1 (*) 00100001 01000011 in 300001 00100001 01000011 uint16 21 43 1 (*) 10000100 11000010 out 400001 10000100 11000010 int16 84 C2 1 (*) 00100001 01000011 in 300001 00100001 01000011 int16 21 43 1 (*) 10000100 11000010 out 400001 400002 10000100 00000000 11000010 00000000 uint32 84 C2 00 00 1–2 (*) 00100001 01000011 (**) in 300001 300002 00100001 00000000 01000011 00000000 uint32 21 43 00 00 1–2 (*) 10000100 11000010 (**) out 400001 400002 10000100 00000000 11000010 00000000 int32 84 C2 00 00 1–2 (*) 00100001 01000011 (**) in 300001 300002 00100001 00000000 01000011 00000000 int32 21 43 00 00 1–2 (*) 10000100 11000010 (**) out 400001 10000100 11000010 raw C2 84 1 (*) 01000011 00100001 in 300001 01000011 00100001 raw 21 43 1 (*) 10000100 11000010 out 400001 10000100 11000010 string 84 C2 1 (*) 00100001 01000011 in 300001 00100001 01000011 string 21 43 1 (*) 10000100 11000010 1 8 9 D–Type CRP811 I/O Data 1 8 9 16 16 (*) These entries correspond to the State RAM Addresses in column 2. (**) Prohibited, register 2 is incorrect. 38 PROFIBUS Overview 00 Input 1–16 Output 1–16 Figure 13 170 BDM 344 00 00 Breite: 185 mm Höhe: 230 mm PROFIBUS Overview 39 2.2.4 DAP 204 – Digital output / 4 bits, 24 VDC out / in State RAM Addresses State RAM Data MSB LSB 1 8 9 D–Type CRP811 I/O Data CRP811 State RAM Module 16 1 4 Output out 000001 –16 10000100 00000000 Bool 21 1–4 (*) 1000 out 400001 10000100 00000000 Bool 21 1 (*) 1000 out 400001 00000000 11000010 uint8 84 1 (*) 0010 out 400001 00000000 11000010 int8 84 1 (*) 0010 out 400001 10000100 00000000 uint16 84 00 1 (*) 0010 (**) out 400001 10000100 00000000 int16 1 (*) 0010 (**) out 400001 400002 10000100 00000000 00000000 00000000 uint32 84 00 00 00 1–2 (*) 0010 (**) out 400001 400002 10000100 00000000 00000000 00000000 int32 84 00 00 00 1–2 (*) 0010 (**) out 400001 00000000 10000100 raw 84 1 (*) 0010 out 400001 10000100 00000000 string 84 1 (*) 0010 84 00 (*) These entries correspond to the State RAM addresses in column 2. (**) Only bits 1–8 valid in register 1 1 U 2 output < 250V 3 1 4 5 6 7 2 8 9 10 11 M 12 U 13 output < 250V 14 3 15 Wiring is internal 16 17 18 4 19 20 21 22 M card Figure 14 ASABDAP204 (244676) 40 PROFIBUS Overview 00 2.2.5 DAP216 – Digital output / 16 bits, 24VDC out / in State RAM Addresses State RAM Data MSB LSB 1 8 9 D–Type CRP811 I/O Data CRP811 State RAM Module 16 1 17 8 9 24 25 16 32 out 000001 10000100 –16 11000010 Bool 43 21 1–16 (*) 10000100 11000010 out 400001 10000100 11000010 Bool 43 21 1 (*) 10000100 11000010 out 400001 400002 00000000 00000000 10000100 11000010 uint8 84 C2 1–2 (*) 01000011 00100001 out 400001 400002 00000000 00000000 10000100 11000010 int8 84 C2 1–2 (*) 01000011 00100001 out 400001 10000100 11000010 uint16 84 C2 1 (*) 01000011 00100001 out 400001 10000100 11000010 int16 1 (*) 01000011 00100001 out 400001 400002 10000100 00000000 11000010 00000000 uint32 84 C2 00 00 1–2 (*) 01000011 00100001 (**) out 400001 400002 10000100 00000000 11000010 00000000 int32 84 C2 00 00 1–2 (*) 01000011 00100001 (**) out 400001 10000100 11000010 raw C2 84 1 (*) 00100001 01000011 out 400001 10000100 11000010 string 84 C2 1 (*) 01000011 00100001 84 C2 (*) These entries correspond to the State RAM Addresses in column 2. (**) Prohibited, register 2 is incorrect 1 2 3 4 5 6 7 8 9 10 11 Wiring is internal 12 13 14 15 16 17 18 19 20 21 22 Figure 15 ASABDAP2160 (270385) 00 Breite: 185 mm Höhe: 230 mm PROFIBUS Overview 41 2.2.6 DAP 220 – Digital input and output / per 8 bits, 24VDC out / in State RAM Addresses State RAM Data MSB LSB CRP811 State RAM Module out 000001 –16 10000100 00000000 Bool 21 1–8 (*) 10000100 in 100001 –16 10000100 00000000 Bool 21 1–8 (*) out 400001 10000100 in 300001 10000100 00000000 Bool 21 1 (*) 00000000 Bool 21 1 (*) out 400001 in 300001 00000000 10000100 uint8 84 1 (*) 00000000 00100001 uint8 21 1 (*) out 400001 00000000 10000100 int8 84 1 (*) in 300001 00000000 00100001 int8 21 1 (*) in 300001 111111111 10100001 int8 A1 1 (*) out 400001 10000100 00000000 uint16 84 00 1 (*) in 300001 00100001 00000000 uint16 21 00 1 (*) out 400001 10000100 00000000 int16 84 00 1 (*) in 300001 00100001 00000000 int16 21 00 1 (*) out 400001 400002 10000100 00000000 00000000 00000000 uint32 84 00 00 00 1–2 (*) in 300001 300002 00100001 00000000 00000000 00000000 uint32 21 00 00 00 1–2 (*) out 400001 400002 10000100 00000000 00000000 00000000 int32 84 00 00 00 1–2 (*) in 300001 300002 00100001 00000000 00000000 00000000 int32 21 00 00 00 1–2 (*) out 400001 10000100 10000100 raw 84 1 (*) in 300001 01000011 00100001 raw 21 1 (*) out 400001 10000100 00000000 string 84 1 (*) in 300001 00100001 00000000 string 21 1 (*) 1 8 9 D–Type CRP811 I/O Data 16 1 output 8 1 input 8 10000100 10000100 10000100 00100001 10000100 00100001 10000100 10000101 00100001 (**) 10000100 (**) 00100001 (**) 10000100 (**) 00100001 (**) 10000100 (**) 00100001 (**) 10000100 (**) 01000011 10000100 00100001 10000100 (*) These entries correspond to the State RAM Addresses in column 2. (**) Only bits 1–8 valid in register 1 42 PROFIBUS Overview 00 1 2 3 4 5 6 7 8 9 10 11 12 Wiring is internal 13 14 15 16 17 18 19 20 21 22 Figure 16 ASBDAP220 (272555) 00 Breite: 185 mm Höhe: 230 mm PROFIBUS Overview 43 2.2.7 DEP216 – Digital input / 16 bits, 24VDC out / in State RAM Addresses State RAM Data MSB LSB CRP811 State RAM Module in 100001 –16 10000100 11000010 Bool 43 21 1–16 (*) 10000100 11000010 in 300001 10000100 11000010 in 300001 300002 00000000 01000011 00000000 00100001 Bool 43 21 1 (*) 10000100 11000010 uint8 43 21 1–2 (*) 10000100 11000010 in 300001 300002 00000000 00000000 01000011 00100001 int8 43 21 1–2 (*) 10000100 11000010 in 300001 300002 11111111 11111111 11000011 10100001 int8 C3 A1 1–2 (*) 10000101 11000011 in in 300001 01000011 00100001 uint16 43 21 1 (*) 10000100 11000010 300001 01000011 00100001 int16 1 (*) 10000100 11000010 in 300001 300002 01000011 00000000 00100001 00000000 uint32 43 21 00 00 1–2 (*) 10000100 11000010 (**) in 300001 300002 01000011 00000000 00100001 00000000 int32 43 21 00 00 1–2 (*) 10000100 11000010 (**) in 300001 00100001 01000011 raw 43 21 1 (*) 10000100 11000010 in 300001 01000011 00100001 string 43 21 1 (*) 10000100 11000010 1 8 9 D–Type CRP811 I/O Data 1 8 9 16 16 43 21 (*) These entries correspond to the State RAM Addresses in column 2. (**) Prohibited, register 2 is incorrect 44 PROFIBUS Overview 00 1 2 3 4 5 6 7 8 9 10 11 Wiring is internal 12 13 14 15 16 17 18 19 20 21 22 Figure 17 ASBDEP216 (244630) 00 Breite: 185 mm Höhe: 230 mm PROFIBUS Overview 45 46 PROFIBUS Overview 00 Chapter 3 Installation Guide (Hardware) This documentation descript the standard for installation of new controls and equipments. The basis of the description are the installation guides of the Profibus User organisation (PNO). You can buy them at PROFIBUS Nutzerorganisation e.V., Hard– und Neu–Str. 7, D–76131 Karlsruhe. .00 Breite: 185 mm Höhe: 230 mm Installation Guide (Hardware) 47 48 Installation Guide (Hardware) .00 3.1 General Information on Installing PROFIBUS PROFIBUS-DP is a serial field bus. This bus represents an open network according to the EN 50170 standard, section 2. For PROFIBUS cable connections, only shielded twisted pair cables may be used. Note: The following specifications are mandatory. This refers in particular to the installation and the use of field devices. Note: In addition to these specifications, the technical guidelines by the single manufacturers and vendors must be observed. In all cases make sure to observe the German PROFIBUS User Organization (PNO) Installation Guidelines (Order No. 2.111). 3.1.1 Specific PROFIBUS–DP Requirements for Quantum/Modsoft A maximum of 1 bus master is allowed for a PROFIBUS–DP network. .00 Breite: 185 mm Höhe: 230 mm Number of field devices allowed in one segment: max. 32 stations, not more than 1 active PU predefined bus transfer rate: >= 9.6 kBaud / up to 12 MBaud total length of bus lines in one segment: see Table 11 on page 52 Number of segments max. 4, with a maximum of 3 repeaters Installation Instructions (Hardware) 49 3.1.2 Network sample of PROFIBUS DP with Quantum, Compact, TIOs and Third Party products Quantum Programming and test unit with programming software Modsoft and SPU 833 MB/MB+ PROFIBUS–DP Compact Compact I/Os I/Os CRP 811 ÅÅ ÅÅ ? Third Party Products DEA 203 DEA 203 K–TIOs Momentum A–TIOs Momentum Hardware components for PROFIBUS DP – Master for Quantum: 140 CRP 811 00 –Slaves: for AS–BDEA 203 with Compact periphery Classic TIO components Adaptable TIO components (Momentum) Software components for PROFIBUS DP – Configuration software: 332 SPU 833 01 – Modsoft >=V2.51 Figure 18 PROFIBUS–DP Network 3.1.3 Configuration Limits See Appendix A, page NO TAG Module Description CRP 811 ”Technical Specifications”. See Chapter 1.3 on page 18 ”CRP811 – Master Class 1 Functionality and Performance Specifications. 50 Installation Instructions (Hardware) .00 3.1.4 Segmentation Sample of a PROFIBUS System with Repeaters M Segment 1 S S R S Repeater with terminator and potential isolation R Segment 2 R S Segment 3 S S S Slave with terminator R Repeater without terminator S Slave without terminator Repeaters located at the beginning or at the end of a segment have to be terminated. For further information see page 62. .00 Breite: 185 mm Höhe: 230 mm Installation Instructions (Hardware) 51 3.1.5 Methods of Cabling and Bus Design for PROFIBUS DP Table 11 Transmission equipment Bus length per segment Transfer rates for cable Type A up to 12 MBaud max. 1.2 km 9.6 kBaud max. 1.2 km 19.2 kBaud max. 1.2 km 93.75 kBaud max. 1.0 km 187.5 kBaud max. 0.4 km 500 kBaud max. 0.2 km 1.5 MBaud max. 0.1 km 3 MBaud max. 0.1 km 6 MBaud max. 0.1 km 12MBaud Line redundancy no Bus cable type (yard good) twisted pair, shielded PROFIBUS cable type ”A” up to 12 MBaud, rigid Connection interface acc. to EIA RS 485 Bus connector (with / without terminator acc. to standard 390 / 220 / 390 Ohms See Chapter 3.3.2 on page 69 Stub cables none (except for diagnostic purposes: 1 X 3 m to bus monitor) Table 12 52 Bus technology Station type Master Class 1 Bus access method Master / slave to DP–Slave Transfer mode half–duplex Length of telegram max. 255 Bytes Data field length max. 244 Bytes Data security Hamming distance HD = 4 Bus addresses 1 .... 126 FDL service SRD for slave parameterization, configuration, diagnostics, and user data transmission Installation Instructions (Hardware) .00 3.2 Regulations for Installation 3.2.1 Bus Segment Installation As a basic rule of cable layout, the bus cable must not be twisted, stretched, or squeezed/pinched. Each bus segment must be terminated on both ends using a terminator. The segment is not terminated if, for example, the last slave which carries a bus termination connector remains without voltage. Since the bus termination connector receives its voltage signal from the station, the terminator remains ineffective. If the bus cable is looped through, the bus connector may always be pulled off the bus interface of a device without interrupting bus data traffic. Note: Make sure that all devices with an activated terminator have a steady voltage supply during operation and in the warm–up phase. 3.2.2 Cabinet Line Layout For cabinet cabling, the system’s resistance to jamming greatly depends upon the line layout inside the cabinet. Shielded data lines (for PROFIBUS–DP, PG, etc.) must be separated from all cables carrying direct or alternating current of more than 60 Volts. Also, cables for direct or alternating current between 60 and 230 Volts must be separated from cables carrying voltages above 230 Volts. Separation criteria are met if the lines are laid out in separate cable ducts or if separate trunk groups are used. Signal lines and power cables must be laid out at a minimum distance of 20 centimeters. This regulation must be strictly observed with respect to the voltage supply of electronic devices, such as PROFIBUS slaves, I/O modules, controllers, etc. Inside the cabinet, the shield of the PROFIBUS–DP data line must be laid out on a shield neutralization rail. The shield must then be continued to the module and installed according to the regulations above. PG screw connections with integrated ground terminal are not allowed. Stub cables are not allowed for PROFIBUS network installations. .00 Breite: 185 mm Höhe: 230 mm Installation Instructions (Hardware) 53 3.2.3 Line Layout Outside Cabinets Lines outside cabinets should generally be laid out on metal ducts. Only lines with voltages below 60 Volts or shielded lines with voltages below 230 Volts may be laid out on the same ducts (flat duct, vat, groove, or pipe). Lines with voltages above 230 Volts must be laid out separately. On metal ducts, fins may be used for separation. However, the minimum distance of 20 centimeters must always be respected. Note: PROFIBUS data lines always must be laid out on separate metal cable ducts. Only communication lines may be laid out on the same ducts (flat duct, vat, groove, or pipe). If a bus line is laid out on cable vats or flat ducts, these ducts must be connected to a continuous chain and connected to ground terminal. This regulation also applies to short stub cable vats. 3.2.4 Trailing Lines The trailing line must be inserted into the drag chain or holding device twist–free. The trailing line must not be lifted off the roll in loops. In the drag chain, the trailing line must either be laid out next to lines with voltages of up to 60 Volts, or duct fins must be used, if present. The trailing line must be free to move in the drag chain. The trailing line must be fastened over a large surface to the fixed point and to the catch using appropriate cable cleats. Note: Make sure that the trailing line is unable to move inside the fixed point and that the leads of the cable are not pinched. Note: The trailing line may not be used in catenary suspension. Bend radius must not be below 15 x cable diameter. 54 Installation Instructions (Hardware) .00 3.2.5 Outdoor Line Layout For outdoor line layout make sure to use cables suitable for underground installation. In general, the same recommendations apply to both outdoor and indoor layout. For outdoor installation, cables should additionally be laid out inside an appropriate plastic pipe. For underground installation, only underground cables may be used. Make sure to take into account the temperatures the cable will be exposed to. For outdoor to indoor transitions always use a terminal box. The task of a terminal box is to ensure an appropriate transition from underground cable to standard bus cable. In addition, a terminal box contains a protective circuit with surge protection (lightning protection). Note: For transfer rates above 500 kBauds it is recommended to use suitable optical fiber cables for cable layout between buildings. 3.2.5.1 Surge protection for Bus Lines up to 500 kBaud (outdoor) In order to protect communication devices from surges (lightning) it is recommended to provide long distance lines with surge protection (lightning arrestors). The minimum nominal discharge current should be 5 kA, e.g. type ARE Order No. 919 232, Manufacturer: Dehn und Söhne Postfach 92306 Neumarkt 1 Protection of a PROFIBUS cable requires two ARE lightning arrestors for each building. .00 Breite: 185 mm Höhe: 230 mm Installation Instructions (Hardware) 55 1 3 2 4 IN OUT 45 90 OUT IN 5 17.5 35 88 Figure 19 Connection Diagram and Technical Specifications of ARE Lightning Arrestor 56 Installation Instructions (Hardware) .00 Bus device(s) rd gn ÒÒ ÒÒ Ò Ò Shield 6 sqmm Z2 ARE ARE ARE ARE DINTop hat rail Outdoor 6 mm gn rd ÒÒ ÒÒ Shield Ò Ò W1 Building 1 Building 2 W1 PROFIBUS cable KAB PROFIB Z2 Ground terminal cleat EDS 000 Figure 20 Terminal Diagram of ARE Lightning Arrestor Be sure to meet the following requirements: Do not switch the red and green leads at the transition point. Do not switch the IN and OUT sides of the ARE (IN = outdoor) Install a functional ground terminal (potential–equalization rod). Mount the lightning arrestors in the vicinity of the functional ground, so that the surge current can be derived to the building ground over the shortest possible distance. Keep the line (minimum diameter 6 sqmm) leading to functional ground as short as possible. A cable pair of a loom of PROFIBUS cables may be connected to a maximum of 10 lightning arrestors in series, i.e. there is a maximum of 5 outdoor line segments. .00 Breite: 185 mm Höhe: 230 mm Installation Instructions (Hardware) 57 3.2.5.2 Surge protection for Bus Lines over 500 kBaud to 1.5MBaud (outdoor) with optical fiber cables 3.2.5.3 Additional Notes Note: For additional notes on installation see Installation Instructions, PNO No.: 2.111 Note: In case electronic speed regulators are used, be sure to respect the manufacturer’s EMC guidelines. These guidelines contain information on the correct use of filters, chokes, and shieldings. Caution: For illumination of control cabinets always use lamps without starters or with EMC–compliant starters. 3.2.6 3.2.6.1 Grounding, Potential Equalization and Shielding Grounding and Shielding of Systems with Potential Equalization In order to ensure maximum electromagnetic compatibility, the bus shieldings should form a continuous envelope and be connected to the metal cases of the connected bus devices, if possible. Since this system design requires multiple grounding of the bus cable shielding, correct potential equalization is very important. Central control cabinet Quantum with DP–Master x1 Substation ”1” Substation ”n” Slave ”1” Å x1 ÅÅ ÅÅ Slave ”n” x1 Å x1 Ground bus bar x2 PROFIBUS–DP cable x2 Potential–equalization line > = 16qmm Figure 21 Grounding with Potential Equalization 58 Installation Instructions (Hardware) .00 Grounding / potential equalization Due to ground potential fluctuations, an equalizing current may occur over shieldings which are connected on both ends. In order to prevent this, potential equalization is absolutely necessary for all connected system components and devices. For this purpose, and in order to achieve maximum EMC, all system components (machine, cabinets, external control panels, devices, etc.) must be sufficiently grounded over a large surface and connected to the ground bus bar (FE/PE) of the central cabinet over a minimum cable diameter of 16 sqmm. Shielding The braided shielding and foil shielding of the bus cable serves to improve electromagnetic compatibility (EMC). The braided shielding and the foil shielding underneath it must be grounded on both sides and with good conduction using metal structures with large surfaces. When stripping the insulation, make sure not to damage the braided shielding. Note: Upon entering the control cabinet, the braided shielding of the bus cable must be directly inserted into a shield bar. Note: The shield bar must be connected to cabinet ground over a large and conductive surface (no varnished surfaces). Ground bus bar ÒÒ ÒÒ ÒÒ ÒÒ or ÒÒ ÒÒ ÒÒ cable cleat encloses cable FE Figure 22 Shield connection for PROFIBUS acc. to PNO .00 Breite: 185 mm Höhe: 230 mm Installation Instructions (Hardware) 59 3.2.6.2 Grounding and Shielding of Systems without Potential Equalization In case of particular system configurations (e.g., separate halls / buildings) which do not allow potential equalization to a central ground point in the control cabinet, the following grounding and shielding technique may be applied. However, this method is not as effective as the measures described under 3.2.6.1 ff. and should therefore be considered a backup solution. Central control cabinet Quantum with DP–Master x1 Å Substation ”1” Substation ”n” Slave ”1” x1 ÅÅ Slave ”n” x1 ÅÅ x1 Ground bus bar x2 PROFIBUS–DP cable For information on mounting the Z1 connection see the device–specific installation instructions. x2 Figure 23 Decentralized Grounding Measures 60 Installation Instructions (Hardware) .00 In this case, the bus cable shield is only grounded on one side (in the central control cabinet), over a large surface and electronically, as described in 3.2.6.2. From there to the last bus device, the shield must be laid out continually and without further electronic ground connection. All bus devices require capacitive grounding of the shield in order to derive interfering high–frequency signals. See the following grounding method using the capacitive grounding clamp GND 001. Modnet 1/P Ò ÒÒ ÒÒ Ò Z1 Z2 C1 C1 GND 001 Z1 Shielding Z2 Top hat rail connection Figure 24 Example of Connecting the Capacitive Grounding Clamp GND 001 When installing the shielding connection for grounding clamp connection, please follow these steps: CF = Cu foil shielding (included) mm ÒÒ ÒÒ ÒÒ ÒÒ ÒÒ ÒÒ ÒÒ ÒÒ ÒÒ CF Ò ÒÒ ÒÒ ÒÒ ÒÒ Ò ÒÒ ÒÒ Ò Figure 25 Installation of Shielding Connection with Potential–Free Grounding Note: On the bus end devices, this grounding method requires only one cable. .00 Breite: 185 mm Höhe: 230 mm Installation Instructions (Hardware) 61 3.2.7 PROFIBUS–DP Repeaters Repeaters may be used where the maximum line length of a network segment is exceeded or where the number of devices used exceeds the maximum number of devices allowed per segment. In these cases the line length can be extended or the number of devices can be raised by using a repeater. When using repeaters on segment end devices make sure to install a bus termination. Installation Example of Terminator Locations: Segment 1 R Terminator on bus segment 1 is activated,since it is located at end of bus! Segment 2 Terminator on bus segment 2: do not activate! Figure 26 Connecting Two Bus Segments to RS–485 Repeater For cabinets, only RS485 Repeaters of safety type IP20 are allowed (e.g., Siemens, Order No. 6ES7 972–0AA00–0XA0) Example of repeater: Set the bus transfer rate using the <Bitrate> rotary switch. The repeater requires a power supply of 24 Volts DC, i.e., the jumper connection between M and PE of the repeater power supply must be removed. It is not necessary to set a bus address for the repeater. However, the repeater uses a device address, i.e., the maximum number of slaves in a segment is reduced by the number of repeaters used. For detailed information see the specifications provided by the manufacturer. 62 Installation Instructions (Hardware) .00 3.2.8 Backplane Grounding of the Quantum CPU For protection against interference and accidental contact each backplane must be connected to the protective conductor (PE) over a minimum cable diameter of 6 sqmm using the ground screws of the backplane. In all cases, the internal reference potential 0V of the backplane XPB 00 X is connected to the backplane (delivery state) over the Z screw (see figure below). Backplane Z Ground screws Figure 27 Quantum Z Screw, .00 Breite: 185 mm Höhe: 230 mm Installation Instructions (Hardware) 63 3.2.9 Grounding of Backplane DTA 200 of the Compact Periphery For protection against interference and accidental contact each zinc coated top hat rail with inserted components must be connected to the protective conductor (PE) over a minimum cable diameter of 6 sqmm. The DTA 200 backplanes may be installed with or without electronic connection to ground potential. Prior to initiation, please verify that the Z screw provided for this purpose is fastened to the backplane, i.e. that the internal reference potential 0V is connected to PE. For the Z screw location please see the figure below. A120 MA X (MA) = Ground clamp for functional ground connection (X) = Zinc coated top hat rail (Y) = Ground connection over ground springs (Z) = Z screw on backplane DTA 200 (0V) = Reference conductor system of internal electronics Z1 = Common CPU, Compact with PE Z Y OV Figure 28 Compact, Grounding and EMC Measures, Z Screw 3.2.10 Grounding of TIO Components For protection against interference and accidental contact each TIO component with inserted components must be connected to the protective conductor (PE) over a minimum cable diameter of 6 sqmm. When mounting the TIO component on the top hat rail, the component PE is automatically connected to the top hat rail via a ground spring. A connection between internal reference potential 0V and PE is normally established internally on the component using appropriate RF capacitors. The Z1 connection is additionally required for ground protection. Grounding is ensured via a ground clamp (EDS 000) and a 2.5 sqmm CU Faston or screw connection. 64 Installation Instructions (Hardware) .00 MA X Z1 (MA) = Ground clamp for functional ground connection (X) = Zinc coated top hat rail (Y) = Ground connection of the TIO component over ground spring (Z1) = CU connection to top hat rail as a protective measure. Y Figure 29 Grounding of top hat rails and TIO components 3.2.11 Additional Grounding Measures V Connection to ground bus bar To system, part 1: V Quantum h h h h Quantum Backplane () Zinc coated top hat rail from NAE 911 (*) (6 sqmm) Ground clamp EPS 001 (6 sqmm) Lay out bus cable shielding on bus ground bar using ground clamp To system, part 2: V A120 h Zinc coated top hat rail(s) from A120 (*) (6 sqmm) h Lay out bus cable shielding on bus ground bar using ground clamp To system, part 3: V TIO h Zinc coated top hat rail from TIO components (6 sqmm) h Lay out bus cable shielding on bus ground bar using ground clamp (*) Ground clamp EPS 001 V >= 16 sqmm copper connection between ground bus bars. .00 Breite: 185 mm Höhe: 230 mm Installation Instructions (Hardware) 65 3.2.12 Example of an Indoor System ”with” Potential–Equalization Lines System, part 1 Quantum C R P 2.5 sqmm 1= top hat rail 1 NAE 911 NAD 911 Metal mounting plate 6 sqmm Ground bus bar System, part 2 Start of bus System, part 3 DEA 203 NAD 911 End of bus TIO 1 TIO 1 NAD 911 6 sqmm 6 sqmm Ground bus bar Ground bus bar > = 16 sqmm 66 Installation Instructions (Hardware) .00 3.2.13 Example of an Indoor System ”without” Potential–Equalization Lines System, part 1 Quantum C R P 2.5 sqmm 1= top hat rail 1 NAE 911 NAD 911 Metal mounting plate 6 sqmm Ground bus bar System, part 2 Start of bus System, part 3 DEA 203 End of bus NAD 911 TIO 1 TIO 1 NAD 911 6 sqmm 6 sqmm 1 Ground bus bar .00 Breite: 185 mm Höhe: 230 mm 1 Ground bus bar Installation Instructions (Hardware) 67 3.3 Specifications 3.3.1 Cable specifications Due to the maximum baud rate of 12 MBaud, only cables of the A type may be used, as defined by the PROFIBUS standard. According to EN 50 170, this cable type is a twisted pair line with a shield consisting of a foil shielding and an braided shielding in the layer above. Cable parameters are as follows: Parameter Value Surge impedance 135... 165 Ohms at 3 to 20 MHz Capacitance per unit length < 30 pF / m Loop impedance < 110 Ohms / km Lead diameter > 0.64 mm Lead cross section > 0.34 sqmm The following cable may be used as a PROFIBUS cable for fixed layout in grooves or pipes: Manufacturer Schneider Automation Order No. KAB PROFIB For cable installation use the following color assignment i t ((example) l ) 68 Installation Instructions (Hardware) Line A: red Line B: green .00 3.3.2 Connector Specifications Both connectors with turn–off terminator (up to 1.5 MBaud) and ready–made connectors (up to 12 MBaud), such as ”integrated bus termination” , ”bus node”, and ”bus node with service SS” may be used. The following Schneider Automation connectors have been defined for different field devices: DP–Master Bus connector with service interface (12MBd./ IP 20) Manufacturer Schneider Automation: Order No. 490 NAD 911 02 (up to 1.5 MBaud)* Order No. 490 NAD 911 05 (up to 12 MBaud) Slave devices Bus connector with / without service interface (12MBd./ IP 20) Manufacturer Schneider Automation: Order No. 490 NAD 911 02 (with service interface) up to 1.5 MBd * Order No. 490 NAD 911 03 (start or end termination) Order No. 490 NAD 911 04 (node) – up to 12 MBaud Order No. 490 NAD 911 05 (node with service interface)– up to 12 MBaud * = run–out model up to 1.5 MBits/sec Note: The mounting procedure for bus connectors NAD 911 03 / 04 / 05 differs from the mounting procedure for NAD 911 02. Please refer to the installation instructions delivered with the respective component. Note: The specified NAD 911 02 cables and connectors must be installed according to the installation instructions delivered with the respective components. Also see chapter 3.3.2.2 on page 70 3.3.2.1 .00 Breite: 185 mm Höhe: 230 mm Pin Assignment NAD 911 Pin / housing Signal Description Connector housing Shield Functional ground 3 RxD/TxD–P Receive / send data positive 5 DGND Data transfer potential (reference potential to 5V) 6 VP Supply voltage for terminators–P, (P5V) 8 RxD/TxD–N Receive / send data negative Installation Instructions (Hardware) 69 3.3.2.2 Cable installation on NAD911 02 30+ 5 Step 1: Cut the cable to the appropriate length 7 +1 12+ 2 CS ∅7.3 Step 2: Prepare the cable ends (see figure) Step 3: Pull the braided shielding ”CS” over the PVC jacket ”PV”. Be sure to remove additional shielding foils with plastic lamination, if necessary. PV CS Step 4: Wrap the included Cu foil shielding ”CF” around the braided shielding (see figure). PV CF Step 5: Fasten cable(s) ”D” to the connector using cable cleat ”C”. Step 6: Connect the two leads of the respective cable as follows: Lead(s) ”red” to terminal(s) 3 and 4–2 Lead(s) ”green” to terminal(s) 8 and 9–7 Step 7 (NAD 911 02): a) If two cables are connected to the PROFIBUS connector (bus is looped through), all 3 jumpers (A) must be removed. b) If only one cable is connected (start or end of bus), all 3 jumpers (A) must be connected. Plotting scale 1:1 CF Cu foil shielding CS Braided shielding PV PVC jacket A E ÒÒ Ò ÒÒ Ò Î Î Î Î rd gn rd gn D B C D C Figure 30 Handling and Connection of the 490 NAD 911 02 PROFIBUS Connector 70 Installation Instructions (Hardware) .00 3.4 Schneider Automation Products for PROFIBUS Installation with Quantum Table 13 Quantum acc. to catalog 140 CRP 811 00 PROFIBUS–DP Master activation for use with Quantum AS–BDEA 203 PROFIBUS–DP Slave activation for Compact I/O periphery connection. All digital and analog I/O modules may be used in combination with AS–BDEA 203. BDI 344 01 PROFIBUS–TIO 16 dig. inputs, 24 V BDI 354 01 PROFIBUS–TIO 32 dig. inputs, 24 V BDM 344 01 PROFIBUS–TIO 16 dig. inputs, 24 V & 16 dig. outputs24 V / 0.5 A BDO 354 00 PROFIBUS–TIO 32 dig. outputs 24 V / 0.5 A Momentum TIOs See Table 10, page 33 Table 14 Modsoft >=2.51 Programming Unit for Quantum (English) 332 SPU 833 01 Project and configuration tool for read–in of Device Data Base and parameterization of all PROFIBUS–DP devices 332 GSD 831 01 The software package contains Device Data Base files for all Schneider Automation I/O modules. They can also be downloaded from http://www.PROFIBUS.com PROFIBUS Accessories KAB PROFIB PROFIBUS cable, type ”A” (yard good), O2Y (ST) CY 2 x 0.64 sqmm YDL 052 PC cable (9 pins) CRP / NOP (9 pins), length: 3 m 490 NAD 911 02 PROFIBUS connector with programming device connection (up to 1.5 MBaud) 490 NAD 911 03 PROFIBUS connector terminator (up to 12 MBaud) 490 NAD 911 04 PROFIBUS connector node (up to 12 MBaud) 490 NAD 911 05 PROFIBUS connector node with service interface (up to 12 MBaud) Table 16 Breite: 185 mm Höhe: 230 mm Software Requirements SW–MS1D–9Sa Table 15 .00 Hardware Installation Accessories GND 001 Capacitive ground terminal clamp HUT 3575 Zinc coated top hat rail (rail by DIN–EN 50022) EDS 000 Ground cleat Installation Instructions (Hardware) 71 3.5 Example of PROFIBUS Test Certificate Po s. Test step Test point Nominal value True value Comments All devices connected 1.0 Check number of bus devices for each bus segment <= 32 2.0 Check maximum bus length according to selected transmission devices Table 11 on page 52 No devices connected 2.1 Check bus length according to loop impedance. Connect leads A–B or terminals 3 at one end of the bus to pin 8 of the bus connector and measure the impedance between leads A–B at the other end. 3–8 *) 2.2 Check physical course of bus (control measurement), connect jumper 3–8 of the respective bus connector and measure at the end of the bus with terminators removed 3–8 *) 2.3 Check bus termination, remove jumper 3–8 of the bus connector. Connect bus terminations at one end of the bus, remove bus termination at the other end of the bus, and measure at the end of the bus with terminators removed. Reconnect terminators. 3–8 *) 220 Ohms + value from meas. 2.1 3.1 Supply impedance at first device 3–6 **) 390 Ohms 3.2 3–8 *) 220 Ohms 3.3 5–8 **) 390 Ohms 3–6..**) 390 Ohms 3.5 3–8 *) 220 Ohms 3.6 5–8 **) 390 Ohms 3.4 72 Supply impedance at last device Installation Instructions (Hardware) For line with diam. 0.34 sqmm approx. 0.12 x bus length (meters) Lead impedance of cable type A must not exceed 110 Ohms/km. Caution: Only activate terminator of the h connector you want to measure. .00 Po s. Test step Test point Nominal value 3–8 *) 1.10 Volts 3–6 **) 1.95 Volts 5–8 **) 1.95 Volts 3–8 **) 1.10 Volts 3–6 *) 1.95 Volts True value Comments Only first and last bus device connected 4.1 4.2 Measure voltage over terminators at the fi t bus first b device d i 4.3 4.4 4.5 Measure voltage over terminators at the l tb last bus d device i 4.6 Measurement of di t currentt direct 5–8 **) 1.95 Volts 4.7 Measure voltage at the PROFIBUS connectors of the remaining bus devices 3–8 **) 1.10 Volts It is not necessary for the connector to be plugged in. 4.8 Remove the connector at one end device and measure the bus voltage in idle state 3–8 **) 0.62 Volts Measurement of direct current 3–8 **) 0.62 Volts Both terminators are active All bus devices except master are connected 4.9 Measurement of bus voltage in idle state *) = Terminal B of 490 NAD 911 02 acc. to Figure 30 on page 70 **) = Connector E of 490 NAD 911 02 acc. to Figure 30 on page 70 (6) B (3) A (8) +5V 390 Ohms Terminator 220 Ohms 390 Ohms (5) Figure 31 Bus Termination .00 Breite: 185 mm Höhe: 230 mm Installation Instructions (Hardware) 73 74 Installation Instructions (Hardware) .00 Chapter 4 Software Configuration .00 Breite: 185 mm Höhe: 230 mm Software Configuration 75 76 Software Configuration .00 4.1 Information for PROFIBUS DP 4.1.1 General The goal of this chapter is to describe the configuration steps in global for PROFIBUS. But since this is not really possible without knowledge of the nearer network surroundings, this and the interaction between the various software packages will be handled. Note: The reader of this documentation should be well aware of the involved principles and functional relationships of PROFIBUS (e.g. DIN 19245, Parts 1,2 and 3). The description is based in the simplest case upon a plant configuration consisting of a Quantum PLC and various SAD–I/O modules from the TIO and Momentum series. These components are linked over an appropriate bus cable and a CRP 811 interface module with the Quantum PLC. An exchange of pure I/O data takes places over this connection, whereby the Quantum (CRP 811) is always characterized in the course of the configuration as the master, and the connected TIOs as slaves. Quantum C R P 811 Master address 1 Product family: Quantum DDB set for: CRP 811 (file name: ASA_5506.gsd) PROFIBUS–DP Slave– addresses: Device type: (examples) File name: Slave 3 Slave 4 Slave 5 Slave 6 Slave 7 TIO BDI344 0x TIO TIO TIO BDM344 0x BDI354 0x Momentum BDO354 0x DNT110 0x tiox1344.gsd tiox3344.gsd tiox1354.gsd tiox2354.gsd asa_7512.gsd Figure 32 PROFIBUS–DP configuration .00 Breite: 185 mm Höhe: 230 mm Software Configuration 77 Different manufacturers devices can be operated on this bus. A device data set is available for identification of the differing device types on the bus. For PROFIBUS–DP this is a device data base set. This data set is made available from the respective device manufacturer for each device type in the form of a GSD file. A station specific Modsoft file is modified by the SPU931 tool, in being supplemented with addresses and diverse parameters, as well as state ram register ranges in which the slave I/O signals are reflected. These data sets are also transferred into the PLC when user programs are loaded. 4.1.2 Relationships between tools It was already outlined and illustrated in this documentation, the following general sequence of tasks applies: Project specification (plant and stations) with the Modsoft software package. Inclusion of the device data sets (GSD files) with parameter modifications using the software packages SPU 832 for PROFIBUS–DP. Address mapping and topology determination for bus controllers with the SPU 931 software package for PROFIBUS DP. Loading the generated data into the PLC with Modsoft. The following drawing demonstrates the relationships between the concerned configuration tools: DP SPU 832 for PROFIBUS–DP GSD files SPU931 for PROFIBUS–DP Modsoft PLC >=2.51 Figure 33 Configuration tool relationships (DP) The device data sets (GSD files) are manufacturer specific and available on diskette or internet. The required device data sets (GSD files) are imported by the SPU 832 tool and used for configuring of a bus project. The bus project has to be stored in a file. 78 Software Configuration .00 The file produced is then imported with the SPU931 tool and further modified as needed. The result is then integrated into an existing Modsoft file and subsequently loaded into the PLC with the user program. .00 Breite: 185 mm Höhe: 230 mm Software Configuration 79 4.2 Software Packages and their Features (DP Configuration) Configuration of the DP communication takes place in 5 global steps and in the following sequence. Create the plant name directing by a programm manager (WIN3.11) or explorer (WIN95/NT) Step 1 Determination of the plant and station specific data on the PLC through the Modsoft software package, in particular: h Plant name (program name locations) h Station name (program ......) h The communication parameters (e.g. Modbus or MB+ – required for PLC load) h CPU type and surrounding hardware h State RAM ranges h Addition of the CRP 811 interface module within Modsoft configuration (DP bus) h Config extension size Step 2 Determination of any bus specific data through the PROFI–KON–DP software configuration tool SPU832, such as: h Import of device data base sets (GSD files) h Selection of the DP Master and DP Slaves for the bus project. h Master/Slave parameters h Definition and saving of a bus project with all bus specific and slave specific data into the path PLANT\STATION. PLANT means plant name, STATION means station name (programm). Step 3 80 Mapping (address assignments) of the DP Slave specific data with the SPU 931 configuration software to the state ram: Software Configuration .00 h Import of the bus project data (originating from the PROFI–KON–DP tool) h Assignment of the bus project to the Quantum DP bus controller CRP811 h Assignment of the slave specific data (I/O points) to PLC state ram register addresses (state ram mapping). Step 4 Initiate communication by: h Load user program into the PLC h Start communication The following drawing should help illustrate the relationships of the processing steps. >Plant >Station >Ranges >Config ex– tension size >User program Modsoft I .CFG file PROFI–KON–DP GSD831 GSD II Import files .CNF file III Import SPU931 Modsoft IV + Gene– rate .CFG file File load PLC >Bus parameters >Bus mapping >Master/Slave >I/O mapping >Saving as PLANT\STATION\STATION.cnf The fields I to IV indicate the processing sequence. (step 1 – 4) Figure 34 Quantum PROFIBUS–DP processing steps under Modsoft Note: The PROFI–KON–DP software package (SPU832) consists up to Version 1.60 of 1 independent diskette and a hard lock(dongle) diskette contains the executable configuration software, the for software protection. To make use of the software the dongle is must also be installed. Until Version 1.6 (Windows 3.11 / 95) a token diskette is needed for software protection. .00 Breite: 185 mm Höhe: 230 mm Software Configuration 81 4.3 Directory Structure for Programs and Data A common directory structure is essential in guaranteeing correct interaction for all of the software packages participating in communications configuration. A common directory structure is also essential for the different stations within a plant’s network. Program (.exe) directories: (not necessary, but recommendable) Data or plant directories: (mandatory) Drive: (e.g. E:\) Drive: (e.g. F:\) \ASAD \ASAPLANT \MODSOFT 1)* \PLC_ST00 \PROF_DP PLC_ST00.* (Modsoft files) DPPLC_00.cnf (DP–Bus project) \GSD_DP *.gsd *.gsg \PLC_ST00.env \SPU832 \SPU931 1)* The name is determined by the software Figure 35 Program and data directory structures 82 Software Configuration .00 4.4 Configuration Step by Step The following description shows the global steps for configuration. 4.4.1 Modsoft Configuration Part (Step 1) In the subsequent discussion configuration steps related to DP configuration will be handled. Note: The representation offered in Figure 36 only pertains to the DP configuration part. PLC_ST00 ASAPLANT DP master 140 CRP 811 00 + config extension size + 0x, 1x, 3x, 4x memory references Figure 36 Quantum hardware for Modsoft PROFIBUS–DP configuration. Names and their Meanings .00 Breite: 185 mm Höhe: 230 mm ASAPLANT Plant name (characterizes the program directory) PLC_ST00 PLC station name (program name) 140 CRP 811 00 DP option board (bus controller) Software Configuration 83 1)*)15 &&*),% ,*),% -+"),%$/!,0&%/ --*0 %3 2)1 Version 2.51 -$0-&1 /-'/!+ !+% $/%00 5.% +-3%0 "%14%%, 1(% %,2 !/ !,$ 1(% $)1),' #/%%, ./-3)$%0 (%*. -, 1(% +%,2 )1%+ %*%#1%$ "5 1(% #2/0-/ &&*),% 0%*%#1)-,,0 !##%00 ./-'/!+0 0!3% &)*%0 !,$ #(!,'% 0%11),'0 Figure 37 Start screen of Modsoft Note: Further sequences see User Instruction for POFIBUS-DP (840 USE 469 00). 84 Software Configuration .00 4.4.2 Bus Topologie Configuration (Step 2) In the next step you have to configure the bus topologie with the software tool SPU 832 01 (it is called also PROFI–KON–DP and a part of SPU 833 01). ASAPLANT PLC_ST00 CRP 811 DP bus project name DPPLC_00 (1) DP Master parameters/addresses DP bus (3) 16I (4) 16I+16O (5) (6) (7) (8) (9) DP Slave parameters/addresses 32I 16I 16I+16O Classic TIO 32I (10) D E P 2 1 1 E T 2 0 0 M DEA203 ET 200M D E A 2 0 3 D E P 2 0 8 Momentum Figure 38 The bus topology to be configured .00 Breite: 185 mm Höhe: 230 mm Software Configuration 85 After the installation under Windows and a corresponding program start, the following start screen appears. PROFIBUS DP Configurator Version: 1.60 softing OK Figure 39 Start screen of the Software Tool to configure bus parameters Note: Further sequences see User Instruction for POFIBUS-DP (840 USE 469 00). 86 Software Configuration .00 4.4.3 Mapping of I/O and Bus Project (Step 3) In the following steps the slave I/O addresses will be mapped into PLC memory and the bus controller assigned to the bus project ASAPLANT PLC_ST00 + 0x, 1x, 3x, 4x memory references for I/O and diagnostics CRP 811 Bus mapping (1) I/O mapping DPPLC_01 (3) 16I (4) 16I+16O (5) 32I Classic TIO (6) 16I (7) 16I+16O (8) 32I (9) (10) D E P 2 1 1 E T 2 0 0 M DEA203 ET 200M D E A 2 0 3 D E P 2 0 8 Momentum Figure 40 Assignment between the bus project and nodes of a plant .00 Breite: 185 mm Höhe: 230 mm Software Configuration 87 After the installation under Windows and a corresponding program start, the following start screen appears. SPU 931 -#!* -,&)'1.!0)-, --* %./)-, +" %*)'%,/0!$0 0%),(%)+%. 0. Figure 41 Start figure of the Software Tool to map I/O and bus project Note: Further sequences see User Instruction for POFIBUS DP (840 USE 469 00). 88 Software Configuration .00 4.4.4 Initiate Communication (Step 4) Downloading CFG–file If the CFG–file of the desired station is generated, your DP–configuration is ready for downloading into the PLC. Note: Loading under Modsoft (the station is already boot loaded) about menue ”Transfer”. 1)*)15 &&*),% ,*),% -+"),%$ /!,0&%/ --*0 %3 2)1 Version 2.51 -$0-&1 /-'/!+ !+% $/%00 5.% +-3%0 "%14%%, 1(% %,2 !/ !,$ 1(% $)1),' #/%%, ./-3)$%0 (%*. -, 1(% +%,2 )1%+ 0%*%#1 "5 1(% #2/0-/ &&*),% 0%*%#1)-,,0 !##%00 ./-'/!+0 0!3% &)*%0 !,$ #(!,'% 0%11),'0 Figure 42 Finalizing of DP Configuration Start Communication After downlowding about menue ”Transfer” you can choice the start of communication about the menue ”Online” PLC Start / PLC Stop. Note: If you start the PLC you start the communication too. End of DP Configuration .00 Breite: 185 mm Höhe: 230 mm Software Configuration 89 90 Software Configuration .00 Chapter 5 Diagnostic for CRP 811 Diagnostic Breite: 185 mm Höhe: 230 mm 91 92 Diagnostic 5.1 Scope This document describes the V RS 232C diagnostic interface and the V LED diagnostic h of the PROFIBUS Network Option Board CRP 811 (PROFIBUS–DP) for Quantum product line. The RS 232C diagnostic and LED diagnostic provides a method of an board online diagnostic from all relevant option board Software tasks / modules, configuration data and transfered data between PROFIBUS network and Quantum State RAM. Backplane Handler CDS I/0 data Menu handler task Terminal handler task Buffer Handling CCMP CMI Handler Memory Handling Profile User I/F Timer Handling Report Handling DDLM PCMCIA O S Driver FDL ASIC Figure 43 CRP 811 Software Tasks and Moduls Legend CDS: Configuration Data Download Server: local entity that controls the configuration process and distributes configuration data on a communication adapter. CCMP: Coordination Channel Communication Manager: Profile specific module CMI: Common Memory Interface .00 Breite: 185 mm Höhe: 230 mm Software Configuration 93 OS: Operating System DDLM: Direct–Data–Link–Mapper FDL: Fieldbus Data Link ASIC: Application Specific Integrated Circuit PCMCIA: Personal Computer Memory Card International Association = PC–Card 94 Software Configuration .00 5.2 RS 232C Diagnostic Interface To use the RS 232 diagnostic interface connect a terminal or a PC with a terminal emulation program (e.g. ”PROCOMM”) on the RS 232C (SUB–D9) port socket. For diagnosis connect the PC to the RS 232C (SUB–D9) port socket. This requires one of the following cable configurations: Serial Modbus cable 990 NAA 263–x0 or YDL 052. RS–232C Socket Signal Function 2 3 5 7 8 D2 (RXD) D1 (TXD) E2 (GND) S2 (RTS) M2 (CTS) Received Data Transmitted Data Signal Ground Request to Send Clear to Send Pin occupied N/C Figure 44 RS 232C Port Diagram CRP811 2m cable PC 1 2 Rx = Receired Data 3 Tx = Transmitted Data 4 DTR = Data Terminal Ready 5 GND = Signal Ground 6 7 8 9 1 RX 2 Tx 3 4 GND 5 6 RTS 7 CTS 8 9 Shield Housing SUB–D9 Pins (male) Housing SUB–D9 Pins (female) Figure 45 Example for a cable between PC and CRP811 .00 Breite: 185 mm Höhe: 230 mm Software Configuration 95 For print outputs on the terminal the CRP811 option board diagnostic interface needs a high signal on CTS over the cable connector from the PLC side. Default Terminal Settings 19200 Baud 8 Databits 1 Stopbit no Paritybit Remark When using a PC as a terminal there is a possibility to use a Baudrate higher than the 19200 Baud used for terminal output, so that there will be a higher throughput to the PC and it’s Logfile. RS 232C COM1 Programming Cable PC with Terminal Emulation in Program (e.g. PROCOMM) Option board Figure 46 Connection the RS 232 Interface 5.2.1 Print out Modus The RS232 diagnostic interface can be switched by the operator between the Menusystem and the normal print output modus from the option board. The normal print output modus is active after power up and after leaving the menu system with the keystroke of both, <CTRL> and <C>. The normal output in the printout modus consists of the output of the activated error reports and of the output of the tasks according to their debug mask. This mask can be set/reset in the debug mask menu in the expert mode and the setttings will stay in effect till power down. 96 Software Configuration .00 5.2.2 Menu System The menu system will be activated in the printout modus by a keystroke (Carriage Return or SPACE) of the terminal and it will display the Main–Menu for selection of the required function. The menu will be exited to the printout modus with the keystroke of both, <CTRL> and <C>. The input of ”ESCAPE” will cancel a given input or menu. 5.2.2.1 Main Menus The RS 232 diagnostic interface decides between the normal Main Menu and the Main Menu for Expert Modus. The normal Main Menu (after power up) is shown in Figure 48, Page 115. The Main Menu for Expert Modus is shown in Figure 49, Page 116. All submenus in the Main Menu are activided with the given letters in the round brackets. 5.2.2.2 Error Report menu (e) This submenu will allow the user to view the error report buffers of each task (see Figure 50, Page 116) , even if the Debugmask of the task has disabled the output of the reports. If the output is enabled by the debugmask, then the output will be sent automatically to the terminal handler task. But if there is no terminal connected to the UART, the data will be lost, because the data will be fetched from the task message queue and released immediately if there is no terminal connected. These lost data are still available in the error report circularbuffer in each task, so they can be viewed later on (see Figure 51, Page 117). 5.2.2.3 DP Data Menu (d) This menu offers a selection to show global CCMP information, information about the data sent to the PLC and information about each slave connected to that CCMP. For further information see also chapter 5.5 (Page 107) and Figure 53 (Page 118) ... Figure 64 (123). The submenu ’s’ for the display of the slave data shows the output/input data as they are sent/received over the bus to/from the DP slaves. This format is not the same as the State RAM format! 5.2.2.4 Global Data Menu (g) This submenu will allow the user to get information of the CRP811 firmware Version (headline of the screen), the PC Card (PCMCIA) firmware Version, the global Board status, the adress and size of the global heap , some print related object ID’s and the number of error reports that are saved for each task (see Figure 52, Page 117). There will be an additional Menu screen for the detailed output for the Board status for each task also chapter 5.2.2.10 on page 99). The last line of the Global Data Menus see the user the configured Profibus data rate. .00 Breite: 185 mm Höhe: 230 mm Software Configuration 97 5.2.2.5 Firmware Update Menu (u) This submenu (see Figure 66, Page 124) will enable the user to reload the flash eprom on board with a new image. But be aware of the fact, that the board will remain in the flash loader state forever, if no image is loaded to the board with the Flash loader on the PC. The only possibility to cancel that load request once it has been issued is to switch the board’s power off and on again! (see Figure 67, Page 125) 5.2.2.6 Terminal Setup Menu (t) This submenu (see Figure 68 and Figure 69, Page 125) will allow the user to change the Baudrate of the UART in order to connect a PC as a ’Logging device’ for the Output of the printf–task. This menu will allow to switch the Baudrate from 2400 Baud to 115000 Baud. 5.2.2.7 Expert Mode Menu (x) This submenu (see Figure 70. Page 126) is used for entering the expert mode of the menu system, a mode that is used to enable the access to the following submenus. In order to switch to the expert mode the user has to enter a password (see Figure 71). This password is originally ”ASAD E42”, but it can be changed by the user to any other password with a length between 6 and 31 characters (see Figure 73 ... Figure 75, Page 129). The menu system will show the additional menu selections (see Figure 72, Page 127) only if the expert mode is true. The menus that are normaly accessible are the following ones : (d) DP communication handler (for DP only) (e) Error Report Menu (g) Global Data Menu (t) Terminal Setup Menu (u) Firmware Update Menu (x) Expert Mode Menu The password is saved in RAM and if there is a new password entered by the user this new password is only valid until the next power up of the board. In order to help the user there is a message showing wether the original power up password or the user password is to be entered. The expert mode is only for debug use by an ASA technican or by a customer on demand by ASA to help in finding the problem of the malfunctioning board. The information of the normal main menu is all the customer needs to know of the board. 5.2.2.8 98 Board Reset Menu (r) This submenu (see Figure 65, Page 124) will only be accesible in expert mode and it will enable the user to issue a board RESET by software instead of hardware. But be aware that this RESET is only valid for the option board and not for the PLC! Software Configuration .00 5.2.2.9 Memory Browser Menu (b) This submenu (see Figure 76, Page 129) will only be accessible in expert mode and it will ask for the segment and offset values of the Startadress of the memory partition to be displayed. The display output will show the adress and 16 bytes in HEX and ASCII notation starting at that adress per line. After output of one page (256 byte) a new adress can be entered. 5.2.2.10 Task Information Menu (i) This submenu will only be accessible in expert mode and it will allow the user to get information of a specific task on the board (see Figure 79, Page 131) . In this menu the user can select a task to get some information about this task. He will get an output as in Figure 80 (Page 131). Additionaly there may be further menu screens for each task, where more information is shown about its internal state and variables. The menus for DP that are accessible here, are the same as the menus that are accessed via ’d’ in the main menu. There are only additional menus for the following tasks : (b) (c) (d) (n) backplane interface handler configuration data handler DP communication handler for DP only network interface handler Menu for Backplane Interface Handler This menu shows the global information of the backplane handler, e.g. Hook counters and other internal information. For further information see also chapter 5.6 (Page 113) and Figure 86 (Page 134) ... Figure 88 (Page 135). Menu for network interface handler This menu shows the global information of the PC Card handler, e.g. send/receive counters and other internal information. For further information see also chapter 5.7 (Page 114) and Figure 89 (Page 136) and Figure 90 (Page 136). Menu for Configuration Data Handler This menu shows the information of the configuration data handler and its internal information. For further information see also chapter 5.4 (Page 102) and Figure 81 (Page 132) ... Figure 85. 5.2.2.11 .00 Breite: 185 mm Höhe: 230 mm Debug Mask Menu (m) This submenu will only be accessible in expert mode and it will display the debug masks of all tasks on the board and it will allow the user to change each tasks debug mask (see Figure 77 and Figure 78, Page 130). These changes are only valid until the next power up, when the default values will be restored to the factory settings again. Software Configuration 99 5.3 LED Diagnostic For online LED diagnosis, option board use 7 LED fields in the front panel. Active Ready Fault Backplane PROFIBUS DP S/R Load Figure 47 Status LEDs of the Option Board CRP 811 The LEDs Active, Ready and Fault have the standard meaning like Quantum I/O and option moduls. Additionaly the Active LED is used to indicate the firmware download from a PC to the option board. The LEDs Backplane, DP S/R, PROFIBUS and Load are used in two ways. Either to indicate the transfer of PROFIBUS user data and config data or to indicate error/fault conditions from option board internal software tasks and software moduls. To indicate the different functions on the LED block the following basic blink frequencies and its abbreviations are defined for the option boards: OFF: LED is off (dark) ON: LED is on SLOW flashing frequency: 400 ms on and 400 ms off MEDIUM flashing frequency: 200 ms on and 200 ms off FAST flashing frequency: 100 ms on and 100 ms off Fault code: Blink sequence from 1 to 12 on and off states followed by a pause. Blink sequence and pause are repeated with a period of 6,4 sec. ODD Blink: Repeated irregular blink sequence 100 Software Configuration .00 Table 17 Status LEDs of the CRP 811 LEDs Color Function Active Green On: CPU is in ”Run” mode and the backplane communication active Flashing: The flash rom load operation is active Ready Green On: Module in operation Fault Red Off: Error free operation On: Other LEDs are flashing with faults code Backplane Green Off: Error free operation Flashing with fault code: on backplane fault PROFIBUS Green Off: Error free operation Flashing with fault code: on erroneous configuration data or PROFIBUS fault DP S/R Green Fast flashing frequency: Sending/Receiving DP bus data Medium flashing frequency: Configuration Slaves Slow flashing frequency: Waiting for configuration data Flashing with fault code: on erroneous configuration data Load Yellow Flashing: Configuration data load operation active Flashing with fault code: on load operation fault Caution: To reset the fault LED (red) the CRP811 must be powerd off / on by hot swap or PLC off / on. .00 Breite: 185 mm Höhe: 230 mm Software Configuration 101 5.4 Diagnostics for the CDS task For the LED ”Load” assigned to it, CDS uses the following blink codes to signal its state and error conditions: Table 18 102 CDS LEDS Blink Codes LEDs Meaning Permanently OFF No task messages received / positive confirmation Permanently ON Startup. Not yet registered with the system interface Slow Blink CDS is initialized and waiting for messages Medium Blink Loading configuration data from the PLC Fast Blink Loading configuration data to the tasks (CMI Handler, CCMP, ICMP) Odd Blink Error Report made, if not shown by a Blink_Code_1 to Blink_Code_12 Flash not used Blink Code 01 fault in PC Card configuration data Blink Code 02 fault in CCMP configuration data Blink Code 03 fault in ICMP configuration data Blink Code 04 fault in ICOM configuration data Blink Code 05 fault in function ’CDS_handle_received_Send_Data_Msg’ Blink Code 06 fault at receiving and/or sending a task message Blink Code 07 fault while loading configuration data from PLC to CDS Blink Code 08 fault while loading configuration data from CDS to tasks (PC Card,CCMP,ICMP and/or ICOM) Blink Code 09 a wrong Board type is configured Blink Code 10 fault in function ’Handle_service_message’ for subsystem PC Card,CCMP,ICMP,ICOM Blink Code 11 fault in function ’Handle_service_message’ for subsystem Backplane handler Blink Code 12 fault in function ’Handle_service_message’ for subsystem CDS Software Configuration .00 The Output of the Error report has in the component ’Detail’ the CDS_State as the higher word and the sending Subsystem as the lower word. In the component ’Line’ is the Linenumber of the Errorreport call. In the component ’Code’ there is mostly the reason for the error (e.g. service_class,subssytem,...). If an error report is made and the reason could not be assigned to the blink codes 1 to 12 then the blink code will be ’ODD’. Table 19 .00 Breite: 185 mm Höhe: 230 mm CDS Error Report Message ID Member Code Meaning of the message ID 3 slot ID searched for config data for this slot ID was not found 9 Timer type a wrong timer type was received 102 service class / service there are no more memory resources available 103 Error Code there was an error while receiving a task message for CDS 104 Error Code there was an error while sending a task message from CDS 105 message type an invalid message type was received 106 service a wrong service was received 107 service class a wrong service class was received 108 received PLC state a wrong PLC state was received 109 received Hook type a wrong Hookout type was received 110 CDS state a wrong CDS State is encountered 111 Cfg Load status there was an error while loading configuration data 112 service class / service this is an invalid PDU, that is rejected 113 service class / service an invalid subsystem is received 114 Invoke ID a wrong Invoke ID is in the received message 115 Error Code an error occurred while loading configuration data from the PLC 116 PDU type an invalid PDU type was received 117 Error Code there was an error while sending an unconfirmed START service 118 service class / service this subsystem / task does not exist 119 Board type a wrong board type is configured Software Configuration 103 Table 20 Error Code for CDS Error Report Error Code Meaning of the Error Code for ’status’ in above table – 4101 no memory available or no data attached to response – 4103 no resource available / Timeout at Task message receive call – 4107 Timeout at Task message receive call – 4109 there was an invalid parameter in the PDU – 4112 invalid timer message type – 4118 an invalid message type was received – 4119 an invalid sending subsystem was received – 4300 other initialization error while initializing CDS task – 4303 an invalid service was received and rejected – 4307 not supported – 4401 an invalid PDU type was received – 4403 an invalid service was received – 4404 an invalid service class was received – 4406 a service was rejected – 5110 there was no entry in the extended configuration area for an option board – 5801 a wrong CDS State is encountered – 5802 an error occured while loading configuration data to a task – 5803 an invalid subsystem was received – 5804 a new configuration request from Backplane Handler received – 5805 a wrong board type has been configured – 5806 a wrong Invoke ID to a previous request is received – 5807 while reading data from the PLC with Hookout protocol an error occured The menu for the CDS is only accessible in the ’expert’ mode in the ’Task Information’ menu. There are the following 5 submenus : Table 21 104 5 Submenus Ref. Meaning (g) global data (m) last sent message (l) load information (s) Status Notify events (v) internal values/counters Software Configuration .00 In the ’global data’ submenu the following values are shown : internal task state of the CDS the protocols that are supported by that option board (DP, FMS) the slot ID where this QOMP is inserted into the backplane the maximum size of bytes that can be transfered in one request the type of the last hook from the PLC the status of the PLC from the last hook from the PLC the board status bits (see also menu screen 2 of ’global data menu’) And if the PLC_MEM_INFO function returns a valid status then there is another menu where the internal data of the PLC is shown (e.g. PageF adress, number of 4X registers, ...). This information is only for the developer of the board software relevant. In the submenu for the ’last sent message’, the last message that was sent from the CDS will be shown, including the address and amount of data to be read from the PLC, if the message has a data pointer unequal NULL. In the submenu of the ’load information’ there is an information of amount of data that were loaded to the PC Card handler, the CCMP, the ICMP and the ICOM. There is also an information about the error context of the loaded data available. This error context consists of the following context code and an return error of the load function for the configuration data. .00 Breite: 185 mm Höhe: 230 mm Software Configuration 105 The meaning of the context code per task is as follows : Table 22 PC Card Handler Bit Meaning no bit set everything is OK bit 0 set error by profibus_init() or cmi_init() call bit 1 set error by call of DP_Master_INIT() function bit 2 set error with Busparameter bit 3 set error by activate busparameter call bit 4 set error by CRL Init_download call bit 5 set error by CRL Load_cfg_data call bit 6 set error by CRL Terminate_download call Table 23 DP Data Handler Number Meaning 0 everything is OK 1 an error occured outside the configuration data 2 an error occured by the use of PLC_mem_info() 3 an error occured in the global DP configuration 4 an error occured in the slave part of the DP configuration In the submenu for the ’internal values/counters’ the following values/counters are displayed : number number number number number of of of of of request PDUs to BP handler request PDUs to PC Card handler request PDUs to DP data handler positive response PDUs negative response PDUs number of error report counter number of reconfiguration counter number of Power UP hooks since last reset 106 Software Configuration .00 5.5 Diagnostics for the CCMP Task For the LED ”DP S/R” assigned to it, CCMP uses the following blink codes to signal its state and error conditions: Table 24 CCMP LED Blink Codes Blink Codes Meaning Permanently OFF Resetting (state: Resetting). No task messages received (state: Running). Permanently ON Startup. Not yet registered with the system interface (state: Initializing). Slow Blink Waiting for configuration data (states: Initializing, Loading) Medium Blink Downloading slave parameter sets (state: Configuring Slaves). Fast Blink Ready to run (state: Stopped, Synchronizing). Odd Blink not used Flash Task message received (state: Running). Blink Code 01 Unable to register with operating system error reporting service Blink Code 02 Error during basic task initialization Blink Code 03 Out of memory while creating internal buffers and data management tables Blink Code 04 Global configuration data inconsistent Blink Code 05 Slave configuration data inconsistent (slave number: see error report) Blink Code 06 Slave parameter download service failed Blink Code 07 Timeout while waiting for slave parameter download confirmation Blink Code 08 Unable to set stack operating mode Blink Code 09 Unable to synchronize with Backplane Handler Blink Code 10 Unable to synchronize with PCMCIA Handler Blink Code 11 Start command not allowed in current state Blink Code 12 reserved for future use The normal state blink feature can be turned on/off by setting/clearing the corresponding bit of the CCMP debug mask. The error code blink feature is not affected by the settings of the debug mask, neither is the message flash feature in the Running state. The following table lists the message ID’s for the CCMP error reports. Each error report has a unique message ID. For each message ID there is an explanation of the error cause and additional information about the component ’detail’. .00 Breite: 185 mm Höhe: 230 mm Software Configuration 107 Table 25 DP Communication Handler Error Report Message ID Explanation and detail codes. The 32–bit detail code may hold multiple segments of additional information whose size is given in brackets Standard Error Messages 0 No errors. (Not used) 1 Unknown error. (Not used) Fatal Initialization Error Messages 108 2 Illegal state in task state machine. detail = DP service (8), DP service primitive (8), handler task state (16) 3 Could not get CDS task ID. Entity not started? detail = 0 (32) 4 Could not get profile handler task ID. Entity not started? detail = 0 (32) 5 Could not get backplane handler task ID. Entity not started? detail = 0 (32) 6 Could not get profile handler event flag group handle. detail = 0 (32) 7 Could not get backplane handler event flag group handle. detail = 0 (32) 8 Could not get communication message buffer handle. Buffer not created?. detail = 0 (32) 9 Could not get communication message buffer info. Buffer not created? detail = 0 (32) 10 Out of memory. detail = handler task state (16), service_class (8), service (8) 11 Out of memory while creating state RAM output data image buffer. detail = max. backplane message size (16), image buffer number (16) 12 Out of memory while creating state RAM input data image buffer. detail = max. backplane message size (16), image buffer number (16) 13 Out of memory while creating state RAM diagnostic data image buffer. detail = max. backplane message size (16), image buffer number (16) 14 Out of memory while creating slave output data image buffer. detail = slave_number (32) 15 Out of memory while creating slave input data image buffer. detail = slave_number (32) 16 Out of memory while creating slave diagnostic data image buffer. detail = slave_number (32) 17 Out of memory while creating slave output template buffer. detail = slave_number (32) 18 Out of memory while creating slave input template buffer. detail = slave_number (32) 19 Out of memory while creating slave diagnostics template buffer. detail = slave_number (32) 20 Out of memory while creating slave parameter set buffer. detail = slave_number (32) Software Configuration .00 Table 25 DP Communication Handler Error Report Message ID Explanation and detail codes. The 32–bit detail code may hold multiple segments of additional information whose size is given in brackets Task Communication Error Messages 21 Could not get a task communication buffer. detail = message buffer pool ID (32) 22 Error while receiving task message. detail = message_type (32) 23 Error while sending task message. detail = destination task ID (16), service_class (8), service (8) 24 Error while setting flag in flag group. detail = destination task ID (16), flag group ID (16) 25 Invalid task message type. detail = message_type (32) 26 Invalid system task message. detail = command code (32) 27 Invalid service task message. detail = source subsystem/task ID (32) 28 Invalid service class. detail = source subsystem/task ID (16), service_class (16) 29 Invalid service code. detail = source subsystem/task ID (16), service_class (8), service (8) 30 Invalid PDU type. detail = source subsystem/task ID (16), PDU type (16) 31 Unknown task message source entity. detail = source subsystem/task ID (16), PDU type (16) 32 Destination entity of received task message not CCMP. detail = source subsystem/task ID (16), destination task ID (16) 33 Service message rejected. detail = destination task ID (16), service_class (8), service (8) 34 Service message not accepted after multiple send retries. detail = destination task_ID (16), service_class (8), service (8) DP Data and DP Configuration Error Messages .00 Breite: 185 mm Höhe: 230 mm 35 Invalid slave ID. detail = slave number (16), slave node ID (8), master node ID (8) 36 Invalid slave data DPM offset. detail = slave number (16), offset (16) 37 Invalid slave data template. detail = slave ID (16), template entry number (16) 38 CC data size too large for backplane transfer image. detail = slave ID (16), template entry number (16) 39 Invalid or no PLC memory/state RAM information. detail = health table segment (16), register segment (16) Software Configuration 109 Table 25 DP Communication Handler Error Report Message ID Explanation and detail codes. The 32–bit detail code may hold multiple segments of additional information whose size is given in brackets Task State and Task Configuration Error Messages 40 Not reset to accept a CDS InitLoad request. detail = handler task state (16), service_class (8), service (8) 41 Need CDS InitLoad request at the beginning of (re–)configuration. detail = handler task state (16), service_class (8), service (8) 42 Configuration data inconsistent. detail = handler task state (16), service_class (8), service (8) 43 Multiple configuration messages received from CDS. detail = handler task state (16), service_class (8), service (8) 44 CDS TerminateLoad request received while not in Loading state. detail = handler task state (16), service_class (8), service (8) 45 CCMP not in Configured / Stopped state while receiving CDS Start request. detail = handler task state (16), service_class (8), service (8) Global Configuration Data Error Messages 46 Out of range in configuration data buffer. detail = 0 (32) 47 Invalid master network node ID. detail = master node ID (32) 48 Invalid number of slave devices. detail = number of slaves (32) DP Slave Configuration Data Error Messages 110 49 Invalid slave output data DPM offset. detail = slave number (16), DPM output data offset (16) 50 Invalid slave input data DPM offset. detail = slave number (16), DPM input data offset (16) 51 Configured slave output data size too large (template). detail = slave number (16), data size (16) 52 Configured slave input data size too large (template). detail = slave number (16), data size (16) 53 Configured slave diagnostic data size too large (template). detail = slave number (16), data size (16) 54 Configured slave output state RAM data size too large (template). detail = slave number (16), data size (16) 55 Configured slave input state RAM data size too large (template). detail = slave number (16), data size (16) 56 Configured slave diagnostic state RAM data size too large (template). detail = slave number (16), data size (16) 57 Configured slave output discretes offset too large. detail = slave number (16), number of discretes in 0xxxx area (16) 58 Configured slave input discretes offset too large. detail = slave number (16), number of discretes in 1xxxx area (16) 59 Configured slave diagnostic discretes offset too large. detail = slave number (16), number of discretes in 1xxxx area (16) 60 Configured slave output registers offset too large. detail = slave number (16), number of registers in 4xxxx area (16) 61 Configured slave input registers offset too large. detail = slave number (16), number of registers in 3xxxx area (16) Software Configuration .00 Table 25 DP Communication Handler Error Report Message ID Explanation and detail codes. The 32–bit detail code may hold multiple segments of additional information whose size is given in brackets 62 Configured slave diagnostics registers offset too large. detail = slave number (16), number of registers in 3xxxx area (16) 63 Configured slave parameter length too small. detail = slave number (16), size of configured slave parameter set Profile Download and Service Error Messages 64 Invalid PDU size in PDU from profile. detail = DP service (16), DP primitive (16) 65 Invalid service code in PDU from profile. detail = DP service (16), DP primitive (16) 66 Invalid service primitive in PDU from profile. detail = DP service (16), DP primitive (16) 67 Unexpected service PDU from profile. detail = DP service (16), DP primitive (16) 68 Service request to profile failed. detail = DP service (8), DP primitive/if download: slave number (8), response status code (16) 69 Timeout while waiting for service confirmation from profile. detail = handler task state (16), DP service (8), slave number/operating mode (8) 70 Not allowed to handle unexpected profile messages in current state. detail = DP service (8), DP primitive (8), handler task state (16) 71 Invalid profile operating mode specified. detail = DP profile operating mode (32) 72 Unable to set required profile stack operating mode. detail = profile response status (16), required operating mode (16) Task Synchronization Error Messages .00 Breite: 185 mm Höhe: 230 mm 73 Unable to send synchronization message to profile handler. detail = 0 (32) 74 Unable to send synchronization message to backplane handler. detail = 0 (32) 75 Communication message buffers too small for DP parameter download. detail = message buffer pool ID (32) 76 Invalid PLC status in notification from backplane handler. detail = PLC status code (32) 77 Timeout while waiting for output scans. CPU failure? detail = configured timeout value (32) Software Configuration 111 112 Software Configuration .00 5.6 Diagnostics for the Backplane Handler Task This menu is only accessible in the ’expert’ mode of the main menu. In the menu for the Backplane handler there is a menu that consists of two screens. The first screen shows global data as follows : Module ID of the board (e.g. 0x400 for DP) state of the backplane handler Table 26 State of the Backplane Handler Number Meaning 0 backplane handler not active 1 backplane handler waiting for configuration data 2 backplane handler configures the DPM 3 backplane handler has an error while configuring the DPM 4 backplane handler is active timeout counter (reserved : 0 as default) timeout on wait counter (reserved : 0 as default) hook delay time (reserved : 0 as default) maximum time for DP hooks actual time for DP hooks maximum time for configuration hooks actual time for configuration hooks with the time values in microseconds. In the second screen the counters for the different hook types are shown, divided into the hooks that are received when the PLC is in ’stopped’ state and in ’running’ state. Only the hooks that are used by the board have a seperate counter, all non used hooks are counted in one general counter. There is also a menu point, that allows to clear this backplane handlers data. Diagnostic Breite: 185 mm Höhe: 230 mm 113 5.7 Diagnostics for the PC Card handler task This menu is only accessible in the ’expert’ mode of the main menu. The PC Card handler has a menu showing its global data. If the PC Card version is available, then this version string from the PC Card will be shown. Otherwise only the following counters will be shown : Table 27 Counters Type of Counter Meaning timeout counter how many times has the PC Card detected a timeout diagnostics counter how many diagnostics indications are received DP data output counter how many messages are sent to the PC Card for DP output DP data input counter how many messages are received from the PC Card for DP input sent messages counter how many messages are sent to the PC Card received messages counter how many messages are received from the PC Card There is also a menu point, that allows to clear this PC Card handler data. 114 Diagnostic 5.8 Textboxes for Terminal Menu Handler Quantum CRP 811 V2_00D, Schneider Automation, 1996 Main Menu ––––––––– Select one of the following options: (d) (e) (g) (t) (u) (x) DP Data Menu Error Report Menu Global Data Menu Terminal Setup Menu Firmware Update Menu Expert Mode Menu Press <CR> to accept, <ESC> to cancel, <CTRL–C> to quit: Figure 48 Output normal Main Menu after Power up Note The top line each textbox shows the current firmware version of CRP 811. This Main Menu is starting at Version 2.00 00 Breite: 185 mm Höhe: 230 mm Diagnostic 115 Quantum CRP 811 V2_00D, Schneider Automation, 1996 Main Menu (Expert Mode) ––––––––––––––––––––––– Select one of the following options: (b) (d) (e) (g) (i) (m) (r) (t) (u) (x) Memory Browser Menu DP Data Menu Error Report Menu Global Data Menu Task Information Menu Debug Mask Menu Board Reset Menu Terminal Setup Menu Firmware Update Menu Expert Mode Menu Press <CR> to accept, <ESC> to cancel, <CTRL–C> to quit: Figure 49 Output Main Menu for Expert Mode, selected with Submenu (x) in Figure 48 Quantum CRP 811 V2_00D, Schneider Automation, 1996 Error Report Menu ––––––––––––––––– The number of buffered report entries per task is given in brackets. Select one of the following tasks: (b) (c) (d) (f) (m) (n) (o) (s) (t) backplane interface handler configuration data handler DP communication handler FMS communication handler terminal menu handler network interface handler system object handler system timer handler terminal interface handler (00) (00) (00) (00) (00) (00) (00) (00) (00) Press <CR> to accept, <ESC> to cancel, <CTRL–C> to quit: Figure 50 Menu for viewing Error Reports from Task Circular Buffer, selected with Submenu (e) in Figure 48 or Figure 49 116 Diagnostic 00 Quantum CRP 811 V2_00D, Schneider Automation, 1996 Error Report Menu ––––––––––––––––– The DP communication handler (Ver.00.100a) was created at Mar18 1996 It was started at system startup + 00:00:00,00. Its error report buffer holds 1 reports. Error report number 1 from the DP communication handler: time of creation module name source line error code error detail error message ID caller : : : : : : : 00:00:16,27 CCMP.C 348 –4107 0003E700h 69 0792:07C5 Press <CR> to continue, <ESC> to cancel, <CTRL–C> to quit: Figure 51 Output of an Error Report Entry, selected with Submenu (e) in Figure 48 or Figure 49 Quantum CRP 811 V2_00D, Schneider Automation, 1996 Global Data Menu –––––––––––––––– build date build time PC Card firmware version PC Card firmware build date global option board status global heap base segment global heap size (bytes) largest free block on global heap print task ID print flag group handle print buffer pool handle task message buffer pool handle maximum task message buffers task message buffers used max. error reports per task Profibus data rate : Mar 18 1996 : 14:13:47 : 5.01 : 25.01.1996 : 003Ch : 0845h : 228272 : 141936 : F607h : 0502h : 0601h : 0602h : 30 : 1 : 16 12MBit/s Press <CR> to continue, <ESC> to cancel, <CTRL–C> to quit: Figure 52 Output of the global Values for the Board, selected with Submenu (g) in Figure 48 or Figure 49 00 Breite: 185 mm Höhe: 230 mm Diagnostic 117 Quantum CRP 811 V2_00D, Schneider Automation, 1996 DP Data Menu –––––––––––– This task controls all DP data mapping. Choose one of the following options: (h) (d) (s) (m) (c) (o) (t) DP DP DP DP DP DP DP handler task information data image information slave information slave diagnostic (manual) slave diagnostic (cyclic) slave diagnostic (overview) slave diagnostic (statistic) Press <CR> to accept, <ESC> to cancel, <CTRL–C> to quit: Figure 53 Submenu for DP Data Menu, selected with Submenu (d) in Figure 48 or Figure 49 Quantum CRP 811 V2_00D, Schneider Automation, 1996 DP Data Menu –––––––––––– global state profile startup enabled profile stack operating mode output data transfer enabled output transfers since startup input transfers since startup configuration error code configuration error context code PROFIBUS master node ID PROFIBUS master PNO identifier number of slaves configured : : : : : : : : : : : 12 1 C0h 0 0 3895 0 0 1 B204h 25 slave status bit table (1=active, 0=inactive) 1111111111111111 1111111110000000 0000000000000000 0000000000000000 0000000000000000 0000000000000000 0000000000000000 0000000000000000 Press <CR> to continue, <ESC> to cancel, <CTRL–C> to quit: Figure 54 Output for global DP Data, selected with Submenu (h) in Figure 53 118 Diagnostic 00 Quantum CRP 811 V2_00D, Schneider Automation, 1996 DP Data Menu –––––––––––– DP output data image dump (transfer #1) length= 55, type=1, fcode=5, crossover=0, segment=B000h 00081:000000000000001b 00129:000000000000000b 00177:000000000000000b 00225:000000000000000b 00273:000000000000000b 00321:000000000000000b 00369:000000000000000b 00417:000000000000001b 00097:000000000000000b 00145:000000000000000b 00193:000000000000000b 00241:000000000000000b 00289:000000000000000b 00337:000000000000000b 00385:000000000000000b 00433:000000000000001b 00113:000000000000000b 00161:000000000000000b 00209:000000000000000b 00257:000000000000000b 00305:000000000000000b 00353:000000000000000b 00401:000000000000000b Press <CR> to continue, <ESC> to cancel, <CTRL–C> to quit: Figure 55 Output for Data Output Image of DP, selected with Submenu (d) in Figure 53 Quantum CRP 811 V2_00D, Schneider Automation, 1996 DP Data Menu –––––––––––– DP input data image dump (transfer #1) length= 113, type=1, fcode=6, crossover=0, segment=B000h 10033:000000000111000b 10081:000000000000000b 10129:000000000000000b 10177:000000000000000b 10225:000000000000000b 10273:000000000000000b 10321:000000000000000b 10369:000000000000000b 10417:000000000000000b 10049:111111111111111b 10097:000000000000000b 10145:000000000000000b 10193:000000000000000b 10241:000000000000000b 10289:000000000000000b 10337:000000000000000b 10385:000000000000000b 10433:000000000000000b 10065:000000000000000b 10113:000000000000000b 10161:000000000000000b 10209:000000000000000b 10257:000000000000000b 10305:000000000000000b 10353:000000000000000b 10401:000000000000000b Press <CR> to continue, <ESC> to cancel, <CTRL–C> to quit: Figure 56 Output for Data Input Image of DP, selected with Submenu (d) Figure 53 00 Breite: 185 mm Höhe: 230 mm Diagnostic 119 Quantum CRP 811 V2_00D, Schneider Automation, 1996 DP Data Menu –––––––––––– DP diagnostics data image dump (transfer #1) length= 1309, type=1, fcode=6, crossover=0, segment=B000h 30310:0000h 30313:0001h 30316:0007h 30319:0000h 30322:0000h 30412:0000h 30415:0044h 30418:0000h 30421:0000h 30511:000Ch 30514:0033h 30517:0000h ( ( ( ( ( ( ( ( ( ( ( ( +0.) +1.) +7.) +0.) +0.) +0.) +68.) +0.) +0.) +12.) +51.) +0.) 30311:000Ch 30314:0013h 30317:0000h 30320:0000h 30410:0000h 30413:0001h 30416:0007h 30419:0000h 30422:0000h 30512:0000h 30515:0044h 30518:0000h ( ( ( ( ( ( ( ( ( ( ( ( +12.) +19.) +0.) +0.) +0.) +1.) +7.) +0.) +0.) +0.) +68.) +0.) 30312:0000h 30315:0054h 30318:0000h 30321:0000h 30411:000Ch 30414:0013h 30417:0000h 30420:0000h 30510:0000h 30513:0001h 30516:0007h 30519:0000h ( ( ( ( ( ( ( ( ( ( ( ( +0.) +84.) +0.) +0.) +12.) +19.) +0.) +0.) +0.) +1.) +7.) +0.) Press <CR> to continue, <ESC> to cancel, <CTRL–C> to quit: Figure 57 Output of Diagnostics Data for DP, selected with Submenu (d) in Figure 53 Quantum CRP 811 V2_00D, Schneider Automation, 1996 Information for DP Slave #2 (node ID 4, ACTIVE) ––––––––––––––––––––––––––––––––––––––––––––––– output discretes area input discretes area diagnostics discretes area output registers area input registers area diagnostics registers area DP parameter data size PNO identifier diagnostics data byte #1 diagnostics data byte #2 diagnostics data byte #3 diagnostics data byte #4 (master) diagnostics data byte #5/6 (vendor) station not reachable count station not ready count invalid response count input register for life sign : 0xxxx–0xxxx : 10065–10080 : 1xxxx–1xxxx : 4xxxx–4xxxx : 3xxxx–3xxxx : 30410–30422 : 14 : 1344h : 00000000b : 00001100b : 00000000b : 1 : 1344h : 0 : 0 : 0 : 300013 Press <CR> to continue, <ESC> to cancel, <CTRL–C> to quit: Figure 58 Information for a given Slave, selected with Submenu (s) in Figure 53 120 Diagnostic 00 Quantum CRP 811 V2_00D, Schneider Automation, 1996 DP Data Menu –––––––––––– DP output data of DP slave #2 (node ID 4): No DP output data defined for this slave. Press <CR> to continue, <ESC> to cancel, <CTRL–C> to quit: Figure 59 Actual Input Data from a given Slave, selected with Submenu (s) in Figure 53 Quantum CRP 811 V2_00D, Schneider Automation, 1996 DP Data Menu –––––––––––– DP input data of DP slave #2 (node ID 4): 00h 00h Press <CR> to continue, <ESC> to cancel, <CTRL–C> to quit: Figure 60 Actual Output Data for a given Slave, selected with Submenu (s) in Figure 53 00 Breite: 185 mm Höhe: 230 mm Diagnostic 121 Quantum CRP 811 V2_00D, Schneider Automation, 1996 DP Data Menu –––––––––––– Diacnostic for DP slave #1 (node ID 9): Byte #1 Byte #2 Byte #3 Byte #4 (Master) 00000000b 00001100b 00000000b 1 Byte #5/6 (vendor) 1354h Diagnostic bytes #1 to #13 in Hexa Decimal 0 00 01 02 03 04 05 06 07 08 09 10 11 12 13 14 15 16 17 18 19 –– 00 0C 00 01 13 54 07 00 00 00 00 00 00 Press <CR> to continue, <ESC> to cancel, <CTRL–C> to quit: Figure 61 DP Slave diagnostic with manual update by keystroke, selected with Submenu (m) in Figure 11. Quantum CRP 811 V2_00D, Schneider Automation, 1996 DP Data Menu –––––––––––– Diacnostic for DP slave #1 (node ID 9): Byte #1 Byte #2 Byte #3 Byte #4 (Master) 00000000b 00001100b 00000000b 1 Byte #5/6 (vendor) 1354h Diagnostic bytes #1 to #13 in Hexa Decimal 0 00 01 02 03 04 05 06 07 08 09 10 11 12 13 14 15 16 17 18 19 –– 00 0C 00 01 13 54 07 00 00 00 00 00 00 Press <CR> to continue, <ESC> to cancel, <CTRL–C> to quit: Figure 62 DP Slave diagnostic with automatic update by runing diagnostic data, selected with Submenu (c) in Figure 11. 122 Diagnostic 00 Quantum CRP 811 V2_00D, Schneider Automation, 1996 DP Data Menu –––––––––––– DP diagnostic overview R: Slave is running, ?: Slave is not running, C: No Diagnostic available addr\offs 0 10 00 01 02 03 04 05 06 07 08 09 R R R R Press <CR> to continue, <ESC> to cancel, <CTRL–C> to quit: Figure 63 DP Slave diagnostic overview with manual update by keystroke, selected with Submenu (o) in Figure 11 Quantum CRP 811 V2_00D, Schneider Automation, 1996 DP Data Menu –––––––––––– DP diagnostic statistic addr\offs 00 0 10 003 01 02 03 04 05 06 07 08 09 003 003 003 Press <CR> to continue, <ESC> to cancel, <CTRL–C> to quit: Figure 64 DP Slave diagnostic statistic overview with manual update by keystroke, selected with Submenu (t) in Figure 11. 00 Breite: 185 mm Höhe: 230 mm Diagnostic 123 Quantum CRP 811 V2_00D, Schneider Automation, 1996 Board Reset Menu –––––––––––––––– The board will be completely reset to power up state. All parameters that have been changed using the diagnostics terminal (e.g. baud rate settings, debug masks) will be reset to default state. Choose one of the following options: (a) (r) abort action and resume in normal mode reset and re–initialize board Press <CR> to accept, <ESC> to cancel, <CTRL–C> to quit: Figure 65 Software RESET of the Board, selected with Submenu (r) in Figure 49 Quantum CRP 811 V2_00D, Schneider Automation, 1996 Firmware Update Menu –––––––––––––––––––– The board will be switched to firmware download mode. Having finished the download successfully, the new firmware will be started. The parameters of the serial interface will be reset to default. In case of a download failure or user abort it may be necessary to restart the board with a power down / power up to resume normal operation. Choose one of the following options: (a) (e) abort action and resume in normal mode enter firmware download mode Press <CR> to accept, <ESC> to cancel, <CTRL–C> to quit: Figure 66 Activation of the Flash Loader, selected with Submenu (u) in Figure 48 or Figure 49 124 Diagnostic 00 Quantum CRP 811 V2_00D, Schneider Automation, 1996 Firmware Upgrade Menu ––––––––––––––––––––– Ready to perform firmware download. Keyboard input will not be accepted until this operation has been finished. To cancel this operation turn power off and then on again. Figure 67 Message Screen after Activation of the Flash Loader, selected with Submenu (u) in Figure 48 or Figure 49 Quantum CRP 811 V2_00D, Schneider Automation, 1996 Terminal Setup Menu ––––––––––––––––––– Default Settings for Diagnostics Terminal serial interface cursor home cursor up cursor down cursor right cursor left toggle ins/overw confirm selection cancel action enter menu mode exit menu mode : : : : : : : : : : : r=19200, p=off, ESC+H or CTRL+^ ESC+A or CTRL+K ESC+B or CTRL+J ESC+C or CTRL+L ESC+D or CTRL+H TAB CR ESC CR or SPACE CTRL+C d=8, s=1 / CHR (30) / CHR (11) / CHR (10) / CHR (12) / CHR (8) Press <CR> to continue, <ESC> to cancel, <CTRL–C> to quit: Figure 68 Output of the Terminal settings after Power Up, selected with Submenu (t) in Figure 48 or Figure 49 00 Breite: 185 mm Höhe: 230 mm Diagnostic 125 Quantum CRP 811 V2_00D, Schneider Automation, 1996 Terminal Setup Menu ––––––––––––––––––– The parameters of the serial I/F will be set before return to the main menu. Choose one of the following options: (0) 19200 (1) 14400 (2) 9600 (3) 4800 (4) 2400 (5) 1200 (6) 9600 (7) 2400 (8) 38400 (9) 115200 Baud, Baud, Baud, Baud, Baud, Baud, Baud, Baud, Baud, Baud, 8 8 8 8 8 8 7 7 8 8 data data data data data data data data data data bits, bits, bits, bits, bits, bits, bits, bits, bits, bits, 1 1 1 1 1 1 1 1 1 1 stop stop stop stop stop stop stop stop stop stop bit, bit, bit, bit, bit, bit, bit, bit, bit, bit, no parity no parity no parity no parity no parity no parity even parity even parity no parity no parity Press <CR> to accept, <ESC> to cancel, <CTRL–C> to quit: Figure 69 Selection of a different Baudrate, selected with Submenu (t) in Figure 48 or Figure 49 Quantum CRP 811 V2_00D, Schneider Automation, 1996 Expert Mode Menu –––––––––––––––– Select one of the following options: (e) enter password Press <CR> to accept, <ESC> to cancel, <CTRL–C> to quit: Figure 70 Menu for the Expert Mode available also in normal Mode, selected with Submenu (x) in Figure 48 126 Diagnostic 00 Quantum CRP 811 V2_00D, Schneider Automation, 1996 Password Menu ––––––––––––– The default password is active. Enter password: Figure 71 Input of the Password to enter ”Expert Mode”, selected with Submenu (x) in Figure 48 Quantum CRP 811 V2_00D, Schneider Automation, 1996 Expert Mode Menu –––––––––––––––– Select one of the following options: (e) (s) (x) enter password set new password exit expert mode Press <CR> to accept, <ESC> to cancel, <CTRL–C> to quit: Figure 72 Menu for Expert Mode in Expert Mode, selected with Submenu (x) in Figure 49 00 Breite: 185 mm Höhe: 230 mm Diagnostic 127 Quantum CRP 811 V2_00D, Schneider Automation, 1996 Password Setup Menu ––––––––––––––––––– Enter new password: ******** Figure 73 Input of a (new) Customer Password, selected with Submenu (s) in Figure 72 Quantum CRP 811 V2_00D, Schneider Automation, 1996 Password Setup Menu ––––––––––––––––––– Enter new password: ******** Figure 74 Reenter new Password once again, selected with Submenu (s) in Figure 72 128 Diagnostic 00 Quantum CRP 811 V2_00D, Schneider Automation, 1996 Password Setup Menu ––––––––––––––––––– Your new password is valid. Do you want to save the new password permanently? If you enter ’w’, your new password will be written to memory and the option board will be reset. DP communication will be disabled during the time needed to restart the board. Select one of the following options: (n) (w) do not write password to memory write password to memory Press <CR> to accept, <ESC> to cancel, <CTRL–C> to quit: Figure 75 Do you want to save the new Password in RAM?, selected with Submenu (s) in Figure 72 Quantum CRP 811 V2_00D, Schneider Automation, 1996 Memory Browser Menu ––––––––––––––––––– addr\offs|00010203 04 05 06 07 08 29 0A 0B 0C0D0E0F|0123456789ABCDEF –––––––––+–––––––––––––––––––––––––––––––––––––––––+–––––––––––––––– FD00:0000|FAFCEB5C 90 00 00 00 00 00 00 00 00000000|...\............ FD00:0010|4153415F 44 45 55 54 53 43 48 4C 414E445F|ASA_DEUTSCHLAND_ FD00:0020|4C4F4144 45 52 5F 4E 4F 50 39 31 315F5F5F|LOADER_NOP911___ FD00:0030|50524F54 4F 54 59 50 45 5F 5F 5F 5F5F5F5F|PROTOTYPE_______ FD00:0040|5645522E 5F 54 30 30 30 30 30 30 2E30325F|VER._T000000.02_ FD00:0050|32302E31 31 2E 31 39 39 35 5F 5F 5F5F5F5F|20.11.1995______ FD00:0060|B810008E D8 8E D0 F8 B8 14 00 2D 1000BB10|..........–.... FD00:0070|00F7E305 BE 02 8B E0 B8 4C 00 BB 40004B2B|[email protected]+ FD00:0080|C3B103D3 E0 8B C8 E3 13 B8 48 FE 408ED8BE|..........H.@... FD00:0090|0000B840 00 8E C0 BF 00 00 F3 A5 B88100BB|...@............ FD00:00A0|4D00432B C3 B1 03 D3 E0 8B C8 E3 0A8EC3BF|M.C+............ FD00:00B0|0000B800 00 F3 AB B8 1A 0C BB 5A 0B2BC3B1|...........Z.+.. FD00:00C0|01D3E88B C8 E3 11 8C C8 8E D8 BE 5A0BB800|............Z... FD00:00D0|008EC0BF 00 00 F3 A5 B8 10 00 8E D8B81000|................ FD00:00E0|8ED88ED0 F8 B8 14 00 2D 10 00 BB 1000F7E3|........–....... FD00:00F0|05BE028B E0 E9 38 00 F4 00 E8 C3 09B0FFA2|......8......... Enter address to continue dump from: FD00:010 Figure 76 Memory Browser Menu, selected with Submenu (b) in Figure 49 00 Breite: 185 mm Höhe: 230 mm Diagnostic 129 Quantum CRP 811 V2_00D, Schneider Automation, 1996 Debug Mask Menu ––––––––––––––– The current debug mask value is given in brackets. Select one of the following tasks: (b) (c) (d) (f) (m) (n) (o) (s) (t) backplane interface handler configuration data handler DP communication handler FMS communication handler terminal menu handler network interface handler system object handler system timer handler terminal interface handler (00000A01h) (00001201h) (00001A01h) (00000A01h) (00000A01h) (00000A01h) (00000201h) (00000201h) (00000A01h) Press <CR> to accept, <ESC> to cancel, <CTRL–C> to quit: Figure 77 Menu for Viewing and Changing the Debug Masks of all Tasks, selected with Submenu (m) in Figure 49 Quantum CRP 811 V2_00D, Schneider Automation, 1996 Debug Mask Menu ––––––––––––––– Debug mask for the configuration data handler (select bit to change) XXXXXXXXh (xxxxxxxxxxxxxxxxAaflibphSsRrTtEe) 00001201h (00000000000000000001001000000001) (a/A) (b) (e/E) (f) (h) (i) (l) (p) (r/R) (s/S) (t/T) additional debug support output beep when displaying critical messages display error reports in short/long format enable LED flash mode during message/data transfers display buffer headers when sending/receiving display initialization status messages enable LED task state blink codes display task printouts (needed for the following) display received task messages in short/long format display task messages in short/long format before send display timer messages in short/long format Press <CR> to accept, <ESC> to cancel, <CTRL–C> to quit: Figure 78 Menu for Setting/ Resetting each Bit in the Debugmask of a given Task, selected with Submenu (m) in Figure 49 130 Diagnostic 00 Quantum CRP 811 V2_00D, Schneider Automation, 1996 Task Information Menu ––––––––––––––––––––– Select one of the following_tasks: (b) (c) (d) (m) (n) (o) (s) (t) backplane interface handler configuration data handler DP communication handler terminal menu handler network interface handler system object handler system timer handler terminal interface handler Press <CR> to accept, <ESC> to cancel, <CTRL–C> to quit: Figure 79 Menu for Selecting the internal Task for which Display of internal Data is requested, selected with Submenu (i) in Figure 49 Quantum CRP 811 V2_00D, Schneider Automation, 1996 Task Information Menu ––––––––––––––––––––– System task information of the backplane interface handler: version : 0.001a date of creation : Mar 18 1996 task ID : FC02h status : 0 priority : 50 debug mask : 00000A01h stack base : 3476h stack size : 2048 stack used : 382 local heap base : 0000h local heap size : 0 local heap free : 0 message queue size : 32 message queue used : 0 CPU usage hh:mm:ss,ddd : 00:00:43,117 Press <CR> to continue, <ESC> to cancel, <CTRL–C> to quit: Figure 80 Submenu for the Backplane Interface Handler, selected with Submenu (b) in Figure 79 00 Breite: 185 mm Höhe: 230 mm Diagnostic 131 Quantum CRP 811 V2_00D, Schneider Automation, 1996 Configuration Data Handler Global Data –––––––––––––––––––––––––––––––––––––– internal task state: protocol(s) supported backplane slot ID max. DPM transfer size last hook type global PLC state board status bit mask 0 : : : : : : DP 10 2510 01h 20h 0000 PLC memory info is valid Press <CR> to continue, <ESC> to cancel, <CTRL–C> to quit: Figure 81 Output for global Information of the CDS, selected with Submenu (c) in Figure 79 Quantum CRP 811 V2_00D, Schneider Automation, 1996 Configuration Data Handler Last Sent Message –––––––––––––––––––––––––––––––––––––––––––– sending subsystem destination task ID message type send count service class service PDU type service specific status invoke ID data length : : : : : : : : : : : 247 FB05h 5 1 2 5 3 251 0 19 0 Press <CR> to continue, <ESC> to cancel, <CTRL–C> to quit: Figure 82 Output of the last sent Message from the CDS, selected with Submenu (c) in Figure 79 132 Diagnostic 00 Quantum CRP 811 V2_00D, Schneider Automation, 1996 Configuration Data Handler Load Information ––––––––––––––––––––––––––––––––––––––––––– PC Card data length PC Card error detail : : 138 0/0000h DP handler data length DP handler error detail : : 1894 0/0000h Press <CR> to continue, <ESC> to cancel, <CTRL–C> to quit: Figure 83 Output of the State of the Configuration Data Load, selected with Submenu (c) in Figure 79 Quantum CRP 811 V2_00D, Schneider Automation, 1996 Configuration Data Handler Status Notify Events ––––––––––––––––––––––––––––––––––––––––––––––– hook type controller state time of request in msec : : : Reconfiguration reconfiguring (FF) (FF) 0 ms hook type controller state time of request in msec : : : Power Up stopped ( 1) (20) 0 ms Press <CR> to continue, <ESC> to cancel, <CTRL–C> to quit: Figure 84 Output of Ringbuffer for Status Notify Requests, selected with Submenu (c) in Figure 79 00 Breite: 185 mm Höhe: 230 mm Diagnostic 133 Quantum CRP 811 V2_00D, Schneider Automation, 1996 Configuration Data Handler Internal Counters/Values ––––––––––––––––––––––––––––––––––––––––––––––––––– request request request request PDUs PDUs PDUs PDUs to to to to backplane handler PC Card handler DP data handler FMS data handler : : : : 9 5 5 0 positive response PDUs negative response PDUs : : 14 0 error report counter reconfiguration counter Power UP hooks since last reset : : : 0 1 1 Press <CR> to continue, <ESC> to cancel, <CTRL–C> to quit: Figure 85 Output of the internal Coutners and Variables of the CDS, selected with Submenu (c) in Figure 79 Quantum CRP 811 V2_00D, Schneider Automation, 1996 Backplane Handler Menu –––––––––––––––––––––– This task performs all backplane data transfer. Choose one of the following options: (g) (r) global data reset counters Press <CR> to accept, <ESC> to cancel, <CTRL–C> to quit: Figure 86 Menu for Backplane Handler global Data, selected with Submenu (b) in Figure 79 134 Diagnostic 00 Quantum CRP 811 V2_00D, Schneider Automation, 1996 Backplane Handler Internal Data ––––––––––––––––––––––––––––––– module ID handler state timeout counter timeout on wait : : : : 0400h 4 0 0 hook delay : 0 max. time for DP/FMS hook : last time for DP/FMS hook : 4380 2860 max. time for config hook : last time for config hook : 36000 36000 Press <CR> to continue, <ESC> to cancel, <CTRL–C> to quit: Figure 87 Backplane Handler global Data, selected with Submenu (g) in Figure 86 Quantum CRP 811 V2_00D, Schneider Automation, 1996 Backplane Handler Internal Data ––––––––––––––––––––––––––––––– PLC in STOPPED state Powerup hook counter : 1 Exit Dim Awareness hook counter : 1 End of Scan hook counter : 10930 Dummy End of Scan hook counter : 0 Port 3 Preprocessing hook counter : 0 User Logic hook counter : 0 other hooks counter : 10932 PLC in RUNNING state Powerup hook counter : 0 Exit Dim Awareness hook counter : 0 End of Scan hook counter : 0 Dummy End of Scan hook counter : 0 Port 3 Preprocessing hook counter : 0 User Logic hook counter : 0 other hooks counter : 0 Press <CR> to continue, <ESC> to cancel, <CTRL–C> to quit: Figure 88 Number of Hooks from PLC, selected with Submenu (g) in Figure 86 00 Breite: 185 mm Höhe: 230 mm Diagnostic 135 Quantum CRP 811 V2_00D, Schneider Automation, 1996 PC Card Handler Menu –––––––––––––––––––– This task performs all PC Card data transfer. Choose one of the following options: (g) (r) global data reset counters Press <CR> to accept, <ESC> to cancel, <CTRL–C> to quit: Figure 89 Menu for PC Card Handler global Data, selected with Submenu (n) in Figure 79 Quantum CRP 811 V2_00D, Schneider Automation, 1996 PC Card Handler Menu –––––––––––––––––––– PC Card ident string: @(#1) PROFIcard PBFW_DP.SBN V5.01 timeout counter : 0 diagnostics counter : 33 DP data output counter DP data input counter : : 371616 403960 sent messages counter received messages counter : : 66 69 25.01.1996 Press <CR> to continue, <ESC> to cancel, <CTRL–C> to quit: Figure 90 Couter Values for PC Card Handler, selected with Submenu (n) in Figure 79 136 Diagnostic 00 Appendix A Module Discriptions The following modules you will find: 140 CRP 811 00 AS–BDA–203 .00 Breite: 185 mm Höhe: 230 mm Module Discriptions 137 138 Module Discriptions .00 140 CRP 811 00 Communication Module PROFIBUS–DP Module Description 140 CRP 811 00 link TSX Quantum devices to the PROFIBUS–DP as per DIN 19 245 Parts 1 and 3. Enclosed you will find the following module specific information: Features and Function Configuration Diagnosis Technical Specifications 22 Breite: 185 mm Höhe: 230 mm 140 CRP 811 00 139 Figure 1 Front View 1 2 3 Positions of the User Accessable Parts 1 Color Code 2 LED Status Display 3 Quantum Module 140 CRP 811 00 4 RS–232C Port 5 PCMCIA Card (467 NHP 911) 6 Module Mounting Screws 7 PROFIBUS RS–485 Port 8 Transmission Access Point (490 NAE 911) 4 5 6 7 8 140 140 CRP 811 00 22 1 Features and Function 1.1 Features The communication module serve ar the connecting linkage between the CPU and external PROFIBUS nodes. 1.2 Functional Details Quantum Parallel Bus Quantum ASIC Dual Port Ram 4 K * 16 (IDT 7024) 16 Bit Data Bus 19 Bit Address Bus 80386EX Microproc. 25 MHz 256 KB Ram 256 KB Flash Rom 14,3181 MHz ISA Timing GAL PCMCIA Host Adapter CL–PD6710 LED Status Display 144–PIN VQFP Vcc. Vpp. Switch LTC 1472 RS–232C 68–PIN PCMCIA Connector Figure 2 Functional Block Diagram of the Quantum Module 22 Breite: 185 mm Höhe: 230 mm 140 CRP 811 00 141 A0 – A13 WAIT D0 – D15 IRQ D0 – D7 Dual Port Ram 8 K x 16 Bit (IDT 7024) PCMCIA Card ASIC OKI MSM 60801 100–PIN TQFP CIS EEPROM 100–PIN TQFP MCS16 MCS8 PCMCIA Card INTH RSTCPU 80C165 Micro– controller 256 KB RAM 256 KB ext. Ram 100 PIN P–MQFP INTP 16 Bit Data Bus TSOP32 20 Bit Address Bus 256 KB Flash Rom EEPROM TSOP48 ASPC2 + 5V 100 PIN P–MQFP CTXD, CRXD, BTLD RS–485 20–PIN IO Connector 15–PIN D–Sub RS–485 DC–to–DC Converter Transmission Access Point (Transceiver) + 5V + 5V RS–485 9–PIN D–Sub PROFIBUS–DP/FMS Figure 3 Functional Block Diagram of the PCMCIA Card + the Transmission Access Point 142 140 CRP 811 00 22 To Figure 2: The architecture of the module is based upon an 80386EX microprocessor coupled with a Quantum parallel bus and PCMCIA interface card (PCMCIA PC Card Standard, Release 2.01). The communications module sends and receives data from the Quantum bus through the dual port ram interface. The firmware which manages the data exchange between the PCMCIA interface card and the CPU is resident within the flash rom. To Figure 3: The PCMCIA card defines the complete interface with the PROFIBUS. The conversion into the RS–485 standard connection is made by the transceiver (Transmission Access Point). The PCMCIA card is executed as a Type III and finds use in both communications modules, CRP 811 and NOP 911. The PCMCIA card is based on the 80C165 microcontroller and PROFIBUS ASIC APSC2. The ASPC2 performs all the tasks related to Layer 2 of the PROFIBUS (corresponding to Layer 2 of the ISO–OSI reference model). The remaining layers are processed with the help of the 80C165 running the protocol software resident in flash rom. 22 Breite: 185 mm Höhe: 230 mm 140 CRP 811 00 143 2 Configuration You must configure: 2.1 Mounting Slot in the Subrack Install the module into any free I/O slot within the TSX Quantum primary subrack. The individual installation steps should proceed as shown in the accompanying user information. 2.2 PROFIBUS RS–485 Port The PROFIBUS port utilizes varied Sub–D9 plug connectors 490 NAD 911 02. The individual connection steps should proceed as shown in the accompanying user manual. RS–485 Pin Signal Function 1 3 5 6 8 SHIELD RxD/TxD-P DGND VP RxD/TxD-N Shield, Protective Ground Receive/Transmit-Data-P (+) 5 V Signal Ground Positive Supply (+5 V) Receive/Transmit-Data-N (–) Pin occupied N/C Figure 4 PROFIBUS Port Diagram 144 140 CRP 811 00 22 2.3 RS–232C Port For diagnosis connect the PC to the RS–232C (Sub–D9) port socket. This requires one of the following cable configurations: Serial cable YDL 052 or Programming cable 990 NAA 263 x0 (Modbus cable) RS–232C Socket Signal Function 2 3 5 7 8 D2 (RXD) D1 (TXD) E2 (GND) S2 (RTS) M2 (CTS) Received Data Transmitted Data Signal Ground Request to Send Clear to Send Pin occupied N/C Figure 5 RS–232C Port Diagram 22 Breite: 185 mm Höhe: 230 mm 140 CRP 811 00 145 3 Diagnosis The module contain the following LED status display: Active Ready Fault Backplane PROFIBUS DP S/R FMS S/R Load Figure 6 Status LEDs of the CRP 811 Table 1 146 Status LEDs of the CRP 811 LEDs Color Function Active Green On: CPU is in ”Run” mode and the backplane communication active Flashing: The flash rom load operation is active Ready Green On: Module in operation Fault Red Off: Error free operation On: Other LEDs are flashing with fault code Backplane Green Off: Error free operation Flashing with fault code: on backplane fault PROFIBUS Green Off: Error free operation Flashing with fault code: on erroneous configuration data or PROFIBUS fault DP S/R Green Fast flashing frequency: Sending/Receiving DP bus data Medium flashing frequency: Configuration Slaves Slow flashing frequency: Waiting for configuration data Flashing with fault code: on erroneous configuration data FMS S/R Green not used Load Yellow Flashing: Configuration data load operation active Flashing with fault code: on load operation fault 140 CRP 811 00 22 Diagnosis through the RS–232C serial port Required serial port presets: Baud rate: 19.2 Kbd, 8 Databits, 1 Stopbit, Parity: off Table 2 22 Breite: 185 mm Höhe: 230 mm Main menu functions callable over the RS–232C port: Name Function (d) DP Data Menu View PROFIBUS–DP data (CRP 811) (e) Error Report Menu View error output (g) Global Data Menu View global data / Status (t) Terminal Setup Menu RS–232C port settings (u) Firmware Update Menu Update CRP 811 firmware (x) Expert Mode Menu Extended and password protected expert mode menu 140 CRP 811 00 147 4 Technical Specifications 4.1 Communication Module CRP 811 Assignment Device TSX Quantum at Modsoft version 2.32 / 2.4 / 2.51 TSX Quantum at Concept version 2.2 Module Area I/O area of the primary subrack Compatible CPU Modules 140 CPU 113 02 (256 KB),140 CPU 113 03 (512 KB) 140 CPU 213 04 (768 KB), 140 CPU 424 02 (2 MB) Number CRP per Quantum 2 with CPU 113 2 with CPU 213 6 with CPU 424 *) No Quantum Hot Stand By Updating of time with 32 slaves (for every 16 bit inputs, 16 bit outputs) 4 ms with CPU 424 Necessary Configuration Tools for Modsoft 332 SPU 833 01, PROFIBUS–DP configuration pack (Engl.) 332 SPU 833 02, PROFIBUS–DP configuration pack (Germ.) Necessary Configuration Tools for Concept TLX L FBC M, PROFIBUS DP Configuration tool (Engl.) TLX L FBC M, PROFIBUS DP Configuration tool (Germ..) TLX L FBC M, PROFIBUS DP Configuration tool (Franz.)) TLX L FBC M, PROFIBUS DP Configuration tool (Span.) PNO–Ident–No. 5506 Device Data Base (DDB) ASA_5506.GSD Supply Voltage over the Internal I/O Bus 5 VDC, max. 1.2 A Data Interface PROFIBUS Up to 12 Mbps off the transceiver RS–485 port RS–232C Baud rate max. line length as per DIN 66 020, non–isolated 19.2 Kbps default 3 m shielded cable Backplane Quantum parallel bus Processor Microcontroller 148 140 CRP 811 00 25 MHZ Intel 80386EX in the Quantum module (Controller) Siemens 80C165 and Siemens ASIC ASPC2 in the PCMCIA card 22 Memory RAM 256 KB for program data + 8 KB DPR in the Quantum module 512 KB for program data + 16 KB DPR in the PCMCIA card EEPROM 128 Bytes in the PCMCIA–Karte Flash Rom 256 KB in the Quantum module 256 KB in the PCMCIA card Mechanical Design Dimensions Width = 40.34 mm (standard–size module) Quantum module with PCMCIA Type III card mounted Weight 0.68 kg (gross) Environmental Conditions 4.2 System Data See the Quantum User Manual, Ch. 3.1 Power Dissipation max. 6.5 W PROFIBUS–DP with CRP 811 Transmission Specifications 22 Breite: 185 mm Höhe: 230 mm Bus Nodes max. 32 Bus lengths, transmission rates (for 12 Mbps cable) max. 1.2 km at 9.6 Kbps max. 1.2 km at 19.2 Kbps max. 1.2 km at 93.75 Kbps max. 1 km at 187.5 Kbps max. 0.5 km at 500 Kbps max. 0.2 km at 1,5 Mbps max. 0.1 km at 3 Mbps max. 0.1 km at 6 Mbps max. 0.1 km at 12 Mbps Transmission media (per meter) shielded twisted pair KAB PROFIB, PROFIBUS cable up to 12 Mbps, rigid Connection Interface EIA RS–485 Bus Connector (Cable Termination) 490 NAD 911 01, 490 NAD 911 02 (as per Norm 390 / 220 / 390 Ω for 12 Mbps cable) Stub Cabling none (except 1 x 3 m from the bus monitor) 140 CRP 811 00 149 Bus Specifications Node Type Master Class 1 Bus–Access Procedure Master/Slave to DP bus slaves Transmission Procedure half–duplex Frame Length max. 255 Bytes Data Unit Length max. 246 Bytes Data Security hamming distance, HD = 4 Node Addresses 1 ... 126 FDL Send/Req. Data Services for slave services: parameter assignment, configuration, diagnosis, data transfer Master Class 1 DP Bus Functionality Read Diagnostic Information from DP Bus Slave on slave initialization, automatically, should new slave diagnostic data be available, data filed in state ram area (Input Reference 3x) n x INT8 n = 0 no filing of diagnostic information n = 6 default value for standard diagnostic data Send Parameter Data to DP Bus Slave only on slave initialization, Uses parameter data from the DP bus configuration tool and DP bus slave device master data Send Configuration Data to DP Bus Slave only on slave initialization, Uses configuration data from the DP bus configuration tool and DP bus slave device master data Operation Cyclically transfer in– & output data from the state ram 150 Output Output Reference 0x and 4x (Boolean, packed) Output Reference 4x (Integer 8 / 16 / 32, Unsigned 8 / 16 / 32, RAW / String, packed e.g. ASCII) Input Input Reference 1x and 3x (Boolean, packed) Input Reference 3x (Integer 8 / 16 / 32, Unsigned 8 / 16 / 32, RAW / String, packed e.g. ASCII) 140 CRP 811 00 22 AS–BDEA 203 PROFIBUS–DP Coupler Module Description The AS–BDEA 203 is a PROFIBUS–DP coupling module adhering to DIN 19 245 Parts 1 and 3 with integrated (non–isolated) power supply. It is used to drive the remote I/O modules of the Modicon TSX Compact family. It provides a 5 VDC supply at 1.6 A for the modules on the parallel I/O bus. The AS–BDEA 203 can address a maximum of 18 I/O modules (288 I/Os) via the subracks DTA 200, DTA 201 or DTA 202. With the exception of intelligent modules, all analog and discrete Compact I/O modules can be employed. When analog modules are utilized, there is a particular total data volume which may not be exceeded. The device master data file from the 381 SWA 000 00 discette must be utilized for AS–BDEA 203 configuration. The following module specific information will be presented in this description: Features and Function Configuration Diagnosis Technical Specifications 20 Breite: 185 mm Höhe: 230 mm AS–BDEA 203 151 18 19 20 21 22 Figure 1 AS–BDEA 203 Front View and Label Inlays 1 Features and Function 1.1 Features Standardized, isolated PROFIBUS Port Transmission rates of up to 12 Mbps Automatic adaptation to master transmission rate setting Slave address adjustment per rotary switch. DIP switch adjustment of disconnection behavior 152 AS–BDEA 203 20 1.2 Functional Details PROFIBUS–DP Sub–D9 Identcode Slave Address RS–485 DC–DC Converter Mode Switch + 5 VDC + 5 VDC Interface 48 MHz Clock SPC3 12 MHz Clock INT Address Decoder 24 KB RAM 80C152 Micro– controller Data Bus CPU A8 ... A15 64 KB EPROM Address Bus A0 ... A7 I/O Bus ASIC Power Supply + 5 VDC 24 VDC + 5 VDC I/O Bus Figure 2 AS–BDEA 203 functional details The AS–BDEA 203 serves as the coupling element between the PROFIBUS–DP and the internal I/O bus. The set disconnection behavior is activated by watchdog when PROFIBUS communication is interrupted longer then the supervision time set by the master. 20 Breite: 185 mm Höhe: 230 mm AS–BDEA 203 153 The AS–BDEA 203 collects messages from the associated modules and reports these further to the master as diagnostic information. 2 Configuration The following configuration tasks must be performed: 2.1 Settings (Slave Address, Disconnection Behavior) 2.1.1 Slave Address (x10, x1) The slave address (node address) is to be set on the front panel ”x10, x1” rotary switches. Addresses from 1 ... 99 are allowed (0=as shipped ). 2.1.2 Disconnection Behavior (S2, S3) Figure 3 Module rear view 154 AS–BDEA 203 20 OFF ON OFF ON S3 S2 Forced cutoff S1 of all outputs * S0 S3 S2 Halt with value retention S1 (outputs remain unchanged) S0 S3 Firmware Standard * S2 S1 S0 S3 Reserved for AEG service specialists S2 (Test bay setting) S1 S0 * As shipped Figure 4 DIP Switch Settings S0 and S1 settings are meaningless. 2.2 I/O Expansion Limitations Arbitrary I/O combinations are only possible with discrete I/O modules. Use of analog I/O modules restricts total data volume to a particular level. Total data volume is the sum of data from the PROFIBUS master to the AS–BDEA 203 (D out), and from the AS–BDEA 203 to the PROFIBUS master (D in). The feasibility of a particular combination can be verified with the following tables. The first table lists data volume by respective module (D out / D in) in bytes. The data volume of all employed modules through the AS–BDEA 203 to the PROFIBUS master (D in sums) must </= 244 bytes. In accordance with the (D in) data volume, this table permits the data volume calculation for PROFIBUS master to AS–BDEA 203 (D out). With the second table the (D out) data volumes of all employed modules is to be checked against the max. permissable (D out) data volume. 20 Breite: 185 mm Höhe: 230 mm AS–BDEA 203 155 Table 1 Module D in Data Volume (Bytes) D out Data Volume (Bytes) DEP 208, DEP 210, DEP 211 1 0 DAP 204, DAP 208, DAP 210 0 1 DAP 212, DAP 220, DAP 292 1 1 DEO 216, DEP 214, DEP 215, DEP 216, DEP 217, DEP 218, DEP 220, DEP 296, DEP 297, DEX 216 2 0 DAO 216, DAP 216, DAP 217, DAP 218, DAX 216 0 2 DAU 202 0 4 DAU 208 0 16 ADU 204, ADU 205 10 0 ADU 206, ADU 216 10 1 ADU 210 10 4 ADU 214 18 8 Table 2 2.3 Data volume by module Max. permissable ”D out” data volume in respect to ”D in” data volume D in Data Volume Sums (Bytes) Max. D out Data Volume Sums (Bytes) 241 ... 244 144 233 ... 240 152 225 ... 232 160 217 ... 224 168 209 ... 216 176 0 ... 208 184 Subrack Mounting Slot Install the module in DTA 200 primary subrack slot 0. The individual installation steps are to be carried out in adherence with the accompanying user documentation. 156 AS–BDEA 203 20 2.4 Power Supply Connection UB (24 VDC) M2 1.25 A medium time–lag fuse 18 19 20 21 22 Figure 5 Connection example Caution: The module’s integrated power supply is non–isolated. Improper connection, e.g. absence of the M2 connection, can lead to module destruction. Enter system relevant power supply information in the label inlay. Noise immunity can be improved when by–pass capacitors are installed at the power supply module U and M terminals. Details can be found in the User Manual ch. ”A120 Grounding Procedures”. 20 Breite: 185 mm Höhe: 230 mm AS–BDEA 203 157 2.5 PROFIBUS Connection The PROFIBUS port utilizes varied Sub–D9 plug connectors: 490 NAD 911 02 for transmission rates up to 12 Mbps or PBS1 for transmission rates up to 500 Kbps. The individual installation steps are to be carried out in adherence with the accompanying user documentation. PROFIBUS–DP Pin Signal Function 3 5 6 8 RxD/TxD–P DGND VP RxD/TxD–N Receive/transmit data (+) Signal ground +5 VDC supply Receive/transmit data negated (–) Pin occupied N/C Figure 6 PROFIBUS port pin assignments 3 Diagnosis The module front plate contains the following displays: Table 3 158 AS–BDEA 203 LED status display No. Label Inlay Identifier Color Function 18 (left) U Green 24 VDC supply present 19 (left) ready 5 V Green Module ready for service, 5 VDC output voltage present 3 (right) ready Green Coupler ready 4 (right) BF Red Bus coupling faulty (bus failure), Probable cause: The AS–BDEA is not parameterized and initialized, the PROFIBUS–DP protocol is not running AS–BDEA 203 20 4 Technical Specifications 4.1 AS–BDEA 203 Assignment System TSX Compact (A120, 984) Module area Slot 0 of DTA 200 primary backplane Identcode Hex A203, entry through the device master data file type 381 SWA 000 00 Power Supply External input voltage UB = 24 VDC, max. 0.85 A Primary fusing 1.25 A medium time–lag fuse Power on current 20 A, time constant = 1 ms Tolerances, limiting values Refer to the TSX Compact User Manual, ch. ”Technical Specifications” Reference potential M M2 Protective earth PE Secondary voltage 5.15 VDC, max. 1.6 A, non–isolated Buffering time Typically 5 ms for 24 VDC Overload protection Through current limiting Data Interface PROFIBUS–DP Through a potential–free RS–485 interface up to 12 Mbps Pin assignments Refer to ch. PROFIBUS Connection Figure 6 Back plane Parallel I/O bus, refer to TSX Compact User Manual, ch. ”Technical Specifications” Processor Processor type Intel 80C152 / 12 MHz Data memory 32 KB RAM Firmware 64 KB EPROM Mechanical Design Module Standard double–size module Format 3 HE, 16 T Weight Approx. 500 g Connection Styles 20 Breite: 185 mm Höhe: 230 mm Power supply 5–pole screw/plug–in terminal block PROFIBUS Sub–D9 socket, matching to 490 NAD 911 Back plane 2 plug connectors 1/3 C30M, 1 socket connector 1/3 R30F AS–BDEA 203 159 Environmental Characteristics 4.2 Regulations Meets VDE 0160, UL 508 System data Refer to TSX Compact User Manual, ch. ”Technical Specifications” Permissable ambient temperature 0 ... +60 degrees C. Power dissipation Typically 6 W AS–BDEA 203 on the PROFIBUS–DP Transmission Specifications Nodes per bus Max. 32 Bus lengths, transmission rates max. 1.2 km at 9.6 Kbps or at 19.2 Kbps or at 93.75 Kbps max. 1 km at 187.5 Kbps max. 0.5 km at 500 Kbps max. 0.2 km at 1.5 Mbps max. 0.1 km at 3 Mbps or at 6 Mbps or at 12 Mbps Bulk transmission media Shielded twisted pair (S–UTP) KAP PROFIB, PROFIBUS cable up to 12 Mbps, rigid Connection interface Adhering to EIA RS–485 Cable termination As per Norm 390 / 220 / 390 Ω Stub cabling None Data security Hamming distance, HD = 4 Bus Specifications Node type Slave Node addresses 1 ... 99 Operation Cyclically transfer in– & output data from the state ram 160 DP Bus Byte Output Output Reference 0x (Boolean, packed) Output Reference 4x (Integer8, unpacked; Unsigned8, unpacked; RAW, packed e.g. ASCII) DP Bus Byte Input Input Reference 1x (Boolean, packed) Input Reference 3x (Integer8, unpacked; Unsigned8, unpacked; RAW, packed e.g. ASCII) Bus Word Output Output Reference 0x (Boolean) Output Reference 4x (Integer16 = Unsigned16 = RAW) Bus Word Input Input Reference 1x (Boolean) Input Reference 3x (Integer16 = Unsigned16 = RAW) AS–BDEA 203 20