1
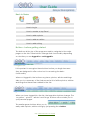
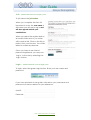
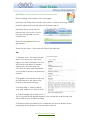
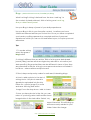
Introduction
planbooktravel has developed two websites:
1. business.planbooktravel.com (tourism directory)
2. planbooktravel.com.au (destination publishing)
The directory site is available for travel and tourism business to promote
their products and services.
The publishing site is designed for creating user generated content
about Australian locations.
planbooktravel.com.au is available for writers, photographers, travellers
and businesses alike to write stories, upload photos and keep journals.
Share your travel experiences and information about your location with
others.
Articles and photos when published, will appear in the town, Region,
State and on many other places on the site, including the home page.
As a member of the site, you also have a home page called 'My Place'.
My Place is where you manage your profile, contributions, photos,
articles, blogs and is how other members can contact you.
Guide to the Publishing site: planbooktravel.com.au
This user guide is designed to enable any person with any level of
computer experience, the opportunity to use the publishing web site
and enjoy the experience of travel writing and sharing photos.
Each section contains tips for how to use site features and why.
Help is available at planbooktravel.com.au/help or contact our
customer service department directly at [email protected]
We thank you for joining the community at planbooktravel.com.au and
we look forward to enjoying your articles, blogs and photos.
The team at planbooktravel
Help: planbooktravel.com.au/help
Back to Basics
How to join
How to log in
How to create a ‘My Place’
How to add a photo
How to add an article
How to add a blog
Buttons – before getting started
The buttons at the top of the page are used to navigate to the major
pages on the site. These buttons change their functionality depending
on whether you are logged in or not logged in.
* not logged in view
It is important to recognise these buttons before you begin because
they are designed to offer a short cut to accessing the basic
functionality.
When not logged in, the buttons: my place, photos, articles and blogs
take you to a summary of the feature and a list of all the photos, articles
and blogs that have been added to the site.
* logged in view
When you have logged into the site, the large blue buttons change. The
‘my place’, ‘photos’, ‘articles’ and ‘blogs’ buttons will now take you to
your personal pages.
The smaller green buttons allow you to
easily add a photo, article or blog by just pressing the + button.
Help: planbooktravel.com.au/help
Join - planbooktravel.com.au/join_form
To join select the join button.
When you complete the form it is
important to note, the user name is
the name you will use to log in and
will also appear beside your
contributions.
When you select the register button,
an email will be sent to you which
will include a link. Click on the link or
paste it into your browser. You will be
asked to create a password.
Once you have a user id and
password registered, you may now
‘Log In’ to the site by selecting the
‘login’ button.
Login – planbooktravel.com.au/login_form
To login, select the green login button. Enter your user name and
password.
If you have printed this user guide, write down your username and
password on the box below for your reference.
User ID:
Password:
Help: planbooktravel.com.au/help
My Place - planbooktravel.com.au/author/user-name
Before starting, personalise your home page.
My Place is a folder that contains your photos, articles and blogs. Add a
portrait, a description and a web link (include http://).
My Place allows other users to
interact with you and for you to
become recognised for your
contributions.
Select the my place button to
get started.
There are two tabs – view and edit. Select the edit tab.
Tips
1. General note: The more people
who know about you, the more
rapport you will build and soon you
will have a loyal base of readers
waiting for your next entry. Be
concious of which personal details
you include for privacy and security
reasons.
2. Biography: Tell readers what they
should expect to see when they
read your articles and blogs.
3. Include http:// when entering
your web address or it will not work.
4. Portrait image size should be 75 x
100. Your portrait will appear against your contributions all through the
site as well as your 'my place' page.
5. Please include a portrait photo. Members with photos attract more
readership and interaction than members without.
Help: planbooktravel.com.au/help
Photos - planbooktravel.com.au/traveller/you/photos
The easiest way to quickly add a photo is to select the green
+ photo button.
Tips
1. Select the + photo
button at any stage
whilst using the site and
this screen will appear.
Got a photo for a town Just hit + photo!
2. Reduce your photo
size so it is quicker to
upload to the site. A good size is 400 pixels wide and 272 pixels high or
less than 100kb.
3. Make file names lowercase and without spaces when you are resizing/saving them on your computer.
Applying good file naming conventions has its benefits – most
importantly photos are more easily found by users, the site and search
engines. GOOD: the-beach.jpg vs BAD: IMG 1256#.JPG
4. The + photo button will only allow you to upload photos in jpg format –
you cannot add zip files of photos using + photo. To upload a zip (batch
of several images) use the ‘import’ tab – This is an advanced user
option, speak to site editors to enable this on your account.
5. Write a title and description with key phrases that would be typed into
a search engine (Title: Daintree Rainforest Queensland). Select relevant
key words for the image. Photos with relevant key words and well
thought out descriptions receive the greatest number of views and are
best for search engine optimisation.
6. Once saved, don’t forget to submit
for publishing.
7. To edit the image again after it is published it must be re-tracted.
Select 'State' then 'retract'.
Help: planbooktravel.com.au/help
Articles - planbooktravel.com.au/traveller/you/reviews
Whether you are an experienced writer or would just like to
try your hand, you can create an article easily with + article.
Articles can include images, links, editor and peer ratings.
Once published, your articles will appear at relevant
locations in the site and can be reviewed, ranked and
commented on by users.
Select from different templates to change the
appearance and layout.
Adding an article to a location helps the location to be discovered and
experienced by other travellers. To write an article select + article
Tips:
1. Adding a photo to an Article: Follow the process that is set out in the
site 'NEXT, NEXT, SAVE'.
Step 1. Write the article and provide a location
reference (what town it is relevant to 'Gladstone').
Step 2. Select next and you will be able to add images to the article
Step 3. Select next and you will be able to add links to the article
Step 4. Select save.
2. Topics: Write about your interests,
your hobbies, great characters you
know, hidden treasures, your
passions. If you are short of a topic –
check the ‘Key Words’ – that should
help you get started.
3. Articles are published on location,
region and state pages. Don't forget
to publish your article (tip 6, page 5).
Help: planbooktravel.com.au/help
Blogs - planbooktravel.com.au/traveller/you/blog
What is a blog? A blog is derived from the term ‘web log’. In
the context of planbooktravel, think of a blog as a travel log,
diary or date based journal.
Use your Blog to keep a journal of your daily experiences.
Use your Blog to link to your favourite content, locations you have
visited and relevant articles you find on-line. Once you have completed
your travels your Blog represents a complete archive of personal
experiences which you can re-visit and reflect upon, to inspire your next
adventure.
Tips:
1. To create a blog
select the green +
blog button
2. A blog is different from an article. Think of a blog as a date based
journal (diary) and an article as single story relevant to a location (not
date specific). Blogs and articles are also different in terms of how they
are presented in the site. A blog is more personal and are not linked to
locations – where articles and photos are.
3. Short, sharp and punchy makes for well read, interesting blogs.
4. How to add a photo to the text of
a blog: Note – the photo needs to
already be uploaded into the site.
Either use + photo (page 5) or write
and save the blog and select
‘Image’ from the drop down ‘add to folder’.
5. Now you have photos in the site, you can
return to your blog, select edit and the insert
image button in the text editor. Select ‘My
recent items link. This will bring up
all items recently added to your
folder. Select the image.
Help: planbooktravel.com.au/help
General Tips
Copyrights and Content Licences: Articles and Photos can carry a
Copyright as well as other information, also referred to as ‘metadata’.
This is the collection of information that is used to categorize an object,
assign effective dates, expiration dates, language and keywords. To
assign a copyright to an
article or photo - first
save, then select the
‘properties’ tab.
By selecting ‘Other’ (above) you can create your own personal license
which can carry an image or logo. A good example can be found at:
planbooktravel.com.au/traveller/janduf/reviews/koala-and-the-brownsnake-you-yangs-victoria/view
My Subscriptions: you can subscribe to
different content, pages and keyword
searches in the site. When changes are made to the content you are
alerted.
Help: planbooktravel.com.au/help