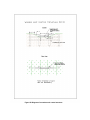
1
North Carolina
Division of Soil and Water Conservation
Community Conservation Assistance Program
Stormwater Best Management Practice
Design Manual
Community Conservation Assistance Program - BMP Design Manual
Prepared By:
Biological and Agricultural and Engineering Department
North Carolina State University
William F. Hunt, PhD, PE
Assistant Professor and Extension Specialist
Jon M. Hathaway, EI
Extension Associate
Ryan A. Smith, PE
Extension Associate
2
Community Conservation Assistance Program - BMP Design Manual
Table of Contents
1.0 Introduction ...................................................................................................6
1.1 Introduction to the Community Conservation Assistance Program..............6
1.2 The CCAP Best Management Practice Design Manual ..............................7
2.0 Introduction to Stormwater ..........................................................................7
2.1 Definition of Stormwater ..............................................................................7
2.2 Effects of Urbanization ................................................................................8
2.3 Stormwater BMPs .....................................................................................10
3.0 General Stormwater BMP Design Considerations ...................................11
3.1 The First Flush ..........................................................................................11
3.2 Connected Imperviousness .......................................................................12
3.3 The Simple Method ...................................................................................12
3.4 Peak Flow..................................................................................................15
3.4.1 Storm Intensity....................................................................................16
3.4.2 Runoff Coefficient ...............................................................................17
3.5 Diversion Berms ........................................................................................17
3.6 Determining Outlet Location and Size .......................................................18
3.6.1 Determining Outlet Location ...............................................................18
3.6.2 Determining Outlet Size ......................................................................18
3.6.3 Outlet installation ................................................................................19
3.7 Riparian Buffer Considerations..................................................................19
3.8 General Soils Discussion ..........................................................................20
3.8.1 Information from Soil Surveys.............................................................21
3.8.2 Information from Site Investigation .....................................................21
3.9 Information on Water Table Depth ............................................................23
4.0 General Stormwater BMP Considerations ................................................23
4.1 Avoid Concentrated Flow ..........................................................................23
4.2 Multiple Property Owners ..........................................................................24
4.3 General Information Matrix for Backyard Stormwater BMPs .....................25
5.0 Backyard Rain Garden Design...................................................................25
5.1 Overview of Practice .................................................................................25
5.2 Selection of this practice over others.........................................................25
5.3 Rain Garden Design..................................................................................26
5.3.1 Rain garden siting ...............................................................................26
5.3.2 Determine watershed and impervious area draining to BMP ..............26
5.3.3 Rain garden sizing ..............................................................................27
5.3.4 Rain garden bottom topography .........................................................28
5.3.5 Plant selection ....................................................................................28
5.3.6 Inlet protection and pretreatment ........................................................29
5.3.7 Outlet design.......................................................................................31
5.4 Rain Garden Maintenance ........................................................................31
6.0 Backyard Wetland Design ..........................................................................32
6.1 Overview of Practice .................................................................................32
3
Community Conservation Assistance Program - BMP Design Manual
6.2 Selection of this practice over others.........................................................33
6.3 Backyard Wetland Design .........................................................................34
6.3.1 Determining wetland watershed characteristics..................................34
6.3.2 Backyard wetland sizing .....................................................................34
6.3.3 Backyard wetland inlet considerations ................................................35
6.3.4 Backyard wetland outlet considerations..............................................36
6.3.5 Backyard wetland plants .....................................................................36
6.3.6 Drought tolerant wetland.....................................................................38
6.4 Backyard Wetland Construction ................................................................39
6.4.1 Laying out the wetland ........................................................................39
6.4.2 Digging the wetland ............................................................................40
6.4.3 Planting the wetland ...........................................................................42
6.5 Backyard Wetland Maintenance................................................................43
7.0 Cistern Design.............................................................................................44
7.1 Overview of Practice .................................................................................44
7.2 Selection of this practice over others.........................................................46
7.3 Cistern Design...........................................................................................46
7.3.1 Determining Cistern Watershed Characteristics .................................46
7.3.2 Cistern sizing ......................................................................................47
7.3.3 Additional Cistern Components ..........................................................48
7.3.4 Outlet structure ...................................................................................49
7.4 Cistern Construction..................................................................................49
7.4.1 Preparing the soil base .......................................................................49
7.4.2 Preparing the gutter downspout..........................................................50
7.4.3 Preparing the gutter downspout..........................................................50
7.4.4 Setting the cistern into place...............................................................51
7.4.5 Final cistern construction considerations ............................................52
7.5 Cistern Maintenance .................................................................................52
8.0 Vegetated Swales........................................................................................53
8.1 Overview of Practice .................................................................................53
8.2 Determining Site Constraints.....................................................................54
8.3 Depth and Velocity Calculations................................................................55
8.4 Simplified Triangular Swale Design...........................................................57
8.4.1 Adjusting Manning’s equation for simplified triangular swale design ..57
8.4.2 Simplified triangular swale design process .........................................59
8.5 Construction Guidance..............................................................................60
8.6 Maintenance..............................................................................................61
9.0 Impervious Removal...................................................................................61
9.1 Overview of Practice .................................................................................61
9.2 Selection of this practice over others.........................................................62
9.3 Carrying Out Impervious Removal ............................................................62
10.0 Permeable Pavement................................................................................62
10.1 Overview of Practice ...............................................................................62
10.2 Selection of this practice over others.......................................................64
10.3 Permeable Pavement Design..................................................................65
4
Community Conservation Assistance Program - BMP Design Manual
10.3.1 Initial Soil Analysis Field Test ...........................................................65
10.3.2 Soil Analysis Lab Test.......................................................................66
10.3.3 Concrete Edging ...............................................................................66
10.3.4 Gravel Base ......................................................................................67
10.3.5 Permeable Pavement Sizing Criteria ................................................68
10.4 Permeable Pavement Construction.........................................................68
10.4.1 Soil excavation..................................................................................69
10.4.2 Gravel base ......................................................................................69
10.4.3 Concrete edging ...............................................................................70
10.4.4 Permeable pavement installation......................................................70
10.5 Permeable Pavement Maintenance ........................................................70
11.0 References: ...............................................................................................72
5
Community Conservation Assistance Program - BMP Design Manual
1.0 Introduction
1.1 Introduction to the Community Conservation Assistance Program
The population distribution of North Carolina is becoming more urban and
suburban, causing the North Carolina Division of Soil and Water Conservation to
address nonpoint source pollution from these non-agricultural lands. In the
summer of 2006, a survey was distributed to all districts to inventory their level of
interest in best management practices on urban, suburban and rural lands.
Many districts completed surveys about their needs for this program, and they
requested over $6.5 million for local projects. Division staff used the survey
responses to develop two grant applications for program funding; both were
approved at 100% funding. In addition, the Soil and Water Conservation
Commission received authorizing legislation to establish the Community
Conservation Assistance Program through Session Law 2006-78, partially due to
the strong support of District Supervisors.
The Community Conservation Assistance Program (CCAP) supports the
installation of water quality best management practices on non-agricultural lands.
This program is an innovative approach to controlling water quality impacts
caused by stormwater runoff. Through locally-led conservation, the Division of
Soil and Water Conservation (DSWC) and Soil and Water Conservation Districts
(SWCD) have been successful in implementing voluntary agricultural BMPs,
which have addressed many water quality parameters. The CCAP is intended to
operate under the same guidance and accountability as the NC Agriculture Cost
Share Program and achieve the same successes.
CCAP will focus its efforts on retrofitting stormwater BMPs on existing land uses;
it will not be used to assist new development sites to meet state and federal
stormwater mandates. Soil and Water Conservation Districts have the technical
expertise to install stormwater BMPs and a successful history of promoting
voluntary conservation practices. The program will give the Districts the structure
and financial assistance to carry out this mission. CCAP will encourage local
governments, individual landowners, and businesses to incorporate stormwater
BMPs within their landscape where BMPs were not required by regulation. The
economic incentive, 75% of average installation costs, will encourage voluntary
conservation.
Since this is a grant funded program, only districts participating in the surveys will
receive an allocation. The maximum amount of assistance per practice is limited
to $50,000. To see which districts will be implementing CCAP BMPs through
these grants, refer to the map below (Figure 1.1). Other Districts are
implementing these BMPs through funding sources they have secured on their
own. The goal of the DSWC is to seek additional funding sources, including
recurring state appropriations, to offer this program statewide in the future. The
6
Community Conservation Assistance Program - BMP Design Manual
Community Conservation Assistance Program is expected to be an asset in
addressing current stormwater pollution issues within North Carolina.
Figure 1.1 Districts Participating in the Community Conservation Assistance Program
1.2 The CCAP Best Management Practice Design Manual
The purpose of the CCAP Stormwater Best Management Practice (BMP) Design
Manual is to be a resource for soil and water conservation district staff in siting,
selecting, designing, installing, and maintaining stormwater BMPs. This manual
is intended to educate staff members in order to implement effective stormwater
practices while efficiently distributing funds throughout participating districts.
As part of the CCAP, North Carolina State University Biological and Agricultural
Engineering Department (BAE) has also prepared a document entitled,
“Stormwater BMP Costs,” for use by employees of the Soil and Water
Conservation Division (Hathaway and Hunt, 2006). This resource was produced
so proper cost estimates can be prepared by district staff. Proper BMP cost
estimates will lead to efficient allocation of cost share funds. This document
should be referenced in conjunction with the CCAP Stormwater Best
Management Practice Design Manual to fulfill the intentions of the program.
2.0 Introduction to Stormwater
2.1 Definition of Stormwater
Stormwater is produced immediately following a rainfall event or as a result of
snowmelt. When a rainfall event occurs, there are four potential fates for the
precipitation: (1) Some infiltrates into the soil, (2) a portion is taken up by plants
and released to the atmosphere (called transpiration), (3) a fraction evaporates to
the atmosphere and (4) the remainder of the rainfall runs off land surfaces and
7
Community Conservation Assistance Program - BMP Design Manual
impervious areas. This final fraction is stormwater (North Carolina Division of
Water Quality: Stormwater Unit).
2.2 Effects of Urbanization
North Carolina contains communities that are considered among the best places
to live in America; as a result, the state’s growth rate is consistently one of the
highest in the country. The resulting urban influx affects many facets of the
state’s infrastructure–more cars drive our roads, more children enroll in our
schools, more people create higher wastewater discharges, and more
development necessitates stormwater runoff controls. How does urbanization
affect stormwater runoff? Roads, parking lots, sidewalks, homes, and offices
replace the natural–and permeable–landscape. Rainfall that once soaked into
vegetated ground is now “available” for stormwater runoff. As more surfaces
become impermeable, water simply moves across them. Impermeable surfaces
connect to form a “stormwater superhighway” that allows runoff to reach streams
more quickly (Figure 2.1).
Figure 2.1 Stormwater runoff in a highly urbanized watershed
There are many affects of this increase in impermeable area: (1) more
stormwater reaches streams because there is less opportunity for it to infiltrate
into the ground; (2) peak flows increase because the “stormwater superhighway”
transports runoff from large areas rapidly; (3) velocities in the stream increase,
causing a larger erosion potential; and (4) baseflow is lower during dry weather
due to a lack of infiltration into the underlying groundwater. An area with natural
ground cover loses 40% of the annual rainfall it receives to evapotranspiration,
25% of the annual rainfall goes into the shallow groundwater, 25% of the rainfall
goes into deep infiltration, and 10% runs off. When impervious areas cover 35%
8
Community Conservation Assistance Program - BMP Design Manual
to 50% of a similar watershed, only 35% of the annual rainfall is lost to
evapotranspiration, 20% of the annual rainfall goes into the shallow groundwater,
15% goes into deep infiltration, and 30% runs off (Leopold, 1968). Figures 2.2
and 2.3 illustrate the impact of urbanization (Donaldson, 2007).
Figure 2.2 Watershed hydrology prior to urbanization
Figure 2.2 Watershed hydrology after urbanization
9
Community Conservation Assistance Program - BMP Design Manual
Using traditional analyses such as the Natural Resources Conservation Services’
stormwater model, TR-55, or the U.S. Army Corps of Engineers’ many versions
of HEC, it can be shown that peak flows alone can increase by up to five-fold
from pre- to post-development conditions. The public knows this effect of
urbanization as flooding. While an increase in stormwater runoff is an easily seen
result of urbanization, there are many less visible water quality impacts
associated with development. Erosion and sedimentation have long been
recognized as water quality concerns. Although the North Carolina legislature
passed laws to curb sediment pollution in 1973, sediment remains the number
one pollutant of N.C. waters. In addition, metals and chemicals from vehicles and
industries pollute stormwater runoff in increasing amounts. Under forested
conditions, these pollutants would only be found in trace amounts. Likewise,
nutrients are found in the urban environment in a variety of forms, one such form
being fertilizer. Fertilizer contains nutrients for plants to grow, but excess fertilizer
or fertilizer that is inadvertently applied to pavement harms water quality. Even if
proper amounts of fertilizer are applied, nutrients can enter our streams in other
ways, including atmospheric deposition, wildlife and pet waste, and septic system
malfunction. There are numerous ways to reduce pollutant loadings, including
source reduction–such as proper application of fertilizer and correctly maintaining
septic systems. Structural devices can also help curb this problem. This manual
will provide design guidance for several structural Best Management Practices
(BMPs) that can be constructed to treat runoff and thereby reduce the amount of
pollution entering streams.
2.3 Stormwater BMPs
An urban stormwater BMP is believed to be a “best” way of treating or limiting
pollutants in stormwater runoff. It can be as simple as applying the proper
amount of fertilizer to a home lawn or as complex as building an engineered
structure such as a stormwater wetland. Each BMP has certain conditions under
which it will function properly. The pollutants to be treated, the size of watershed,
the imperviousness of the watershed, the local water table, and the amount of
available land for the practice all influence the selection of a BMP. Some of the
BMPs are relatively well known and researched, while others are in their infancy.
This document will focus on BMPs that can be installed in small scale settings,
such as individual residences and small businesses. The stormwater BMPs that
will be discussed in this document are: backyard rain gardens, backyard
wetlands, cisterns, grassed swales, impervious surface removal, and permeable
pavements. Each of these BMPs can be valuable in treating the stormwater
leaving a given watershed. Guidance on BMP selection (based on site
conditions) will be discussed in detail in this document.
10
Community Conservation Assistance Program - BMP Design Manual
3.0 General Stormwater BMP Design Considerations
3.1 The First Flush
The term “first flush” has become common nomenclature in the stormwater
management field. The concept behind this term is that pollutants that have
collected on impervious surfaces will wash off during the first part of a storm
event. Essentially, the first portion of a given rain event will “flush” the impervious
surface of its pollutants, resulting in stormwater runoff that contains more
pollutants than runoff produced later in the storm. This concept was adopted by
many in the stormwater management field, who theorized that if the first half inch
of runoff (the first flush) could be captured and treated by a stormwater practice,
that 90% of the pollutants leaving the site would be treated by the stormwater
practice (Schueler, 2000). Of course, one half of an inch of runoff is not produced
by one half of an inch of rainfall. Some water is stored in depressions in
roadways, lawns, and other places; and some infiltrates into the watershed’s
grassed and forested areas. Thus, capturing the runoff associated with 1 inch of
rainfall was previously considered the standard for capturing the first flush.
However, because rainfall patterns vary throughout North Carolina, it was
questionable that 1-inch of rainfall corresponded to the first flush in all areas of
North Carolina.
A study was performed by BAE for NCDENR to evaluate the first flush (or water
quality event) in various locations throughout North Carolina (Bean, 2005). For
the basis of this study, the water quality storm event was defined as the event
size (in depth) which 90% of all storms are equal to or less than. Essentially, if a
stormwater practice is sized to capture 90% of all rain events, it will theoretically
be able to treat at least 90% of the pollutants from a given watershed. Prior to the
study, the water quality storm was considered to be 1 inch in all areas of North
Carolina excluding CAMA counties. In CAMA counties, the water quality storm
was considered 1.5 inches. Figure 3.1 shows a map of the CAMA counties in
North Carolina.
Figure 3.1 Map of CAMA counties in North Carolina
11
Community Conservation Assistance Program - BMP Design Manual
Thirty years of rainfall data were analyzed from 9 locations in North Carolina. For
most of North Carolina, capturing approximately 1 inch of rainfall would only
result in capturing 80% of all the rainfall that fell on a given watershed. Likewise,
in CAMA counties, 1.5 inches would result in capturing approximately 80% of all
the rainfall. Because of the premise that the majority of pollution is carried in the
earlier portions of the storm, it was assumed that at least 90% of pollution would
be transported by the runoff produced by 80% of the rainfall. NCDENR
considered these values to be acceptable based on this assumption, so the
stormwater design standards remained the same. There are a few supporting
studies in literature for this (Flint and Davis, 2007), but the theory has not been
proven completely (Sansalone and Cristina, 2004)
3.2 Connected Imperviousness
The idea of impervious areas was discussed above in section 2.2; however, not
all impervious areas substantially contribute to stormwater runoff in a given
watershed. Impervious areas that immediately drain to a drainage system (such
as a pipe or swale) are considered to be “connected impervious” areas and more
readily produce runoff within urban environments. For example, a rooftop that
drains to a gutter which drains directly unto a nearby street (as can be found in
many cities) and into the street drainage would be considered “connected
impervious.” Conversely, if a rooftop drained onto a lawn where runoff would
sheet flow across the grass, the rooftop would not be considered connected
impervious as it is does not immediately drain into any stormwater conveyance
system. Runoff from non-connected impervious areas is routed to some pervious
area where it has a chance to infiltrate. As a rule of thumb, if a rooftop or
pavement is allowed to sheet flow for at least 30 feet before it re-concentrates
(e.g. forming a swale or spilling into a drop inlet), it may be considered a nonconnected impermeable surface.
3.3 The Simple Method
The water quality storm can easily be used to calculate the anticipated volume of
runoff that will leave a given residence or small business through the application
of the simple method (Schueler, 1987). The required information is as follows: (1)
area that will be draining to the proposed BMP location in square feet, (2) the
percentage of the drainage area that is impervious, and (3) the desired depth of
rainfall targeted for capture (normally the water quality event). The simple
method is described in equations 1 and 2 below.
Equation 3-1: Calculate Runoff Coefficient
Rv = 0.05 + (0.009 * I)
12
Community Conservation Assistance Program - BMP Design Manual
Equation 3-2: Calculate Runoff Volume
V = Rv * A * (P/12)
Where:
Rv = Runoff Coefficient (fraction of rainfall that will produce runoff)
I = Connected impervious percentage in watershed (%)
V = Volume of runoff (ft3)
A = Area that drains to BMP (ft2)
P = Depth of storm to be captured (normally water quality event) (in)
Figures 3.2, 3.3, 3.4 and 3.5 use the simple method to calculate the volume of
water that can be expected from a given watershed, these values are calculated
using water quality events of either 1 inch or 1.5 inches (as defined in figure title).
Estimated Volume as a function of Watershed Size
(<5000 sf) and Impervious % (1" Rainfall)
Volume (cf)
1000
Watershed
Size (sf)
100
500
1000
1500
2000
3000
4000
5000
10
1
0
20
40
60
80
100
% Impervious
Figure 3.2 Estimated runoff volumes from various watersheds for 1-inch rainfall
13
Community Conservation Assistance Program - BMP Design Manual
Estimated Volume as a function of Watershed Size
(>5000 sf) and Impervious % (1" Rainfall)
10000
Practice Size (sf)
Watershed
Size (sf)
1000
5000
7500
10000
15000
20000
30000
40000
50000
100
10
0
20
40
60
80
100
% Impervious
Figure 3.3 Estimated runoff volumes from various watersheds for 1-inch rainfall
Estimated Volume as a function of Watershed Size
(<5000 sf) and Impervious % (1.5" Rainfall)
Volume (cf)
1000
Watershed
Size (sf)
100
500
1000
1500
2000
3000
4000
5000
10
1
0
20
40
60
80
100
% Impervious
Figure 3.4 Estimated runoff volumes from various watersheds for 1.5-inch rainfall
14
Community Conservation Assistance Program - BMP Design Manual
Practice Size (sf)
10000
1000
Watershed
Size (sf)
100
5000
7500
10000
15000
20000
30000
40000
50000
10
0
20
40
60
80
100
% Impervious
Figure 3.5 Estimated runoff volumes from various watersheds for 1.5-inch rainfall
3.4 Peak Flow
Determining the peak flow leaving a watershed during a design storm is
important when designing many stormwater BMPs. The peak flow is simply the
largest flow that leaves the watershed through the course of a storm event.
Figure 3.6 shows a sample flow vs. time relationship and the associated peak
flow. The depth of rain that falls throughout the event can be observed on the
right side of the graph.
0
0.6
0.01
0.5
0.02
0.03
0.04
0.05
0.3
0.06
0.2
0.07
0.08
0.1
0.09
0
0.1
2/
12
/2
00
4
0:
2/
00
12
/2
00
4
3:
2/
00
12
/2
00
4
6:
2/
00
12
/2
00
4
2/
9:
12
00
/2
00
4
12
2/
:0
12
0
/2
00
4
1
2/
5:
12
00
/2
00
4
18
2/
:0
12
0
/2
00
4
21
2/
:0
13
0
/2
00
4
0:
2/
00
13
/2
00
4
3:
2/
00
13
/2
00
4
6:
2/
00
13
/2
00
4
2/
9:
13
00
/2
00
4
12
:0
0
Flow (cfs)
0.4
Date and Time
Figure 3.6 Peak Flow Illustration
15
Rainfall (in)
Peak Flow
Community Conservation Assistance Program - BMP Design Manual
The peak flow is used to determine the proper size of conveyances such as
swales and drainage pipes and can also be used to determine the proper size of
high flow overflow devices. Peak flow can be calculated easily using the rational
method (Bedient and Huber, 1992). The rational method is a simple model used
to estimate the peak flow from a given watershed. For applications such as
backyard stormwater BMPs, where small, highly impervious watersheds will be
treated, the rational method offers a somewhat coarse, but adequate estimate of
peak flow. The rational method is as follows:
Equation 3-3: Rational Method
Q=C×I×A
Where:
Q = Peak flow (ft3/s)
C = Runoff Coefficient (dimensionless) – varies based on land use
A = Watershed area being treated (acres)
I = Intensity of storm event to be captured (in/hr)
(Note: There are 43,560 ft2 in 1 acre)
3.4.1 Storm Intensity
The rational method is highly adaptable to various land uses, storm events, and
watershed characteristics. For the purpose of this manual, some generalizations
can be made to simplify the calculation. Rainfall intensity varies throughout the
course of a storm. For small watersheds (those being treated by the backyard
BMPs constructed as part of this program) stormwater from the far end of the
connected impervious area does not have a long distance (typically 100’s but not
1000’s of feet) to travel to the BMP; thus, the time it takes stormwater to reach
the BMP from all parts of the watershed is short. With these watershed
characteristics, the peak flow from the watershed is likely to be produced by the
most intense part of the storm. A short duration of high intensity rainfall is the
most intense part of the storm, thus, a the amount of rainfall that falls during the
most intense 5 minutes of the storm will be chosen as the intensity used in the
rational method calculation. Table 3.1 shows the 5-minute peak intensity for
various North Carolina cities for the 2, 5, 10, and 25-year storm events. Data
from the city closest to the proposed BMP location can be used (Table 3.1) or
further information can be gathered for a specific city by visiting the National
Weather Service’s - Hydrometeorological Design Studies Center
(http://hdsc.nws.noaa.gov/hdsc/pfds/orb/nc_pfds.html)
16
Community Conservation Assistance Program - BMP Design Manual
Table 3.1 Peak Intensity (in/hr) for Various Storm Events (5-minute duration)
Location
2 - year
5 - year
10 - year
25 - year
Asheville
4.8
5.8
6.5
7.4
Charlotte
5.6
6.6
7.2
8.0
Greensboro
5.4
6.2
6.8
7.4
Winston-Salem
5.3
6.2
6.8
7.6
Fayetteville
6.1
7.1
7.9
8.9
Raleigh
5.6
6.5
7.2
7.9
Durham
5.6
6.5
7.2
7.9
Wilmington
7.4
8.6
9.7
10.9
Elizabeth City
6.1
7.0
7.9
9.0
Greenville
6.2
7.1
8.0
9.1
Taken from the National Weather Service
3.4.2 Runoff Coefficient
Although it is assumed that the BMPs implemented as part of the CCAP will treat
watersheds that are primarily impervious (rooftops, driveways, parking lots),
there will likely be other land uses associated with each watershed. Landscaped
areas, lawns, and other pervious areas are likely in each watershed. The rational
method is versatile enough to account for both the impervious and pervious
areas of each watershed.
Runoff coefficients (C) vary per type of land use. In an effort to simplify the
process of determining a composite C value that can be applied to a given
watershed, a C value of 0.95 should be applied to all impervious areas, and a C
value of 0.25 should be applied to all pervious areas. Equation 3-4 can be used
to determine a C value that can be applied to the whole watershed.
Equation 3-4: Determine the Composite Runoff Coefficient
C = [((Impervious Area) × 0.95) + ((Pervious Area) × 0.25)]/Watershed
Area
3.5 Diversion Berms
Diversion berms are earthen structures that are designed to intercept stormwater
and direct it to the BMP. They can increase the effectiveness of the BMP by
allowing it to treat a larger watershed. The sideslopes of the berm should not be
graded steeper than 2:1. The height of the berm does not need to exceed 1 foot.
The diversions can be covered with grass or mulch depending on the landscape
and the expected runoff velocities in the diversion. Erosion control blanket
should be used for cover while vegetation is being established.
17
Community Conservation Assistance Program - BMP Design Manual
3.6 Determining Outlet Location and Size
3.6.1 Determining Outlet Location
Close attention should be paid to where the water from a stormwater BMP exits a
given property. During small rain events, depending on soil conditions, all the
stormwater produced in a small watershed may be retained in the BMP.
However, the BMP will also experience larger rain events that overload it with
stormwater. During these events, the stormwater BMP will fill to capacity and spill
into the adjoining area. Special care should be taken to ensure that the area to
which the excess stormwater spills is able to convey the stormwater safely to a
nearby drainageway (such as a culvert or swale).
The easiest way to allow excess stormwater to leave a property is to direct it into
the existing drainage pathways. For instance, if a roof drain leads to a swale
which routes the water off the property, a BMP could be placed in the path of the
swale, whereby small amounts of runoff are retained and treated and stormwater
from larger storms flows out of the BMP and continues down the swale.
Other drainage conveyances can be used to safely allow large stormwater
volumes to leave a property. Yard inlets, swales, and ditches can all be used for
this purpose. In some cases a swale must be constructed between the BMP and
the closest natural drainageway to allow proper draining of the system. More
information on swales is available in section 8.0.
When earthen berms are used to retain stormwater (a common practice in rain
garden and backyard wetland design) there is opportunity for the berm to erode if
the BMP fills to capacity and spills over the retention berm. In these cases, it is
good practice to design and protect a spillway for the additional stormwater. An
opening in the berm can be constructed where the stormwater will be conveyed
out of the system. A piece of pretreated lumber, with a rectangular notch cut in it,
can be installed in the berm in this opening so the stormwater passes over a
stable edge instead of over the easily eroded earthen berm. This lumber acts as
a weir to spread the flow, thus reducing velocities. More information on BMP
outlet design and construction is given in Sections 3.6.2 and 3.6.3.
3.6.2 Determining Outlet Size
The outlet weir rectangular notch (described above in Section 3.6.1) should be
sized such that the notch is not overtopped during a 10-year storm event. This
means that the weir notch must be long enough to allow the peak flow associated
with the 10-year storm to pass without the water rising high enough that the top
of the board is reached. To determine the appropriate length of weir notch to
pass the 10-year storm, the weir equation can be applied. The weir equation is
as follows:
18
Community Conservation Assistance Program - BMP Design Manual
Equation 3-5: Weir Equation
Q = Cw × L × H1.5
Where:
Q = Flow (ft3/s) – Use peak flow from 10-year event
Cw = Weir Coefficient (dimensionless) – Use 3.0
L = Length of Weir (ft)
H = Height of Water Over Top of Weir (ft) – Use 0.5 feet
The flow that should be passed is the flow associated with the 10-year event as
determined using the rational method (Section 3.4). The weir coefficient is set to
3.0 and the height of the water over the top of the weir should be no higher than
6 inches (0.5 feet) so the water will not flow over the containment berm. Thus,
the only unknown in the equation is the length of the weir. This equation can be
rearranged to solve for the weir length:
Equation 3-6: Weir Equation
L = Q ÷ (Cw × H1.5)
Sample 10-year peak flow calculations for various watershed scenarios are
shown in Appendix A. Included is a required weir length for each watershed
scenario.
3.6.3 Outlet installation
Appendix B shows a diagram of a wooden weir structure that could be used for
an outlet control structure on large systems. For any type of outlet used,
concentrated flows should only pass over a structure or undisturbed and
vegetated soil. All wooden weir structures should be tied into the underlying
soils. Soils filled around structures should be compacted and protected.
3.7 Riparian Buffer Considerations
Many regulations have been implemented to improve the quality of surface
waters in North Carolina, including the riparian buffer rules detailed by the North
Carolina Division of Water Quality in the “Redbook” of surface waters and
wetlands standards (Administrative Code 15A NCAC 02B .0100, .0200 & .0300).
These rules state that a 50 foot riparian buffer should be maintained around
surface waters in the Tar-Pamlico Basin, Neuse River Basin, the main stem of
the Catawba River, and in the Randleman Lake watershed; all these water
bodies being nutrient sensitive. The purpose of these rules is to make use of the
19
Community Conservation Assistance Program - BMP Design Manual
inherent ability of riparian buffers to remove nutrients and other pollutants from
stormwater runoff. These riparian buffer rules can impact the function and siting
of a backyard stormwater BMP.
When siting a backyard BMP in one of the nutrient sensitive watersheds
described in the NCDWQ Redbook, a measurement should be made
perpendicular to the stream from the stream bank towards the area being
considered for a BMP. No part of the BMP should be located within this 50-foot
boundary running along the stream bank. Additionally, backyard swales can not
be constructed in the riparian buffer. Only existing swales can be utilized to route
water through the riparian buffer.
The riparian buffer rules not only include a requirement to maintain a 50-foot
buffer along the stream bank, they also require that stormwater released into the
buffer be done so in a diffuse manner. This means that in systems where water
will be collected and dispersed through an outlet (wetlands, bioretention areas,
etc.) the outlet should be designed to spread the water out as it enters the
riparian buffer. No newly constructed channel should be used to convey the
water into the buffer, instead, a large weir or berm can be used. The North
Carolina Division of Water Quality – 401/404 Wetlands Unit should be contacted
for additional information should a newly constructed drainage way be
necessary. General level spreader guidance is found in Hathaway and Hunt,
2006 (Appendix C), and on-line via the North Carolina Division of Water Quality –
Wetlands and Stormwater Branch (http://h2o.enr.state.nc.us/ncwetlands).
Avoiding the installation of CCAP projects in areas adjacent to riparian buffers is
generally recommended. If a project is located in a watershed with protected
riparian buffers, the BMP discharge should be routed into any existing drainage
ways if at all possible.
3.8 General Soils Discussion
Stormwater BMPs are impacted significantly by the soil in which they are
constructed. Therefore, it is important to know which soil types are present at a
given location before designing or constructing a stormwater BMP. Backyard
Stormwater BMPs that rely heavily on infiltration (rain gardens and permeable
pavement) must contain soils that will drain at most within 24 hours of a rain
event, further details are provided later in this document. In North Carolina, the
presence of clay precludes using soils from many parts of the state as the
underlying soil for rain gardens and permeable pavement (As discussed in
section 10.2, the need for infiltration in the underlying soils of permeable
pavement prohibits its use in locations other than the Coastal Plain or Sandhills).
Conversely, BMPs that require saturated soils to maintain BMP function and
plant vitality (backyard wetland) require that water be easily accessible to plant
roots via the water table or that poorly drained soils at the site will hold the
captured stormwater long after a rain event (Section 6.0). When a site is
20
Community Conservation Assistance Program - BMP Design Manual
evaluated for BMP implementation, determining the soil type at the site can be
performed by collecting information from soil surveys and, most importantly, from
field reconnaissance.
3.8.1 Information from Soil Surveys
Division of Soil and Water Conservation staff should be familiar with the soil
survey of their particular county. This soil survey provides some understanding of
the type(s) of soils present at the site being considered for BMP installation.
Once the soil that is present at the site (in situ soil) is identified, the staff member
should observe the detailed description of the soil series in the soil survey. This
description will give some detail as to the common location of a given soil in the
county landscape and will give some description of what type of soil is present in
each soil horizon in the soil series. This information should only be used to
gather preliminary data on a particular site. A site investigation will be needed to
verify the information gathered in the soil survey. In general, the soils will be
classified as either well draining or poorly draining. The soil survey will also
provide an indication of the expected seasonal high and low water table.
Generally, the soil types that are present from the soil surface to 36 inches below
the soil surface are the most crucial for backyard BMP siting. If the soils in this
range (0 – 36 inches deep) mostly consist of sand or loam, they may be suitable
for backyard bioretention areas. If the soils in this range consist primarily of
sandy soils, they may also be suitable for permeable pavement areas (only install
in Coastal Plain or Sandhills). Lastly, if the soils in this range consist primarily of
clay, they are potentially suitable for backyard wetlands.
3.8.2 Information from Site Investigation
Soil classifications gathered from a soil survey should never be used exclusively
to determine which type of soil is present at a given site. A site investigation will
be needed to verify that the soil on site is suitable for a given BMP. The first step
in this investigation is to talk to the property owner about the condition of the
proposed location immediately following a rain event. If the area remains wet or
saturated 1.5 days after a rain event, it is likely at least somewhat poorly drained.
Additional information can be gathered by digging a hole in the location of the
proposed BMP that is approximately 2-foot deep, or to the depth of the bottom of
the proposed BMP, whichever is deeper. As the hole is being dug, the soil should
be observed for signs that it is a wetland soil. Wetland soils are commonly grey
with ribbons of brown (Figure 3.7 and 3.8). If wetland soils are identified within 1
foot of the surface at a given site, the site is likely poorly drained. A detailed
description of wetland soils is available in Vepraskas (1999).
21
Community Conservation Assistance Program - BMP Design Manual
Figure 3.7 Brown ribbons in
wetland soil
Figure 3.8 Brown ribbons in
wetland soil (close)
The last evaluation that should be used during the site investigation is a
simplified soil infiltration test. This is a test to check the permeability of the soils
being evaluated for BMP suitability. A hole should be dug using an auger or
spade, approximately 1 foot below the expected bottom of BMP. The newly dug
hole should be filled with water (Figure 3.9). Monitor how quickly the hole drains
and use this information to select the appropriate BMP. Table 3.3 shows a range
of outcomes from the simplified soil infiltration test and the resulting BMP that is
suggested based on the results. More information will be presented on these
BMPs in sections 5 and 6. This drainage rate is particularly important for plant
selection and bottom grading of the practice.
Figure 3.9 Simplified soil infiltration test
Table 3.2 Selection Chart for Soils with Moderate Infiltration
Time For 2-Foot Hole to Drain
BMP Selection
½ day or less
Standard Rain Garden
½ day to 1½ days
Zoned Rain Garden*
1½ days to 4 days
Drought tolerant wetland**
4 days or more
Standard wetland
* More information on the Zoned Rain Garden is available in Section 5.0
** More information on the Drought tolerant wetland is available in Section 6.0
22
Community Conservation Assistance Program - BMP Design Manual
3.9 Information on Water Table Depth
While the soil analysis is being performed at the proposed BMP location, the
location of the seasonal high water table can be approximated. This is an
evaluation of the highest consistent level that the water table reaches with
respect to the ground surface during the year. As the soil is removed from the 2foot hole that is dug at the site, the soils should be observed for signs of the
seasonally high water table.
After the topsoil is excavated from the hole, the soil layers underneath provide
some information regarding the location of the seasonally high water table. When
soils are observed as gray or contain gray mottles (spots of gray color), this soil
is likely in contact with the water table for extended periods of time. Thus, as the
soil is being extracted from the hole, the seasonal high water table is likely to be
at the depth at which these mottled soils are encountered. More information on
determining the seasonal high water table is available in Richardson and
Vepraskas (2001). Obviously, if groundwater is encountered as the hole is being
dug, the site very likely has a high water table (Figure 3.10).
Figure 3.10 Obvious wet conditions in this location lead to selecting
a backyard wetland as a stormwater BMP
If the seasonal high water table is found within 2 feet of the ground surface, the
site is likely not a good candidate for certain stormwater BMPs (rain gardens,
permeable pavement). If such conditions exist at a site, a backyard wetland is a
more appropriate choice as a stormwater BMP; although, a seasonal high water
table within 1-foot of the ground surface is more desirable for this BMP.
4.0 General Stormwater BMP Considerations
4.1 Avoid Concentrated Flow
Stormwater collects and concentrates very easily into depressions, swales, and
natural runoff conveyances. Stormwater concentration can also occur as water
23
Community Conservation Assistance Program - BMP Design Manual
overflows from a backyard rain garden or wetland, or as water passes through a
cistern that is already filled to capacity. This concentration can lead to erosion of
berms, riparian buffers, lawns, or other ground cover.
If possible, backyard stormwater BMPs should be sited near or in the path of the
current drainage way leading from the watershed being treated (Figure 3.6). The
current drainage path can be utilized as a way to convey water away from the
BMP should a storm occur that is larger than what the BMP can hold. If the
drainage path is currently eroding, see section 8.0 for information on swale
protection.
Potential Site
Drainage Paths
Figure 3.6 A low area in the drainage path provides
a suitable location for a backyard BMP
4.2 Multiple Property Owners
Before a site is chosen for a backyard stormwater BMP, the property boundaries
should be clearly defined by the SWCD staff member. This is to ensure that no
part of the stormwater BMP is sited on property belonging to an individual not
participating in the program. If a stormwater BMP is to be sited in such a way that
multiple property owners will be impacted, all property owners should be
contacted and should agree upon the project.
There is an additional concern in impacting adjoining property owners not
participating in the program. Stormwater BMPs are designed to slow and capture
stormwater as it leaves a given property, thus a pool of water can form as water
slows and enters the stormwater BMP. This pool of water should not extend to a
neighbor’s property without consent. It should be noted, however, that
downstream property owners usually benefit from their upslope neighbor’s
24
Community Conservation Assistance Program - BMP Design Manual
installation of backyard BMPs, which bring about a potential reduction in flooding
and erosion on the downstream owner’s property.
4.3 General Information Matrix for Backyard Stormwater BMPs
5.0 Backyard Rain Garden Design
5.1 Overview of Practice
A rain garden (or bioretention area) is essentially a vegetated sand filter, and is
designed so it quickly dries after rain events. These BMPs are depressions in the
landscape, to which runoff is directed to be stored and infiltrate into the soil. A
typical rain garden will not have ponded water for more than 12 hours, although a
modified rain garden design can be used if water remains ponded between 12
and 36 hrs (1.5 days). Rain gardens are typically planted with a combination of
trees, shrubs and perennials and then mulched. Grass can also be used as
cover without other vegetation or along with trees, shrubs or perennials. Cover
and layout of rain gardens can be very flexible to suit a given site.
Figures 5.1a Picture of rain garden installations in Caldwell County (left) and
(b) Brunswick County (right), NC.
5.2 Selection of this practice over others
Rain Gardens offer an attractive, versatile and multi-functional option in
stormwater treatment. They can sometimes be installed without the help of heavy
equipment, although a small excavator would be beneficial in many cases. This
will likely be one of the more commonly selected BMPs.
The proposed BMP location should not have a seasonal high water table closer
than about 2.5 feet from the existing ground surface. A high water table will limit
drainage from the system between rain events, increasing the likelihood of plant
25
Community Conservation Assistance Program - BMP Design Manual
loss due to wet conditions. The seasonal high water table can be evaluated using
the method described in Section 3.8. The percolation rate of the soils should be
tested as described in Section 3.7.2. When performing a simplified soil infiltration
test, it is best to use several holes. Holes should extend approximately 1 foot
below the anticipated depth of the proposed rain garden. Water should drain
within 12 hours from each hole in order for the native soil to be acceptable for a
traditional rain garden. If the water drains between 12 hours and 36 hours a
modified rain garden design, called a zoned rain garden, could be used.
5.3 Rain Garden Design
5.3.1 Rain garden siting
There are a number of siting concerns regarding rain gardens. The soils must be
suitable, as described in section 5.2. To avoid contact between the infiltrated
stormwater and any building foundations, the rain garden should be located at
least 10 feet away from any foundations. The rain garden should be at least 25
feet away from any septic system drain fields and 25 feet away from any well
heads. It should not be upslope from wells and should be lateral to septic
systems (not upslope or down slope). Utility lines should be located and marked
prior to any excavation. For the best plant growth, the BMP should be located in
an area that receives partial to full sun exposure.
The rain garden should be located where stormwater naturally drains or water
should be routed to it. Avoid routing large areas to a new rain garden that would
overload the existing drainage ways. This will ensure that the garden will
intercept runoff during storm events and that overflows can be directed to
existing drainage paths.
5.3.2 Determine watershed and impervious area draining to BMP
The first step in rain garden design is determining the watershed area that drains
to the proposed rain garden site, which will contain some impervious area
(typically between 10 and 40%). This impervious area will most likely consist of
driveways and rooftops. In order to capture stormwater runoff from driveways
and other associated parking areas, the drainage must flow to the proposed
location. Rooftops normally are drained via gutters which may or may not drain to
the proposed location. In this case; however, a 4 or 6-inch pipe can be used to
route this water to the proposed location. After any modifications are considered
(like routing rooftop drainage to the proposed area) the total watershed area and
total impervious area draining to the proposed location can be calculated. Manual
measurements taken with a tape measure will work well in determining the area
draining to the BMP.
26
Community Conservation Assistance Program - BMP Design Manual
Figure 5.2 A rain garden’s perimeter is laid
out and a soil test is taken.
5.3.3 Rain garden sizing
Rain gardens should be sized to capture the first flush event. Once the amount of
watershed and impervious area has been calculated, the Simple Method (Section
3.3) can be used to determine the volume of water that will enter the BMP during
the first flush event. The depth of ponding in the bioretention cell can be selected
based upon topography, available area and home owner preference. The
approximate area needed for the rain garden is the runoff volume divided by the
depth of ponding. Appendix D shows the results of such calculations and can be
used to determine the BMP size based upon the percent of impervious area,
watershed size and depth of ponding.
Figure 5.3 First flush events completely fill a rain garden
to a ponding depth of 6 inches
27
Community Conservation Assistance Program - BMP Design Manual
5.3.4 Rain garden bottom topography
The topography of the bottom of the rain garden will largely be a function of the
infiltration rate of the soil. The infiltration rate can be tested as described in
Section 3.7.2. If the soil drains in 12 hours or less, the bottom of the rain garden
can be essentially flat. If the soil drains between 12 and 36 hours, grade the
bottom of the rain garden so that zones of varying bottom elevation exist. This
will create areas where the flood pool depth is shallow and ponding time is
shorter, which can help the survival of some bioretention plants (some of which
cannot tolerate wet conditions for extended periods). Creating higher and lower
elevation zones along with planting some plants on the banks of the bioretention
cell can help ensure the survival of plants when drainage conditions are
somewhat uncertain. Keep in mind that higher elevation zones take away from
the storage volume of the garden and the area should be increased accordingly.
This can be done by dividing the runoff volume by an average depth for the cell.
For example, if 50% of the cell will be ponded 9 inches deep and 50% will be
ponded 6 inches deep, the average depth is 7.5 inches. Shallow rain gardens
take up more surface area than their deeper counter parts.
Figure 5.4 Mounding of soil allows certain rain garden plants
to survive better in a zoned rain garden.
5.3.5 Plant selection
When the rain garden drains in less than 12 hours, the bioretention plant list in
Appendix E can be used as a guide to plant selection. Grass can also be used in
this case as an alternative to other vegetation or in combination with other
vegetation. Warm season grass (e.g. Bermuda, Centipede, Zoysia) is
recommended in much of the State, but cool season grass (Fescue, Kentucky
31) can be used in cooler climates or to match existing lawn. It may be
necessary to re-seed the cell in the fall.
When the garden drains between 12 and 36 hours and the zoned rain garden is
built (contains areas of high and low elevation), the plants in Appendix F should
28
Community Conservation Assistance Program - BMP Design Manual
be used. In each case it is good to use a variety of plants for aesthetic value and
to improve the chances of plant survival. In the zoned system, place some plants
in the base of the garden and others in higher areas and on the banks.
5.3.6 Inlet protection and pretreatment
It is a good practice to dissipate the energy of the inflow and to remove sediment
from runoff before it enters the main body of the rain garden. A few methods for
accomplishing this include:
•
Vegetated filter strip - Directing flow into the garden as sheet flow over a
vegetated surface, like a lawn. This spreads the stormwater to limit
concentrated flow (and the associated erosive velocities) and to allow
filtration by the grass. This can also increase the volume of infiltration at
the site.
•
Swale – A swale can also increase stormwater infiltration and sediment
filtration. See Section 8.0 for more information on designing swales.
Stone or rip-rap can be used at the entrance to the rain garden if velocities
exiting the swale are too high.
•
Forebay – A forebay can be used at the entrance of the garden to pool
water, settle sediment, and dissipate energy before flow enters the main
body of the rain garden. These features should be used particularly in
larger watersheds.
•
Gravel verge – This method should frequently be used when space is
limited or when stormwater enters as sheet flow from an impervious
surface directly adjacent to the garden, such as from a driveway. Figure
5.5 shows a gravel verge and vegetated filter strip combination on the
slope of a rain garden. Sheet flow leaving the impervious surface should
first contact a strip of washed 57 stone over geotextile fabric and then a
grass strip. Each section should be at least 1 foot wide.
29
Community Conservation Assistance Program - BMP Design Manual
Figure 5.5 A gravel verge and grass filter strip for use in dissipating energy and removing
sediment from sheet flow into a bioretention cell
Figure 5.6 A gravel verge precedes a sod filter strip leading into
this bioretention area (rain garden).
30
Community Conservation Assistance Program - BMP Design Manual
5.3.7 Outlet design
The outlet structure controls the ponding depth in the rain garden and allows
excess flows to exit the garden in a controlled manner without damaging any
berms used to form the garden or the drainage infrastructure. The first step in
designing an outlet structure is determining the peak flow of the desired design
storm for the given watershed, often the 10-year storm. Section 3.4 discusses
the use of the Rational Method for calculating peak flow rate. A weir structure is
commonly used for bioretention cells, with the weir sized so not to be overtopped
during the peak of the 10-year storm. During the peak flow of the 10-year storm,
all higher velocity outflow should be in contact with the weir, not contacting soil
composing the berm. Section 3.5.2 discusses weir sizing. Appendix B describes
the layout and construction of a wooden weir structure. For smaller rain gardens,
as will often be the case, a simpler structure than what is described in the
appendix may be used. For example, a treated 2x12 with a weir notch cut in it,
installed using some of the guidance in Appendix B may be sufficient. All
structures should extend at least 6 inches below final grade at the base and 12
inches into the sides of the berm. Soil filled around the structure should be well
compacted in 4 to 6-inch lifts. The rain garden should be designed so that no
sensitive upstream areas are flooded because of the garden during any rain
event.
5.4 Rain Garden Maintenance
The first step in maintenance of a rain garden is designing the system to be low
maintenance. If sediment can be removed before entering the body of the rain
garden (using the inlet protection methods discussed in section 5.3.6)
maintenance will be less intensive. Any sediment buildup in the garden or in an
inlet protection area should be cleared as necessary to prevent clogging of the
garden.
Plant health should be monitored during establishment and during droughts, this
can help ensure their survival. It may be necessary to water the rain garden in
such times, depending on the garden’s condition. It is also necessary to check
the outlet structure to make sure it is clear and isn’t preventing the garden from
draining properly. Fertilizers are not recommended, as sufficient nutrients for the
plants are delivered from the watershed.
Mulch will need to be replaced 1 or 2 times per year for aesthetics, to shade the
soil, and to help keep weeds out. Weeds will arrive in the garden and must be
occasionally removed. Pesticides are not recommended for weed control in rain
gardens.
31
Community Conservation Assistance Program - BMP Design Manual
Table 5.1 Maintenance Activities for Backyard Rain Gardens
Activity
Frequency
Remove any sediment that has
accumulated in garden or inlet
(Check contributing watershed for
signs of instability)
Once per year or more
frequently as needed
Remove trash from rain garden
As needed
Replace mulch in rain garden
Every 6 months
Remove debris from around
overflow weir
As needed
Water garden plants
During drought
Remove weeds, prune garden
plants
As needed
6.0 Backyard Wetland Design
6.1 Overview of Practice
A backyard wetland, also referred to as a “pocket wetland” or a “wetland garden,”
is built in an area that is perennially moist. The wetland is designed such that it
will usually be wet, even several days after a rain event. A properly functioning
backyard wetland will be substantially more wet than a rain garden and is usually
constructed as an alternative to rain gardens. A typical backyard wetland will be
a shallow, excavated bowl ranging from 3 to 12 inches deep. Inside this bowl a
variety of vegetation is planted. It is essential that a variety of plants are grown in
the wetland to avoid a monoculture and potential mosquito hazard. Wetland
vegetation tends to grow densely. Stormwater wetlands are most frequently used
to treat large watersheds, such as shopping centers and residential communities;
however, in locations with high water tables, pocket wetlands can capture runoff
from small watersheds such as an individual property. Figures 6.1 and 6.2 show
a wet spot in a yard (an ideal location for a pocket wetland) and types of
vegetation found in a backyard wetland, respectively.
32
Community Conservation Assistance Program - BMP Design Manual
Figure 6.1 A perennially wet spot in a
yard is a good location for a pocket
wetland.
Figure 6.2 This pocket wetland, in
Tarboro, NC, features vegetation such
as lily pads, pickerelweed, and joe pye
weed.
6.2 Selection of this practice over others
Backyard wetlands are used in similar environments as rain gardens. As with rain
gardens, backyard wetlands should be located in a low area where stormwater
naturally drains. This will ensure that the wetland will operate properly during
storm events. The wetland should also be located near the current surface
drainage system (the drop inlet or swale that currently drains the watershed).
This will allow the designer to direct stormwater that overflows the wetland to the
current surface drainage system via a swale or overland flow. By directing the
stormwater overflow to the current surface drainage system, no additional
drainageways will be required to direct stormwater off the property.
There are a number of other siting concerns for backyard wetlands. To avoid
contact between the infiltrated stormwater and any building foundations, the
wetland should be located at least 10 feet away from any foundations. The
wetland should be at least 25 feet away from any septic system drain fields and
25 feet away from any well heads. Because stormwater wetlands are located in
areas that are perennially wet, they tend to be placed down slope of wells and
septic tanks and well away from home foundations. Utility lines should be located
and marked prior to any soil excavation. For the best plant growth, the
stormwater wetland should be located in an area that receives partial to full sun
exposure to allow plant growth.
In general, backyard wetlands should be selected over other BMPs when site
conditions involve poorly drained soils and/or high water tables. When an initial
soil investigation is performed, if the seasonal high water table (Section 3.8) is
within 1-foot of the soil surface, the site should be considered for a backyard
wetland. Additionally, if the soil investigation shows the soils to be poorly drained
(Section 3.7) the site will be more suitable for a backyard wetland than a rain
33
Community Conservation Assistance Program - BMP Design Manual
garden. Another way to verify that a site has poorly drained soils is to identify the
spot at a given property where standing water is present for multiple days after a
rain event. If the initial simplified soil infiltration test described in Section 3.7.2
results in the test hole draining in between 1.5 and 4 days, a “drought tolerant”
wetland should be constructed at the site. More information on drought tolerant
wetlands is given in Section 6.3.6.
SWCD staff should evaluate sites with poorly drained soils extremely carefully.
The overwhelming majority of CCAP projects will be too small to impact
jurisdictional wetlands, if wetland soils are detected on a large project (> 1/4
acre) then the property should be evaluated by a member of the Army Corps of
Engineers and/or the North Carolina Division of Water Quality – 401/404
Wetlands Unit.
6.3 Backyard Wetland Design
6.3.1 Determining wetland watershed characteristics
The first step in backyard wetland design is determining the watershed area that
drains to the proposed site. The percentage of impervious area in this watershed
should also be determined. This impervious area will most likely consist of
driveways and rooftops. In order to capture stormwater runoff from driveways
and other associated parking areas, the drainage must naturally flow to the
proposed location. Rooftops normally are drained via gutters which may or may
not drain to the proposed location. In this case, either a 4- to 6-inch plastic
flexible pipe or a diversion berm (Section 3.5) can be used to direct this water to
the proposed rain garden location. After any modifications are considered
(routing rooftop drainage to the proposed area) the total area draining to the
proposed location and the percentage of impervious area in the watershed can
be calculated
Manual measurements taken with a tape measure can help determine the
watershed area, as well as the area draining from driveways, patios, and parking
areas. The rooftop area can be measured manually or housing plans can be
obtained. If the total rooftop area is known, a judgment must simply be made on
how much of the roof drains to a given downspout that will be routed to the
backyard wetland location.
6.3.2 Backyard wetland sizing
Backyard wetlands should be sized such that the ponding depth of the captured
runoff is no more than 9 inches. In some cases, a property owner may desire a
larger wetland; if so, the ponding depth can be as little as 3 to 6 inches. Using the
volume of runoff produced in the contributing watershed, and this maximum
ponding depth, the surface area of the wetland can easily be calculated. The
34
Community Conservation Assistance Program - BMP Design Manual
shape of the backyard wetlands that are installed as part of the CCAP will vary
upon topography, obstructions (e.g., trees and utilities), and landowner desires.
The shape will largely be determined by the available space at the stormwater
collection point, aesthetic appeal should also be considered. In general, neither
the length nor the width should be less than 3 feet.
Once the watershed size and the percentage of impervious area have been
calculated, the Simple Method (Section 3.3) can be used to determine the
volume of water that will enter the BMP during the first flush event. The wetland
surface area will simply be this volume divided by the ponding depth desired for
the site. The figures in Appendix D use the simple method to determine the BMP
surface area that is required for various watershed scenarios (various sizes and
impervious percentages). These figures can be used to size a stormwater
wetland for 3, 6, and 9 inch average ponding depths.
6.3.3 Backyard wetland inlet considerations
As stormwater enters the wetland from a pipe or swale, the energy of the
stormwater can cause erosion. Placing a check dam in the path of the
stormwater just before it enters the wetland will reduce the velocity of the water.
This check dam can be constructed of rolled erosion control matting or with 6” –
8” nominal diameter rip-rap. This may not be required in all situations; however, if
the slope of the swale or pipe entering the backyard wetland is steep (>6%),
erosion is likely to occur. Examples of check dams constructed of erosion control
matting and rock are shown below in Figures 6.3 and 6.4.
Figure 6.3 Swale leading to BMP with check dams
constructed of rolled erosion control matting
35
Community Conservation Assistance Program - BMP Design Manual
Figure 6.4 Swale with check dam constructed of stone
(Source – USDA – Natural Resource Conservation Service – Illinois)
6.3.4 Backyard wetland outlet considerations
The outlet structure controls the ponding depth in the backyard wetlands and
allows excess flows to exit in a controlled manner without damaging any berms
used to form the wetland or the drainage infrastructure. The first step in
designing an outlet structure is determining the peak flow of the desired design
storm for the given watershed, often the 10-year storm. Section 3.4 discusses
the use of the Rational Method for calculating peak flow rate. A weir structure is
commonly used for wetlands, with the weir sized so not to be overtopped during
the peak of the 10-year storm. During the peak flow of the 10-year storm, all
higher velocity outflow should be in contact with the weir, not contacting soil
composing the berm. Section 3.5.2 discusses weir sizing. Appendix B describes
the layout and construction of a wooden weir structure.
For smaller rain gardens, as will often be the case, a simpler structure than what
is described in Appendix B may be used. For example, a treated 2x12 with a
weir opening, installed using some of the guidance in Appendix B may be
sufficient. All structures should extend at least 6 inches below final grade at the
base and 12 inches into the sides of the berm. Soil filled around the structure
should be well compacted in 4 to 6-inch lifts. The backyard wetland should be
designed so that no sensitive upstream areas are flooded because of the wetland
during any rain event.
6.3.5 Backyard wetland plants
Wetland plants, like any other plant species, have specific environments that they
thrive in. Most notably for backyard wetlands, water depth plays an important role
in plant selection. For the purposes of the CCAP, these water depths will be
divided into three groups: upland plants (not normally in contact with surface
water – planted around rim of wetland where roots can access moist soil),
shallow water plants (water depth consistently between 0 and 4 inches), and
deep water plants (depths consistently greater than 6 inches).
36
Community Conservation Assistance Program - BMP Design Manual
A short list of plants which thrive in each environment is shown in tables 6.1, 6.2
and 6.3. This information was gleaned from “A Citizen’s Guide to Protecting
Wilmington’s Waterways.”(Butler, 2005) Additional plant choices are available,
especially with regard to perennials. A local cooperative extension horticulture
agent should be contacted for additional plant choices. In times of extreme
drought, the land owner is encouraged to water the wetland as needed based on
the condition of the plants (if they show signs of stress due to lack of rain)
Most backyard wetlands will NOT retain water deep enough for a long enough
period to support deep water plants. However, if after the wetland has been
constructed the property owner observes 6- to 9-inch deep water reliably in the
spring, summer, and fall, the plants listed in table 6.1 should be incorporated into
the planting scheme.
Some rules-of-thumb for backyard wetland plant selection include:
(1) Choose native species. Nearly all the species provided in tables 5.3
through 5.5 are native to most of North Carolina
(2) Include evergreen vegetation to provide some color in the backyard
wetland during the winter months
(3) Select a few species of plants with showy flowers, which will attract
butterflies and dragonflies. This will add aesthetic appeal (butterflies) and
an important mosquito predator (dragonflies) to the BMP.
Common Name
American Lotus
Table 6.1 Sample deep water wetland plants1
Scientific Name
Comments
Bold plant with foliage and flower stems standing
4' - 6' above water's surface. Large, showy yellow
Nelumbo lutea
flowers produced throughout summer.
Spadderdock - Cow
Lily
Nuphar luteum
Fragrant Water-Lily
Nymphaea odorata
Heart shaped leaves float on water's surface, 1"2" wide, globe shaped, yellow flowers are born
throughout summer
Rounded, heart shaped leaves float on water's
surface. Large, white, sweetly fragrant flowers
open throughout summer
1
It should be noted that if the water level in the wetland is not consistent and
normally drains in between rain events, the deep water plants should not be
used.
37
Community Conservation Assistance Program - BMP Design Manual
Common Name
Arrow Arum
Pickerelweed
Lizard's Tail
Duck Potato
Soft Rush
Woolgrass
Common Name
Swamp Milkweed
Joe Pye Weed
Swamp Sunflower
Red Star Hibiscus
Rose Mallow
Cardinal Flower
Soft Rush
Table 6.2 Sample shallow water wetland plants
Scientific Name
Comments
Elegant arrowhead shaped leaves and
Peltandra virginica
interesting green flowers on a clump forming
plant
Upright plant producing numerous 3' tall spikes
topped with blue flowers all summer. Tough and
Pontederia cordata
attractive.
Spreading perennial that will grow in shallow
standing water and wet soils. Pendant spikes of
Saururus cernuus
white flowers in late spring and summer.
Tough emergent aquatic with arrowhead shaped
leaves and spikes of white flowers produced
Sagittaria latifolia
throughout summer. Reproduces rapidly.
Common rush found throughout NC. 2' - 3' tall
with dark green spiky foliage. Green flowers are
Juncus effusus
to brown seed pods throughout summer. Near
evergreen.
Large, 3' - 4' tall and wide clump forming bulrush
producing wooly green flower heads in summer
Scirpus cyperinus
that age to an attractive rusty brown as seed
mature
Table 6.3 Sample upland wetland plants
Scientific Name
Comments
Pink flowers in early summer. Larval food of
Asclepias incarnata
monarch butterflies.
Masses of rosy-mauve flowers in late summerEupatorium fistulosum
fall attract butterflies
Towers of 3" wide golden sunflowers in fall Helianthus
attracts butterflies
angustifolius
Tough, clump forming, sturdy plant with star
Hibiscus coccineus
shaped red flowers in summer
Tough, durable plants with huge white, pink or
Hibiscus moscheutos
rose flowers in summer
Tall spikes of crimson red flowers in late summer
Lobelia cardinalis
and fall - attracts hummingbirds and butterflies
Juncus effusus
Common rush found throughout NC. 2' - 3' tall
with dark green spiky foliage. Green flowers are
to brown seed pods throughout summer.
6.3.6 Drought tolerant wetland
As noted in Sections 6.2 and Table 3.4, the results of the simplified soil infiltration
test will sometimes lead to the decision that the soil in question is neither poorly
drained nor well drained. Thus, it is not suitable for a standard rain garden or a
standard wetland. A modification of these practices is needed for the range of
38
Community Conservation Assistance Program - BMP Design Manual
soils between poorly and well drained. When the test hole at a given location
drains in 1.5 to 4 days, and the soils at the site have a significant clay content,
the site will likely support a wetland. However, the wetland that is constructed
must the drought resistant.
In general, drought resistant wetlands can be designed and constructed in the
same way that regular wetlands are designed and constructed. The main
difference in these wetlands is the plant selection. The major danger in allowing a
backyard wetland to dry is plant mortality. Thus, selecting hardy, drought tolerant
plants will result in a well functioning wetland under these drier conditions. Table
6.4 shows a set of suitable plants that can grow in these harsh conditions.
Table 6.4 Plant selection for drought resistant wetland
Common Name
Scientific Name
Plant Type
Soft Rush
Juncus effusus
perennial
Joe Pye Weed
Eupatorium fistulosum
perennial
Rose Mallow
Hibiscus moscheutos
perennial
Ironweed
perennial
Vernonia novaboracensis
Blue Flag Iris
perennial
Iris virginica
Blue Star
Amsonia tabernaemontana
shrub
Buttonbush
Cephalanthus Occidentalis
shrub
Virginia Willow
Itea Virginica
shrub
Possumhaw
Viburnum Nudum
shrub
Winterberry
Ilex Verticillata
shrub
Green Hawthorn
Crataegus Viridus
small tree
Possumhaw
Ilex Decidua
small tree
Sweet Bay
Magnolia Virginiana
small tree
River Birch
Betula Nigra
Tree
Bald Cypres
Taxodium Distichum
Tree
In times of extreme drought, even the drought tolerant plants in the wetland may
be impacted by the lack of water. If the plants begin to dry out and show signs of
stress consistent with a lack of water (such as wilted foliage), the plants should
be watered. The wetland can be irrigated in the same manner as any adjoining
lawn, and can obviously tolerate more irrigation than a standard lawn (if
resources are available).
6.4 Backyard Wetland Construction
6.4.1 Laying out the wetland
Once the suggested wetland surface area has been determined and a location
has been selected, marking paint, string / rope, or flags can be used to lay out
the perimeter of the wetland (Figures 6.5a and 6.5b). The wetland dimensions
39
Community Conservation Assistance Program - BMP Design Manual
will vary based on site conditions and landscaping preferences. The layout
should be measured multiple times before digging to ensure that the suggested
surface area of the wetland is achieved with the dimensions that have been
marked.
Figures 6.5a and 6.5b Mark wetland area prior to excavating the area
6.4.2 Digging the wetland
After the wetland area has been laid out, digging can commence. Topsoil should
be removed and stored by the side of the wetland (this topsoil will be put back
into the wetland later). If the BMP is built on a slope, the remaining soil removed
from the wetland area should be placed around the wetland perimeter to create a
berm that will retain the stormwater (Figures 6.6 and 6.7). If it is not built on a
slope, the entire BMP can be dug into the ground and no berm is required
(Figure 6.8). In this case, the soil is not needed for a berm and can be discarded.
Figure 6.6 Illustration of backyard wetland constructed on 4% slope
40
Community Conservation Assistance Program - BMP Design Manual
Figure 6.7 Berm Construction at downslope edge of BMP
Figure 6.8 Illustration of backyard wetland constructed on 0.5% slope
Since an average depth of 9 inches is desired, some areas in the wetland can be
as deep as 1-foot, while other areas will be 3 inches or less. The depth is found
by measuring down from the top of the overflow weir (or lowest elevation along
the wetland perimeter if no weir is used) to the excavated soil surface. Building
variability into the wetland with respect to water depths encourages plant
diversity. If the water table is encountered while digging the wetland, this is a
good sign that wetland vegetation will survive in this location. The topsoil will be
added back to the wetland after it has been dug; thus, the wetland may have to
be a little deeper to account for the reapplication of the topsoil. A small, deeper
section (forebay) can be included in the wetland design were the stormwater
initially enters. This forebay will cause some influent sediment to fall out and will
dissipate the energy of the stormwater, reducing erosion inside the BMP. Often, if
the watershed is small (<0.5 acres) and stable, a forebay is not needed.
When a backyard wetland is constructed on a slope, the berm height will vary
based on the severity of the slope. In general, the berm should not be more than
1 foot higher than the surrounding ground surface. This will minimize the erosive
41
Community Conservation Assistance Program - BMP Design Manual
potential of any stormwater that spills over the back side of the berm. The berm
should be stabilized with grass seed and straw after the construction is complete.
During the period before the grass has been established, the berm will be
susceptible to erosion and should be checked after every rain storm. If the
property owner desires, sod strips can be used to stabilize the outlet berm. An
outlet should be constructed as described in Section 6.3.4 to provide safe
passage of stormwater overflow whenever a berm is necessary.
Whether the BMP is constructed on a flat landscape or one that is sloped, a strip
of erosion control fabric (the width of one roll of fabric, which is approximately 6
feet) should be added immediately downslope of the backyard wetland. This is
shown in both Figures 6.6 and 6.8. This erosion control fabric will help prevent
erosion as the water leaves the wetland.
After the berm and outlet structure have been constructed, the internal cavity, or
bowl, of the wetland can be prepared. If the wetland is not sited where the water
table will be readily accessed by plant roots (high water table –Section 3.8), the
wetland plants will rely on ponded stormwater remaining in the wetland due to
poor infiltration. In locations where poor infiltration is relied upon, a hand tamper
or other mechanical compactor can be used to compact the underlying soils. This
compaction will result in reduced soil infiltration, leading to improved water
retention within the wetland.
After the underlying soils have been prepared, the topsoil that was removed
should be reapplied on top of the underlying soils at a depth of 2 – 3 inches. This
topsoil can be raked into the underlying soils to provide a suitable media for plant
growth, this topsoil should not be compacted. Some 10-10-10 slow release
fertilizer may also be added to the soils in small quantities to initiate plant growth.
After initial fertilization, the wetland should not be fertilized again. In many cases,
the wetland soil should also be limed. To verify pH, soil samples can be sent to
the NCDA&CS laboratory in Raleigh for testing.
6.4.3 Planting the wetland
Some wetland plants can be purchased at home improvement stores, others will
only be available at specialty native plant nurseries. Plant nurseries can also
provide valuable insight on plant selection. Planting wetland vegetation is similar
to planting any other type of vegetation. A trowel or shovel can be used to create
a small hole for planting. Wetland plants should be placed in the location around
the wetland in which they are best suited, the zones discussed in Section 6.3.5
are a good guide in planting the various species in the correct environment. The
depth of zones is found by measuring from the top of the overflow weir (or lowest
elevation along the wetland perimeter if no weir is used) to the underlying soil.
42
Community Conservation Assistance Program - BMP Design Manual
6.5 Backyard Wetland Maintenance
Backyard wetlands must be maintained to ensure their long term functionality. As
mentioned earlier, the BMP should initially be checked frequently (every month)
for signs of erosion around the containment berm (if one is present), where the
stormwater enters the system, and just downslope of the wetland. All three of
these locations may be prone to erosion. If erosion is observed, the area can be
graded with a rake and shovel and reseeded. Erosion control matting and check
dams (described above) can be installed if additional protection is required.
Once the vegetation has established and if there have been no signs of erosion,
inspection frequency can be decreased to only following storms exceeding 2
inches.
Invasive species can result in reduced plant diversity within the wetland. Cattails
are one species that often becomes established in stormwater wetlands. The
herbicide; aquatic formulations of glyphosate (example trade name of Rodeo®)
can be applied to the cattail stalks, resulting in plant mortality. This should be
performed the first time a cattail is identified in the wetland, typically in midspring. Care should be taken when using these chemicals. A chemical-resistant
glove should be worn whenever handling herbicides. An easy way to apply the
chemical is to wear a cloth glove over the chemical resistant glove and to let
some of the chemical soak into the cloth glove. The stalks can simply be wiped
with the cloth glove. For a detailed description of this method of removing
cattails, please see Stormwater Wetland and Wet Pond Maintenance (Hunt and
Lord) available in Appendix G.
Additional maintenance activities include such things as cleaning out the
sediment that has accumulated in the forebay of the BMP (using a shovel), and
picking up any trash that has entered the wetland.
Table 6.5 Maintenance Activities for Backyard Wetlands
Activity
Frequency
Initially every month until
Monitor wetland for signs of erosion stabilization and after any
large storm (> 2 inches)
Remove sediment from forebay
As frequently as once per
year, if ever.
Remove trash from wetland
As needed
Remove invasive species
As needed, typically midspring.
Remove debris from around
overflow weir
As needed
43
Community Conservation Assistance Program - BMP Design Manual
7.0 Cistern Design
7.1 Overview of Practice
Cisterns are perhaps the oldest rainwater treatment practices. They are used to
capture runoff, primarily from roof tops. Sometimes runoff from pavement is also
temporarily held in cisterns. A cistern is simply a tank that stores runoff. These
tanks range in size from thousands of gallons to as small as 50 gallons. The
small version of a cistern is known as a rain barrel. Cisterns can be employed
above or below ground, with the former type of cistern typically being cheaper to
purchase and install. Above ground cisterns will be the focus of this document.
These systems vary in size, color, and shape. Figures 7.1, 7.2, and 7.3 show
examples of cisterns installed in various locations in North Carolina.
Figure 7.1 3,000-gallon cistern installation in Greenville, N.C.
Figure 7.2 5,600-gallon cistern in Kinston, N.C.
44
Community Conservation Assistance Program - BMP Design Manual
Figure 7.3 300-gallon cistern in Greenville, N.C.
The cistern is part of a larger system, consisting of gutter diversions, outlet lines
and often a pump (Figure 7.4). This system is referred to as a rainwater
harvesting system. Rainwater captured in cisterns is used, or harvested, for uses
such as irrigation, toilet flushing, vehicle washing, and clothes washing. Irrigation
and car washing are expected to be the primary use for stormwater collected in
backyard cisterns. These uses are non-potable (non-drinkable) only. It is
important to alert users that this water is not for drinking such as was done in
Figure 7.3.
Figure 7.3 Warning signs on a cistern to prevent human intake of the stormwater
The demand for cistern water and the size of the cistern relative to the
contributing watershed (rooftop) tends to govern how much runoff reduction the
water harvesting system provides. Because rain barrels tend to be very
undersized, they do not provide as much runoff reduction when compared to
larger multi-hundred or multi-thousand gallon cisterns.
45
Community Conservation Assistance Program - BMP Design Manual
Figure 7.4 Schematic of cistern system
7.2 Selection of this practice over others
The primary advantage of installing a stormwater cistern is that the stormwater
can be captured and used for some other objective. In other BMPs, stormwater is
lost to the atmosphere, is used by plants, or drains into the soil. A property owner
should be able to describe the intended use of the stormwater to SWCD staff.
This is important because the cistern is only an effective BMP if it has storage
space. Storage space is created by using the cistern water between rain events.
Cisterns can be installed, in many cases, without excessive digging, and soil type
and water table depth have little impact on above-ground cistern installation.
The disadvantage of using cisterns is that they will only treat runoff from rooftops
in a backyard stormwater BMP setting. Thus, rain gutters are necessary on the
rooftops being treated. SWCD will not provide any cost-share for gutter
installation. Any runoff produced by parking lots or other impervious surfaces are
typically not captured by the cistern.
7.3 Cistern Design
7.3.1 Determining Cistern Watershed Characteristics
Determining the characteristics of the watershed draining to the cistern is
relatively easy. Since the cistern will be receiving drainage from a rooftop, the
rooftop area draining to the gutters feeding the cistern should be determined.
Design plans, internet tax maps, and site measurements can be used to
determine the drainage area.
46
Community Conservation Assistance Program - BMP Design Manual
7.3.2 Cistern sizing
The first step in cistern sizing is to determine the volume of stormwater that is to
be captured. These systems capture runoff from areas that are, in most cases,
100% impervious. The simple method described in equations 3-1 and 3-2 can be
applied to these rooftop watersheds to estimate the volume of runoff that can be
expected for a given storm event. It is unreasonable to capture the entire first
flush (1 or 1.5 inches, depending on location) due to the size of cistern that would
be required to do so. Thus, a reasonable water quality and volume reduction can
be achieved by capturing the first 0.5 inches of rainfall (0.75 inches in CAMA
counties).
An appropriately sized cistern can be selected based on the capture volume that
was calculated. Cisterns come in standard sizes and shapes, so the cistern may
be slightly over or under sized based on the desired volume and the available
cistern sizes. Table 7-1 shows the estimated runoff associated with various
rooftop areas and a suggested cistern size for each rooftop. The cistern
manufacturer should be contacted to determine what size cisterns are available.
Plastic cisterns are more desirable for the purpose of the CCAP, and a range of
colors are available to suit aesthetic needs.
Rooftop
Area
(ft2)
250
500
750
1000
2000
3000
5000
Runoff
Volume
(cf)
10
20
30
40
79
119
198
Table 7.1 Estimated Runoff Volumes and
Cistern Suggestions for Various Rooftop Areas
0.5-inch
0.75-inch
Runoff
Suggested
Runoff
Runoff
Volume
Cistern Size
Volume
Volume
(gal)
(gal)
(cf)
(gal)
74
148
222
296
592
888
1480
65 (rain barrel)
133 (rain barrel)
210
300
550
1000
1500
15
30
45
59
119
178
297
111
222
333
444
888
1332
2221
Suggested
Cistern Size
(gal)
133 (rain barrel)
210
300
550
1000
1500
2500
Because cistern sizing is based upon water supply and demand, the chart
provided above will often undersize, but occasionally oversize, the cistern. The
preferred way to determine the size of a cistern is to run a simple water budget
model such as those available on the following website:
http://www.bae.ncsu.edu/topic/waterharvesting.
This model simulates 30 years of actual rainfall data from several cities in North
Carolina and couples this “supply” of water with user defined demands – such as
the number of gallons of water used per week to irrigate and wash vehicles.
Before a cistern is installed, it is highly recommended that the eventual operator
47
Community Conservation Assistance Program - BMP Design Manual
of the cistern know how much water he/she is using on a daily basis. This
information can be obtained using a simple hose-attached water meter, available
for purchase at most garden centers. The model will show the optimal size for a
cistern based upon runoff reduction, nutrient removal, and payback period (cost).
More information on this model is provided in Appendix H.
7.3.3 Additional Cistern Components
A few additional components may be desirable to ensure proper cistern function
and to increase the usability of the collected rainwater. Most notably, a filter
should be used to remove leaves and large debris that have made their way
down the gutter with the stormwater. This filter can be placed just below the
gutter downspout where the stormwater enters the cistern (Figure 7.5)
Figure 7.5 Debris filter just below gutter downspout
An overflow assembly is part of the cistern as well. This assembly generally
consists of a system of pipes that attach to the overflow orifice that is built into
the cistern. If the cistern does not have enough storage space to capture an
entire rain event, this system of pipes allows any overflow stormwater to leave
the cistern and discharge onto the ground below without cascading down the
side of the cistern (Figure 7.6 and 7.7).
Figures 7.6 and 7.7 Overflow assembly on cistern
48
Community Conservation Assistance Program - BMP Design Manual
Additional equipment may be needed to access the cistern water, such as
spigots and other pipes. The cistern vendor should be contacted to determine
exactly what outlet configuration will be required to access the cistern water for a
given water usage. In some cases, a pump will be required to send the
stormwater to the point of usage. Vendors can give some guidance on pump
sizing. A North Carolina Cooperative Extension publication has been produced
that will also aid in pump selection. This document has been attached as
Appendix I.
7.3.4 Outlet structure
Cisterns have an internal overflow device that is used when they do not have
enough storage space to capture a given rain event (Figure 7.6 and 7.7). The
quantity of stormwater that overflows or bypasses the cistern will vary depending
on event size. Thus, some effort should be made to route the overflow
stormwater to a nearby drainageway. This may be done via a swale or plastic
drainage line. Failure to do so may result in the formation of an erosion channel
where the stormwater leaves the cistern.
7.4 Cistern Construction
7.4.1 Preparing the soil base
Cisterns are extremely heavy when full of water. A stable, level, soil base is
needed to ensure the stability of the cistern. If the site is not level, the cistern
could tip and fall. The area to be occupied by the cistern should be cleared of any
vegetation or debris that could make the cistern unstable over time (Figure 7.8a).
Cisterns that are 1500 gallons or greater in size may require some additional
stability underneath. A level depression (12 – 18 inches) can be excavated in the
shape of the cistern before a gravel base (~ 4 – 5 inches) is laid down for
systems 1500 to 3000 gallons (Figure 7.8b). The area of excavation should be a
couple feet larger than the footprint of the cistern so the cistern can be shifted
into place to receive the stormwater flow (placed underneath the gutter
downspout). Larger cisterns (such as those made of metal, exceeding 5000
gallons of storage) should be placed above a 4 to 6 inch concrete pad (Figure
7.9), a hole similar to that described above for the gravel base can be excavated,
and the cement can be poured in to the proper thickness.
49
Community Conservation Assistance Program - BMP Design Manual
Figures 7.8a Cistern site preparation and b. Preparing the gravel support base.
Figure 7.9.a Concrete pad constructed to support (b) a 5000 gallon metal cistern.
7.4.2 Preparing the gutter downspout
As mentioned previously, gutters should already be installed when a cistern is to
be implemented. The cistern can temporarily be sat in the excavated area near
its final location. Since the downspout should still be in place, it will not be
possible to place the cistern exactly in its final location. The height of the top of
the debris filter should be marked on the gutter downspout. Since the screen that
actually filters the water lies just below the top of the debris filter (See Figure
7.5), the location of that screen should be marked on the downspout as well. The
cistern can then be moved back out of the way.
The gutter downspout should be cut approximately 2 inches up from the location
of the screen that will filter the stormwater. This will keep the downspout within
the confines of the debris filter walls, but allow the cistern to be positioned
properly. The downspout can be cut with a hack saw, or by another method that
will produce a smooth, straight edge.
7.4.3 Preparing the gutter downspout
As mentioned previously, gutters should be present where a cistern is to be
installed. The cistern can temporarily be placed in the excavated area near its
final location. Since the gutter downspout should still be in place, it will not be
50
Community Conservation Assistance Program - BMP Design Manual
possible to fix the cistern in its final location (since the cistern will sit under the
gutter once the gutter has been cut). The height of the top of the debris filter
should be marked on the gutter downspout. Since the screen that actually filters
the water lies just below the top of the debris filter (See Figures 7.10 and 7.11),
the location of that screen should be marked on the downspout as well. The
cistern can then be moved back out of the way.
Figure 7.10 Gutter
empties into cistern
screen
Figure 7.11 Cistern
screen close-up
The gutter downspout should be cut approximately 2 inches above the location of
the filter screen. This will keep the downspout within the confines of the debris
filter sides, but allow the cistern to be positioned properly. The downspout can be
cut with a hack saw, or by another method that will produce a relatively smooth,
straight edge.
7.4.4 Setting the cistern into place
Once the site has been properly prepared, the cistern can be set into place. The
cistern should be situated such that the gutter downspout can feed into the debris
screen that is attached to the top of the cistern. If the gutter downspout and the
base have been prepared properly, this should be easy to do. By preparing a
support base surface area slightly larger than the cistern, the cistern can be
shifted into the proper place (Figure 7.12a and 7.12b).
51
Community Conservation Assistance Program - BMP Design Manual
.
Figure 7.12a Proper cistern placement (b) prepare an area slightly larger than the cistern
7.4.5 Final cistern construction considerations
The last step in the construction process is to attach the overflow apparatus and
any spigots or other distribution apparatus. Teflon tape should be used on any
joints where a water tight seal is desired. Pumps should be installed per
manufacturer’s recommendation.
7.5 Cistern Maintenance
Maintenance is crucial to cistern performance. Most notably, the gutters and the
debris screen should be checked for leaves and other debris. Since these two
components are essential in routing stormwater to the cistern, they should be
checked frequently, particularly when a tree canopy is near a roof top. Any hose
or pipe connections associated with the cistern should be checked for leaks. The
cistern should also be checked for stability. If the cistern is consistently low on
stormwater, it may become light and require some sort of anchoring system to
keep it in pace. If a windy storm event is possible, such as before a tropical
storm, the owner of the cistern may want to fill it part way with potable water to
prevent the wind from tipping the cistern. A list of maintenance activities and their
associated frequency is shown in Table 7.2.
52
Community Conservation Assistance Program - BMP Design Manual
Activity
Table 7.2 Cistern Maintenance Activities
Frequency
Clean gutters of debris that have
accumulated, check for leaks
Bi-annual
Clean debris screen to allow unobstructed
stormwater flow into the cistern
Monthly
Winter-proof system
Fall
Check cistern for stability, anchor system
if necessary
Check accuracy of water level indicator if
present
Bi-annual (Spring / Fall)
Annual
Check pipe and valve connection for leaks
Annual
Make sure cistern manhole is accessible,
operational, and secure
Annual
Fill tank ½ full with water (if tank is less
than ½ full)
Before any major wind related
storms (such as tropical
storms or hurricanes)
8.0 Vegetated Swales
8.1 Overview of Practice
Swales often serve to convey water around and away from businesses and
residences. They are vegetated, open channels, most often lined with grass.
From a water quality perspective, they are preferable to pipes because they allow
more soil/water contact and more opportunity for infiltration. Filtration of
sediment and debris can also occur within swales, especially if the grass is kept
relatively long. When swales are designed to be flat and wide, stormwater
velocity is decreased, leading to increased soil/water contact and thus promoting
infiltration and filtration. Figures 8.1a and 8.1b show a grassed swale.
53
Community Conservation Assistance Program - BMP Design Manual
Figures 8.1a and 8.1b show two swales in the Raleigh-Durham area. Both have
turf reinforcement mats. The former in Durham (b) is mowed while the latter in
Raleigh (a) contains a taller grass stand.
8.2 Determining Site Constraints
The first step in designing a vegetated swale is to determine the constraints of
the site.
Slope
The swale must lead from an upland area where it ties into an existing grade to a
lower area where it again ties into an existing grade. Often, swales will lead from
a point in the watershed to a BMP or from a BMP to the existing drainage
infrastructure. This information can be used to determine the allowable slope of
the swale. The swale should have a relatively constant slope between it’s
inception and destination, the slope should gradually change if necessary.
Slope (S) = elevation change from start to end (ft) ÷ length of swale (ft)
Top Width
The maximum width of the swale may be dictated by site constraints. Determine
the maximum width before beginning calculations.
Side Slopes
It may be desirable at some sites to leave the side slopes of a swale mild enough
that they can be mowed with a riding lawn mower. If this is the case, a slope of
4:1 (H:V) or flatter is recommended, no steeper than 3:1 is recommended in most
cases, and never more than 2:1 unless the designer has extensive experience
with swales. Triangular swales can be used on small watersheds less than 2
acres. They can be designed as trapezoidal swales with very small bottom
widths.
Shape
Both trapezoidal and triangular cross-sections will be commonly used for water
quality swales. The depth of flow within these channels will be shallow during
54
Community Conservation Assistance Program - BMP Design Manual
small storms, allowing increased soil and grass contact with the stormwater, and
thus increased infiltration and filtration. Triangular shaped swales are more
appropriate for small drainage areas.
Peak Flow
Swales should be designed to convey the peak flow of the 10-year storm without
overtopping, as calculated in section 3.4 using the Rational Method. During
extreme events (e.g. 25 or 100-year storms) portions of the swale may be
breached and should be repaired by the property owner as necessary.
8.3 Depth and Velocity Calculations
Swales should be able to carry their design flow without overtopping or eroding.
If the velocity is too high for grass cover in a given swale design and the slope
and cross-section cannot be adjusted, the swale can be reinforced with rip-rap or
turf reinforcement matting (which can withstand a higher velocity). There are
several approaches to designing a swale. A given site may have constraints
which dictate the channel slope and cross-section, in which case the designer
must simply ensure that the channel lining will be strong enough to handle the
velocities produced. Conversely, there may be flexibility with respect to the
channel cross-section and the designer may choose to size it such that a simple
grass lining will be sufficient to prevent erosion. Figure 8.2 is a diagram of a
swale with a trapezoidal cross-section and illustrates some of the parameters
discussed in this section. The equations used in trapezoidal channel design are
as follows:
Equation 8-1 The Continuity Equation
Q = VA
Where:
Q = flow rate (cfs)
V = average velocity of the cross-section (ft/s)
A = cross-sectional area of the flow (ft2)
And:
A = bd + xd2 (refer to figure 8.2)
Equation 8-2 The Manning Equation - can be used to calculate the velocity
of the stormwater in a given channel
55
Community Conservation Assistance Program - BMP Design Manual
V = 1.49 * (1/n) * R 2/3 * S 1/2
Where:
V = velocity (ft/s)
n = Manning roughness (Table 8.1)
R = hydraulic radius (ft)
S = channel bed slope (ft/ft)
The hydraulic radius (R) is equal to the cross-sectional area of flow (A) divided by
the wetted perimeter (Wp) (see Figure 8.2), or for trapezoidal channels:
R = (bd + xd2) / (b + 2dx)
*all dimensions in ft
For convenience, the top width of the trapezoidal channel can be calculated as:
Swale Top Width = b + 2Dx
*all dimensions in ft
Figure 8.2 Trapezoidal swale cross-section
The correct cross-section must be determined by trial and error. A computer
spreadsheet or other software (e.g., TR-55) would be helpful in this process and
has been provided to SWCD personnel in the past. Once a channel geometry is
assumed, then the Continuity Equation (Equation 8-1) and Manning Equation
(Equation 8-2) are used to determine the average velocity of flow for the design
storm. A nomograph has been provided in Appendix J that can be used to solve
the Manning Equation. Using the maximum permissible velocity method, it can
be determined whether the channel will erode. Table 8.2 shows maximum
permissible velocities for a variety of channel linings. Manufactured products
should have maximum permissible velocity specifications available. If the
channel velocity exceeds the maximum permissible velocity for a given surface
lining, erosion will occur. It is good practice to design conservatively. Multiply the
calculated velocity by a safety factor of 1.3 when comparing with the maximum
56
Community Conservation Assistance Program - BMP Design Manual
permissible velocities in Table 8.2. Assume that grass will not be mowed
regularly when selecting a Manning n. Leave at least 0.3 ft of freeboard at the top
of the swale during the 10-yr storm. The channel can be reinforced if velocities
cannot be lowered sufficiently by enlarging the swale.
Table 8.1 Manning’s n values for various channels
Type of Channel Lining
Design n
Riprap
0.035
Earth, straight, uniform, short grass and weeds
0.027
Earth, winding, sluggish, grass and weeds
0.033
Earth, winding, sluggish, dense weeds or aquatic plants
0.04
Figure 8.3 Turf reinforcement mats used along a swale at Umstead State Park.
Table 8.2 Maximum permissible velocities for various channel linings
Maximum Permissible
Type of Channel Lining
Velocity (ft/s)
Grass
4
Graded Rock, D50 = 3 in.
6.5
Graded Rock, D50 = 6 in.
9.0
Turf reinforcement mat products
9.5 - 25
8.4 Simplified Triangular Swale Design
8.4.1 Adjusting Manning’s equation for simplified triangular swale design
In many cases, a given watershed will be small enough to justify the use of a
triangular swale. Some assumptions and generalizations can be made when
designing triangular swales, these assumptions will simplify the design process.
When the triangular swale cross section is split in half, two right angles are
formed (figure 8.4).
57
Community Conservation Assistance Program - BMP Design Manual
y
y
x
x
Figure 8.4 Triangular swale cross section – broken into two right angles
Breaking the swale into two right angles allows some simplification of the
triangular swale design method. By the Pythagorean Theorem (Figure 8.4), we
can determine the length of the unknown side “x.” In triangular swales with 3 to 1,
4 to 1, or gentler, sideslopes, the length of “x” is found to be approximately the
same as the length “y.” The “y” value is equal to half of the swale width, thus, the
unknown distance “x” is also approximately equal to half the swale width.
Because the wetted perimeter (section 8.3) of a triangular swale is calculated as
the sum of the two “x” distances seen in the figure above, the wetted perimeter is
approximately equal to the swale width.
When constructing a swale with known sideslopes, the width of the swale can be
defined in terms of the depth, since they have a consistent relationship with one
another. For example, 3 to 1 sideslopes on a swale indicates that for every 1 foot
of depth, each sideslope will be 3 feet wide, for a total swale width of 6 feet. In
general terms:
Swale width = swale depth × 6
Also, we can define the area of the swale as:
Swale area = ((swale depth)2) × 3
With these geometrical assumptions, the equations used to size swales (section
8.3) can be simplified as the area and wetted perimeter can both be written in
terms of depth in the hydraulic radius calculation (section 8.3). Thus, our final
equations are as follows:
Equation 8-3 Manning’s Equation for triangular swales (sideslope = 3 to 1)
Qp = (1.49 ÷ n) × 1.04 × D2.67 × S(1/2)
Or
D = [Qp × n ÷ (1.55 × S(1/2))]0.375
58
Community Conservation Assistance Program - BMP Design Manual
Where: Qp = Peak Flow (ft3/s - section 8.2)
n = Manning’s n value (Table 8.2)
D = Swale depth (ft)
S = swale slope (ft/ft)
Equation 8-4 Manning’s Equation for triangular swales (sideslope = 4 to 1)
Qp = (1.49 ÷ n) × 1.26 × D2.67 × S(1/2)
Or
D = [Qp × n ÷ (1.88 × S(1/2))]0.375
Equation 8-5 Manning’s Equation for triangular swales (sideslope = 5 to 1)
Qp = (1.49 ÷ n) × 1.46 × D2.67 × S(1/2)
Or
D = [Qp × n ÷ (2.18 × S(1/2))]0.375
8.4.2 Simplified triangular swale design process
With the simplifications made to the Manning’s equation for triangular swales, the
design process for these practices becomes fairly straightforward. In a basic
design scenario, the slope (S) of the swale will likely be set (Section 8.2).
Likewise, the peak flow (Qp) from the supplying watershed will be calculated
using the rational method. Therefore, the depth of swale (D) and Manning’s n will
be the only unknowns once a given swale geometry is chosen. If space is
available, sideslopes of 4 to 1 or 5 to 1 can be used (most often 4 to 1). This will
allow easy access to the swale for mowing equipment. If limited space is
available, 3 to 1 sideslopes may be used.
The design process may require a few iterations to achieve an acceptable
design. In general, the steps of the design process are as follows:
1.
2.
3.
4.
Calculate peak flow for the 10 year storm from the watershed
Determine slope from swale beginning to end
Select swale geometry (typically 4 to 1 or 3 to 1 sideslopes)
Assume n value from Table 8.1 – use n value for grass, make selection
based on vegetation and straightness of swale
5. Use equation to determine D (depth of swale – if completely full of
stormwater during 10 year storm) – use equations 8-3, 8-4, or 8-5
59
Community Conservation Assistance Program - BMP Design Manual
6. Use D to calculate swale area as define in Section 8.4.1 (also calculate
channel width as defined in Section 8.4.1 – make sure space is available –
if not, steeper sideslopes may be used)
7. Use area calculated in step 6 and Qp to determine the velocity of the
stormwater in the swale during the 10 year storm (use equation 8-1, the
continuity equation)
8. Check velocity against table 8.2 to determine if grass alone can withstand
the velocity produced in the channel – if so, the design is complete
9. If grass can not withstand the velocity produced in the channel, turf
reinforcement matting can be used. If turf reinforcement matting is not
desired, rock can be used; however, the design process must be repeated
using a different Manning’s n value. Always perform a check to determine
if the velocity produced in the channel can be passed by the channel lining
without eroding.
10. If a safe velocity can not be achieved with a given swale design, the slope
of the system can be adjusted by changing the course of the swale or a
trapezoidal channel can be used.
8.5 Construction Guidance
Swales can be constructed using a variety of heavy equipment. The equipment
used will depend on what is already on site, if anything, and the size of the swale.
A small excavator would work well on smaller jobs and may be on site for
construction of other BMPs.
If turf reinforcement matting is used, it should be installed according to the
manufactures recommendations. Use plenty of staples to stabilize the mat and
maintain good contact between the mat and the ground surface in all locations. It
is helpful to use short lengths of matting on curves, to avoid bunching. Seed and
lime should be applied under the matting, or as suggested by the manufacturer.
Native grass will perform the best; however, the grass should only be applied at
the proper time of year (proper time varies depending on grass type). The
property owner may desire that the grass planted match what is already in their
yard. County extension offices can help with grass selection and planting.
Temporary seed can be used if construction must take place during a time of
year when the onsite grass will not germinate. Annual Rye grass can be used in
cool seasons or Millet in warm seasons, for example. If temporary seed is used,
the swale must be re-seeded with perennial grass at the proper time of year.
For grass covered swales, the surface should be protected using a suitable
erosion control product while seed is being established (to avoid erosion). Sod
may also be used in many cases.
60
Community Conservation Assistance Program - BMP Design Manual
8.6 Maintenance
Swale maintenance should consist mostly of mowing. Adjusting the mower to
keep the grass long is preferable for filtration. If erosion occurs, the swale may
be re-shaped and stabilized. If substantial sediment deposition occurs, it must
be removed to allow unobstructed flow in the channel.
Activity
Table 8.3 Maintenance Activities for Swales
Frequency
Mow grassed channel (keep
relatively long)
As needed
Check swale for signs of erosion
As frequently as once per
month
Remove trash from swale
As needed
Remove deposited sediment which
could obstruct flow
As needed
Reseed
Repair Turf Reinforcement Matting
If needed – late spring / late
summer depending on grass
type
As needed. (rarely a problem
if mower does not “catch” the
mat)
9.0 Impervious Removal
9.1 Overview of Practice
As discussed in section 2.2, urbanization (characterized by increases in
impervious area) can cause a substantial increase in stormwater runoff. One
basic stormwater management practice is to reduce the amount of impervious
area in a given urbanized area. If an area has already been urbanized, this can
be accomplished by removing impervious areas that are no longer needed.
Patios, walkways, parking areas, and driveways can all be removed and
converted to pervious areas. Gardens, lawn, and permeable pavements all can
be used in place of the impervious area.
For permeable pavement costs to be offset by CCAP, it must be accompanied by
impervious surface removal.
61
Community Conservation Assistance Program - BMP Design Manual
9.2 Selection of this practice over others
Impervious surface removal should only take place when there is a patio,
walkway, parking area, or driveway that is no longer being used, or is going to be
converted to a permeable surface. Impervious areas that drain directly into the
stormwater sewer system should be targeted. Impervious areas that are directly
connected (connected imperviousness – Section 3.2) to the larger stormwater
drainage system (via a swale or pipe) have the greatest impact on stormwater
runoff. Impervious areas that drain onto pervious areas (forested areas, lawns,
etc.) before collecting in the storm drainage network present less of an impact, as
runoff from these impermeable surfaces has an opportunity to infiltrate into the
nearby pervious area. Impervious surface removal can provide a water quality
benefit when there is limited space to construct a rain garden, pocket wetland, or
other BMP in the path of the stormwater at it routes to the stormwater sewer
system.
Impervious removal should be performed in combination with the creation of
pervious areas such as lawn, gardens, or permeable pavement. Permeable
pavement conversion can only be performed in the Sandhills and Coastal Plain
as part of the CCAP.
9.3 Carrying Out Impervious Removal
While removing impervious area is a simple way to limit stormwater runoff,
removing asphalt, concrete, or brick can be challenging. Breaking the impervious
area into small pieces and removing these pieces should be performed by a
contractor to avoid injury. The impervious area, once broken up, will consist of
very heavy, sharp-edged debris. A large truck will be required to transport the
debris from the location to a disposal site after heavy equipment, such as a
backhoe, breaks the pavement apart and carries it to the truck.
10.0 Permeable Pavement
10.1 Overview of Practice
Traditionally paved surfaces are impermeable, converting nearly all rainfall to
runoff. These pavements were designed to be strong, that is, able to withstand
heavy traffic. Permeable pavement allows water to pass through it, reducing
runoff (Figure 10.1). These pavements are best used in low traffic situations
similar to those found in patios, parking pads, and driveways, making them a
good “backyard” BMP. Permeable pavements may be constructed of permeable
asphalt, pervious concrete, permeable interlocking concrete pavers, concrete
grid pavers and grassy pavers (Close up views of many of these surfaces are
found as Figure 10.2). They are typically underlain by a gravel support layer
ranging in thickness from 4 to 12 inches. Permeable pavements work best when
62
Community Conservation Assistance Program - BMP Design Manual
sited on sandy soils, such as those found on Barrier Islands, the Coastal Plain,
and the Sandhills. Permeable pavement should not be placed near active
construction zones, as they are prone to clog. An example of a patio constructed
of permeable pavement is shown in Figure 10.2, and a residential driveway
application is shown in Figure 10.3.
Figure 10.1 Illustration of permeable pavement function – garden hose dispensing onto
permeable concrete
Figure 10.2 Four types of permeable pavements (starting top left corner and moving
clockwise): permeable concrete, permeable interlocking concrete pavement, grass pavers,
and concrete grid pavers.
63
Community Conservation Assistance Program - BMP Design Manual
Figure 10.2 Permeable pavement patio outside a café in Swansboro, NC.
Figure 10.3 Permeable pavement driveway
10.2 Selection of this practice over others
In parts of North Carolina, NC DENR awards a runoff reduction credit if
permeable pavement is used in place of traditionally impermeable pavement.
This blanket credit for permeable pavement as a stormwater BMP is only
available in the Sandhills and Coastal Plain/ Barrier Islands; thus, these backyard
practices should only be installed in these two locations. The reason for this
geographic limitation is that the stormwater infiltration associated with permeable
pavements is limited by the soils in which they are installed. Sandhill and Coastal
Plain soils are often sandy and well draining.
It is imperative that in situ soils are analyzed in depth before permeable
pavements are installed. A three foot hole should be dug in multiple locations in
the proximity of the proposed permeable pavement site. The soils should be well
drained (See Section 3.7), with no signs of wetland characteristics within the soil
section (the entire 3 feet). (See Section 3.8) Additionally, the infiltration rate at
64
Community Conservation Assistance Program - BMP Design Manual
the site should exceed 2 in/hr throughout the top 3 feet of soil. Infiltration rates at
the top of the soil column (within the top 6 inches) can actually be quite low and
the pavement will still function well. This is because the pavement is expected to
drain from the bottom, which is at least 6 inches from the pavement surface (and
usually several inches deeper). This is an important consideration, because often
where impermeable surfaces were once located the soil immediately beneath
them has been compacted and has become relatively impermeable. In short, the
bottom of the permeable pavement is below the compacted area created by the
existing pavement (which is to be removed).
The site where the BMP is to be installed must currently consist of impervious
area that will be removed and replaced with the permeable pavement. The area
must have a very slight slope (less than 0.5%) to allow maximum stormwater
storage. This practice should only be used for backyard patios, sidewalks, and
residential parking pads. The sites that are selected for permeable pavement
installation should not experience heavy vehicular traffic, such as garbage trucks.
The traffic load should be consistent with normal residential use. Any parking lot
associated with a business or larger than 2 stalls should be designed by an
engineer to ensure structural stability.
Permeable pavement should not be used to treat runoff from any adjoining areas
larger than the square footage of the permeable pavement itself. It is imperative
that these pavements are surrounded by a stable area. No disturbed soil should
be present in an area draining to the permeable pavement. Permeable pavement
is used primarily to infiltrate the rain that falls onto it.
Typically, if grassed and rooftop areas are to be treated at a given residence, a
BMP other than permeable pavement may be more desirable. The collected
rainwater will infiltrate into the soil below, thus if water capture and reuse is
desirable, permeable pavement is not a good BMP choice. These systems are
meant for low traffic areas, and can not handle loads heavier than standard
passenger vehicles.
10.3 Permeable Pavement Design
10.3.1 Initial Soil Analysis Field Test
The infiltration rate at the site should be 2 in/hr throughout the top 3 feet of soil.
To test this, three holes will be required, each at least 4 feet away from the other
(again, this should be done in multiple locations around the proposed site). Each
of the three holes will have a different depth, 1-foot, 2-foot, and 3-foot. Each hole
should be filled with water. The 1-foot hole should be empty in 6 hours, the 2-foot
hole should be empty in 12 hours, and the 3-foot hole should empty in 18 hours.
This test is performed to ensure no impermeable layer is present in the top 3 feet
of soil.
65
Community Conservation Assistance Program - BMP Design Manual
In general, the soil classification should be no finer than a Loamy Very Fine Sand
as defined by the United States Department of Agriculture – Natural Resources
Conservation Service. More detail on permeable pavement is available in section
3.10 of the North Carolina Stormwater BMP Manual (2005). If these infiltration
criteria are met, the soils at the site meet the screening criteria for permeable
pavement installation; however, detailed soil analysis should be performed to
ensure that the site is suitable. It is recommended that a soil scientist or a
professional competent in evaluating soils be consulted to determine a given
soil’s permeability if it is questionable.
10.3.2 Soil Analysis Lab Test
If the initial field soil test described in section 10.3.1 indicates that the soils may
be suitable for further analysis, soil samples should be taken from the area where
the BMP is to be implemented. These samples should be taken to a laboratory
for analysis to ensure that they will be structurally sufficient to support the
permeable pavement, and will be suitable for infiltrating the captured stormwater.
One sample should be taken for every 200 square feet of area to be constructed.
Since the area that is to be used for the BMP should be taken up by impervious
area prior to the permeable pavement installation, samples may be taken along
the periphery of the current impermeable area.
At each sampling location, a hole should be dug to a depth of 3 feet. The topsoil
can be discarded (top 6 inches); however, all other soil excavated from the hole
should be placed in a bucket and mixed until all soil lenses are combined
homogeneously. A sample should be taken from this bucket and placed into a
vessel that is approved by the laboratory that will be analyzing the sample (The
laboratory selection should be approved by SWCD staff). Again, this procedure
should be repeated at each sampling location.
The laboratory should perform a sieve analysis to determine what percentage of
the soil sample consists of fines (clay and silt particles – not prone to high
infiltration or structural stability). If the percentage of fines is less than 8% (or the
amount passing the 270 sieve, which means the sample consists primarily of
sand and loamy soils) the soils are suitable as a base for the permeable
pavement.
10.3.3 Concrete Edging
Concrete edging should be used around the perimeter of the paved area
whenever permeable interlocking concrete pavers are installed (see Figure 10.4).
The edging should be approximately 18 inches deep and have a width of 6
inches. This edging will reduce the possibility of the pavement blocks on the
edge of the paved area sloughing over. Permeable concrete and concrete grid
pavers will not require this edging provided that the very edge of the paved area
is not exposed to vehicular traffic.
66
Community Conservation Assistance Program - BMP Design Manual
Figure 10.4 Pavers abutting a concrete edge.
10.3.4 Gravel Base
The gravel base that is laid over the existing soils is used to (1) store captured
stormwater and (2) provide structural stability (Figure 10.5). The depth of and
type of stone in the gravel base will vary depending on whether permeable
concrete or permeable pavers are installed. If the soil criteria described in
sections 10.3.1 and 10.3.2 is met, the total gravel base should be approximately
6 inches deep. Any stone used as a gravel base should be washed, effectively
reducing the amount of fines in the gravel. If possible, the stone should be double
washed. These fines, if not removed, will migrate to the soil sub base and clog
the soil pores. This clogging would result in reduced infiltration and, thus,
reduced permeable pavement performance.
Figure 10.5 Gravel layers under permeable pavers
When permeable concrete is used for a given location, the gravel base will
consist of a washed #57 stone that is approximately 6 inches thick. The
permeable concrete can be poured on top of this gravel base after the base has
been properly compacted. If washed #57 stone is unavailable, a semi-angular to
angular stone alternative can be used. Round support stone will not interlock,
allowing shifts in pavement to occur, such as rocking or splitting.
67
Community Conservation Assistance Program - BMP Design Manual
When permeable block pavers or plastic grid pavements are used for the BMP, 4
inches of washed #57 stone can act as the gravel base that lays on top of the in
situ soil; however, the pavers must sit on a bedding layer of smaller stone. This
bedding layer should be made of washed #78 stone and be approximately 2
inches thick. This #78 stone should also be used to fill any voids present in
between the permeable paver blocks after they are installed. (Figure 10.6).
Figure 10.6 Filling permeable paver voids with gravel
10.3.5 Permeable Pavement Sizing Criteria
The permeable pavement BMPs used as part of the CCAP will treat no more
than 2 times their surface area. No real sizing criteria is required for these
systems as part of the CCAP program. The square footage of the permeable
pavement lot will generally be the same as the square footage of impervious area
that was removed. The thickness of the permeable pavers is determined by the
manufacturer (normally approximately 3.25 inches). Plastic grid pavers tend to be
2 inches thick. The permeable concrete should be poured to a thickness of 6
inches.
10.4 Permeable Pavement Construction
Due to the scale of many permeable pavement installations, it is recommended
that a certified permeable pavement contractor install permeable pavements.
Installing permeable concrete or permeable block pavers requires some
experience and expertise and should not be attempted by the general public. A
list of professionals who are certified to install permeable interlocking concrete
pavers (PICP) and concrete grid pavers (CGP) is available from the Interlocking
Concrete Pavement Institute (ICPI) at http://www.icpi.org. Carolinas Ready Mixed
Concrete Association (CRMCA) can be contacted for a list of professionals with
experience in installing permeable concrete (www.crmca.com). The only
exception to this would be small, backyard patios that will be installed using
permeable block pavers. In such an installation, traffic load will be minimal and
the result of a structure failure will not be dangerous to human health and well
being.
68
Community Conservation Assistance Program - BMP Design Manual
The construction steps below can be completed by a responsible, experienced
contractor with minimal instruction. The key points from each section should be
conveyed to the contractor, and a SWCD staff member should be on site during
construction.
10.4.1 Soil excavation
For permeable pavement to be used as part of the CCAP, some amount of
impervious removal must be performed. After the impervious area has been
removed (likely an impervious driveway, sidewalk, parking pad, or patio) the site
excavation can commence.
Excavation depth should be measured from the soil surface down. No fill should
be used to bring the surrounding soil to the top of pavement level. Whenever
possible, the excavated area should not be driven on by any construction
equipment. This is preferable, as the soils can be compacted when exposed to
heavy machinery, reducing their infiltration capability.
During the construction, a SWCD staff member should be on site to verify that
the excavated area is brought to the correct depth. A survey instrument (such as
a level) would be beneficial for this process. Additionally, survey measurements
can be made within the excavated area to ensure that it is relatively flat (<0.5%).
10.4.2 Gravel base
The gravel base should be applied after the area has been excavated to the
correct depth. Again, washed (or double washed) stone should be used for any
permeable pavement installation. The gravel base installation will vary slightly
depending on whether permeable concrete or permeable pavers are being
installed.
If permeable concrete is being installed, a 6-inch layer of washed #57 stone can
be placed in the excavated area. The stone should be spread and leveled to the
appropriate slope. The stone should then be compacted with a minimum 10 ton
static roller (at least 4 passes). The stone should be compacted until there is no
visible movement within the gravel base. (Smith, 2000)
If permeable pavers are being installed, the same procedure that is described for
the permeable concrete gravel base would be performed with a 4-inch thick layer
of washed #57 stone. Next, a 2 inch layer of #78 stone should be added to the
top of the #57 stone layer. This layer should be compacted using the same
process that was used for the first layer.
The gravel base will now be structurally ready to support permeable pavement.
69
Community Conservation Assistance Program - BMP Design Manual
10.4.3 Concrete edging
When permeable interlocking concrete pavers are installed, some edging will be
required to keep the pavers stable along the edges of the new permeable area.
As stated in section 10.3.3, a 6-inch wide, 18-inch deep concrete curb should be
sufficient. The framing for the curb should be constructed before the compaction
of the gravel takes place. The curbing should simply run along the perimeter of
the permeable area to provide support to the pavers on the edge of the lot.
10.4.4 Permeable pavement installation
As stated above, installing permeable concrete or permeable pavers should be
performed by a professional familiar with their installation.
The methods used to install permeable concrete vary from those used to install
standard concrete. Because permeable pavement contains void spaces which
allow stormwater to infiltrate, the integrity of these pores must be maintained.
Vibratory screens (such as those used in some cases to compact standard
concrete) should not be used during permeable concrete installation. Such
instruments can smear the surface of the concrete, resulting in reduced or
restricted infiltration. Additionally, concrete vibrators, employed to reduce air
pockets, are not to be used. A heavy steel roller is used in place to provide
adequate compaction without smearing the concrete. Finishing exercises such as
floating and brooming are not necessary and could result in surface sealing on
the lot. Permeable concrete does not contain the same curing compounds as
traditional concrete; thus, plastic is placed over the concrete for a number of days
to prevent drying (Ferguson, 2005). The plastic should never be drug across the
pavement, as smearing could result. These are a few of the differences between
traditional and permeable concrete installation. While seemingly minimal, the
system will be ineffective if these differences are not addressed.
Installing permeable block pavers is similar to installing regular block pavers; the
difference in these systems is that voids are maintained between the pavers,
allowing water to infiltrate. The blocks are placed on top of the compacted #78
stone. Once set into place, the blocks are compacted before additional #78 stone
is added to the top of the pavement area and allowed to fall into the voids in
between the permeable paver blocks. Excess #78 stone is swept off of the area
and the permeable paver blocks are compacted one final time. Tight placement
of the blocks is essential to maintaining the structural integrity of the system
(Smith, 2000).
10.5 Permeable Pavement Maintenance
Like any other BMP, permeable pavements require maintenance to be effective
over time. The greatest concern related to these systems is clogging of the
surface void spaces. Once these surface voids become clogged, the system
loses its function and effectively becomes an impervious area.
70
Community Conservation Assistance Program - BMP Design Manual
One means of removing sediment and debris from the permeable pavement area
is to vacuum and sweep the area. On most commercial sites, this can be done
easily by running a vacuum truck over the area. This may not be possible in a
backyard BMP setting; however, the site should be swept regularly and cleared
of all debris. As mentioned in section 10.4.5, the area around the permeable
pavement lot should continually be evaluated to verify that sediment from
adjoining areas is not washing onto the permeable pavement areas. This
sediment can clog the permeable pavement over time. Additionally, any weeds or
mosses that grow in the pavement voids can be removed using herbicide or be
flamed.
Lastly, over time, the stone that is used to fill the voids in between the permeable
pavements can be lost as tires track it off of the lot and as the gravel settles. This
rock should be replaced periodically to restore the proper amount of gravel in the
void spaces. Table 10.1 shows the maintenance activities associated with
permeable pavements and the frequency with which these activities should take
place.
Table 10.1 Permeable Pavement Maintenance Activities
Activity
Frequency
Sweeping and vacuuming
Monthly
Semi-annually initially, less
Gravel replacement
frequently with time
Avoidance of landscape debris
During landscape maintenance
(leaves, grass clippings)
Spray weeds and mosses with
herbicide
Observe adjoining area for
sediment deposition
Monthly
Continually
71
Community Conservation Assistance Program - BMP Design Manual
11.0 References:
Bean, E.Z. 2005. A Field Study to Evaluate Permeable Pavement Surface
Infiltration Rates, Runoff Quantity, Runoff Quality, and Exfiltrate Quality. M.S.
thesis. Raleigh, NC: Biological and Agricultural Engineering Department, North
Carolina State University.
Bedient, P.B., and W.C. Huber. 1992. Hydrology and Floodplain Analysis, 2nd
Edition, Reading, Massachusetts: Addison-Wesley Publishing Company.
Butler, J.D., and T. Caudill. 2005. Citizen’s Guide to Protecting Wilmington’s
Waterways. City of Wilmington, NC: Storm Water Services.
Donaldson, Susan. 2007. The Effects of Urbanization on the Water Cycle.
Nevada Cooperative Extension. Fact Sheet 04-43.
Ferguson, B.K., ed. 2005. Porous Pavements. Boca Raton, FL: CRC Press LLC.
Flint, K.R. and A.P. Davis. 2007. Pollutant Mass Flushing Characterization of
Highway Stormwater Runoff from an Ultra Urban Area. Journal of Environmental
Engineering 133(6): 616-626.
Hathaway, J.M., and W.F. Hunt. 2006. Stormwater BMP Costs: Division of Soil
and Water Conservation Community Conservation Assistance Program. Raleigh,
NC: Biological and Agricultural Engineering Department – North Carolina State
University.
Leopold, L.B. 1968. Hydrology for Urban Land Planning, U.S. Geological Survey,
Circular 544.
North Carolina Division of Water Quality. Stormwater Unit: What is Stormwater?.
http://h2o.enr.state.nc.us/su/what_is_stormwater.htm (Accessed April 2, 2007).
Richardson, J.L., and M.J. Vepraskas, eds. 2001. Wetland Soils: Genesis,
Hydrology, Landscapes, and Classification. Boca Raton, FL: CRC Press LLC.
Sansalone, J.J., and C.M. Cristina. 2004. First Flush Concepts for Suspended
and Dissolved Solids in Small Impervious Watersheds. Journal of Environmental
Engineering 130(11): 1301-1314.
Schueler, T.R., and H.K. Holland, eds. 2000. The Practice of Watershed
Protection. Ellicott City, MD: Center for Watershed Protection.
72
Community Conservation Assistance Program - BMP Design Manual
Schueler, T. 1987. Controlling Urban Runoff – A practical Manual for Planning
and Designing Urban Best Management Practices. Metropolitan Washington
Council of Governments. Washington, DC 240 pp.
Smith, D.R. 2000. Permeable Interlocking Concrete Pavements: Selection,
Design, Construction, Maintenance. 2nd edition, Washington, DC: Interlocking
Concrete Pavement Institute.
73
APPENDIX A
Flow Calculations and Associated Weir Sizing for Sample Watersheds
Assumptions:
1. Assume C value for impervious areas is 0.95
2. Assume C value for pervious areas is 0.25
3. Assume 6 inch driving head
4. Use 10-year, 5 minute intensity
5. Based on Equations 3-4, 3-5, and 3-6
Table A1 – A4 use a rainfall intensity of 6.5 in/hr – These calculations
should only be used for Asheville
Table A1 Flow calculations and suggested weir length – 1-acre watershed, various
watershed scenarios – intensity of 6.5 in/hr
Impervious Pervious Equivalent
Q
Weir Required
Weir Suggestion
%
%
C
(cfs)
(ft)
(ft)
5
95
0.29
1.9
1.7
2.0
10
90
0.32
2.1
2.0
2.0
15
85
0.36
2.3
2.2
2.0
20
80
0.39
2.5
2.4
2.5
Table A2 Flow calculations and suggested weir length – 3/4-acre watershed, various
watershed scenarios – intensity of 6.5 in/hr
Impervious Pervious Equivalent
Q
Weir Required
Weir Suggestion
%
%
C
(cfs)
(ft)
(ft)
5
95
0.29
1.4
1.3
1.5
10
90
0.32
1.6
1.5
1.5
15
85
0.36
1.7
1.6
1.5
20
80
0.39
1.9
1.8
2.0
25
75
0.43
2.1
2.0
2.0
Table A3 Flow calculations and suggested weir length – 1/2-acre watershed, various
watershed scenarios – intensity of 6.5 in/hr
Impervious Pervious Equivalent
Q
Weir Required
Weir Suggestion
%
%
C
(cfs)
(ft)
(ft)
5
95
0.29
0.9
0.9
1.0
10
90
0.32
1.0
1.0
1.0
15
85
0.36
1.2
1.1
1.0
20
80
0.39
1.3
1.2
1.0
25
75
0.43
1.4
1.3
1.5
30
70
0.46
1.5
1.4
1.5
Table A4 Flow calculations and suggested weir length – 1/4-acre watershed, various
watershed scenarios – intensity of 6.5 in/hr
Impervious Pervious Equivalent
Q
Weir Required
Weir Suggestion
%
%
C
(cfs)
(ft)
(ft)
10
90
0.32
0.5
0.5
1.0
15
85
0.36
0.6
0.5
1.0
20
80
0.39
0.6
0.6
1.0
25
75
0.43
0.7
0.7
1.0
30
70
0.46
0.7
0.7
1.0
35
65
0.50
0.8
0.8
1.0
40
60
0.53
0.9
0.8
1.0
Table A5 – A8 use a rainfall intensity of 7.2 in/hr – These calculations
should only be used for Charlotte, Greensboro, Winston-Salem,
Raleigh, and Durham
Table A5 Flow calculations and suggested weir length – 1-acre watershed, various
watershed scenarios – intensity of 7.2 in/hr
Pervious Equivalent
Q
Weir Required
Weir Suggestion
Impervious %
%
C
(cfs)
(ft)
(ft)
5
95
0.29
2.1
1.9
2.0
10
90
0.32
2.3
2.2
2.0
15
85
0.36
2.6
2.4
2.5
20
80
0.39
2.8
2.6
2.5
Table A6 Flow calculations and suggested weir length – 3/4-acre watershed, various
watershed scenarios – intensity of 7.2 in/hr
Pervious Equivalent
Q
Weir Required
Weir Suggestion
Impervious %
%
C
(cfs)
(ft)
(ft)
5
95
0.29
1.5
1.5
1.5
10
90
0.32
1.7
1.6
1.5
15
85
0.36
1.9
1.8
2.0
20
80
0.39
2.1
2.0
2.0
25
75
0.43
2.3
2.2
2.0
Table A7 Flow calculations and suggested weir length – 1/2-acre watershed, various
watershed scenarios – intensity of 7.2 in/hr
Pervious Equivalent
Q
Weir Required
Weir Suggestion
Impervious %
%
C
(cfs)
(ft)
(ft)
5
95
0.29
1.0
1.0
1.0
10
90
0.32
1.2
1.1
1.0
15
85
0.36
1.3
1.2
1.0
20
80
0.39
1.4
1.3
1.5
25
75
0.43
1.5
1.4
1.5
30
70
0.46
1.7
1.6
1.5
Table A8 Flow calculations and suggested weir length – 1/4-acre watershed, various
watershed scenarios – intensity of 7.2 in/hr
Pervious Equivalent
Q
Weir Required
Weir Suggestion
Impervious %
%
C
(cfs)
(ft)
(ft)
10
90
0.32
0.6
0.5
1.0
15
85
0.36
0.6
0.6
1.0
20
80
0.39
0.7
0.7
1.0
25
75
0.43
0.8
0.7
1.0
30
70
0.46
0.8
0.8
1.0
35
65
0.50
0.9
0.8
1.0
40
60
0.53
1.0
0.9
1.0
Table A9 – A12 use a rainfall intensity of 8.0 in/hr – These calculations
should only be used for Fayetteville, Elizabeth City, and Greenville
Table A9 Flow calculations and suggested weir length – 1-acre watershed, various
watershed scenarios – intensity of 8.0 in/hr
Pervious Equivalent
Q
Weir Required
Weir Suggestion
Impervious %
%
C
(cfs)
(ft)
(ft)
5
95
0.29
2.3
2.1
2.0
10
90
0.32
2.6
2.4
2.5
15
85
0.36
2.8
2.7
3.0
20
80
0.39
3.1
2.9
3.0
Table A10 Flow calculations and suggested weir length – 3/4-acre watershed, various
watershed scenarios – intensity of 8.0 in/hr
Pervious Equivalent
Q
Weir Required
Weir Suggestion
Impervious %
%
C
(cfs)
(ft)
(ft)
5
95
0.29
1.7
1.6
1.5
10
90
0.32
1.9
1.8
2.0
15
85
0.36
2.1
2.0
2.0
20
80
0.39
2.3
2.2
2.5
25
75
0.43
2.6
2.4
2.5
Table A11 Flow calculations and suggested weir length – 1/2-acre watershed, various
watershed scenarios – intensity of 8.0 in/hr
Pervious Equivalent
Q
Weir Required
Weir Suggestion
Impervious %
%
C
(cfs)
(ft)
(ft)
5
95
0.29
1.1
1.1
1.0
10
90
0.32
1.3
1.2
1.5
15
85
0.36
1.4
1.3
1.5
20
80
0.39
1.6
1.5
1.5
25
75
0.43
1.7
1.6
1.5
30
70
0.46
1.8
1.7
2.0
Table A12 Flow calculations and suggested weir length – 1/4-acre watershed, various
watershed scenarios – intensity of 8.0 in/hr
Pervious Equivalent
Q
Weir Required
Weir Suggestion
%
C
(cfs)
(ft)
(ft)
Impervious %
10
90
0.32
0.6
0.6
1.0
15
85
0.36
0.7
0.7
1.0
20
80
0.39
0.8
0.7
1.0
25
75
0.43
0.9
0.8
1.0
30
70
0.46
0.9
0.9
1.0
35
65
0.50
1.0
0.9
1.0
40
60
0.53
1.1
1.0
1.0
Table A13 – A16 use a rainfall intensity of 9.7 in/hr – These calculations
should only be used for Wilmington
Table A13 Flow calculations and suggested weir length – 1-acre watershed, various
watershed scenarios – intensity of 9.7 in/hr
Impervious
%
5
10
15
20
Pervious
%
95
90
85
80
Equivalent
C
0.29
0.32
0.36
0.39
Q
(cfs)
2.8
3.1
3.4
3.8
Weir Required
(ft)
2.6
2.9
3.2
3.6
Weir Suggestion
(ft)
2.5
3.0
3.0
3.5
Table A14 Flow calculations and suggested weir length – 3/4-acre watershed, various
watershed scenarios – intensity of 9.7 in/hr
Impervious
Pervious Equivalent
Q
Weir Required
Weir Suggestion
%
%
C
(cfs)
(ft)
(ft)
5
95
0.29
2.1
2.0
2.0
10
90
0.32
2.3
2.2
2.5
15
85
0.36
2.6
2.4
2.5
20
80
0.39
2.8
2.7
3.0
25
75
0.43
3.1
2.9
3.0
Table A15 Flow calculations and suggested weir length – 1/2-acre watershed, various
watershed scenarios – intensity of 9.7 in/hr
Impervious
Pervious Equivalent
Q
Weir Required
Weir Suggestion
%
%
C
(cfs)
(ft)
(ft)
5
95
0.29
1.4
1.3
1.5
10
90
0.32
1.6
1.5
1.5
15
85
0.36
1.7
1.6
1.5
20
80
0.39
1.9
1.8
2.0
25
75
0.43
2.1
1.9
2.0
30
70
0.46
2.2
2.1
2.0
Table A16 Flow calculations and suggested weir length – 1/4-acre watershed, various
watershed scenarios – intensity of 9.7 in/hr
Impervious
Pervious Equivalent
Q
Weir Required
Weir Suggestion
%
%
C
(cfs)
(ft)
(ft)
10
90
0.32
0.8
0.7
1.0
15
85
0.36
0.9
0.8
1.0
20
80
0.39
0.9
0.9
1.0
25
75
0.43
1.0
1.0
1.0
30
70
0.46
1.1
1.1
1.0
35
65
0.50
1.2
1.1
1.5
40
60
0.53
1.3
1.2
1.5
APPENDIX B
Outlet Construction – Wooden Weir Control Structure
Figure B1 is a diagram of a wooden weir control structure. This type of structure
can be used to control ponding depth, drawdown rate and depth of outflow from a
variety of devices, including wetlands and rain gardens. Only lumber treated for
at least in-ground use should be selected. Do not use CCA treated lumber.
Stainless steel fasteners are recommended. The structure can be installed as
follows:
1) Dig a trench 2 to 3 feet wide and long and deep enough for the weir. Each
side of the weir should extend at least 18 inches into the adjacent bank and
18 inches below final grade at the base of the weir.
2) Two or 4 posts can be used to stabilize the structure, depending on the length
of the weir. The posts can be 4x4 or 4x6, depending on the BMP size,
although 4x4 will be sufficient in most cases. Points can be cut on the tips of
the posts and they can be driven into the ground at the bottom of the trench. If
they can not be driven sufficiently, post holes can be dug and backfilled with
concrete. Use a string line to make sure the posts are aligned.
3) Flashboards can then be nailed or screwed to the posts, starting from the
bottom and working up. Check the level on the boards. Caulk between each
board. Leave a weir opening near the top of the flashboard wall as
necessary.
4) An additional board or metal plate can be nailed or screwed to the
flashboards and used to adjust ponding depth – rather than having to modify
the flashboard structure – and/or as an adjustable orifice plate for wetlands. If
a metal plate is used, consider any safety issues with sharp edges.
5) Proper backfill around the structure is very important to keep it from washing
out during the first large storm event. Soil should be added in small lifts (4-6
inches) and compacted with each lift. If the space is too small for power
equipment, the top of a sledge hammer works well or the end of a shovel
handle for even smaller spaces. The surface of the compacted soil can be
further protected using filter fabric and stone or rip-rap, as necessary.
Figure B1 Diagram of a wooden weir control structure
APPENDIX C
Level Spreader Design, Construction, and Maintenance
Level Spreaders: Overview, Design,
and Maintenance
Level spreaders are stormwater structures that can support the filtering action of riparian buffers if designed and installed properly.
Distributed in furtherance
of the acts of Congress of
May 8 and June 30, 1914.
North Carolina State University and North Carolina
A&T State University commit
themselves to positive action
to secure equal opportunity regardless of race, color,
creed, national origin, religion, sex, age, or disability. In
addition, the two Universities
welcome all persons without
regard to sexual orientation.
North Carolina State University, North Carolina A&T State
University, U.S. Department
of Agriculture, and local governments cooperating.
This publication presents the latest
research findings on level spreaders in North Carolina and describes
recommended practices for designing, installing, and maintaining these
structures.
Since 1998, North Carolina has
implemented rules to protect riparian
buffers in several major river basins.
These rules require that concentrated
stormwater runoff be diffused, or
spread, prior to discharge into a riparian area. To accomplish this, the Division of Water Quality (DWQ) in the
N.C. Department of Environment and
Natural Resources (NCDENR) recommended the use of level spreaders and
developed initial design standards in
October 2001. An overview of level
spreaders and riparian buffers can be
found in Urban Stormwater Structural
Best Management Practices, AG-58801, of the Urban Waterways series.
This fact sheet provides more detailed
information on designing, installing,
and maintaining level spreaders.
DIFFUSE FLOW: WHAT IS IT?
Diffuse flow, sometimes called sheet
flow, occurs when water spreads out
evenly across an area (Figure 1). In
contrast, when stormwater collects
in a drainage system and flows to a
stream via a pipe, swale, or ditch, it
does not make enough contact with
or bypasses the riparian buffer—a
vegetated area along streams, rivers, and other water bodies that helps
to filter runoff and prevent erosion.
Riparian buffers can improve water
quality in urban environments by reducing stormwater peak flow, reducing
runoff volume through infiltration,
and removing nutrients and sediment
through physical and biological processes. They are most effective, however, when stormwater flows through
them at a shallow, uniform depth—the
diffuse flow that well-designed level
spreaders can provide.
LEVEL SPREADER SYSTEMS:
AN OVERVIEW
Level spreader systems consist of
three parts: the forebay, the channel,
and the riparian buffer (Figure 2).
1
perse outflow from a detention pond, a forebay may be
necessary to reduce runoff velocity before the outflow
reaches the level spreader.
CHANNEL. After the stormwater passes though the
Figure 1. A level spreader providing diffuse flow
(Frank Hahne, Mecklenburg County)
FOREBAY. The first part of the system is the forebay,
which is used for the preliminary treatment of stormwater. It is an excavated, bowl-shaped feature that
slows the influent stormwater and allows heavy sediment and debris to settle. The forebay may be lined
with riprap to reduce erosion within the excavated
area. The uneven riprap surfaces function as small
sediment traps. When a level spreader is used to dis-
Figure 2. Level spreader system
2
forebay, it enters a concrete, rock, or grassed channel—the main body of the level spreader. This is a
dead-end channel because it does not directly connect
the watershed to the stream. Instead, the channel is a
long, shallow impoundment that fills to the level of
its lower side. The lower side (the downslope side) of
the channel is constructed so that it is level along its
full length. This lower side, or level spreader lip, is
often constructed of concrete or rock so that it resists
erosion. As stormwater enters the channel, it rises
until it fills the channel and exits evenly over the lip.
The downslope side of the system functions as a long,
broad-crested weir.
RIPARIAN BUFFER. After the stormwater passes over the
level spreader lip, it enters the riparian buffer, often
simply called the buffer. As the stormwater passes
through the buffer vegetation, some of the water infiltrates. Ideally, the buffer will remove sediment and
nutrients from runoff before it reaches the stream.
RECENT LEVEL SPREADER RESEARCH
The Biological and Agricultural Engineering Department at North Carolina State University received a
grant from NCDENR in December 2005 to evaluate
level spreaders as stormwater best management practices (BMPs). The researchers visited 24 locations
where level spreaders were in use and performed various qualitative and quantitative analyses.
The results of the study indicated that none of the
level spreader–riparian buffer systems was able to
provide diffuse flow through the riparian buffer from
the level spreader to the stream. Common causes for
failure to maintain diffuse flow included the following:
• Lack of maintenance.
• Poor design.
• Riparian topography, vegetation, or both .
• Poor construction methods (level spreader lip not
level; channel built with easily eroded materials
as in Figure 3).
• Human interference after the level spreader has
been constructed.
This field evaluation indicated that level spreader systems in North Carolina would benefit from design revisions, construction guidance, and maintenance. As a
result, the design guidelines developed by NCDENR
in October 2001 were revisited and revised in the
summer of 2006.
DESIGN RECOMMENDATIONS
Based on this research, the following recommendations should be considered when designing level
spreaders.
LEVEL SPREADER LIP. A level spreader system obviously
needs a stable lip that cannot be eroded. Concrete
level spreaders can be built with minimal slope along
the length of the channel’s downslope side. Concrete
level spreaders resist erosion better than level spreaders made of earth, gravel, or both. If a flow greater
than the design flow is routed over a level spreader
made of concrete, the level spreader lip will not be
damaged. Level spreaders made of earth, gravel, or
both should not be used in any urban applications because they routinely fail. Another stable material is a
metal gutter. Like concrete level spreaders, pre-fabricated metal level spreaders can be expected to remain
level with minimal maintenance.
Ideally, the lip of the concrete level spreader should
Figure 3. Failure at level spreader constructed
with ABC stone
be higher than the existing ground by 3 to 6 inches.
This allows water to pass over the lip without interference from buffer vegetation. To limit any erosion that
could occur as water falls from the top of the level
spreader to the existing soil, a layer of filter fabric
should be extended a distance of 3 feet from the level
spreader lip towards the buffer. Stone, such as No. 57
aggregate, should be placed on top of the filter fabric
(3 to 4 inches deep) to reduce erosion just downslope
of the level spreader (Figure 4). A 3-foot wide strip
of erosion control matting can be used in place of the
filter fabric and No. 57 stone combination. However,
such an area must be stable and have adequate vegetation before receiving stormwater.
LEVEL SPREADER DIMENSIONS. Level spreader dimen-
sions have a broad range, and no combination seems
to be superior. The width of a level spreader, however,
should be at least three times wider than the diameter
of the inlet culvert. The design depth, or depth between the invert of the level spreader channel and the
level spreader lip, is currently recommended to be no
less than either 9 inches or half of the inlet culvert diameter, whichever is greater.
When discharging into a buffer with thick ground
cover, there must be 13 feet of level spreader for
every 1 cubic foot per second (cfs) of flow. This
design specification is based on maximum flow velocities and is intended to limit erosion in the buffer.
Grass, for example, is more resistant to erosion than
mulch and detritus. Therefore, a shorter length of
level spreader is needed upslope of grass than upslope
3
of mature woods. In forested buffers, this number
varies based on the width of the riparian buffer. The
wider the riparian buffer, particularly wooded buffers,
the more stormwater will infiltrate the buffer. When
infiltration within the buffer is taken into account,
the length of level spreader per unit of flow can be
reduced:
• A level spreader discharging onto a 50-foot wide
wooded riparian buffer should be sized at 65 feet
per 1 cfs of flow.
• Discharging onto a 100-foot wide wooded buffer
requires 50 feet of level spreader per 1 cfs of flow.
• Discharging onto a 150-foot wide wooded buffer
requires 40 feet of level spreader per 1 cfs of flow.
The minimum length of any level spreader should be
13 feet, and the maximum allowable length by DWQ
standards is 130 feet. A summary of the sizing guidelines for level spreader lip length is shown in Table 1.
Table 1. Level Spreader Lip Sizing Guidelines
Riparian Buffer
Vegetation
Riparian Buffer
Width (ft)
Length of Level
Spreader
(ft per 1 cfs of flow)
Thick ground cover
For any width
13
Forested
50
65
Forested
100
50
Forested
150
40
FOREBAY INCLUSION. Forebays should be utilized in level spreader systems to dissipate energy and reduce the
sediment that accumulates behind the level spreader
lip (Figure 5). The forebay is essentially a bowlshaped depression lined on the bottom and sides with
Class B rip rap. The forebay should be sized so that it
is at least 0.2 percent of the contributing catchment’s
impervious or paved surface area. The catchment is
the land area draining to the system.
The depth of the forebay where the stormwater initially enters should be 3 feet. The forebay should then
slope upward to a depth of 1 foot prior to discharging
into the level spreader (Figure 5).
Level Spreader
FLOW-BYPASS. If runoff from high intensity storms
(those that deliver more than 1 inch of rain per hour)
is allowed to flow through a level-spreader and riparian-buffer system that is not designed to handle such
storms, erosion can occur within the buffer. Thus, during heavy rain storms that produce more runoff than
can be infiltrated by the buffer, excess stormwater
should bypass the buffer and be sent through a protected channel to a predetermined, protected stream
entry point. This is achieved by allowing the runoff
produced by a rainfall intensity of 1 inch per hour to
enter the level spreader while diverting runoff from
heavier rainfalls to the stream. The bypass channel, or
swale, should employ turf reinforcement matting or
rip rap.
Figure 4. Sample cross section of a concrete level spreader
4
B
A
Figure 5. (A) Forebay schematic. (B) Image of level spreader with forebay
MAXIMUM SLOPE. The first 10 feet of riparian buffer
downslope of the level spreader should have a slope
less than or equal to 4 percent.
The overall slope of the buffer should not exceed 6
percent for wooded buffers and 8 percent for buffers
containing thick ground cover (such as grass). When
slopes are greater than this, other practices, such as
bioretention, stormwater wetlands, and ponds, can be
used to reduce peak flows and provide water quality
improvements. However, on a case-by-case basis, the
DWQ may approve a series of level spreaders for riparian buffer slopes of 12 to 15 percent. This approval
is contingent on a site visit and the professional judgment of the DWQ permitter.
MAINTENANCE
Level spreaders require at least yearly maintenance
to remove trees and shrubs that begin to grow on the
level spreader lip or that impede flow just downslope
of the level spreader (in the section of No. 57 stone
from Figure 4). Any debris and sediment that build
up in the level spreader, forebay, and channel should
be removed annually and after storms greater than
or equal to a two-year storm—the precipitation
associated with a 24-hour storm event that occurs, on
average, once every two years (Figures 6 and 7). In
North Carolina, the two-year storm ranges from 3.5 to
4.25 inches over a 24-hour period. Additionally, the
level spreader channel and the riparian buffer should
be examined annually and after storms greater than or
equal to the two-year storm for possible erosion and
gulley formation.
If possible, the buffer vegetation immediately
downslope of the level spreader lip should be mowed
Figure 6. Level spreader just after construction
Figure 7: Sediment and debris build-up after approximately 4.5 years of operation
5
regularly to encourage low, dense growth and to
facilitate inspection. The use of perennial, dense,
low-growing ground covers (such as common bermudagrass) downslope of the lip may help to maintain
diffuse flow.
These issues should be addressed immediately to
restore proper function. If erosion is apparent, corrective action must be taken, such as installing erosion
control matting and possibly regrading. NCDENR
must be notified before any work is performed in the
protected buffer.
RIPARIAN BUFFER TOPOGRAPHY
Riparian buffers are highly variable. Depending
on internal buffer topography, water will tend to
re-concentrate, almost immediately in some cases.
Certain level-spreader and riparian-buffer systems
may only partially disperse influent concentrated
flow. The systems still can improve water quality
and reduce flow peaks. However, level spreaders
should be situated in areas away from natural swales,
depressions, and mounds where diffuse flow is more
attainable. If the riparian buffer is not conducive to
diffuse flow, other BMPs should be considered.
SUMMARY
Table 2 shows suggested site selection, design, and
maintenance criteria for level spreader systems. Level
spreader design is not as technically challenging
as other stormwater BMP designs. Nevertheless,
siting and installing a level spreader that functions
properly is challenging. The design criteria described
in this publication represent elements of good level
spreader design but do not ensure overall system
effectiveness. For the system to function as intended,
it must be maintained, and the internal topography of
the riparian buffer must be conducive to keeping flow
diffuse. Before designing a level spreader system, the
designer should visit the site. This site visit is highly
recommended. If conditions are not suitable for the
installation of the level spreader (for example, if the
slope is too steep or adequate space is not available),
other stormwater BMPs should be used.
Table 2: Level Spreader Site Selection, Design, and Maintenance Recommendations
Item
Recommendation
Level spreader lip material
A concrete or sturdy metal lip should be used in all level spreaders. The lip should be tied into
the soil with an appropriately sized concrete footer or similar footer.
Level spreader lip dimensions
The concrete lip should extend 3 to 6 inches above the existing grade on the buffer side. Just
after the lip, a 3-foot wide, 3- to 4-inch thick layer of No. 57 stone should be used to minimize
erosion due to the water spilling over the level lip. This gravel should be laid on top of filter
fabric that has been tied into the soil.
Buffer slope
Riparian buffer slopes should not exceed 8% when discharging into a densely vegetated buffer
and 6% when discharging into a forested buffer. A series of level spreaders may be approved by
DWQ for buffer slopes up to 12 to 15%.
Flow bypass
Only the amount of flow associated with a rainfall intensity of 1 inch/hour should be routed
through the level spreader. All additional flow should be routed to the stream via a properly
designed and maintained swale or pipe. Stream banks should be protected at the point where
the additional flow will be discharged.
Forebay
A forebay, or some other form of pretreatment, should be a part of any level spreader design.
The forebay surface area should be no less than 0.2% of the contributing catchment’s
impervious surface area.
Maintenance
Level spreaders should be maintained yearly and after storms greater than or equal to a twoyear, 24-hour event. Sediment and debris should be removed from the forebay and from the
channel behind the level lip. All trees and vegetation that grow in the section of no. 57 stone
should be removed. The grass in all swales should be maintained, and the level spreader and
buffer should be checked for signs of erosion. Erosion that is discovered in the buffer should be
addressed through the application of erosion control mat and through re-grading if necessary.
NCDENR must be notified prior to any work performed in a protected riparian buffer.
6
RESOURCES
RELATED FACT SHEETS in the Urban Waterways series,
RELATED WEB SITES
North Carolina Cooperative Extension, and North
Carolina Agricultural Research Service Bulletins,
N.C. State University:
Hunt, W. F. 2000. Urban Stormwater Structural Best
Management Practices (BMPs) (AG-588-01).
Online: http://www.bae.ncsu..edu/stormwater/
PublicationFiles/UrbanBMPS199.pdf
Hunt, W. F., and L. L. Szpir. 2006. Permeable Pavements, Green Roofs, and Cisterns: Practices for
Low Impact Development (AGW-588-06). Online:
http://www.bae.ncsu.edu/stormwater/
PublicationFiles/BMPs4LID.pdf
Osmond, D. L., J. W. Gilliam, and R. O. Evans. 2002.
Riparian Buffers and Controlled Drainage to Reduce Agricultural Nonpoint Source Pollution. N.C.
Agricultural Research Service Technical Bulletin
318. Online: http://www.soil.ncsu.edu/lockers/
Osmond_D/web/RiparianBuffers.pdf
BAE Stormwater Group
www.bae.ncsu.edu/stormwater
Highlights of stormwater research projects and
Extension programs provided across North
Carolina by N.C. State University’s Biological and
Agricultural Engineering Department.
State of North Carolina
www.stormwater.org
NCDENR’s stormwater site.
http://h20.enr.state.nc.us/su/Manuals_Factsheets.
htm
DWQ manuals, fact sheets, and a link to the revised
level spreader design guidelines.
ACKNOWLEDGEMENTS
All photographs provided by the authors except for
Figure 1, courtesy of Frank Hahne, Mecklenburg
County Engineering Department.
Prepared by
Jon M. Hathaway, Extension Associate
William F. Hunt, Assistant Professor and Extension Specialist
Biological and Agricultural Engineering
North Carolina State University
Published by
NORTH CAROLINA COOPERATIVE EXTENSION SERVICE
AGW-588-09
E07-45839
11/2006/bs
7
APPENDIX D
Sizing Charts for Rain Gardens and Backyard Wetlands
Practice Size (sf)
1
10
100
1000
0
20
60
% Impervious
40
80
100
Figure D1: Wetland Surface Area as a function of Watershed
Size (<5000 sf) and Impervious % (1" Rainfall) 9" ponding
depth
500
1000
1500
2000
3000
4000
5000
Watershed
Size (sf)
Practice Size (sf)
10
100
1000
10000
0
20
60
% Impervious
40
80
100
5000
7500
10000
15000
20000
30000
40000
50000
Watershed
Size (sf)
Figure D2: Wetland Surface Area as a function of
Watershed Size (>5000 sf) and Impervious % (1" Rainfall)
9" ponding depth
Practice Size (sf)
1
10
100
1000
0
20
60
% Impervious
40
80
100
Figure D3: Wetland Surface Area as a function of
Watershed Size (<5000 sf) and Impervious % (1.5"
Rainfall) 9" ponding depth
500
1000
1500
2000
3000
4000
5000
Watershed
Size (sf)
Practice Size (sf)
10
100
1000
10000
0
20
60
% Impervious
40
80
100
Figure D4: Wetland Surface Area as a function of
Watershed Size (>5000 sf) and Impervious % (1.5"
Rainfall) 9" ponding depth
5000
7500
10000
15000
20000
30000
40000
50000
Watershed
Size (sf)
Practice Size (sf)
1
10
100
1000
0
20
60
% Impervious
40
80
100
Figure D5: Wetland Surface Area as a function of
Watershed Size (<5000 sf) and Impervious % (1"
Rainfall) 6" ponding depth
500
1000
1500
2000
3000
4000
5000
Watershed
Size (sf)
Practice Size (sf)
10
100
1000
10000
0
20
60
% Impervious
40
80
100
5000
7500
10000
15000
20000
30000
40000
50000
Watershed
Size (sf)
Figure D6: Wetland Surface Area as a function of
Watershed Size (>5000 sf) and Impervious % (1" Rainfall)
6" ponding depth
Practice Size (sf)
1
10
100
1000
10000
0
20
60
% Impervious
40
80
100
Figure D7: Wetland Surface Area as a function of
Watershed Size (<5000 sf) and Impervious % (1.5"
Rainfall) 6" ponding depth
500
1000
1500
2000
3000
4000
5000
Watershed
Size (sf)
Practice Size (sf)
10
100
1000
10000
100000
0
20
60
% Impervious
40
80
100
Figure D8: Wetland Surface Area as a function of
Watershed Size (>5000 sf) and Impervious % (1.5"
Rainfall) 6" ponding depth
5000
7500
10000
15000
20000
30000
40000
50000
Watershed
Size (sf)
Practice Size (sf)
1
10
100
1000
10000
0
20
60
% Impervious
40
80
100
Figure D9: Wetland Surface Area as a function of
Watershed Size (<5000 sf) and Impervious % (1"
Rainfall) 3" ponding depth
500
1000
1500
2000
3000
4000
5000
Watershed
Size (sf)
Practice Size (sf)
10
100
1000
10000
100000
0
20
60
% Impervious
40
80
100
5000
7500
10000
15000
20000
30000
40000
50000
Watershed
Size (sf)
Figure D10: Wetland Surface Area as a function of
Watershed Size (>5000 sf) and Impervious % (1" Rainfall)
3" ponding depth
Practice Size (sf)
1
10
100
1000
10000
0
20
60
% Impervious
40
80
100
Figure D11: Wetland Surface Area as a function of
Watershed Size (<5000 sf) and Impervious % (1.5"
Rainfall) 3" ponding depth
500
1000
1500
2000
3000
4000
5000
Watershed
Size (sf)
Practice Size (sf)
10
100
1000
10000
100000
0
20
60
% Impervious
40
80
100
Figure D12: Wetland Surface Area as a function of
Watershed Size (>5000 sf) and Impervious % (1.5"
Rainfall) 3" ponding depth
5000
7500
10000
15000
20000
30000
40000
50000
Watershed
Size (sf)
APPENDIX E
Plant Selection for Normal Rain Gardens
Plants for Rain Gardens
Recommended for Southeastern North Carolina
Charlotte Glen, Urban Horticulture Agent,
North Carolina Cooperative Extension – New Hanover County Center
Soil conditions in rain gardens alternate between wet and dry, making them tough places
for many plants to grow. The following plants are adapted to these conditions, though
some plants will tolerate more moisture than others. Each plant is marked according to its
flooding tolerance, with 3’s being tolerant of longer flooding, 2’s only tolerating brief
flooding, and 1’s indicate plants that tolerant extended drought once established.
All of these plants are native to the southeastern United States in wetland habitats and
most are readily available at local nurseries. Wetland plants can generally grow well in
moist or well-drained soils, whereas plants adapted to dry soils rarely survive in soggy
conditions. How wet a rain garden stays will vary considerably depending on the site
where it is installed. Rain gardens created on sandy soils will rarely hold water for more
than a few hours. On these sites it is most important to choose plants for their drought
tolerance. Rain gardens created on loamy or silty soils could pond water for 1-2 days (if
your site ponds water for more than 3 days, you should consider creating a wetland). On
these sites, choosing plants tolerant of extended flooding is critical to success.
Remember you are not limited to planting just within the excavated area! Extending
plantings around this area will help the rain garden to blend in with the overall landscape.
Any plants adapted to the site conditions can be used outside of the excavated area.
For more information on designing rain gardens and bioretention areas, refer to the
following NCSU publication: Designing Rain Gardens (Bioretention Areas), available
from your local NC Cooperative Extension office or online at:
http://legacy.ncsu.edu/classes-a/bae/cont_ed/bioretention/lecture/design_rain.pdf
Large Trees (over 30’ tall)
Deciduous
Red Maple (2) – Acer rubrum
River Birch (1,3) – Betula nigra
Green Ash (3) – Fraxinux pennsylvanica
Black Gum (2) – Nyssa sylvatica
Willow Oak (1,2) – Quercus phellos
Willows (3) – Salix species
Bald Cypress (1,3) – Taxodium distichum
Pond Cypress (1,3) - Taxodium ascendens
Nutall Oak (1,2) – Quercus nuttalii
Evergreen
Atlantic White Cedar (1,3) – Chamaecyparis thyoides
Southern Magnolia (1,2) – Magnolia grandiflora
Longleaf Pine (1,2) – Pinus palustris
Swamp Laurel Oak (3) – Quercus laurifolia
Small Trees (under 30’ tall)
Deciduous
Red Buckeye (2) – Aesculus pavia
Ironwood (1,3) – Carpinus caroliniana
Redbud (1,2) – Cercis canadensis
Fringe Tree (2) – Chionanthus virginicus
Washington Hawthorn (3) – Crataegus phaenopyrum
Possumhaw (1,3) - Ilex decidua
Evergreen
Dahoon Holly (1,2) – Ilex cassine
American Holly (1,2) – Ilex opaca
Red Cedar (1,2) – Juniperus virginiana
Sweet Bay (3) – Magnolia virginiana
Devilwood (1,2) – Osmanthus americanus
Red Bay (1,2) – Persea borbonia
Evergreen shrubs that can be grown as small trees include Yaupon, Wax Myrtle, and
Anise Shrub.
Shrubs
Deciduous
Chokeberry (1,3) – Aronia arbutifolia
Beautyberry (2) – Callicarpa americana
Sweet Shrub (2) – Calycanthus floridus
Buttonbush (3) – Cephalanthus occidentalis
Pepperbush (2) – Clethra alnifolia
Strawberry Bush (2) – Euonymous americanus
Fothergilla (2) – Fothergilla gardenii
Winterberry (3) – Ilex verticillata
Virginia Willow (3) – Itea virginica
Spicebush (2) – Lindera benzion
Possumhaw (3) – Viburnum nudum
Dusty Zenobia (2) – Zenobia pulverulenta
Shrubs continued. . . .
Evergreen
Florida Leucothoe (2) – Agarista populifolia
Inkberry (2) – Ilex glabra
Yaupon (1,2) – Ilex vomitoria
Florida Anise Shrub (3) – Illicium floridanum
Anise Shrub (1,2) – Illicium parviflorum
Coastal Leucothoe (2) – Leucothoe axillaris
Wax Myrtle (1,2) – Myrica cerifera
Dwarf Palmetto (3) – Sabal minor
Perennials
Blue Star (3) – Amsonia tabernaemontana
Lady Fern (2) – Athyrium felix-femina
Butterflyweed (1) – Asclepias tuberosa
Swamp Milkweed (3) – Asclepias incarnata
Climbing Aster (3) – Aster carolinianus
False Indigo (1,2) – Baptisia species
Boltonia (3) – Boltonia asteriodes
Turtlehead (3) – Chelone glabra
Green and Gold (2) – Chrysongonum virginianum
Mouse Ear Coreopsis (2) – Coreopsis auriculata
Tickseed (1,2) – Coreopsis lanceolata
Swamp Coreopsis (2) – Coreopsis rosea
Joe Pye Weed (3) – Eupatorium dubium
Swamp Sunflower (3) – Helianthus angustifolius
Swamp Mallow (3) – Hibiscus moscheutos
Texas Star (3) – Hibiscus coccineus
Blue Flag Iris (3) – Iris virginica
Seashore Mallow (3) – Kosteletskya virginica
Gayfeather (2) – Liatris spicata
Cardinal Flower (3) – Lobelia cardinalis
Cinnamon Fern (3) – Osmunda cinnamomea
Royal Fern (3) – Osmunda regalis
Garden Phlox (2) – Phlox paniculata
Moss Pinks (1,2) – Phlox subulata
Rudbeckia (1,2) – Rudbeckia fulgida
Green Headed Coneflower (3) – Rudbeckia laciniata
Goldenrod (3) – Solidago rugosa
Stoke’s Aster (2) – Stokesia laevis
Ironweed (3) – Vernonia novaboracensis
Verbena (1,2) – Verbena canadensis
Ornamental Grasses
River Oats (1,3) – Chasmanthium latifolium
Muhly Grass (1,2) – Muhlenbergia capillaris
Panic Grass (1,3) – Panicum virgatum
Indiangrass (1,2) – Sorghastrum nutans
Sedges and Rushes
Lurid Sedge (3) – Carex lurida
Fringed Sedge (3) – Carex crinita
Southern Waxy Sedge (3) – Carex glaucescens
White-topped Sedge (3) – Rhynchospora latifolia
Woolgrass (3) - Scirpus cyperinus
Non-native perennials and ornamental grasses suitable for rain gardens include: Liriope
(1,2) (Liriope muscarii and L. spicata), Siberian Iris (2) (Iris sibirica), Daylily (1,2)
(Hemerocallis hybrids), Rain Lilies (3) (Zephyranthes species), Crinum Lilies (3)
(Crinum species), Japanese Painted Fern (2) (Athyrium nipponicum) and Maiden Grass
(1,2) (Miscanthus cultivars).
1
Plants that, once established*, can withstand considerable drought ( 3-4
weeks without rainfall)
2
Plants that grow best in moist to average soils and will only tolerate short
periods (1-2 days) of flooding.
3
Plants that will tolerate longer periods of flooding (3-5 days), but will also
grow in moist to average soils.
*Establishment usually takes 1-2 years for trees and shrubs and 1 year for perennials.
For more detailed information and images of each plant, visit the Plant
Fact Sheets available on NCSU’s Urban Horticulture website:
www.ncstate-plants.net
Plants for Rain Gardens
Recommended for central North Carolina
Charlotte Glen, Urban Horticulture Agent,
North Carolina Cooperative Extension – New Hanover County Center
Soil conditions in rain gardens alternate between wet and dry, making them tough places
for many plants to grow. The following plants are adapted to these conditions, though
some plants will tolerate more moisture than others. Each plant is marked according to its
flooding tolerance, with 3’s being tolerant of longer flooding, 2’s only tolerating brief
flooding, and 1’s indicate plants that tolerant extended drought once established.
All of these plants are native to the southeastern United States in wetland habitats and
most are readily available at local nurseries. Wetland plants can generally grow well in
moist or well-drained soils, whereas plants adapted to dry soils rarely survive in soggy
conditions. How wet a rain garden stays will vary considerably depending on the site
where it is installed. Rain gardens created on sandy soils will rarely hold water for more
than a few hours. On these sites it is most important to choose plants for their drought
tolerance. Rain gardens created on loamy or silty soils could pond water for 1-2 days (if
your site ponds water for more than 3 days, you should consider creating a wetland). On
these sites, choosing plants tolerant of extended flooding is critical to success.
Remember you are not limited to planting just within the excavated area! Extending
plantings around this area will help the rain garden to blend in with the overall landscape.
Any plants adapted to the site conditions can be used outside of the excavated area.
Large Trees (over 30’ tall)
Deciduous
Red Maple (2) – Acer rubrum
River Birch (1,3) – Betula nigra
Green Ash (3) – Fraxinux pennsylvanica
Black Gum (2) – Nyssa sylvatica
Willow Oak (1,2) – Quercus phellos
Willows (3) – Salix species
Nutall Oak (1,2) – Quercus nuttalii
Evergreen
Southern Magnolia (1,2) – Magnolia grandiflora
Swamp Laurel Oak (3) – Quercus laurifolia
Small Trees (under 30’ tall)
Deciduous
Red Buckeye (2) – Aesculus pavia
Ironwood (1,3) – Carpinus caroliniana
Redbud (1,2) – Cercis canadensis
Fringe Tree (2) – Chionanthus virginicus
Washington Hawthorn (3) – Crataegus phaenopyrum
Possumhaw (1,3) - Ilex decidua
Evergreen
American Holly (1,2) – Ilex opaca
Red Cedar (1,2) – Juniperus virginiana
Shrubs
Deciduous
Chokeberry (1,3) – Aronia arbutifolia
Beautyberry (2) – Callicarpa americana
Sweet Shrub (2) – Calycanthus floridus
Buttonbush (3) – Cephalanthus occidentalis
Pepperbush (2) – Clethra alnifolia
Strawberry Bush (2) – Euonymous americanus
Winterberry (3) – Ilex verticillata
Virginia Willow (3) – Itea virginica
Spicebush (2) – Lindera benzion
Possumhaw (3) – Viburnum nudum
Evergreen
Inkberry (2) – Ilex glabra
Wax Myrtle (1,2) – Myrica cerifera
Perennials
Blue Star (3) – Amsonia tabernaemontana
Lady Fern (2) – Athyrium felix-femina
Butterflyweed (1) – Asclepias tuberosa
Swamp Milkweed (3) – Asclepias incarnata
Climbing Aster (3) – Aster carolinianus
False Indigo (1,2) – Baptisia species
Boltonia (3) – Boltonia asteriodes
Turtlehead (3) – Chelone glabra
Green and Gold (2) – Chrysogonum virginianum
Mouse Ear Coreopsis (2) – Coreopsis auriculata
Tickseed (1,2) – Coreopsis lanceolata
Swamp Coreopsis (2) – Coreopsis rosea
Joe Pye Weed (3) – Eupatorium dubium
Swamp Sunflower (3) – Helianthus angustifolius
Swamp Mallow (3) – Hibiscus moscheutos
Texas Star (3) – Hibiscus coccineus
Blue Flag Iris (3) – Iris virginica
Cardinal Flower (3) – Lobelia cardinalis
Cinnamon Fern (3) – Osmunda cinnamomea
Royal Fern (3) – Osmunda regalis
Garden Phlox (2) – Phlox paniculata
Moss Pinks (1,2) – Phlox subulata
Rudbeckia (1,2) – Rudbeckia fulgida
Green Headed Coneflower (3) – Rudbeckia laciniata
Goldenrod (3) – Solidago rugosa
Ironweed (3) – Vernonia novaboracensis
Ornamental Grasses
River Oats (1,3) – Chasmanthium latifolium
Muhly Grass (1,2) – Muhlenbergia capillaris
Panic Grass (1,3) – Panicum virgatum
Indiangrass (1,2) – Sorghastrum nutans
Sedges and Rushes
Lurid Sedge (3) – Carex lurida
Fringed Sedge (3) – Carex crinita
White-topped Sedge (3) – Rhynchospora latifolia
Woolgrass (3) - Scirpus cyperinus
Non-native perennials and ornamental grasses suitable for rain gardens include: Liriope
(1,2) (Liriope muscarii and L. spicata), Siberian Iris (2) (Iris sibirica), Daylily (1,2)
(Hemerocallis hybrids), Rain Lilies (3) (Zephyranthes species), Crinum Lilies (3)
(Crinum species), Japanese Painted Fern (2) (Athyrium nipponicum) and Maiden Grass
(1,2) (Miscanthus cultivars).
1
Plants that, once established*, can withstand considerable drought ( 3-4
weeks without rainfall)
2
Plants that grow best in moist to average soils and will only tolerate short
periods (1-2 days) of flooding.
3
Plants that will tolerate longer periods of flooding (3-5 days), but will also
grow in moist to average soils.
usually
trees and
for
For
*Establishment
takes 1-2 years for
shrubs and 1 year
perennials.
more detailed
information and
images of each plant, visit the Plant Fact Sheets available on NCSU’s
Urban Horticulture website: www.ncstate-plants.net
Plants for Rain Gardens
Recommended for Western North Carolina
Charlotte Glen, Urban Horticulture Agent,
North Carolina Cooperative Extension – New Hanover County Center
Soil conditions in rain gardens alternate between wet and dry, making them tough places
for many plants to grow. The following plants are adapted to these conditions, though
some plants will tolerate more moisture than others. Each plant is marked according to its
flooding tolerance, with 3’s being tolerant of longer flooding, 2’s only tolerating brief
flooding, and 1’s indicate plants that tolerant extended drought once established.
All of these plants are native to the southeastern United States in wetland habitats and
most are readily available at local nurseries. Wetland plants can generally grow well in
moist or well-drained soils, whereas plants adapted to dry soils rarely survive in soggy
conditions. How wet a rain garden stays will vary considerably depending on the site
where it is installed. Rain gardens created on sandy soils will rarely hold water for more
than a few hours. On these sites it is most important to choose plants for their drought
tolerance. Rain gardens created on loamy or silty soils could pond water for 1-2 days (if
your site ponds water for more than 3 days, you should consider creating a wetland). On
these sites, choosing plants tolerant of extended flooding is critical to success.
Remember you are not limited to planting just within the excavated area! Extending
plantings around this area will help the rain garden to blend in with the overall landscape.
Any plants adapted to the site conditions can be used outside of the excavated area.
For more information on designing rain gardens and bioretention areas, refer to the
following NCSU publication: Designing Rain Gardens (Bioretention Areas), available
from your local NC Cooperative Extension office or online at:
http://legacy.ncsu.edu/classes-a/bae/cont_ed/bioretention/lecture/design_rain.pdf
Large Trees (over 30’ tall)
Deciduous
Red Maple (2) – Acer rubrum
River Birch (1,3) – Betula nigra
Cherry birch (2) – Betula lenta
Willows (3) – Salix species
Bald cypress (1,3) – Taxodium distichum
Sycamore (2) – Platanus occidentalis
Yellow buckeye (2) – Aesculus octandra
Persimmon (2) – Diospyros virginiana
Silverbell (1) – Halesia carolina
Blackgum (3) – Nyssa sylvatica
Black cherry (2) – Prunus serotina
White basswood (1) – Tilia heterophylla
Box Elder (3) – Acer negundo
Evergreen
-
Small Trees (under 30’ tall)
Deciduous
Ironwood (1,3) – Carpinus caroliniana
Redbud (1,2) – Cercis canadensis
Fringe Tree (2) – Chionanthus virginicus
Washington Hawthorn (3) – Crataegus phaenopyrum
Umbrella Tree (2) – Magnolia tripetala
PawPaw (2) – Asimina triloba
Tag Alder (3) – Alnus serrulata
Serviceberry (2) – Amelanchier arborea
Pagoda Dogwood (1) – Cornus alternifolia
Witch-hazel (1) – Hamamelis virginiana
Silky Dogwood (3) –Cornus amomum
Evergreen
American Holly (1,2) – Ilex opaca
Sweetbay Magnolia (3) – Magnolia virginiana
Shrubs
Deciduous
Chokeberry (1,3) – Aronia arbutifolia
Sweet Shrub (2) – Calycanthus floridus
Buttonbush (3) – Cephalanthus occidentalis
American Hazelnut (1) – Corylus americana
Strawberry Bush (2) – Euonymous americanus
Winterberry (3) – Ilex verticillata
Virginia Sweetspire (3) – Itea virginica
Spicebush (2) – Lindera benzion
Ninebark (2) – Physocarpus opulifolius
Common Elderberry (2) – Sambucus canadensis
Meadowsweet (3) – Spiraea latifolia
Hardhack (3) – Spiraea tomentosa
Swamp Azalea (3) – Rhododendron viscosum
Swamp Rose (3) – Rosa palustris
Blueberry (1) – Vaccinium ashei
Arrow-wood (2) – Viburnum dentatum
Possumhaw (3) – Viburnum nudum
Evergreen
Native Brake-Cane (3) – Arundinaria gigantea
Carolina Rose (1) – Rosa carolina
Perennials
Blue Star (3) – Amsonia tabernaemontana
Lady Fern (2) – Athyrium felix-femina
Swamp Milkweed (3) – Asclepias incarnata
Butterflyweed (1) – Asclepias tuberosa
False Indigo (1,2) – Baptisia species
Turtlehead (3) – Chelone glabra
Green and Gold (2) – Chrysongonum virginianum
Mouse Ear Coreopsis or Lobed Tickseed (2) – Coreopsis auriculata
Lanceleaf Tickseed (1,2) – Coreopsis lanceolata
Rose Mallow (3) – Hibiscus moscheutos
Texas Star (3) – Hibiscus coccineus
Jewelweed (3) –Impatiens capensis
Swamp Iris (3) –Iris versicolor
Blue Flag Iris (3) – Iris virginica
Gayfeather (2) – Liatris spicata
Cardinal Flower (3) – Lobelia cardinalis
Cinnamon Fern (3) – Osmunda cinnamomea
Royal Fern (3) – Osmunda regalis
Garden Phlox (2) – Phlox paniculata
Moss Pinks (1,2) – Phlox subulata
Pickerelweed (3) –Pontedara cordata
Rudbeckia (1,2) – Rudbeckia fulgida
Cutleaf Coneflower (3) – Rudbeckia laciniata
Goldenrod (3) – Solidago rugosa
Stoke’s Aster (2) – Stokesia laevis
Ironweed (3) – Vernonia novaboracensis
Ornamental Grasses
River Oats (1,3) – Chasmanthium latifolium
Panic Grass (1,3) – Panicum virgatum
Indiangrass (1,2) – Sorghastrum nutans
Sedges and Rushes
Lurid Sedge (3) – Carex lurida
Fringed Sedge (3) – Carex crinita
Woolgrass (3) - Scirpus cyperinus
Soft Rush (3) –Juncus effuses
1
Plants that, once established*, can withstand considerable drought ( 3-4
weeks without rainfall)
2
Plants that grow best in moist to average soils and will only tolerate short
periods (1-2 days) of flooding.
3
Plants that will tolerate longer periods of flooding (3-5 days), but will also
grow in moist to average soils.
*Establishment usually takes 1-2 years for trees and shrubs and 1 year for perennials.
For more detailed information and images of each plant, visit the Plant
Fact Sheets available on NCSU’s Urban Horticulture website:
www.ncstate-plants.net
APPENDIX F
Plant Selection for Zone Rain Garden
List of adaptable plants that can be used in a zoned rain garden.
Large Trees
River Birch - Betula nigra
Bald Cypress - Taxodium distichum
Small Trees, 10'-20'
Green Hawthorn - Crataegus viridus
Possumhaw - Ilex decidua
Sweet Bay - Magnolia virginiana
Shrubs
Buttonbush - Cephalanthus occidentalis (not as readily available others
but very tough)
Virginia Willow - Itea virginica
Possumhaw - Viburnum nudum
Winterberry - Ilex verticillata
Dwarf Palmetto - /Sabal minor/ (Coastal Plains Only)
Perennials
Blue Star - Amsonia tabernaemontana
Joe Pye Weed - Eupatorium dubium
Blue Flag Iris - Iris virginica
Ironweed - Vernonia novaboracensis
Swamp Mallow - Hibiscus moscheutos
Common Rush - Juncus effusus
APPENDIX G
Pond and Wetland Maintenance
Maintenance of Stormwater Wetlands
and Wet Ponds
Stormwater management practices must be kept in proper working
order to maintain their intended functions and aesthetic appeal.
This publication presents maintenance
guidelines for stormwater wetlands
and wet ponds, two stormwater practices that are being constructed across
North Carolina.
OVERVIEW
Distributed in furtherance
of the acts of Congress of
May 8 and June 30, 1914.
North Carolina State University and North Carolina
A&T State University commit
themselves to positive action
to secure equal opportunity regardless of race, color,
creed, national origin, religion, sex, age, or disability. In
addition, the two Universities
welcome all persons without
regard to sexual orientation.
North Carolina State University, North Carolina A&T State
University, U.S. Department
of Agriculture, and local governments cooperating.
As its name implies, a stormwater
wetland is a wetland system designed
to treat stormwater runoff. Wetlands
typically have shallow water (except for intermittent deep pools) and
dense vegetation. A well-functioning
stormwater wetland will be a diverse
ecosystem that includes many plant
and animal species. It will also do an
excellent job of removing pollution
from stormwater runoff—its intended
function. Stormwater wetlands are
very efficient at nutrient removal.
Recent studies conducted by North
Carolina State University researchers
indicate that a stormwater wetland removes 40 to 80 percent of all nitrogen
and 50 to 70 percent of all phosphorus
entering the wetland. Figure 1 depicts
some wetlands located across North
Carolina. (For more information on
stormwater wetlands, see Designing
Stormwater Wetlands for Small Watersheds, AG-588-02, in the Urban Waterways fact sheet series.)
Wet ponds are typically much
deeper than stormwater wetlands—
their average depth ranges from 4 to
8 feet. They are designed so that most
of the pond is open water. Wet ponds
are the most common stormwater
management practice in North Carolina and have been constructed since
the 1970s in some parts of the state.
More recent pond configurations incorporate wetland features, such as an
aquatic shelf (or wetland bench) and a
forebay.
An aquatic shelf is a shallow-water
zone of a pond, usually along the
bank edges, planted with wetland vegetation. These shelves flood during
storms. A forebay is a pool where
inflow first enters the pond, and
heavier pollutants, such as sediment,
initially settle there. Research conducted across the United States shows
that wet ponds effectively remove
sediment and the pollutants associated with it from stormwater. Both wet
ponds and stormwater wetlands can
1
A
B
C
D
be used for flood control as well. For more information on stormwater practices, see Urban Stormwater
Structural Best Management Practices (BMPs) in the
Urban Waterways series (AG-588-01).
MAINTENANCE GOALS
Maintenance of stormwater wetlands and wet ponds
is performed to achieve four goals: efficient hydraulic
flow and pollutant removal, aesthetic appeal, safety,
and mosquito control. Most of the maintenance activities associated with wetlands and wet ponds pertain to
two or more of these goals. The following activities
should be performed regularly to maintain stormwater
wetland and wet pond efficiency:
• Remove sediment and gross solids from forebays.
• Keep the orifice (the drawdown hole) free-flowing.
• Clean away floating trash and debris.
• Remove vegetation along the dam face.
• Remove invasive plant species.
• Mow the perimeter of wet ponds.
• Control pests, such as muskrats and beavers.
2
Figure 1. Stormwater wetlands across
North Carolina:
(A) Brevard College
in the mountains;
(B) Hillandale Golf
Course in Durham;
(C) Carteret-Craven
Electric Cooperative
near Morehead City;
and
(D) Smithfield-Selma
Senior High School
in Johnston County.
REMOVE SEDIMENT AND GROSS SOLIDS
FROM FOREBAYS
Forebays are located at the inlets to stormwater wetlands and wet ponds. They are designed to slow incoming water, dissipating the water’s energy, and to
provide a location for sediment and other gross solids
(such as leaves, other tree debris, cigarette butts, and
trash) to settle and accumulate.
A forebay is typically 2 feet deep in a stormwater
wetland and sometimes deeper in a wet pond. If the
forebay fills with sediment and gross solids, these materials will bypass the forebay and begin to accumulate
in other portions of the wetland or wet pond that may
be more ecologically sensitive.
To check sediment levels inside the forebay, record
the depth of the forebay at the same time each year.
Depending on the size of the forebay, a fish finder can
be used from a small boat or someone can survey the
depth along a grid of the forebay with a rod (Figure
2). If the forebay water is clear, the depth can often be
determined visually.
Once the forebay is half full of sediment or the
average sediment level is within 1 foot of the water
Figure 2. Inspection (A) of sediment depth and cleaning or
”dipping” (B) of forebays. A
long boom on the excavator
is sometimes essential to access sediment collected in the
middle of the forebay.
A
B
surface, remove the sediment and gross solids.
This task is typically accomplished by a track hoe
or backhoe (Figure 2). The water level inside the
wet pond or stormwater wetland can be lowered, if
needed, to aid excavation of the forebay. Depending
upon the size of the forebay, cleaning it can require
anywhere from a day to a week.
Once the excavated soil (or spoils) from the dredging has begun to dry, either spread it in the watershed
away from the banks of the wetland or wet pond and
seed it, or take it to a landfill. Consider the location
when disposing of the soil. Spoils from wet ponds
downstream of industrial facilities may contain pollutants that need to be disposed of in a landfill, while
those from a residential wetland or wet pond may not.
If there is any concern as to proper disposal, samples
of the excavated soil should be sent to a laboratory for
chemical analysis. This can be costly.
A recent study by N.C. State researchers indicates that sediment and gross solids from forebays
typically need to be removed (also known as dipped
or dredged) once every 5 to 10 years. If wet ponds
and stormwater wetlands are located in watersheds
with active construction, however, spoils may need
to be removed as often as once a year.
Like the forebay, the final deep pool of the pond
or wetland near the outlet also must be inspected
and maintained. The major difference between the
two is that the final deep pool takes longer to fill
with soil. The drawdown hole (located at the outlet
and described in the next section) is where captured stormwater slowly drains from the wetland
or wet pond. It must be free of accumulated debris
and sediment to work properly. Remove sediment
and gross solids from the deep pool near the outlet
whenever the material is within 1 vertical foot of
the drawdown hole.
WHAT DESIGNERS CAN DO TO MAKE FOREBAY
CLEANOUT EASIER
Access to older wet ponds and stormwater wetlands
is often a problem. New design recommendations
can make forebay cleanout easier by improving accessibility:
• Include reinforced paths that give heavy equipment easy access to the forebay (Figure 3). Sometimes the path doubles as a separation between the
forebay and the remainder of the pond.
• Make forebays relatively long and narrow. A narrow
forebay makes it easier for a trackhoe or backhoe
arm to reach at least to the middle of the forebay
from either side.
Figure 3. A wide path is provided for heavy equipment
to access the forebay (located to the right of the path).
3
Figure 4. A small orifice allows
slow release of captured
stormwater (A), but can
easily clog due to its size. A
clogged orifice can affect plant
communities inside the wetland
or wet pond (B).
A
B
KEEP THE ORIFICE (DRAWDOWN HOLE) FREE
FLOWING
Wetlands and wet ponds are designed to capture and
detain stormwater from 2 to 5 days. On smaller ponds
and wetlands, a relatively small hole or orifice is
used to detain water for this period. The diameter of
the orifice can be as small as 2 inches, which makes
it susceptible to clogging (Figure 4). Because many
ponds and all wetlands contain vegetation, dead plants
can float to and clog the orifice. Moreover, floating
trash and debris (see the next section) will potentially
clog the orifice.
A clogged drawdown hole poses several problems,
including the loss of storage to capture later storms
and flooding of desirable plant species. When water
levels remain too deep for the desirable plants to
survive, stronger, usually invasive, plant species take
WHY SUCH A SMALL HOLE?
A large opening would release the water too quickly and not provide adequate time for treatment.
Stormwater wetlands and wet ponds are designed
to capture the first flush (or water quality volume)
from their upstream drainage areas. The first flush is
runoff generated by a 1 to 1.5 inch storm. The total
volume of water can range up to several acre-feet.
Once the first flush is captured in the wetland or
wet pond, it must be slowly released to allow time
for sediment and other gross solids to settle. Design
standards require that the first-flush volume be kept
for at least 2 days, with a recommended 3- to 4-day
retention time. To release this water slowly, a small
hole is often necessary. When the hole is only 2, 3,
or 4 inches in diameter, clogging is a significant concern.
4
over. The aesthetics and performance of the practice
can suffer when the plant community changes.
The wetland or wet pond needs to store water
between storms to perform its intended function. It
cannot store water from the next storm effectively if
the orifice is clogged and the wetland is continually
full.
Unclogging the orifice is relatively simple. Clean
the hole with a stick, a piece of wire, a pole, or your
hand. Inspect it regularly—the drawdown hole can
clog at any time. Visit the site once a month to make
sure water is flowing freely through the orifice, and
inspect the outlet after every rainfall event exceeding
2 inches.
CLEAN AWAY FLOATING DEBRIS AND TRASH
Stormwater wetlands and wet ponds are located in
low elevations of the landscape. All water from several acres drains to wetlands and wet ponds. With this
water comes trash and other debris, called floatage.
It must be removed from wetlands and wet ponds for
several reasons:
• It is unsightly, particularly when the wetland or wet
pond is designed to be an attractive amenity.
• Floating trash, such as cups or plastic bags,
often store small amounts of water in a sheltered
environment. Studies have shown that mosquito
larvae are more likely to be protected inside floating
trash than in the exposed pond.
• Trash and other floating debris can clog the
drawdown hole (the orifice), which is often used to
slowly release captured runoff (Figure 5).
Inspect wet ponds and wetlands for trash regularly
and frequently—typically once a month but occasionally once a week. On smaller wetlands and wet ponds,
collect trash by simply wading along the edges. With
Figure 5. Trash
floats to the
drawdown hole,
where it can clog
the small hole,
restricting flow.
Removing the
trash is often
very simple, but
essential.
larger facilities, a small boat or vac truck may be required. Because most trash follows the movement of
water, it tends to collect near the outlet of the wetland
or wet pond. This makes trash easier to collect, but it
increases the risk of clogging the drawdown orifice.
REMOVE VEGETATION ALONG THE DAM FACE
Dam inspection officials require earthen dams to be
free of large shrubs and trees. Roots can conduct
water through the dam from the open pond to the
downstream side of the embankment. The movement
of water along the roots is called piping, which can
eventually lead to soil erosion and, if unchecked, dam
failure. Piping tends to be a problem for large ponds
and wetlands that have a large dam face. Some small
wetlands and wet ponds and those with concrete dams
do not have this problem. If a dam face is vegetated, it
should be grassed exclusively.
Inspect the dam once a year, and remove all shrubs
and trees from the dam top and both faces. If the
wetland or wet pond has been regularly maintained
and any shrubs and trees growing are juvenile, simply
mowing the bank is sufficient. Otherwise, a weed
wiper, which applies herbicides to plants more than
12 inches tall, can be used along the bank. The weed
wiper will kill any plant it touches or scrapes.
If a bank is severely overgrown, trees and shrubs
should be cut down and removed. A systemic herbicide can be applied to the freshly cut stumps, which
will kill the root systems. This is a laborious process.
If the dam face is heavily overgrown, a contractor who specializes in removal should be consulted.
Because dams of larger ponds and wetlands are responsible for retaining large volumes of water, dam
failure can be catastrophic if homes, businesses, or
roads are downstream.
REMOVE INVASIVE PLANT SPECIES
Stormwater wetlands and wet ponds with aquatic
shelves can become overgrown with invasive plants.
The most common invasive plant is the cattail (Typha
species, Figure 6). Cattails, while native to North
Carolina, crowd out other, more desirable plants. Cattails tolerate a variety of conditions and do a good job
of pollutant removal. From this functional standpoint,
cattails can be considered good plants to have in a
wetland. However, cattail monocultures fail to meet
two very important design goals: aesthetics and mosquito control.
A wetland or wet pond that is overgrown with cattails is not a diverse ecosystem. Ecosystem diversity
is critical for mosquito control. Cattails provide a
safe environment for mosquito larvae to mature to
adulthood. When cattails go dormant in the fall, some
of the fronds will form a protective thicket for mosquitoes. For more information on mosquito control
in wetlands and wet ponds, see Mosquito Control
for Stormwater Practice Designers and Managers
(AGW-588-04) in the Urban Waterways series.
Figure 6. (A) Cattails (Typha
sp.) and (B) common reeds
(Phragmites sp.) are very aggressive invasive species. Once
established, each plant will
crowd out more desirable plant
species.
A
B
5
A
B
C
Figure 7. Aquatic glyphosate (herbicide) can be applied via direct contact (a protected hand) or via a small weed-wipe
pole (A). Stroking individual cattail fronds sends the herbicide down the shoot and reaches tubers located in the soil (B).
Once the herbicide reaches the tubers, the cattails will die within 2-3 days (C). The herbicide can also be applied with a
small brush. (Franklin County Cooperative Extension Center)
Removing cattails can be challenging. It is almost
impossible to remove a mass of cattails by hand.
Cattails grow from tubers that spread, and they also
spread by seed. If a piece of cattail is left in the
wetland or wet pond after removal, the stand will
probably re-establish. Use a backhoe for mass cattail
removal when a wet pond or wetland is completely
overgrown by cattails.
If a wetland or wet pond has a variety of vegetation
but cattails are beginning to colonize it, use an alternative form of cattail removal, such as applying an
aquatic formulation of the herbicide glyphosate (one
trade name for this is Rodeo). Wear a chemical-resistant glove underneath a cloth glove. Soak the cloth
glove in 2 percent glyphosate, and stroke the cattail
leaves. Or brush the herbicide onto the leaves with a
small weed wiper. Not every leaf needs to be touched
by the herbicide because many of the cattails are connected by tubers. Within 10 to 12 days, the cattails
fronds will wither and die (Figure 7).
The herbicide must be applied by hand rather than
by broadcast spray because it will kill every herbaceous plant it touches. Use only aquatic formulations
of glyphosate because they do not harm fish and other
aquatic species.
The frequency of cattail removal can vary. Several
factors influence the need to apply herbicide to cattails: the density at which the wetland is planted
with desirable species, the time of year the wetland
is planted, and the maturity of the wetland. During
the first year or two after wetland construction,
remove cattails twice a year. As the wetland matures
6
and desirable species begin to dominate, reduce the
maintenance frequency to once a year. The amount
of time needed to remove unwanted vegetation (via
the glyphosate wipe) varies, but a well-maintained,
mature wetland requires visits of about 2 hours per
acre of wetland.
Other unwanted plant species include common
reed (Phragmites species, Figure 6), various noxious
floating aquatics (such as parrot feather, Myriophyllum aquaticum, and giant salvinia, Salvina spp.), and
Asiatic dayflower (Murdannia keisak). Phragmites
species can be removed in a manner similar to that
described for cattails. Noxious floating aquatics may
require careful chemical or physical removal. If you
observe these exotic invasive species, contact your
county Extension center.
MOW THE PERIMETER OF WET PONDS
Stormwater wetlands are not mowed to the water’s
edge and tend to be surrounded by mature grasses.
As a result, mowing the perimeter of wetlands is not
a typical stormwater wetland maintenance activity.
Many wet ponds, however, do have a grassed perimeter that needs to be maintained. Mowing maintenance
is almost purely aesthetic. The type of grass used, its
growing season, and pond aesthetics dictate the height
and frequency of mowing:
• Mow cool-season grasses to a recommended height
of 4 inches and no lower than 2.5 inches. Coolseason grasses, such as fescue, tend to be used west
of Interstate 95 in North Carolina.
• Mow warm-season grasses to a recommended
height of 2.5 inches and no lower than 1.5 inches.
Warm season grasses include centipede, Bermuda,
and zoysia, and are principally found in eastern
North Carolina.
• Mow every one to three weeks during the growing
season when the wet pond is part of an accessible
landscape or treated as an amenity.
• Mow wet ponds that are located out-of-sight once
or twice a year.
The size and severity of slopes along the wet pond
determine the type of mower to use. For small ponds,
a standard push mower is often adequate. Larger
ponds or ponds with steep banks will probably require
a specialized pond mower.
Grass clippings can be left adjacent to the pond to
provide organic matter that encourages grass to grow.
Do not discharge grass clippings into the water, as this
will encourage the growth of algae and could potentially clog the drawdown hole.
CONTROL PESTS
Rodents such as muskrats and beavers are attracted to
stormwater wetlands and wet ponds (Figure 8). Once
A
B
Figure 8. (A) Muskrat (Ondatra zibethicus). (B) Beaver
(Castor canadensis). (U.S. Fish and Wildlife Service)
Figure 9. Muskrat
holes along the
perimeter of the
wetland or wet
pond are a sign
of infestation.
Destroying the holes
is a simple way of
forcing muskrats
to move, if the
population is limited.
there, they can damage the stormwater management
practice.
Muskrats eat aquatic vegetation and burrow holes
in the deeper pools. When muskrats actively burrow
near the outlet of a wetland or wet pond, they will
add sediment and increase turbidity to the outflow, increasing the release of pollutants from the wetland or
wet pond. Moreover, muskrats will sometimes burrow
holes around and through dams. These muskrat holes
artificially lower the water level inside the pond or
wetland, causing some plant species to die. At worst,
the holes can lead to dam failure.
Beavers are attracted to the sound of running water.
Once a beaver colonizes a wet pond or stormwater
wetland, it will remove trees and shrubs surrounding
the stormwater practice to build its lodge and dam.
Beaver activity will clog or block the drawdown
structure, thus raising the height of water inside the
pond or wetland. This change in the depth of water
inside wet ponds with aquatic shelves and stormwater
wetlands will alter the types of vegetation that survive
in the practice. Usually this change is undesirable.
Muskrat infestation is a difficult maintenance
problem that usually must be addressed only when
a pond or wetland has suffered from neglect. If the
practice is infested, muskrats can be trapped under
water, where they drown. Muskrats frequently escape
traps, however, which makes live trapping difficult.
Hire a licensed, experienced trapper who takes care to
place traps where pets cannot be trapped by mistake.
Once muskrats have been removed from the pond,
their dwelling holes should be destroyed.
7
KEEP GEESE AWAY FROM WET PONDS
AND STORMWATER WETLANDS
Canada geese are attracted to an open body
of water with good visibility around the perimeter, and they enjoy eating grass. This
describes many “old-design” wet ponds that
are mowed to the edge, allowing geese easy
access in and out of the pond. Designers can
include features in a wet pond to prevent
Canada geese from taking up residence:
• Build a visual barrier along the pond perimeter—the aquatic shelf. By taking away
good visibility, geese will not feel as safe.
Most newly designed ponds include some
aquatic shelf.
• Place shiny objects, such as silver tape,
around the perimeter of the pond if building an aquatic shelf is not feasible.
• Place a grid of string across the wet pond
to prevent easy waterfowl water landing.
This string can also have shiny tape attached to it (Figure 10).
You can also bring a dog to the pond regularly to scare the geese. Geese do not like
certain species of dogs, particularly border
collies. If they often encounter a frightening
dog, the Canada geese will eventually move
elsewhere.
Figure 10. A grid of fishing line adorned with
silver tape has been strung across this wet pond
to prevent geese from making it their home. The
string grid makes water landing more difficult, and
geese do not like shiny or flashy objects like windblown silver tape.
8
If the stormwater practice has been regularly maintained, muskrat populations can more easily be controlled. Encourage muskrats to move away from the
wetland or wet pond by making it an uncomfortable
place to live. If muskrat holes are observed around
the perimeter of a wet pond or stormwater wetland,
destroy them or fill them with soil (Figure 9). Identify
and destroy muskrat holes during any regular maintenance activity: whenever the wetland or pond is
being inspected to verify that the drawdown is freely
flowing and during mowing and trash removal.
Removing beavers is more difficult that removing
muskrats. If a beaver is observed living in or around
a stormwater wetland or wet pond, contact a professional trapper who specializes in beaver removal.
SUMMARY
Well-designed stormwater wetlands and wet ponds
remove pollutants and mitigate floods. To accomplish
these goals and remain safe, aesthetically pleasing,
and free of mosquitoes, they must be maintained
properly to meet their design goals. Most stormwater wetland and wet pond maintenance activities are
simple and inexpensive. But without them, the effectiveness of these stormwater management practices
will decline.
TABLE 1. STORMWATER WETLAND AND WET POND MAINTENANCE TASKS AND FREQUENCIES
Task
Remove sediment from
forebay and deep pool
(dredging/ dipping).
Monitor sediment depth in
forebay and deep pools.
Maintaining free-flowing
orifice (drawdown hole).
Remove floating trash and
debris.
Remove vegetation from
dam top and faces.
Remove invasive species
(particularly cattails).
Mow the wet pond perimeter.
Remove muskrats and
beavers.
Frequency
Notes
Varies. In stable watersheds, once every In unstable watersheds (those with
5 to10 years is typical.
active construction), the frequency
increases to once a year, assuming the
forebay is correctly sized.
Once a year.
In a large pond or wetland, a small boat
may be needed.
Once per month and after every storm Perform inspection regularly. Unclogexceeding 2 inches.
ging the hole when needed is simple.
Depends on design aesthetics: once a
Remove trash whenever the drawdown
week to once a month.
hole is being inspected. Inspect for trash
more often if necessary, and remove as
needed.
Once a year.
Dam top and faces should consist of
mowed grass, if vegetated.
In years 1 and 2, twice a year (spring
If spread of cattails is somewhat limited,
and fall). From year 2 onward, once a
use the glyphosate-wipe method.
year (spring).
Depends on design aesthetics. Ranges Wet ponds that are a design amenity will
from every 1 to 3 weeks to once a year. require more frequent mowing (every 1
to 3 weeks).
Contact a professional beaver trapper
Muskrat hole inspection and destructo remove beavers. Use muskrat traps to
tion should occur every time the
wetland or wet pond is visited (at least remove muskrats, or contact a profesonce a month).
sional trapper.
RESOURCES
Fact sheets in the Urban Waterways series, North
Carolina Cooperative Extension, N.C. State University:
Hunt, W. F. Urban Stormwater Structural Best Management Practices (BMPs). AG-588-01.
Online: http://www.bae.ncsu.edu/stormwater/
PublicationFiles/UrbanBMPs1999.pdf
Hunt, W. F., and B. A. Doll. Design of Stormwater
Wetlands for Small Watersheds. AG-588-02.
Online:http://www.bae.ncsu.edu/stormwater/
PublicationFiles/SWwetlands2000.pdf
Hunt, W. F., C. A. Apperson, and W G. Lord. Mosquito Control for Stormwater Facilities. AG-588-04.
Online: http://www.bae.ncsu.edu/stormwater/
PublicationFiles/Mosquitoes2005.pdf
Hunt, W. F., and W.G. Lord. Bioretention Performance, Design, Construction, and Maintenance.
AGW-588-05.
Online: http://www.bae.ncsu.edu/stormwater/
PublicationFiles/Bioretention2006.pdf
Rodewald, A. D. Nuisance Canada Geese: How to Deal
with the Problem. Ohio State University Extension
publication no. W-3-2001.
Online: http://ohioline.osu.edu/w-fact/003.html
BAE Stormwater Group Web site:
www.bae.ncsu.edu/stormwater
Obtain information on upcoming workshops
(including BMP Inspection and Maintenance
Certification Courses), publications, PowerPoint
presentations, images to download, and design and
construction specifications.
State of North Carolina Stormwater Web site:
www.ncstormwater.org
ACKNOWLEDGEMENTS
All photographs were provided by the Department
of Biological & Agricultural Engineering at N.C. State
University except as noted for Figures 7 and 8.
9
Recommendations for the use of agricultural chemicals are included in this publication
as a convenience to the reader. The use of brand names and any mention or listing of
commercial products or services in this publication does not imply endorsement by
North Carolina Cooperative Extension nor discrimination against similar products or
services not mentioned. Individuals who use agricultural chemicals are responsible
for ensuring that the intended use complies with current regulations and conforms to
the product label. Be sure to obtain current information about usage reulations and
examine a current product label before applying any chemical. For assistance, contact
your county Cooperative Extension agent.
Prepared by
William F. Hunt, Ph.D., P.E.
Assistant Professor and Extension Specialist
Biological and Agricultural Engineering
North Carolina State University
and
Bill Lord
Area Environmental Agent
North Carolina Cooperative Extension
Published by
NORTH CAROLINA COOPERATIVE EXTENSION SERVICE
AGW-588-07
10
E07-45831
08/2006/bs
APPENDIX H
Cistern – Additional Information - Water Budget Model
Rainwater Harvester 1.0
User Manual
Developed by: Matthew Jones
BAE Stormwater Engineering Group
Biological and Agricultural Engineering Department
North Carolina State University
[email protected]
Overview
The Rainwater Harvester model simulates the performance of a rainwater
harvesting system, using historical rainfall data to evaluate a daily water balance. The
model is intended to assist designers in sizing a rainwater harvesting cistern based
upon rainfall inputs and anticipated usage.
General Operating Instructions
1. Load rainfall data file
2. Input system design values
3. Change tab to “Water Usage” and input usage values
4. Click “Simulate” button at lower right
5. View system performance summary data
Optional:
6. Click “Animate” button to view a visual representation of the cistern level over time
7. Save the simulation results to a comma-separated variable (.csv) file
Inputs
System Configuration
Rainfall Input File:
Rainfall input files for several North Carolina cities are available from the NCSU
rainwater harvesting website. The file can have a “.rai” or “.csv” extension with the
data formatted as comma-separated variables with the following data columns:
• Index Day (Beginning with 1/1/1900 as day 1)
• Year
• Month
• Day
• Rainfall (in 1/100ths of an inch)
Roof Area:
Horizontal footprint of the roof area contributing runoff to the cistern
Capture Factor:
This factor represents the ratio of rainfall depth that is captured by cistern.
Research from USARS suggests a ratio of 0.9, the model’s default value. Research at
NCSU has shown that this factor can be dramatically reduced if gutters aren’t kept free
of leaves or an inlet filter on the cistern restricts flow.
City:
Selecting a city from the list loads the default values for water cost and nitrogen
concentration.
Water Cost:
The cost of a gallon of water from municipal sources
Nitrogen Concentration:
The typical concentration of nitrate and ammonia in rooftop effluent
First Flush Depth:
Depth of rainfall containing the most polluted runoff. Values vary by region, but
typically range from 0.5” to 1.5”
Cistern Size:
Cistern volume in gallons
Cistern Cost:
The cost of the rainwater harvesting system and installation
Table 1: Example cost estimates for a variety of cisterns
Cistern Volume
Plastic
Metal
100 gallons
$300
-500 gallons
$500
$1400
1,000 gallons
$900
$2200
5,000 gallons
$2100
$5200
10,000 gallons
$5000
$7700
Water Usage
Importance of Water Usage Information:
In order for the model to closely simulate the performance of a rainwater
harvesting system, accurate water usage data is essential. Ideally, water usage
measurements should be collected at the location where the rainwater harvesting
system will be installed. These usage estimations can be collected with a variety of
inexpensive flow metering devices.
Table 2: Typical water usage that could be replaced with harvested rainwater
Usage
Frequency
Volume
Irrigating Established Lawn
Once per week
62 gal. / 100 ft²
Home Car Wash
-50 – 100 gal.
Professional Car Wash
-~ 20 gal.
Daily Usage:
Gallons per day that are used consistently on a day-to-day basis
Seasonal Usage:
Gallons per day evaluated each week during the specified months
Toilet Usage:
Estimated toilet usage based upon 5 uses per individual per day
Weekend Usage:
If checked, the model will include toilet usage during all 7 days of a week
Outputs
Total Volume Captured:
Percentage of total runoff volume the cistern was able to capture without
overflow
Usage Replaced:
Percentage of total water demand that the cistern was able to supply
Note: The total volume captured and usage replaced serve as quick indicators of how
well the cistern performs with regards to water quality and water supply
Annual Water Usage:
Average amount of water used from the cistern in a given year
Annual Water Savings:
Average amount of monetary savings from using the cistern to replace municipal
water supply
Overflow Frequency:
Percentage of rainfall events that resulted in overflow from the cistern
Dry Cistern Frequency:
Percentage of days when there was a water demand, but not enough water
stored in the cistern to meet that demand
First Flush Volume Captured:
Percentage of runoff volume associated with the first flush rainfall depth that the
cistern was able to capture without overflow
Annual Nitrogen Removed:
Weight of nitrogen removed from runoff, assuming that all nitrogen captured by
the cistern is removed via the cistern itself or subsequent water usage
Payback Period:
Number of years of water use required for total water savings to equal the cost of
the cistern
Model Assumptions
•
When calculating the daily water balance, the model first adds rainfall inputs, then
subtracts the daily water usage
•
Cost estimates are based upon local city water costs from 2005 and do not include
sewer costs, which are often based upon water usage
•
Calculation of pay return period is a simple calculation that does not account for
interest rates or changes in water cost over time
•
Total nitrogen captured by the cistern is assumed to be removed through
denitrification within the cistern or subsequent water usage. Denitrication within the
cistern may be minimal; however, using the water for toilet flushing or irrigation
effectively reduce or eliminate the nitrogen loading to surface waters.
Troubleshooting
•
•
Problem:
o I receive an error about the .NET Framework or the program won’t open
Solution:
o Check in the “add or remove programs” area of the windows control panel to
see if you have the .NET Framework installed. The .NET Framework is often
installed with windows updates, but can be manually installed from:
http://www.microsoft.com/downloads/details.aspx?familyid=0856eacb-4362-4b0d-8eddaab15c5e04f5&displaylang=en
•
•
•
•
•
•
Problem:
o I accidentally changed or deleted an input file
Solution:
o The input data files can be extracted and manually copied from the .zip file
located on the NCSU rainwater harvesting website
Problem:
o I receive an error when trying to save the output to a network folder
Solution:
o Currently, output files can only be saved to local drives and then copied to
network folders
Problem:
o My output values don’t seem reasonable
Solution:
o If using custom rainfall data, ensure that the input data file is in the correct
format
APPENDIX I
Pump Sizing Information for Cisterns
Choosing a Pump for Rainwater Harvesting
Introduction
Water harvesting is the practice of capturing rainwater runoff, normally from
a rooftop, and storing it in a tank or
cistern for use around a home or business. While gravity flow from a cistern
is generally enough to fill a bucket or
to water a few nearby plants, most water-harvesting systems require a pump
to convey the water from the holding
tank to the spot where it will be used
(Figure 1). Typical uses include watering plants, washing vehicles, flushing
toilets, and washing clothes. A pump
can increase the uses of the water-harvesting system and is required when
Cistern
Pressure
Tank
Distributed in furtherance
of the Acts of Congress of
May 8 and June 30, 1914.
North Carolina State University and North Carolina
A&T State University commit themselves to positive
action to secure equal
opportunity regardless of
race, color, creed, national
origin, religion, sex, age, or
disability. In addition, the
two Universities welcome
all persons without regard
to sexual orientation. North
Carolina State University,
North Carolina A&T State
University, U.S. Department
of Agriculture, and local
governments cooperating.
consistent pressure is needed. Knowledge
of how pumps operate and how they are
selected will ensure that an efficient and
appropriate pump is included in the water-harvesting system design.
Because pumps and plumbing systems are diverse, people installing water-harvesting systems should consult an
experienced plumber to make sure all applicable codes are met and that there will
be no damage to the pump or plumbing.
Pump selection should be based on the
flow and total head the pump is required
to supply. Flow is the rate at which water
travels through a pipe and often is measured in gallons per minute (gpm). Total
Motor
Intake
Pump
Figure 1. Pump with pressure tank before installation and example of system in use
head is a description of the energy required to move
the water and is typically expressed in feet of water or
pounds per square inch (psi). This publication reviews
the pump selection process and at the end provides a
sample calculation of flow and total head.
When properly configured, a rainwater-harvesting system delivers many benefits, including reduced
flooding, improved water quality, reduced demand on
a well or city water supply, and monetary savings. For
more information on water-harvesting systems, see
Permeable Pavements, Green Roofs, and Cisterns:
Stormwater Practices for Low Impact Development,
AG-588-06, part of the Urban Waterways series.
Pump Types
Pumps can be divided into two major categories:
positive displacement pumps and dynamic pumps.
Positive displacement pumps operate by mechanically moving water by means of the action of a gear
or piston and are able to produce high heads, but relatively low flows. They are generally used in hydraulic
systems and in a number of specialty applications.
Typical positive displacement pumps are piston and
rotary pumps.
Dynamic pumps provide a continuous flow by developing a high fluid velocity and are able to produce
high flows, but relatively lower heads. They are used
to satisfy most general pumping requirements and
typically require less maintenance than displacement
pumps. Typical dynamic pumps include centrifugal
and jet pumps.
A centrifugal pump is suitable for most water-harvesting applications because of its relative simplicity,
range of head and flows, and relative low cost. A centrifugal pump consists of a motor, pump casing, and
impeller (Figure 2). The pump casing holds the impeller and channels water to and from the impeller. The
impeller is a rotating vane structure that draws water
into the pump casing, transfers energy to the water,
and discharges it from the pump casing. The motor
supplies the energy needed to rotate the impeller. For
a specific pump casing, the motor and impeller often
can be sized to meet head and flow requirements.
When a pump is installed above a cistern, problems with priming the pump and maintaining the
prime arise. For this reason, either a submersible
pump should be installed toward the bottom of the
cistern, or a plumber should be consulted for specific
pump requirements.
Calculation of Pump Demand
Flow The flow for a pump system is determined by
adding the flows of all fixtures, such as toilets, washing machines, sprinklers, etc., that may draw water
from the cistern at the same time. For example, if a
lawn needs to be watered with an impact sprinkler and
a toilet is flushed while the sprinkler is running, the
flows should be added for both uses. Table 1 contains
typical flows for common fixtures. Specific flows for
many devices can be found in the product literature
and should be used in calculations when available.
Head The “head” required of the pump is deter-
mined by calculating the total dynamic head of the
system.
Equation 1. Total Dynamic Head (TDH)
TDH = hp + he + hf
TDH = total dynamic head (ft)
hp = operating head (pressure) required by fixture (ft)
he = h2 – h1 = elevation difference between pump and fixture (ft)
hf = friction loss in system (ft)
When the cistern feeds multiple fixtures, the total
dynamic head should be calculated independently for
each fixture. Because total dynamic head is not cumulative, the specifications for the fixture that demands
the most head should be used in pump selection.
Figure 2. Centrifugal pump
Table 1. Typical minimum requirements of common fixtures in water-harvesting.
Use
Pressure (ft)
Pressure (psi)
Flow
Impact sprinkler
93
40
4.5 gpm
Clothes washer
46
20
5 gpm
Pressure washer
46
20
4 gpm
Toilet
46
20
6 gpm
Garden hose nozzle
81
35
5 gpm
Figure 3. Graphic representation of the terms in Equation 1.
Pressure: hp The term “pressure” corresponds to
the pressure required at the outlet to operate whatever
device is being used. Typical minimum operating pressures for a number of devices are found in Table 1. For
specific pressure requirements, consult the product literature. Equation 2 can be used to convert pressures in
psi to feet of head. If the pressure selected is too low,
the pump may not provide an adequate flow to operate the device; on the other hand, if an extremely high
pressure is selected, it could damage seals and other
plumbing equipment. The 2002 North Carolina state
building code specifies that a water distribution system
should not leak when tested at 100 psi.
Equation 2: Pressure Conversion
Feet of Head = PSI x 2.31
Elevation: he The term “elevation” corresponds to
the vertical distance water must be lifted to reach the
location where it will be used. This distance is measured from the pump intake (h1) to the water outlet
(h2) (Figure 3).
Friction: hf “Friction” accounts for energy losses
associated with moving water through a plumbing
network. The primary components are energy loss due
to friction with the pipe walls and losses through elbows, valves, and other fittings. Manual calculation of
friction is a complex process; therefore, information
on typical friction losses for common pipe diameters
is included in Tables 2 and 3.
Friction loss due to pipe fittings can be calculated by using what is known as the equivalent length
method. Look up the equivalent pipe length for the
appropriate diameter of each fitting in Table 3. Add
the equivalent lengths for all fittings encountered
between the pump and the intended fixture for use in
Equation 3.
To calculate the friction loss within the pipe, first
find the friction factor (F100) that corresponds to the
flow and pipe diameter of the plumbing in Table 2.
Next, find the total linear distance of pipe that water
must travel from the pump to the intended fixture.
Use the calculated values in Equation 3 to determine
the total friction loss.
Tables for use in friction loss calculations
Table 2. Friction loss for every 100 linear feet of schedule 40 PVC pipe (units: feet of head).
Pipe Diameter (in.)
Q (gpm)
1/2
3/4
1
1 1/4
1 1/2
2
2 1/2
3
2
5.752
1.302
0.390
0.111
0.052
0.015
0.006
0.002
4
19.307
4.346
1.294
0.365
0.170
0.050
0.021
0.008
6
39.437
8.850
2.627
0.739
0.343
0.100
0.041
0.015
8
14.697
4.355
1.222
0.567
0.165
0.068
0.025
10
21.811
6.455
1.808
0.838
0.244
0.100
0.037
13.234
3.697
1.710
0.496
0.203
0.075
6.156
2.845
0.823
0.337
0.124
9.154
4.227
1.222
0.500
0.183
15
20
Excessive Velocities
25
Table 3. Equivalent length for pipe fittings (units: feet of pipe length).
Pipe Diameter (in.)
Fitting
1/2
3/4
1
1 1/4
1 1/2
2
2 1/2
3
90° Elbow
1.5
2.0
2.5
3.8
4.0
5.7
6.9
7.9
45° Elbow
0.8
1.1
1.4
1.8
2.1
2.6
3.1
4.0
Open Gate Valve
0.3
0.4
0.6
0.8
1.0
1.5
2.0
3.0
Tee – Straight Flow
1.0
1.4
1.7
2.3
2.7
4.3
5.1
6.2
Tee – Branch Flow
4.0
5.0
6.0
7.0
8.0
12.0
15.0
16.0
(Tables 2 and 3 adapted from www.engineeringtoolbox.com)
How to Select a Specific Pump
Equation 3. Friction loss in system
hf = [ (LP + LF) / 100 ] x F100
Fp: Friction head loss (ft)
LP: Linear length of pipe (ft)
LF: Equivalent length for pipe fittings (ft)
F100: Friction loss per 100 feet of pipe from Table 2 (ft)
If the calculated friction loss is very high, it may be
necessary to consider using pipes of larger diameter
to prevent damage to the pump or plumbing system.
A rule of thumb is to limit the water velocity in the
pipes to 7.5 feet per second or less. If water will
be pumped through a filter, the head loss through
the filter should be included with the friction term.
Because head loss due to filtration varies depending
on the type of filter being used and the flow rate, the
filter product literature must be consulted for specific head losses.
Once the required flow and total dynamic head are
determined, a pump vendor can be consulted for
information on specific pumps that are best suited for
system demand. If a designer wishes to select his/her
own pump or to understand why a vendor recommends a specific pump, knowledge of “pump curves”
is required (Figure 4). A pump curve provides a
description of pump performance and can be obtained
from a pump manufacturer or vendor.
While the publication of pump curves varies,
depending on the source, the most common curve is
the head/flow curve. This curve illustrates what flow
the pump will supply for a given head requirement.
The pump is designed to operate at a point somewhere along this curve. It is important that the target
head and flow lie either on or below this curve. If the
target head and flow lie above and to the right of this
curve, the pump will not be able to supply enough
water to meet design requirements. For best overall efficiency, the target discharge should be in the
middle third of the curve.
Figure 4. Example of a pump curve with 2 impeller options.
disengage when no water is being used.
Pump Accessories
Check valve – The internal check valve prevents
Depending on the water-harvesting application, some
pump accessories may be needed. Consult a pump
vendor to determine which accessories are necessary
and compatible with a specific pump.
water from flowing back through the pump when it is
not running. Some pumps do not have these valves.
Consult a pump vendor or plumber to determine if additional check valves are needed.
Pressure tank – The tank stores pressurized water
Float level switch – This switch, when installed in
to prevent the pump from cycling on and off to meet
small demands; it also supplies a constant pressure.
Pressure switch –This device engages the pump
when a pressure drop is observed and disengages it
when there is no demand. For example, the pump will
engage to supply water when a faucet is opened and
disengage when no water is being used.
the cistern, can prevent damage to the pump by disengaging the pump when the cistern runs dry or cistern
water falls below a predetermined level.
Throttling valve – This device is intended to control
the flow and pressure of water exiting the pump and is
typically in the form of a gate valve. Special control
systems can be installed to maintain a constant output
despite changing water levels within a cistern.
Example: Choosing a pump for a water-harvesting system
An aboveground water-harvesting cistern is installed
at a home in coastal North Carolina. The cistern will
be used to flush a toilet on the second floor of the
home and to run an impact sprinkler for the lawn. All
pipes in this example are ¾ inches in diameter. Select
a pump that meets the needs shown in Figure 5.
Figure 5. Example of a simple water-harvesting system.
Required Flow
From Table 1*, the required flow is 6 gpm for the
toilet and 4.5 gpm for the impact sprinkler. It may be
necessary to operate both fixtures at the same time;
therefore:
Total Peak Flow = 6 gpm + 4.5 gpm = 10.5 gpm
Required Total Dynamic Head
Impact Sprinkler
he = h2-h1 = 0 ft (from Figure 5)
hp = 93 ft (Table 1)
Friction
LF = 1.4 ft (3/4” Tee – Straight Flow, Table 3)
LP = 30 + 60 = 90 ft (Adding lengths of pipe segments)
Because there are 2 fixtures for this system, the
required total dynamic head for each fixture must be
calculated independently.
Toilet
Because the impact sprinkler has a higher head requirement than the toilet, the impact sprinkler head
value will be used for the pump design.
Two pump curves are shown in Figure 6. Find the
design point by locating the intersection of the required head and flow, denoted by the “x” in the graph.
Notice that the design point lies above the curve for
the 4.5” impeller; therefore, that impeller size will not
meet the system demand. The design point lies below
the curve for the 6” impeller, indicating the 6” impeller will provide an adequate water supply. Because
the 6” impeller can supply the required head and flow,
this pump will satisfy the demands of this water-harvesting system.
he = h2-h1 = 12 ft (from Figure 5)
hp = 46 ft (Table 1)
Friction
LF = 5.0 (3/4” Tee – Branch Flow, Table 3) + 2.0 (3/4” 90° Elbow, Table 3) = 7.0 ft
LP = 30 + 12 + 3 = 45 ft (Adding lengths of pipe segments)
hf = [ (45 + 7.0) / 100 ] x 8.85 (Friction factor for ¾” pipe at 6 gpm , Table 2) = 4.6 (Equation 3)
Total Head Requirement = 12 + 46 + 4.6 = 62.6 ft (Equation 2)
*Sources for numbers are noted by blue italics.
hf = [ (90 + 1.4) / 100 ] x 8.85 = 8.1 (Equation 3)
Total Head Requirement = 0 + 93 + 8.1 = 101 ft (Equation 2)
Figure 6. The pump’s design point is at “x,” the intersection of the required head and flow.
Internet Resources
2002 North Carolina State Building Code
http://www.ncdoi.comOSFM/Engineering/engineering_home.asp
Engineering Tool Box
www.engineeringtoolbox.com
North Carolina State University —
Biological and Agricultural Engineering Stormwater Group
www.bae.ncsu.edu/stormwater
State of North Carolina Stormwater Home Page
www.ncstormwater.org
Texas A&M Rainwater Harvesting
http://rainwaterharvesting.tamu.edu/
Urban Waterways series: Permeable Pavement, Green Roofs, and Cisterns:
Stormwater Practices for Low Impact Development, AG-588-06
http://www.bae.ncsu.edu/stormwater/Publication Files/BMPs4LID.pdf
Water Harvesting at North Carolina State University
www.bae.ncsu.edu/topic/waterharvesting
Prepared by
Matthew P. Jones, E.I.
and
William F. Hunt, P.E., Ph.D.
Biological and Agricultural Engineering
North Carolina State University
Copyright © 2006 by North Carolina State University
Published by
NORTH CAROLINA COOPERATIVE EXTENSION SERVICE
NC STATE UNIVERSITY
AG-588-08
E07 45836
10/06—JL
APPENDIX J
Nomograph For Use In Solving The Manning Equation For Trapezoidal Channels
From the Draft Iowa Stormwater Management Manual (www.ctre.iastate.edu/PUBS/stormwater/)
Trapezoidal solution nomograph. The trapezoidal channel nomograph solution to Manning’s
equation in Figure 10 can be used to find the depth of flow if the design discharge is known or
the design discharge if the depth of flow is known:
a. Determine input data, including slope in feet per feet, Manning’s n value, bottom width in
feet, and side slope in feet per feet.
b. Given the design discharge, do the following:
1) Find the product of Q times n, connect a line from the slope scale to the Qn scale, and
find the point of intersection on the turning line.
2) Connect a line from the turning point from Step b1 to the b scale, and find the
intersection with the z=0 scale.
3) Project horizontally from the point located in Step b1 to the appropriate z value, and find
the value of d/b.
4) Multiply the value of d/b obtained in Step b3 by the bottom width b to find the depth of
uniform flow, d.
c. Given the depth of flow, do the following:
1) Find the ratio d divided by b, and project a horizontal line from the d/b ratio at the
appropriate side slope, z, to the z=0 scale.
2) Connect a line from the point located in Step c1 to the b scale and find the intersection
with the turning line.
3) Connect a line from the point located in Step c2 to the slope scale and find the
intersection with the Qn scale.
4) Divide the value of Qn obtained in Step c3 by the n value to find the design discharge, Q.