1
RoboRemo User Manual v1.8
Table of Contents
General Description...................................................................................................................................3
Bluetooth / WiFi / Ethernet modules..........................................................................................................4
Available interface items............................................................................................................................7
Building the interface.................................................................................................................................9
Common edit options...............................................................................................................................10
Button edit options...................................................................................................................................10
Local actions............................................................................................................................................11
Slider edit options....................................................................................................................................12
Led edit options........................................................................................................................................13
Led examples...........................................................................................................................................13
Level indicator edit options......................................................................................................................14
Text log edit options.................................................................................................................................14
Accelerometer edit options......................................................................................................................14
Text field edit options...............................................................................................................................15
Plot edit options.......................................................................................................................................15
Image edit options....................................................................................................................................16
Touchpad edit options..............................................................................................................................17
Kbd connector edit options......................................................................................................................18
Kbd connector examples..........................................................................................................................18
Heartbeat sender edit options...................................................................................................................19
Touch stopper edit options.......................................................................................................................19
Menu options............................................................................................................................................20
RFCOMM settings...................................................................................................................................21
Interface menu options.............................................................................................................................21
New features and fixed bugs....................................................................................................................22
2
General Description
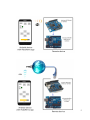
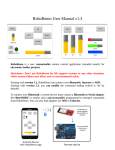
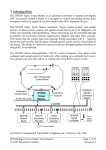
RoboRemo is a user customizable remote control application intended mainly for
electronics hobby projects. RoboRemo can connect over Bluetooth (RFCOMM),
Internet or WiFi (TCP).
Disclaimer: Don't use RoboRemo for life support systems or any other
situations where system failure may affect user or environmental safety. Please
don't use RoboRemo in projects where high-level security is required.
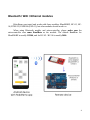
To connect over Bluetooth, a remote device must contain a Bluetooth to Serial
adapter like BlueSMiRF, BTM-222, HC-05, HC-06, etc. and a microcontroller
programmed to interpret commands from RoboRemo. You can also find adapters for
Wifi or Ethernet.
All the commands from RoboRemo are text strings, ending with command
ending which is LF character '\n' (hex code 0x0A) by default, but user can change it.
For example if you configure a button to send “abc” when pressed, it will send “abc\n”
if command ending is '\n' or it will send “abcqwerty123” if command ending is
“qwerty123”. The command ending is used by the microcontroller program to know
where each command ends.
RoboRemo also can receive commands for updating some interface items (for
example you can have a battery level indicator to monitor the battery level of the remote
device). These input commands also must end with command ending.
It is not recommended to set command ending to empty string, because receiving
commands from microcontroller to app will not work properly. (App “will think” that
command ends after each received character). However the commands from app to
microcontroller will be sent as expected (a button configured to send “abc” will send
“abc”).
3
Bluetooth / WiFi / Ethernet modules
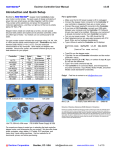
RoboRemo was tested and works with these modules: BlueSMiRF, HC-05, HC06, BTM-222, ESP8266 (ESP-01), but other modules should work too.
When using Bluetooth module and microcontroller, please make sure the
microcontroller uses same BaudRate as the module. The default BaudRate for
BlueSMiRF is usually 115200, and for HC-05 / HC-06 is usually 9600.
4
5
6
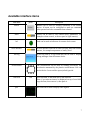
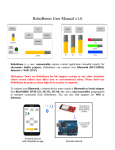
Available interface items
item name
photo
description
button
Buttons can be used for sending commands to the remote
device. A button can be configured to send one command
when pressed and other command when released.
slider
Sliders can be used to vary remote device parameters, for
example volume control, or motor speed or light intensity.
led
Leds can be used as indicators for remote device states.
level indicator
A level indicator item can be used to display data from remote
sensors, for example temperature or battery level.
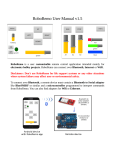
text log
A text log item is a log screen that can be used to display
debug messages from the remote device.
accelerometer
The accelerometer can be used for sending periodically the
acceleration measured by the phone's accelerometer. You can
set the ids the 3 axes and the repeat (refresh) period.
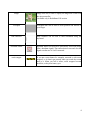
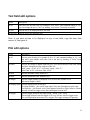
text field
plot
text
Text field item, to add some text to the interface.
Note: if you want an item to be displayed on top of text field,
copy the item, then remove it, then paste it.
Plot item can be used to display some signals.
7
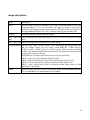
image*
Image item can be used to display an image that is sent from
the microcontroller.
*available only in RoboRemo Full version
touchpad
Touchpad item can be used to send position and motion of
your finger.
kbd connector
Kbd connector can be used to send commands using the
keyboard.
heartbeat sender
heartbeat sender can be used to periodically send some string
(like a heartbeat signal). The remote device can watch for this
signal to make sure it is still connected.
touch stopper
If you put a reset button for example, surround it with touch
stoppers, so it doesn't get pressed when you touch the screen
near to it. When you exit ui editor, touch stoppers become
invisible, so they don't annoy you.
8
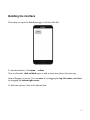
Building the interface
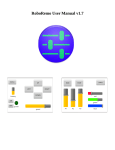
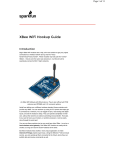
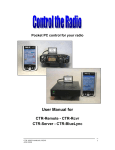
First when you open the RoboRemo app, it will look like this:
To edit the interface, click menu → edit ui.
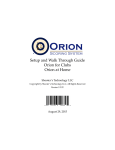
Now in edit mode, click on blank space to add an item, then choose the item type.
Item will appear on screen. You can move it by dragging the top left corner, and resize
by dragging the bottom right corner.
To edit item options, click on the desired item.
9
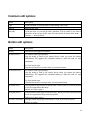
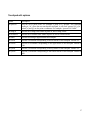
Common edit options
option
description
copy
Copies the item so you can paste it when adding a new item.
remove
Removes the item.
lock edit
Locks the item, so you can not edit it anymore. This is useful if you want to
add other items on top of this item. You can unlock all items from menu →
interface → unlock edit all.
Button edit options
option
description
set text
Sets the text that appears on button.
set press action
For remote action type (default):
Sets the string to send to the remote device when you press the button.
(RoboRemo will append the command ending to mark the end for each
command).
For local action type:
Sets the local action to execute when you press the button.
set release action
For remote action type (default):
Sets the string to send to the remote device when you release the button.
(RoboRemo will append the command ending to mark the end for each
command).
For local action type:
Sets the local action to execute when you release the button.
set repeat delay
Sets the button repeat delay in milliseconds. When you hold a button pressed,
it will first repeat after this delay.
Default is 0 (don't repeat)
set repeat period
Sets the button repeat period in milliseconds. When you hold a button pressed,
it will first repeat after delay, then after period.
Default is 0 (don't repeat)
set local / set remote
Changes button action type from remote to local, from local to remote.
Default is remote.
10
Local actions
action
description
“iface n” or “interface n”
select the nth interface. (n from 0 to 7)
“echo abc”
will simulate the receiving of “abc” command.
“disconnect”
disconnect from the remote device
“connect rfcomm 11:22:33:44:55:66 1” or
“connect rfcomm 112233445566 1”
connect over Bluetooth RFCOMM to the remote
device with address 11:22:33:44:55:66 and port 1.
“connect rfcomm e 112233445566 1”
Also use encryption.
“connect rfcomm 112233445566 d”
Connect using the default UUID
“connect rfcomm 112233445566 f”
Connect using the first UUID
“connect tcp 192.168.0.5:9876”
conect over tcp/ip to the remote device with
ip 192.168.0.5 and port 9876.
11
Slider edit options
option
description
set id
Sets the slider id string. For example if id is “s1” and you move the slider to
the value 100 and command ending is “\n”, it will send “s1 100\n” (id followed
by space followed by value followed by command ending).
set label
Sets the text string to appear under the slider. You can use the slider value
inside the label. Examples for slider with value 100:
label “speed = #*0.1” will show “speed = 10.0”
label “x = #*-5+10 cm” will show “x = -490 cm”
set min
Sets the minimum value, default is 0.
set max
Sets the maximum value, default is 255.
send when moved / Sets the slider send mode, default mode it to send when released.
send when released
set color
Sets the slider color.
send space /
don't send space
Select if you want the slider to send space character after id or not.
auto return /
don't auto return
Select if you want the slider to return to its center when released or not.
set return value
Set the return value to be used for auto return when released. You can enter an
integer, or min/mid/max. Default is mid.
set repeat period
Set the repeat period (in ms) for slider. 0 = don't repeat (default).
When repeat enabled, the slider will also send its data periodically, in addition
to normal operation.
12
Led edit options
option
description
set id
Sets the led id string.
set on command
Sets the led on command, default is “1”.
set off command
Sets the led off command, default is “0”.
set label
Sets the text string to appear under the led
set color
Sets the led color.
set on timeout
Set the timeout after which led will turn off if it does not receive on command.
You can program your remote device to periodically send a command to turn on
an led, and set the on timeout so that you will see the led will turn off if the
connection is lost.
set off timeout
Set the timeout after which led will turn on if it does not receive off command.
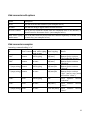
Led examples
Led id
led
ledA
ledB
Led on command
1
on
#>=10
Led off command
0
off
#<10
Interface command ending
\n
;
ok
To turn the led on,
microcontroller must send
led 1\n
ledA on;
ledB 10ok
or
ledB 11ok
etc.
To turn the led off,
microcontroller must send
led 0\n
ledA off;
ledB 9ok
or
ledB 8ok
etc.
13
Level indicator edit options
option
description
set id
Sets the level indicator id string. For example if id is “batt” and command ending is “\n”,
you can set its level to 100 by sending “batt 100\n” from microcontroller.
set label
Sets the text string to appear under the level indicator. You can use the level indicator
value inside the label. Examples for level indicator with value 100:
label “temp. = #*0.5-10 °C” will show “temp. = 40.0 °C”
label “batt. #*1%” will show “batt. 100%”
set min
Sets the minimum value, default is 0.
set max
Sets the maximum value, default is 255.
set color
Sets the level indicator color.
Text log edit options
option
description
set id
Sets the text log id string. For example if id is “dbg” and command ending is “\n”, you
can append the message “qwerty” to the text log by sending “dbg qwerty\n” from
microcontroller.
set label
Sets the text string to appear under the text log.
set text size Sets the font size for the text.
Accelerometer edit options
option
description
set x id
Sets the id for x axis. Accelerometer will periodically send the id followed by a
space character (or not), followed by a floating point number representing the
acceleration on that axis. You can disable an axis by setting the id to empty string.
set y id
Sets the id for y axis.
set z id
Sets the id for z axis.
set repeat period Sets the repeat (refresh) period in ms for accelerometer. Default is 20.
send space /
Select if you want the accelerometer to send space character after ids or not.
don't send space
14
Text field edit options
option
description
set id
Sets the id for the text field. For example if id is “text1” and command ending is “\n”,
you can change the text to “abc” by sending “text1 abc\n” from microcontroller.
set text
Sets the text to be displayed inside text field
set text size
Sets the size of the displayed text
Note: if you want an item to be displayed on top of text field, copy the item, then
remove it, then paste it.
Plot edit options
option
description
set id
Sets the plot id string. For example if id is “x” and command ending is “\n”, you
can add a new sample with value 100 to the plot by sending “x 100\n” from
microcontroller.
set label
Sets the text string to appear under the plot. You can use the plot's last value inside
the label. Examples for plot with last value 100:
label “temp. = #*0.5-10 °C” will show “temp. = 40.0 °C”
label “batt. #*1%” will show “batt. 100%”
set min
Sets the minimum value, default is 0.
set max
Sets the maximum value, default is 255.
set length
Sets the length (number of samples) to fit in one frame, default is 256.
Maximum length is 10000.
set display mode Sets the display mode for the plot.
Scrolling (default) – plot scrolls from right to left, new data appears on the right.
Oscilloscope – plot doesn't scroll. Data appears from left to right. When it reaches
the end, it waits for trigger event, then starts again from the left.
set trigger
Sets the trigger threshold and edge (rising / falling / both / none).
If none edge selected, then the trigger is off, so it will not wait for trigger event.
For scrolling display mode there is no trigger (The trigger settings are ignored).
15
Image edit options
option
description
set id
Sets the image id string. For example if id is “img” and image format is “auto” and
command ending is “\n”, you can display an image by sending “img [len]\n”
followed by the image data from microcontroller. [len] must be the size in Bytes of
the image data that follows. The “auto” format accepts jpg, png and bmp data.
set label
Sets the text string to appear under the image.
keep / don't keep Sets if the image should keep the original w/h ratio, or should it fill the entire image
ratio
item.
filter / don't filter Sets if the image should be filtered or not when scaled.
set image format Sets the image format. Default format is “auto” and accepts jpg, png and bmp data.
For raw image format, you can choose “RGB_888(w,h)”, “GRAY_8(w,h)”,
“GRAY_4(w,h)”, “GRAY_2(w,h)” or “GRAY_1(w,h)”, where you have to replace
w and h with numbers (width and height in pixels). The pixels are scaned from left
to right, lines from top to bottom.
RGB_888 uses 3 bytes per pixel (the levels for red, green and blue).
GRAY_8 uses 1 byte per pixel (has 256 gray levels).
GRAY_4 uses 4 bits per pixel (1 byte for 2 pixels) and has 16 gray levels.
GRAY_2 uses 2 bits per pixel (1 byte for 4 pixels) and has 4 gray levels.
GRAY_1 uses 1 bit per pixel (1 byte for 8 pixels) and has 2 gray levels (0 is full
black and 1 is full white)
import
Import an image from the SD card. The image is stored in the RoboRemo interface.
It is recommended to use small images (up to 100KB).
16
Touchpad edit options
option
description
set press id
Sets the id for press event. For example if press id is “pressed” and command
ending is “\n”, when the user touches the touchpad, it will send “pressed [x] [y]\n”,
where [x] and [y] are the point coordinates. For example: “pressed 316 244\n”
set drag id
Sets the id for drag event. Same as press id, but for drag events.
set release id
Sets the id for release event. Same as press id, but for release events.
set label
Sets the text string to appear under the touchpad.
set x min
Sets the x coordinate coresponding to the left border of the touchpad. Default is 0.
set x max
Sets the x coordinate coresponding to the right border of the touchpad. Default is
640.
set y min
Sets the y coordinate coresponding to the top border of the touchpad. Default is 0.
set y max
Sets the y coordinate coresponding to the bottom border of the touchpad. Default is
480.
17
Kbd connector edit options
option
description
set id
Sets the id for the kbd connector. (see examples below)
set label
Sets the text string to appear under the kbd connector..
set local / remote
Sets if the kbd connector should send the commands back to the interface, or
should it send to the remote device. (see examples below)
send while typing / Sets if the kbd connector should send each character separately or should it wait
send at enter
for enter key. (see examples below)
Kbd connector examples
Assuming command ending is “\n”
id
local / remote send while typing / user is typing
send at enter
Result
“kbd”
remote
while typing
ab[enter]
Remote device receives:
“kbd a\nkbd b\n kbd \n\n”
“kbd”
remote
at enter
ab[enter]
Remote device receives:
“kbd ab\n”
“” (empty string) remote
while typing
ab[enter]cde
Remote device receives:
“ab\ncde”
“” (empty string) remote
at enter
ab[enter]cde
Remote device receives:
“ab\n” (and at next [enter]
will receive “cde\n”)
“echo”
local
while typing
abc
Local interface
“a\nb\nc\n”
receives
“echo”
local
at enter
abc[enter]
Local interface
“abc\n”
receives
“” (empty string) local
at enter
echo abc[enter]
Local interface
“abc\n”
receives
18
Heartbeat sender edit options
option
description
set id
Sets the string that will be sent periodically to the remote device.
set label
Sets the text string to appear under the item.
set repeat period
Sets the time interval (in ms) at which the heartbeat signal should be sent.
Default is 1000.
Touch stopper edit options
Touch stopper does not have any special edit options.
19
Menu options
option
description
connect / disconnect
Connects to a remote device / disconnects from a remote device. To connect
to a Bluetooth remote device, it has to be paired. To pair with a Bluetooth
device, open Android settings → Bluetooth → search for devices. Pin code
for Bluetooth to serial adapter is usually “1234” or “0000”. Select port 1 (if
port selection is set to manual from RFCOMM settings).
To connect over internet or WiFi, data connection or WiFi has to be
activated from Android settings. Then in RoboRemo app choose menu →
connect → internet and select the ip and port. You can also use the domain
name instead of ip.
edit ui / don't edit ui
Enters / exits the interface edit mode.
interface
Opens interface menu.
help
Shows help link.
about
Shows info about the app.
undo
Undo the last modification in the current interface.
enable / disable
autoconnect
Enables / disables the auto connect option. If enabled, the app will try to
connect to the last connected device at next app start, if the user did not
select disconnect before closing app. (App disconnects automatically when
closed).
lock / unlock autorotate Locks / unlocks the screen autorotate function for the app.
keep / don't keep screen Used to disable the automatic screen lock.
on
set char delay
Slow microcontrollers need time to process each character received over
serial port. You can set the char delay so that RoboRemo will wait after each
character sent.
RFCOMM settings
Change RFCOMM settings. RFCOMM is the name for the Bluetooth Serial
protocol. Default settings are: automatic port selection, without encryption.
20
RFCOMM settings
port (channel) selection manual = will ask each time
fixed(1) = will use port 1
auto = will select automatically
UUID (for automatic)
Used only if port selection = auto. Ignored otherwise.
default = use the well known UUID for Bluetooth to Serial modules, which
is 00001101-0000-1000-8000-00805F9B34FB
first = use first UUID of the remote device, from the local cache
encrypted
Use / don't use encryption.
Note: Some devices may fail to connect with certain settings. In this case it is
recommended to try different settings.
Interface menu options
option
description
select
Select other interface. RoboRemo has 8 interfaces, numbered 0 to 7.
rename
Rename the current interface.
set connect action
Set a command string to be send to the remote devices after connecting.
set command ending
Change the command ending for the current interface. The default is “\n”.
Command ending can also be set to empty string, but it is not recommended.
import
Import an interface from file. Interfaces are stored in the roboremo folder on
the SD card. The folder is created automatically at first app start.
export
Export the current interface to a file. Interfaces are stored in the roboremo
folder on the SD card. The folder is created automatically at first app start.
unlock edit all
Unlock all items that were locked with lock edit.
clear
Clear the current interface.
21
New features and fixed bugs
App. version New features
Fixed bugs
1.2
- accelerometer support
N/A
- Internet / WiFi connectivity
- option for sliders to return to center when
released.
1.3
- option to change command ending
- string inputs from user are interpreted for
escape characters ('\t', '\b', '\n', '\r','\f'). For '\'
character, enter '\\'.
- fixed interface import / export for
interfaces with non-ASCII characters.
- fixed text wrapping and auto
scrolling when resizing text logs.
1.4
- local action “interface n” same as “iface n”
where n is the interface number (0 to 7)
- auto connect option
- local actions for connecting and
disconnecting by pressing buttons.
- removed ”exit” from menu (app can be closed
by pressing back key).
- fixed the bug with “\r\n” string in
interfaces.
- fixed a bug where app crashed if n
was not an integer in “iface n” or
“interface n” local action.
1.5
- option to use the slider or level indicator
value inside their labels
- made slider with "send when moved" send
only when the value changes
- option to change on and off commands for
leds
- removed the dialog showing error when
sending a non-integer value to a level indicator
- undo option in interface editor.
- fixed a bug in processing received
commands. Now if there are more
items with same id, all of them will
respond to it.
1.6
- added option to set repeat period for sliders
- added text fields
- added plots
- improved touch processing algorithm so that
it will send touch events only to interactive
items (now you can have buttons / sliders
hidden under leds, plots, etc)
- added menu option to change RFCOMM
settings
- fixed a bug in sliders where slider
with auto return enabled did not send
data when it was the same value as
before return.
1.7
- added option to set text size for text fields and
text logs
- added option to set id for text field so that
user can change the text remotely
- when command ending is empty
string, do not apend “\n” at the end in
text logs
- fixed a bug where autoconnect
22
- added image item in RoboRemo Full version
- reduced TCP connect timeout from 90000ms
to 5000ms
- improved menus (now they are scrollable)
- added touchpad item
- added option to keep screen on
- added kbd connector item
1.8
dialog could not be cancelled after
screen orientation change
- interface → clear now also resets the
command ending and connect action
- added item option to lock edit and interface
option to unlock edit all
- added option to set return value for slider
- added option to set led on/off timeout
- added option to import image from SD card
and store it in RoboRemo interface
- added items: heartbeat sender, touch stopper
- changed default RFCOMM settings to
automatic port selection
- added option to start a TCP server
- can connect to domain name
- added option to use plot's last value inside the
label
23