1
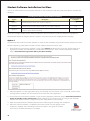
www.insideng.com
www.hbedge.net
Online Coach®
I M P L E M E N TAT I O N G U I D E
Contents
About Implementing Inside and Edge Online Coach ........................................... 1
Implementation Timeline ................................................................................................ 2
Completing the District Import File............................................................................. 3
Headsets ................................................................................................................................ 5
Installing the Online Coach Student Software ........................................................ 6
Windows® Installation ......................................................................................... 7
Mac® Installation ................................................................................................16
Installing the Online Coach Libraries ....................................................................... 22
Windows® Installation .......................................................................................23
Mac® Installation ................................................................................................24
Administrator and Teacher Access ............................................................................ 27
Confirming Account Activation ................................................................................. 28
Preparing Participants ................................................................................................... 30
Providing Local Support ............................................................................................... 33
Appendices & Tables
Appendix A: Firewall Rules and Proxy Server Settings...............................34
Appendix B: Fonts...............................................................................................35
Table A: Ordering Information ........................................................................36
Table B: Minimum System Requirements .....................................................36
Table C: Contact Information ..........................................................................37
About Implementing Inside and Edge Online Coach
In this starter guide, you will find detailed instructions for implementing Inside and Edge Online Coach from
National Geographic School Publishing (NGSP). Online Coach provides high-interest materials and a supportive
reading environment to help striving readers practice in a safe environment. The program also provides
structured support and motivation to engage students as they build reading power. The associated teacher
website allows educators to manage class rosters and review performance results.
Each student using the Online Coach will need a computer connected to the Internet with the student or “client”
software installed. Students will also need headsets with built-in microphones. Participating educators will access
the teacher website to manage student settings and assignments, view performance reports, and access online
archives of student audio recordings.
Inside and Edge are proficiency-based reading programs. Inside Online Coach supports middle school students,
placed in one of three reading-proficiency levels, C, D, or E. Edge Online Coach supports high school students
placed in one of three reading-proficiency levels A, B, or C. (Note: Online Coach is not intended for students with
reading grade levels below 3.0.)
All students require an Inside or Edge reading level in order to use the Online Coach. Districts may load reading
levels into the system in one of four ways:
1. Populate the Inside or Edge Level field in the district import file
2. Populate the Reading Grade Level field in the district import file; the system will translate these values into
Inside or Edge reading levels
3. Input via the teacher website
4. Assign the Placement Test through Inside or Edge eAssessment; the system will assign the student’s level
based on their test score
Online Coach uses a set of True Type fonts, usually present on standard operating systems. When these standard
fonts are unavailable, the Online Coach selects a default font that may not fit on the page. If this occurs, refer to
the instructions in Appendix B to determine which fonts are missing and install them onto your workstation.
Inside & Edge Online Coach | 888-915-3276 | [email protected]
1
Implementation Timeline
It’s important to consider implementation before ordering Online Coach. For this reason, your NGSP Sales
Representative will provide Online Coach product and technical information to support your decision-making
process. We also recommend identifying a subscriber and technical contact in your district to coordinate
the implementation. Your subscriber contact will work with NGSP to coordinate the order and oversee local
implementation. Your technology contact will ensure site readiness by confirming hardware, software, and
connectivity for participating administrators, teachers, and students.
The following shows a recommended implementation timeline leading up to the first day of student use.
Implementation Timeline
Week 1: Ordering
• Order Online Coach
• Purchase headsets
Week 2: District Import
• Complete & submit district import template
• Announce Online Coach to participating schools & teachers
Week 3: Site Readiness
• Load software & confirm site readiness
• Schedule complimentary training
Week 4: Announcement
• Invite participating teachers to Online Coach training
Week 5: Activation
• Confirm import & account activation
• Prepare for training
Week 6: Training
• Teachers participate in hands-on training
Consider planning for these implementation tasks in the six weeks leading up to your
first test administration.
2
Completing the District Import File
Once National Geographic School Publishing receives your Online Coach order, our Customer Service
Representative will email a district import template to your subscriber contact. The district import template is
an Excel file with two main worksheets, one for administrator information and another for teacher and student
information. We recommend completing the template at least three weeks prior to account activation.
National Geographic School Publishing uses the import file to establish administrator and teacher log-ins, and to
set up class rosters. Information from the import file is also used to create online student records, which teachers
can edit via the teacher website. Finally, we use the student’s name and school to create a student log-in.
For consistency, it’s best to populate the district import template with information from your district’s student
information system (SIS). Larger districts with high mobility rates may want to arrange automated updates.
Smaller districts or single-site users may choose to load administrator and teacher information by way of the
district import template and hand-input student information. The following charts give character limits and
guidelines for each field in the district import template.
Administrator Worksheet
Field
Character
Limit
District Name*
50
Fill in as you would like the district name to display on reports
School Name*
50
Leave blank for District Administrators
First Name*
30
Fill in for all district and school administrators, who need to access Online
Coach
Middle Name
30
Fill in if needed for administrators with the same first and last name
Last Name*
40
Fill in for all district and school administrators, who need to access Online
Coach
Work eMail
Address*
7 min
255 max
Becomes the administrator’s Online Coach username and contact email
for NGSP tech support
Password*
5 min
20 max
Becomes the administrator’s Online Coach password
Coach IT User
n/a
Notes
Use “Y” for any user who needs access to installation and advanced IT
administration tools. Use “N” for regular administrative access.
* Required Field
Inside & Edge Online Coach | 888-915-3276 | [email protected]
3
Teacher & Student Worksheet
Field
Character
Limit
School Name*
50
Repeat for all students associated with the school
Teacher First
Name*
30
Repeat for all of the teacher’s students
Teacher Middle
Name
30
Repeat for all of the teacher’s students or leave blank if teacher’s name is
unique within the school
Teacher Last
Name*
40
Repeat for all of the teacher’s students
Teacher School
email Address*
255 max
Becomes the teacher’s Online Coach username and contact email for
NGSP tech support; repeat for all of the teacher’s students
Teacher
Password*
5 min
20 max
Becomes the teacher’s Online Coach password; repeat for all of the
teacher’s students
Group Name*
50
Class name, e.g., Period 1; repeat for each student in the class
Group
Description
70
e.g., Morning Class; repeat for each student in the class or leave blank
Course ID
25
Repeat for each student in the class or leave blank
Period
25
Repeat for each student in the class or leave blank
Student First
Name*
30
Student Middle
Name
30
Student Last
Name*
40
Student
Number*
10
Student ID
Student Birthday
n/a
Use the format: MM/DD/YYYY or leave blank
Student Gender
n/a
Use “F” for female or “M” for male
Student Grade*
n/a
For Inside, use 6, 7, 8, or 9
For Edge, use 8, 9, 10, 11, or 12
Reading Grade
Level
n/a
For Inside, use 3.0-6.0
For Edge, use 3.0-9.0
Edge / Inside
Level
n/a
For Inside, use C, D, or E
For Edge, use A, B, or C
* Required Field
4
7 min
Notes
Helpful for distinguishing students with the same first and last names
Headsets
Because Online Coach uses speech recognition technology, the audio quality greatly impacts the student’s
experience. National Geographic School Publishing has tested several microphone headsets for compatibility
with Online Coach. You can purchase the recommended model, Andrea Electronics Model NC-185, from NGSP.
Other compatible models are:
• Abeier Model ACL-109M (email your request to [email protected])
• Labtec Stereo 332, Axis 302 (call 800-732-3054)
You will need a USB adapter when using these headsets with a Mac® and some Windows® machines.
We will ship the Andrea Electronics USB Adapter along with your headset order. (For more information go to
www.andreaelectronics.com.)
Correct microphone connections and headset placement are essential for a clear audio signal. To use the adapter,
plug one end of the headphone cable into the USB adapter and plug the other end into the computer as shown.
Double-check that connections are secure and in the correct ports.
After installing the student software, you can test the headsets through the Online Coach application. Software
installation instructions are explained in the next section.
Inside & Edge Online Coach | 888-915-3276 | [email protected]
5
Installing the Online Coach Student Software
You can install the Online Coach student software on a Windows or Mac operating system. Many sites require
local administrator access to install software. Three installation methods are available, depending on the structure
of your site and network. The first two options require a separate installation on each student computer. These
options are best for sites with a small number of student computers or for sites with a moderate number of
student computers but no access to network tools.
The third option is an unattended installation that allows you to load the client software on multiple student
computers from a single location. This option requires network tools and is ideal for installing the software on
more than ten computers. NGSP Technical support is available to help you decide which installation method is
best suited for your site.
Installing the Online Coach Student Software
Option
Description
Number of Student
Computers
Option 1
Download and install on each student computer
1–2
Option 2
Download to a shared location; install on each student computer
3–10
Option 3
Unattended installation for network users
(requires WinINSTALL®, Altiris®, or Apple® Remote Desktop)
>10
To prepare for student software installation regardless of operating system and download method, follow these
steps.
1. Ensure each student computer has Internet access and meets the minimum system requirements shown in
Table B.
2. Make sure you have an Inside or Edge log-in with IT staff privileges.
3. Navigate to www.InsideNG.com or www.HBEdge.net and sign in using your IT staff username and password.
4. From the left-hand menu, select Manage Tests.
5. Next, select Download Software under Online Coach.
6. Select Windows or Mac. Then, refer to the instructions in the following sections to download and install the
Online Coach student software using the best option for your site.
6
Student Software Installation for Windows
Option 1
To complete this installation, you will download and install the Online Coach student software to each student
computer. Log into the teacher website and select the Windows operating system from the Online Coach
software download screen. Then,
1. On the Windows Workstation Client Installation screen, select Option 1. Record the server URL, district name,
and registration number. Then, click the hypertext link below the table: Download and Install the OLC
Client for Windows to this workstation.
2. In the file download dialog box, select Run. Download time will depend on your connection speed. When
the download is complete, you will see the self-extractor dialog box.
3. Select Setup in the self-extractor dialog box. When file extraction is complete, the InstallShield Wizard loads.
4. On the first screen of the InstallShield Wizard, click Next to install.
Inside & Edge Online Coach | 888-915-3276 | [email protected]
7
Student Software Installation, Windows cont’d.
5. In the customer information box, enter a user and school name and click Next. You will see the license
agreement.
NGSP Technical Support, 888-915-3276
6. Click Yes to accept the license agreement. You will be prompted for a destination folder.
7. The default destination folder for the program is C:\Program Files\Hampton-Brown\Online Coach. Click
Browse to look for a different destination folder. Or, if space is an issue, click Disk Space to review space
availability on another drive. After selecting a folder, click Next to continue.
8
8. You will be asked for a destination for student data, which includes audio recordings, library files, and
preferences. The default folder is C:\OnlineCoachData. Browse for a different folder or, click Next to continue.
9. On the next screen, input the server URL, district name, and registration number you saved in step 2. All fields
are case-sensitive.
Click Test to verify the connection. If the connection fails, check the information, your Internet connection,
and your local firewall or security settings. If you are still unable to connect, see Appendix A for Firewall and
Proxy Server Settings.
Once you verify the server connection, click Next to begin the installation.
When the installation is completed, the Online Coach icon will appear on the computer’s desktop. See
Confirming Account Activation in this guide to confirm your district’s student information is available.
Inside & Edge Online Coach | 888-915-3276 | [email protected]
9
Student Software Installation, Windows cont’d.
Option 2
The steps for installing the student software on each student computer from a shared location include three
main tasks: download and extract the Windows Client Installer; download the registration file; and install the
student software or client application. To download and extract the installer, log into the teacher website and
select the Windows operating system from the Online Coach software download screen. Then,
1. On the Windows Workstation Client Installation screen, select Option 2. Record the Server URL, District Name,
and Registration number. Then, click the hypertext link under Step 1: Download and Extract Windows
Client Installer to a Shared Location.
2. Click Save on the File Download dialog box. Choose a location from the Save As dialog box and click Save.
3. Locate and launch “Online Coach Shared Installer v4.1.exe” on your computer. From the Self-Extractor dialog
box, select a folder on your main drive or a drive shared by all target computers.
10
4. Click Unzip. The “Online Coach Shared Installer v4.1” folder will download to the specified location.
5. To download the registration file, return to your Windows Workstation Client Installation screen in your
browser and click the hypertext link for Step 2: Download the registration file to the Online Coach for
Windows installer folder.
6. When the Save As dialog box displays, navigate to your Online Coach Shared Installer v4.1 folder. Save the
registration file inside this folder.
For sites that do not have access to a shared drive, save the Online Coach Shared Installer v4.1 folder with
the registration file to a CD, thumb drive, or Zip drive. You can then copy the folder from this source to each
student computer.
7. To install the student software at each student computer, navigate to the Online Coach Shared Installer v4.1
folder. Double-click Setup.exe to load the InstallShield Wizard. Then, click Next.
8. Follow steps 5-10 in Option 1 to complete the installation on each student computer.
Inside & Edge Online Coach | 888-915-3276 | [email protected]
11
Student Software Installation, Windows cont’d
Option 3
Online Coach supports unattended (silent mode) installations on a Windows network. This method allows you to
remotely install the Online Coach software without physically visiting each student computer. It is recommended
for sites that have a large number of student computers and access to network tools such as WinINSTALL or
Altiris. To run the silent installer on Windows Vista®, the User Account Control (UAC) must be disabled. See your
Windows Vista documentation for instructions. The steps for this option include three main tasks:
• Download the Online Coach installer to one computer
• Create a silent installer on one computer
• Run the silent installer on the remaining student computers using a network tool
To download the coach installer to one computer, log into the teacher website and select the Windows
operating system from the Online Coach software download screen. Then,
1. On the Windows Workstation Client Installation screen, select the radio button for Option 2. Record the
server URL, district name, and registration number. Then, Select the link for Step 1: Download and Extract
Windows Client Installer to a Shared Location.
12
2. Click Save on the File Download dialog box. Choose a location from the Save As dialog box and click Save.
3. Locate and launch “Online Coach Shared Installer v4.1.exe” on your computer.
4. The Self-Extractor dialog box displays, prompting for a location to unzip the installation folder. Select your
root C drive. Then, click Unzip. The files will be extracted into the folder “C:\Online Online Coach Shared
Installer v4.1”.
5. Navigate to the C drive and rename the “Online Coach Shared Installer v4.1” folder to read hb installer.
6. Follow these steps to open the command prompt window and create the silent installer:
a. From the Windows Start menu, click Run.
b. The Run dialog box opens. In the Open field, type cmd and click OK.
Inside & Edge Online Coach | 888-915-3276 | [email protected]
13
Student Software Installation, Windows cont’d
c. A command prompt window appears. If you do not see C:\> in the window as shown, type C: and press
Enter.
d. Type cd hb installer and press Enter. Then, type: setup.exe /r /f1“c:\hb installer\setup.iss” and press
Enter. The silent installer will be saved in a file named “setup.iss”, in the “C:\HB Installer” folder and
InstallShield Wizard will open. Keep the command prompt window open as you follow the next steps.
7. Click Next in the InstallSheild Wizard. Enter your user and school name, and accept the License Agreement.
8. Choose the folder where you would like to install the program. The default folder is C:\Program Files\
Hampton-Brown\Online Coach. Keep in mind that this location will be set up on each student computer later
when you run the script file. Click Next to continue.
9. Choose a folder to store Online Coach data. The default folder is C:\OnlineCoachData. Student data includes
audio recordings, library files, and preferences. This location will be set up on each student computer when
you run the script file. Click Next to continue.
14
10. Enter the Server URL, District Name, and Registration number you saved at the beginning of Step 1 (fields are
case-sensitive).
11. To the right of the Server URL field, click Test to verify the computer is able to connect to the server. If the
connection fails, verify your information is entered correctly.
If so, ensure that your internet connection
is working and your local firewall or security settings allow access to the Server URL. If you are still unable to
connect, see Appendix A for firewall rules and proxy server settings.
12. Click Next to begin installation. When the client installation is completed, the Online Coach icon will appear
on your desktop. Close the command prompt window. Your silent installer entries are now saved in the file
“setup.iss”.
13. To run the silent installer using a network tool such as WinINSTALL or Altiris, copy the folder C:\HB Installer
to each student computer on your network. It is important that the folder is placed in the same location on
every computer.
14. Use the network tool to remotely run the silent installer script using the command setup.exe /s . The
installer will run on the student computers in the background. Depending on your network tool, you can run
installations for all student computers at once, or one at a time. Consult your network tool documentation for
instructions.
When the installation is completed, the Online Coach icon will appear on the computer’s desktop. See
Confirming Account Activation in this guide to confirm your district’s student information is available.
Inside & Edge Online Coach | 888-915-3276 | [email protected]
15
Student Software Installation for Macs
You can install the Online Coach student software on Mac computers with the same three options available for
Windows:
Installing the Online Coach Student Software
Option
Description
Number of Student
Computers
Option 1
Download and install on each student computer
1–2
Option 2
Download to a shared location; install on each student computer
3–10
Option 3
Unattended installation for network users
(requires Apple® Remote Desktop)
>10
If you have a large number of Mac student computers and would like to install the software using Option 2,
contact NGSP Technical Support. Option 3 requires a local area network and Apple Remote Desktop.
Option 1
To download and install the student software on each student computer, log into the teacher website and select
the Mac operating system from the Online Coach software download screen. Then,
1. On the Online Coach Client Installation screen, select Option 1. Record the server URL, district name, and
registration number. This information is needed later in the process. Then, click the hypertext link below
Step 1: Download the registration file to your Mac Desktop.
2. When prompted, save the registration file to your desktop. This file contains your server URL, district name,
and registration number. You will need this file to install the client application.
3. On the Online Coach Client Installation screen, click the hypertext link below Step 2: Download the Online
Coach for the Mac to this workstation. When prompted, save “Online Coach 4.1.dmg” to your desktop.
Double-click “Online Coach 4.1.dmg” to extract the Setup folder to your desktop.
4. Open the Setup folder and double-click the OLC Installer program to begin the installation.
5. When the client installation is completed, the Online Coach icon will appear on the
computer’s desktop. See Confirming Account Activation in this guide to confirm
your district’s student information is available.
16
Option 3
You can install the Online Coach software without physically visiting each student computer using Apple Remote
Desktop from a Mac OS X server. The following steps show how to perform unattended installs using Apple
Remote Desktop Management System 3. You can find detailed information about this system at www.apple.com.
The Online Coach client installer uses Apple’s native installer, which employs metapackages. The Online Coach
metapackage (mpkg) is placed in a disk image (dmg). More information about metapackages and disk images
can be found at http://developer.apple.com.
Before you begin, make sure Apple Remote Desktop is installed and configured on the Mac OS X server. Then,
turn on each target computer and verify that a compatible version of the Apple Remote Desktop Agent is
available. Configure the agent to accept file copies and installations from Apple Remote Desktop. You may need
to enable Remote Management and activate all options under “Sharing” in System Preferences. Consult your
Apple Remote Desktop documentation for more information. Target computers must be running during the
unattended installation.
There are three parts to the unattended installations using Apple Remote Desktop:
• Download the Online Coach installer and registration file onto the OS X server
• Copy the registration file to target computer desktops
• Install the Online Coach client to target computers
To download the Online Coach installer and registration file to the OS X server, log into the teacher website and
select the Mac operating system from the Online Coach software download screen. Then,
1. On the Online Coach Client Installation screen, select Option 1. Record the server URL, district name,
and registration number. This information is needed later in the process. Then, select the link for Step 1:
Download the registration file to your Mac Desktop.
Inside & Edge Online Coach | 888-915-3276 | [email protected]
17
Student Software Installation, Mac cont’d
2. When prompted, save the registration file to the OS X server. This file contains your server URL, district name,
and registration number.
3. On the Online Coach Client Installation screen, click the hypertext link below Step 2, Download the Online
Coach for the Mac to this workstation. When prompted, save “Online Coach 4.1.dmg” to the OS X server.
Double-click Online Coach 4.1.dmg to extract the Setup folder to the server.
4. Launch Remote Desktop on the OS X server and view the computers by selecting All Computers or ARD
Client List from the main menu.
5. Select the target computers. In this example, two student computers are targeted for remote installation.
Click the Copy button on the toolbar to open the Copy Items screen.
18
6. Drag and drop the net_reginfo.txt registration file from the desktop into the Items to Copy list.
Click the Copy button in the lower right corner of the screen to place the items in the current user’s desktop
folder.
The Task Status field will change to “Succeeded” each time Remote Desktop finishes copying the registration
file to a computer. When the status changes to “Succeeded” for all computers, this step is complete.
7. To begin installing the Online Coach software, select the target computers from Remote Desktop and click
the Install button in the toolbar. The Install Packages screen displays.
8. On the OS X server desktop, double-click the client installer disk image, Online Coach v4.1.dmg. This will open
the disk image with the metapackage inside.
Inside & Edge Online Coach | 888-915-3276 | [email protected]
19
Student Software Installation, Mac Option 3 cont’d
9. Drag and drop the Online Coach v4.1.mpkg file from the disk image window into the Packages list. The
installer appears in the list.
10. Click the Install button. An Install Packages progress screen displays.
20
11. When installation is complete, Remote Desktop displays “Succeeded” under Task Status for the target
computer. When each computer displays with this task status, the unattended installation is complete.
12. To confirm the installation, look for the Online Coach icon on the desktop of every target computer. See
Confirming Account Activation in this guide to confirm your district’s student information is available.
Inside & Edge Online Coach | 888-915-3276 | [email protected]
21
Installing the Online Coach Libraries
The Online Coach student software makes use of readings, which are downloaded from the application server.
Depending on your site’s Internet access, this download may take several minutes. To avoid delays, it’s a good
idea to download the libraries to each student computer before students start using the Online Coach.
As with the student software, you can manually install the libraries to each student computer or use an
unattended installation. You may download libraries for one Inside or Edge level at a time. Or, you can download
libraries for all levels. To prepare for the Online Coach library installation on Windows or Mac machines,
1. Log into www.InsideNG.com or www.HBEdge.net.
2. From the homepage menu, select Manage Groups.
3. Select Download Library under Online Coach.
4. Select the radio button for your operating system.
5. Next, select the library installers you wish to download.
Library Manual Installation for Windows & Mac
The Windows installer is an InstallShield file. The Mac installer is a StuffIt file. Both installers are large files.
You can save time by downloading them to a local source such as a shared network directory, USB drive, or CD.
Then, you can copy the installer to each student computer from your local source.
From each computer, navigate to the folder in which you saved the library installers. Click the installer icon for
the desired library. Follow the prompts in the dialog boxes to install the libraries on each student computer.
22
Library Unattended Installation for Windows
Online Coach supports unattended (silent mode) library installations on a Windows network. This method
is recommended for sites that have more than 10 student computers with access to network tools such as
WinINSTALL or Altiris. Depending on your network tool, you can run installations for all student computers at
once, or one at a time. Consult your network tool documentation for instructions.
There are three parts to the unattended library installations on a Windows network:
• Download the Online Coach Library installer to one computer
• Create a silent installer on one computer
• Run the silent installer on the remaining student computers using a network tool
To download the Online Coach Library installer to one computer, log into the teacher website and select the
Windows operating system from the Online Coach software download screen. Then,
1. At the root of the C drive, create a folder or directory titled OLC Library.
2. After selecting the library installers you wish to download from the teacher website download the installers
to the C:\OLC Library folder.
3. To create a silent installer on one computer, open the command prompt window. Then,
a. From the Windows Start menu, click Run.
b. The Run dialog box opens. In the Open field, type cmd and click OK.
c. A command prompt window appears. If you do not see C:\> in the window as shown below, type C: and
press Enter.
Inside & Edge Online Coach | 888-915-3276 | [email protected]
23
Windows Library Installation cont’d
d. Type the following command: cd OLC Library and press Enter. Then, type
EdgeLibA_472.29_Installer.exe/r/f1”c:\OLC Library\setup.iss” and press Enter.
The silent installer will be saved in a file named “setup.iss” in the C:\OLC Library folder. Keep the command
prompt window open as you follow the next steps.
4. The InstallShield Wizard opens. Complete the installation as normal.
5. Close the command prompt window. Your silent installer is now saved in the file setup.iss.
6. To run the silent installer using a network tool such as WinINSTALL or Altiris, copy the folder C:\OLC Library to
each student computer on your network. It is important that the folder is placed in the same location on
every computer.
7. Use the network tool to remotely run the silent installer script using the command
EdgeLibA_472.29_Installer.exe/s (the file name will differ depending on the library). The installer will run
on the computers in the background.
Library Unattended Installation for Macs
Like student software installation, Online Coach supports unattended (silent mode) installations from a Mac OS X
server. This method of installation is recommended for sites that have more than ten student computers.
To complete the unattended install using Apple Remote Desktop, you will first download the library installer to
the OS X server. Then you will remotely install the Online Coach library to target computers.
This document provides instructions on how to perform unattended installs using Apple Remote Desktop
Management System 3. You can find detailed information about this system at www.apple.com. The Mac Online
Coach client installer uses Apple’s native installer, which employs metapackages. The Online Coach metapackage
(mpkg) is placed in a disk image (dmg). More information about metapackages and disk images can be found at
http://developer.apple.com.
Before you begin, make sure Apple Remote Desktop is installed and configured on the Mac OS X server. Then,
turn on each target computer and verify that a compatible version of the Apple Remote Desktop Agent is
available. Configure the agent to accept file copies and installations from Apple Remote Desktop. You may need
to enable Remote Management and activate all options under “Sharing” in System Preferences. Consult your
Apple Remote Desktop documentation for more information. Target computers must be running during the
unattended installation.
To download the library installer to the OS X server, log into the teacher website and select the Mac operating
system from the Online Coach software download screen. From the OS X server, download the selected Stuffit
library installer file to the desktop. Then,
24
1. Unstuff the installer metapackage file to the desktop by opening it with StuffIt Expander, Standard, or Deluxe.
More info can be found at: http://my.smithmicro.com/mac/index.html.
2. In Remote Desktop, select the target computers and click the Install button in the toolbar. The Install
Packages screen appears.
3. Drag and drop the library installer file from the desktop into the Packages list.
4. The installer displays in the list. Click the Install button. An Install Packages progress screen displays.
Inside & Edge Online Coach | 888-915-3276 | [email protected]
25
5. When the installation is complete, the task status for the target computer will change to “Succeeded.”
When all computers display with this status, the installation is complete.
26
Administrator and Teacher Access
Participating educators will access Online Coach to manage student settings and assignments, view
performance reports, and access online archives of student audio recordings. Ensure these users have access to a
computer that meets the minimum system requirements in Table C.
When signing into Online Coach for the first time, teachers and administrators should follow these steps to
enable pop-ups in their browser:
Internet Explorer
From the Tools menu, select Pop-up blocker > Always allow pop-ups from this site.
Firefox
1. From the Tools menu, select Options and click the Content icon.
2. Click the Exceptions button next to Block pop-up windows.
3. Add http://admin.insideng.com or http://admin.hbedge.net to Allowed Sites.
Other Popup Blockers
Check popup blocker help on how to add admin.insideng.com or admin.hbedge.net to allowed sites.
Teaching Edge Homepage
Inside & Edge Online Coach | 888-915-3276 | [email protected]
27
Confirming Account Activation
We will activate your account on the date requested in your Online Coach order. At this time, we will notify your
subscriber contact with an email from NGSP Technical Support. We will also email a welcome message with login information to participating administrators and teachers.
Sometimes student names will appear in the teacher’s online class list but not in the Online Coach student
software. For this reason, it is particularly important to confirm that your account is active and class lists display in
both places.
To confirm account activation, log into http://admin.insideng.com or http://admin.hbedge.net. If your account
is active, the log-ins will lead you to the Inside Teaching or the Teaching Edge homepage. Alert NGSP Technical
Support immediately if you encounter any issues. To spot-check online class rosters,
1. Select Manage Groups from the main menu.
2. Then, select Manage Students from the left-hand menu under the Groups heading. A student roster displays.
Make sure every student is assigned to an Inside or Edge level.
3. Review the rosters for several teachers to ensure student records are associated with the correct classes.
Inside Online Coach Student Roster
To confirm account activation through the student software, launch the application and click Start. For each class
in the pull-down menu, a list of students should appear. If the class or student list is blank, or if students are
missing from the list, return to the teacher website and make sure each student is placed into an Inside or Edge
level. Students without a level placement will not appear on your Online Coach student list.
28
You can place students into Inside or Edge levels online by editing student profiles. To edit a student profile,
choose Manage Students under Groups from the main menu.
1. A list of students displays. If you have not already selected a group, “All Groups” will appear in the pull-down
menu. From this menu, you may select a group name to filter the student list.
2. To edit a profile, click the Edit icon next to a student’s name.
3. Choose an Edge or inside Level from the drop-down menu.
4. To save your changes, click Update Profile. The student’s name should now display in the student list for the
Online Coach application.
Inside & Edge Online Coach | 888-915-3276 | [email protected]
29
Preparing Participants
It’s helpful to prepare participating administrators and teachers for Online Coach. Announce the new tools as
early as possible in the school year and email details about the Online Coach training session. Once your account
is activated, it is also appropriate to encourage administrators and teachers to visit the Online Coach teacher
website and confirm their username and password. Teachers should check their student rosters and report or
correct any inaccuracies.
Announcing Online Coach
After submitting your order, it’s helpful to let teachers and administrators know about the benefits of Online
Coach. Let them know that National Geographic School Publishing will email usernames and passwords once
the account is activated.
$0A')%)##!#$"#()')$'(#)'(B
*)0#!#$
'$!!*/
*' ()') ( %*'( )$#! $'% $$! *!(#2( #!# $/ #)')+ ($),' (# )$ !% ()*#)( +!$%
'#( !!(1
#!# $ %'$+( 3#)'() ")'!( # (*%%$')+ '#
#+'$#"#) )$ !% ()*#)( ()'*!# ,) '# $"%'#($#
$" (*((*! ''(1 %'$'" !($ %'$+( ()'*)*' (*%%$')
#"$)+)$#)$#()*#)(().*!'#%$,'1#!#
$ )' ,() !!$,( )'( )$ "# !(( '$()'( # +,
()*#)'%$')(1
#! *%%$') ,!! "! ,!$" "(( )$ .$* .
A)+)$# )B ,) .$*' (((("#) !$3# #$'")$#1 # !$3
#/.$*#+,()*#)'$()'($'.$*'!((1
#$*' .$* )$ " *( $ )( %$,'*! '($*' # .$*'
!(('$$"1 $' "$' #$'")$# $*) ) %'$*)/ +() ,,,11$"
##+))$'$")#$!$.)1
,!!(##$'")$#$*)#!#$)'##$%%$')*#)(#
$!!$,3*%"((1
#'!./
A*(''$#))B
A$$!()')B
Sample Announcement for Inside Online Coach
30
Preparing for Teacher Training
National Geographic School Publishing offers a free teacher training onsite or through WebEx. We will contact
your subscriber contact to schedule the session.
For WebEx training, we send an email invitation for you to distribute to confirmed participants. Your subscriber
and technology contacts can work together to determine the best way for participants to sign into the WebEx
conference.
Onsite training will require additional preparation. Our training consultant will work with your technology
contact to confirm readiness. You can use the following checklist to monitor progress.
Onsite Training Checklist
Task
✔
1.
Training announcement sent to all participating teachers and administrators and participant count confirmed.
2.
Location and hardware availability confirmed for all participants.
3.
Local technical support confirmed to assist with technical issues during training.
4.
At least three days prior to training: Each computer meets system requirements.
5.
One hour prior to training: each computer is turned on and has the Online Coach Sampler installed (provided by
our training consultant).
When your training session has been scheduled, send a second email announcement. Inform teachers and
administrators about the training, how to access student usernames and passwords, and where to find user’s
manuals.
Inside & Edge Online Coach | 888-915-3276 | [email protected]
31
$0A')%)##!#$"#()')$'(#)'(B
*)0(##!#$
'$!!*/
#)!./ .$* '+ "(( '$" ,!$"# .$* )$ #(
#!#$1"((%'$+.$*,).$*'#!#$*('#"
#%((,$'1
$)$'#),)#(#!#$/.$*'#+))$))#%'$*)
)'##((($#%'$+.)$#!$'%$$!*!(#1
)0%)"'<)/:898
"0:%"4=%"
$)$#0.,$$!$"%*)'!
.**():@)/:898)$*'#).$*'()
$%'%'$'))'##/%!(%'#)!()$()*#)*('#"(#
%((,$'($!!$,#)(()%(0
91 ##)$.$*'#!#$,()
:1 $$(#'$*%('$")$"%
;1 $$(#)*#)(*#''$*%('$")"#"#*
<1 #(('./(!)'$*%'$")%*!!3$,#"#*
=1 !()$()*#)(,!!%%'1! '#)#))$%#+)$#'
>1 ! '#))$)+).$*''$,('2(%'#)*#)$#
?1 ! '#),)$')*'#)$)"#('#
$((('2(*('$")#!#$,()0
91 ! )!%!# #)*%%'')#$'#'$)('#
:1 $,#!$)$!!$,#")'!(/($#.$*'#(0
* )')*4),$3%''#()*#.$*
)'$*)"$()$""$#!.*(#!#$)*'(
('2(#*!4)!#$'")$##()%3.3()%#()'*)$#(
$'!!#!#$)*'(
$'&*()$#(/$'.$*+#$)'+,!$""((/$#))"
)A#(')%$##*"'B1
#'!./
A*(''$#))B
A$$!()')B
Sample Inside Online Coach Training Announcement
32
Providing Local Support
Teachers and administrators participating in Online Coach can download documentation from the teacher
website’s Help page. Encourage teachers to read these manuals as they use Online Coach.
To access the manuals, sign in to www.InsideNG.com or www.HBEdge.net. Click the Help link in the upper right
hand corner of the screen, then download materials by clicking the PDF links.
Quick Start Guide—brief, step-by-step instructions for teachers using Online Coach.
User’s Manual—detailed overview and instructions for all Online Coach features.
As your district starts to use Online Coach, participants may require local support. NGSP is available to assist
you with technical problems that you cannot resolve locally. Consider sharing a “Who to Call” list that includes
something like the following:
Local Support
NGSP Technical Support
• Computer lab setup
• Completing the district import template
• Meeting system requirements
• Installation of the Online Coach using Mac Option 2
• Internet and local network setup
• Account activation and student rosters
• Firewall and Internet security settings
• Technical problems with Online Coach student
software or teacher website
• Downloading and installing software
• How to use Online Coach
Inside & Edge Online Coach | 888-915-3276 | [email protected]
33
Appendix A
Firewall Rules and Proxy Server Settings
Firewall Rules
The Online Coach application communicates to a remote server using an HTTPS connection to port 443. The
application requires that you allow communication from any port to the servers on port 443, listed below.
To increase the performance, add a Quality of Service (QoS) rule prioritizing this traffic to your firewall.
• olc.ngsp.com; 209.94.145.53
• olc.hbedge.net; 209.94.145.55
• olc.insideng.com; 209.94.145.52
Proxy Servers
Proxy servers are intended to filter and cache data to protect and speed up Internet traffic. They normally apply
a list of filtering rules for incoming and outgoing traffic to determine which content to block. These rules can be
processor intensive, and as traffic increases, time and resource demands will increase.
Most modern proxy servers allow SSL connections to be monitored by decrypting, processing the same filtering
rules, and re-encrypting the SSL connection. Adding this SSL-enabled layer adds to the latency of the traffic and
increases the possibility that Online Coach data will be blocked.
You can improve performance by creating a rule at the top of the processing order that allows traffic to and from
the application server free from unnecessary filtering rules. Establishing this rule will increase the performance of
both the proxy server and the Online Coach application server.
34
Appendix B
Fonts
The following fonts are required for Online Coach to display correctly. Follow the instructions below to check
your computer and install any fonts that are missing.
• Arial
• Times New Roman
• Comic Sans MS
• Trebuchet MS
• Courier New
• Verdana
• Georgia
Windows
1. Select Start > Settings > Control Panel > Fonts. Scroll through the alphabetical list of currently installed
fonts to determine which are missing.
2. You can download Comic Sans, Georgia, Trebuchet, or Verdana from http://www.soliloquylearning.com/
fonts/. Locate your operating system and click a font link from the list to begin installation.
3. If Arial, Courier New, or Times New Roman are missing, use your operating system’s install disc to install the
fonts.
Mac
1. Select Macintosh HD > Library > Fonts. Scroll through the alphabetical list of currently installed fonts to
determine which are missing.
2. You can download Comic Sans, Georgia, Trebuchet, or Verdana from
http://www.soliloquylearning.com/fonts/.
a. Locate your operating system and click a font link from the list. Download the package to your desktop.
b. Extract the files within each package. (You may need to install Stuffit© to extract these files. A free version
is available from www.stuffit.com).
c. Drag all extracted files to your System Folder > Fonts folder.
3. If Arial, Courier New, or Times New Roman are missing, use your operating system’s install disc to install the
fonts.
Inside & Edge Online Coach | 888-915-3276 | [email protected]
35
Table A: Order Information
Subscription
Description
Inside ISBN
Edge ISBN
Classroom Set
Contains 25 per-student 12-month
subscriptions to the Online Coach
978-07362-72995
978-07362-73008
Individual per Student
Single 12-month subscription
978-07362-59934
978-07362-39417
Headset
NGSP-approved noise cancelling
headset
978-07362-72940
978-07362-72940
Table B: Minimum System Requirements
Online Coach
Windows
Mac
Operating
System
Windows XP® Professional with SP2,
Windows Vista Business or Enterprise Edition
OS 10.2.6+
RAM
512 MB RAM (1GB RAM for Vista)
512 MB RAM
Screen
Display
1024 x 768 resolution,
support for DirectX 9graphics and
8 MB of graphics memory (32 MB for Vista)
1024 x 768 resolution,
thousands of colors display
Audio
SoundBlaster PCI/AC97 compatible sound
device with DirectSound support (if a second
soundcard is present, it must be disabled)
Integrated Soundcard
300 MB for single user (add 100 MB for each additional user), plus library space:
Hard Drive
Space
Library—Inside
Level C—296 MB
Level D—446 MB
Level E—436 MB
1.17 GB for combined installer
Library—Edge
Level A—284 MB
Level B—407 MB
Level C—482 MB
1.11 GB for combined installer
Internet
Connection
Bandwidth T1 or better; Direct connection to Port 443 open without proxy to our website
for both uploads and downloads; 10/100 MB Ethernet LAN port (minimum)
Ture Type
Fonts
Arial, Comic Sans MS, Courier New, Georgia, Times New Roman, Trebuchet MS, Verdana
Additional
Software
QuickTime 6.0 or higher (downloaded for free from www.apple.com/quicktime)
Headsets
Recommended model:
Andrea Electronics Model NC-185;
(Contact NGSP Customer Service; ships with adapter)
Other compatible models:
Abeier Model ACL-109M (email [email protected])
Labtec Stereo 332, Axis 302 (call 800-732-3054)
Adapters:
USB adapter and available USB port required for Mac and Vista
Andrea Electronics USB Adapter (go to: www.andreaelectronics.com)
36
Table C: Contact Information
Contact / Area of Expertise
Phone
eMail
National Geographic School Publishing
Customer Service
• Online Coach orders
• Headset orders
888-915-3276
Monday-Friday
8:00 am-8:00 pm EST
[email protected]
Technical Support
• System requirements
• District import
• Account setup & activation
• General Online Coach support
888-915-3276
Monday-Friday
8:00 am-8:00 pm EST
[email protected]
Professional Development
• Course descriptions, delivery options and
pricing
• Course scheduling and coordination
888-915-3276
Monday-Friday
8:00 am-8:00 pm EST
[email protected]
Inside & Edge Online Coach | 888-915-3276 | [email protected]
37
Revised 12/09 · Inside and Edge Online Coach Implementation Guide