1
User Manual and Installation Guide
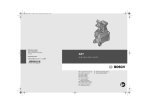
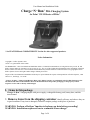
Charge−N−Run PDA Charging System
for Palm VII/ III Series of PDAs*
* See FEATURES and COMPATIBILITY Section for other supported products.
Notice Information
Copyright © Pellico Systems 2001
version 1.3a, part number 83001−uman
NO WARRANTY. This User Manual and Installation Guide ("Technical Documentation") is being delivered to you AS−IS, and
Pellico Systems makes no warranty as to its accuracy or use. Any use of this Technical Documentation or the information contained
therein is at the risk of the user. The Technical Documentation may include technical or other inaccuracies or typographical errors.
Pellico Systems reserves the right to make changes without prior notice.
No part of this User Manual and Installation Guide may be copied without the express written permission of Pellico Systems, 1440
Oliver Ave., San Diego, CA 92109
"Charge−N−Run", "Charged And Ready to Run", and "Pellico Systems" are trademarks of D.J. LaRue Enterprises, Inc.
All other brand names and trademarks shown in this manual and on the product packaging are the property of their
respective owners and are hereby acknowledged.
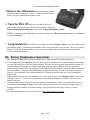
I. Items in this package
Charge−N−Run charging adapter with power supply, rechargeable battery pack, battery door, and this
users manual.
1. Remove items from the shipping container, identify all items, and observe they are
in good condition. If any item is damaged, return the complete package to the place of purchase.
WARNING: Perform a HotSync function to backup your data before proceeding!
WARNING: Installation requires at least a continuous 8 hour charge!
Page 1 of 6
User Manual and Installation Guide
II. Installation
1. Notice there are tabs on the
adapter which, in the next step, will go into
the slots on the sides of the cradle when
aligned correctly ( see figure )
2. Hold the cradle upside down in
your left hand and hold the adapter upside
down in your right hand then slide the
adapter onto your cradle by aligning the
slots on the adapter with the slots on the
cradle and gently push on the adapter ( see
figures ).
3. Plug the Power Supply into an
active power outlet. The Status Indicator
should blink momentarily and then remain in
the Steady−On state.
4. Turn your PDA Off and place it
upside down ( "door up" ) on a clean flat
surface . If you can read the writing on the
back of the PDA, the orientation is correct.
Page 2 of 6
User Manual and Installation Guide
5.Remove the old batteries and replace them with the
new battery pack so that the "+" and "−" labels are leftmost in the
PDA( see figure ). Install the new battery door.
6. Turn the PDA ON and place it in the cradle for its
initial charge of at least 8 hours. After the initial charge, follow the
Battery Maintenance Instructions to always be "Charged and Ready to Run" .
NOTE: Your battery gauge might not be accurate any longer. See "Battery Gauge Accuracy" in Section VI
for more information.
7. Congratulations! Your PDA is now being powered by Charge−N−Run’s
advanced battery pack
and charging system. The battery pack should not have to be replaced for years to come. Be sure to properly
dispose of your old alkaline batteries. Call your local recycling center for information on disposal and
recycling of alkaline batteries.
III. Battery Maintenance Instructions
1. The Charge−N−Run battery pack was designed for a long and useful life under normal use.
2. It is recommended you "condition" your new battery pack for maximum life. After the initial 8 hour charge,
use your PDA until you get the low battery warning. The time it takes to get the warning this first time will
vary depending on how much of a charge your battery pack had when it shipped. Once you get the low
battery warning, turn the PDA ON and put it in the cradle for at least 8 hours to charge the battery pack back
up to a full charge. Then repeat this drain/charge prodder one more time to ’prime’ your battery pack for a
long life. This procedure is not a requirement, but it will help you get the most out of your rechargeable
battery pack.
3. When periodically charged, a few hundred cycles can be expected from your Charge−N−Run battery pack
resulting in up to 2 − 3 years of use. Under heavy loads and deep discharges, less than 2 years of service
could be expected.
4. The longest battery pack life will result from topping off the batteries weekly. It is recommended to once a
year discharge the Charge−N−Run battery pack to the point where the low battery warning message is
displayed and then complete a full 8 hour charge. This will ensure the full charge capacity is always
available.
5. For replacement battery packs see our web site at http://www.charge−n−run.com.
Page 3 of 6
User Manual and Installation Guide
IV. Warnings
1. The Charge State Indicator light should blink a few times and then remain in the Steady−On state a few
seconds after plugging in the power supply. If the Charge State Indicator fails to blink a few times or does
not remain in the Steady−On state, with no PDA installed, then the Charge−N−Run cradle adapter is
damaged and the entire package should be returned to the place of purchase.
2. Data loss may occur if the installation steps are NOT followed correctly. Keep in mind that the PDA can not
retain data for very long without battery power. It is important that you thoroughly read and understand the
battery pack installation steps before removing the existing PDA batteries.
3. When installing the Charge−N−Run Replacement Battery Door, don’t force the door. It should install
smoothly and latch into place when the Charge−N−Run battery pack is installed correctly. If the new door
does not fit correctly, reinstall the alkaline batteries for one full minute to preserve your data then follow the
battery installation steps again if needed.
V. Features and Compatibility
Charge State Indicator
The charge state indicator light located on the left side of the Charge−N−Run cradle adapter will indicate
three charging states:
1) Steady−ON: No charging is occurring. Ready for PDA insertion.
2) Slow−Blink: Maintenance charge. Batteries are fully charged.
3) Fast−Blink: Charging in progress. Batteries are less than fully charged.
Depending on the Charge−N−Run battery pack’s charge level, the microprocessor controlled charge circuit
will adjust the charge cycle to optimize the charge state and life of the Charge−N−Run battery pack.
NOTE: When the external power unit is plugged in, the Charge−N−Run microprocessor will blink the charge
state indicator a few times before the charger is ready for use.
Compatibility
Your Charge−N−Run product was designed for use with the following PDA’s:
Palm VII/x, III/x/xe/e, Symbol SPT1500, IBM WorkPad c5, TRG pro
Operating Characteristics
For indoor use only. Only operate within the following operating temperature range, 0°C to 40°C ( 32°F to
104°F ).
Page 4 of 6
User Manual and Installation Guide
VI. Cautions and Cleaning Information
First Time Use
Because the Charge−N−Run battery pack may be shipped in a discharged state, the initial charge cycle
requires no less than 8 continuous hours in the Charge−N_Run adapted cradle before using the PDA out of
the cradle. Use of the PDA in the cradle during this period is allowed but should be limited to less then a total of
one hour.
Optimizing Charging
Turn your PDA ON each time just prior to insertion into the cradle. This will provide a more accurate reading
to the microprocessor controlled charging circuit and result in optimized charging cycles. Pushing any of the
four application launch buttons is one easy way to do this.
Battery Gauge Accuracy
The battery gauge on your PDA may not accurately represent a full charge on the Charge−N−Run battery
pack. This is because most PDAs ship with the battery gauge setting set for alkaline type batteries and the
Charge−N−Run battery pack uses NiMH battery technology. To select the correct setting for your new battery
pack ( NiMH or NiCad ) see our web site at http://www.charge−n−run.com for free software and instructions.
Cleaning Contacts
The battery contacts and cradle adapter spring contacts should be kept clean. If oil or other contaminants are
present, charging capabilities may be reduced. To clean the battery contacts, use a small amount of isopropyl
alcohol on a clean lint−free rag. Moisten but don’t dampen the rag to prevent excess fluid from damaging
components.
1) To clean the cradle adapter contacts: Wipe the contacts one at a time by using a top−to−bottom (up−>down
) motion following the guide on the cradle adapter to each of the spring contacts. Just 2−3 wipes should be
sufficient under normal use. Repeat if necessary.
CAUTION: Any side to side motion could damage the cradle adapter contacts.
2) To clean the battery pack contacts: Wipe the contacts from left−to−right across both contacts.
CAUTION: The battery door must remain installed to prevent fluids from entering the PDA and
causing damage.
Battery Replacement
If the battery pack will not hold a charge for very long, a replacement battery pack may be required.
Replacement battery packs can be purchased from our web site at http://www.charge−n−run.com
VII. Frequently Asked Questions
Please see our web site at http://www.charge−n−run.com for product FAQ’s. To ask us questions about Charge−
N−Run send email to [email protected] with a subject of CNR−questions.
Page 5 of 6
User Manual and Installation Guide
VIII.
Pellico Systems Limited Warranty
Limited warranty
Pellico Systems warrants that its Charge−N−Run PDA charger (the "Product") will, if properly installed, used, and maintained, be
free from defects in materials and workmanship for a period of one (1) year from the date of purchase. If the Product which is the
subject of this Limited Warranty fails during the warranty period for reasons covered by this limited warranty, Pellico Systems will, at
its sole option, repair the product, replace the product, or refund the purchase price of the Product. This limited warranty does not
cover damages due to external causes, including accident, problems with electrical power, usage not in accordance with product
instructions, neglect, alteration, repair, or improper installation.
How to obtain warranty service
All warranted products must be accompanied with proof of purchase and a Return Material Authorization (RMA) number. Contact
Pellico Systems customer support for shipping instructions and an RMA number. No product will be accepted for warranty service
without proof of purchase and an authorized RMA number clearly printed on the outside surface of the shipping container. If Pellico
systems determines that the defect was caused by misuse or abnormal operating conditions, the cost of the repair will be billed to the
customer
Warranty limitations and exclusions
THESE WARRANTIES REPLACE ALL OTHER WARRANTIES, EXPRESS OR IMPLIED INCLUDING BUT NOT LIMITED
TO, THE IMPLIED WARRANTIES OF MERCHANTABILITY AND FITNESS FOR A PARTICULAR PURPOSE. PELLICO
SYSTEMS MAKES NO EXPRESS WARRANTIES BEYOND THOSE STATED HERE. PELLICO SYSTEMS DISCLAIMS ALL
OTHER WARRANTIES, EXPRESS OR IMPLIED, INCLUDING WITHOUT LIMITATION, IMPLIED WARRANTIES OF
MERCHANTABILITY AND FITNESS FOR A PARTICULAR PURPOSE.
SOME LAWS DO NOT ALLOW THE EXCLUSION OF IMPLIED WARRANTIES, SO THIS LIMITATION MAY NOT APPLY
TO YOU. IF THESE LAWS APPLY, THEN ALL EXPRESS AND IMPLIED WARRANTIES ARE LIMITED IN DURATION
TO THE LIMITED WARRANTY PERIOD. NO WARRANTIES APPLY AFTER THAT PERIOD. SOME LAWS DO NOT
ALLOW LIMITATIONS ON HOW LONG AN IMPLIED WARRANTY LASTS, SO THIS LIMITATION MAY NOT APPLY TO
YOU.
Limitations of liability
PELLICO SYSTEMS’ RESPONSIBILITY UNDER THIS OR ANY OTHER WARRANTY, IMPLIED OR EXPRESS, IS
LIMITED TO REPAIR, REPLACEMENT, OR REFUND, AS SET FORTH ABOVE. THESE REMEDIES ARE THE SOLE AND
EXCLUSIVE REMEDIES FOR ANY BREACH OF WARRANTY. PELLICO SYSTEMS IS NOT RESPONSIBLE FOR
INDIRECT, SPECIAL, INCIDENTAL, OR CONSEQUENTIAL DAMAGES RESULTING FROM ANY BREACH OF
WARRANTY OR UNDER ANY OTHER LEGAL THEORY INCLUDING, BUT NOT LIMITED TO, LOST PROFITS,
DOWNTIME, GOODWILL, DAMAGE TO OR REPLACEMENT OF EQUIPMENT AND PROPERTY, DAMAGE TO OR LOSS
OF DATA, OR COSTS OF DATA RECOVERY OR REPROGRAMMING. SOME JURISDICTIONS DO NOT ALLOW THE
EXCLUSION OR LIMITATION OF INCIDENTAL OR CONSEQUENTIAL DAMAGES, SO THE ABOVE LIMITATIONS OR
EXCLUSIONS MAY NOT APPLY TO YOU.
THIS LIMITED WARRANTY GIVES YOU SPECIFIC LEGAL RIGHTS, AND YOU MAY ALSO HAVE OTHER RIGHTS
THAT VARY FROM JURISDICTION TO JURISDICTION.
Pellico Systems
attn: Customer Service
1440 Oliver Ave
San Diego, CA. 92109
http://www.pellicosystems.com
1−866−PELLICO
Page 6 of 6