1
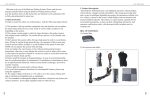
Cautions ▣ The recorded videos by our product is no legal binding force. It is only for references of the car accident during driving. Our company is not responsible on legal trouble or damages for recorded video or non-recorded video. ▣ Please check the recording data status of 5 to 10 minutes before use. ▣ After power turns off, remove the video out cable and rear camera (2ch) ▣ We cannot warranty on other adaptor not supplied from us. ▣ This product designed used for cigar jack. When you use an ordinary power in a car, please consult with expert. The problem by above connection is responsible for customer. ▣ Avoid the high temperature (direct ray of light) and high humidity and abnormal shock. I may bring about the cause which the product is out of order. ▣ Out of order by careless treatment, individual disassembly, wrong power source, calamity could not be warranted. ▣ Warranty period is 1 year after purchased this product. . Caution on use the memory card ▣ Please perform the SD card format and virus checking periodically to prevent from abnormal recording or non-recording etc. ▣ If the SD card is pulled out from the card slot while the power of the body turns off, it turns the power of the body off and may bring out the damage of the data. ▣ Use the SD card by original manufacturer in case if no use of supplies SD card from us. ▣ Do not pull out the SD card before LED light off after turns off the power of car. It means the body cannot record the last file. ▣ There is a life time by of SD due to read/write. Error can be made by long used SD card. You must buy new SD card. Please understand this situation is not our responsibility for the error of recorded data. ▣ Please backup the important files to your PC or portable storage device. To keep the normal recording, the rest capacity of SD card must maintain more than 100MB. ▣ In case of transportation of SD card, please use the memory card adaptor to prevent from data loss of static electricity. ▣ Our company is not responsible for data in SD card. 2 Battery Be sure to read carefully the following cautions. ▣ Strongly swelled battery is very dangerous. Please contact manufacturer or seller without hesitation. ▣ Do not close the heat of fire.( Do not insert in micro wave range.) ▣ In summer time, do not place inside car. ▣ Do not use or keep on high temperature, high humidity. ▣ Do not use on coverlet, electric carpet, carpet for a long time. ▣ Do not place in airtight box in power on status for a long time. ▣ Do not contact metal part of necklace, coins, key and watch etc. ▣ Use the guaranteed Li 2 cell battery. ▣ Do not disassembly, compress, piercing and so on. ▣ Do not drop from high rise place. ▣ Do not exposure over 60℃ high temperature. ▣ Do nor contact moisture. Disposal guide ▣ Do not throw used battery at random. ▣ Do not throw the battery pack into fire due to explosion or fire. ▣ The way of battery disposal is different, depending on countries. Advice on charging way Do not charge the battery in other way different from user manual mentioned. Otherwise, the battery may be explosive. Power off In case of uncontrollable power by wrong action, press “ force. 3 “ button. You can power off by 1. Consist Main Body CD-ROM (PC Viewer, User Manual included) microSD card Car Cigar Adaptor Magnetic holder & metal plate (optional) Aux-to-RCA cable (optional) Video-out cable (optional) External GPS Cable arrange clips Rear camera (optional) 1. There is PC Viewer program and the user manual in CD-ROM. Please install PC Viewer program into the computer to see the recorded files by the device, as well as, install PDF reader to see the user manual. 2. Optional accessories may not come in the package, depending on countries. 4 2. Features ◈ 2.0 mega pixel (⅓” CMOS) lens ◈ 110° wide angle of camera ◈ High definition recording resolution ⇒ 1ch : 1280x720 pixel, Max 20 frames, H264 ⇒ 2ch : 640x480 pixel, Max 10frames, H264 (rear camera optional) ◈ Continuous recording function ⇒ General recording : creating files per minute in sequence ⇒ Impact recording : each 10 sec pre/post of impact occurrence ⇒ Manual recording : each 10 sec pre/post of button action ⇒ Motion recording : 20 sec recording after occurring motion ◈ Video input port for Rear camera(2CH-IN) ◈ Built-in backup battery ⇒ The last recording file saved in safe without power from car. ◈ Built-in 3axis impact sensor (G-SENSOR) ◈ Built-in high efficiency MICROPHONE ⇒ Simultaneous recording Video and Audio data. ◈ 3 Colors LED mounting ⇒ Built-in high brightness LED displaying working status. ◈ Panorama security LED mounted ⇒ Warning, antitheft and interior effect in front of car. ◈ External Video output port ◈ Built-in RTC(REAL TIME CLOCK) ⇒ Creating recording files by date and time unit. ◈ Built-in BEEP sound ⇒ Inform the working status with BEEP sound. ◈ OSD display ⇒ Displaying the data and time on recorded video picture. ◈ Function setting program ⇒ Supply the program that control the function of system. ◈ External GPS ⇒ Recording location and driving speed etc via external GPS. 5 3. Name of each part 1 Double side tape Use to attach VTR107 on car glasses or attach metal plate (optional) if it comes with magnetic holder in the package 2 4 Way cradle Fix the device after direction control ( Up, Down, Right, Left ) 3 Cradle fixing screw 4 Security LED 5 Power input port Fix goods after angle (Up , Down ) Panorama moving LED light : interior effect, car security Supply the power to main system (DC 12V) 6 Micro SD card slot Insertion slot of micro SD card 7 2ch connection port 2ch(2CH-IN) camera cable connect to this port 8 External video out port 9 Lens 10 GPS connection port 11 Voice/Motion recording button 12 Power button 13 Manual REC / Security LED button LED (Left) Recording video ahead Connect to external GPS set with jack ON/OFF the Voice recording or motion (parking) recording function Power On/Off the main body ON/OFF the Manual(forced) or security LED function. LED (Right) Inform the working status with color, light-up and blinking. Microphone Record audio sound by built-in microphone. 14 15 Use to check the video via external display 6 4. Installation Notice - How to use magnetic holder if it comes in the package. (optional) 1. Attach the magnetic holder on the windshield of your vehicle. 2. Attach the metal plate on the other side of external GPS. 3. Remove the double side tape of device and attach it with GPS. 4. Now, you can attached/detach the device on/from the magnetic holder on windshield freely. If magnetic holder &metal plate (optional) does not come in the package, the device should be attached on the clean place of the windshield of your vehicle Insert SD card into main body. (Beware of the insert direction. In case of wrong insertion, it may bring serious damages.) Connect car cigar adapter DC power input port. Connect car cigar adapter to cigar socket of car. jack to “ON” the power button. Start recording in status of LED on. 7 5. Basic way of using 1. Power on and start ▷ Press Power button to turn on the device. ▷ During the booting, 2 LEDs are blinking repeatedly with BLUE, GREEN, RED colors. Normal recording begins with blue light after completing the booting. 2. “RECORD” 1) Start of “RECORD” ▷ Light up ( Blue color ) of 2 LED : Green colors : GPS connection and Voice recording is ON. Left LED blinking : GPS connection and Voice recording is OFF. It saves the all videos during driving to ““RECORD” ” folder. Audio recording ON Audio recording ON (GPS) Audio recording OFF 2) Contents of “RECORD” folder ▷ “RECORD” file is created in Micro SD card is making folder of date/time in sequence. ▷ The file is creating the type of “REC_2011_04_29_12_21_11.avi ” and the meaning is “year_month_day_hour _minute_second.avi” of recorded time. ▷ “RECORD” file is created every 1 minute. ▷ The number of max 100 recording files is creating in one “date/time” folder. In excess of Micro SD card capacity, new date/time folder and recording files is creating after deletion from the oldest file. 3) Button working in “ RECORD” mode BUTTON Press shortly Press lengthy Voice recording : ON/OFF ( default : ON ) Motion mode : ON/OFF ( default : OFF) 8 Manual recording Security LED : ON/OFF ( default : ON) SD card format + 4) Impact sensor detection in “RECORD” mode ▷ Impact recording begins when sensing the impact during “RECORD”. ▷ Total 20 sec ( pre 10sec, post 10 sec) of Impact recording files saving in “EVENT” folder. ▷ Buzzer beeps twice shortly when impact recording beginning. Right LED light up with RED color until impact recording stop. 5) LED status in “RECORD” LED working status GPS ON GPS OFF Mode Right Left LED Left LED Right LED LED Voice recording ON Voice recording ON Voice recording OFF Voice recording OFF Voice recording ON Voice recording ON Voice recording OFF Voice recording OFF Voice recording ON Voice recording ON Voice recording OFF Voice recording OFF RECORD EVENT MANUAL Formatting Micro SD card Unusual recording Firmware UPGRADE 6) Buzzer status in “RECORD” Working mode Buzzer status “RECORD” start One beep shortly “EVENT” start Two time beep shortly “MANUAL” start One beep shortly Button working One beep shortly Unusual recording Repeating beep until power off Power OFF Two time beep lengthy 9 7) In case of Remove the micro SD card during “RECORD” ▷ It is impossible to save the recording present file normally. ▷ It may critical damage to micro SD card and goods. ▷ When remove the SD card from goods, automatically reboot the system 8) Power off during “RECORD” ▷ When turn off the power during “RECORD”, present recording file in SD card is saved normally and turn off the power. ▷ Buzzer beeps twice lengthy and power turns off at last. ▷ In case of remove the micro SD card before LED off entirely, last recording file may not saving or cannot playback the last file. ▷when power on before the power off entirely, the goods maintains status of power on for some time. 3. “MOTION” recording 1) Starting of “MOTION” ▷ When motion detected in lens angle range during parking or stopping, recording starts for certain time. The recording stops in stand-by status when Motion disappeared. ▷ Press“ “button lengthy, buzzer beep one time shortly. And change over to motion recording mode. Right LED light off and left LED light on to Blue color. ▷ Recording stops in motion mode standby status. ▷ Buzzer beeps twice shortly, left LED light up to Red color until stops recording. ▷ “MOTION” for 20 sec and creating continuous files by 20 sec in continual motion occurrence. ▷ When press “ “button lengthy, motion mode stops and changeover to general recording mode. In case of “MOTION” mode, changeover “RECORD” mode for 2~3 sec delay. In case of the changeover to “MOTION” mode during “RECORD”, “EVENT”, and “MANUAL”, stops each recording files and change to “MOTION” mode for 2) Contents of “MOTION” 2~3 sec delay. folder ▷ “MOTION” file is created in Micro SD card is making files of date/time in sequence. ▷ The file is creating the type of “MOT_2011_04_28_11_22_13.avi ” and the meaning is “year_month_day_hour _minute_second.avi” of recorded time. ▷ The number of recording files in “motion recording” folder is depend on memory 10 capacity. In excess of Micro SD card capacity, new date/time folder and recording files is creating after deletion from the oldest file. 3) In case of Impact sensor sensing during “MOTION” mode working ▷ Buzzer beeps twice shortly, right LED light up to red color until stops event recording when impact detected in parking mode. ▷ Total 20 sec ( pre 10sec, post 10 sec) of event recording files saving in “event recording” folder. ▷ The created files are saved to “EVENT” folder. Audio recording ON Audio recording OFF 4. “MANUAL” recording “MANUAL” is used for the purpose of prevent deleting videos or taking pictures of landscapes and place want to save From “RECORD” to “MANUAL”. 1) Start of “MANUAL” recording ▷ Press “ “button one time shortly, buzzer beeps one time shortly, 2 pieces of LED light up to red color and starting manual recording. ▷ The files are saved to “MANUAL” folder. ▷ Total 20 sec ( pre 10sec, post 10 sec) of “MANUAL” files is creating. It is impossible to “MANUAL” recording during “EVENT” recording. “EVENT” do not works during “MANUAL” recording even the impact happen. 2) Contents of “MANUAL” folder ▷ “MANUAL” file is created in Micro SD card is making files of date/time in sequence. ▷ The file is creating the type of “MAN_2010_12_12_14_30_56.avi ” and the meaning is “year_month_day_hour _minute_second.avi” of recorded time. ▷ The number of recording files in “MANUAL” folder is depend on memory capacity. In excess of Micro SD card capacity, new date/time folder and recording files is creating 11 after deletion from the oldest file. 5. “EVENT” recording When the impact occurred, impact sensor detect the impact and saving the files to another separate folder. 1) start of “EVENT” ▷ Buzzer beeps twice shortly according to the setup sensitivity, LED-2 light up and starts “EVENT” recording. ▷ The files saving to “EVENT” folder. . ▷ Total 20 sec ( pre 10sec, post 10 sec) of “EVENT” files are creating. In PC Viewer program you can set the sensitivity of impact sensor in “setup”. 2) Contents of “EVENT” folder ▷ “EVENT” file is created in Micro SD card is making folder of date/time in ▷ The file is creating the type of “EVT_2010_12_12_14_30_56.avi ” and the meaning is “year_month_day_hour _minute_second.avi” of recorded time. ▷ The number of recording files in “MOTION” folder is depend on memory capacity. In excess of Micro SD card capacity, new date/time folder and recording files is creating after deletion from the oldest file. During “EVENT” recording , another impact appear again, it is not works until impact recording stops. In power off during “EVENT” recording, saving files for 20 sec and power turns off. 12 Voice Voice recording ON Recording OFF 6. Setting additional function 1) “Voice Record” ON/OFF setup ▷ Press “ “button shortly, Voice recording ON or OFF ( default : ON ) ▷ Voice recording ON : Left LED is light up Voice recording OFF : Left LED is blinking Set Voice Record is maintain the same status even the power off. 2) Security ON/OFF setup ▷ Press “ “button lengthy, On/OFF the security LED. ( default : ON ) Set security LED is maintain the same status even the power off. 3) ) Memory Format by button ▷Press “ “,“ buttons lengthy at the same time, it begins micro SD card format in inserted slot. ▷ 2 pieces of LED are blinking with BLUE color until format completed. . ♦ Please backup the data before the memory format. Deleted data by format is impossible to recovery. ♦ Power off or remove the micro SD card during format, It may hurt SD card and goods. 7. Contents of “Memory Info” 1) Way of using the memory ▷ When the memory is left 300MB, the firstly saved file in Record folder is automatically deleted consecutively in order to continue recording and saving. 2) Minimum used memory ▷ To record the normal work, there is Min. memory 100MB necessary at least. ▷ In case of recording with Min. memory, the recording may work irregularly. 3) Used file size of memory (microSD card 8GB) ▷ EVENT : Creating 40 files in the folder ▷ MOTION : Creating 100 files in the folder ▷ MANUAL : Creating 20 files in the folder RECORD (4700MB) EVENT (800MB) MOTION (2000MB) 13 MANUAL (500MB) 6. Working status of LED and Buzzer " " means LED ON, " " means LED blinking. GPS ON Mode GPS OFF LED(Left) Voice recording (ON) Voice recording (OFF) LED(Left) LED (right) Voice recording (ON) Voice recording (OFF) LED (right) Buzzer (BEEP) BOOTING - RECORD Recording start 1 time beep shortly EVENT 2 times beep shortly MANUAL 1 time beep shortly in Manual button shortly MOTION (stand-by) Off Off 1 time shortly in parking mode button lengthily MOTION Off Off In motion2 times shortly (recording) SD card format 1 time shortly to format Firmware Upgrade Unusual working Repeat beeps shortly 14 7. PC Viewer program Minimum System requirement for the installation of PC Viewer OS – Windows XP SP3 or above Hardware – Pentium 4, 2.8GHz, RAM 1GB or above Browser – MicroSoft Internet Explorer 8.0 or above Direct X – Direct X 9.0 (JUNE 2010) or above Others – Windows.NET Framework 3.5 or above ATTENTION In case of the failure of PC Viewer installation, you need to install the following files first. If the computer is Windows OS 32bit, 1. Go to www.google.com and search 4 files each mentioned below. ▷IE8-WindowsXP-x86-KOR.exe (for Windows XP) or ▷IE8-WindowsVista-x86-KOR.exe (for Windows Vista) ▷directx_Jun2010_redist.exe ▷visual c++ 2008 sp1 - vcredist_x86.exe ▷dotnetfx35langpack_x86ko.exe 2. Choose your Windows language and download each file from MicroSoft website. 3. Install 4 files into the computer. 4. After completing the installation, turn off the computer and turn it on. 5. Now, install PC Viewer into the computer. If the computer is Windows OS 64bit, 1. Go to www.google.com and search 4 files each mentioned below. ▷IE8-WindowsServer2003-x64-KOR.exe (for Windows XP) or ▷IE8-WindowsVista-x64-ENU.exe (for Windows Vista) ▷directx_Jun2010_redist.exe ▷visual c++ 2008 sp1 - vcredist_x64.exe ▷dotnetfx35langpack_x64ko.exe 2. Choose your Windows language and download each file from MicroSoft website. 3. Install 4 files into the computer. 4. After completing the installation, turn off the computer and turn it on. 5. Now, install PC Viewer into the computer. 1. Install PC Viewer into the computer ▷ Insert CD into the computer and go to the model name of folder. (example, VTR107) ▷ Double click the installation file of PC Viewer and follow the instruction on the screen. ▷ Click “CarBlackBoxViewer.exe” to run PC Viewer. 15 2. Main Screen 1 2 3 4 5 6 7 8 9 11 13 14 16 12 19 15 17 18 1 Setting 11 1CH playback screen 2 Picture capture 12 2CH playback screen 3 GPS information window 13 Present playback time 4 Full screen 14 Progressing playback status 5 Channel screen turnover 15 Total playback time 6 Hidden program/exit 16 Playback speed control 7 “RECORD” folder 17 Playback sound control 8 “EVENT” folder 18 Playback screen control menu 9 “MANUAL” folder 19 Playback video list 10 “MOTION” folder 3. Menu bar 1 2 3 4 5 6 16 7 8 10 1 Playback previous file 5 Search backward each frame in playback 2 Playback recoded file 6 Search forward each frame in playback 3 Pause playback file 7 Fast playback 4 Playback next file 8 Open microSD card 4. GPS Click the “GPS” to see information. ▷ Running speed : display present driving speed ▷ Time : display present time of playback file. ▷ Latitude : display present latitude of playback file. ▷Longitude ▷Bearing 5. Seeing Full Screen Click the “Full Screen” icon on upper part of PC Viewer to see it in full. Click the “Down Sizing” to see it in normal size. ♦ If the resolution of monitor is higher than the recorded file’s resolution (1280x720p), it displays original resolution as 1280x720p. ♦ If the resolution of monitor is lower than the recorded file’s resolution (1280x720p), it displays, according to the monitor’s resolution. 17 6. Setting ● ATTENTION To change [Setting], you should use the device at least once after inserting microSD card into the device, before changing [Setting] 1. Insert microSD card into the device and turn it on. After completing the booting, turn off the device. Take out microSD card from the device and insert it into the computer. 2. Run PC Viewer. Click [OPEN] and choose the drive of microSD card. Then, Files are listing at right side of screen. Now you are ready to change [Setting]. 3. After changing each value of setting, click [OK] button. 4. Take out miroSD card and insert it into the device. Turn on the device, and the new values are automatically setting during the booting of device. 1) Time Setting ● ATTENTION - In case of the device WITHOUT GPS, you should use [Time Setting] to set your local time if you are outside Korea. Default of device is Korea time. - In case of device with GPS, you should use [Time Zone] to set your local time. 1. To change the date and time, you should use the device at least once. Insert microSD card into the device and turn it on. After completing the booting, turn off the device. 2. Take out microSD card from the device and insert it into the computer. 3. Run PC Viewer. Click [OPEN] and choose the drive of microSD card. Then, Files are listing at right side of screen. 4. Go to Setting Time Setting change the date and time manually. 5. After changing the time and date, click [ ] button and you will see the message “Time settings have been saved ” click [OK] 6. Click [OK] to save it. The new date and time is saved in the name of “date_Time.cfg” of “setting” folder of micro SD card. 7. Take out microSD card from the computer and insert it into the device. 8. Turn on the device, and it will automatically be setting into the device. 18 2) Setting the “Voice Record” ▷ ON / OFF the Voice Record ( default : ON ) 3) Setting the “Security LED” ▷ ON / OFF the Security LED ( default : ON ) 4) Setting the “Buzzer” ▷ ON / OFF the Buzzer ( default : ON ) 5) Setting the “G-Sensor Sensitivity” ▷ Control the sensitivity of G-sensor ( default : 8 steps ) 6)Time Zone ● ATTENTION - In case of the device WITH GPS, you should use [Time Zone] to set your local time if you are outside Korea. Default of device is GMT +09:00 (Korea). - In case of device WITHOUT GPS, you should use [Time Setting] to set your local time. 1. To set the time zone, you should use the device at least once. Insert microSD card into the device and turn it on. After completing the booting, turn off the device. 2. Take out microSD card from the device and insert it into the computer. 3. Run PC Viewer. Click [OPEN] and choose the drive of microSD card. Then, Files are listing at right side of screen. 4. Go to Setting Time Zone choose your GMT time zone and click [OK] 5. Take out microSD card from the computer and insert it into the device. Turn on the device, and the new time zone is automatically setting by GPS. 7) Applying the each setting value ▷ After setting up each condition, click “OK” to save the values in microSD card. ▷The new values are stored into “setup.cfg” file in “setting” folder of micro SD card. ▷After inserting the microSD card into the device, turn it on. The new values are adjusted. ♦ When “setup.cfg” file of microSD card is deleted by force, be sure to insert it into the device and turn it on. “setup.cfg” file is automatically generated with default value. 19 Memory Info Click the “Memory Info” to memory information of microSD card. You can see detail information of each recorded folder. i.e.) RECORD folder, EVENT folder, MANUAL folder, MOTION folder. Memory Format(Caution) - Click the “Format” to format microD card. . ♦ Be sure to back up all data before format. It is not possible to recover data after format. Version Info Click the “Version Info” to see firmware version, viewer version. - Firmware Download You can download the firmware to upgrade the device. (1) Click “Firmware Download”. (2) Press "YES", you will visit website. Find the newest firmware file and download it into the computer. (3) Copy and paste the firmware file into "UPDATE" folder of microSD card. (4) Insert microSD card into the device and power on. During updating, 2 pieces of LED are blinking to Green color for 20~30 sec. After updating, re-booting and starting recording. To download the firmware, the computer should be connected with internet. 7. Capture Click “Capture” to make a moment in jpeg photo file and enter the file name and save it. 20 8. Specification Power Power consumption Recording way Storage / working temperature range Camera Visual angle Video Audio format Recording media External output GPS DC 12/24V Max. 420mA(DC 12V) [RECORD] recording per minute [EVENT] 10secs pre/post of impact (total 20sec) [MANUAL] 10secs pre/post of button works(total 20 sec) [MOTION] need separate device for general power -30℃ ~ 80℃ / -20℃ ~ 60℃ 2.0M Pixels, 1/3.2” CMOS 110°(D) [1ch] HD(1280 x 720 P), mpeg4 file format (H264 codec) [2ch] VGA(640 x 480 P), mpeg4 file format (H264 codec) AAC (Advanced Audio Codec) Micro SD card (4GB~32GB) NTSC External GPS / SIRF3 Impact sensor 3 axis G-sensor (3D, ±4G) Security LED HIGH-INTENSITY LED status LED 3 colors LED ( 2ea ) Warning sound Built-in BEEP buzzer Battery Built-in RTC battery Dimension 91 x 63 x 44 mm Weight 98g 21 Vision Tech America, Inc 1452 E. Valencia Drive Fullerton, CA 92831, USA www.visiontechamerica.com Product made in Korea 22