1
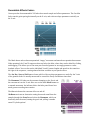
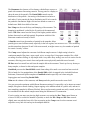
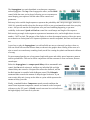
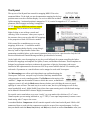
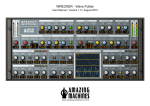
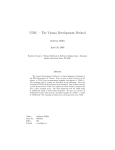
VECTORSPACE
REAKTORT!PS.COM
user manual version 1..0
© 2015 Peter Dines
Vectorspace is a CPU friendly sample
based instrument for Reaktor whose
sound at any given time is a
superposition of gestural sequencers
and effects. It also includes a
sequeggiator - a probabilistic
sequenced arpeggiator - that plays
staggered chords as polyphonic
sequences, creating a constantly
evolving blend of rhythm and
harmony.
Vectorspace is ideal for transforming
an acoustic instrument or synth
sample plus a simple chord
progression into the rhythmic and
harmonic scaffolding of a track - just
add some drums and bass.
It can also be played as a more traditional sampler, a soundscape creator or as a physically modelled
synth using the sampled material as an exciter and the resonator effect as a body. The resonator is
polyphonic and responsive to note and chord changes. Its partials can be tuned, damped and skewed to
create bell, percussion and drum sounds, or abstract reverberations.
The sample position, sample length, grain spacing and envelope parameters can all be automated, as
can the resonator, growl, filter and delay effects. Each X and Y parameter can run in smooth or
quantized mode, and quantized mode allows you to set individual clock speeds and sequence lengths
for the X and Y axes of each automated fader. Quantized mode also gives you the opportunity to edit
and fine tune the level of each step in a fader's X and Y sequences. This makes it easy to create gated
rhythmic filter effects or gradual changes.
It is impossible to predict precisely what sounds will be produced when you have various effects
activated with different sequence lengths on different parameters. But at the same time, the gestures
and sequence settings are under your control, so the end result will be a blend of your intent and the
superposition of the cycling sequences. Think of it as an "inspire-o-graph" for sound, a machine
collaborator to bounce back your ideas transformed. What it's not good for: wobble basses, control
freaks, type “A” personalities. Loosen up!
Getting Started
The first thing to know about Vectorspace is that it is a sequenced instrument. The clock must be
running in Reaktor standalone or in your DAW to make it work properly, recording and playing back
gestures.
The second thing to note is that there is a B panel on the instrument that has extra compressor, mapping
and tuning options. More on that later.
All controls are tool tipped. Make sure the “show info” toolbar button is turned on.
Front Panel Controls
The waveform display is made to be clicked and dragged on. The horizontal position sets the position
in the waveform, and the vertical position sets the length of the currently playing area. If the Auto
button is on, then your gestures will be recorded and each note you play will happen in a different area
of the sample. When the Freeze button is on, each note will freeze in the area of the sample the cursor
was traveling through when the note occurred. An indicator to the right of the waveform shows how
much gesture recording time is left.
The other options on the controls above the waveform:
• Sample Select selects the sample
• Sample Tune and Fine to tune the sample
• Sample Tune and Fine to tune the resonator
• a Ref Tone generator for tuning your imported samples – by default the pitch of the reference
tone is set to 60 (middle C)
• a Smooth control that sets the resynthesis smoothness – low values make it clicky, high values
make it smooth
• VoiceLFO adds instability to each voice's sample position - use this in conjunction with Freeze
especially
• Max Vel. makes each incoming note play at maximum velocity
• Samp Vol can be used to add a little extra gain to quiet samples
• Standard Attack, Decay, Sustain and Release envelope controls
Recordable Effects Faders
Vectorspace has four automatable XY faders that control sample and effects parameters. The first blue
fader controls grain spacing horizontally on the X axis, and scales envelope parameters vertically on
the Y axis.
The Mode button selects between quantized “steppy” movement and smooth non-quantized movement.
When quantized, the X and Y sequences show up below the fader, where they can be edited by clicking
and dragging. This allows you to fine tune your recorded gestures or set steppy patterns to create
rhythmic effects. You can also set the individual X and Y pattern lengths and speeds in the controls to
the right of the sequences, creating almost limitless variation as your patch evolves.
The Att, Dec, Sust and Rel buttons choose which of the envelope parameters are scaled by the Y axis
of the granular fader. It's usually most useful to control the Decay and Release times here.
The Resonator XY fader sets the resonator damping on the X axis and
the resonator mix on the Y axis. Here we see the fader Mode button set
to smooth movement. An indicator below the fader panel shows how
much gesture recording time remains.
The On switch turns the resonator effect on and off.
Alt Route activates an alternative routing that sends sound from the
sampler through the Growl macro before the Resonator, which can
drastically alter the sound, taming the growl and yelding a rounder
sound. Try both options!
The Resonator also features a View button, which allows access to a
panel with resonator fine tuning controls. The top panel is a display to
show the state of the partials. The Partial Shift control sets the
distribution of the partials – the tuning of the harmonics relative to
each other. X axis controls the linear distribution and Y axis controls
the parabolic distribution. Right click and set default to return to a
default state. Hold down shift to fine tune.
Dec / Dmp sets the overall decay and damping of the resonator. The
damping is modulated / scaled by the X position of the automated
fader. A Hi / Dec control sets the decay of the higher partials and the
balance between low and high partials. Experiment with this if the
Resonator sounds too boomy or shrill.
A Partials control sets the number of partials in the snapshot. More
partials give a more brilliant sound, especially in the low register, but use more CPU. You can usually
set this somewhere between 16 and 24 for most sounds, or might want a very low number of partials
for certain “reverby” effects.
The Comp control adjusts the resonator for different sample sources. A high setting is best for
continuous samples like piano, organ, synth, voice, or song clips. Using sparse samples, like a field
recording of stones clicking, or any sample with a very short decay setting, can act as an exciter for the
resonator, allowing you to turn it down and produce more physically modeled sorts of sounds.
Hi-Pass tunes how much low end from the sample affects the resonator. Turn it up for very boomy or
bassy samples, or down for thin and sparse samples.
GateMode prevents the Partial Shift control from taking effect until a new note has been received.
This is handy for live manipulation of the Partial Shift, which is mapped in the included Konkreet
Performer, Lemur and QuNeo templates. GateMode sounds especially cool when using the
Sequeggiator and controlling Partial Shift.
Gain sets the volume of the resonator, and Pan spreads the partials across the stereo field.
Use your ears and experiment with different Resonator settings. It's especially cool to import an atonal
sample, like glass or metal clanking, fingers tapping or the ambient sound of a public area, and turn it
into something completely different. Plucked, blown and percussive sounds are easily created, and can
be crossfaded with the natural sample sound using the Resonator's XY automation.
If you're getting too many ear-piercing high overtones, try turning the Res. Tune control down an
octave or a fifth, or reduce the number of partials, or move the Dec / Dmp and Hi / Dec controls
slightly more towards the lower left. Also try turning up the Comp control so the resonator won't
respond to every little tick and tap in the sampled material.
The Growl XY fader controls various distortion parameters,
depending upon which effect is selected in the drop down menu.
Freqy is a frequency modulation effect that ranges from a subtle
wobble to a distortion effect. X axis controls aplitude and Y axis
controls frequency.
Wringer is a ring modulation effect. The X and Y axes control left
and right channel ring modulation frequency, respectively. Use this
to add a distinctive metallic or distorted tone to the sound. This is a
good one for creating gated / rhythmic effects using the sequencers
in a gapped pattern in quantized mode.
Crush is a bitcrusher. X axis controls sample rate reduction and Y
controls bit depth reduction.
Shape is a shaping distortion. X and Y axes control left and right
channel distortion. This effect can create stereo effects as the channels are affected individually. Don't
boost the sample level with Samp Vol on the top row of the front panel if you're using Shape, and tame
the levels using the compressor as necessary.
Fold is a more extreme distortion. Try this one with the resonator's alt route control engaged, so sound
goes to the Growl macro before the resonator.
The Filter macro offers six different filter effects. X and Y axis functions
are dependent on the filter selected. A Mix control mixes filtered and dry
signal, useful if, for example, you want to let some high end through while
still doing resonant sweeps with the lowpass filter.
Swirly is a phaser type effect. X and Y axes control modulation frequency
and amplitude.
Notcho is a notch filter. X and Y control – well, it's complicated. Just try
it!
Hipass, Bandpass and Lowpass are typical filter types. X axis controls
resonance and Y axis controls filter cutoff. It can be useful to mix in some
dry signal on this one, especially with the lowpass and bandpass filter
types. These are the best filter types for creating gappy / gated sequences
with the sequencers in quantized mode. Try it with different sequence
lengths for X and Y so the resonance increases at different cutoff points as the sequences shift against
each other.
Swudge is an allpass filter type, and XY automation creates subtle swirling stereo effects. Useful when
you want a bit of extra movement but nothing too obtrusive. Mixing in some dry signal is also worth
trying with this one.
The Sequeggiator is a semi-algorithmic cross between a sequencer
and an arpeggiator. The Arp control engages the effect, and the Hold
control holds the notes you've played, allowing you to concentrate on
sound shaping your sequence with the other effects controls and
parameters.
Each step in the variable length sequencer represents the probability that a step will trigger, from 0% to
100%. It's generally useful to keep the first step at 100% so you get an immediate result when you play
a note – but you can turn the first step down once you have something happening, to get more
variability in the sound. Speed and Pat Len control the overall tempo and length of the sequence.
Each moving rectangle in the sequencer represents an instrument voice, and its height shows its voice
number – NOT its pitch. The purpose of the display is to show the temporal spacing of the active notes,
not to function as a mini piano roll. Sequencer patterns are saved in snapshots, but notes and chords are
not.
A good way to play the Sequeggiator is to add and hold one note at a time until you have a three or
four note chord with an offset between them, as shown in the graphic above. Hitting all the notes of a
triat or tetrad can create housey sounding chords, useful for creating the rythmic and harmonic skeleton
of a song.
For more unusual patches, use a long pattern length with sparse and widely spaced sequencer patterns
and low probabilities. This can be neat in conjunction with the resonator to create cavernous, abstract
soundscapes.
Below the Sequeggiator is a tempo synced delay with an automatable mix
control. An On switch activates it, and there are individual left and right
channel delay time controls. A lowpass filter affects the feedback, and the
feedback amount is controlled with the Repeat control. The Delaymix
automated fader controls the amount of delayed signal in the mix. If you
want a static delay mix, just tap on the fader at a point which represents the
amount of delay you want.
Finally, a standard Reaktor Compressor rounds out and conditions the
sound. Some important compressor controls are featured on the front panel
with more on the “B” panel. A Clarify control cuts some low end and boosts
the highs slightly for a better fit in your mix.
The B panel
The top row of the B panel has controls for mapping MIDI CC#s to the
automated faders. To the right you see the automation mapping for the loop
position cursor over the waveform display. I've set it to match the included
QuNeo mapping – horizontal position is mapped to CC 36, vertical is mapped to CC 37, and the Z
parameter, which engages recording, is mapped to
CC 35. Do not use MIDI learn on these controls
themselves! They're meant to be set manually.
Right clicking on one of these controls and
choosing “show in structure” takes you to a part of
the structure where you can also add OSC mappings
in the properties of each OSC Receive module.
If this seems like a roundabout way to set up
mappings, believe me – I would have made it
easier, by mapping knobs directly, except doing it
that way leads to unpredictable results when
automating recordable faders, as the control parameters have to arrive in a precise order. Only the OSC
Receive terminals and Channel Message modules give that kind of accuracy.
On the bright side, once the mappings are set, they work brilliantly for remote controlling the faders.
Included are mappings and templates for QuNeo, Lemur, and Konkreet Performer. These templates are
designed as performance surfaces to enhance the experience of playing Vectorspace and are not
intended as full replacements for the onscreen GUI! Any control surface that has XY controller pads
and sends a Z parameter as a touch indicator can be mapped to work with Vectorspace.
The Microtuning macro offers quick algorithmic non traditional tunings for
Vectorspace. This is not everyone's cup of tea but I find they sound brilliant
with percussive or exotic sounding patches. The Hz Base sets the tuning of the
“middle C”, Steps sets the number of notes to divide the octave, an On switch
engages or turns it off, and the Mode menu chooses whether you're dividing the octave in equal
spacings of cents or Hertz. The usual way is to work in cents, but do try Hz tunings as well as they
sound wonderfully novel. Aleksi Perälä (Ovuca) has done some stunning work with Hz based tunings
on his Mental Union and MU3 releases. Highly recommended.
For a quick exotic sound where every note “works”, try cents mode with a division of 5 or 7 notes.
Almost anytime you see tuning indicated as, eg, 17-TET (17 tone equal temperament) it means a cents
based tuning with 17 steps to the octave.
A strandard Reaktor Compressor with all controls exposed is also found on the B panel. While a full
treatment of how to work with the compressor exceeds the scope of the current document, I will say
that you should watch the Knee, Sat(uration) and Rel(ease) controls as well as Out Gain to tailor your
sounds to a nice level without clipping.
Also on the B panel is a Sample Init button. This is normally activated and initializes a
patch on preset load or sample change so that the sample area plays back accurately. A
side effect is that all notes stop when changing sample or preset. Turn this off to have notes sustain
through sample or preset changes. This setting does not save with presets.
Control Surface Mappings
Vectorspace comes with two Konkreet Performer mappings for
the automatable faders – an angular mode and an XY mode. In
both:
•
•
•
•
•
•
Node 1 maps to the Loop Automation
Node 2 to the Granular automation
Node 3 to Resonator automation
Node 4 to Growl automation
Node 5 to Filter automation
Node 6 to Resonator Partial Shift
Performer's bottom ribbon controls the delay automation. There's no feedback from Reaktor to KP to
set up here, so just make sure KP is transmitting on the right port and address, and that Reaktor is set up
to receive on those ports.
The Lemur template is straightforward and fully labeled. Simply direct its OSC output to Reaktor, then
set up an OSC target in Reaktor called Lemur so that when snaps load in Reaktor, the Sequeggiator
length and sequence will be sent to the Lemur GUI.
The QuNeo template is very simple to set up – once you've imported the template, just make sure its
MIDI is directed to Reaktor.
Adding Samples
To add your own samples, click on the
sample map button to open the sample map.
There's only one sample map in the ensemble -add your own samples after the existing ones, one
sample per key. Don't worry about root information – any sample you add and select with the Sample
Select control will play at its natural pitch on middle C. If it's a tonal sample and it isn't tuned to C, use
the Sample Tune control and turn on the Ref. Tone to tune it. In the sample mapper menu on the left,
make sure “ignore root note on file load” is selected.
The kinds of samples that work best are two to ten seconds long. Try a variety of material – spoken
word, singing, guitar, piano, music clips, field recordings, animal noises...
When making snaps, remember that not every snap needs to use every sound mangling option! Some of
my favorite snaps use just animation on the sample area and a bit of grain automation.
In Conclusion
Have fun with Vectorspace and please don't hesistate to contact me at reaktortips.com with questions,
comments and feature requests. Vectorspace has a modular construction, especially regarding effects
and I'll be adding more effects modules in the growl and filter macros.
Peter Dines, May 17 2015
http://reaktortips.com