1
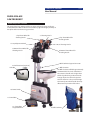
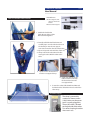
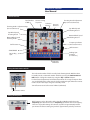
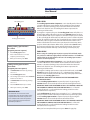
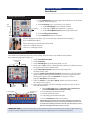
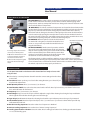
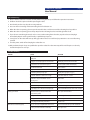
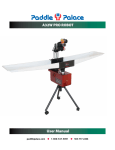
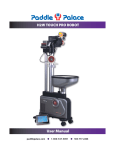
S4W PRO ROBOT
User Manual
paddlepalace.com
1-800-547-5891
503-777-2266
Taking Robot Technology
to the Next Level
The Paddle Palace S4W Pro takes robot technology to the next level. This innovative robot
has two heads, each with two throw wheels. Both heads, and the four throw wheels, are all
independently programmable, allowing you great flexibility in designing playing patterns
and practice options. You can program a seamless combination of topspin and underspin (or
side-spin or no-spin) shots in the same play sequence. The S4W Pro comes with an easy to
use, comprehensive control box, conveniently located at the player’s end of the table. This
heavy duty robot is durable for club and home use. It is ready to use right out of the box.
With the S4W Pro, you can use one or both heads to produce desired practice patterns.
Use the single head to set up a specific serve or volley, or employ both heads to alternate
seamlessly between types of spin, short and long balls, strong and weak balls, or high
and low balls. Plus, you choose the landing spot locations, as well as the speed and throw
frequency. You can set up one head to reproduce a realistic serve that hits the robot side of
the table first, then complete the sequence with volleys from the 2nd head.
See paddlpalace.com for all the details!
Two heads and four throw wheels
Heads and throw wheels can be set independently for speed,
spin, and landing spots on consecutive shots
Topspin, underspin, sidespin, and no spin--plus serves--can be
programmed into your custom training pattern
Set your own, or use 30 pre-programmed sets of landing
location sequences
Short & long balls, strong & weak balls, or high & low balls
can be combined in one training sequence
Remote control box on player side of table
Random sequence mode for the ultimate challenge
Memory function saves current settings for next practice
session
Ball recycling and net collection system
Easy set up, and rolls from table for convenient storage
PADDLE PALACE ROBOTS INCLUDE:
Free 120 Nittaku Balls
Free Ball Pick-up Net
Free Robot Training DVD
Item OPVS4
Free shipping to contiguous USA
30-day money-back Guarantee
One year limited Warranty
Paddle Palace S4W Robot
page 3
User Manual
Table of Contents
4
Robot Components / Features
5
How to Assemble the Ball Catch Net
5
The Power Supply
6
Control Box Features
6
Setting the Total Number of Balls
6
Setting the Frequency
7
Setting the Head Angle (Loop)
7
Setting the Type of Spin (Head Rotation)
8
Setting Throw Wheel Speed
8
Selecting Pre-Programmed Landing Sequences (Various
Serving Sequence)
8
Selecting (Random) Landing Spot Sequences
9
Selecting the Landing Spot Locations
9
Setting Landing Spot Locations for 1 Head and 2 Heads
10 Setting Single Head Serve
10 Setting Double Head Serve
11 How to Maintain Your New Robot
11 Quick Start Guide
12 General Warning/Safety Issues
12 Trouble-Shooting
13 30 Pre-Programmed Landing Sequences
800-547-5891 503-777-2266
www.paddlepalace.com
Paddle Palace S4W Robot
page 4
User Manual
PADDLE PALACE
S4W PRO ROBOT
Robot Components / Features
This manual has been written to help you enjoy and get the most out of your
new Paddle Palace Robot. Take time to read these pages thoroughly and keep it
handy for reference when using your robot.
1. Top Throw Wheel for
Shooting Head 1
7. Loop Adjustment Knob
5. Bottom Throw Wheel for
Shooting Head 1
3. Shooting Head 1
2. Top Throw Wheel for
Shooting Head 2
4. Shooting Head 2
6. Bottom Throw Wheel for
Shooting Head 2
8. Ball Catch Net Support Connector
9a. Ball Container [top view]
Poke Bar
9. Ball Container
The Ball Container will hold approximately
100 40mm balls. The level of the balls in
the container should not be higher than
the label (yellow line) positioned inside.
Foreign objects should not be put into
the ball container as they could damage
the internal parts which would adversely
affect normal operation of the robot.
10. Power Switch
11. Control Box
12. Control Box
Support Bracket
13. Ball Catch Net
page 5
Paddle Palace S4W Robot
User Manual
How to assemble the Ball Catch Net
Net Hardware:
A
A 2 Net Supports that
clamp on either side
of table
B Control Box Support
B
1. Unlock the buckle that
holds the two halves of the
Ball Catch Net together.
2. Partially unfold the Ball Catch Net and
carefully slip it over the robot head. Insert
the double pin into the net support
connector located on the robot frame.
3. Open and spread out both sides of the net.
4. Always unlock the robot wheels before
moving the robot. Roll the robot to the
table.
5. Slip the sleeves of the ball net
over the net support clamps.
6. Clamp net supports to the
table near the net and slip
the elastic band over the
net support knob.
7. To store the robot, fold the Ball Catch Net and
lock the buckles. Unlock the wheels and roll the
robot away.
The Power Supply
The robot is powered by
standard US home current
(120V). Make sure the power
cord is securely plugged in.
The on/off switch is located
on the backside of the robot.
Turn off and unplug the robot
when not in use.
page 6
Paddle Palace S4W Robot
User Manual
S4W Control Box
Total Number
of Balls
Shooting Head 1 Adjustment Keys
(Increase/Decrease)
Various Serving
Sequence
Selection
Menu
Shooting Head 2 Adjustment
Keys (Increase/Decrease)
Increase/
Decrease
Top-Wheel Speed
Shooting Head 2
Top-Wheel Speed
Shooting Head 1
Bottom-Wheel Speed
Shooting Head 2
Bottom-Wheel Speed
Shooting Head 1
Frequency Indicator
(Increase/Decrease)
Ball Counter 1
Ball Counter 2
START/PAUSE
Landing Spot
Locations
[11 Positions]
Set Landing
Spot
Sequences
in Random
Setting the Total Number of Balls
This is the total number of balls served by both Shooting Heads. With the robot
in Standby mode, set the total number of balls by pressing the Total Number of
Balls button. Change the number by using the “Up” or “Down” buttons.
For fast-forward adjustment, hold either button down. The range of output is from
1 to 999 balls. When the robot starts, the ball countdown begins. When the counter
reaches “0”, the robot stops and goes to Standby mode.
Turn off counter to set ball count to “Infinite” (unlimited).
Total Number of Balls
Setting the Frequency
Ball frequency can be adjusted in either Standby or Working mode. Press the
Frequency (+) button to increase, or Frequency (-) button to decrease frequency.
There are 10 possible settings. The slowest (1) produces approximately 25 balls
per minute. The fastest setting (10) produces approximately 95 balls per minute.
Paddle Palace S4W Robot
page 7
User Manual
Setting the Head Angle (Loop)
Head Angle
Lock
Loosen the Head Angle Lock knob with one hand while
adjusting the head angle using the Loop Adjustment Knob.
Tighten the Head Angle Lock knob to hold head at desired
angle.
Set the head angle upward to deliver the ball directly.
Set the head angle downward and the ball will bounce on
the robot side of the table before crossing the net. Use this
setting to practice service returns, the speed and spin is
slightly reduced because of this extra bounce.
Loop
Adjustment
Knob
Low curve makes landing spot short
High curve makes landing spot long
Setting the Type of Spin (Head Rotation)
Top and
Bottom
Throw
Wheels
Each of the two shooting heads can be set to produce one of
9 different types of spin. Top Spin, Under Spin, and No Spin are
produced by varying the speed of the top and bottom throw
wheels. Left-side spin, right-side spin, left-side top spin, left-side
under spin, right-side top spin, and right-side under spin are
achieved by rotating the shooting heads. When rotating a head,
be sure it does not interfere with the operation of the other head.
Both heads cannot be set to straight side spin at the same time.
Paddle Palace S4W Robot
page 8
User Manual
Setting Throw Wheel Speed (Amount of Speed and Spin)
Top Wheels
Bottom Wheels
Wheel speed can be set in either Working or Standby mode.
The top and bottom wheel display will blink the current settings when the
robot is in Standby mode. The wheel speeds are changed by pressing the
“Increase” or “Decrease” buttons. The speeds of the top and bottom throw
wheels determine the speed and amount of spin, or lack of spin, of the ball
delivery.
Each wheel has 10 numeric settings. The higher the setting the faster the
ball speed becomes. The ball speed is roughly proportional to the strength
of spin. To produce topspin, the top wheel is set at a higher number than
the bottom wheel. To produce under spin, the bottom wheel is set higher
than the top. Less or no spin is produced when the wheel speeds are set
closely together.
To practice against heavy under spin shots (chopping), a very realistic chop
can be created by moving the robot away from the table a few feet. This
also works for lobbing.
Shot Examples:
Topspin ball with Medium Speed and Medium amount of Topspin – Set the top wheel at 5 and the bottom wheel at 2.
Topspin ball with Faster Speed and Medium amount of Topspin – Set the top wheel at 7 and the bottom wheel at 3.
Medium Speed ball with Heavier Topspin – Set top wheel to 7, bottom wheel to 1.
ROBOT TIP: The bigger the difference in setting between the top and bottom wheels, the more the spin is produced.
Selecting Pre-Programmed Landing Sequences (Various Serving Sequence)
Up/Down
Various Serving Sequence
The Various Landing Sequence is set in Standby mode. By pressing the Various
Serving Sequence button you can select one of the 30 numbered sets of
Pre-Programmed Landing Sequences listed on page 13. A red LED light will come
on when this feature is activated. Press the “Up” or “Down” arrow buttons until the
number of your desired sequence shows in the display.
Set the head angle and type of spin to suit your training needs for each landing
sequence.
Use the ball counter to set the number of balls you want to play for each sequence.
Turn off the ball counter for unlimited play.
Selecting (Random) Landing Spot Locations Sequences
Sequences in
Random
Landing Spot Locations
The Random Landing Spot Locations Sequence is set in Standby
mode.
Activate this feature by pressing the Sequences in Random
button. A red led light will come on. The robot will randomly select
one of the 30 pre-programmed sequences and rearrange the
serving order to form a new sequence. This feature will produce
thousands of different sequences. (List of 30 Pre-Programmed
Landing Sequences on page 13.
Paddle Palace S4W Robot
page 9
User Manual
Selecting the Landing Spot Locations (Program Your Own Sequence)
Set Landing Spot
Landing Spot Locations
Setting Landing Spot Locations
for 1 Head
(program your own sequence)
1.
Press Landing Spot button.
2.
Press Location buttons 1-11 in the
sequence you wish to play.
3.
When you are done, press Start.
Setting Landing Spot Locations
for 2 Heads
(program your own sequence)
1.
Set Ball Counter for Head 1 by pressing
the “+” or “-”.
2.
Press Landing Spot button.
3.
Set Landing Spot Locations. Press Location
buttons to set Head 1.
4.
Set Ball Counter for Head 2 by pressing
the “+” or “-”.
5.
Press Location buttons up to 9 times
6.
When you are done, press Start.
IMPORTANT NOTE:
The robot will serve head one’s entire
sequence first, then serve head two’s entire
sequence. When head two’s sequence has
been completed the robot will repeat the
serving order beginning with head one
followed by head two.
FOR 1 HEAD
The Landing Spot Locations Sequence is set in Standby mode. There are
11 numbered buttons on the bottom of the control box. These buttons
indicate 11 locations (landing spots) on the table where the robot will
deliver balls. The blue area surrounding the buttons represents the
receiving end of the table.
To program a sequence, first press the Landing Spot button. All of the 1-11
location lights will be off at this point. Press the Location button for where
you want the first ball of your sequence to land (for example, press Location
3). The red led light for that location (3) will come on. Press another location
button (for example Location 8). The second ball of your sequence will land
at location 8. Press 8 again and the third ball will land on location 8. The
number of balls that land on the same spot depends on how many times
you press that location button. When done, start the robot (Start button).
Your sequence will play, then repeat, until the ball counter gets to zero.
Robot memory function will keep current settings next time you play.
FOR 2 HEADS
Before setting the Landing Spot Locations sequence for both heads, make
sure you have a sufficient supply of balls in the ball container. An insufficient
supply of balls in the ball container will cause the Landing Spot Locations
sequence to work improperly.
The Landing Spot Locations Sequence is set in Standby mode. There are
11 numbered buttons on the bottom of the control box. These buttons
indicate 11 locations (landing spots) on the table where the robot will
deliver balls. The blue area surrounding the buttons represents the
receiving end of the table.
To program a landing spot locations sequence for both heads, set the Ball
Counter for Head 1 by pressing the “+” or “-“ adjustment keys until you
reach the number of balls you want the robot to put into play from Head 1.
Next press the Landing Spot button.
IMPORTANT! ONLY PRESS THE LANDING SPOT BUTTON ONCE WHEN
SETTING BOTH HEADS.
Set the Landing Spot Locations sequence for Head 1 by pressing the
Location buttons to locate the placement of balls shooting from Head 1.
IMPORTANT! MAKE SURE THE NUMBER OF BALLS SET FOR HEAD 1 MATCHES
THE NUMBER OF LANDING SPOTS PRESSED FOR HEAD 1. (i.e. If the ball
counter for Head 1 is set for 6 balls then 6 landing positions must be
selected for Head 1 sequence).
Set the Ball Counter for Head 2 by pressing the “+” or “-“ adjustment keys
until you reach the number of balls you want Head 2 to put into play. Then
set the Landing Spot Locations sequence for Head 2 by pressing the
Location buttons to locate the placement of balls for Head 2.
IMPORTANT! MAKE SURE THE NUMBER OF BALLS SET FOR HEAD 2 MATCHES
THE NUMBER OF LANDING SPOTS PRESSED FOR HEAD 2. (i.e. If the ball
counter for Head 2 is set for 8 balls then 8 landing locations must be
selected for Head 2 sequence).
When you have completed this process press Start to begin play.
Paddle Palace S4W Robot
page 10
User Manual
Setting Single Head Serve
1. Set the Ball Counter of one shooting head to infinity. Press and hold the
(+) button until a dash appears.
2. Set the Frequency press (+) to increase (-) to decrease.
3. Set the Head Angle (Loop) - illustration below
Frequency
4. Set the type of Spin (spin indication) - See page 5
5. Set the Throw Wheel Speed (amount of speed and spin)
6. Set the Landing Spot Locations.
7. Press Start/Pause button to start robot
Ball
Counter
When changing the loop of the serve, loosen the Loop Lock Knob before adjusting
the Loop Modulation Wheel.
When achieving your desired loop, lock the knob.
High curve = landing spot long
Low curve = landing spot short
Setting Double Head Serve
The control box automatically stores the current settings when the robot is turned off and will start with
those settings next time the robot used.
1.
2.
3.
4.
Total Number
of Balls
5.
6.
7.
Shooting
Head 1
Shooting
Head 2
8.
Set the Total Number of Balls.
Set the Frequency.
Set the Head Angle (loop) for Shooting Heads 1 and 2.
Set the type of Spin, rotate the Shooting Heads until the spin indicator points to
the type of spin wanted. Set both heads.
Set the Throw Wheel Speeds (amount of speed and spin) for
Shooting Heads 1 and 2
Select the Landing Spot Location Sequence you want to use. You have three
options: Random, Pre-Programmed (various), or you can program your own
landing spot sequence. If you set “Random” in step 6 you are done.
Press the “Start/Pause” to start robot.
If you set “Various” use the “Up” or “Down” buttons to choose one of the
30 sequences (See page 13).
If you chose to program your own Landing Spot Sequence in Step 6, set the
ball counter for Head 1.
9. Push Landing Spot button ( IMPORTANT! PRESS LANDING SPOT
BUTTON ONLY ONCE WHEN SETTING BOTH HEADS )
Landing Spot
Landing Spot Locations
Sequences in
Random
10.
11.
12.
13.
Set landing spot locations for Head 1.
Set ball counter for Head 2
Set landing spot locations for Head 2
Press “Start/Pause” button to start robot.
IMPORTANT! The ball counters for both Head 1 and Head 2 must match the
number of landing spot locations set for Head 1 and Head 2. (If Head 1 is set
for 3 balls then 3 landing spot locations must be selected. If Head 2 is set for 5
balls then 5 landing spot locations must be selected.)
IMPORTANT NOTE: The robot will serve head one’s entire sequence first, then serve head two’s entire sequence. When head two’s
sequence has been completed the robot will repeat the serving order beginning with head one followed by head two.
Paddle Palace S4W Robot
page 11
User Manual
How to Maintain Your New Robot
A
B
If a foreign object enters the ball
container, turn off the power.
A Open the moveable door cover
to the view window, located on
the motor side of the robot.
B Unscrew the transparent guard
plate, and remove the foreign
object.
ELECTRONICS: The robot’s electric components are located in the machine’s circuit
board and the control box. Therefore, you should be careful to avoid dropping either
component or avoid any activity that would cause damage to the internal electronic units
of one or both of these components.
MECHANICS: The robot’s mechanical components are located in the mechanisms that
produce the ball service and delivery. Special attention should be paid so that no foreign
objects are put into the ball container. Foreign objects will block the robot’s delivery
wheel and result in damage to the robot. If a foreign object does enter the ball container,
it can be retrieved by opening the moveable door cover to the view window located on
the motor side of the robot. First, turn off the power, then open the moveable door cover,
remove the transparent guard plate, and take out the foreign object.
POKE BAR: When the poke bar inside the ball container
Ball Container [top view]
has worked for a long time, it should be checked for loose
showing Poke Bar
screws so as to prevent any trouble that would lead to an
irregular ball delivery.
FRICTION WHEELS: Under normal operation, and after
long use, the top and bottom friction wheels may become
dirty. To ensure a quality serve, please clean the wheels often
with a wet towel. Always turn off the robot’s power before
cleaning. To avoid doing damage to the internal parts of the
robot do not use force to move the shooting head.
The friction wheels are able to work for 5,000 hours or longer before they need to be
replaced. When performing the replacement, power off the robot, remove the protective
cover and remove the screws from the friction wheels with a screwdriver. After replacing
the wheels, replace the screws properly and with care.
Quick Start Guide
Use the Quick Start Guide on the bottom of the Control Box for a handy reference while
using the robot.
The robot has a memory function that will retain the current settings when the robot
is turned off.
Start/Pause: Power up robot, press “Start” after setting functions, press “Pause” if you
need to make adjustments.
Ball Quantity Counter: Press (+) to increase (-) to decrease.
Total Number of Balls: Pause the robot. Press total number of balls. Press “Up” to increase, press “Down” to decrease.
Press and hold button for fast forward.
Frequency: Press (+) to increase (-) to decrease.
Head Angle (Loop): Loosen the “Loop-Lock” knob. Adjust the angle of the shooting head using the loop modulation
wheel. Tighten the knob after achieving the correct head angle.
Type of Spin (Head Rotation): Rotate the shooting heads until the spin indicator points to the type of spin wanted.
Throw Wheel Speed (Amount of Speed and Spin): Press (+) to increase or (-) to decrease throw wheel speed for top
and bottom throw wheels.
Random Landing Sequences: Pause the robot. Press “Sequences in Random”
Various Landing Sequences: Pause robot. Press “Various Serving Sequences”.
Landing Spot Locations Selection: Pause the robot. Press “Landing Spot” button. Press landing spot location buttons
1-11 to select landing spots.
Paddle Palace S4W Robot
page 12
User Manual
General Warnings
1. Please read the instruction manual carefully before using the robot, and follow the operation instructions.
2. Children should be supervised while operating the robot.
3. Avoid windy and/or rainy days when using outdoors.
4. Use care when connecting and disconnecting the ball collection net
5. When the robot is operating, do not open the movable door, and do not touch the shooting head or poke bar.
6. When the robot is operating, please keep away from the shooting head to avoid being hit with a ball.
7. If you observe something abnormal, such as some smoke coming from the robot, stop the robot and unplug it
immediately. Repair must be performed by a qualified repair person.
8. Some places on the robot will heat up during operation. Please be careful and pay attention so as to avoid burning
yourself.
9. Turn the power switch off and unplug the robot after use.
10. Only authorized repair shops are qualified to repair the robot. The robot warranty will be void if repairs are done by
unauthorized persons or shops.
Trouble-Shooting
FAILURE
CAUSE
SOLUTION
Robot doesn’t work
The ball counter has reached 0 and the robot is in
standby mode
Press the Start Key
The plug is not connected properly to the electrical outlet.
Check the plug connected to the electrical outlet
The Start button on the control box is not pressed.
Press the Start button until the number display
The control box doesn’t work
Replace control box
The poke bar in ball container is loose
Fasten the poke bar
The ball duct is jammed by foreign object
Clear away the foreign object (see page 9)
The amount of balls in the container are not enough
The amount should be 50 to 100 balls
It takes time to transport the balls from container
to shooting head
Wait for a while
The parts in control box do not work temporarily
Start up again after shut off of 5 or more seconds
The cable connecting to motor is loose
Connect it with the original method
The pressing key on the control box do not work properly
Replace the thin-film switch on the surface of the control box
Dirt and wear on the top and bottom wheels after a
period of time in operation
Clean or replace the friction wheel
The long and short ball sequence mode is selected.
Cancel the long and short ball sequence mode
The irregular rotation mode is selected
Cancel the irregular rotation mode
The shooting head is deflected by external force
Restart the robot
There are some broken or unqualified balls inside the robot
Remove the broken balls and replace with standard balls.
The robot just started and the balls are still feeding
Wait a couple seconds
Robot works but does not release the balls
Speed and Frequency cannot be adjusted
Landing spot is unstable
Ball counter does not function properly
page 13
Paddle Palace S4W Robot
User Manual
See pages 8-9 for setting up this feature.
30 Pre-Programmed Landing Sequence s
NO.
LEFT HEAD
RIGHT HEAD
LEFT HEAD
RIGHT HEAD
LEFT HEAD
1.
Twice at spot #10
Twice at spot #2
2.
Twice at spot #1
Three times at spot #8
3.
Twice at spot #11
Three times at spot #2
4.
Once at spot #5
Twice at spot #1
5.
Three times at spot #2
Once at spot #9
6.
Twice at spot #4
Twice at spot #11
7.
Four times at spot #8
Twice at spot #1
8.
Twice at spot #10
Three times at spot #1
9.
Twice at spot #1
Four times at spot #9
10.
Three times at spot #2
Twice at spot #4
11.
Twice at spot #11
Twice at spot #4
Twice at spot #1
12.
Once at spot #9
Once at spot #1
Twice at spot #10.
13.
Twice at spot #10
Once at spot #2
Once at spot #11
14.
Once at spot #11
Twice at spot #1
Twice at spot #6
15.
Once at spot #6
Once at spot #11
Three times at spot #2
16.
Twice at spot #11
Once at spot #6
Three times at spot #1
17.
Twice at spot #2
Twice at spot #11
Once at spot #2.
18.
Three times at spot #11
Three times at spot #2
Once at spot #11
19.
Once at spot #1
Once at spot #10
Twice at spot #2
20.
Once at spot #2
Once at spot #11
Three times at spot #1
21.
Once at spot #10
Once at spot #1
Twice at spot #5
Once at spot #11
22.
Once at spot #1
Twice at spot #11
Twice at spot #1
Three times at spot #9
23.
Once at spot #11
Once at spot #7
Once at spot #1
Twice at spot #9
24.
Once at spot #11
Once at spot #2
Three times at spot #10
Once at spot #6
25.
Once at spot #1
Twice at spot #3
Once at spot #8
Twice at spot #11
26.
Once at spot #1
Once at spot #11
Once at spot #2
Once at spot #10
Three times at spot #5
27.
Twice at spot #10
Twice at spot #1
Once at spot #9
Once at spot #11
Once at spot #2
28.
Twice at spot #1
Once at spot #9
Once at spot #2
Twice at spot #3
Twice at spot #10
29.
Once at spot #1
1 shot from RH to #9
Once at spot #2
Once at spot #3
Twice at spot #10
30.
Twice at spot #11
Once at spot #2
Twice at spot #9
Once at spot #1
Three times at spot #11
NOTE: The pre-programmed landing sequences chart indicates the order and location of the shots. For example, for
Sequence #16, the left head serves twice to spot #11, then the right head serves once to spot #6, then the left head serves three
times at spot #1, then it repeats back to the beginning of the sequence.
800-547-5891 503-777-2266
www.paddlepalace.com