1
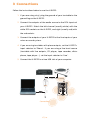
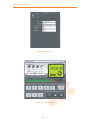
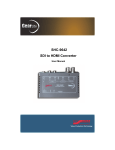
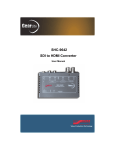
cross-banner.pdf
10/07/2009
16:54:45
C
M
J
CM
MJ
CJ
CMJ
N
User Manual
Contents
1
Welcome
3
2
U-RIP22 Description
4
3
Connections
6
Installation
7
4
5
6
4.1 Windows
7
4.2 Mac OS X
8
4.3 Launching AUDIO RECORDER or VINYL RIPPER
8
4.4 License Key
8
Vinyl Ripper
9
Audio Recorder
12
6.1 Preferences
7
12
vibe-watermark-brig
6.2 Overview of the Graphical User Interface
12
6.3 Save as
C
13
Audacity
M
15
J
CM
MJ
CJ
CMJ
N
2 / 16
1 Welcome
Thank you for choosing EasyREC. This product was designed to provide
a simple and fully audio recording solution.
Take a few minutes to run through this manual and you’ll be on your way
to recording any audio sources!
We invite you be a part of the MixVibes community to share your experiences, find help and advice, and check for available updates. See you
1
2
online on the forum or on the website !
Minimum System Requirements for PC
•
•
•
•
Windows XP SP2 or Windows Vista SP1 or Windows 7
Pentium 4 / 2 GHz or equivalent
1 GB RAM
Hard drive space for music
Minimum System Requirements for MAC
•
•
•
•
Mac OS X 10.4
Intel Core Duo / 1.83 GHz or higher
M
1 GB RAM
J music
Hard drive space for
Contents of the box
•
•
•
1
2
C
CM
EasyREC disc
MJ
U-RIP22 USB audio interface
This user manual CJ
http://forum.mixvibes.com
CMJ
http://www.mixvibes.com
N
3 / 16
vibe-watermark-brig
urip22.pdf
23/07/2009
11:48:11
2 U-RIP22 Description
1
6
7
INPUT
OUTPUT
2
3
4
U-RIP 22
5
U-RIP22
C
M
1 Inputs 1/2: You can use these inputs to connect any RCA audio
J
sources (decks for example). The phono level inputs (in genCM
eral for vinyl turntable) and line level inputs vibe-watermark-brig
share the same
MJ
connectors. Use the input source selector to select the inputs
CJ
source.
CMJ
C
2 Outputs 1/2: You can use these outputs to connect an external
M
N
mixer or your sound system (amplifier, powered speakers, or
home stereo).
J
3 Input source (LINE/PHONO) selector: This is where you seCM
lect inputs source of input 1/2.
4 Gain control for MJ
line input: Controls the inputs level of the
line inputs 1/2.
CJ
5 USB connector: Connects the USB cable to the computer. This
is a plug and play device, no drivers are required. Power is
CMJ
supplied via USB.
N
4 / 16
2 U-RIP22 Description
6 Grounding screw: When you use a turntable, connect the
ground lead from your turntable to the grounding screw to help
prevent hum.
7 LED : Find the correct signal location by rotating gain control
until the LED returns to green.
Specification
Power 5V dc
Frequency Response Phono: 20Hz-20KHz +1/-3dB (RIAA) (IN: 1KHz
3mV) Line: 20Hz-20KHz +1/-2dB (IN: 1KHz 800mV)
THD+N (A Weighted and “20KHz”) Phono: <0.08%@1KHz (IN: 1KHz
19mV VR: MAX.) Line: <0.05%@1KHz (IN: 1KHz 800mV VR: MAX.)
S/N (A Weighted and “20KHz”) Phono: Less than -70 dB (IN: 1KHz
vibe-watermark-brig
19mV VR: MAX.) Line: Less than -75 dB (IN: 1KHz 800mV
VR: MAX.)
Channel Separation (A Weighted and “20KHz”) Phono: Less than
C
-70 dB (IN: 1KHz 19mV VR: MAX.) Line: Less than -70 dB (IN: 1KHz 800mV
VR: MAX.)
M
Input Impedance & Sensitivity Phono: 47K Ohm /19 mV +0/-3dB
J
Line: 10K Ohm /800mV +1/-2dB
Maximum Input Phono: 19mV
1KHz (VR: MAX. OUT)
CM
LED Red on Range 750 ~ 950mV (Line in 1KHz VR MAX.)
MJ
Dimensions (wxdxh) 75 x 107 x 30.5mm
Weight 140g
CJ
Computer interface USB1.1 Compliant Windows XP or MAC OS X
CMJ
USB Cable Length 1.5M
N
5 / 16
3 Connections
Follow the instructions below to use the U-RIP22:
1 If you are using vinyl, plug the ground of your turntable to the
ground lug on the U-RIP22.
2 Connect the outputs of the audio source to the RCA inputs of
your U-RIP22. Match the left channel (usually white) with the
white RCA sockets on the U-RIP22, and right (usually red) with
the red sockets.
3 Connect the outputs of your U-RIP22 to the line inputs of your
mixer or sound system.
4 If you are using turntables with phono outputs, set the U-RIP22’s
input selector to ’Phono’. If you are using a line level source
(turntable with line outputs, CD player, tape recorder, dictaphone, tape player...), set the input selector to ’Line’.
connections.pdf
23/07/2009
11:51:11
5 Connect the U-RIP22 to a free USB slot of your computer.
vibe-watermark-brig
C
M
J
INPUT
OUTPUT
U-RIP 22
CM
MJ
CJ
Connections
CMJ
C
N
M
J
6 / 16
4 Installation
4.1 Windows
1 Insert the EasyREC installation disc into your computer’s CDROM drive. The installation program will launch automatically.
In case it does not, open Windows Explorer, navigate to the
EasyREC installation disc and double-click on ’Autorun.exe’.
2 Choose the software you want to install: AUDIO RECORDER,
VINYL RIPPER or AUDACITY. If you want to rip your vinyls or
record any RCA sources (turntable, CD player, tape recorder,
dictaphone, tape player...), install VINYL RIPPER; if you want
to record others audio sources (internet radio...), install AUDIO
RECORDER; if you want to edit an audio file, install AUDACITY. If
you choose to install AUDIO RECORDER or VINYL RIPPER, follow
the following steps.
3 Choose your language and click OK.
vibe-watermark-brig
4 Read and accept the End-User License Agreement by clicking I
Agree.
C
5 Select the Components
you want to install and click Next.
M
6 Choose the folder in which you want to install the software and
click Next.
J
7 Choose the Start Menu
folder in which you want to create the
CM
software shortcuts. To start the installation, click Install.
MJ
8 Once the installation is complete you can click Finish. If the
check box Run is selected, the software will launch automatiCJ
cally.
CMJ
N
7 / 16
4 Installation
4.2 Mac OS X
1 Insert the EasyREC installation disc into your computer’s CDROM drive.
2 Double-click the EasyREC icon on your desktop.
3 Choose the software you want to use: AUDIO RECORDER, VINYL
RIPPER or AUDACITY. If you want to rip your vinyls or record any
RCA sources (turntable, CD player, tape recorder, dictaphone,
tape player...), drag and drop VINYL RIPPER into your Applications folder; if you want to record others audio sources (internet
radio...), drag and drop AUDIO RECORDER into your Applications
folder; if you want to edit an audio file, drag and drop AUDACITY
into your Applications folder.
vibe-watermark-brig
4.3 Launching AUDIO RECORDER or VINYL
C
RIPPER
M
Windows Go to [Start > All Programs > MixVibes > Audio Recorder or
Vinyl Ripper] and click
on the application icon.
J
Mac OS X Go to [Applications > Audio Recorder or Vinyl Ripper] and
CM
double-click on the application.
MJ
4.4 License Key
CJ
Enter the License Key found on the sleeve of your installation disc and
CMJ
click Submit.
N
8 / 16
5 Vinyl Ripper
VINYL RIPPER allow you to rip your vinyls or record any RCA sources
(turntable, CD player, tape recorder, dictaphone, tape player...).
The Vinyl Ripper Wizard will guide you in 7 steps through the ripping
process.
Step 1: Type of project
1 Select what type of project you want: rip vinyls or encode existing audio files. If you choose encode existing files, go to the
step 5.
Step 2: Capture Info
1 Select the location for recording.
2 Click on Audio device options to choose the sound card ’USB
Audio CODEC’ then close the devices window.
3 If you are using turntables with phono outputs, keep ’yes’ ticked
vibe-watermark-brig
for preAmp. If you are using a line level source
(turntable with
line outputs, CD player, tape recorder, dictaphone, tape player,
C
internet radio...), keep ’no’ ticked for preAmp (an RIAA emulation filter will be applied). Make sure to follow the connection
M
instructions in section 3.
J
Step 3: Tracks Informations
1 Change informations
CM about the tracks you’re about to rip. A new
folder will be created to keep things organized.
MJ
2 You can drag cover (back and front) from any explorer/finder
window.
CJ
3 Click reset to reset all info, including covers.
CMJ
Step 4: Capture
N
9 / 16
5 Vinyl Ripper
1 Turn on the audio input you want to record. Click Test to test
the volume (not too loud, not too low). Put the dBMeter under
0dB using your audio input level controler. Then click Test again
to deactivate.
2 Put the needle on the vinyl without playing it then click Calibrate to calibrate the silence threshold.
3 Click Rumble to deactivate/activate a rumble filter.
4 Click Param to set the minimum silence between two tracks
and the silence threshold for silence detection.
5 Click Capture to start capturing and writing to disk.
Step 5: Edit the tracks
1 Double click on a track to rename it.
2 Right click on a track to access actions on it.
vibe-watermark-brig
3 You may preview the selected effects on a track. To preview a
C
track you have to click on the track then select an effect. Play
button become Preview button.
M
4 You can also apply filters to files in the tracklist. Caution! No
preview here: filesJwill be edited in place.
5 You can merge two tracks together if you right click on the first
CM
one and choose Merge track with the next one.
MJ
Step 6: Format of the file
1 Select the format CJ
of the audio file you want to generate. For
iTunes conversion, you need iTunes installed. For lame, you
need to select theCMJ
location of ’lame_enc.dll’.
N
10 / 16
5 Vinyl Ripper
Step 7: Newvinyl_ripper1.pdf
capture
27/05/2009
12:27:23
1 Start over again by clicking on the Do new capture button.
vinyl_ripper2.pdf
27/05/2009
12:26:34
Capture info: audio device options
vibe-watermark-brig
C
C
M
J
M
CM
J
MJ
CJ
CMJ
CM
MJ
N
CJ
CMJ
Capture
C
M
N
J
11 / 16
6 Audio Recorder
AUDIO RECORDER allow you to record internet radios or sound coming
from your computer.
6.1 Preferences
6.1.1 General
1 Choose the destination folder.
2 Select the output format: *.mp3, *.wav, *.ogg, *.flac, *.aiff.
6.1.2 Audio
1 Go to [Preferences > Audio].
2 Select the audio device ’USB Audio CODEC’ from the pull down
menu.
vibe-watermark-brig
3 Choose your desired sample rate and buffer size.
C
4 Inputs are automatically
activated. If you want to use the moni-
toring, activate the outputs of the audio device by clicking on
them.
M
J
6.2 Overview of CMthe Graphical User
Interface
MJ
REC Start the recording.
CJ
PAUSE Pause the recording or the playback. In recording mode, if you
CMJ automatically create a cue point.
click on pause again you will
N
12 / 16
6 Audio Recorder
STOP Stop the recording or the playback.
PLAY Start the playback.
FF Fast forward of 10 seconds.
REW Rewind of 10 seconds.
SKIP Go to the previous/next cue point. CUE: Add a cue point.
REC LEVEL Display the record level.
LEVEL FADER Control the record level.
TIME Display the recording time and the output format. Stop mode:
click on Time to add a delay time to the recording start. Record mode:
click on Time to know how many recording times is available (depending
on the hard drive space).
QUALITY Choose the recording quality (only for ogg and mp3 output
vibe-watermark-brig
formats).
C
6.3 Save as
M
1 Name your recording file (label, title and artist) then click on
Save.
J
2 Choose the destination folder then click on Save.
CM
3 Find two files: the audio file chosen and a file with a cue extension. You can useMJseveral softwares (like foobar2000 or CUE
Splitter) to open it.
CJ
CMJ
N
13 / 16
recorder1.pdf
6 Audio Recorder
15/07/2009
recorder2.pdf
15/07/2009
Audio preferences
11:36:36
11:39:01
C
M
vibe-watermark-brig
J
CM
C
MJ
CJ
CMJ
M
J
N
CM
MJ
CJ
C
Graphical User Interface
CMJ
M
J
N
CM
14 / 16
MJ
7 Audacity
AUDACITY allow you to edit the tracks you’ve recorded previously. Find
1
documentation about Audacity online .
vibe-watermark-brig
C
M
J
CM
MJ
CJ
CMJ
1
http://audacity.sourceforge.net/help/documentation
N
15 / 16
Contact
•
For all technical or sales information, please contact your local
reseller or MixVibes directly:
MixVibes
4, rue de la Sablière
92230 Gennevilliers
FRANCE
www.mixvibes.com
•
Technical support:
•
•
online on our forum
2
Sales Information:
•
by email to [email protected]
Copyright 2009 MixVibes. All rights reserved.
vibe-watermark-brig
The contents of this manual may change without prior notice. Best
C
efforts have been put forth to insure the accuracy of the contents of
this manual. MixVibes is notM liable for any errors, typographical or other,
contained herein. Except as specifically permitted herein, no portion of
J
the information on this manual
may be reproduced in any form or by
any means without the prior written permission of MixVibes. Trademarks
CM
and trade names displayed on this manual are the property of their
respective owners.
MJ
This manual may be updated from time to time. Please check for updates
3
CJ
on our website .
2
3
http://forum.mixvibes.com
CMJ
http://www.mixvibes.com
N
16 / 16