1
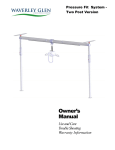
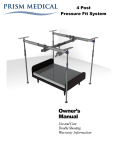
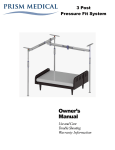
Free Standing Track
Owner’s
Manual
Use and Care
Trouble Shooting
Table of Contents
Free Standing Track
Introduction ........................................................................................................... 3
Overview................................................................................................................. 3
Placement of the Free Standing Track ................................................................ 4
Components of system........................................................................................... 5
Component list ....................................................................................................... 6
Specifications ......................................................................................................... 6
Cautions .................................................................................................................. 7
Assembly
Opening of package ............................................................................................ 11
Assembling the Side Supports ............................................................................ 12
Assembly of the Track ........................................................................................ 15
Assembly– Mounting the Track ........................................................................ 17
Mounting the C-300 Lift .................................................................................... 20
Mounting the P-300 Lift ..................................................................................... 21
Raising up the Free Standing Track System .................................................... 22
Full raised Free Standing Track ........................................................................ 25
Disassembly of Free Standing Track ................................................................. 26
Disassembly of Post ............................................................................................ 30
Packaging of Post ................................................................................................ 31
Packaging of Track ............................................................................................ 32
Packaging of Rolling Bag ................................................................................... 33
Trouble Shooting ................................................................................................ 34
General Inspection and Maintenance .............................................................. 36
Service Record History—Initial Information .................................................. 38
Service record History ...................................................................................... 39
Contact Information............................................................................................ 42
Free Standing Track - User Guide
Part#633282
Rev: 05/01/2012
Page: 2
CAUTION: DO NOT ATTEMPT TO USE THIS EQUIPMENT
WITHOUT FIRST UNDERSTANDING THE CONTENTS OF
THIS MANUAL.
Introduction
Before using this equipment, and to ensure the safe operation of your Free Standing Track system , carefully
read this entire manual, especially the section on “Cautions”. The Free Standing Track system is designed to
be used in conjunction with Prism Medical Ltd. portable lift units, accessories and slings. Please refer to any
user guides supplied with these components and reference them while reviewing this manual.
Should any questions arise from reviewing this manual contact your local authorised Prism Medical Ltd.
dealer. Failure to comply with warnings in this manual may result in injury to the operator, or the individual
being lifted/transferred. Damage to the lift and/or related components may occur. Be sure that the contents of
this manual are completely understood prior to using this piece of equipment.
Store this manual with the documents included with the lift system and sling (s). Contents of this manual are
subject to change without prior written notice.
Overview of the Free Standing Track System
The Free Standing Track system is a lifting aid to help lift, position and transfer clients or a disabled family
member. The Free Standing Track system is part of what is termed overhead lift technology which takes advantage of lifting from above and not from below or the side. The Free Standing Track system makes it possible to move mobility impaired individuals with minimal strain or risk to the caregiver, while providing complete safety, dignity and comfort for the client or family member.
The Free Standing Track system is designed to work with a Prism Medical Ltd portable lift system such as the
P/C-300 ( Free Standing Track Maximum Safe Working Load is 300lbs). Use of other portable lift units with this
system may be possible. However, please contact your local authorised Prism Medical Ltd dealers in order to
obtain approval before use.
The Free Standing Track system is a floor based free standing system that can be used to lift and transfer individuals from a bed, chair or similar fixture. It needs basic level of expertise to assemble or setup. It is easy to
assemble and can be completed by just one person in a short period of time. Additionally, no tools are required. It is also light weight and once dismantled, can be moved to another location. Its quick setup (less than
5 minutes) and lightweight assemblies allows the caregiver to transport and transfer the client with minimum
effort.
Please review the following pages that outline the parts included with your package. Should you have any
questions about this product or its use contact your local authorised dealer.
Free Standing Track - User Guide
Part#633282
Rev: 05/01/2012
Page: 3
General Placement
Trolley
Portable
Lift
Track
Side Support
Assembly
Foot
Photo showing Side View and the general placement of a bed in
relationship to the Free Standing Track.
General Placement Requirements
1) The Bases of the Free Standing Track must always be placed on a hard level surface.
2) Do not place the Bases on surfaces that will cause them to wobble or be unstable. Make sure the surfaces
are free of any obstacles that may cause the Bases to be unstable.
3) Never place the Bases on wet surfaces.
4) Assemble the Free Standing Track so that the Track is directly over the location where the transfer will
occur. For beds this is generally between 39” - 45” (1000mm - 1145mm) from the head of the bed. For
wheelchairs, living room chairs, recliner chairs and similar furniture this is directly above the middle
(center) of the seat.
Free Standing Track - User Guide
Part#633282
Rev: 05/01/2012
Page: 4
Components of the Free Standing Track
Track Assembly
433200
Locking Handle
Post Assembly
-Right hand
433201
Leg Assemblies
433203
Post AssemblyLeft hand
433202
Clamp
Ratchet
Figure 1A - Disassembled Free Standing Track.
Minimum - Maximum Dimensions
3’ Wide (W) x 5-7.5’ Adjustable Height (H) x 8’ Length (L)
Free Standing Track - User Guide
Part#633282
Rev: 05/01/2012
Page: 5
Component List
The following components are included with your Free Standing Track:
Description
Part Number
Quantity
Post Assembly-RH
433201
1
Post Assembly-LH
433202
1
Track Assembly
433200
1
Leg Assembly
433203
2
Owners Manual
633282
1
CAUTION:
DO NOT EXCEED THE CAPACITY OF THE FREE STANDING TRACK
(Maximum Safe Working Load of 300 LBS)
Specifications of the Free Standing Track
•
•
•
•
•
•
•
High-strength lightweight Aluminum
°
Track weight is 15 lbs
°
Post and leg assembly weight 12 lbs
° Unit weight is 41 lbs including trolley
Portable installation
Eliminates the mounting of a connection system in the ceiling
One person set up (less than 5 minutes)
Addresses a number of different set ups
Weight capacity Maximum Safe Working Load of 300lb
Adjustable in height
° Minimum height 5 feet
°Maximum height 7.5 feet
°Height adjustable in “2 inches” increments
Model Table for the FST-300 System
Free Standing Track - User Guide
Part#633282
Code
Description
341400
Free Standing Track
Rev: 05/01/2012
Page: 6
Before you start: Check Requirements and Cautions
Cautions:
Failure to observe cautions listed below could result in serious injury or death.
•
•
•
•
•
•
•
•
•
•
•
•
•
•
The Free Standing Track system must be assembled prior to use. Should you have any questions during
assembly contact your local authorised dealer.
The Free Standing Track system parts should not be loose, broken or bent. If any part is missing or damaged do not install. Contact your local authorised dealer immediately.
Under no circumstance should the track, lift and sling (s) or entire system be put in control of a person
who has not been properly trained in the use and care of this equipment. Failure to adhere to this warning may result in serious injury to the operator, and/or the individual being lifted/transferred.
Never expose the Free Standing Track directly to water. Warranty does not cover any misuse or abuse of
the Free Standing Track system.
Any accessories used with the Free Standing Track including lift and sling (s), should be checked to ensure that they are in good working order. Check for signs of wear or fraying prior to use. Report any unusual wear or damage immediately to your local authorised dealer.
The Free Standing Track and associated lift, and sling (s) are intended only for lifting and transferring
of a person. Prism Medical Ltd. will not be responsible for any damage caused by the misuse, neglect or
purposeful destruction of the lift and/or its’ associated components.
The installation of the Free Standing Track , lift, accessories, and sling are certified to a maximum load.
Do not exceed the maximum rated load of any of the components.
Ensure that a clear space is maintained around the Free Standing Track . Remove all furniture and other
obstacles out of the way before performing a transfer.
The Free Standing Track has been designed to lift vertically at its maximum load and at maximum
height. Do not attempt to lift an individual at an angle to the track.
Do not install The Free Standing Track on an uneven floor. Do not install on a sloped floor greater
than .5 degree.
Ensure floor area is clear off dirt and debris.
Do not drop product, it may cause breakage. Protect the Free Standing Track and its accessories during
transport.
Prior to each use of the equipment, complete a visual inspection. A monthly maintenance inspection
must be done in order to ensure good operating conditions.
Make sure the Lift is in Parking spot before raising or lowering the Posts.
Free Standing Track - User Guide
Part#633282
Rev: 05/01/2012
Page: 7
Check Requirements and Cautions-continued
Cautions: After Installation
•
Ensure that the Handle lock are fully in locked position as per labels.
•
•
Make sure track is sitting properly on the posts. There should be no gap between Track and Track Holders.
Make sure all four foot pads are sitting flat on the floor. There should be no gap between the foot pads and
floor.
Make sure clamp levers are locked always when in use.
During the use of Free Standing Track, do not bump or lean against the posts. This might cause system to
become unstable.
In places where more than one operator will be responsible for using the Free Standing Track, associated
lift and sling(s), it is imperative that all operators be trained in its’ proper use.
To maintain optimum function, the Free Standing Track should be inspected and maintained on a regular
basis. See the section titled “General Inspection and Maintenance”.
•
•
•
•
•
The manufacturer's warranty is void if persons unauthorized by Prism Medical perform work on the Free
Standing Track System.
Do not attempt to lift the patient at an angle. See below picture.
Free Standing Track - User Guide
Part#633282
Rev: 05/01/2012
Page: 8
Assembly
Caution: Before using the Free Standing Track,- the Post assembly and track must be visually
checked to ensure that they are not damaged. Should anything look unusual contact your local
dealer prior to
use.
Failure to comply with this caution could result in serious injury to the operator, the individual being
lifted and/or damage to the Free Standing Track and/or portable lift unit.
Cleaning Rubber Feet :
Prior to each installation, clean the rubber feet with wet cloth soaked with water.
Note:
After cleaning, Make sure the rubber feet
are clean and dry with no residue of dirt or
dust left on them.
Also, ensure Floor area is cleaned and free
of dirt & debris.
Clean all 8 Rubber pieces. Wipe off the
dirt with a wet cloth as shown in picture.
Free Standing Track - User Guide
Part#633282
Rev: 05/01/2012
Page: 9
Assembly of the supporting Post
Step 1 - Place the Post in Standing Position.
Step 2 - Grab the Side leg to open the foot.
Always support the post with one hand and open
the leg with the other hand.
Step 3 - Open the other leg of the post. Make sure that the
both hinges are flat and they can not go further down.
Step 4 - Completed Post assembly .
Free Standing Track - User Guide
Part#633282
Note—Follow Steps 1–4 to finish 2nd
post assembly.
Rev: 05/01/2012
Page: 10
Completed Post Assembly of Free Standing Track
Track Holders Must face
each other
Distance the 2 posts at 8 Feet apart from each other and
completely parallel
Track Holder Must face
each other as shown in
above Figure
Free Standing Track - User Guide
Part#633282
Rev: 05/01/2012
Page: 11
Trolley Installation
C-300 Trolley
P-300 Trolley
Step 1– Detach the hook/eyelet of trolleys as per step 1 in
trolley disassembly (page 27) by removing the split ring and
pin.
Step 2– Fold and place the track on a secure place. Insert the
trolley into the middle of the track.
Step 3– Using a screw driver push the trolley lock button
down to be able to fit the trolley into the track opening.
Step 4– Attach the hook/eyelet of the trolley to the trolley
using the pin and split ring.
Free Standing Track - User Guide
Part#633282
Rev: 05/01/2012
Page: 12
Assembly of the Track
“ Click”
Step 1 - Place the track on the floor. Unfold the track as
shown in figure until it is fully straight.
Note: If you do not hear the “click” sound,
press the lock with hand until it is in locking
position.
Free Standing Track - User Guide
Part#633282
Step 2 - Track should automatically locks itself in place with a
“ click” sound.
Note: Ensure Track is locked and fully straight.
Step 3— Lay Track Flat on the floor.
Rev: 05/01/2012
Page: 13
Assembly—Mounting the Track
Step 1 - Place the Track against the floor.
Step 2- Grab the handle and pull the hook inside the track
slightly out using a finger and Twist the handle towards the
unlock direction until the lock is fully opened.
Step 3– Repeat the same step for other side handle.
Free Standing Track - User Guide
Part#633282
Rev: 05/01/2012
Page: 14
Assembly—Mounting the Track
Step 4 - lift the track with both hands and Place one end of
the track on the Post Assembly as shown in figure.
Step 5 - Track should fall into place and sit flat on the track
holder of the Post as you see in next figure.
Note: always make sure that handles are in
open position before placing the track on the
post.
No Gap
Step 6: Place the other end of the track on the other
Post.
Step 7— Both ends should lay completely Flat on the
top of post assemblies.
Note: Make sure there is no gap between
the Track and Track Holder.
Free Standing Track - User Guide
Part#633282
Rev: 05/01/2012
Page: 15
Assembly—Mounting the Track Continued...
Step 8 - Grab Track Lock handle
Step 9 - Twist the handle downwards in the lock direction
A big gap should be visible after
locking handle
Spring should be visible after
locking handle
Step 10 - Twist until you hear a click indicating that
track is locked in position and the Safety lock pops
out.
Note: Big gap between the Track and the
safety lock indicates that track is locked
as shown above.
Note: Above picture shows that the track
is not completely locked. You should hear
a click sound and spring should be visible.
Step 12 - Repeat steps 9-11 to lock the other side of the Track.
Note: Read instructions for mounting a Portable lift to the Free Standing Track on the
next page.
For ease of assembly, Track should be raised up untill your eyelevel before mounting
the Portable lift .
Free Standing Track - User Guide
Part#633282
Rev: 05/01/2012
Page: 16
Mounting the C-300 Lift
Caution: Prior to mounting the C-300 lift onto the C-300 trolley , read the owners manual of the C300 lift. Be sure that the instructions on the use of the lift and any accessories, such a slings are thoroughly understood before attempting to use them with the Free Standing Track. Free Standing Track is rated
only for 300lbs. Do not exceed the limit of the Free Standing Track.
FAILURE TO COMPLY WITH THIS MAY RESULT IN INJURY TO THE INDIVIDUAL
BEING LIFTED AND/OR THE CAREGIVER, OR DAMAGE TO THE LIFT AND/OR THE
FREE STANDING TRACK.
Track
C-300 Trolley
C-300 lift
Step 1- Press latch of the trolley from back as shown in figure. Slide the lift hook on to the trolley hook and release the
Latch. Follow the figures for the C-300 lift and attach the eyelet of the lift to the hook.
Step 2 - Grab the lift and drag it to the parking spot.
Note:
Free Standing Track - User Guide
Part#633282
Note: always make sure that the lift is in
parking spot before raising the posts.
Apply load and pull the lift down to be able
to remove the lift from parking spot and
use it.
Rev: 05/01/2012
Page: 17
Mounting the P-300 Lift
Caution: Prior to mounting the P-300 lift onto the P-300 trolley , read the owners manual of the P300 lift. Be sure that the instructions on the use of the lift and any accessories, such a slings are thoroughly understood before attempting to use them with the Free Standing Track. Free Standing Track is rated
only for 300lbs. Do not exceed the limit of the Free Standing Track.
FAILURE TO COMPLY WITH THIS MAY RESULT IN INJURY TO THE INDIVIDUAL
BEING LIFTED AND/OR THE CAREGIVER, OR DAMAGE TO THE LIFT AND/OR THE
FREE STANDING TRACK.
Parking Spot
Track
P-300Trolley
Grab the Trolley eyelet and bring it to the parking spot. Once the trolley is in parking spot, Place
the Portable lift in secure and comfortable position. Pull enough strap out of the lift to be able to
hook the carabineer comfortably to the eyelet of the trolley. Put the carabineer of the lift strap into
the eyelet of the trolley as shown in figure above. Raise the lift to the track height.
Note: always make sure that the lift is in parking spot before raising the posts.
Apply load and pull the lift down to be able to remove the lift from parking spot and use it.
Free Standing Track - User Guide
Part#633282
Rev: 05/01/2012
Page: 18
Raising up the Free Standing Track
Step 1 - Grab The Post Centre to open the
post clamp
Step 3 - Grab The Inner Post with one
hand and grab the Outer Post section with
the other hand.
Step 2 - Fully Open The clamp
Step 4: Raise the Post Up using the height
indicators.
Note: When Raising the Post from
Lowest setting, it is recommended
to raise in 1 Foot increments.
Step 5 - Repeating steps 1-5, raise the
other Post.
Free Standing Track - User Guide
Part#633282
Rev: 05/01/2012
Page: 19
Raising up the Free Standing Track Continued...
Note: Free Standing Track will be in a
slanting position as shown in figure. Set up
the Free Standing Track by raising the post
assemblies one by one.
Note: a caution sign at the 7 feet indicates that you are approaching the
end of the post. Carefully extend the
post until you approach the stop sign or 7.5 feet
if desired or applicable.
Max Height of
Free Standing
Track
Do not extend post after 7.5 Feet
height mark.
Note: Maximum height of Free Standing
Track is 7.5 Feet.
Free Standing Track - User Guide
Part#633282
Rev: 05/01/2012
Page: 20
Raising up the Free Standing Track Continued...
Step 6 - Close the post clamp as shown in figure.
Step 7 - Make sure the clamp is fully closed on both
posts.
Completely Installed Free Standing Track
Always Before Use check the following steps:
Make sure the height indicator shows the same number on both posts.
2) No Gap between Track and track Holder.
3) No Gap Between Foot Pads and Floor.
1)
Free Standing Track - User Guide
Part#633282
Rev: 05/01/2012
Page: 21
Attaching the Skirt– Optional Accessory
Step 1 - Rap the skirt around the legs and close it using the
Velcro hooks.
Free Standing Track - User Guide
Part#633282
Step 2 - Use the pocket as a storage for the sling or as you
require.
Rev: 05/01/2012
Page: 22
Disassembly of Free Standing Track
Step 1 - Before disassembly , make sure the lift and /or Trolley is in parking spot.
Step 2 - Grab The Post Centre to open the post clamp and
fully open the clamp.
Step 3 - Grab The Post and press the Ratchet with thumb.
Step 4 - Bring down the Free Standing Track by sliding
down the inner Post while keep pressing down the
Ratchet Lock.
Note: When Lowering down the Post from
highest setting, it is recommended to lower in
1 Foot increments.
To prevent sudden drop of the post you should
release the ratchet in at least every 12” ( or
every 6 holes). Failure to do this step might
cause injury or damage to the floor.
Free Standing Track - User Guide
Part#633282
Rev: 05/01/2012
Page: 23
Disassembly of Free Standing Track
Note: Free Standing Track will be in a slanting
position as shown in figure. Bring down the other
side of the Free Standing Track following steps 25.
Note: Make sure the posts are parallel and not
twisted inside each other. Failing to do that , user
might experience resistance in lowering down the
posts.
Safety lock Button
Step 5 - Bring the Free Standing Track to the shoulder height
and dismantle the lift from the trolley following the user manual of the lift.
Step 6 - Push the safety lock button to unlock the track from
Post assembly.
Press
Step 7 - Press the Push button and Twist handle in unlock direction at the same time.
Free Standing Track - User Guide
Part#633282
Step 8 - Repeat step 11 & 12 for other end to unlock the track
from both ends.
Rev: 05/01/2012
Page: 24
Disassembly of Free Standing Track
Step 9 - Lift The track up from post assembly and place it on
the floor.
Step 10 - Press the Track lock hook as shown in figure to fold
the track. While holding the lock , slightly fold the track .
Step 11 - Let go of the lock and fold the track.
Step 16 - Close the track fully.
Free Standing Track - User Guide
Part#633282
Rev: 05/01/2012
Page: 25
Disassembly of Legs
Step 1 - Pull the hinge slightly upwards as shown
in figure.
Step 2 - Grab The side leg and press in as shown
in figure. Repeat the step 1 and 2 for the other side
Free Standing Track - User Guide
Part#633282
Caution: Do not place your finger
underneath the hinge it might get
Step 3 - Fully closed legs. Repeat the steps 1 to 3
for the other leg and post assembly.
Rev: 05/01/2012
Page: 26
Trolley Disassembly
Removing Trolley C-300 (Prism part number 330051)
Step 1– Remove the split ring as shown in figure .
Step 2– Detach the hook of the C-300 by taking the pin out as
shown in figure .
Step 3– Make sure not to loose any part.
Step 4– Fold and place the track on the floor or on a secure
table. Bring the trolley to the opening of the track.
Free Standing Track - User Guide
Part#633282
Rev: 05/01/2012
Page: 27
Trolley Disassembly Continued...
Step 5– Use a screw driver and push the trolley lock button
down to allow the trolley to come out.
Step 6– Remove the trolley.
Removing Trolley P-300 (Prism part number 330052)
Step 1– Follow the step 1 to 6 from the removing trolley
C-300.
Free Standing Track - User Guide
Part#633282
Note: Make sure not to loose any part.
Rev: 05/01/2012
Page: 28
Trouble Shooting
Should problems arise with the use of the Free Standing Track review the following chart. Find the fault and
complete the recommended solution. If the fault is not found and/or the solution does not correct the problem
contact your local authorized dealer for service immediately.
Fault
Reason
Recommended Solution
Visually the system is not aligned
straight.
1.
2.
Post is not set straight.
Floor is not leveled.
1) Set up the post following Post Assembly instructions.
Note: Make sure the track is seating completely
flat on the track holder.
2) Foot pads must be seating completely flat on
the floor. There should be no gap between the
foot and floor pads.
If problem persists, contact your local authorized
dealer immediately.
Feet are slipping after installation.
1.
2.
Feet are not cleaned.
Floor is not cleaned.
1) Clean the feet as per “ Cleaning Rubber Feet
Instructions”.
2) Ensure floor area is dry and free of debris .
If problem persists, contact your local authorized
dealer immediately .
Clamp Lever can not be fully closed.
1.
Clamp bolt is tight
1) Open the Clamp Lever and use 3/16” Allen key
to loose the bolt one turn each time. Close the
clamp lever and see if closes fully. After closing the clamp press the ratchet. You should not
be able to open the ratchet. If the ratchet gets
open while the clamp is fully closed, it means
that you have loosen the bolt too much. Tight
the bolt back till you are not able to open the
latch.
Note: Do not loose bolt too much. If problem persists, contact your local authorized dealer immediately .
The Folded Track does not sit properly 1.
on the post assemblies.
2.
Physical damage to track.
Handle lock is in lock position.
1) Check for physical damage to track. If so, contact local authorized dealer immediately.
2) Follow the track assembly instructions and
open the handle lock.
3) Posts are not parallel or not standing completely straight.
Trolley does not move smoothly along
the adjustable track.
Physical damage to track or trol- 1) Visually make sure tracks and wheels are not
damaged.
ley wheels.
Track slots or trolley wheels are 2) Ensure that tracks are cleaned with cloth and
free of dirt.
not cleaned.
If problem persists, contact local authorized dealer
immediately.
1.
2.
Trolley does not park
1.
2.
3.
The folded track is not locking on the
Post assembly.
1.
2.
Free Standing Track - User Guide
Part#633282
Parking hole is filled with dirt or 1) Clean the hole with cloth and remove dirt or
debris.
debris.
Trolley spring is damaged.
2) Contact local authorized dealer.
Trolley lock button is damaged. 3) Contact local authorized dealer immediately.
Track Handle Lock hook damaged or broken.
Track Handle Lock Push button
damaged or broken.
Rev: 05/01/2012
Do not use the system.
Contact your local authorized dealer immediately.
Page: 29
Ratchet sticks out when lowering or
raising and dose not lock
1.
Ratchet spring is damaged
1) Do not use the system. Contact your local authorized dealer immediately.
Track Lock Not working.
1.
Physical damage to track lock
assembly.
Track Lock Spring breaks or
damaged.
1) Unfold the Track and the fold it together to see
if the track lock set it self in locking position
or not. If not then contact local authorized
dealer immediately.
2) Do track assembly steps and see the if the track
locks or not. If not then contact local authorized
dealer immediately.
2.
Ratchet can be pushed out when the
clamp lever is locked
1) Open the Clamp Lever and use a 3/16” Allen
key to tight the bolt one turn at a time. Close
the clamp lever and then push the Ratchet to
see if it opens up.
Note: Do not over tight the bolt. You should be
still able to close the clamp lever without any
problem.
If problem persists, contact your local authorized
dealer immediately.
1. Clamp bolt is loose
FAQs
Question: The Free Standing Track seems unstable. Should I be worried?
Answer: No. you should not be worried/concerned. Provided the Free Standing Track has been installed per the manuals specifications. After spending some time with the device, especially once a client has
become accustomed to the device, the lateral stability issue will be less obvious.
Question: How stable is the device?
Answer: This device has been tested as per ISO 10535 requirements for Free Standing Hoists. This
testing includes; a 10 degree tilts test (on all four sides) with 375lbs ( 300lbs safe working load x 1.25).The
hoist has passed all testing procedures.
Question: Is the device strong enough to stand the load of 300lbs?
Answer: This device has been tested to maximum load of 450lbs ( 300lbs safe working load x 1.5).
The hoist has passed the test with no sign of defect.
Question: If the floor has a slope, will the trolley slide towards the direction of slope by itself ?
Answer: A braking mechanism is integrated to the design of the trolley which prevents it from sliding unintentionally. You need to apply force to be able to move the trolley to the desire location.
Free Standing Track - User Guide
Part#633282
Rev: 05/01/2012
Page: 30
General Inspection and Maintenance
Failure to follow inspection and maintenance instructions below may
result in serious injury or death.
Periodic general inspection and maintenance should be performed by a person who is properly qualified and
trained with the use and care of The Free Standing Track System.
Any defects and damage to the Free Standing Track that have lead to corrective actions should be noted and
dated by the inspector. The defects and corrective actions report should be submitted in written form to the
dealer.
Upon Receipt of The Free Standing Track system:
•
•
•
•
•
Ensure all the received components are according to the component list.
Ensure the user manual is present otherwise do not install the Free Standing Track system.
Ensure all the components are in working condition and not damaged.
Ensure service record history forms are included in the package to record any completed service and repairs.
Complete the Purchase and Service Information as soon as this equipment is installed.
Each Use– To be completed by user
Prior to each use, the Free Standing Track and associated lift, accessories and sling (s), must be visually inspected. Refer to the lift, accessory and sling user guides for specific details regarding their inspection.
Should any of these items below fail the inspection do not use the Free Standing Track
Contact your local authorized dealer for service.
Visually check for the following:
⃞ Ensure all the components of Free Standing Track System are in working condition. If damaged, please
contact the dealer for replacement before use.
⃞ All 4 feet are on a stable, level surface and the supporting post assemblies are secure.
⃞ Check rubber feet for damages. If damage is noticed , please contact dealer for replacement. Make sure
that they are clean before placing them on the floor. ( refer to cleaning rubber feet instruction)
⃞ The Post clamps are locked.
⃞ The ratchets are locked
⃞ The handles are locked
⃞ The trolley moves easily along the track.
⃞ The adjustment track is placed in the correct location for transferring.
⃞ Ensure the labels are legible and in good condition. If not contact dealer for replacement.
⃞ Record the service record history form for any completed service and repairs.
⃞ Ensure that the service record is signed and dated each time it is used.
⃞ The portable lift has been inspected as outlined in it’s owners manual.
⃞ The sling (s) has been inspected as outlined in it’s owners manual.
Free Standing Track - User Guide
Part#633282
Rev: 05/01/2012
Page: 31
Service Record History - Initial Information
•
•
•
•
Complete the following section- Purchase and Service Information as soon as this
equipment is installed.
Use the service record history to record any completed service and repairs.
Ensure that the service record is signed and dated each time it is used.
Be sure to have this piece of equipment serviced on a regular basis as described in the
General Inspection and Maintenance Section
PURCHASE INFORMATION:
Product Name:
Free Standing Track System
Serial#:________________________
Date of Purchase: _____________________
Date Installed: _________________
Purchased From: ___________________________________________________________
Address:
_______________________________________
City:
__________________________
Telephone No:
__________________________
Post Code: ____________________
Comments:
SERVICE INFORMATION:
Contact the following company for service:
Company:
___________________________________________________________
Address:
_______________________________________
City:
__________________________
Telephone No:
Post Code: _________________
__________________________
Comments:
Free Standing Track - User Guide
Part#633282
Rev: 05/01/2012
Page: 32
Service Record History
Date: _______________________
Service Type: □ Periodic Inspection □ Monthly Inspection
Completed By: _________________________
Complete this section after each service, repair inspection and/
or maintenance. Photocopy additional pages as required.
Time: ________________________
□ 6 Month Inspection
□ Repair □ Yearly Inspection
□ Other:_________
_____________________________
Printed Name
Signature
Company: _____________________________________________________________
Remarks & Action Taken:
Date: _______________________
Service Type: □ Periodic Inspection □ Monthly Inspection
Completed By: _________________________
Time: ________________________
□ 6 Month Inspection
□ Repair □ Yearly Inspection
□ Other:_________
_____________________________
Printed Name
Signature
Company: _____________________________________________________________
Remarks & Action Taken:
Free Standing Track - User Guide
Part#633282
Rev: 05/01/2012
Page: 33
Service Record History
Date: _______________________
Service Type: □ Periodic Inspection □ Monthly Inspection
Completed By: _________________________
Complete this section after each service, repair inspection and/
or maintenance. Photocopy additional pages as required.
Time: ________________________
□ 6 Month Inspection
□ Repair □ Yearly Inspection
□ Other:_________
_____________________________
Printed Name
Signature
Company: _____________________________________________________________
Remarks & Action Taken:
Date: _______________________
Service Type: □ Periodic Inspection □ Monthly Inspection
Completed By: _________________________
Time: ________________________
□ 6 Month Inspection
□ Repair □ Yearly Inspection
□ Other:_________
_____________________________
Printed Name
Signature
Company: _____________________________________________________________
Remarks & Action Taken:
Date: _______________________
Service Type: □ Periodic Inspection □ Monthly Inspection
Completed By: _________________________
Time: ________________________
□ 6 Month Inspection
□ Repair □ Yearly Inspection
□ Other:_________
_____________________________
Printed Name
Signature
Company: _____________________________________________________________
Remarks & Action Taken:
Date: _______________________
Service Type: □ Periodic Inspection □ Monthly Inspection
Completed By: _________________________
Time: ________________________
□ 6 Month Inspection
□ Repair □ Yearly Inspection
□ Other:_________
_____________________________
Printed Name
Signature
Company: _____________________________________________________________
Remarks & Action Taken:
Date: _______________________
Service Type: □ Periodic Inspection □ Monthly Inspection
Completed By: _________________________
Time: ________________________
□ 6 Month Inspection
□ Repair □ Yearly Inspection
□ Other:_________
_____________________________
Printed Name
Signature
Company: _____________________________________________________________
Remarks & Action Taken:
Date: _______________________
Service Type: □ Periodic Inspection □ Monthly Inspection
Completed By: _________________________
Time: ________________________
□ 6 Month Inspection
□ Repair □ Yearly Inspection
□ Other:_________
_____________________________
Printed Name
Signature
Company: _____________________________________________________________
Remarks & Action Taken:
Free Standing Track - User Guide
Part#633282
Rev: 05/01/2012
Page: 34
Service Record History
Date: _______________________
Service Type: □ Periodic Inspection □ Monthly Inspection
Completed By: _________________________
Complete this section after each service, repair inspection and/
or maintenance. Photocopy additional pages as required.
Time: ________________________
□ 6 Month Inspection
□ Repair □ Yearly Inspection
□ Other:_________
_____________________________
Printed Name
Signature
Company: _____________________________________________________________
Remarks & Action Taken:
Date: _______________________
Service Type: □ Periodic Inspection □ Monthly Inspection
Completed By: _________________________
Time: ________________________
□ 6 Month Inspection
□ Repair □ Yearly Inspection
□ Other:_________
_____________________________
Printed Name
Signature
Company: _____________________________________________________________
Remarks & Action Taken:
Date: _______________________
Service Type: □ Periodic Inspection □ Monthly Inspection
Completed By: _________________________
Time: ________________________
□ 6 Month Inspection
□ Repair □ Yearly Inspection
□ Other:_________
_____________________________
Printed Name
Signature
Company: _____________________________________________________________
Remarks & Action Taken:
Date: _______________________
Service Type: □ Periodic Inspection □ Monthly Inspection
Completed By: _________________________
Time: ________________________
□ 6 Month Inspection
□ Repair □ Yearly Inspection
□ Other:_________
_____________________________
Printed Name
Signature
Company: _____________________________________________________________
Remarks & Action Taken:
Date: _______________________
Service Type: □ Periodic Inspection □ Monthly Inspection
Completed By: _________________________
Time: ________________________
□ 6 Month Inspection
□ Repair □ Yearly Inspection
□ Other:_________
_____________________________
Printed Name
Signature
Company: _____________________________________________________________
Remarks & Action Taken:
Date: _______________________
Service Type: □ Periodic Inspection □ Monthly Inspection
Completed By: _________________________
Time: ________________________
□ 6 Month Inspection
□ Repair □ Yearly Inspection
□ Other:_________
_____________________________
Printed Name
Signature
Company: _____________________________________________________________
Remarks & Action Taken:
Free Standing Track - User Guide
Part#633282
Rev: 05/01/2012
Page: 35
Warranty
This Warranty does not affect or in any way limit your Statutory Rights
1) Subject to the exclusions set out in Clause 2, the conditions set out in Clause 3 and the limitations set out in
Clause 4, Prism Medical Ltd., as sole licensed representative of Corven Healthcare Inc., guarantees all
equipment supplied as new against failure within the period of 1 year from date of purchase by virtue of
defects in material or workmanship.
2) This guarantee does not apply to failure attributable to normal wear and tear, damage by natural forces,
user neglect or misuse or to deliberate destruction.
3) This guarantee shall be void if the equipment is not serviced by Prism Medical Ltd. or its authorised
service agents in accordance with the manufacturer’s recommendations or if any unauthorised person
carries out works on the equipment.
4) The liability of Prism Medical Ltd. under the terms of this guarantee shall be limited to the replacement of
defective parts and in no event shall Prism Medical Ltd. incur liability for any consequential or
unforeseeable losses.
™ Trade-mark of Corven Health Care Inc. Used under licence.
Printed in Canada
E.& O.E.
Free Standing Track - User Guide
Part#633282
Rev: 05/01/2012
Page: 36