1
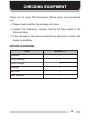
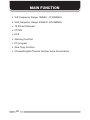
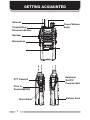
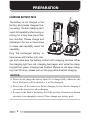
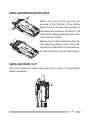
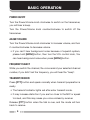
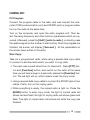
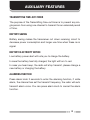
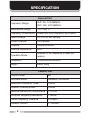
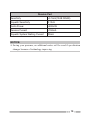
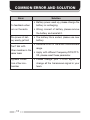
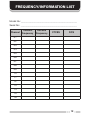
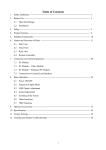
THANK YOU! We are grateful you have chosen FM VHF/UHF portable transceiver. This 2-way radio represents novel design and stable performance. It is developed to meet the demands of portability, easy-operating and multifunction. Believes the small size and the reasonable price will satisfy your requirements. I SAFETY INFORMATION SAFETY It is important for you to read the following carefully in order to use this transceiver safely and efficiently. Please DO NOT try to open the transceiver. Modified by laypeople may do damage the transceiver. Please turn off your transceiver when you enter the place with the sign” Please turn off radio”, such as hospital and other medical care place to avoid electromagnetism interfere or electromagnetic compatibility. Please turn off your 2way radio when it is requested by aircrew on the plane. Please DO NOT put the transceiver in the area of airbag if you are in a car with airbag. Please TURN OFF your transceiver before entering flammable and exposable place. Please DO NOT use broken antenna. Broken antenna might cause slight burn if it touches skin Please DO NOT expose the transceiver to direct sunlight for a long time: DO NOT place the transceiver near any heating devices. Either high temperature might shorten the life of electrical parts and also might cause some plastic transform. Please DO NOT put the transceiver in dusty or dirty place. Please keep the transceiver dry. Rain and damp may erode the PCB. If an abnormal odor or smoke is detected coming from the transceiver. TURN OFF the power immediately and remove the rechargeable battery pack from the transceiver and contact with your dealer. II CHECKING EQUIPMENT Thank you for using T30 transceiver. Before using, we recommend you: Please check whether the package is broken. Unpack the transceiver carefully: Identify the items listed in the following table. If any damage or miss has occurred during shipment, contact with dealer immediately. SUPPLIED ACCESSORIES ITEM Antenna QUANTITY 1 Li-ion Battery 1 Desk Charger 1 Adapter 1 Belt Clip 1 User Manual 1 III MAIN FUNCTION VHF Frequency Range: 136MHz -173.995MHz UHF Frequency Range: 400MHz~479.995MHz 16 Stored Channels CTCSS DCS Alarming Function PC program Wire Copy Function Chinese/English Channel Number Voice Annunciation IV CONTENTS GETTING ACQUAINTED .............................................................. 1 PREPARATION ............................................................................ 3 Charging Battery Pack ............................................................. 3 Installing/Removing Battery Pack ............................................ 4 Installing the Belt Clip .............................................................. 4 Power ON/OFF ......................................................................... 5 Adjust Volume .......................................................................... 5 Frequency Select ..................................................................... 5 Transmit/Receive ...................................................................... 5 BASIC OPERATION ..................................................................... 5 CHANNEL EDIT ........................................................................ 6 Transmitting Time-Out-Timer ................................................... 8 Battery Saving ......................................................................... 8 Battery Electricity Notice ......................................................... 8 Alarming Function .................................................................... 8 AUXILIARY FEATURES................................................................ 8 SPECIFICATION ........................................................................... 9 COMMON ERROR AND SOLUTION ......................................... 11 FREQUENCY/INFORMATION LIST .......................................... 12 V GETTING ACQUAINTED Antenna Transmitting/ Receive Indicator Power/Volume Knob Speaker Microphone PTT Transmit Earphone Slot/PC Program Slot Firce to Receive(MONI) Alarm Knob 1 Battery Pack Antenna Rubber antenna used to receive and transmit signals. Transmitting Indicator Lights red while transmitting. Receive Indicator Lights green while receive. Power/Volume Knob Turn clockwise until a clatter to switch on the transceiver. Turn counterclockwise until a clatter to switch off the transceiver; Rotate to adjust the volume. PTT Transmit Press to get into transmits state, release to return to receive state. Force to Receive (MONI) Press to receive signal or noise in the channel your selected when in receive state. Alarm knob Press this knob 2 seconds, then the radio will alarm Microphone Input voice. Earphone Slot/PC Program Slot Connect with external earphone, or connect to PC by downloading frequency line and use software to download. Speaker Output voice. Belt Clip Clip the transceiver to you belt, making it convenient to take. Battery Pack 3.7V Li-ion battery pack 2 PREPARATION CHARGING BATTERY PACK The battery is not charged in the factory, and please charges it before using. The first charging can’t reach full capability after buying or storing for a long time (more than two months). Please charge and discharge it for two or three times to make real capability reach full capability. Plug the uncharged battery or transceiver with battery into charger, and make sure the battery contact with charging terminal. When the charging light turn red, charging has begun, and while the charging light turn green, charging has finished. Please do not keep charging over 20 hours, please pull out the plug while finished charging. NOTICE: Please do not charge the battery again if it is charged fully, otherwise, the life of the battery will be shorted or it will be damaged. Please turn off the transceiver before charging. It may disturb charging if you use the transceiver when charging. It comes to the limit of the battery life if the use time of transceiver shorten obviously even charging is correct. Please change new battery pack. 3 INSTALLING/REMOVING BATTERY PACK Match two juts on the top and two grooves at the bottom of the battery pack with the corresponding guides on the aluminous frame on the back of the transceiver. Slide the battery pack upon until hearing a clatter. Please turn off the transceiver first before removing battery pack. Push battery latch on the button of the transceiver, then pull away from the transceiver. INSTALLING THE BELT CLIP Use two accessory screws fixing belt clip to make it convenient to take if necessary. 4 BASIC OPERATION POWER ON/OFF Turn the Power/Volume knob clockwise to switch on the transceiver, you will hear a beep. Turn the Power/Volume knob counterclockwise to switch off the transceiver. ADJUST VOLUME Turn the Power/Volume knob clockwise to increase volume, and turn it counterclockwise to decrease volume. If you can’t hear background noise because of squelch system, please hold [MONI] button, then turn the VOL control knob, You can hear background noise when press [MONI] button. FREQUENCY SELECT While you switch the channel, the voice remind your selected channel number, if you didn’t set the frequency, you will hear the “beep”. TRANSMIT/RECEIVE Press [PTT] button and speak normally when transmit preparation is ready. The transmit indicator lights red after enter transmit mode. It may increase distortion if you are too close to the MIC or speak too laud, and this may cause you voice unclear by receiver. Release [PTT] button when the talk is over, and the mode will turn back to receive. 5 CHANNEL EDIT PC Program: Connect the program cable to the radio, and well connect the computer COM (communication port) and SP/MIC jack by program cable, turn on the radio at the same time. Turn on the computer, and open the radio program soft. Then select the using frequency and other function parameters which you required, Afterward, press the [ Edit ] [ write to radio ], or directly press the relative signal on the toolbar to start writing. After the progress bar finished, the screen will display [ Succeed ]. All the parameters on the screen have written in the radio. Wire Copy: Take out a programmed radio, while using a special data copy cable to connect to another radio which you want to copy data. The radio was copied should turn to channel 8. Press [PTT] button and [Function] button, and switch on the radio at the same time you will hear a beep in 5 seconds; release the [Function] button. The red light will on, which means under the copy mode. Using a special data copy cable to connect the SP/MIC jack of two radios. Firstly, turn on the coping radio, While everything is ready, the copied radio is light on, Press the [MONI] button to enter copy mode, the light of copied radio will shows red and flash, the light of coping radio will shows green and flash. The light of copied radio will shows red while the copy has finished. 6 While copy data, if the indicator flash unnormal, it means copy failed, please check whether connect the wire well, while the copied radio is light on, press [MONI] button again. If you want to copy many radios, please turn off the copying radio’s power, and cut off the wire, then change to connect another copying radio, and press [MONI] button of copied radio to start copy. Quit wired copy, you have to re-power of the radio, then the radio is workable. 7 AUXILIARY FEATURES TRANSMITTING TIME-OUT-TIMER The purpose of the Transmitting time-out-timer is to prevent any single person from using one channel to transmit for an extended period of time. BATTERY SAVING Battery saving makes the transceiver cut down receiving circuit to decrease power consumption and longer use time when these is no signal. BATTERY ELECTRICITY NOTICE Low battery power alert will note you to charge the battery. In case the battery has fully charged, the light will turn to red. In case you hear beep, the radio will stop transmit, please change a new battery or charging the battery. ALARMING FUNCTION Press alarm knob 2 seconds to enter the alarming function, if while alarm, the channel has set the transmit frequency, the radio will auto transmit alarm voice. You can press alarm knob to cancel the alarm function. 8 SPECIFICATION General Part Frequency Range UHF: 36~173.995MHz VHF: 400~479.995MHz Temperature Range -10°C+60°C Frequency Combination Phase lock loop frequency synthesize Rated Voltage DC7.4V (Li-ion battery) Stored Channel 16 channels Antenna Rubber antenna Antenna Impedance 50 Operation Mode Simplex of co-frequency or alien frequency Dimension 120mm×62mm×34mm Weight About 280g Transmit Part Output Power 8W Modulate Mode Frequency modulate Maximum Frequency Offset 5KHz Adjacent channel power 65dB spurious harrow (RF) components 7.5 uW occupied frequency bandwidth 16KHZ Carrier frequency tolerance ± 2.5ppm Transmit Current :1400mA 9 Receive Part Sensitivity <0.16uV(12dB SINAD) Squelch Sensitivity 0.12uV Audio Power 500mW Receive Current 150mA Squelch System Waiting Current 20mA NOTICE: Saving your presence, no additional notice will be send if specification changes because of technology-improving. 10 COMMON ERROR AND SOLUTION Error On feedback when turn on the radio The power of battery easily get lost Can’t talk with other member in the same team Appears voices from other nonmember 11 Solution Battery power used up, please change the battery or recharging. Wrong connect of battery, please remove the battery and reinstall it. The battery life is ended, please use new battery. Distance is out of the effect communicate range. Apply with different frequency/DCS/CTCSS, please reset these parameter. Please change your CTCSS signal, or change all the transceivers signal in your team. FREQUENCY/INFORMATION LIST Model No.:_________________________________________________ Serial No.: _________________________________________________ Channel Transmit Frequency Receive Frequency CTCSS DCS 01 02 03 04 05 06 07 08 09 10 11 12 13 14 15 16 12